Olin HVBTR-1200 User manual

Ref: HVBTR1200-004A
OLIN Products: HVBTR-1200
HVBTR‐1200–RecordingtoexternalUSBHDD.
This document is a supplement to the HVBTR-1200 User Guide.
Connecting the external USB HDD
(For more information on the types of External USB Hard Disc Drives, refer to HVBTR1200-003B.pdf - HVBTR-
1200 / HVBTR-1400 - External drive and Flash Drive support notes under the Product FAQs on
www.olinlivenow.com.au )
HVBTR-1200
Push Open the front cover to show the USB port. Connect USB HDD. Light on the HDD should indicate power.
The HVBTR-1200 should recognise the USB HDD on screen – USB device connected.

HVBTR1200‐004A
2|Page
Three ways to record from the HVBTR-1200:
1. RECORD key – on demand instant recording.
2. EPG key – setting from the Electronic Programming Guide (EPG).
3. Timer Setting – setting via the menu system.
1. RECORD key – on demand instant recording.(Manual Page 17 Section 6.2)
Press the RECORD key and the recording information displays on the screen:
Press RECORD key again. You can change the recording Duration from the
default 2 hours to any amount of time. Press the EXIT key to set the adjusted time.
Example: change recording Duration from 2 hours to 3 hours using the numeric buttons on the remote:
Note: If your recording exceeds 3 hours, set Auto Standby to Off.
See 7. Auto Standby at the end of this document.

HVBTR1200‐004A
3|Page
EXIT key on the RCU clears the screen of recording information. The REC symbol stays on the screen of the
channel you are recording.
You leave the recording to automatically complete when it reaches the end of the recording Duration.
You can also finish the recording before the end of the recording Duration:
To finish recording, press the STOP key on the RCU. A display will show what you have recorded.
Press STOP key on the RCU again. The HVBTR-1200 will ask for confirmation that you wish to finish the recording.
Use (left direction) key to select Yes and OK key to stop recording.
Other tips for instant recording:
- Watching same Logical Channel Number (LCN). HVBTR-1200 is not a dual tuner. But you can move
between the different channels in the Logical Channel Number (LCN) that you are recording. For example you
can record ABC1 and watch ABC2 (or another ABC channel). But you cannot record ABC 1 and watch channel
9 or 10 etc.

HVBTR1200‐004A
4|Page
2. EPG key – setting from the Electronic Programming Guide (EPG). (Manual Page 21 Section 7.14.4)

HVBTR1200‐004A
5|Page
Use the direction keys to highlight the program you wish to record:
Press the green TXT key to open the record screen
Set Timer Service to Record
TIP: EPG is not always up to date and does not always take into account program overruns and so on. At
this point you could set the Wakeup Time to an earlier time and the Duration to a longer period to allow for
difference between the EPG and actual running times. See 3. Record Timer section following for an example.
Note: If your recording exceeds 3 hours, set Auto Standby to Off.
See 7. Auto Standby at the end of this document.
Use the direction keys to highlight Save and press the OK key

HVBTR1200‐004A
6|Page
Use the Exit key to back out of the EPG.
You have now set a program to record.
To review your setting, press the MENU key and use the direction keys to go to the System Setup menu
Choose Timer Setting and press OK to show the recordings you have set
EXIT Key will take you out of the menus.

HVBTR1200‐004A
7|Page
3. Record Timer - setting from the HVBTR-1200 menu system. (Manual Page 12)
Useful if you know what time your program is on and you want to set options outside of the EPG information.
Press the MENU key and use the directional keys to go to the System Setup menu.
Use the direction keys to Timer Setting and press OK to show the timer slots available:
Choose the next available recording slot and press OK to display the recording screen. Using the (right
direction) key to set Timer Mode to Once
PR- key down to Timer Service and set to Record

HVBTR1200‐004A
8|Page
PR- key down to Wakeup Channel and set to the station you wish to record
PR- key down to Wakeup Date and set to the date of the program
PR- key down to Wakeup Time and set to the time the program starts (24 hour clock). TIP: In the example below
we set the time to 5 minutes before (11:55) the program starts (12:00) to make sure we catch the beginning of the
show.
PR- key down to Duration and set the recording length. TIP: In the example below we have allowed for the 5
minutes for the early start (11:55). We have also added 5 minutes longer to allow for any program overruns (11:55
+ 40 minutes = 12:35 finish).
Note: If your recording exceeds 3 hours, set Auto Standby to Off.
See 7. Auto Standby at the end of this document.

HVBTR1200‐004A
9|Page
Use the direction keys to the Save key and press OK. The program details will show in the recording slot. Press
EXIT 3 times to back out of the menu system.
To review your setting, press the MENU key and use the directional keys to go to the System Setup menu
Choose Timer Setting and press OK to show the recordings you have set
EXIT key will take you out of the menus.

HVBTR1200‐004A
10|Page
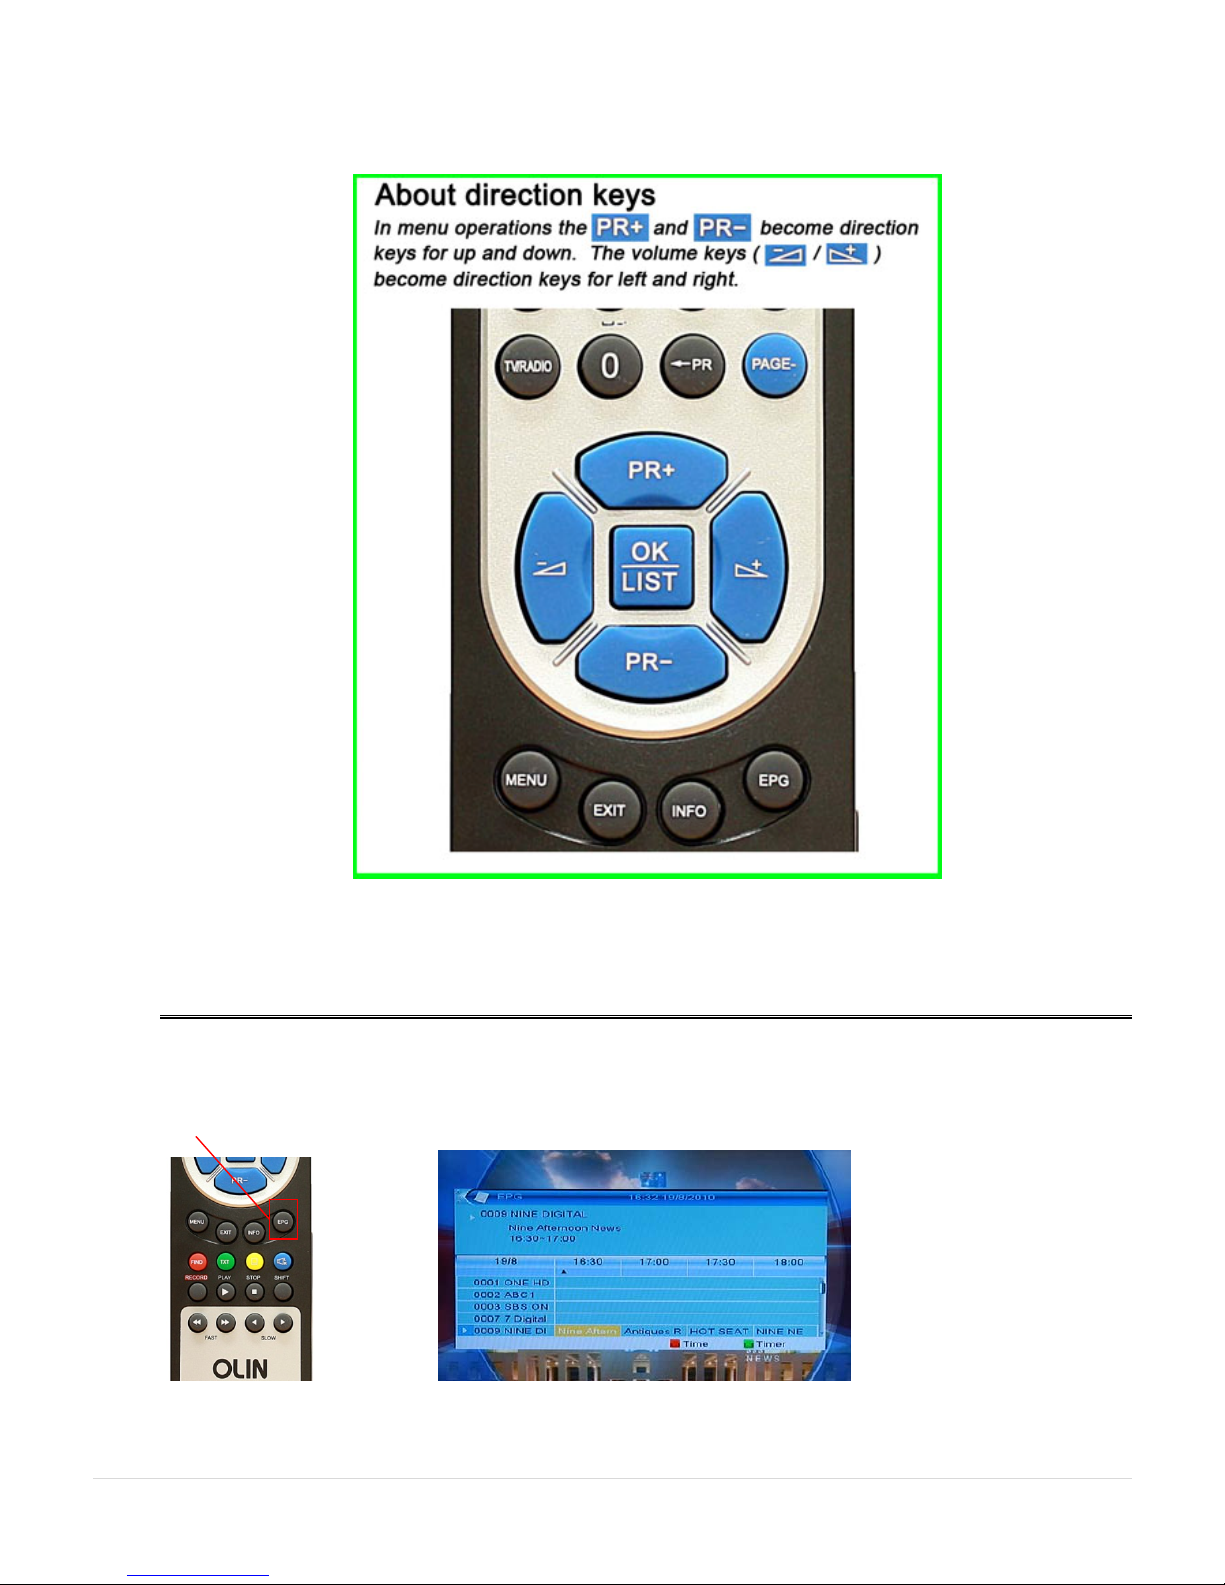
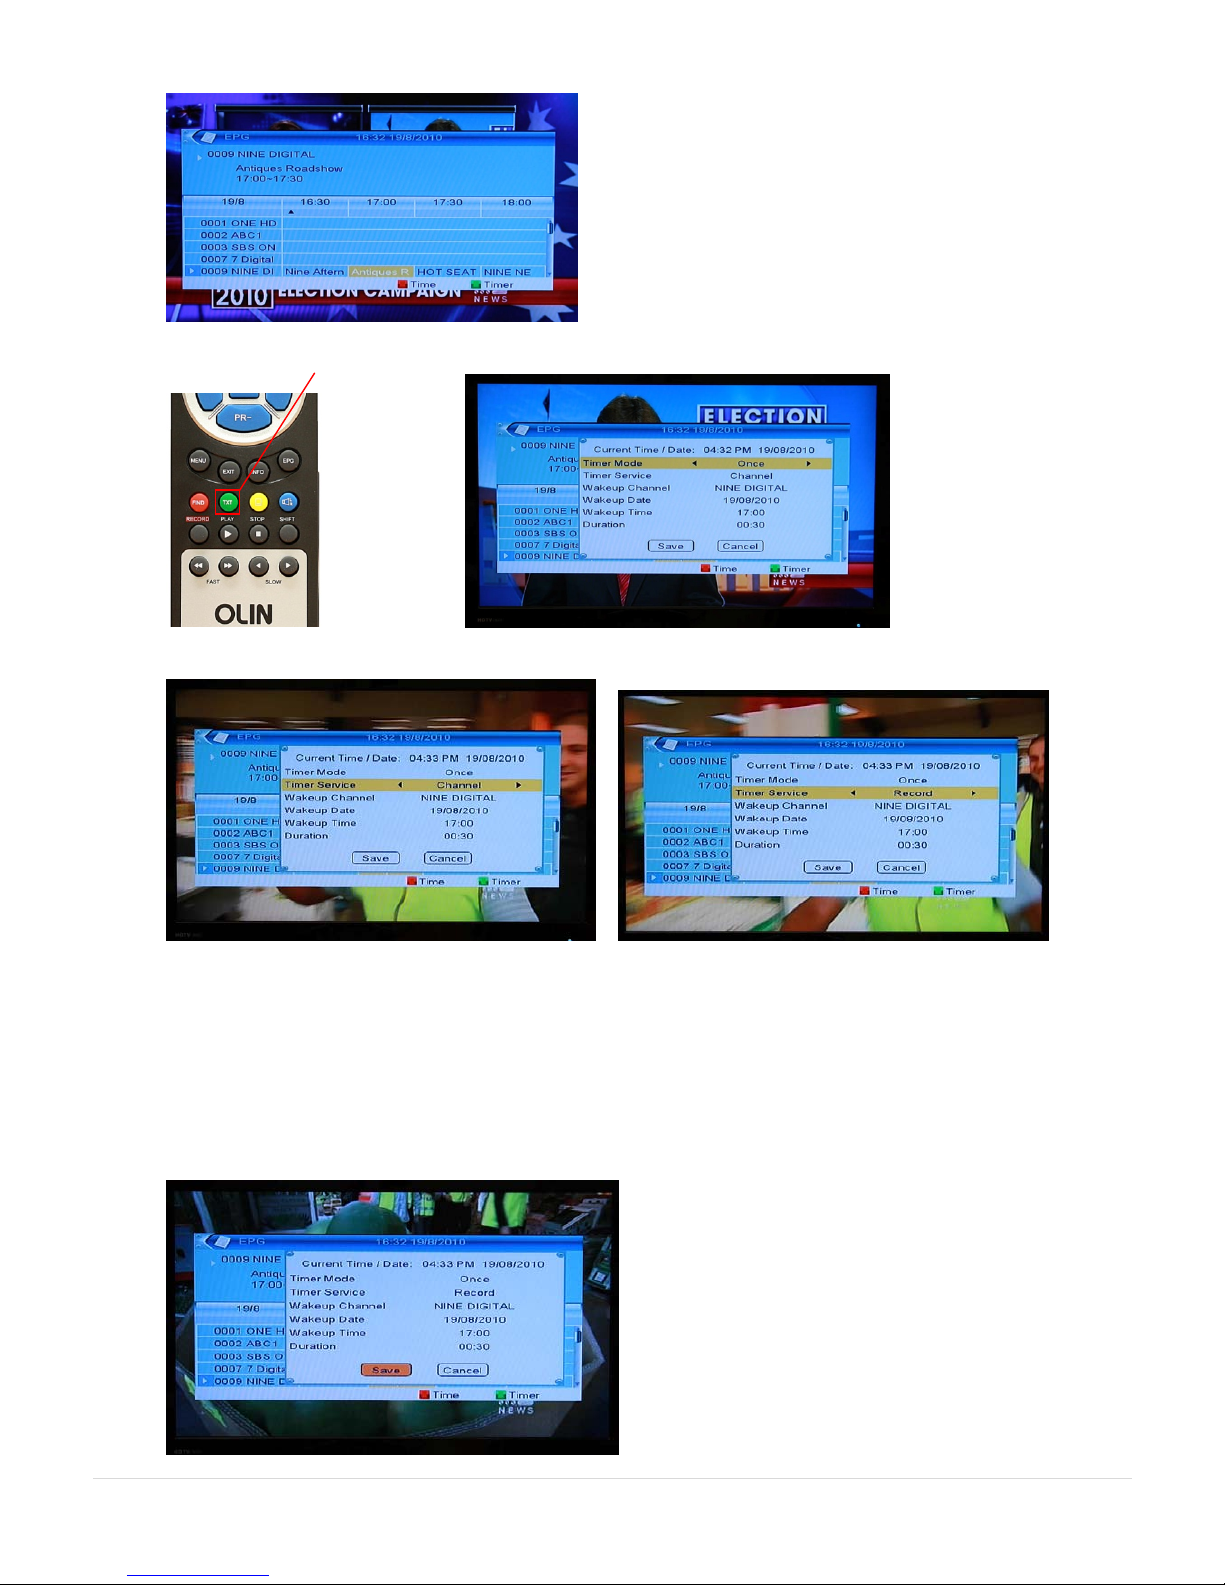
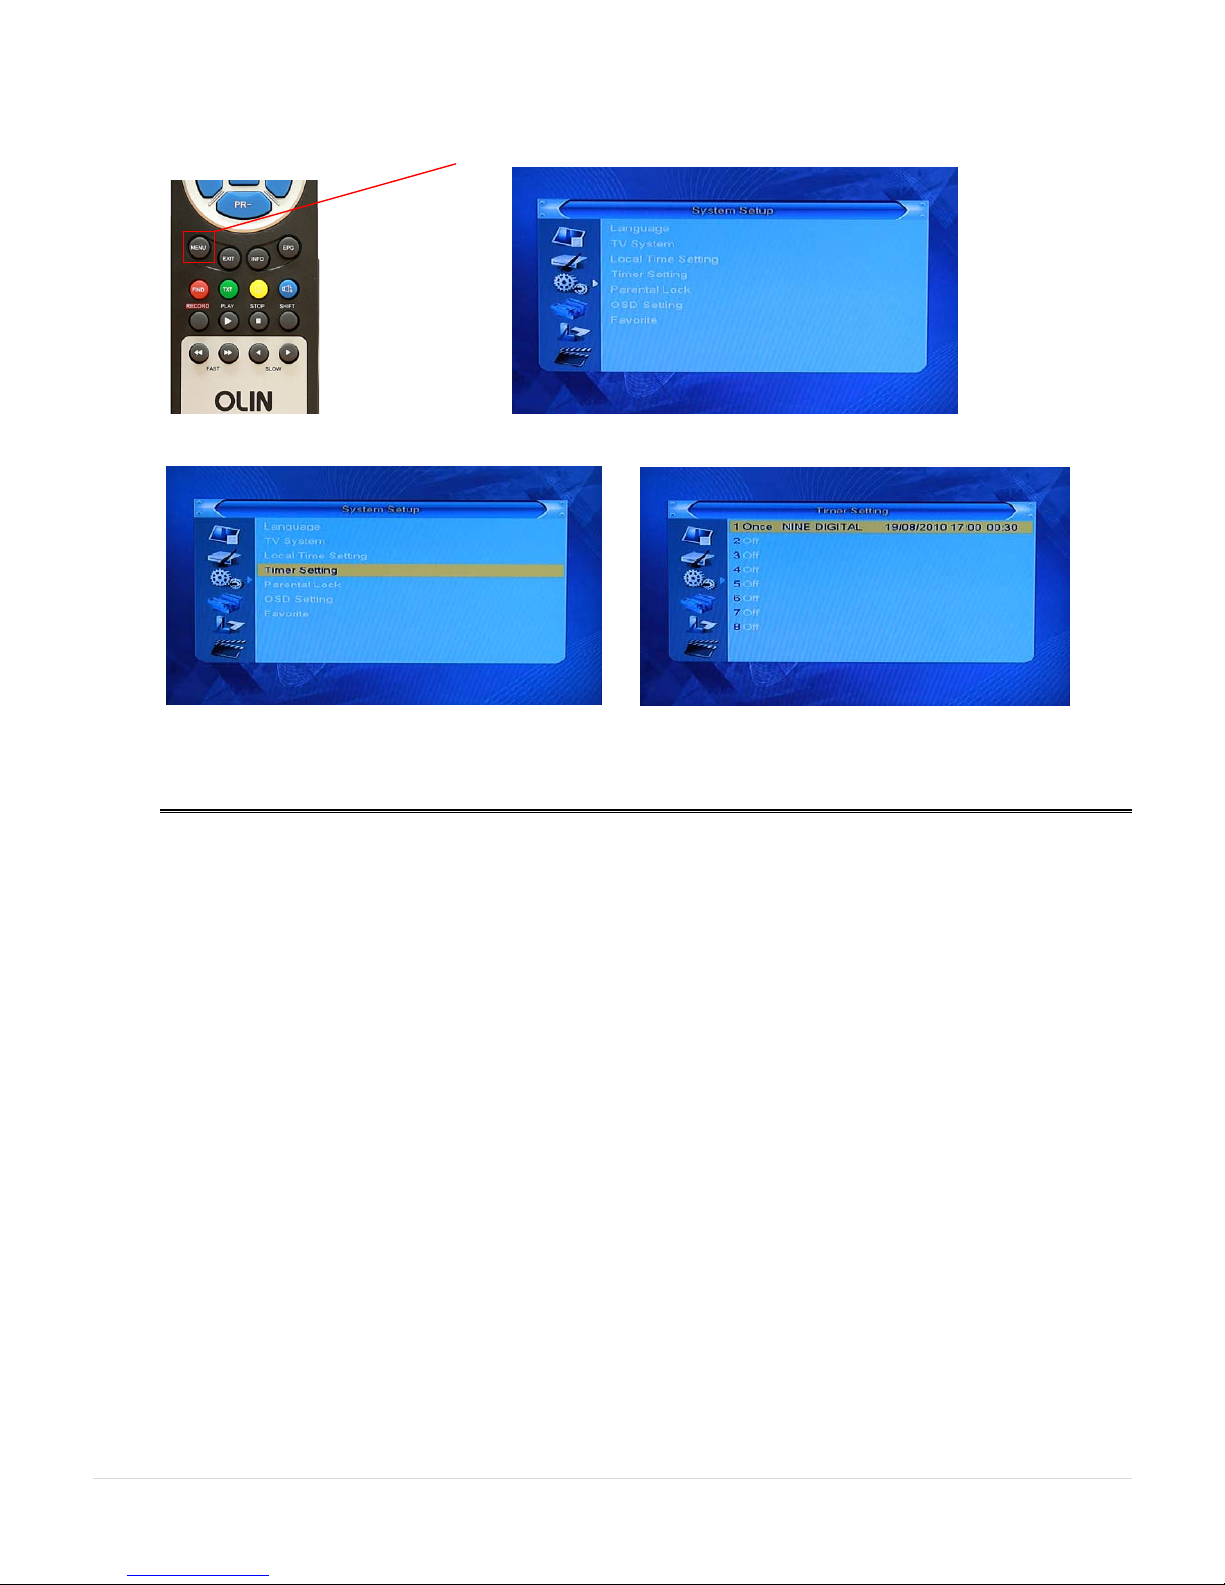
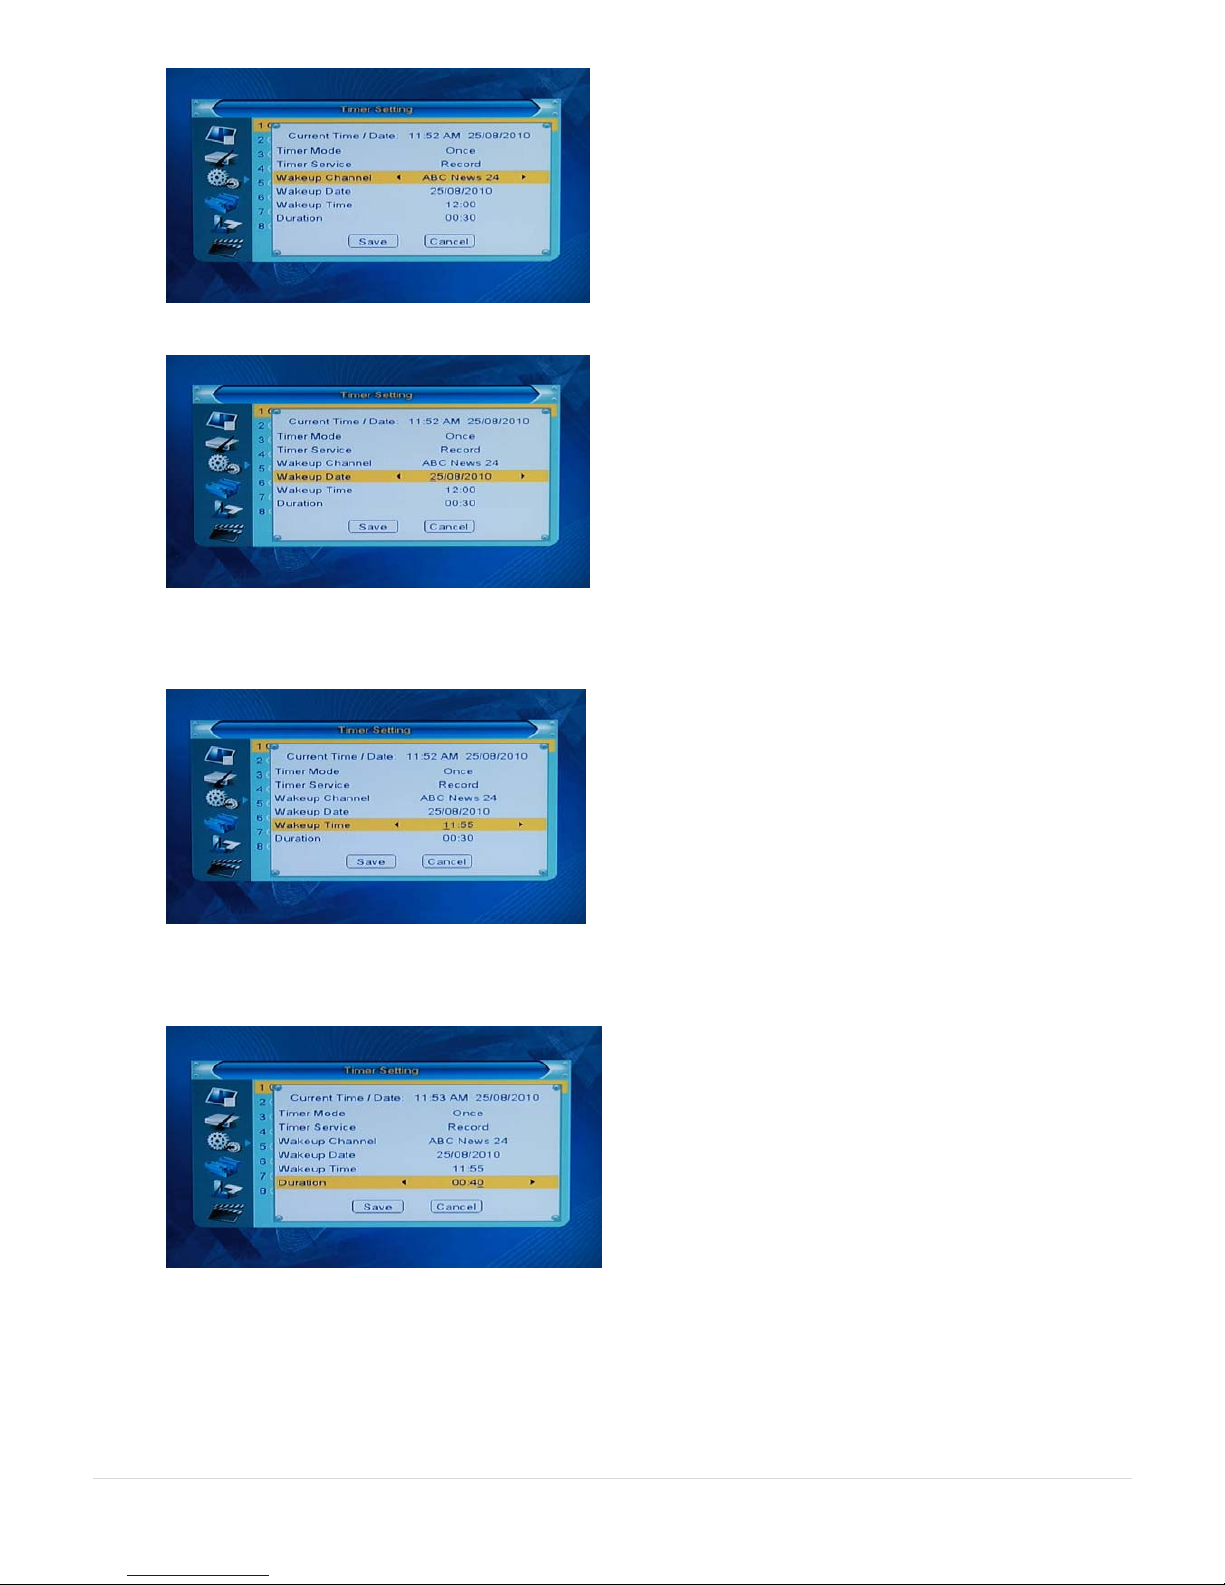
4. EPG and Record Timer recording process
Usually you will have set the HVBTR-1200 to standby and probably turned the TV off after you have set an EPG or
Record Timer recording. When the Wakeup Time is reached, the HVBTR-1200 will automatically come out of
Standby mode and begin recording. Once the recording has finished, the HVBTR-1200 will go back into Standby
mode. If your TV is off, you do not see any of this activity.
If you did have your TV on, this is the process you would see:
The HVBTR-1200 will wake up and recognise the USB device attached – USB device connected.
Event Notified indicates it is performing a Timed Recording
Recording screen will begin with information on the status of the recording.
Note: EXIT key will clear the recording information from the screen.
Event finished notifies that the recording has stopped.
The HVBTR-1200 will then start a 15 second countdown before it goes into standby mode. If you chose yes it will
not go into standby mode and you can continue watching.

HVBTR1200‐004A
11|Page
5. Playing your recordings(Manual Page 18)
FIND key will display the Record Manager
Press OK key to begin playing.
Note: EXIT key will clear the recording information from the screen.
The control keys on the RCU perform the usual functions (PLAY / STOP / FAST / SLOW).
Fast will action both Fast Forward and Fast Reverse (X2 / X4 / X8 / X16 / X24)
Jump function can make it much faster to move backward and forward through a recording.
Example – press the (right direction) key to advance the jump marker (example is to half way).

HVBTR1200‐004A
12|Page
Press OK key and the program will begin playing
from where the Jump marker is positioned.
Last Play function – when you stop watching a recording part way through, the HVBTR-1200 will remember
the position where you stopped viewing. Next time you open that recording, it will begin playing from that position.

HVBTR1200‐004A
13|Page
Other recording tips:
6. Renaming your recordings – (Manual Page 17)
FIND (red) key will display the Record Manager.
Press the FIND (red) key again to display the onscreen keypad.
Use the direction keys, the onscreen keypad and the OK key on the remote to rename the program.
Name can be up to 17 characters long.
Position to OK in the onscreen keypad and press the OK key on the remote.

HVBTR1200‐004A
14|Page
The new name will now be displayed.
Press the EXIT key to save the renaming.
EXIT key will take you out of the menus.

HVBTR1200‐004A
15|Page
7. Auto Standby– (Manual Page 12) - a power saving function that puts the HVBTR-1200 into Standby mode
after 3 hours if there no activity from the controller. If your recording is going to be over 3 hours, set the Auto
Standby in the TV System menu to off.
Press MENU key and use the direction keys to the System Setup menu. The (right direction) key to the TV
System.
Press OK key to the TV System menu and use the direction keys to highlight and set the Auto Standby.
The (right direction) key will toggle between On and Off.
EXIT key will take you out of the menus.
Use the same procedure to reactivate the Auto Standby power saving function (On).
Table of contents
Other Olin TV Receiver manuals