Olymbros Z3 User manual


Thank you for purchasing with Olymbros® Trail Monitor. For making the best use of all the functions of the
device. Please read this manual carefully before you use the product and keep it as a handy reference.
If you have any questions or concerns, please contact Olymbros at
info@olymbros.us or submit the contact form on the official website www.olymbros.us. You are also
welcome to reach out any fresh news of Olymbros by subscribing or following our Facebook page
@olymbrosfun.
Main Functions
The Z3 wireless infrared sensors will detect movement within 60’ of the device, and transmit that signal up
to 650’ away to your location. The 120° vertically and horizontally wide detecting angle and long detecting
distance keep you informed and safe.
The convenient wristwatch receiver picks up the alert signal from the sensors and prepares you before the
target comes within range.The alert signal is programmable to be audible, visual, vibrate, or any
combination.
Connect up to 100 sensors to 1 receiver watch, allowing you to cover even more area. You can also connect
several sensors to many receiver watches, allowing multiple people in the group to monitor the same area.
Specifications
Detecting angle
120°vertical and horizontal
Detecting Range
65 ft./20m between sensors and the target
Communication range
650 ft./200m between sensors and receiver watch
Alarm Modes
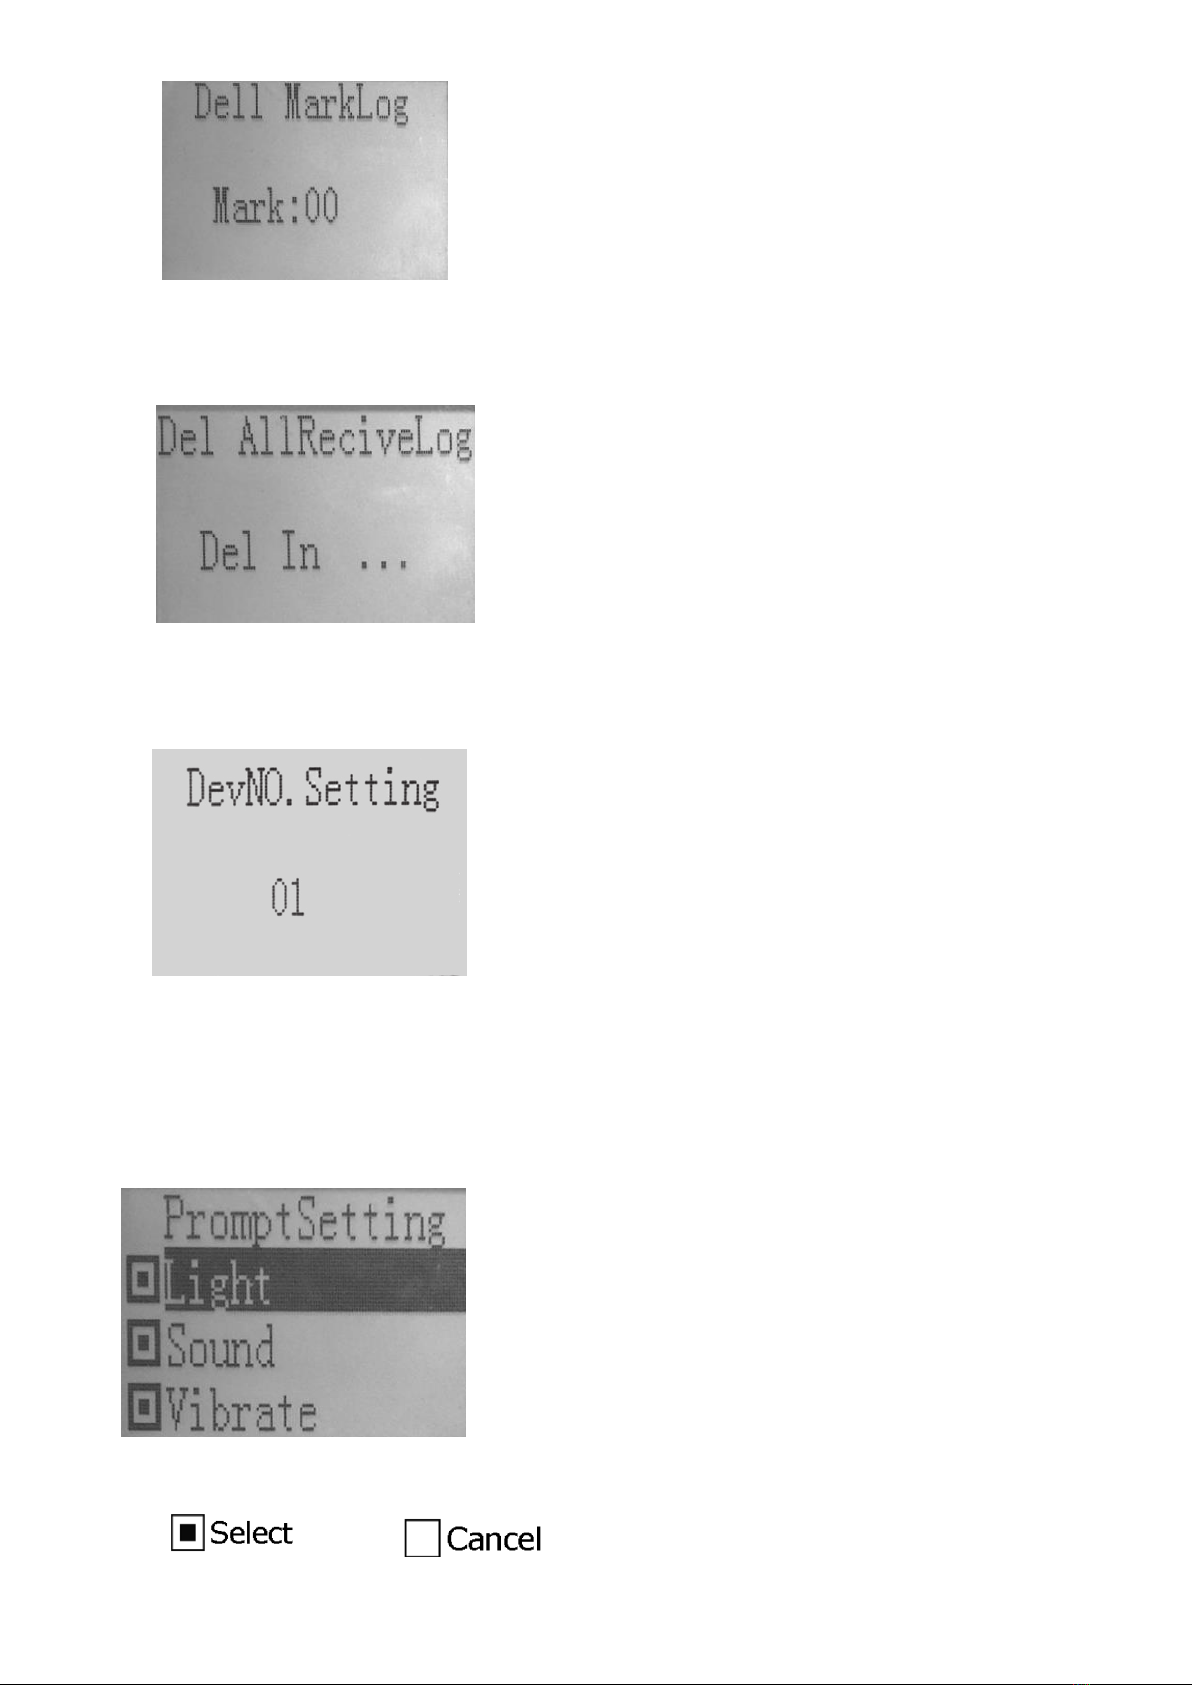
Adjustable Vibrate/Sound(beep)/LED Flash(NO.XXX is calling )
Battery life
4-6 months for sensors and 4-5 days standby time for watches
Connection
1→up to 99 sensors; up to 99 receiver watches→1 sensor
Waterproof
IP54 standard
Warranty
ONE-YEAR AFTER-SALE Manufacturer's Warranty
Application
Hunting alarm, camping security, burglar alarm,
home/ranch/warehouse/yard/driveway security

Manual Content
Sensors Battery Installation ....................................................................................... 1
Sensors Power On and Mounting .............................................................................. 1
Watch Handing and Operation .................................................................................. 2
Quick Setup Guide ................................................................................................... 8
Tips ............................................................................................................................ 8
Low BatteryAlert of the Sensors .............................................................................. 9
Warning ...................................................................................................................... 11
FCC Caution .............................................................................................................. 11

1
Sensors Battery Installation
Olymbros Z3 sensor is powered by one 9V battery(NOT included), open the battery cover by a flat-blade
screwdriver and install one 9V carbon battery.
Sensors Power On and Mounting
Slide the Power Switch to the ON position, the LED indicator will flash a red light, the red light will
disappear and then the sensors are powered up.
Place the sensors on the tree approximately 3-9 ft. High at a slight downward angle.
It can also be placed outside your house/campsite/yard/garage/driveway to detect movement from humans,
cars, and animals, which helps keep you safe.
Note: Every time you Install or remove
the battery, please make sure that the
sensors are turned off.
Note:
1. The antenna should be placed on the LEFT when
mounting the sensors.
2. After the sensor starts working, the red LED light will
flash after each trigger within one minute and no longer
flash after one minute.

2
Watch Handing and Operation
1. LCD Display Interface
(1) Main Interface Operating Instruction
①When watch is under the main interface mode, other buttons are invalid except
“MENU”.
②Press “MENU” button to open the main Settings menu interface and
corresponding sub-menu interface.
③Press “UP” and “DOWN” button to scroll through the main setting menu and select the
desired option of the menu.
④Press “ESC button returns to the main or previous menu interface.
⑤Long press “ESC” button for 2 seconds, open the Shortcut Menu:
•Receiving Switch (ON/OFF) - Choose whether you want to disconnect the sensor or not.
•Shutdown - Shut down the watch.
•Reboot - Restart the watch.
2. Main Setting Menu
Press the “MENU” button to open the main Settings menu interface.
(1) Main Settings Menu Interface
①Menu List
1) Pairing
2) QueryLog
3) DevNo.Setting

3
4) PromptSetting
5) ReceiveSwitch
6) Date&Time
7) RemoteStatus
8) VersionNO
9) Factory Reset
(2) Pairing
①Pairing Menu List
1) Add Pairing
2) Del Pairing
3) Del All Pairing
②Add Pairing
1) Setting Interface
•CurZone: Mark the number of sensors.
•Code: The sensor’s codes, xx-xx-xx means no pairing. One sensor has one Unique code.
2) Button Operation
•“UP” and “DOWN” button: Switch CurZone number among 0-99.
•“ESC” button: Return to the “Pairing” menu interface.
3) Pairing Instruction
•On the “Add Pairing” interface, turn on the sensor and press the “MENU” button, a 6-digit code
will appear on watch's interface once the sensor and the watch are connected.
•Press “UP” and “DOWN” button to switch the CurZone number for the sensors. For example: If
you would like to mark one of the sensors to number 44, then switch the CurZone to 44Mark,
then pairing the sensor and watch. In this way, this sensor is marked to number 44.
•The receiver receives a transmit signal after the sensor is activated. Pairing is successful when
sensor codes show on the interface. For example: Transmit signal is sent via sensor 1 (Code: ED-
CD-2A). Your code will be specific to your device. It means the code “ED-CD-2A” will display
in the area xx-xx-xx when pairing is successful.
•Set the different number for sensors make it’s easier to locate them.
4) Prompt Interface
Each transmitter corresponds to one number.
③Delete Pairing
1) Setting Interface

4
•CurZone: The number of sensors.
•Code: The code of the sensors.
2) Button Operation
•“UP” and “DOWN” button: Switch sensor’s number among 0-99.
•“MENU” button: Delete the current sensor’s pairing.
•“ESC” button: Return to the “Pairing” menu interface.
④Delete All Pairing
1) Select “Delete All Pairing” on the Pairing Menu, all the pairing will be deleted.
2) Return to the “Pairing” Menu interface automatically when all the pairings are deleted.
(3) QueryLog - Track Records
①QueryLog Menu List
1) QueryLog
2) Del AreaLog
3) Del All Log
②QueryLog
1) Setting Interface
•01Mark: The number of sensors. (01Mark - 99Mark)
•Rec:1: The record of the selected sensor pairing. (Rec:1 - Rec:9)
•Date: The date of the record. (No Record means there is no record for the selected number of
sensors)
2) Button Operation
•“UP” and ”DOWN” button: Switch the sensor number among 0-99.
•“MENU” button: Switch Rec.
•“ESC” button: Exit and return to the previous menu.
③Del AreaLog
1) Mark:00: The number of sensors.
2) Use “UP” and “DOWN” button to switch the number of the sensors.
3) Use the “MENU” button to delete the pairing records of the selected sensor number.

5
④Del All Log
1) Select “Del All Log”, all the pairing records will be deleted.
2) Return to the “QueryLog” Menu interface automatically when all the pairing records are deleted.
(4) DevNO.Setting - Set the number of the receiver watch
①Interface
②Button Operation
1) “UP” and “DOWN” button: Set the number of the watch among 0-99.
2) “ESC” button: Save current settings and return to the previous menu.
(5) PromptSetting - Set the alarm mode of the watch
①Interface
②Button Operation
1) “MENU” button: Select or cancel the option.

6
2) “UP” and ”DOWN” button: Scroll through the alarm options.
3) “ESC” button: Save the current settings and return to the previous menu.
(6) ReceiveSwitch - Select whether you want to disconnect the sensor or not.
①Interface
②Button Operation
1) “MENU” button: Select or cancel the option.
2) “UP” and ”DOWN” button: Scroll through the options.
3) “ESC” button: Save the current settings and return to the previous menu.
(7) Date&Time
①Interface
②Button Operation
1) “Menu” button: Enter and switch to the next edit item.
2) “UP” and ”DOWN” button: Set day or time.
3) “ESC” button: Save current settings and return to the previous menu.
(8) RemoteStatus - Check the status of the sensors
①Interface
1) Mark: The number of sensors. (0-99)
2) Online: Whether the sensor is online or not. (Yes or No)
3) BatVol: whether the battery of the sensor is under a normal condition. (Normal: normal condition,
Low: battery low. )

7
②Button Operation
1) “UP” and “DOWN” button: Switch the sensors. (Mark:00 - Mark:99)
2) “ESC” button: Exit and return to the previous menu.
(9) VersionNO
(10)Factory Reset
①Interface
②Button Operation
1. “MENU” button: Restore to the default settings.
2. “ESC” button: Exit and return to the previous menu.

8
Quick Setup Guide
1. With the watch fully charged, and the 9V batteries installed in the sensors, get everything sitting close to
your location.
2. Turn on the watch, press the “MENU” button and select the “Pairing”, open the “Add Pairing” interface.
Then turn on the transmitter, then press the “MENU” button. In this step, you may use “UP” and “DOWN”
to change the number of the sensors.
3. A 6-digit code will appear on the 3rd line on the “Add Pairing” interface, this code means that the sensor
and receiver watch is connected successfully.
4. If the code side shows xx-xx-xx, it means the sensor and the watch are not connected. Please try to delete
the pairing, remove the battery in the sensor, then try the last two steps again.
5. Once you have the first sensor connected successfully, connect the next two sensors by repeat 1 and 2
step. Set the different number for sensors to make it’s easier to locate them.
6. Mount sensors with supplied straps.
Tips
1. Please make sure the receiver watch is fully charged before the first use.
2. Test the sensors connect status around your area first. If one or two does not seem to be working, repeat
the “Quick Setup Guide” step “4”. If all of the sensors don’t work, please check the “ReceiveSwitch”
and the “PromptSetting”, make sure all the settings are correct.
3. The sensors or the watch can be turned off at any time. They will reconnect automatically once they are
turned back on.
4. The watch with a full battery will last 4-5 days, that is, not paired with any transmitters. When it works
as a receiver or an alarm, the full battery will last much shorter due to extra power consumption by
alarm sound, vibration, and receiving signals.
5. Turning off the pairing between the watch and transmitters, when not necessary. It will save more
battery life;
6. Selecting only one alarm option in "Prompt Setting". It will save more battery life for the watch. Default setting
enables all three alarm options.

9
Low Battery Alert of the Sensors
Usually, the 9V batteries life of the sensors would last about 4-6 months.
The low battery alert for the sensors has five low battery modes:
1. When the sensor is at low battery, the watch gives an alarm once every two hours, the sensor will shut
down after three consecutive alarms.
•When an alert is given, the watch’s screen displays “No.000 low battery”.
•The digit represents the number of the sensor at low battery.
•if more than one sensors give the low battery alarms synchronously, only the last alarm is displayed. )
2. After the watch connects with the sensor successfully again, the sensor senses the motion, and then
triggers the watch to give the first alarm. The status is as follows:
Vol Normal indicates that the sensor’s battery has a normal voltage (electricity).
Low Battery indicates that the sensor’s battery has a low voltage (electricity), and may need to be
replaced.
3. The icons on the watch’s main interface are as follows:

10
•the icon at the lower right corner indicates the low voltage of a sensor.
•The xx indicates the number of the sensor.
•If several sensors give the low battery alarms at the same time, only the last alarm will be displayed.
4. The indicators of sensor: The LED indicator of the sensors will flash the green light when the voltage of
the battery is below 5V, the LED will keep on if the voltage is below 4.7V.
5. The status of the sensor can be viewed from the watch:
Press the “MENU” button and select “RemoteStatus”, this interface displays the status of sensor.
•Mark: The number of the sensors. (0-99)
•Online: YES or NO (Whether the sensor is online or not, namely, if the sensor connects with the
watch. YES indicates “connected”; NO indicates that the sensor is off-line.)
•BatVol: Normal or Low (Whether the battery of sensor is normal or not. Normal indicates

11
Warning
The device is IP54 standard waterproof.
The device has electronic parts. Don’t disassemble the device by yourself in case of short circuit or
other problems.
1 year after-sales service of warranty is included.
PIR sensors can not detect motion which occurs behind walls, ceilings, floor, closed doors, glass
partitions, glass doors or windows.
Infrared motion detectors operate by sensing changes in temperature. Their effectiveness may be
reduced when the ambient temperature rises near or above body temperature or if there are intentional
or unintentional sources of heat in or near the detection area. Some of these heat sources could be
heaters, radiators, stoves, barbecues, fireplaces, sunlight, steam vents, lighting and so on.
If you have any questions while using, please feel free to contact customer support or retailers.
FCC Caution
§15.19 Labelling requirements.
This device complies with part 15 of the FCC Rules. Operation is subject to the following two conditions:
(1) The device may not cause harmful interference.
(2) The device must accept any interference received, including interference that may cause undesired
operation.
§15.21 Changes or modification warning.
Any changes or modifications not expressly approved by the party responsible for compliance could void
the user’s authority to operate the equipment.
*RF warning for portable device:
The device has been evaluated to meet general RF exposure requirement. The device can be used in portable
exposure condition without restriction.
Other manuals for Z3
1
Table of contents