manuals.online logo
Brands
  1. Home
  2. •
  3. Brands
  4. •
  5. Omegon
  6. •
  7. Accessories
  8. •
  9. Omegon Deluxe Collimating Eyepiece User manual

Omegon Deluxe Collimating Eyepiece User manual

Any form of reproduction of the entire contents of this document or parts thereof beyond the private use is strictly prohibited.
Subject to alterations and errors. All texts, illustrations and symbols are the property of nimax GmbH.
60908_EN_Instruction Manual_REV_A 1 / 4
Instruction Manual
Omegon® Deluxe Collimating Eyepiece
English Version 04.2019 Rev. A Art. Nr. 60908
Any form of reproduction of the entire contents of this document or parts thereof beyond the private use is strictly prohibited.
Subject to alterations and errors. All texts, illustrations and symbols are the property of nimax GmbH.
60908_EN_Instruction Manual_REV_A 2 / 4
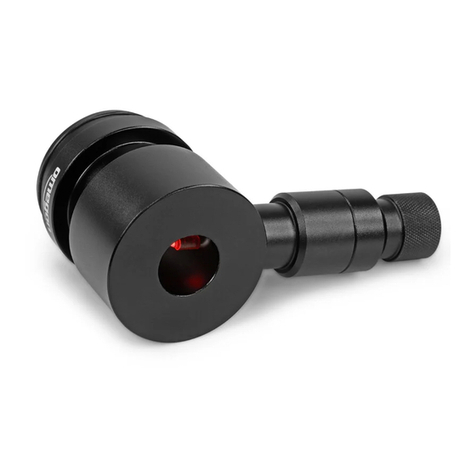
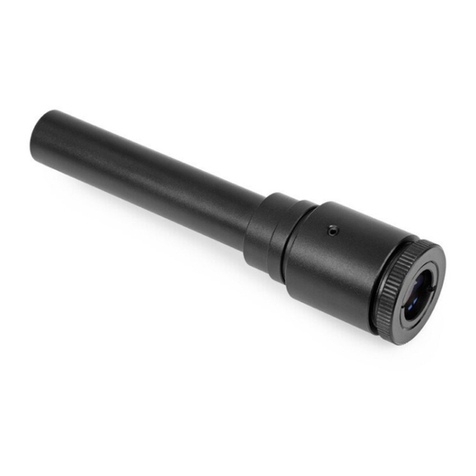
The Omegon® Deluxe Collimating Eyepiece
Congratulations on the purchase of your Omegon Deluxe Collimating Eyepiece! With the help of this eyepiece, it is possible to
perfectly collimate your Newtonian telescope. It is also useful for collimating a refractor. SC telescopes and other Cassegrains
with a hole in the primary mirror cannot be collimated using it –these instruments should be collimated at night, by using a
star’s defocused image.
The Omegon Deluxe Collimating Eyepiece is useful for collimating both mirrors –primary and secondary –but not for
collimating the focuser. If you use your Newtonian for visual observing only, it is not necessary to collimate the focuser. Its
collimation will always be sufficiently good straight from the factory. Only if you want to do high level deep sky photography,
it is possible you may have to collimate the focuser using a special tool. Always start collimation with the secondary mirror,
and finish with the primary.
1. Secondary mirror.
1.1. Preparation. Before starting on the secondary, put
a sheet of white paper into the telescope OTA. This will
make secondary collimation easier, as you will be able
to see the outer edge of the secondary better against
the white paper than against the black inner OTA wall
(Picture 1). In the centre of the front of the secondary
holder, you can see a large Phillips screw; this screw
fixes the secondary holder in place. The three screws
around the central screw are the collimating screws
which press onto the secondary holder. These can be
Phillips or hex-head screws, but the principle is always
the same. Now slide the Collimating Eyepiece
completely into the 1.25“ opening of the focuser.
If everything is completely decollimated, you will see
something like this. The elements may be shifted
relative to each other differently from here –this
picture is only an example. The elements are:
1.2. Positioning of secondary mirror. First, loosen the
three collimation screws on the secondary holder.
After this, once the holder is loose, you can do three
different things: rotating the holder around the
telescope axis, screwing the central screw in or out to
shift the longitudinal position of the secondary and
tilting the lateral position of the holder. First, try to
move the secondary into a position directly under the
focuser. This means that the secondary appears
concentric in the lower rim of the Collimating Eyepiece.
You can check this using the white, U-shaped area,
which should appear concentric. This situation is indicated with the three arrows in Picture 3.
1. Adjustment screw 2. Focuser
3. Collimating eyepiece 4. Adjustment screw
1. Lower edge of the Collimating Eyepiece;
2. Inner OTA wall opposite the focuser –in this picture white
because of the sheet of paper;
3. Outer edge of the secondary or the secondary holder;
4. Reflected in the secondary: outer edge of the primary
mirror. Here, the view is against the sheet of paper, so the
reflection of the main mirror appears white
5. Reflected in the primary: shadow of secondary and spider.
Picture 1. Secondary with focuser.
Picture 2. Completely decollimated Newtonian.
Picture 3. Secondary mirror in correct position.
Any form of reproduction of the entire contents of this document or parts thereof beyond the private use is strictly prohibited.
Subject to alterations and errors. All texts, illustrations and symbols are the property of nimax GmbH.
60908_EN_Instruction Manual_REV_A 3 / 4
To achieve this view, you will have to experiment with the four screws, but once you have done this a few times, you will
become familiar with the process.
1.3. Secondary orientation. In the last step, you have
to adjust the secondary in such a way that you can see
the complete primary mirror in the secondary. This has
been achieved when you can see the (three) primary
clamps. Two of them are indicated in Picture 4. Here,
the third clamp is still a little bit outside the secondary,
but the secondary is almost perfectly collimated.
The two narrow grey areas near the lower rim of the
secondary are the shadows thrown by the sheet of
paper still in the OTA. On the upper part of the
secondary, you can see a part of the focuser tube
protruding into the telescope OTA. The shadow of the
secondary is not in the centre of the primary yet. This
will be done in the next step: collimating the primary.
At this stage, it is not necessary to have all the
elements 100% concentric to each other. All the
previous steps were only in order to illuminate the
field of view more or less concentrically. Even if the
secondary is not in perfect collimation, this will have
no influence on image quality. The primary, however,
should be collimated as well as possible.
2. Primary mirror.
After secondary collimation, slide the Collimating
Eyepiece out of the focuser until the opening on its
side is completely free and is directed towards a bright
surface, e.g. a window. You will now see a bright ring
in the shadow from the secondary (1). Superimposed
on the bright ring, but not concentric to it, is a dark
ring (2). This is the shadow of the central marking in
the centre of the primary (see Picture 5). Most
Newtonian telescopes come with this marking already
there. In this picture, the primary is fairly badly
decollimated.
Last step: Primary collimation. The bright ring (opening of the Collimating Eyepiece) and the dark ring (centre marking on the
primary) must be concentric (as shown in Picture 6). Use the collimation screws at the rear of the primary mirror cell. Here
again, you will become more experienced after some practice.
Collimation completed! Do not forget to remove the sheet of paper!
Picture 4. Secondary correctly collimated.
Picture 5. Primary decollimated.
Picture 6. Primary collimated.
Any form of reproduction of the entire contents of this document or parts thereof beyond the private use is strictly prohibited.
Subject to alterations and errors. All texts, illustrations and symbols are the property of nimax GmbH.
60908_EN_Instruction Manual_REV_A 4 / 4
Most Newtonians have three sets of two
collimation screws on the primary mirror cell, one
adjustment screw and one locking screw each.
3. Remarks. You do not need to worry about
adjusting the collimation screws of your telescope!
You cannot damage anything. The worst case is
that you will end with a decollimated telescope
and have to start all over again.
If possible, do the collimation in bright daylight. The last step (primary collimation) can also be done at night (using a torch to
shine into the opening of the Collimating Eyepiece), but this is less straightforward than collimating during the day and needs
more practice.
Try to have two people available for carrying out primary collimation. One to adjust the collimation screws and the other to
look into the Collimating Eyepiece and say ”better“ or” worse“. With practice, you will be able to collimate the primary in just
one minute.
If you are familiar with collimation, you may wish to try this experiment: roughly decollimate your scope-like in Picture 5 and
observe a star. You will notice a comet-shaped star-image instead of a pinpoint. This is ‘coma’, the main off-axis aberration
with Newtonian telescopes. Any time you see such an asymmetric star image in you telescope, you will know that it is time to
collimate it!
4. Refractors. If you own a refractor with collimation screws on the lens cell, you can also use your Collimating Eyepiece here.
Leave the front cover on the lens and slide the Collimating Eyepiece into the 1.25“ focuser. If you shine a powerful torch into
the opening, you will see ring shaped reflections from the lens surfaces, but these reflections are rather difficult to see. If the
reflections are not concentric, you can use the collimation screws to centre them.
Be aware that the reflections react very sensitively to adjustments with the collimations screws. It is a good idea to try to
collimate your refractor only when notice distorted star images when observing the night sky!
We wish you clear skies with your freshly collimated telescope!
5. Characteristics.
Weight: 75 g;
Dimension: Diameter 28 mm; Height 84 mm;
Material: Anodized aluminium;
Recommended for: Newtonians and Refractors.
1. Adjustment screw 2. Locking screw
Picture 7. Primary mirror cell.

This manual suits for next models

1

Other Omegon Accessories manuals

Omegon 58247 User manual

Omegon

Omegon 58247 User manual

Omegon Solar Filter User manual

Omegon

Omegon Solar Filter User manual

Omegon Push+ User manual

Omegon

Omegon Push+ User manual

Omegon MiniTrack 68713 User manual

Omegon

Omegon MiniTrack 68713 User manual

Omegon Powerbank 38000 User manual

Omegon

Omegon Powerbank 38000 User manual

Omegon MiniTrack LX2 User manual

Omegon

Omegon MiniTrack LX2 User manual

Omegon Pro 3" dual speed Newton Crayford Focuser User manual

Omegon

Omegon Pro 3" dual speed Newton Crayford Focuser User manual

Omegon AZ mount User manual

Omegon

Omegon AZ mount User manual

Omegon EQ-500 X User manual

Omegon

Omegon EQ-500 X User manual

Popular Accessories manuals by other brands

RF Technology Eclipse2 Technical manual

RF Technology

RF Technology Eclipse2 Technical manual

Abus SHMK10000 manual

Abus

Abus SHMK10000 manual

Alarmcom ADC-IS-100-GC installation guide

Alarmcom

Alarmcom ADC-IS-100-GC installation guide

Gamma+ Rebound Net manual

Gamma+

Gamma+ Rebound Net manual

FLORABEST 332812 1907 Assembly instructions

FLORABEST

FLORABEST 332812 1907 Assembly instructions

Light Symphony LS30900BSR operating manual

Light Symphony

Light Symphony LS30900BSR operating manual

Silvercrest 289564 Operation and safety notes

Silvercrest

Silvercrest 289564 Operation and safety notes

smart home IQ Temp install guide

smart home

smart home IQ Temp install guide

MD SPORTS BBG030 018E V2 Assembly instructions

MD SPORTS

MD SPORTS BBG030 018E V2 Assembly instructions

Green Brook PowerBreaker K21S-WP Installation & operating instructions

Green Brook

Green Brook PowerBreaker K21S-WP Installation & operating instructions

C.P. Electronics EBDHS-MB-DNET1 Product guide

C.P. Electronics

C.P. Electronics EBDHS-MB-DNET1 Product guide

Chef's Choice Angle Select 1520 instructions

Chef's Choice

Chef's Choice Angle Select 1520 instructions

MRHANDSFREE Portable Power charger 5200 mAh Pure Edition user manual

MRHANDSFREE

MRHANDSFREE Portable Power charger 5200 mAh Pure Edition user manual

Silvercrest SWUB 85 C2 Operating instructions and safety guide

Silvercrest

Silvercrest SWUB 85 C2 Operating instructions and safety guide

Pro-tec 6000PLUS/HT/TS Installation and service instructions

Pro-tec

Pro-tec 6000PLUS/HT/TS Installation and service instructions

wattstopper FS-705 installation instructions

wattstopper

wattstopper FS-705 installation instructions

I.SOUND COOKIE MONSTER CASE - FOR IPOD TOUCH datasheet

I.SOUND

I.SOUND COOKIE MONSTER CASE - FOR IPOD TOUCH datasheet

AutomationDirect AcuAmp VADT Series installation instructions

AutomationDirect

AutomationDirect AcuAmp VADT Series installation instructions

manuals.online logo
manuals.online logoBrands
  • About & Mission
  • Contact us
  • Privacy Policy
  • Terms and Conditions

Copyright 2025 Manuals.Online. All Rights Reserved.