manuals.online logo
Brands
  1. Home
  2. •
  3. Brands
  4. •
  5. Omegon
  6. •
  7. Accessories
  8. •
  9. Omegon Push+ User manual

Omegon Push+ User manual

Other Omegon Accessories manuals

Omegon Pro 3" dual speed Newton Crayford Focuser User manual

Omegon

Omegon Pro 3" dual speed Newton Crayford Focuser User manual

Omegon EQ-500 X User manual

Omegon

Omegon EQ-500 X User manual

Omegon Powerbank 38000 User manual

Omegon

Omegon Powerbank 38000 User manual

Omegon MiniTrack 68713 User manual

Omegon

Omegon MiniTrack 68713 User manual

Omegon AZ mount User manual

Omegon

Omegon AZ mount User manual

Omegon Deluxe Collimating Eyepiece User manual

Omegon

Omegon Deluxe Collimating Eyepiece User manual

Omegon MiniTrack LX2 User manual

Omegon

Omegon MiniTrack LX2 User manual

Omegon 58247 User manual

Omegon

Omegon 58247 User manual

Omegon Solar Filter User manual

Omegon

Omegon Solar Filter User manual

Popular Accessories manuals by other brands

Quincy lab 140AE-1 operating manual

Quincy lab

Quincy lab 140AE-1 operating manual

HomePro ZIR000 user manual

HomePro

HomePro ZIR000 user manual

DOL 20SCR Technical user guide

DOL

DOL 20SCR Technical user guide

RAB Smart Task installation manual

RAB

RAB Smart Task installation manual

Kemppi KMS 300 quick guide

Kemppi

Kemppi KMS 300 quick guide

Stearns 57,500 Series Installation and service instructions

Stearns

Stearns 57,500 Series Installation and service instructions

iGuzzini TWILIGHT COPENAGHEN manual

iGuzzini

iGuzzini TWILIGHT COPENAGHEN manual

Adelaide Annexe & Canvas Avan Deluxe installation guide

Adelaide Annexe & Canvas

Adelaide Annexe & Canvas Avan Deluxe installation guide

OHAUS 5000 instruction manual

OHAUS

OHAUS 5000 instruction manual

HOME8 WLS1300 quick start guide

HOME8

HOME8 WLS1300 quick start guide

MAXBOTIX MaxSonar quick start guide

MAXBOTIX

MAXBOTIX MaxSonar quick start guide

ioSmart iSmart56 Installation and user guide

ioSmart

ioSmart iSmart56 Installation and user guide

Focusrite Scarlett 18i8 user guide

Focusrite

Focusrite Scarlett 18i8 user guide

Velleman ED38105 user manual

Velleman

Velleman ED38105 user manual

JumpSport SkyBounce user manual

JumpSport

JumpSport SkyBounce user manual

Prima-Temp PRIYA Instructions for use

Prima-Temp

Prima-Temp PRIYA Instructions for use

Tefcold BC85I-BC85I W user manual

Tefcold

Tefcold BC85I-BC85I W user manual

Vaisala WMS302 user guide

Vaisala

Vaisala WMS302 user guide

manuals.online logo
manuals.online logoBrands
  • About & Mission
  • Contact us
  • Privacy Policy
  • Terms and Conditions

Copyright 2025 Manuals.Online. All Rights Reserved.

Reproduction of part or all of the contents of this document in any form is expressly prohibited other than for individual use only. All text, images and labels are property of nimaxGmbh.
Instruction Manual
Omegon® Push+ Mini mount
Art. Nr. - 55041
Reproduction of part or all of the contents of this document in any form is expressly prohibited other than for individual use only. All text, images and labels are property of nimaxGmbh.
Instruction Manual
Congratulations on the purchase of the new Omegon® Push+ Mini mount. This mount with a dual encoder-system is compatible with most telescopes equipped
with a Vixen-Style dovetail. The Dobson-style telescope mount reads the absolute encoders positions and transmits this information via Bluetooth® to a
smartphone, tablet or computer. A dedicated software or app is required to interpret the encoder information and display it on screen allowing the user to
calibrate and search for deep-sky objects.
1. Parts
The Omegon® Push+ Mini Mount is supplied pre-assembled, no additional assembly is necessary. Please take some time to identify the
different mount parts in the figures above.
2. First align indexes, than power!
The Push+ technology relies on absolute encoders. The
encoders have been previously calibrated based on a set of
Altitude and Azimuth indexes. Please align indexes (as shown
on the right) with the mount unpowered. Only after the
indexes alignment is made should you power your mount using
the supplied cable.
3. Mounting the telescope tube to the Push+ base.
First thing to do is to rotate the dovetail knobs (part 1) to the up-right position and release them so that the dovetail’s slot is unobstructed
–figure A. Hold the tube and match the telescope dovetail Vixen-style to the dovetail holder (part 6) and tighten the two dovetail knobs
(part 1) –figure C. It is important that the tube is balanced to the dovetail so that it does not tilt either to the front or the back.
3.1. Balancing the tube. Slide the tube or the dovetail to the front or the back to achieve perfect balancing.
Azimuth axis
place the white dot aligned with vertical spikes.
Altitude axis
Align both back and white dots.
Parts
1. Dovetail knob (2 pcs); 2. Altitude Axis; 3. Smartphone holder; 4. Eyepiece-tray;
5. Power-bank holder; 6. Dovetail holder; 7. Main board; 8. Cable;
9. Side panel; 10. Plate-Right; 11. Plate-Left. 12. Rubber foot;
13. Disc base;
Figure A. Release the two dovetail knobs (part 1)
Figure B. Slide the telescope dovetail and tighten
firmly the two knobs.
Figure C. Move the dovetail down and the tube up!
Reproduction of part or all of the contents of this document in any form is expressly prohibited other than for individual use only. All text, images and labels are property of nimaxGmbh.
3.2. Powering Push+ base. In order for the digital encoders
and the electronics built around it to work and transmit the axes
absolute positions of the telescope - a power supply is required. The
Push+ is designed to work with a 12Volt DC power supply. We
recommend using a field battery for that purpose. Please pay
attention when connecting power to the Push+.
Exceeding the recommended 12Volt DC power will
destroy the electronic components!
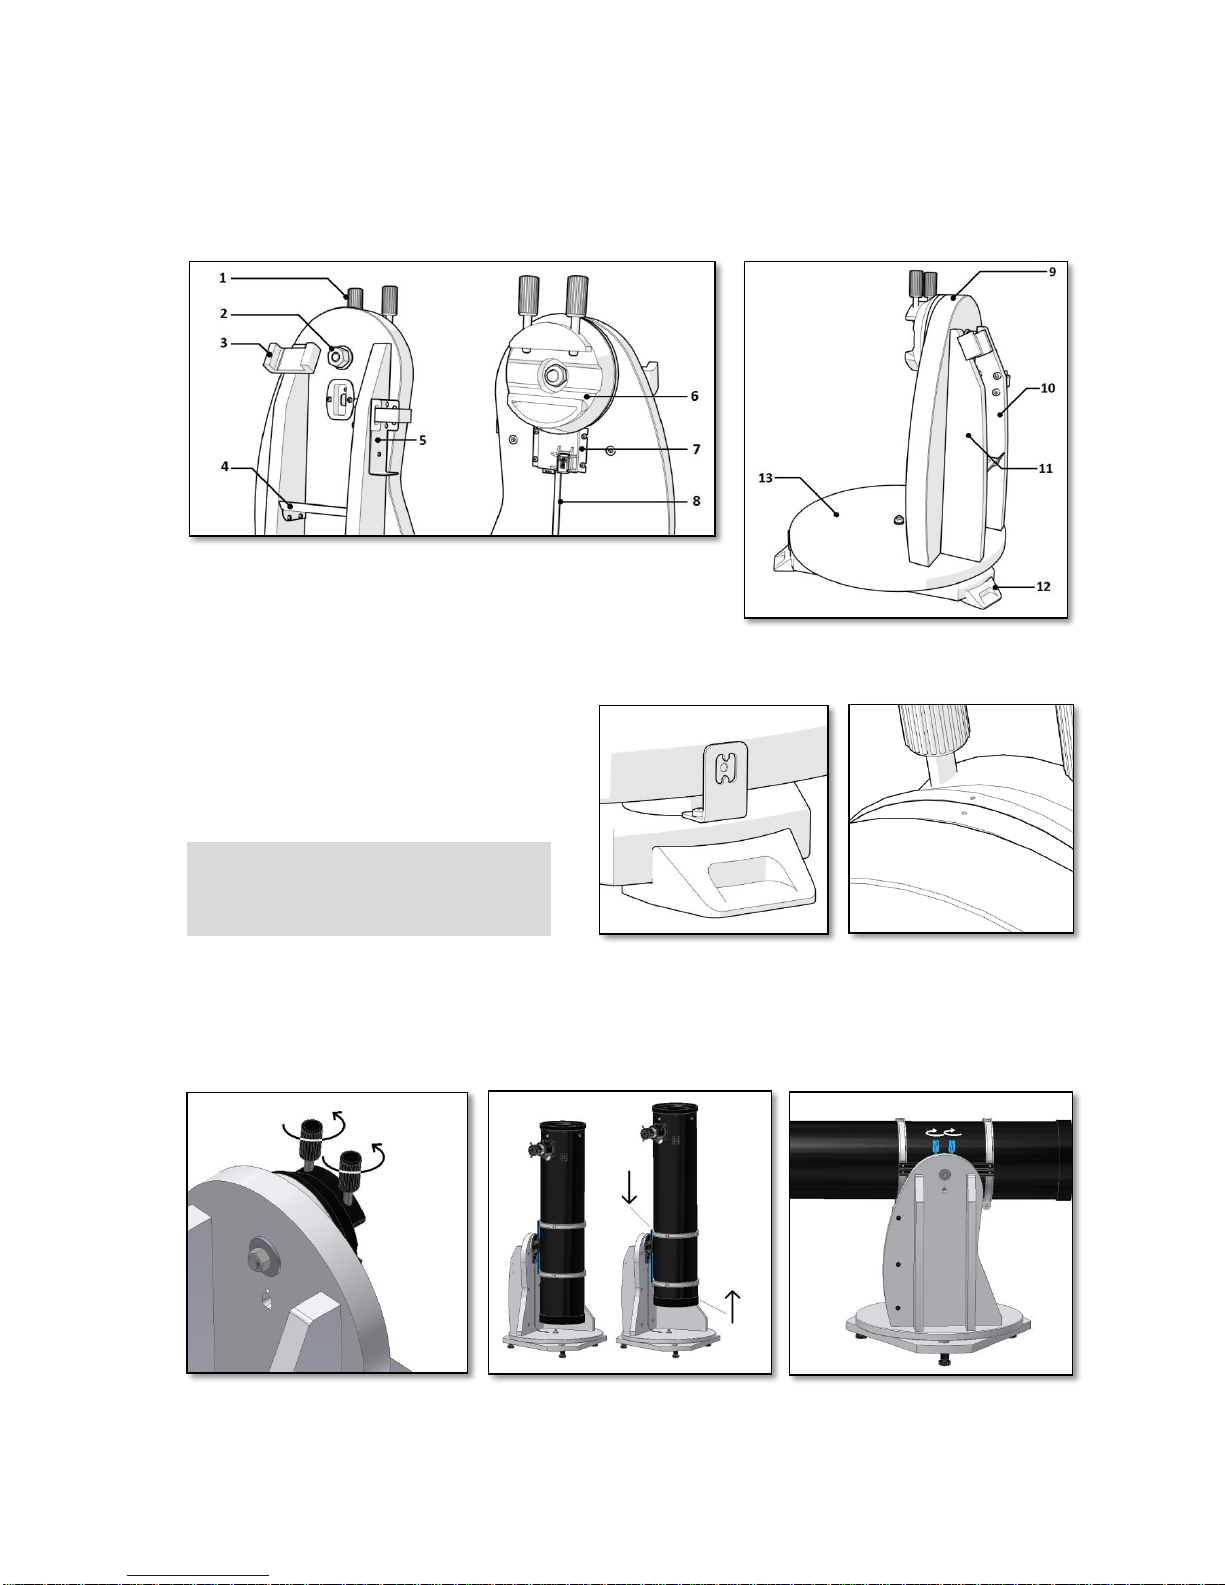
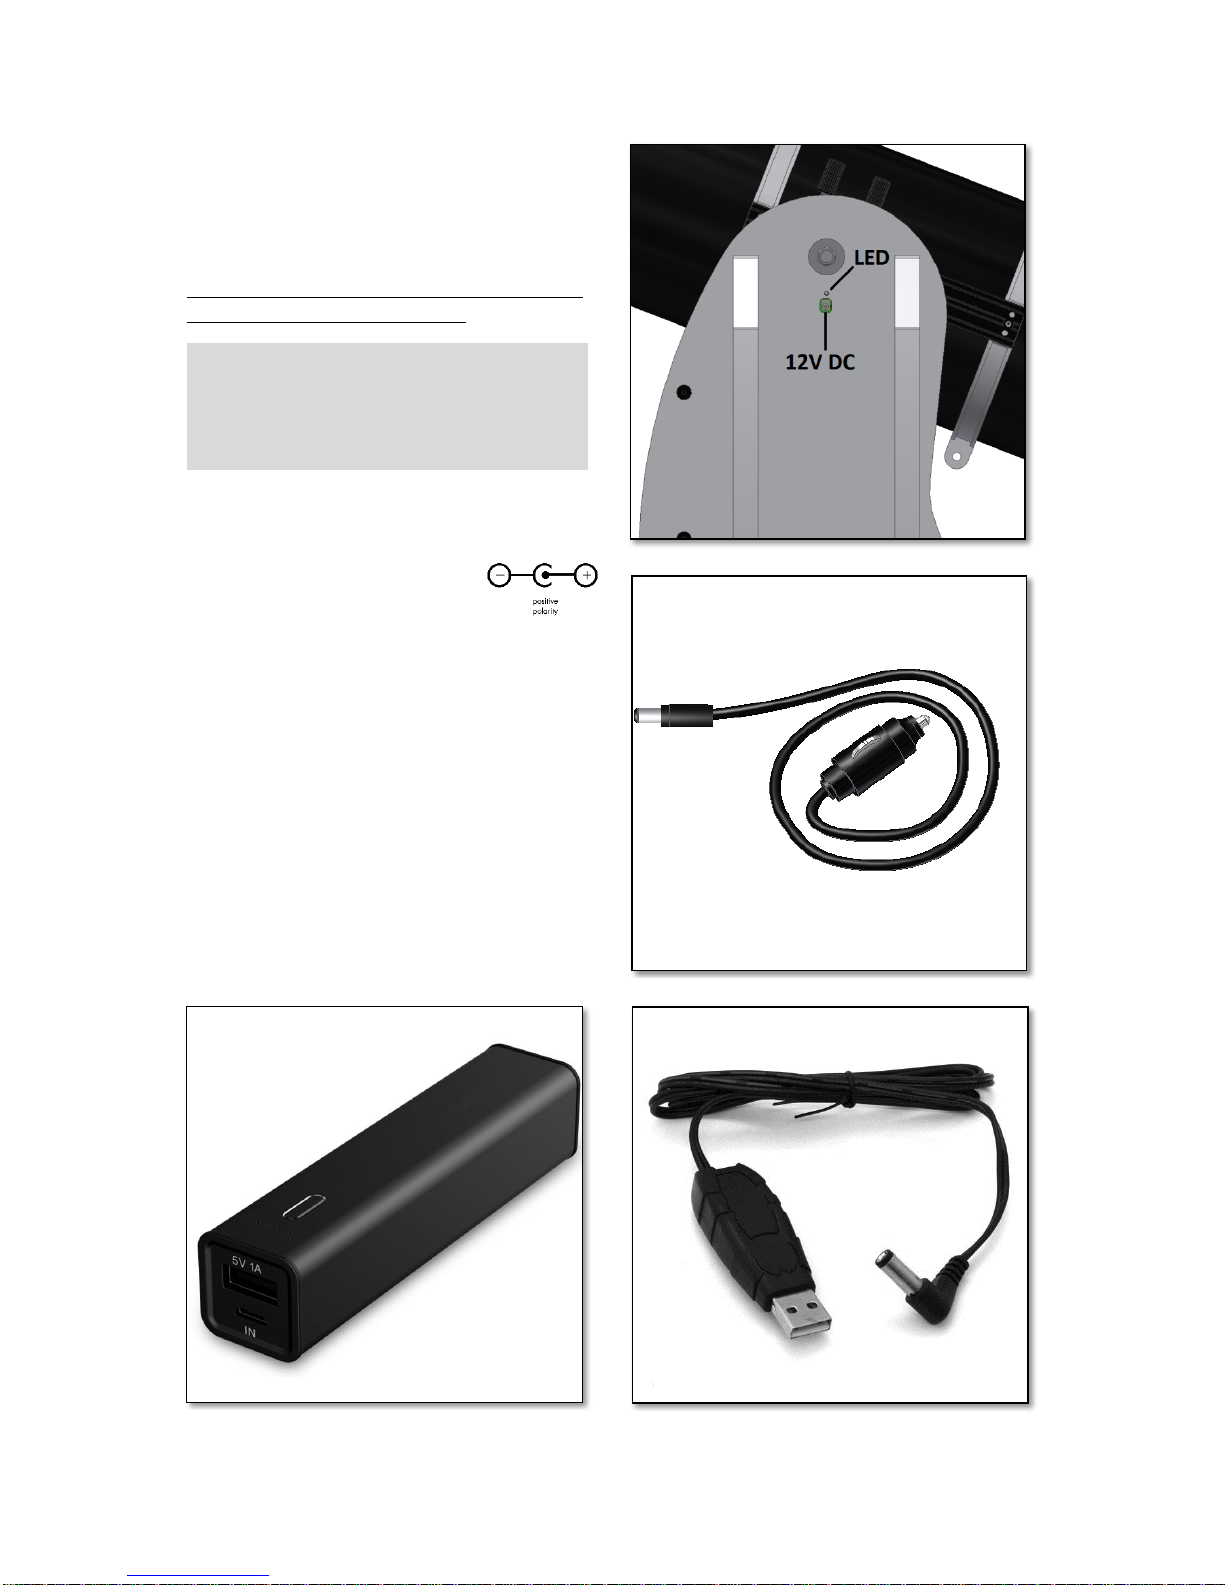
When the Push+ is powered, the red LED (part 5) on the side panel
will light up and blink. This means the Push+ is connected to power
and ready to pair with a Bluetooth® compatible device.
3.2.1. Powering Push+ with Car cigarette
socket cable. The supplied Car cigarette
socket cable (figure 1) allows to connect the
Push+ to a field battery. Positive pole is in the
inside. Please make sure the field battery matches this specifications
- it has the symbol on the right.
3.2.2. Powering Push+ with USB Powerbanks. There are many USB
powerbanks available that are used commonly to charge
smartphones, tablets and other 5Volt devices through a USB port.
These batteries vary in terms of capacity and features. The smallest
ones have a capacity of about 1500 mA/h and only a USB Out port.
They are quite small and can be used easily transported to the field
as they are pocket size batteries. Most of them don’t supply enough
voltage to power the Push+. Some of them have 9Volt or 12Volt
outputs. These are great as they can be connected directly to the
Push+.
3.2.3. Power booster cables. Some small USB (5Volt) Batteries can
also be used to power the Push+. Although the Push+ base is rated
to 12V, with a power jump cable the 5Volt can be increased to the
required 12Volt. These cables are available from different suppliers.
These small USB batteries with a converter cable have capacity to
run the Push+ more than 8 hours.
Power Features
Power Supply requirements: 12Volt DC
Jack 2.1mm with positive in the centre.
Power consumption (idle): 100 mA/h
Power consumption (average): 150mA/h
Connection socket type: Jack 2.1mm
Figure D. Location of the power socket and the red LED.
Figure 1. The car cigarette socket plug (supplied).
Figure 3. Converter cable (not supplied).
Figure 1. USB powerbank/battery (not supplied)
Reproduction of part or all of the contents of this document in any form is expressly prohibited other than for individual use only. All text, images and labels are property of nimaxGmbh.
4. Coordinate System. The Push+ uses two encoders, one on each axis. They measure angular changes to the telescope’s position
and “pass” this information to the electronics. These are relative changes, meaning that the Push+ must be calibrated for every observing
session - during the session as well -to a known set of objects to “know” where it is pointing-to. The two altitude and azimuth relative axial
positions are transformed into signals that can be interpreted by a dedicated planetarium App. The App will then, based on the current
time and location, transform this coordinates into night-sky coordinates. To get the best performance these two altitude and azimuth
coordinates need to be orthogonal to the ground where the Push+ sits. So making the mount horizontal is very important to achieve good
results.
Important: The mount should be horizontal so that the encoder system is orthogonal to the ground!
4.1. Making the mount horizontal to the ground. To obtain the best pointing precision we recommend making the mount
horizontal. Place the Push+ on a good-levelled ground to place the Push+. An inclined driveway should be avoided! Place a bubble level
(builders bubble level not supplied) on the Push+ disc. The level should point to the centre (az-axis) and to one of the plastic foot-set.
Rotate the foot-base (part 10) if necessary so that the bubble shows horizontal levelling –figure 4. Now, without touching the level, rotate
the Push+so that the level is aligned with the next foot-set –figure 5. Adjust the foot-base if necessary. Proceed likewise to the last of the
foot-set, this one should confirm that the base is levelled. Repeat if necessary until a good horizontal base is reached. Make sure at this
point:
1. Mount is levelled;
2.Optical tube fixed to the Push+;
3. Push+ is powered (red LED blinking).
You are now ready to go to the next step.
5. Preparing the Push+ to be used with a device and dedicated App.
The Push+ alone cannot point to a sky object. The Push+ is only the encoder and the integrated Bluetooth®
transmission systems. One still needs a device –smartphone, tablet or computer and an app.
The smartphone or the computer are used to work as a display for the software that will use the relative
encoders positions to point the telescope to a target. One of the most popular software for telescope control
is SkySafari. This is a planetarium app that works virtuously with every telescope system. Push+ is also
compatible with many other software or apps. We will continuously update about software compatibility.
Please check our website for software updates and firmware updates.
6. Push+ compatibility. Push+ is compatible with devices that use
Android® or with computers that use Windows® operating system.
The devices must also be Bluetooth® 2.0 (or higher) compatible. The
following logos apply.
Android® logos and symbols are trademarks of Google Inc.
Microsoft ® and Windows ® are registered trademarks of Microsoft Corporation.
Bluetooth ® is a trademark of Bluetooth SIG Inc.
Reproduction of part or all of the contents of this document in any form is expressly prohibited other than for individual use only. All text, images and labels are property of nimaxGmbh.
7. How to pair Push+ to a device or computer?
Pairing is done as you would do with a cell phone or other
device. First power the Push+ by using the supplied power cable
or by using a power supply as mentioned in 3.3. as soon as
Push+ is powered the red LED will start to blink.
Now you have two options you can pair Push+ to an Android®
device (phone or tablet) or to a Window™ based Computer.
7.1. Pairing Push+ to a device like an Android®
phone. Make sure you phone is compatible with
Bluetooth 2.0 (or higher).
Step 1
Enable the Bluetooth® option in your device. Do this by going to
the Settings Tab or directly by pressing the Bluetooth®symbol
as shown in figure 6.
Step 2
A window with a list of the available devices will be visible. If you had a previously paired device, it will show
up on the list. If Push+ is powered it will also show either as Unknown Device or as Push+.
Step 3
Select Push+ from the list and pair it by inserting the 4-digit pairing code. Each Push+ has its own signature and
when pairing it will “remember” to which device it is paired. This avoids
problems when several Push+ are working close to one another.
Remember the maximum recommended Bluetooth® pairing distance is
10m. Make sure you are within this distance.
Your Push+ is now be paired to your Android® device.
7.2. Pairing Push+ to a laptop or computer. Make sure your computer or laptop is compatible with
Bluetooth® 2.0 (or higher). There are several ways to pair your Push+ to a computer. We will
describe in the following steps a simple and effective
way to do it.
Step 1
Select from Windows™initial menu the arrow pointing up (show hidden icons)
- red circle (right bottom corner on the screen) –figure 7.
Step 2
Click on the Bluetooth® icon. Select “Add Bluetooth device” –figure 8
Step 3
Look for Push+, sometimes it may show up as “unknow device”
Click pair
Step 4
Insert pairing code “1234”
Your Push+ is now paired with your computer.
Push+ pairing code is “1234”
Figure 6. Enable the Bluetooth® function.
Figure 7. Click to show hidden icons.
Figure 8. Add Bluetooth® device.
Reproduction of part or all of the contents of this document in any form is expressly prohibited other than for individual use only. All text, images and labels are property of nimaxGmbh.
7.3. Selecting COM port for apps such as SkyCharts (Cartes du ciel)
When pairing a device to a computer via Bluetooth® a
COM port is automatically assigned to the device so that
the it “talks” to the computer and vice-versa. To
determine which port corresponds to the Push+ please
follow these steps.
Step 1
Select from the Windows™ initial menu the arrow
pointing up (show hidden icons) as shown in 7.2
Step 2
Right-click on the Bluetooth® icon. Select “Open
Definitions” –figure 9.
Step 3
Make sure the Discovery check box is checked as show in
figure 9. Click “OK”.
Step 4
Select “COM Ports” – figure 10.
Step 5
An incoming COM port was already assigned to Push+.
Select “Push+ Dev B”
Click “Add” button–figure 31.
Figure 9. Right-click “Open definitions” on the Bluetooth® symbol.
Figure 10. Click “COM” tab.
Figure 11. Click “Add”.
Reproduction of part or all of the contents of this document in any form is expressly prohibited other than for individual use only. All text, images and labels are property of nimaxGmbh.
Step 6
we now need to selected he Outgoing port. Select
“Outgoing” if not already selected
Step 7
Click on the drop-down menu and select “Push+”
Step 8
From the Service tab select “Dev B”
Step 9
Click “OK”
Step 10
The two assigned COM ports will show up. The “Push+ Dev
B” COM port number should be used with softwares that
require this setting information such as “Cartes du Ciel”.
7.4. “Cartes du Ciel”. Settings for this planetarium software.
Step 1
To configure “Cartes du Ciel” select “Telescope” and click
“Telescope settings”
Figure 12. Select “Outgoing” and “Push+”
Figure 13. Select “Dev B”, click “OK”.
Figure 14. The assigned COM ports will show up. Use this information
for the settings of “Cartes du Ciel” or other computer softwares that
required this setup information.
Figure 15. Telescope settings.
Reproduction of part or all of the contents of this document in any form is expressly prohibited other than for individual use only. All text, images and labels are property of nimaxGmbh.
Step 2
Select “Encoders” if not yet selected.
Step 3
Click “OK”
Step 4
Click on “Control panel” to configure the encoder pulses.
Step 5
Select the “Encoder Configuration” tab and change so that
it reads as shown:
Type: “Intelliscope”
Steps (Alpha): “36000”
Steps (Delta): “36000”
Read Interval (ms): “100”
Mount type: “Alt-Az”
Encoder initialization angle: “90”
Latitude: “insert your latitude here”
Longitude: “insert your longitude here”
Form always visible: check this box
Step 6
Click “Save Setting”
Figure 16. Select “Encoders”.
Figure 17. Select “Control panel”
Figure 18. Select “Control panel”
Reproduction of part or all of the contents of this document in any form is expressly prohibited other than for individual use only. All text, images and labels are property of nimaxGmbh.
Step 7
Select “Port Configuration” tab and change so that it
reads as shown:
Serial Port: use the data from 7.3 Step 10
Speed: “115200”
Data bits: “8”
Parity: “N”
Stop bits: “1”
Timeout (ms): “1000”
Interval Timeout: “400”
Step 8
Click on “Save Settings” when finished.
Step 9
Select the “Coordinates” tab and click “Connect”.
The red square will turn green and some numbers will
show up in the upper blank spaces.
You are now ready to start using “Cartes du Ciel”!
Figure 19. Port configuration.
Figure 20. Click “Connect”.
Reproduction of part or all of the contents of this document in any form is expressly prohibited other than for individual use only. All text, images and labels are property of nimaxGmbh.
8. Which software and apps to use?
8.1. SkySafari® from Simulation Curriculum
one of the most popular existing planetarium app is SkySafari® from Simulation Curriculum®. This planetarium
app shows the sky on a device screen (they have both Android® and iOS versions) and allows telescope
control. It has a huge database with its constellations, deep-sky objects, stars, asterisms and many other
objects. To know more visit www.simulationcurriculum.com. SkySafari® is available in several versions from
entry level to the most advanced ones. We recommend using the SkySafari® Plus 4 for Android®. It can be
downloaded from the Google Play® app centre. Please notice, this is not a free app. The free version does not
allow to control telescopes or Push+. SkySafari® is has a quite intuitive interface and is easy to use.
8.2. Cartes du Ciel. This is a very advanced software which enables precision location of deep-sky objects.
While SkySafari® only uses two stars for calibration, “Cartes du Ciel” can use every start or deep-sky object as a
calibration object. This is great because for each part of the sky it will use the nearest object as a calibration
object increasing dramatically the pointing accuracy. It creates a calibration map for each objected calibrated
to the system. Any encoder reading error is evenly distributed through the night sky and the software
“remembers” the error behaviour making the required compensations.
We strongly recommend this software as it is free and very advanced.
9. Important Push+ Features.
Electronics
Encoder resolution: 36000 ticks/pulses per axis
Protocol: Intelliscope
Bluetooth®: 2.0
Pairing range: 10m (although when unobstructed can reach up to 30m)
Power Characteristics
Power: 12Volt DC
Power consumption: 150mA/h
Power consumption (idle): 100mA/h
Connection type: Jack 2.1mm with positive centre
Maximum carrying weight: 14kg
Accessories:
Smartphone adapter
Shipping
Shipping box dimensions: 780x760x160mm
Shipping weight: 20kg
Net-Weight: 15kg
Pointing Accuracy
Usually between 0.5deg and 0.7deg, should be in the FOV for a 25mm
eyepiece with a 8” Newton OTA.