manuals.online logo
Brands
  1. Home
  2. •
  3. Brands
  4. •
  5. OMG
  6. •
  7. Welding System
  8. •
  9. OMG RhinoBond RBHW1 User manual

OMG RhinoBond RBHW1 User manual

RB1030 Rev. 05032018
153 BOWLES ROAD, AGAWAM, MA 01001 USA
800.633.3800 413.789.0252 RHINOBOND.COM
Non-penetrating fastening system
for commercial roofing
IMPORTANT!
Save this manual
and read it in full
before use.
®
OWNER’S MANUAL
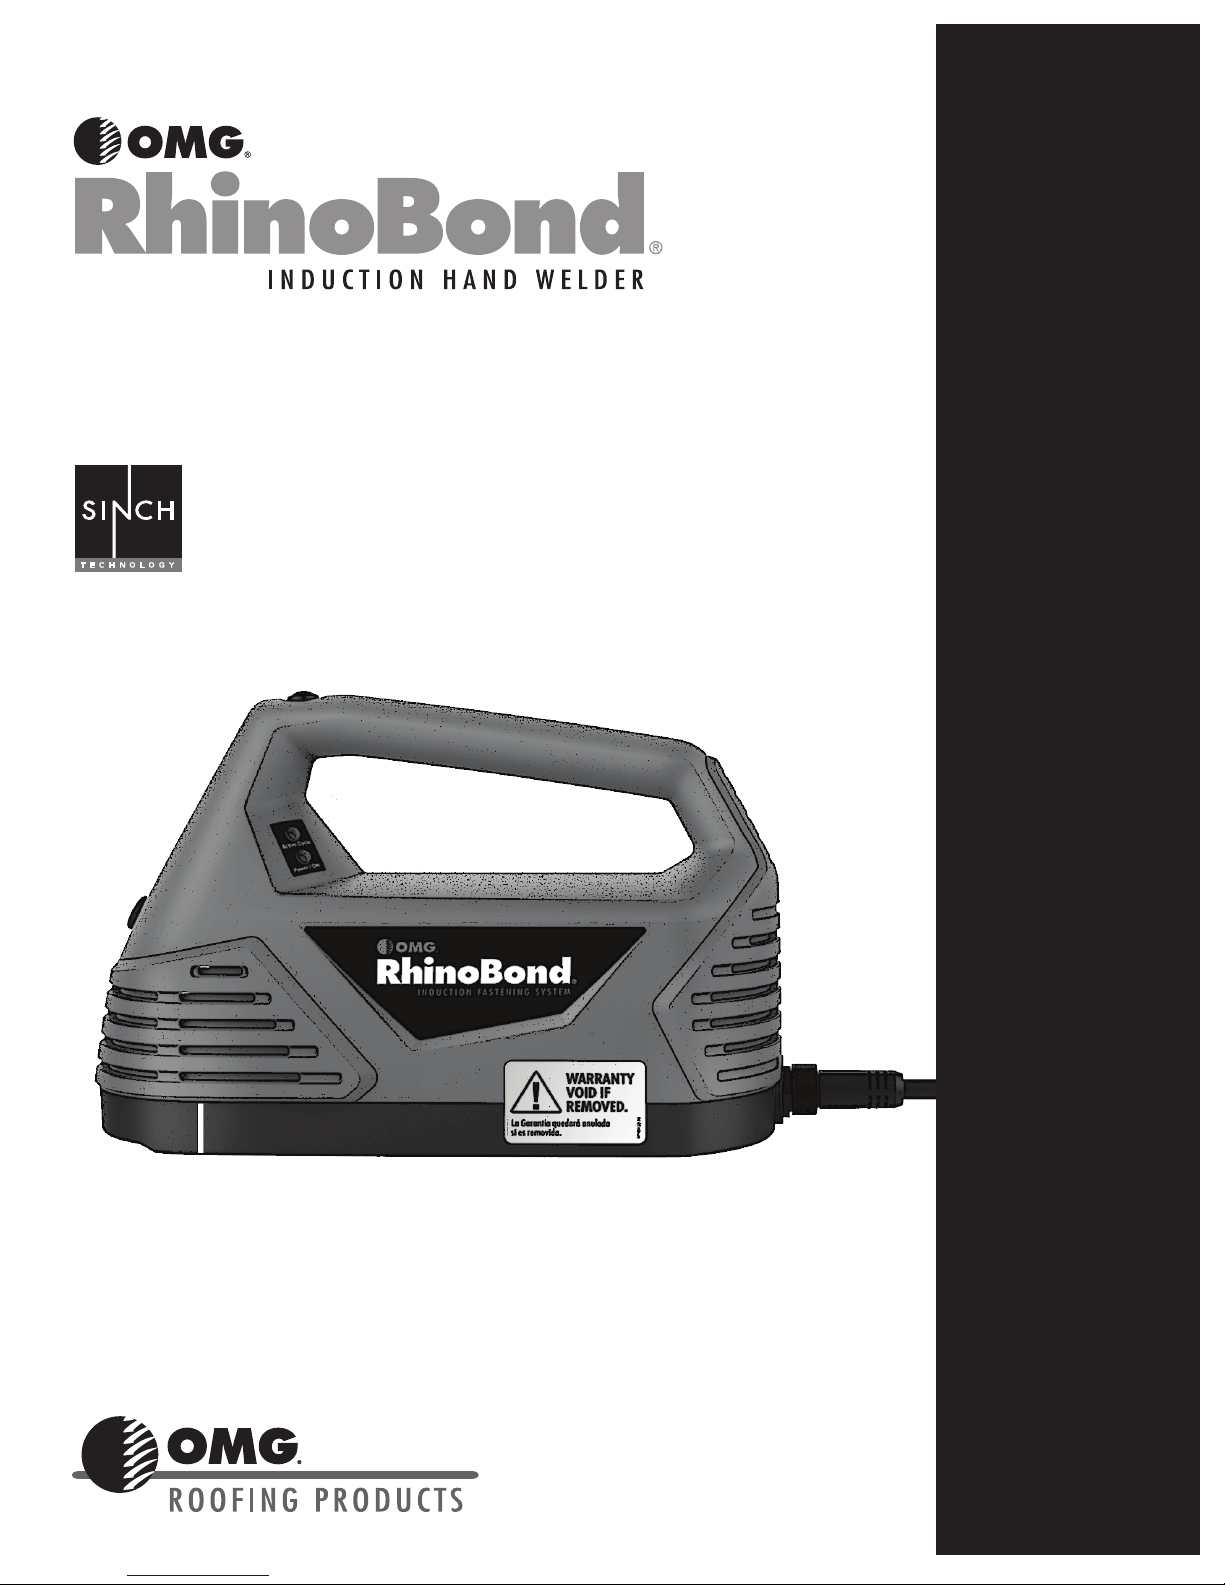
RhinoBond Hand Welder Owner’s Manual Page 2
THE RHINOBOND HAND WELDER WARRANTY
The RhinoBond Hand Welder is guaranteed for 25,000 cycles of operation,
or one year from date of purchase, whichever comes first.
During this period OMG, Inc., at its option, will repair or replace any tool for the
roofing contractor who originally purchased the tool. This will be done free of
charge, provided the tool is determined defective in materials or workmanship
upon examination by an Authorized RhinoBond System Service Technician.
This Warranty will be honored only if:
A. No evidence of abuse, misuse or failure to follow safety or operating
instructions, or improper maintenance or modification of the tool, is present.
Read Owner's Manual for safe use and maintenance instructions.
B. If replacement is necessary, the original purchaser should return the tool,
transportation prepaid, to the nearest Authorized RhinoBond System Service
Technician with a copy of the original purchase receipt or other positive proof
of purchase.
C. Only genuine RhinoBond Tools, Fasteners and Plates are used in the application.
THE FOREGOING WARRANTY IS IN LIEU OF ALL OTHER WARRANTIES.
ALL OTHER WARRANTIES, WHETHER ORAL, WRITTEN, EXPRESS OR
IMPLIED, INCLUDING BUT NOT LIMITED TO THE IMPLIED WARRANTIES OF
MERCHANTABILITY AND FITNESS FOR A PARTICULAR PURPOSE SHALL NOT
APPLY. THESE OTHER EXPRESS OR IMPLIED WARRANTIES ARE SPECIFICALLY
EXCLUDED. BUYER’S OR USER’S REMEDIES ARE SOLELY AND EXCLUSIVELY
AS STATED HEREIN. OMG, INC. SHALL IN NO EVENT BE LIABLE FOR
INCIDENTAL, CONSEQUENTIAL, INDIRECT OR SPECIAL DAMAGES RESULTING
FROM FAILURE OF THIS WARRANTY. IN NO EVENT, WHETHER AS A RESULT
OF BREACH OF CONTRACT, WARRANTY, TORT (INCLUDING NEGLIGENCE)
OR OTHERWISE, SHALL OMG, INC.’S LIABILITY TO THE BUYER OR USER OF
THE TOOL OR ANY LOSS OR DAMAGE ARISING OUT OF THE BREACH OF
WARRANTY, CONTRACT OR TORT, EXCEED THE PURCHASE PRICE HEREIN.
ANY CLAIM OR LIABILITY SHALL IN ANY EVENT TERMINATE UPON THE
EXPIRATION OF THE WARRANTY PERIOD SPECIFIED ABOVE.
For RhinoBond Tool Service, please call: 800-633-3800
International: +1 413-789-0252
TABLE OF CONTENTS
2 RhinoBond Tool Warranty
3 System Description
-System Components
-Power Requirements Chart
Safety Instructions
4 Operating Instructions and
Power Requirements
6 Maintenance & Storage
7 CE Declaration of Conformity
RHINOBOND RESOURCES ON LINE!
We have a dedicated online resource
site where all important RhinoBond
information is kept, including manuals,
tips, videos, best practices, the Rhino
calculator and much more!
RhinoBondResources.com
The RhinoBond system uses Sinch technology to create a strong bond between the roof membrane
and fastening plates.
ROOFTOP SAFETY
In addition to the safety instructions in this manual, OMG Roofing Products recommends that all roof top workers follow the safety
guidelines outlined in the OSHA booklet called "Protecting Roofing Workers" available at www.osha.gov/Publications/OSHA3755.pdf
and EU-OSHA “Directive 92/57/EEC - Temporary or mobile construction sites,” if applicable.
© Copyright 2018 OMG, Inc. All rights Reserved.
READ & SAVE ALL INSTRUCTIONS
THE RHINOBOND HAND WELDER
WARNING
The RhinoBond System produces
heat that can seriously injure
people and damage metal
objects. Please be sure that you
and your crew members read and
understand all instructions in this
manual before attempting to use
the RhinoBond System. Failure to
follow all instructions could result
in property damage, serious
personal injury, electric shock
or death.
This appliance is not intended for
use by persons (including children)
with reduced physical, sensory
or mental capabilities, or lack of
experience and knowledge, unless
they have been given supervision
or instruction concerning use of the
appliance by a person responsible
for their safety. Children should be
supervised to ensure that they do
not play with the appliance.
DO NOT USE THIS TOOL if you
have (or anyone near you has) a
pacemaker, surgical implant,
prosthesis or other medical
device. The RhinoBond tool may
interfere with proper medical
device operation.
DO NOT activate tool over metal
objects in/on the floor.
DO NOT use the cord to carry
the tool.
UNPLUG THE CORD before
attempting to inspect or clean the
tool, or you risk electric shock.
Make sure power/extension cords
do not create a trip hazard.
DO NOT activate tool over the
power cord.
KEEP CORD AWAY FROM heat,
liquids, sharp edges and moving
parts.
STAY ALERT. Do not use this tool
when tired or under the influence of
drugs, alcohol or medication that can
alter your awareness.
DO NOT hold any objects containing
metal in the direct proximity of
the inductor during use, including
watches, jewelry, keys, mobile
phones, etc.
IF CORD IS DAMAGED,
immediately discontinue using the
tool and contact OMG Roofing
Products for repair.
800-633-3800 (+1 413-789-0252)
Activation Button
Energy Setting
Dial
Power
Cord
Induction Coil
Handle
REGION USA / CANADA UK / IRELAND NETHERLANDS
AND REST OF EUROPE CHINA
POWER REQUIRMENTS 110-120V / 20A / 50-60Hz 110-220V / 16A / 50-60Hz 220-230V / 10A / 50-60Hz 220V / 50Hz
EXTENSION CORD 12 gauge (min.), 100-ft. (max.) 110V, 2.5mm X 30m 16A (230V 3x15), 30m 10A, 30m
PORTABLE GENERATOR
POWER SOURCE
5,000W min. with
20A GFCI Circuit
2.5 KVA min. with 16Amp
(110V) protected circuit
2.5 KVA min. with 10Amp
(230V) protected circuit
Honda EU20i 1.6 KVA with 8 Amp
(230V) protected circuit
RHINOBOND TOOLS PER
GENERATOR * 2 1 1 1
POWER REQUIREMENTS CHART
LED Control
Lights
Heat Sinks
(3 included)
(Magnet design may vary)
Extension Cord
(Sold Separately)
(12 gage, 100-ft./30m max)
RhinoBond Hand Welder Owner’s Manual Page 3
See page 7 for country specific plug adapters.
Centering Mark
The RhinoBond Hand Welder is designed for
use in dry weather conditions with relative
humidity between 30 - 90 %.
STEP 1
INSTALL THE PLATES
Always follow roof system manufacturer’s
specifications and fastening patterns, or in
Europe, distributor wind load calculations
and fastening patterns.
When using the RhinoBond system, it is important
to install plates in a straight line. This will improve
system performance and help you more easily
identify plates under the membrane.
Secure plates using appropriate fasteners.
TIP: DO NOT OVERDRIVE PLATES.
Overdriving may result in a poor quality bond.
Too loose;
plate spins
Too tight;
plate
buckles
Proper
installation
Lay membrane over the plates.
ATTENTION:
RhinoBond Plates must be protected from
prolonged UV (ultra violet) sun exposure.
Keep RhinoBond buckets covered when not
retrieving plates. Installed RhinoBond plates
must be covered with membrane by the end of
each workday.
STEP 2
INTERNATIONAL POWER
All RhinoBond Hand Tools are provided with
a plug for U.S. power sources. However,
OMG sells plugs for most international
power sources. Please contact the OMG
representative or call +1 413-789-0252 for
information or to order. (See page 7)
START UP THE RHINOBOND TOOL
WARNING
Failure to follow these instructions may
cause damage to your RhinoBond tool.
NEVER start generator with tool plugged in.
ALWAYS start generator first, then plug in tool.
WHEN NOT IN USE, unplug the tool.
Start portable generator and allow it to warm up
for at least two minutes. Auto-Throttle, Auto-
Idle and/or Eco-Idle switches must be in OFF
position.
DEDICATED POWER
No other tools should be plugged into the power
source while RhinoBond tools are in operation.
Plug the RhinoBond tool into a stable energy
source. Refer to Power Requirements Chart on page 3.
*There is a warning label on the RhinoBond tool to
remind operators of the importance of Safe Start-Up
& Shut Down procedures.
SAFE SHUT-DOWN
Simply unplug the RhinoBond tool to shut down.
To resume work, confirm that generator is running
at full speed and delivering stable power before
plugging in the RhinoBond tool.
THE TOOL IS ON
Once plugged in the tool is on, and the green Power/
ON light will appear. During welding, the red Active
Cycle light will appear.
STEP 3
CALIBRATE THE TOOL
Calibrate the tool each day before starting work.
Adjust the RhinoBond Hand Welder for maximum
bond strength based on the ambient temperature
(from 0°F/-18°C to 120°F/49°C) and membrane
thickness. Adjust the energy level to produce an op-
timal bond. Start calibration at -3 and test samples
at 0 and +3
IMPORTANT TIP
Whenever the ambient temperature changes
up or down by 15°F or more (8°C or more),
recalibrate the RhinoBond tool.
OPERATING INSTRUCTIONS
RhinoBond Hand Welder Owner’s Manual Page 4
RED
GREEN
Use the following calibration process to adjust the
energy setting for each tool to the appropriate
level for the conditions on the job.
Place 3 plates on a sample of your insulation, 10
inches (250mm) apart. Lay a sample of your mem-
brane over the plates. Be sure membrane is clean
and dry.
-3
-2
-1
0
+1
+2
+3
S
E
T
T
I
N
G
Set the Energy Setting Dial to the (-3) position.
Align tool over plate and move forward until you feel
the plate engage the recessed bottom of the tool.
The bottom of the tool must remain flat against the
membrane. Use caution not to push the tool too far
forward, which can result in a poor quality weld due
to the bottom of the tool lifting off of the membrane.
To activate, press and release the weld button on
the top of the tool. Note: the handle is designed to
vibrate during the welding cycle.
WARNING
Hold hand welder tool flat against the
membrane and firmly in place. DO NOT
move tool until weld cycle is complete and
the handle stops vibrating.
Once the weld cycle is complete, the handle will
stop vibrating. Remove the RhinoBond Hand Welder
and immediately set a magnetic heat sink directly
onto the center of the welded plate.
-3
-2
-1
0
+1
+2
+3
S
E
T
T
I
N
G
Next, increase the energy setting to (0) and perform a
weld on the next plate and cover with magnetic heat
sink. Finally, increase the energy setting to (+3) and
repeat process on the last plate.
After the plates have cooled, remove the magnetic
heat sinks and turn membrane over to reveal the
welded plates.
Use pliers to peel each plate off of the membrane.
See Bond Results on page 6.
CALIBRATION TIPS
If you do not get a 100% weld during
calibration, check the power at the female end
of the cord and determine what else is running
on the same circuit.
Power output may be diminished if:
• The cord is too long.
• The power source is
overloaded.
TIP
Cord length must not exceed 100-ft. (30 m)
STEP 4
BOND THE MEMBRANE
Set tool to Energy Setting that provided a
100% bond.
Several settings may yield a 100% bond. If this happens,
select the energy level setting in the middle.
Center the calibrated Handheld tool over the first plate.
Activate the weld. Press and release the weld button.
Immediately place magnetic heat sink over the
welded plate.
RhinoBond Hand Welder Owner’s Manual Page 5
Press and release
Press and release
Repeat process for each plate.
TOOL ALIGNMENT TIPS
For optimum bonding, the RhinoBond Hand Held
tool should be perfectly centered over the in-
stalled RhinoBond Plate. Here are a few tips to
aid in the alignment process:
1) Locate the plate and put a small mark on the
membrane (non permanent) at the 12 o’clock and
9 o’clock (or 3 o’clock) positions as shown in the
diagram. Match the lines on the front and side of the
tool base with the centering marks on the membrane
to align the tool.
Or
2) Locate the plate and place your hand flat on
the membrane with your thumb pointed at the
9 o’clock (or 3 o’clock) position of the plate as
shown in the diagram. Place the tool so the centering
mark on the side of the base is directly opposite
your thumb.
TOOL MAINTENANCE
& STORAGE
Your RhinoBond Hand Welder is designed to require
minimal maintenance. Prior to use, always check
the condition of the tool, looking for cracks in the
housing, cord damage and the like.
While not in use, the RhinoBond Hand Welder
should be stored in its case and kept in a dry
environment.
RHINOBOND
WELD TEST
To determine if a weld has been made, place
the commercially available suction pad next to a
welded plate and create enough suction to lift
the membrane. A weld will crease the membrane
as shown. If the assembly is not welded, the
membrane will lift up from the plate.
Mark any plates that are not welded as a
reminder to complete the weld.
RHINOBOND PRODUCT
LABEL
100 - 230 Vac, 50-60 Hz, 15A rms
HW10001
Tested To Comply
with FCC Standards
U.S. Patent NO. 6,710,314 and 6,849,837
Canadian Patent NO. 2,458,353
U.S. Patent Pending
OMG, Inc. (413) 789-0252 WWW.OMGROOFING.COM
Manufactured by OMG, Inc.
Model #: RBHW1
Year: 2017
Weight: 6 lbs. / 2.72 Kg
PEFC: 151 Amps
Elec. Dwg #: Rev. 0
(25 June 2017)
5
6
7
9
10
1). Machine type 6) Model number
2). Serial number 7) Year of manufacture
3). Technical data 8) Weight
4). CE, FCC 9) Potential Earth Fault Current
5). Patent numbers 10) Electrical Drawing #
RhinoBond Hand Welder Owner’s Manual Page 6
DISPOSAL
RhinoBond tools should never be disposed of with household refuse. Always dispose of this and other
electronic equipment according to local, state and federal regulations.
Dispose of this product in accordance with the National regulations of the End User. This may
include the RoHS Directive 2011/65/EU (Restriction of the use of certain hazardous substances in electrical &
electronic equipment) and the WEEE Directive 2012/19/EU (Waste Electrical & Electronic equipment).
BOND RESULTS
PLATE VIEW
MEMBRANE
DELAMINATION
TOP OF
MEMBRANE
100% BOND
Total, even, consistent 360° adhesion of membrane. Plate makes a visible
impression on the top of the membrane.
PARTIAL BOND
Uneven/incomplete adhesion of membrane. Energy setting may be too
low, tool may be off-center, or plate may be overdriven.
EXCESSIVE HEAT
Membrane may turn yellow, melt or become blistered and adhesive
may char.
ORDERING INFORMATION
SKU DESCRIPTION WEIGHT COUNTRIES SERVED
RB-HandWelder RhinoBond HandHeld Tool 6 lbs (2.72 kg) See Below
RBM003A-10pk
RhinoBond 10 Pack Magnet Set
40 lbs (18.14 kg) See Below
RBPLUGKIT-F16A Type F Plug Kit 0.5 lbs (0.23 kg) Netherlands, Germany, Spain, Greece
RBPLUGKIT-G13A Type G Plug Kit 0.5 lbs (0.23 kg) Hong Kong
RBPLUGKIT-I10A Type I (10A) Plug Kit 0.5 lbs (0.23 kg) China
RBPLUGKIT-I15A Type I (15A) Plug Kit 0.5 lbs (0.23 kg) Australia, New Zealand
RBPLUGKIT-IEC60309 Type IEC60309 Plug Kit 0.5 lbs (0.23 kg) United Kingdom (UK), Ireland
CE DECLARATION OF CONFORMITY
- Manufacturer: OMG Roofing Products, Inc.
- Product Model: RhinoBond®Hand Welder
- Product Serial Number, unique identifier or Batch Code: RB-Hand Welder
- Product Description: HW XXXXX
We, as the manufacturer, hereby declare that the Products described above are in
conformity with the applicable requirements in accordance with the following
European Directive(s):
Low Voltage Directive 2014/35/EU
EMC Directive 2014/30/EU
The object of the declarations described above is in conformity with the relevant Union harmonization
legislation. This declaration of conformity is issued under the sole responsibility of the manufacturer for
the aforementioned product(s).
The following Harmonized Standard(s) and normative references were complied with -
EN IEC 60204-1:2006 + AC/2010 – Electrical equipment of machines - Part 1: General requirements
EN 55011: 2010 – EMC - ISM RF Equipment Class A
EN 61000-3-2: 2014 – EMC – Harmonics
EN 61000-3-3: 2013 – EMC - Flicker
European person authorized to compile the Technical File, on behalf of the Manufacturer, is:
Mrs. Dianne Cowley
Laicon Consulting Services Ltd
300 Pennistone Road
Sheffield S6 2FU England
Signed for and on behalf of:
OMG Roofing Inc.
153 Bowles Road
Agawam, MA 01001, USA
Name of signatory: Chris Mader
Function/Position: Codes Engineer, OMG Roofing Products
ORIGINAL DECLARATION OF CONFORMITY
RhinoBond Hand Welder Owner’s Manual Page 7

Other OMG Welding System manuals

OMG RhinoBond User manual

OMG

OMG RhinoBond User manual

OMG RhinoBond RB7 User manual

OMG

OMG RhinoBond RB7 User manual

Popular Welding System manuals by other brands

Lincoln Electric PIPELINER 200G Operator's manual

Lincoln Electric

Lincoln Electric PIPELINER 200G Operator's manual

Telwin SUPERTIG 280/1 instruction manual

Telwin

Telwin SUPERTIG 280/1 instruction manual

Kemppi Minarc Mig Evo 200 operating manual

Kemppi

Kemppi Minarc Mig Evo 200 operating manual

Svarog ARC 160-PFC user manual

Svarog

Svarog ARC 160-PFC user manual

Miller Electric Gas Cylinder Rack owner's manual

Miller Electric

Miller Electric Gas Cylinder Rack owner's manual

Lincoln Electric RANGER 305D SVM175-A Service manual

Lincoln Electric

Lincoln Electric RANGER 305D SVM175-A Service manual

STEINEL PROFESSIONAL HG Roof Information

STEINEL PROFESSIONAL

STEINEL PROFESSIONAL HG Roof Information

BOC C-DW owner's manual

BOC

BOC C-DW owner's manual

CARBONE Digi-Tig320ACDC Operator's manual

CARBONE

CARBONE Digi-Tig320ACDC Operator's manual

PERKEO ECONOMY operating manual

PERKEO

PERKEO ECONOMY operating manual

ESAB Warrior 750i CC/CV instruction manual

ESAB

ESAB Warrior 750i CC/CV instruction manual

Weldability ARC200S instruction manual

Weldability

Weldability ARC200S instruction manual

STAMOS S-MULTI 250 M user manual

STAMOS

STAMOS S-MULTI 250 M user manual

Miller XMT 304 owner's manual

Miller

Miller XMT 304 owner's manual

Miller XMS 425 MPa CE owner's manual

Miller

Miller XMS 425 MPa CE owner's manual

Pro Spot Hybrid Series Upgrade instructions

Pro Spot

Pro Spot Hybrid Series Upgrade instructions

Lincoln Electric P223 FLUX Specifications

Lincoln Electric

Lincoln Electric P223 FLUX Specifications

BOC MIG 250C operating manual

BOC

BOC MIG 250C operating manual

manuals.online logo
manuals.online logoBrands
  • About & Mission
  • Contact us
  • Privacy Policy
  • Terms and Conditions

Copyright 2025 Manuals.Online. All Rights Reserved.