OMG RhinoBond User manual

Seam Mode
OFF On
Device Ready
Mode
OptiWeld
Membrane
PVC 60 mil
Activations Today
0
RB1044USA Rev. 02222022
153 BOWLES ROAD, AGAWAM, MA 01001 USA
800.633.3800 413.789.0252 RHINOBOND.COM
Non-penetrating fastening system
for commercial roofing
IMPORTANT!
Save this manual
and read it in full
before use.
OWNER’S MANUAL
Now with advanced OptiWeld Technology for
optimum plate bonding and performance!

THE RHINOBOND SYSTEM WARRANTY
Guaranteed for 200,000 cycles of operation, or three years from date of purchase,
whichever comes first. During this period OMG, Inc., at its option, will repair or replace
any tool for the roofing contractor who originally purchased the tool. This will be done
free of charge, provided the tool is determined defective in materials or workmanship
upon examination by an Authorized RhinoBond System Service Technician.
This Warranty will be honored only if:
A. No evidence of abuse, misuse or failure to follow safety or operating instructions, or
improper modification of the tool, is present. (Read this Owner’s Manual for safe use
and proper operating instructions.)
B. When replacement is necessary, the first end-user returns the tool with transportation
prepaid, to the nearest Authorized RhinoBond System Service Technician with
purchase receipt or other positive proof of purchase.
C. Only genuine RhinoBond tool, fasteners, and plates are used in the application.
THE FOREGOING WARRANTY IS IN LIEU OF ALL OTHER WARRANTIES. ALL OTHER
WARRANTIES, WHETHER ORAL, WRITTEN, EXPRESS OR IMPLIED, INCLUDING BUT NOT
LIMITED TO THE IMPLIED WARRANTIES OF MERCHANTABILITY AND FITNESS FOR A
PARTICULAR PURPOSE SHALL NOT APPLY. THESE OTHER EXPRESS OR IMPLIED WARRANTIES
ARE SPECIFICALLY EXCLUDED. BUYER’S OR USER’S REMEDIES ARE SOLELY AND EXCLUSIVELY
AS STATED HEREIN. OMG, INC. SHALL IN NO EVENT BE LIABLE FOR INCIDENTAL,
CONSEQUENTIAL, INDIRECT OR SPECIAL DAMAGES RESULTING FROM FAILURE OF THIS
WARRANTY. IN NO EVENT, WHETHER AS A RESULT OF BREACH OF CONTRACT, WARRANTY,
TORT (INCLUDING NEGLIGENCE) OR OTHERWISE, SHALL OMG, INC.’S LIABILITY TO THE
BUYER OR USER OF THE TOOL OR ANY LOSS OR DAMAGE ARISING OUT OF THE BREACH
OF WARRANTY, CONTRACT OR TORT, EXCEED THE PURCHASE PRICE HEREIN. ANY CLAIM
OR LIABILITY SHALL IN ANY EVENT TERMINATE UPON THE EXPIRATION OF THE WARRANTY
PERIOD SPECIFIED ABOVE.
INTRODUCING THE RHINOBOND®SYSTEM
Congratulations! The RhinoBond System is one of the industry’s most advanced fastening systems for
installing thermoplastic membrane roofing and, in Europe only, “approved” clean EPDM membrane*.
RhinoBond is a portable, easy-to-use, system that secures membrane to roofing substrates using micropro-
cessor-controlled induction welding.
Roofing installed this way has several benefits:
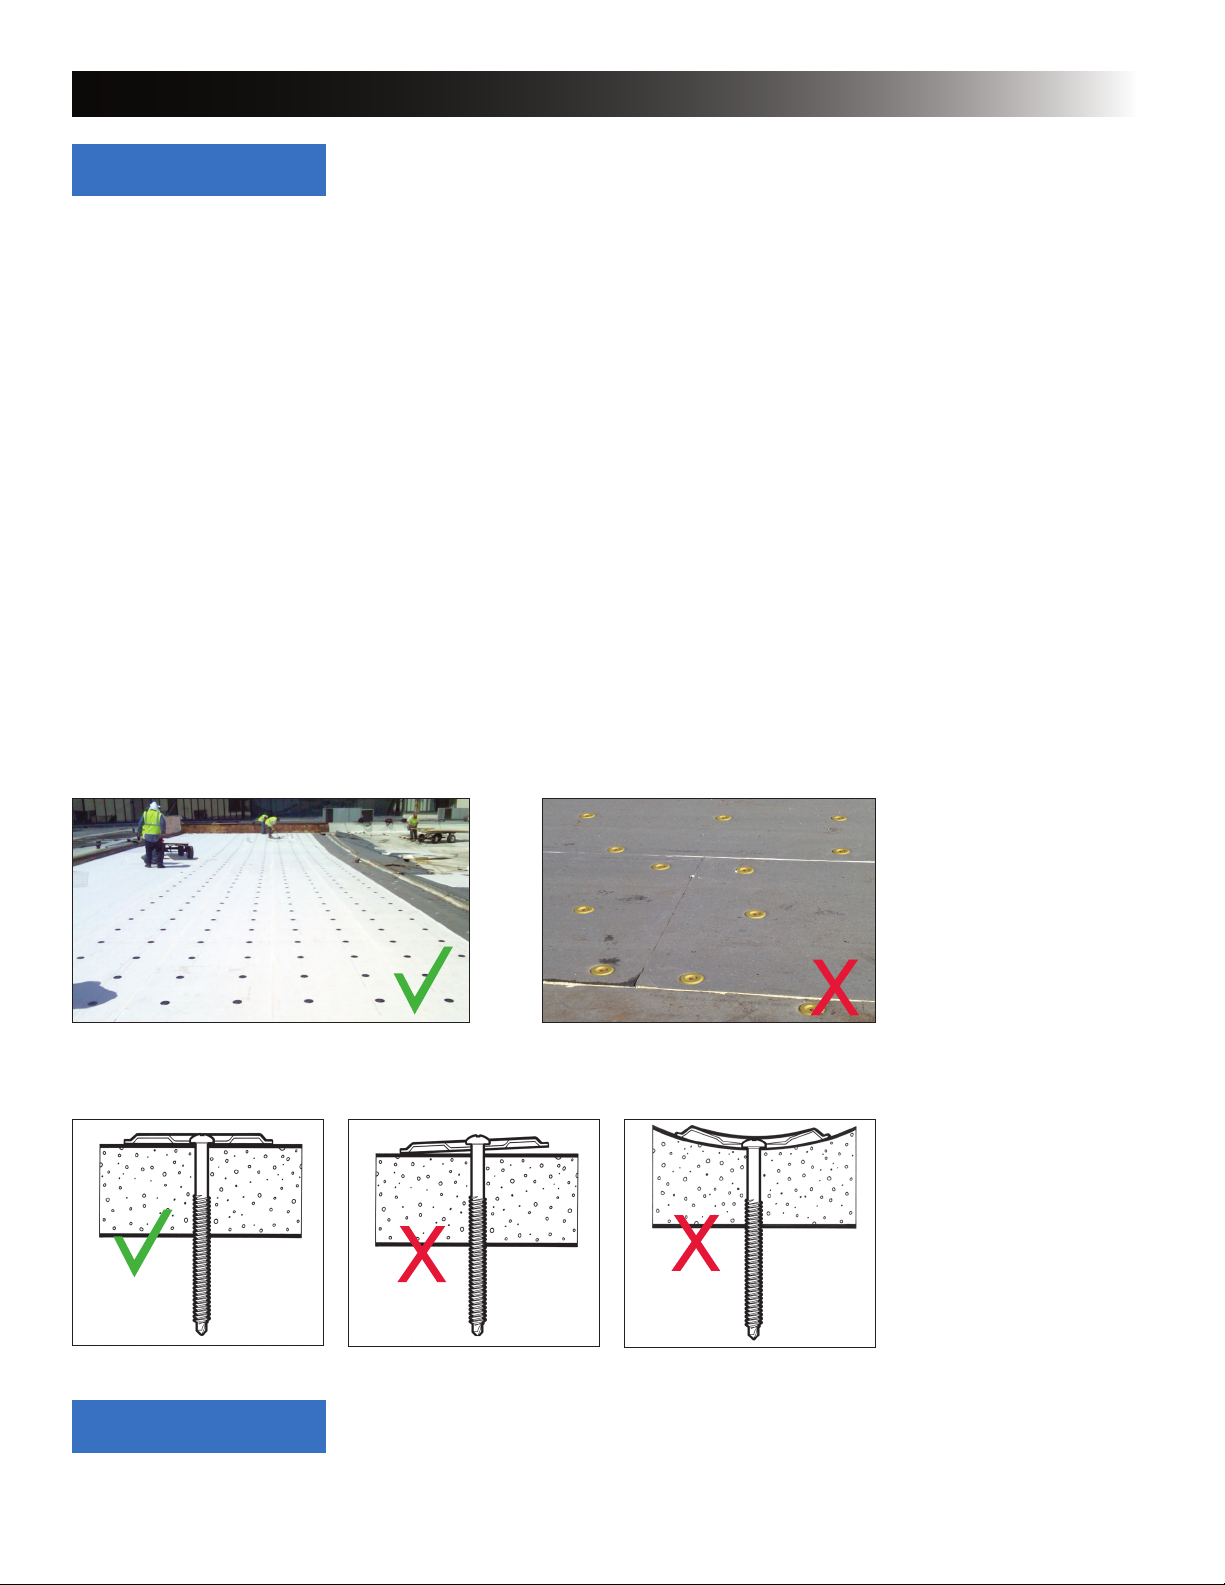
• Fewer Fasteners -- RhinoBond requires 25-50% fewer fasteners vs. mechanical attachment to meet FM
1-90 and Eurocode National wind uplift requirements.
• Zero Penetrations – The fasteners and plates used are all installed under the membrane, so with
RhinoBond there are no membrane penetrations or potential points of entry for moisture.
• Less Seaming – RhinoBond does not require any half-sheets, just full width membrane everywhere. This
can eliminate up to 30% of the seams when compared to a traditional mechanically attached system.
• Superior Wind Performance – The RhinoBond System has higher wind uplift resistance with fewer
fasteners and fewer seams when compared to mechanically attached roofs.
The RhinoBond system uses powerful induction technology to create a strong bond between the roofing
membrane and fastening plates. The technology that makes this possible, SINCH®Technology, is a compact
microprocessor-controlled electromagnetic induction bonding process. Today, this rugged technology is being
used to revolutionize industrial and consumer applications.
While RhinoBond is a safe, tested tool, we caution you to be sure that every member of your crew has a
thorough understanding of the RhinoBond System before attempting to use it. Read, understand and follow
all instructions.
Congratulations on your new purchase. We look forward to your feedback. Please send us your
comments and suggestions at any time.
RhinoBond Team
800.633.3800 | 413.789.0252 | www.rhinobond.com
*Clean EPDM Membrane -- currently there are a limited number of clean EPDM options available only in Europe and approved for
use with RhinoBond. Always verify membrane suitability and approvals with membrane supplier. RhinoBond is not suitable for use
with other EPDM membrane.
© Copyright 2020 OMG, Inc. All rights reserved.
RhinoBond®and SINCH Technology®are registered trademarks, OptiWeld™ is a trademark of OMG, Inc., a leading provider of
innovative fastening solutions and products for the construction industry.
PATENT NOTICE: U.S. Patent Nos. 6,710,314; 6,849,837; 7,399,949; 8,492,683; 8,933,379; 10,925,124.
Canadian Patent Nos. 2,458,353; 2,602,753.
Contact OMG Roofing Products or your roofing membrane manufacturer for the most current list of approvals.
TABLE OF CONTENTS
2 Table of Contents
Introducing the RhinoBond System
The RhinoBond System Warranty
3 Safety Instructions
5 Intended Use
Power Requirements
6 System Description
7 Safe Start UP and Shut Down
8 Tool Operation
Touch Screen Calibration
Select Language
9 Automatic Calibration
11 Manual Calibration
13 Menu Settings & Help
16 EC Declaration of Conformity
RhinoBond Owner’s Manual - Page 2

IMPORTANT SAFETY INSTRUCTIONS
Read and follow all instructions before using the RhinoBond Induction Welding Tool. Failure to follow all instructions could result in property damage, electric
shock, death or serious personal injury. This manual does not cover all possible conditions that may occur. Contact OMG Roofing Products about issues that are
not addressed in this manual, or that you do not understand.
Below are the safety alert symbols used in this manual, which alert you to potential hazards. Each includes the safety symbol and a signal word, which is defined
as follows:
DANGER
WARNING
CAUTION
NOTICE
DANGER indicates a hazardous situation which, if not avoided, will result in
death or serious injury.
NOTICE is used to address practices not related to physical injury.
CAUTION indicates a hazardous situation which, if not avoided, will result in
minor or moderate injury.
WARNING indicates a hazardous situation which, if not avoided, could result in
death or serious injury.
SAVE THIS MANUAL FOR FUTURE REFERENCE
If you have any questions or comments about this or any OMG Roofing Products tool, call us at 800-633-3800, or 413-789-0252.
WARNING READ ALL SAFETY WARNINGS AND ALL INSTRUCTIONS. FAILURE TO FOLLOW THE WARNINGS
AND INSTRUCTIONS MAY RESULT IN ELECTRIC SHOCK, FIRE AND/OR SERIOUS INJURY.
WARNING
1. WORK AREA SAFETY
a) Keep work area clean and well lit. Cluttered or dark areas invite accidents.
b) Do not operate power tools in explosive atmospheres, such as in the presence of flammable liquids, gases or dust.
Arcing could occur which could ignite the dust or fumes.
c) Keep children and bystanders away while operating a power tool. Distractions can cause loss of lose control,
or serious injury.
WARNING
2. ELECTRICAL SAFETY
a) Power tool plugs must match the outlet. Never modify the plug in any way. Do not use any adapter plugs with earthed
(grounded) power tools. Unmodified plugs and matching outlets will reduce risk of electric shock.
b) Avoid body contact with earthed or grounded surfaces such as pipes, HVAC equipment, or lightning protection
equipment. There is an increased risk of electric shock if your body is earthed or grounded.
c) Do not expose power tools to rain or wet conditions. Water entering a power tool will increase the risk of
electric shock.
d) If operating a power tool in a damp location is unavoidable, use a ground fault circuit interrupter (GFCI) protected
supply. Use of a GFCI reduces the risk of electric shock.
e) Do not abuse the cord. Never use the cord for carrying, pulling or unplugging the power tool. Keep cord away from
heat, oil, sharp edges or moving parts. Damaged or entangled cords increase the risk of electric shock. If cord is
damaged, discontinue use immediately and contact OMG Roofing Products at 413.789.0252 for repair information.
f) When operating a power tool outdoors, use an extension cord suitable for outdoor use. Use of a cord suitable for
outdoor use reduces the risk of electric shock. See the ‘Power Requirements Chart’ on Page 5 for details.
The term “Power tool” in the warnings refers to your electric (i.e. corded) power tool.
RhinoBond Owner’s Manual - Page 3

WARNING
3. PERSONAL SAFETY
a) Stay alert, watch what you are doing, and use common sense when operating a power tool. Do not use a power tool
while you are tired or under the influence of drugs, alcohol or medication. A moment of inattention while operating
power tools may result in serious personal injury.
b) Use personal protective equipment. Always wear eye protection. Other protective equipment such as a nonskid safety
shoes, hard hat, hearing protection, and/or dust mask used for appropriate conditions can reduce personal injuries.
c) Prevent unintentional starting. Do not connect to the power source until you are ready to use the tool. Energizing the
tool too early can invite accidents.
d) Do not overreach. Keep proper footing and balance at all times. This enables better control of the power tool in
unexpected situations.
WARNING
4. POWER TOOL USE AND CARE
a) Do not force the power tool. Use the correct power tool for your application.
b) Disconnect the plug from the power source before inspecting, cleaning or storing power tools. Such preventive safety
measures reduce the risk of activating the tool accidentally.
c) Store power tools out of the reach of children and do not allow persons unfamiliar with the power tool or these
instructions to operate the power tool. Power tools are dangerous in the hands of untrained users.
d) Maintain power tools. Check for cracked or broken parts or any other condition that may affect the power tool’s
operation. If damaged, have the power tool repaired before use. Many accidents are caused by poorly maintained
power tools. Contact OMG Roofing at 800.633.3800 or 413.789.0252 for details.
e) Use the power tool, in accordance with these instructions, taking into account the working conditions and the work to
be performed. Use of the power tool for operations different from those intended could result in an injury.
WARNING
5. INDUCTION TOOL USE
a) Do not touch welded plate until a magnetic cooling clamp has been applied to the plate and allowed to cool for at
least 5 minutes after the weld cycle. Welded plates are very hot and touching them can result in severe burns.
b) Do not activate tool over power cords, or any metal objects including keys, safety shoes with metal inserts, jewelry,
watches, etc.
c) Always maintain a space of at least 6-inches (15 cm) between the bottom of the tool and any metal objects other than
the target RhinoBond Plate during activation.
d) Do not use this tool if you have a pacemaker, surgical implant, prosthesis or other medical device unless cleared by a
medical professional. The RhinoBond tool may interfere with proper medical device operation.
e) This tool is not intended for use by persons with reduced physical, sensory or mental capabilities, or lack of experience
and knowledge.
CAUTION
• In addition to the safety instructions in this manual, OMG Roofing Products recommends that all
roof top workers follow the safety guidelines outlined in the OSHA booklet called “Protecting Roofing
Workers” available at www.osha.gov/Publications/OSHA3755.pdf and or EU-OSHA “Directive
92/57/EEC - Temporary or mobile construction sites,” as applicable.
RhinoBond Owner’s Manual - Page 4

Generators should be 5,000 watt (minimum) in good working order. “Auto throttle” and/or “auto idle”
switches MUST be in OFF position.
RhinoBond tools are designed to run on 100–240V. Use a true RMS multimeter to verify voltage at both
the generator, and at end of extension cord.
12 gauge (minimum), 100-feet (maximum) extension cord per RhinoBond Tool. Inspect power cords
regularly for signs of damage; replace as necessary.
Safely operate a maximum of two RhinoBond tools per 5,000 watt generator, with each tool plugged into
a separate 20A, GFCI circuit.
Dedicated power source: No other equipment should be plugged into RhinoBond generator during operation!
DO NOT plug the tools into a pigtail. DO NOT plug RhinoBond tools into a 15A GFCI adaptor.
POWER REQUIREMENTS CHART
REGION USA / CANADA UK / IRELAND NETHERLANDS
AND REST OF EUROPE CHINA
POWER REQUIREMENTS 120V / 20A / 50-60 Hz 110-230V / 16 A / 50-60 Hz 220-230V / 10 A / 50-60 Hz 220V, 50Hz
EXTENSION CORD 12 gauge (min.), 100-ft. (max.) 110V, 2.5mm X 30m 16A (230V 3x15), 30m 10A, 30m
PORTABLE GENERATOR
POWER SOURCE
5,000W min. with (2)
20A GFCI Circuits
2.5 KVA min. with 16Amp (110V)
protected circuit
2.5 KVA min. with 10Amp (230V)
protected circuit
Honda EU20i 1.6 KVA w/ 8 Amp
(230V) protected circuit
# RhinoBond tools per
GENERATOR * 2 1 1 1
INTENDED USE
The RhinoBond System is intended for installing thermoplastic (i.e. TPO and PVC) and “Clean EPDM” roofing membranes on commercial, industrial, institutional
and appropriate residential roofs. Its sole purpose is to bond, by induction means, the bottom side of the roofing membrane to a washer or plate installed to hold
insulation and other roofing components in place and serve as an attachment point for the induction welding process. Only fasteners, washers and tubes provided
by OMG Roofing Products are approved for use with the RhinoBond System. Do not use this tool for any other purpose.
The RhinoBond Tool is designed to operate on universal power, from 100 to 240 Volt sources. See the power requirements chart below for your region.
NOTICE
RhinoBond Owner’s Manual - Page 5

Seam Mode
OFF On
Device Ready
Mode
OptiWeld
Membrane
PVC 60 mil
ActivationsToday
0
Heat Sinks
(6 included with a
carrying case)
Activation
Button
Touchscreen
Display
Power Cord
Height
Adjustment
for Handle
Induction
Coil
Handle
RhinoBond with OptiWeld Tool
with carrying case
THE RHINOBOND SYSTEM
RhinoBond Owner’s Manual - Page 6

Unstable generator power during start-up or shut-down increases the risk of damage to RhinoBond Tools. Failure to follow
these instructions may result in damage to your RhinoBond tool.
• NEVER start or stop a generator with a RhinoBond tool plugged in.
• ALWAYS start the generator first and confirm that the generator is running at full speed and delivering stable power before plugging in the
RhinoBond tool.
• Start portable generator and allow it to warm up for two (2) minutes. The Auto-Throttle, Auto-Idle and/or Eco-Idle switches must all be in
the OFF position.
• WHEN NOT IN USE, unplug the tool.
• Simply unplug the RhinoBond tool to shut down.
• ALWAYS unplug the RhinoBond tool BEFORE TURNING OFF/ POWERING DOWN the generator.
INSULATION COMPATIBILITY
RhinoBond is compatible with polyisocyanurate, mineral wool, and hard cover boards as well as any insulation that will not melt by the induction welding process.
When using RhinoBond over XPS or EPS, use a minimum 1/4-in. (6 mm) thick cover board or 4-in. (102 mm) diameter cardboard discs under each plate to protect the
insulation from melting. On foil faced insulation, the recommended minimum cover board is 1½-in. (38 mm).
Metal Deck
A minimum of 1½-inches (38 mm) of insulation over a metal deck is required for proper tool operation.
PROPER FASTENER INSTALLATION
Always follow the roof system manufacturer’s fastening patterns for field, perimeter, and corner areas needed to achieve desired wind ratings
(i.e.: FM 1-90, FM 1-120, etc.).
Fasteners installed in a straight row in at least one direction with even spacing makes locating fasteners under the membrane easier and speeds installation.
Snap chalk lines to lay-out fastener grid pattern for field, perimeters, and corners.
Fasteners must not be overdriven. Plates should be tight enough that you cannot turn them with your hand. Overdriven fasteners are harder to find and may
result in a poor or partial bond.
SAFE START UP & SHUT DOWN
NOTICE
UV EXPOSURE
RhinoBond Plates must be protected from prolonged UV (ultra-violet) sun exposure for best results. Installed RhinoBond plates
must be covered with membrane by the end of each workday. Keep RhinoBond buckets covered when not retrieving plates.
Too tight;
insulation
buckles
Proper
installation Too loose;
plate spins
NOTICE
RhinoBond Owner’s Manual - Page 7

TOOL OPERATION
GET COMFORTABLE!
You are likely going to be using the RhinoBond Tool for several hours at a time. Make sure that the tool is set for your height and comfort level.
Adjust the handle height of the RhinoBond tool by loosening the clamps on both
sides of the handle. Gently adjust the handle position up or down for maximum
comfort. Lock the clamps into position and tighten, and you’re ready to go!
Avoid over-extending the handle by adjusting it slowly. Over-extending the handle can damage the activation button wiring and your RhinoBond tool.
When first powering up the RhinoBond tool, the main screen will show a status bar indicating tool startup progress.
If necessary, you can calibrate the touch screen at this time. To do so, touch this screen once to begin the calibration
process (see below).
Once startup is complete, the screen will display the “Language” selection screen.
TOUCH SCREEN CALIBRATION
Follow the on-screen instructions. Tap the dot when prompted. Three points of calibration are required to complete the process.
When complete, the tool will return to the “Start-Up” screen and when start-up is complete, display the “Language” selection screen.
SELECT LANGUAGE
Press the appropriate language button to select the desired language.
Once selected, the tool will display the “Ready Screen” in the chosen language.
NOTICE
RhinoBond Owner’s Manual - Page 8

AUTOMATIC CALIBRATION
The new RhinoBond Tool features “OptiWeld” automatic calibration for optimum welding.
When set in OptiWeld mode, the “Mode” button displays OptiWeld. Membrane type and thickness and fine adjust settings
are also displayed. Pressing the “Mode” button allows users to toggle between “OptiWeld” and “Manual” operating mode.
Pressing the “Membrane” button allows users to adjust the “OptiWeld” settings.
From the “Device Ready” screen, press the “Membrane” button and select the type (TPO or PVC) and thickness
(45, 60, 80 mil) of the membrane you are installing.
Press “Save” to return to the “Device Ready” screen.
Activations Log: The “Activation Today” button displays the number of weld cycles performed on that calendar
day. Pressing this button will open the tool log, where a history of weld cycles can be reviewed.
Power Display: The Power Display shows the line voltage the tool is receiving from the power source.
The tool requires a minimum of 100 volts to operate effectively.
Menu: Pressing this button will open the menu screen.
Once the tool settings are complete and accurate for the membrane type and thickness being installed, the tool is ready
to weld.
To activate the tool, place the tool over the plate by aligning the target area on the base of the tool directly over the
plate to be welded. The tool should be centered over the RhinoBond plate for an optimum weld.
When the tool is aligned over the plate, press the activation button, also called the trigger, located on the handle of
the tool.
The display will indicate the tool is in activation mode and show a progress bar.
When the weld is complete, the RhinoBond tool will emit a beep, provided that the sound is turned on
(see Page 11), and display the “Activation Done” screen.
The screen will automatically return to the “Device Ready” screen for the next weld.
RhinoBond Owner’s Manual - Page 9

AUTOMATIC CALIBRATION
Before initiating work on the roof, we highly recommend that you complete a few test welds to ensure that the tool is functioning properly.
To check the quality of the calibration, place three (3) plates on insulation about 10-inches (25 cm) apart. Cover the plates
with a piece of membrane from the project, weld each plate, and apply a magnetic heat sink to each.
Allow plates to cool to the touch (approx 5 minutes) -- before removing the magnetic heat sinks. Turn the membrane over to
reveal the welded plates, and use pliers to peel each plate off to confirm the quality of the welds.
CAUTION
Do not touch welded plate until a magnetic cooling clamp has been applied to the welded plate and allowed to cool down for at least 5 minutes after the weld cycle.
Welded plates are very hot and touching them can result in severe burns.
The image to the left shows a 100% bond. If you do not get a 100% bond, use the OptiWeld
Adjustment feature to adjust the target Energy Setting to optimize the weld.
See ‘Manual Calibration’ information on Page 11 for details.
100% bond
RhinoBond Owner’s Manual - Page 10

MANUAL CALIBRATION
We recommend using the tool in OptiWeld mode, but recognize that you may want to adjust the weld settings from time to time, so we’ve made it easy to do that.
Here’s how:
From the “Device Ready” screen, press the “Mode” button, and select the “Manual” option.
Select the “Manual” option.
The “Energy Level” button displays the current energy setting that will be delivered to the RhinoBond plate.
To adjust the “Energy Level” setting, push the plus (+) or minus (-) buttons.
Push the “Save” button once the energy setting is set.
The screen will automatically return to the “Device Ready” screen.
The “Device Ready” screen will display the current energy setting (i.e. +5).
In addition, you’ll see that the tool is in “Manual” mode, and can see the current power/voltage display and the
day’s activations.
Press the trigger on the handle to activate the weld cycle.
Once the weld is complete, the RhinoBond tool will emit a beep, provided that the sound is turned on (see pg 11)
and display the”Activation Done” screen.
The tool will automatically return to the “Device Ready” screen for the next weld.
RhinoBond Owner’s Manual - Page 11

MANUAL CALIBRATION TEST WELDS
When calibrating the RhinoBond Tool manually, it’s important to set -- and test -- the tool at several Energy Levels to determine which setting provides the best weld.
To calibrate the tool, place at least five (5) plates on insulation about 10-inches (25 cm) apart, and cover the plates with a
piece of membrane from the project.
Calibration videos available on line at OMGRoofing.com.
Set the energy setting to the lowest setting that you think will provide a complete bond (e.g. level #0) and weld the
first plate.
Productivity Tip:
Tracing the base of the tool with a grease pencil will help you judge your accuracy in centering the coil over the plate.
At the end of the weld cycle, place a magnetic cooling clamp on the plate, and mark the energy setting on the
membrane for reference.
Adjust the “Energy Level” to the next higher setting, and repeat the test weld process until all five plates are
welded with increasingly higher energy levels.
Allow the plates to cool to the touch - at least 5 minutes - before removing the magnetic heat sinks.
Use pliers to peel each plate off to review the quality of the welds.
100% BOND
Look for total, even, and consistent 360° adhesion of membrane. The welded plate should make a visible impression
on the top of membrane, and the membrane should delaminate to the scrim in a fairly complete circle/donut.
Look at the reference “Energy Levels” you marked for each test weld and determine which setting provided a 100%
bond. Re-set the tool to that setting.
Remember if you are working in “Manual” Mode you’ll need to adjust the calibration whenever the temperature on
the roof changes by 15°F or more (8°C or more).
RhinoBond Owner’s Manual - Page 12

MENU SETTINGS & HELP
The main “Menu” provides access to “Settings,” the “Tool Log,” and “Help” buttons.
Press the “Settings” button to change the “Language,” “Display,” and/or “Sound,” settings.
Press the “Language” button to change the screen language.
Select desired language for the tool.
Once selected, the screen will return to the “Device Ready” screen.
Select the “Display” button to adjust the screen brightness. Press the sun icons on either side of the bar to
increase or decrease the screen brightness.
Once selected, press the “Save” button to return to the “Device Ready” screen.
Push the back arrow (<) to return to the previous screen.
Press the “Sound” button to change the “Activation Complete” tone. The sound can be enabled by press-
ing the “On” button and disabled by pressing the “Off” button.
You have a choice of two different tones. Press the “Tone 1” or “Tone 2” button to make your selection.
Once the sound has been set, press the “Save” button to return to the Device Ready screen.
Push the back arrow (<) to return the previous screen.
From the main “Menu” screen press the “Tool Log” button to review weld cycle information.
Press the “Activations by Date” button to review the number of weld cycle activations by date.
Once the log has been reviewed, press the back arrow (<) to return to the previous screen.
The “Highest Line Voltage” indicates the highest line voltage seen by the tool since the last factory reset.
RhinoBond Owner’s Manual - Page 13

The table will show the date, welds completed (check mark) and welds with an error message.
Each line of the table indicates a tool setting; any change to tool settings will create a new line in the tool log
for that calendar date.
The “Activations by Date” value shows the cumulative number of weld cycles the tool has complete
since the last factory reset.
Press the “Home” button to return to the “Device Ready” screen.
Press the back arrow (<) to return to the previous screen.
From the main “Menu,” press the “Help” button to access OMG Roofing Products contact information,
troubleshooting tips, and a description of error messages.
Press the “Instructions” button to access a link to a digital version of the RhinoBond user manual.
Use a smartphone to read the QR code which will open an online RhinoBond manual.
Press the “Home” button to return to the “Device Ready” screen.
Press the back arrow (<) to return to the previous screen.
RhinoBond Owner’s Manual - Page 14

From the main “Menu,” press the “Help” button to review the “Troubleshooting” tips, and error message descriptions.
Press any of the error message buttons to get more information and recommendations.
Press the back arrow (<) to return to the previous screen.
Trigger
RhinoBond Owner’s Manual - Page 15

EC DECLARATION OF CONFORMITY
This is the Manufacturer’s Declaration of Conformity which declares that the RhinoBond Induction
Welding Tool, model number(s) listed below, complies with the essential health and safety requirements
of the European Community Directives, including the latest amendments, as provided below.
Machine Description: RhinoBond®Induction Welding Tool
Model #: RhinoBond with OptiWeld, RhinoBond Classic
Item #: RBT007, RBT005
Manufactured by: OMG Roofing Products, Inc.
Directive(s): Low Voltage Directive (LVD) 2006/95/EC
The following harmonized standards were applied:
• LVD EN60335-1:2012 +A11 (2014)
EN60335-2-45:2002 +A2 (2012)
RhinoBond®Induction Welding Tools wielding the CE Mark comply with these harmonized standards.
Date of first use: January, 2015.
Signed: ____________________________________ Date: ___________________________
Name: Chris Mader Position: Codes Engineer, OMG Roofing Products
Authorized responsible person to compile the technical file, established in Europe:
Mrs. Dianne Cowley
Laicon Consulting Services Ltd
300 Penistone Road
Sheffield S6 2FU England
1 March 2015
OMG Roofing Products
153 Bowles Road, Agawam, MA 01001 USA
800.633.3800 +1.413.789.0252
www.rhinobond.com
RhinoBond Owner’s Manual - Page 16

DECLARACIÓN DE CONFORMIDAD DE CE
Esta es la “Declaración de conformidad” del fabricante que declara que el aparato de soldadura por
inducción RhinoBond, número(s) de modelo especificado(s) a continuación, cumple con los requisitos
esenciales de salud y seguridad establecidos en las Directivas de la Comunidad Europea, incluyendo las
últimas enmiendas, según se dispone a continuación.
Descripción de la máquina: Aparato de soldadura por inducción RhinoBond®
Modelo N.º: RhinoBond con OptiWeld, RhinoBond Classic
Artículo N.º: RBT007, RBT005
Fabricado por: OMG Roofing Products, Inc.
Directiva(s): Directiva de baja tensión (LVD) 2006/95/CE
Se aplicaron las siguientes normas armonizadas:
• LVD EN60335-1:2012 +A11 (2014)
EN60335-2-45:2002 +A2 (2012)
Los aparatos de soldadura por inducción RhinoBond®que hacen uso de la marca CE cumplen con estas
normas armonizadas. Fecha de primer uso: enero de 2015.
Firmado: ___________________________________ Fecha: __________________________
Nombre: Chris Mader Puesto: Ingeniero de códigos, OMG Roofing Products
Persona autorizada responsable de elaborar el expediente técnico con domicilio en Europa:
Sra. Dianne Cowley
Laicon Consulting Services Ltd
300 Penistone Road
Sheffield, S6 2FU, Inglaterra
1 de marzo de 2015
OMG Roofing Products
153 Bowles Road, Agawam, MA 01001 USA
800.633.3800 +1.413.789.0252
www.rhinobond.com
Manual Del Propietario - Página 16Manual Del Propietario - Página 16

En el “Menú” principal, presione el botón “Ayuda” para revisar los consejos de “Solución de problemas” y las
descripciones de los mensajes de error.
Presione cualquier mensaje de error para obtener más información y recomendaciones.
Presione la flecha hacia atrás (<) para regresar a la pantalla anterior.
Manual Del Propietario - Página 15

La tabla mostrará la fecha, las soldaduras realizadas (marca de verificación) y las soldaduras con un
mensaje de error.
Cada línea de la tabla indica una configuración del aparato: cualquier cambio de configuración del
aparato creará una nueva línea en el registro del aparato para esa fecha del calendario.
El valor “Activaciones por fecha” muestra la cantidad acumulada de ciclos de soldadura que el aparato
ha completado desde el último restablecimiento de ajustes predeterminados.
Presione el botón “Inicio” para regresar a la pantalla “Aparato listo”.
Presione la flecha hacia atrás (<) para regresar a la pantalla anterior.
En el “Menú” principal, presione el botón “Ayuda” para acceder a la información de contacto de OMG Roofing
Products, a los consejos sobre solución de problemas y a una descripción de los mensajes de error.
Presione el botón “Instrucciones” para acceder a un enlace con la versión digital del manual de usuario
de RhinoBond.
Utilice un teléfono inteligente para leer el código QR que abrirá un manual de RhinoBond en línea.
Presione el botón “Inicio” para regresar a la pantalla “Aparato listo”.
Presione la flecha hacia atrás (<) para regresar a la pantalla anterior.
Manual Del Propietario - Página 14

CONFIGURACIÓN DEL MENÚ Y AYUDA
El “Menú” principal proporciona acceso a los botones “Ajustes”, “Registro del aparato” y “Ayuda”.
Presione el botón “Ajustes” para cambiar la configuración de “Idioma,” “Pantalla” o “Sonido”.
Presione el botón “Idioma” para cambiar el idioma de la pantalla.
Seleccione el idioma deseado para el aparato.
Una vez seleccionado, la pantalla regresará automáticamente a la pantalla “Aparato listo”.
Seleccione el botón “Pantalla” para ajustar el brillo de la pantalla. Presione los íconos de sol en
cualquiera de los lados de la barra para aumentar o disminuir el brillo de la pantalla.
Una vez seleccionado, presione el botón “Guardar” para regresar a la pantalla “Aparato listo”.
Presione la flecha hacia atrás (<) para regresar a la pantalla anterior.
Presione el botón “Sonido” para cambiar el tono de “Activación finalizada”. El sonido puede habilitarse
presionando el botón “Encendido” y deshabilitarse presionando el botón “Apagado”.
Tiene la opción de dos tonos diferentes. Presione el botón “Tono 1” o “Tono 2” para realizar la selección.
Una vez configurado el sonido, presione el botón “Guardar” para regresar a la pantalla “Aparato listo”.
Presione la flecha hacia atrás (<) para regresar a la pantalla anterior.
En la pantalla principal “Menú”, presione el botón “Registro del aparato” para revisar la información de los ciclos de
soldadura.
Presione el botón “Activaciones por fecha” para revisar la cantidad de activaciones de ciclos de soldadura por fecha.
Una vez revisado el registro, presione la flecha hacia atrás (<) para regresar a la pantalla anterior.
“Voltaje de línea más alto” indica el voltaje de línea más alto que haya presentado el aparato desde el último resta-
blecimiento de ajustes predeterminados.
Manual Del Propietario - Página 13
Table of contents
Other OMG Welding System manuals