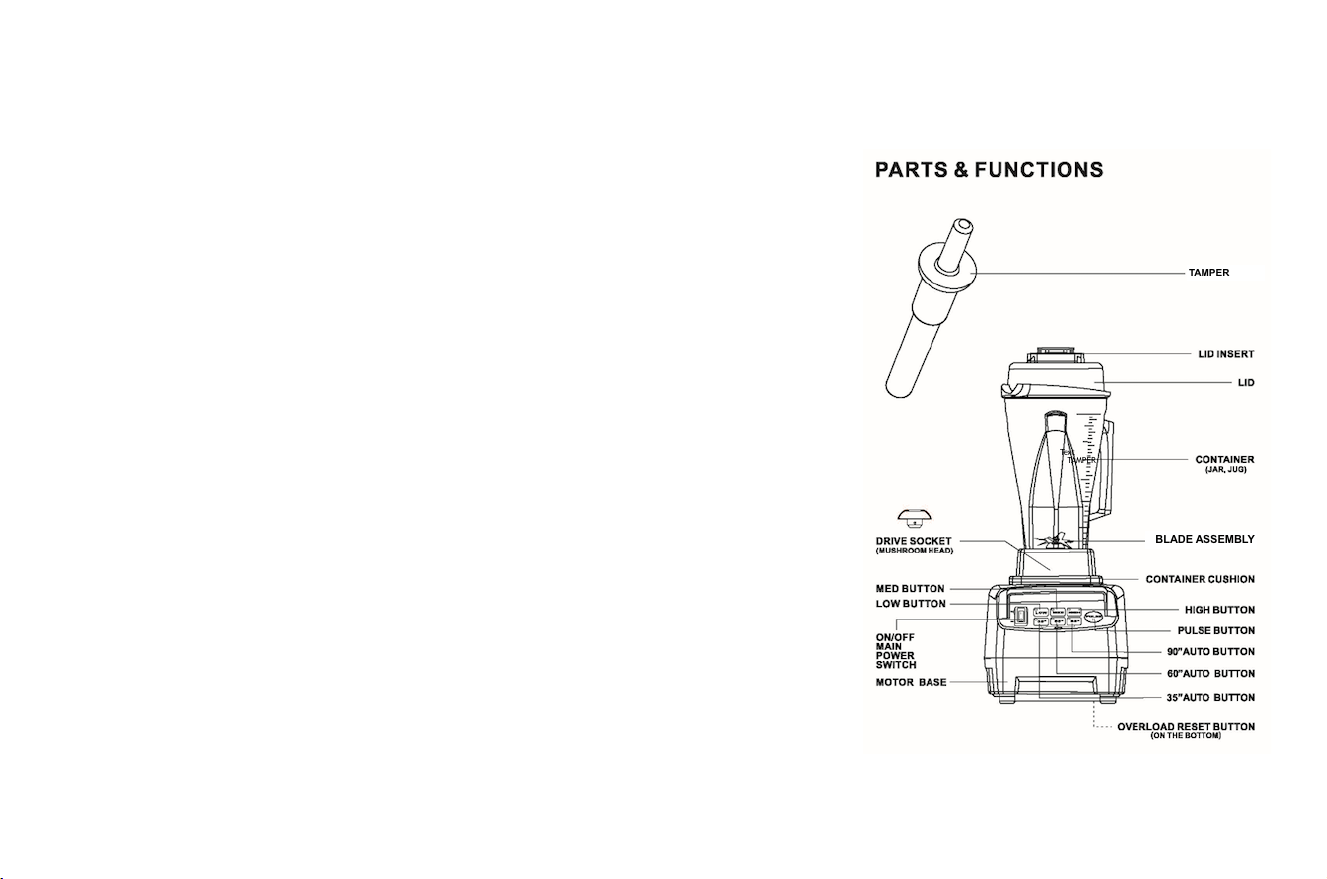
OmniBlend JTC OmniBlend V User manual

OWNER’S MANUAL
JTC OmniBlend V
TM800
OMNIBLEND (PTY) LTD
SOUTH AFRICA
www.omniblend.co.za

2
Table of Contents
LET’S GET STARTED........................................................................................................................................................3
SERVICE & REGISTRATION ............................................................................................................................................4
IMPORTANT SAFEGUARDS...........................................................................................................................................5
PARTS & FEATURES ......................................................................................................................................................10
ABOUT THE BLADES ....................................................................................................................................................12
HOW TO USE THE TAMPER?.......................................................................................................................................14
CONTROL PANEL .........................................................................................................................................................16
HINTS FOR SETTING SPEEDS......................................................................................................................................16
CARE AND CLEANING .................................................................................................................................................18
SPECIFICATIONS...........................................................................................................................................................21

3
LET’S GET STARTED
CONGRATULATIONS!
We hope that you’ll find the information in this step-by-step guide to be useful and beneficial.
Please read all the safety information, warnings, and instructional material found in this booklet before
getting started.
• Set your OmniBlend machine on a dry, level surface.
• Make sure that the power switch is set to Off, and that the machine is plugged into a grounded electrical
outlet.
• Then, follow the cleaning instructions on page 18 to prepare your machine for use. Always clean your
machine before the first use.

4
SERVICE & REGISTRATION
OMNIBLEND SERVICE & REPAIRS
Before returning this product for any reason, first contact OmniBlend Customer Service at 021 012 5999, email
For repair request: https://omniblend.co.za/pages/customer-return-form
PRODUCT REGISTRATION
Register your blender for faster and easier service in the future. You can register here:
https://omniblend.co.za/pages/product-registration-form
Failure to register your machine will not diminish your warranty rights.

5
IMPORTANT SAFEGUARDS
To avoid the risk of serious injury when using your OmniBlend blender, basic safety precautions should be
followed, including the following.
IMPORTANT INSTRUCTIONS FOR SAFE USE
Do not leave your OmniBlend blender unattended when operating. In case of a technical failure, contact
OmniBlend for any repairs or servicing requirements.
WARNING
Electrical Shock Hazard.
Use grounded outlet only.
DO NOT remove ground.
DO NOT use an adapter.
DO NOT use an extension cord.
Failure to follow instructions can cause death or electrical shock.

6
AUTOMATIC OVERLOAD PROTECTION
The Automatic overload protection is a built-in feature which is designed to protect the motor and prevent
your machine from overheating. If the Overload Protection kicks in, the machine will stop operating
suddenly. Leave the machine to cool down for 5 to 10 minutes, and then (while the machine is still connected
to power), press the Overload Button on the bottom of the machine. The machine will now work as normal
again.
Overload Button

7
READ ALL INSTRUCTIONS AND SAFEGUARDS BEFORE OPERATING BLENDER.
1. Not intended for use by or near children or persons with reduced physical, sensory, or mental
capabilities or lack of experience and knowledge. Close supervision is necessary when any appliance is
used by or near children or incapacitated persons.
2. To protect against the risk of electrical shock, do not put the blender base in water or other liquid.
3. Unplug from outlet when not in use, before putting on or taking off parts, and before cleaning.
4. Avoid contacting moving parts.
5. Do not operate any appliance with a damaged cord or plug or after the appliance malfunctions or is
dropped or damaged in any manner. Call OmniBlend Customer Service at 021 012 5999 or email
support@omniblend.co.za for examination, repair or replacement.
6. The use of attachments not expressly authorized or sold by OmniBlend for use with this blender,
including canning jars, may cause fire, electric shock, or injury.

8
7. Do not let cord hang over edge of table or counter. Do not let cord contact hot surface, including the
stove.
8. Keep hands and utensils out of container while blending to reduce the risk of severe injury to persons
or damage to the blender. A silicon scraper or spatula may be used, but only when the OmniBlend
blender is not running.
9. The tamper provided must be used only when the main part of the lid is in place.
10. Blades are sharp. Handle or remove blade and blade assembly from the container with extreme care to
avoid injury. To reduce the risk of injury, never place a blade assembly on the motor base unless
assembled to the OmniBlend container.
11. Do not leave foreign objects, such as spoons, forks, knives or the lid plug, in the container as this will
damage the blades and other components when starting the machine and may cause injury.
12. Never attempt to operate with damaged blades.
13. Always operate blender with lid and lid plug firmly in place. The lid plug should be removed only when
adding ingredients and when using the tamper.

9
14. When blending hot liquids or ingredients, use caution; spray or escaping steam may cause scalding
and burns. Fill the jug 1/3 or max ½full. Filling the jug more than halfway can cause too much steam to
build up and can blow the lid off the blender. Remove the lid-plug, and place lid (without the cap)
securely on the jug. Cover the blender lid with a clean kitchen towel and allow for an easy escape route
for the hot steam. Hold the lid securely and start blending on lowest speed. Gradually increase speed if
needed.
15. When making nut butters or oil-based foods, be cautious of heat. The jug will heat up quicker than with
using liquids. Processing for longer periods can cause dangerous overheating. And can cause damage
to the jug. Leave the jug to cool for 10-15 min, and then continue processing.

10
PARTS & FEATURES
2-Part Lid: Is easy to put on and take off, and easy to clean. Always use
the lid and the lid insert when the machine is in operation. The 1.5ltr jug
has a square lid, the 2ltr jug has a round lid. Both have lid inserts. For the
2ltr jug, make sure it is fitted within the 2 little knobs, to avoid it to rotate
during blending. Remove the lid insert to use the tamper or add
ingredients.
Tamper: use the tamper for blending thicker textures, to move the
ingredients in the jug. ALWAYS use the tamper through the lid (by
removing the insert from the lid), as this prevents the tamper from
touching the blades.
Speed & Timer:press Low, Medium, or High speed to blend for custom
blending time and/or speed. Stop the blender by pressing the button
again. Select a time slot for an automatic cycle. The machine will turn off
automatically after 35, 60, or 90 seconds. When using the timer, the
blender will start slow, and then speed up to high before slowing down
again. For thicker textures, and tougher blends, increase the

11
speed/power for optimal performance.
Pulse: use the pulse for course blends and chopping. Pulse ingredients by pressing a few times, until the
desired consistency is reached.
To lock the lid in place:
1. Position lid on container with sides of the lid between the container’s inner edges.
2. Push the lid the container’s edges until it locks in place.
WARNING
Rotating Blades can cause severe injury.
DO NOT reach into container while machine is running.
Container: Ounces, cups, and milliliters are clearly marked.
Power Cord: Your machine is equipped with a long power cord. Store the unused portion neatly underneath.
Bottom View / Cord Wrap: Plastic cord retainers hold the cord securely.

12
ABOUT THE BLADES
The OmniBlend machine comes standard with the multi-purpose blade. The blade assembly has stainless steel
ball bearing. This blade fits both the 1.5 Ltr and 2 Ltr container. Additional containers with blades may be
purchased separately. Blade assemblies can also be purchased separately. The blade assembly comes with a
1-year warranty.
WARNING
Blade Assembly can damage drive socket.DO NOT remove the container
while the blades are still spinning.
Removing the container prior to blades stopping: Your blade assembly will wear out the teeth of the drive
socket when the container is removed from the blender while it’s still in operation. The Drive Socket is
guaranteed for 3 years against stripping, misalignment or breaking. The Drive Socket and the blade bearing
are not replaced under warranty when showing signs of misuse described above.

13
WARNING
Rotating Blades can cause severe injury.
DO NOT put hands, spatulas, etc. in the container while the machine is
running or while the container is still on the base, only use the tamper
through the lid.
WARNING
Moving Parts may become hot after extended use. DO NOT touch.

14
HOW TO USE THE TAMPER?
The tamper allows you to accelerate the process of very thick and/or frozen mixtures that cannot be processed
in a regular blender. Using the tamper maintains circulation by preventing air pockets from forming. While the
machine is running, and only through the lid plug opening, use the tamper to press ingredients into the blades
as you make frozen ice creams and nut butters, or purée fruits and vegetables.
1. The splash disk (near the top of the tamper) and lid prevent the tamper from
touching the blades when the lid is secured properly in the locked position.
2. Hold the jug firmly, to avoid wiggling of the jug on the base while using the
tamper.
3. The container should not be more than two-thirds full when the tamper is used
during blending.
4. Do not use the tamper for more than 90 consecutive seconds (to avoid
overheating).
5. If the food does not circulate, the machine may have trapped an air bubble.
Carefully remove the lid plug while making sure the lid stays firmly in place.
Release the air bubble by inserting the tamper through the lid plug opening.
6. Holding the tamper straight down may not always help the ingredients
circulate. If need be, point the tamper toward the side or corner of the container.

15
WARNING
When using the tamper, hold the jug firm on the base with the other hand,
and avoid excessive wiggling of the jug on the base. If the jug is wiggling
on the base it starts wearing the drive socket.

16
CONTROL PANEL
1. On/Off Button:Push to turn On (|). Push to turn Off (O).
2. Speed Buttons: LOW indicates the lowest speed available. Push MED or HIGH to increase the speed.
Do not start your machine on MED or HIGH speed.
3. Timer Buttons: Indicates the blending time. Push (35”, 60”, 90”) button to select blending time
(seconds). The machine will stop after the selected time has passed. Blending speed increases from
LOW to MED to HIGH.
4. Pulse Button:Select the HIGH speed instantly. It is inactive by default, and can be activated when
pressing down the switch.
To stop the operation at any time, press any button.
HINTS FOR SETTING SPEEDS
Process on the HIGH setting for as much of the processing time as possible to make whole food juices, soups,
shakes, frozen mixtures, purées, nut butters and for grinding grains. Processing times will generally be less
than one minute (for most recipes the 35 seconds speed cycle will suffice). HIGH speed provides the best
quality of refinement, breaking down ice, frozen fruit, whole fruits or vegetables, and grains to a smooth
consistency.

17
TIP: Blending too long at too low a speed setting will overheat the machine and cause the Automatic
Overload Protection to turn the machine off. Use the HIGH speed as often as possible to achieve the most
uniform consistency. Blending on HIGH speed also maximizes the motor’s cooling fan to avoid overheating.
WARNING
Never Start on Speeds Above LOW with Hot Liquids to Avoid Possible
Burns.
Use Caution; escaping steam or splashes may scald.Leave a small
opening for the heat to escape, and hold the lid with a tea towel.
Blend on LOW.

18
CARE AND CLEANING
Container:
Rinse the jug after each use with warm water. To prepare your new machine for initial use, follow the steps
under Normal Cleaning. This will clean the unit, and break-in the motor.
Normal Cleaning:
1. Fill one third of the jug with warm water and add a couple drops of dish wash liquid.
2. Snap or push the complete 2-part lid into locked position.
3. Turn machine on and select the 35 second cycle.
4. After the machine has completed the cycle, rinse and drain the jug. Leave upside down, to air dry.
Deep Clean:
Once a month, or as needed
1. Place 3 cups of cool water and 3 cups of white vinegar into the container (add an extra cup of water and
vinegar for a 2ltr jug).
2. Leave to soak for about four hours.
3. Pour contents out and rinse thoroughly.
4. Follow the appropriate cleaning instructions above.

19
Lid & Lid Plug:
Separate the lid and lid plug. Wash in warm soapy water. Rinse clean under running water, and dry.
Reassemble before use.
IMPORTANT: To ensure continued and effective performance, do not put the container, lid, or lid plug in the
dishwasher.
WARNING
Electrical Shock Hazard.
Disconnect power before cleaning machine.
Failure to follow instructions can cause death or electrical shock.

20
Motor Base:
1. Unplug the power cord.
2. Wash the outside surface with a damp soft cloth or sponge, which has been rinsed in a mild solution of
liquid detergent and warm water. Do not place the motor base in water.
3. The centering pad can be removed for more thorough cleaning.
4. Thoroughly clean the drive socket. It may become sticky from use. Use a moistened cotton swab to clean
the grooves around the water-shielded switches. Immediately dry any excess water.
5. Polish with a soft cloth.
This manual suits for next models
1
Table of contents
Other OmniBlend Blender manuals