manuals.online logo
Brands
  1. Home
  2. •
  3. Brands
  4. •
  5. on stage
  6. •
  7. Indoor Furnishing
  8. •
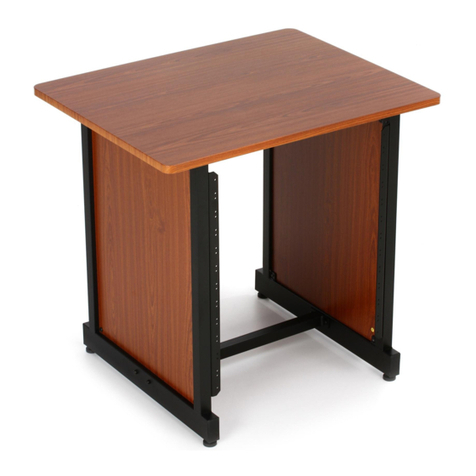
  9. on stage WS7500 User manual

on stage WS7500 User manual

BEFORE YOU BEGIN: Removeall contents from the boxes.
Assemble the Metal Structure
(Figure A)
1. Locate the two holes on the upper horizontal tube. on the left Z-shaped leg (A).
Install one support bar (C) in the upper two holes using two 1.5” Allen head bolts (J)
and two Locking Nuts (K).
2. Install the second support bar (C) in
the two holes located on the left vertical
Z-shaped leg (A).
3. Locate the two holes on the upper
horizontal tube. on the right Z-shaped leg
(PartB). Install one support bar (C) in
the upper two holes using two 1.5” Allen
head bolts (J) and two Locking Nuts (K).
4. Install the second support bar (C) in
the two holes located on the right vertical
Z-shaped leg (A).
5. Locate the four holes on the bottom of
the Legs (A & B). Insert the Feet (O) into
the holes and tighten. Adjust stand to
desiredheight.
Be sure the stand is placed right side up and it’s rubber feet are firmly onthe
ground before proceeding withthe next step.
Assemble the Upper Work Surface
5. Align the holes in the Upper work surface (D)
with the holes in the metal tabs on the Z-shaped
legs (A&B) (see Figure B). This work surface has
two mounting positions: The rear holes allow the
stand to be flush with wall, and the forwardholes
allow for more space on the main work surface.
6. Take 4 WoodScrews (N) andattach the Upper
work surface to the Z-shaped legs (A&B). Do not
over-tighten.
Assemble the Main Work Surface and Keyboard Tray
7. Take both side boards (I), top board (G)
and bottom board (H), andfasten
together with Allen head bolts (L) using
the center holes (see Figure C).
8. Align keyboard tray (F) drawer slide
with the drawer slides on the side boards
(I) and insert the keyboard tray.
9. Take the main work surface (E) and
place it on the floor bottom side up
(see Figure D).
10. Align the holes in the top board (G)
with the four inserts on the main work
surface (E).
11. Take four 1.38” Allen head bolts (M)
andattach the keyboardassembly to the
main work surface.
12. Place the Main work surface (E) with
attached Keyboard tray Assembly on the
metal tabs on the Z-shaped legs (A&B).
Align the holes in the work surface with
the holes in the metal tabs
(see Figure E).
13. Take 4 WoodScrews (J) andattach
the Main work surface (E) to the
Z-shaped legs (A&B).
IMPORTANT:BEFORE USINGYOUR STAND, BE SURE THAT ALL BOLTS AND
NUTS ARE FULLY TIGHTENED.
If desired, the height can be adjusted by spinning the small rubber feet
clockwise to lower the height or counter clockwise to raise the height. Place
a level onthe main work surface to be sure the Workstationislevel before
placing any equipment onthe workstation.
ASSEMBLY INSTRUCTIONS
WS7500
Figure A
Figure B
Figure D
Figure E
Figure C
All manuals and user guides at all-guides.com
all-guides.com
© 2008 TMP, Inc.
www.musicpeopleinc.com
www.onstagestands.com
®®
ASSEMBLY INSTRUCTIONS
WS7500
Professional
Workstation
Congratulations on your
purchase of the WS7500
Professional Workstation.
Please read the following
assembly instructionscarefully.
We hope you enjoy your
new purchase!
Parts
A
B
CDE
FG
J
L
N
Also included:
>Allen Wrench
>3/8” Wrench
Tools Required:
>Level
> Phillips HeadScrewDriver
H
IK
MO
All manuals and user guides at all-guides.com

Other on stage Indoor Furnishing manuals

on stage WSR7500 Series User manual

on stage

on stage WSR7500 Series User manual

on stage KB8802 User manual

on stage

on stage KB8802 User manual

on stage KB9503B User manual

on stage

on stage KB9503B User manual

on stage WS7500 User manual

on stage

on stage WS7500 User manual

Popular Indoor Furnishing manuals by other brands

aspenhome I215-333 Assembly instructions

aspenhome

aspenhome I215-333 Assembly instructions

Safco 2052 Assembly instructions

Safco

Safco 2052 Assembly instructions

Golden Technologies MAXICOMFORT PR515-MLA owner's manual

Golden Technologies

Golden Technologies MAXICOMFORT PR515-MLA owner's manual

Philips Energy Advantage 13781-0 Brochure & specs

Philips

Philips Energy Advantage 13781-0 Brochure & specs

Otto OT8CUBEWE Assembly instructions

Otto

Otto OT8CUBEWE Assembly instructions

BLACK RED WHITE PORTO S322-SZU Assembly

BLACK RED WHITE

BLACK RED WHITE PORTO S322-SZU Assembly

Williams-Sonoma LADD C110368 Assembly instructions

Williams-Sonoma

Williams-Sonoma LADD C110368 Assembly instructions

BLACK RED WHITE GRACE B186-LOZ120 Assembly

BLACK RED WHITE

BLACK RED WHITE GRACE B186-LOZ120 Assembly

Coaster EASTERN KING BED 215681KEB1 Assembly instructions

Coaster

Coaster EASTERN KING BED 215681KEB1 Assembly instructions

Neo Chair N-GEN CITUS Series User guide and assembly instructions

Neo Chair

Neo Chair N-GEN CITUS Series User guide and assembly instructions

Woodpecker RTS2027-22 owner's manual

Woodpecker

Woodpecker RTS2027-22 owner's manual

Merkell 102/246260 Aassembly Instructions

Merkell

Merkell 102/246260 Aassembly Instructions

Whittier Wood Furniture McKenzie 1300AFGAC Assembly instructions

Whittier Wood Furniture

Whittier Wood Furniture McKenzie 1300AFGAC Assembly instructions

Sunset Trading DLU-DK-2302-TA Assembly instructions

Sunset Trading

Sunset Trading DLU-DK-2302-TA Assembly instructions

Albatroz moveis 2105 Assembly

Albatroz moveis

Albatroz moveis 2105 Assembly

agape 369 A369231-32-33-34 Assembly instructions

agape

agape 369 A369231-32-33-34 Assembly instructions

Angeles Value Three Shelf Storage VL1030/7150 Assembly instructions

Angeles

Angeles Value Three Shelf Storage VL1030/7150 Assembly instructions

BE 1001 Assembly instructions

BE

BE 1001 Assembly instructions

manuals.online logo
manuals.online logoBrands
  • About & Mission
  • Contact us
  • Privacy Policy
  • Terms and Conditions

Copyright 2025 Manuals.Online. All Rights Reserved.