manuals.online logo
Brands
  1. Home
  2. •
  3. Brands
  4. •
  5. on stage
  6. •
  7. Indoor Furnishing
  8. •
  9. on stage WS7500 User manual

on stage WS7500 User manual

Components:
©2016 The Music People On-Stage.com
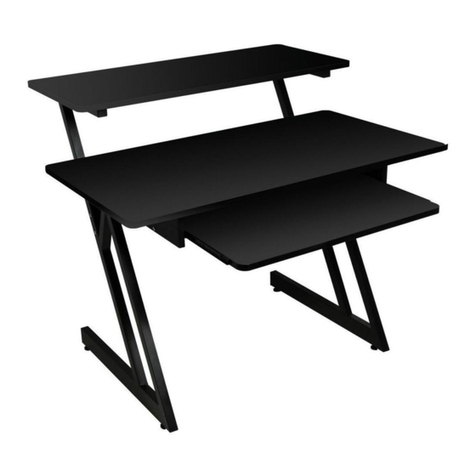
WS7500
Professional
Workstation
Congratulations on your purchase of the WS7500
Professional Workstation! Please read the following
instructions carefully. We hope you enjoy your new purchase.
A Z-Leg (x2)
C Cross Bar (x2) D Main Work
Surface (1)
E Upper Work
Surface (1)
FKeyboard Tray (1)
G Top
Board (1)
H Bottom
Board (1)
I Boards with
Tracks (x2)
J Head
Bolts (x24)
M Head
Bolts (x4)
P Cam (x8)K Locking
Nuts (x8)
O Feet (x4) Hex Wrench Allen Wrench
CAUTION
FAILURE TO OBSERVE PROPER ASSEMBLY INSTRUCTIONS, EXCEEDING THE WEIGHT CAPACITY
OR FAILURE TO OBSERVE THE WARNINGS AS MENTIONED IN THIS INSERT MAY CAUSE STAND TO
COLLAPSE, BODILY INJURY OR EQUIPMENT DAMAGE AND WILL VOID THE PRODUCT WARRANTY.
Assembly Instructions BEFORE YOU BEGIN: Remove all contents from the box
and identify the parts using these diagrams.
Visit On-Stage for the most recently updated instructions.
1. Connect the two Z-Legs (A) by installing
one Cross Bar (C) in the upper two holes
using Head Bolts (J), and Locking Nuts (K).
1
2
2. Install the second Cross Bar (C) in the
two holes located in the vertical tube of
the Z-Legs (A). Use Bolts (J) and Nuts (K) to
secure it like in Step 1.
Tip: To tighten the Locking Nuts (K) and Bolts
(J), use the Allen Wrench and Hex Wrench as
illustrated below. The Hex Wrench serves to
hold the Nut (K) in place while turning the
Bolt (J) with the Allen Wrench.
3. Locate the four holes on the bottom of the
Z-Legs (A) and insert the Feet (O) into the holes
and tighten.
3
4. Align the holes in the Upper Work Surface
(E) with the holes on the top of the Z-Legs (A).
Install with Bolts (J) and Allen Wrench.
Note: Minor height adjustments can be made by
turning the small rubber feet on the frame. Clockwise
will lower the workstation, counterclockwise will raise
it. Place a level on the main work surface, and make
the necessary height adjustments before placing any
equipment on the workstation.
5. Place boards (G) and (H) on a at surface and
insert Cams (P) into the holes as illustrated.
6. Align Boards (G & H) to Boards (I) and connect by
inserting Bolts (J) through the Cams (P). Make sure
that Board (G) is on the top and the sliding tracks
found in Boards (I) are on the bottom.
7. Once Boards (G, H, & I) are assembled, insert
the Keyboard Tray (F) into this structure.
8. Place the Main Work Station (D) upside down on
the ground and align the holes with the structure
from Step 7. Attach by inserting Bolts (M) with the
Allen Wrench as illustrated on the left.
9. Place the Main Work Station (D) with the
attached keyboard tray assembly on the
arms of the Z-Legs (A). Fasten with Bolts (J)
and Allen Wrench.
G
H
10. Before using the Workstation, be
sure all bolts and nuts are tightened.
©2016 The Music People On-Stage.com
G
G
H
H
Bottom View
Top View
Bottom View
Lightning Fast Service - Get the fastest turn around in
the unlikely event of a warranty claim.
Product Notications - We can contact you directly
with product notications and safety information.
Better Products - Your registration helps us to improve
our products and develop new ones.
REGISTER ONLINE. HERE’S WHY:
▪Perfect for the home studio
▪Ergonomic Z-frame constructed from steel
▪Laminate surfaces
▪Slide-out keyboard tray
▪Steel Tubing: 1"x 1"; 1"x 2"on horizontal floor legs
▪Weight Capacity: 175 lbs.
▪Keyboard Tray Height: 25"
▪Platform Height: 29"
▪Top Platform Height: 37½"
▪Dimensions: 43"(w) x 30"(d)
Product Specifications
WS7500
Professional
Workstation
©2016 The Music People On-Stage.com

Other on stage Indoor Furnishing manuals

on stage KB8802 User manual

on stage

on stage KB8802 User manual

on stage KB9503B User manual

on stage

on stage KB9503B User manual

on stage WS7500 User manual

on stage

on stage WS7500 User manual

on stage WSR7500 Series User manual

on stage

on stage WSR7500 Series User manual

Popular Indoor Furnishing manuals by other brands

Cuckooland Ava MG 7827 Assembly instructions

Cuckooland

Cuckooland Ava MG 7827 Assembly instructions

Sareer Reggie 4'6 Bed Assembly instruction

Sareer

Sareer Reggie 4'6 Bed Assembly instruction

Astonica 50104020 instruction manual

Astonica

Astonica 50104020 instruction manual

Walker Edison BDOL Assembly instructions

Walker Edison

Walker Edison BDOL Assembly instructions

MIGROS MICASA Elisa 4021.051 Assembly instructions

MIGROS

MIGROS MICASA Elisa 4021.051 Assembly instructions

muuto LINEAR SYSTEM SCREEN quick start guide

muuto

muuto LINEAR SYSTEM SCREEN quick start guide

Nils Holger Moormann FNP Assembly instructions

Nils Holger Moormann

Nils Holger Moormann FNP Assembly instructions

FourStarGroup 11211719P manual

FourStarGroup

FourStarGroup 11211719P manual

Maximex 89141500 Instructions for use

Maximex

Maximex 89141500 Instructions for use

Crate&Barrel Lafayette quick start guide

Crate&Barrel

Crate&Barrel Lafayette quick start guide

STRUCTUBE MAZE Assembly instructions

STRUCTUBE

STRUCTUBE MAZE Assembly instructions

Emmezeta FY-2209 Assembly instructions

Emmezeta

Emmezeta FY-2209 Assembly instructions

LDI SAFCO Jurni JN FXT Series instructions

LDI

LDI SAFCO Jurni JN FXT Series instructions

Home affaire LANDSIDE 131 installation instructions

Home affaire

Home affaire LANDSIDE 131 installation instructions

Royalcraft Alderley 6 Seat Round Table Dining Set –... Assembly instructions

Royalcraft

Royalcraft Alderley 6 Seat Round Table Dining Set –... Assembly instructions

Manhattan Comfort 24900 Assembly instructions

Manhattan Comfort

Manhattan Comfort 24900 Assembly instructions

JC Penny 343-8931 Assembly instructions

JC Penny

JC Penny 343-8931 Assembly instructions

Meubilair Long Island 203393-03 manual

Meubilair

Meubilair Long Island 203393-03 manual

manuals.online logo
manuals.online logoBrands
  • About & Mission
  • Contact us
  • Privacy Policy
  • Terms and Conditions

Copyright 2025 Manuals.Online. All Rights Reserved.