OnCommand Link User manual

Page 1of 31
OnCommand® Link v1.3
User Guide

Page 2of 31
Contents
Version History OnCommand® Link Device .................................................................................................. 3
Notice............................................................................................................................................................ 4
Introduction .................................................................................................................................................. 4
OnCommand® Link Package ......................................................................................................................... 5
Preparatory Steps ......................................................................................................................................... 5
Maximum Wi-Fi Reception Distances ........................................................................................................... 5
Installing OnCommand® Link on a Vehicle ................................................................................................... 6
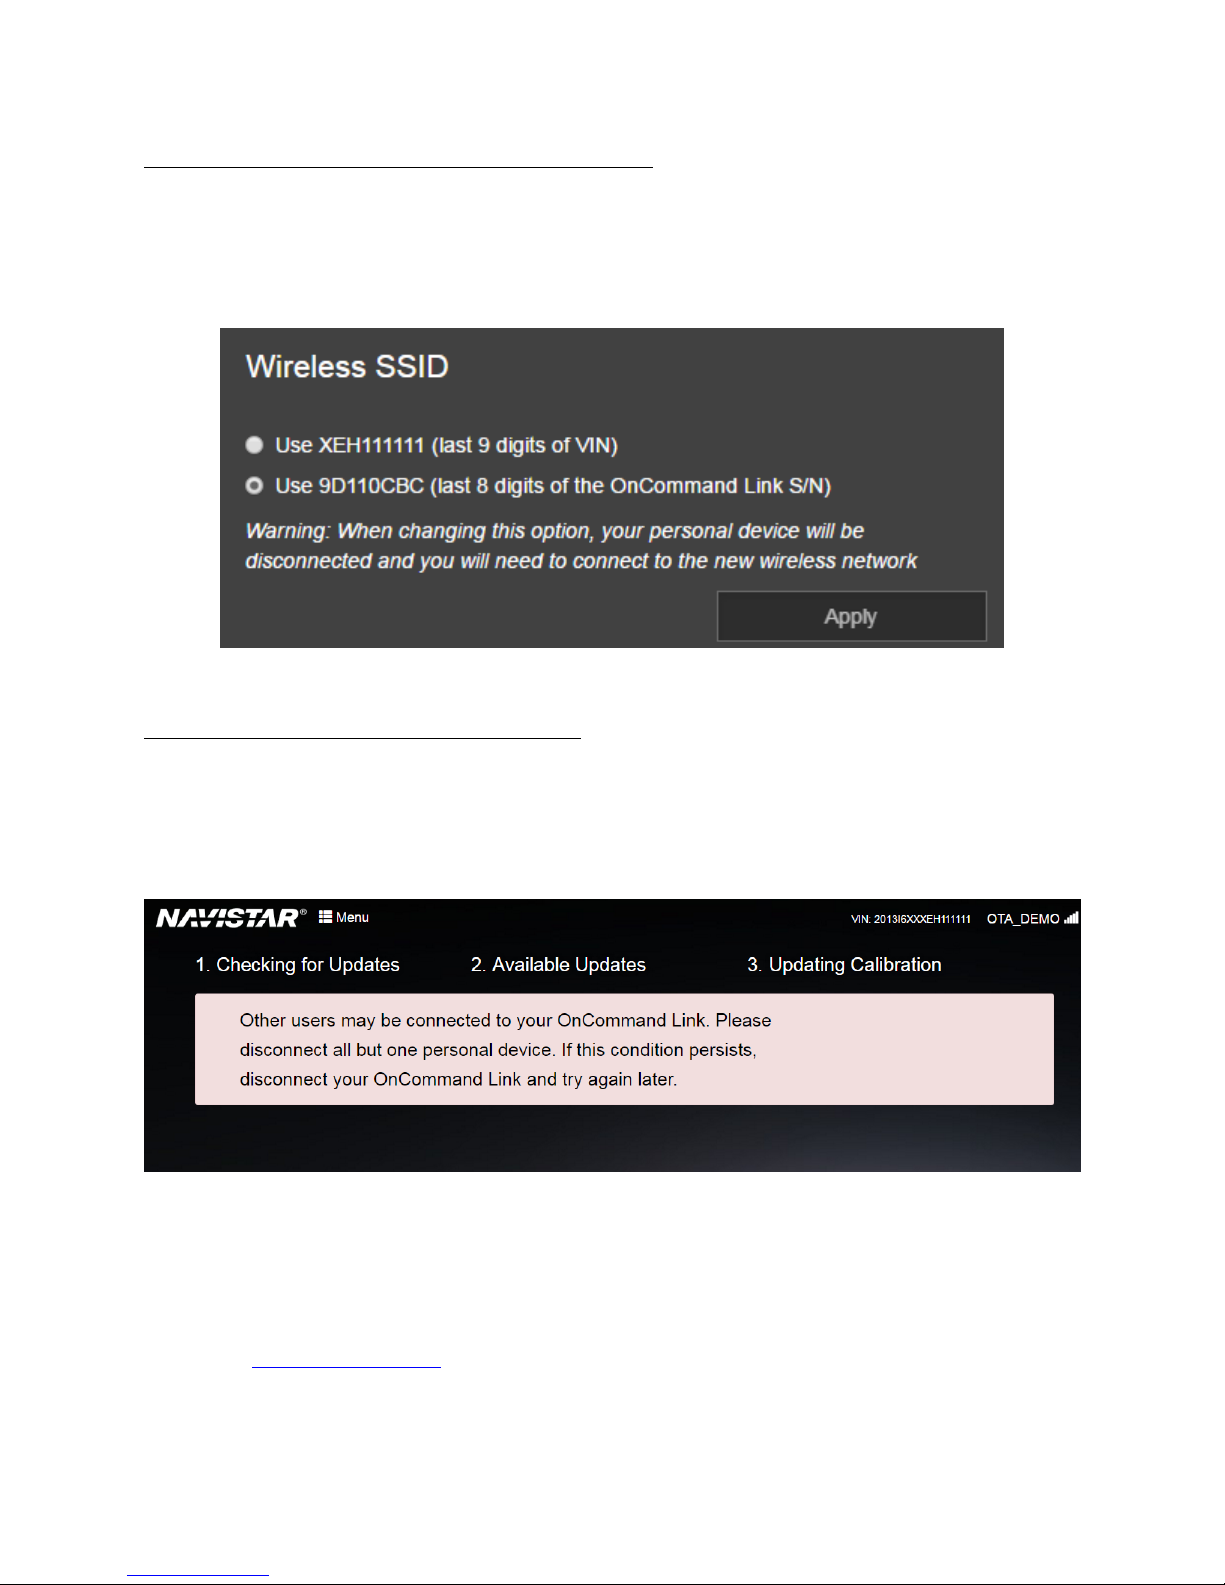
Connecting Personal User Device to OnCommand® Link ............................................................................. 6
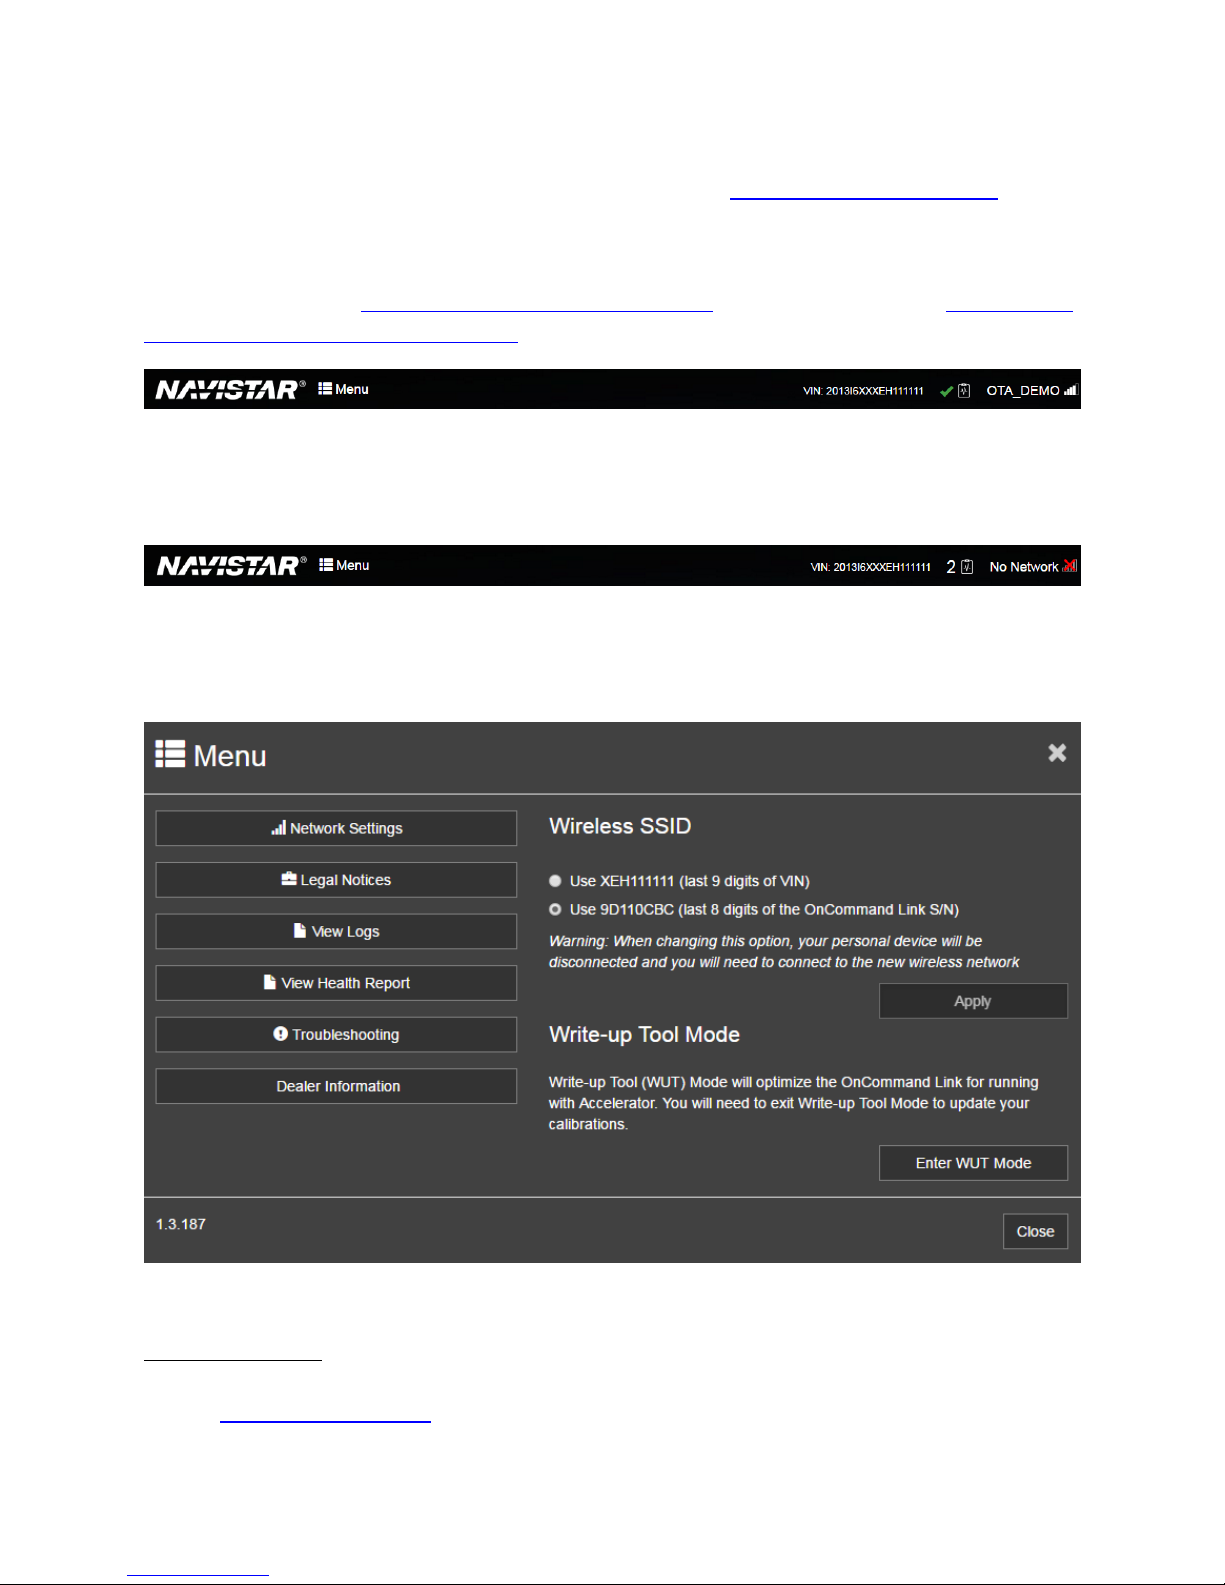
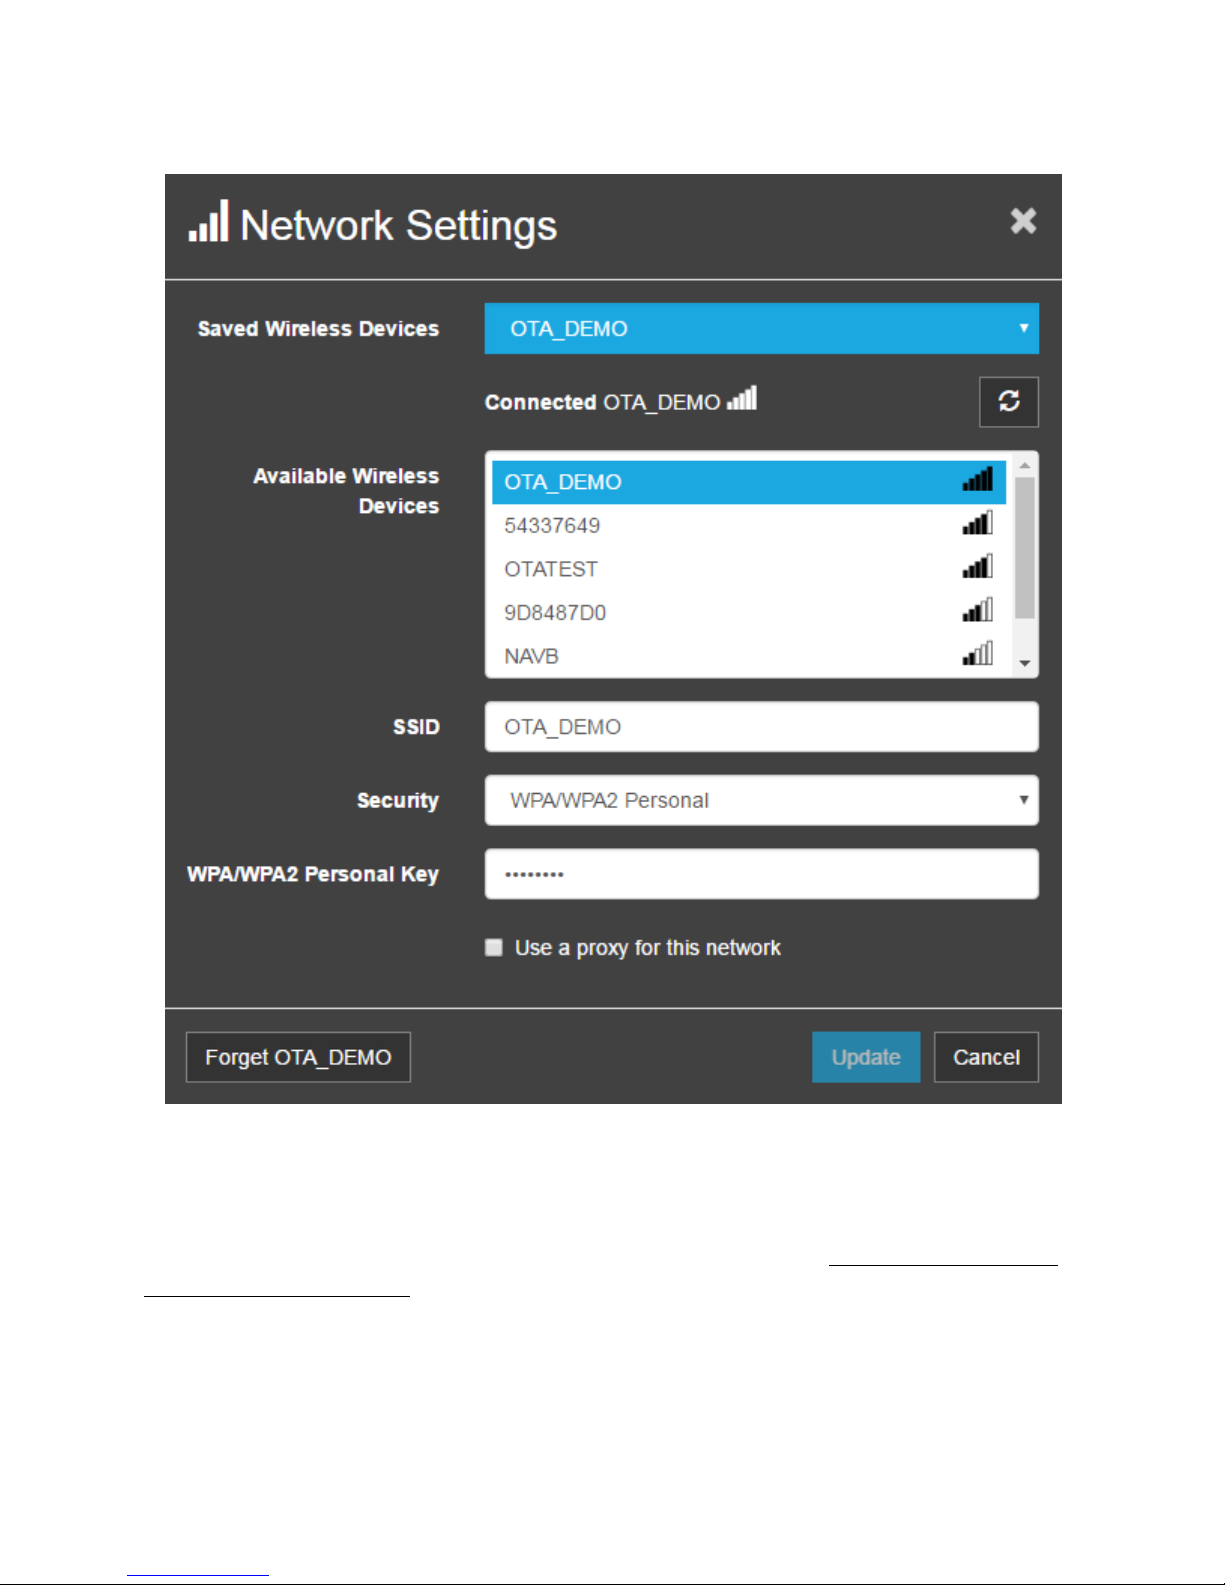
Connecting OnCommand® Link to Internet.................................................................................................. 8
Updating OnCommand® Link Firmware/Application Software ..................................................................12
Programming Cummins Engine with OnCommand® Link...........................................................................13
Important points to note about updating calibrations on Cummins engines………………………………………….13
Detailed process to update/check calibrations on your Cummins-powered vehicle………………………………14
Rollback Calibration on Cummins Engine…………………………………….…………………………………….…………………..17
Programming with OnCommand® Link....................................................................................................... 18
Switching between Write-up Tool Mode and OTA Mode .......................................................................... 24
Standard Health Reports............................................................................................................................. 25
Troubleshooting..........................................................................................................................................27
Technical Assistance ................................................................................................................................... 28
OnCommand® Link End User License Agreement ...................................................................................... 29
1. Definition ............................................................................................................................................29
2. OBLIGATION........................................................................................................................................29
3. Marking and Transmittal..................................................................................................................... 29
4. NEED TO KNOW .................................................................................................................................. 30
5. EXCLUSIONS ........................................................................................................................................ 30
6. WARRANTY AND DAMAGES................................................................................................................ 30
7. AMENDMENT...................................................................................................................................... 31
8. TRANSFER............................................................................................................................................ 31
9. TERM ................................................................................................................................................... 31
10. CHOICE OF LAW .............................................................................................................................. 31

Page 3of 31
Version History
OnCommand® Link Device
Version
Release Date
Change Log
v1.1
May 2nd, 2016
This version of OnCommand® Link device supports Over-The-Air
programming for Navistar’s engine control modules only.
v1.1.19
May 23rd, 2016
This version sets the device SSID as last 9 digits of VIN by
default. It can be changed to last 8 of MAC address using a
checkbox option in application page (under MENU).
v1.2.24
June 22nd, 2016
This version sets the device SSID as last 8 digits of MAC address
by default. It can be changed to last 9 of VIN using an option in
application page (under MENU).
v1.2.27
July 8th, 2016
Rebranded to OnCommand Link, minor fixes and user interface
related changes
v1.2.31
July 26th, 2016
Added user interface to switch between Write-Up tool and
Over-The-Air Programming (OTA) mode
v1.2.39
Nov 7th, 2016
Added description to update OnCommand® Link devices when
a new firmware/application update is available. Also added
details for a YouTube channel where OnCommand® Link
support videos are hosted.
V1.2.42
Feb 2nd , 2017
OnCommand® Link devices support Calibration updates for
2017 Cummins Engines.
V1.3.279
June 12th, 2017
-Updates screenshots wherever applicable.
-Added error message when more than one device connects
OnCommand Link.
-Notification for Device Management server connection error.
-View latest Health Report in OnCommand Link Application.
-Notification for Unsupported calibration
-Proxy configuration support for Connecting OnCommand Link
to Internet.
V1.3.281
July 13th, 2017
- Description updates to section ‘Programming Cummins Engine
with OnCommand® Link’
V1.3.309
Nov 16th, 2017
- Description updates to section ‘Programming Cummins Engine
with OnCommand® Link’
V1.3.337
May 4th, 2018
- Body controller kernel version dependency for A26 calibration
updates
V1.3.366
Dec 18th, 2018
-Updated Cummins engine info
-Added Health Report state indicators (App led/beeps)

Page 4of 31
Notice
This document describes proper usage guidelines for use of the OnCommand® Link device and the
Navistar software loaded on it. Navistar is not responsible for damage caused as the result of tampering
with the device. Tampering with the device voids all warranties for both the OnCommand® Link device
and the vehicle.
Introduction
Navistar’s OnCommand® Link device performs Over-The-Air programming of engine control modules
(ECM), Aftertreatment Control Modules (ACM) and Doser Control Units (DCU). The OnCommand® Link
device also collects diagnostic or health data from International® vehicles and sends it to the Navistar
backend systems. Customers / dealers can view their vehicle’s health / diagnostic information from the
International® Service PortalSM or OnCommand™Connection Portal. International® vehicles with the
following engine modules are supported:
Navistar Engines
Model Year
V8
I6
BB
2010 - 2012
Program
MaxxForce 7
MaxxForce DT 9/10
MaxxForce 13
Modules
ECM
ECM, DCU
ECM
2013
Program
MaxxForce 7
MaxxForce DT 9/10
MaxxForce 13
Modules
ECM
ECM, DCU
ECM
2014
Program
N9/10
N13
Modules
ECM, ACM, DCU
ECM, ACM
2015
Program
N9/10
N13
Modules
ECM, ACM, DCU
ECM, ACM
2016
Program
N9/10
N13
Modules
ECM, ACM
ECM, ACM
2017
Program
N9/10
N13, A26
Modules
ECM, ACM
ECM
Cummins Engines
Model Year
X15
B6.7
L9
2017 and above
Modules
ECM
ECM
ECM

Page 5of 31
OnCommand® Link Package
The package provided to you for the OnCommand® Link contains the following:
1. OnCommand® Link device
2. A label containing the device identification (SSID) and password
3. Welcome card
This User Guide will help you to:
1. Install OnCommand® Link, a smart device that plugs into a vehicle’s 9-pin diagnostic port.
2. Connect OnCommand® Link to a personal user device, such as a smartphone, tablet or laptop.
3. Connect OnCommand® Link to the Internet by connecting it to an available Wi-Fi access point
using device configuration.
4. Use OnCommand® Link to read data from the vehicle CAN bus, send data to the personal user
device, check for a calibration update, and perform an update (if applicable).
5. View Standard Health Reports generated by OnCommand® Link through the OnCommand™
Connection Portal or International® Service Portal. Check Standard Health Reports section for
details.
If you encounter any issues while performing these steps, please check the Technical Assistance section.
Preparatory Steps
To prepare for using OnCommand® Link, please do the following:
1. Choose a personal user device, such as a smartphone, tablet or laptop that will be used to
initiate programming operations and gather data for Standard Health Reports.
2. Check the vehicle’s battery voltage. A voltage of less than 10.5 volts or more than 15.5 volts will
prevent programming.
3. Allow for sufficient time to complete the setup and perform a calibration update –up to 30
minutes for setup and 15 to 25 minutes for performing a calibration update, if applicable.
4. Ensure that the vehicle is parked on a level surface in a safe, secure location.
5. Check Maximum Wi-Fi Reception Distances section to learn about appropriate Wi-Fi range
provided by OnCommand® Link devices.
Maximum Wi-Fi Reception Distances
Table below summarizes the expected maximum distances to be maintained from OnCommand® Link
devices and personal devices/Wi-Fi network.
Devices
Path
Expected Maximum
Distance
OnCommand® Link to Wi-Fi
Network
Unobstructed line of sight
200 to 250 feet
OnCommand® Link to Laptop
Unobstructed line of sight
170 to 200 feet

Page 6of 31
OnCommand® Link to mobile
hotspot (Phone included)
Unobstructed line of sight
30 to 35 feet
OnCommand® Link to Wi-Fi
Network
Wall between Network hotspot
and Truck
70 to 80 feet
OnCommand® Link to
Laptop/Tablet
Wall between laptop/tablet and truck
40 to 60 feet
Installing OnCommand® Link on a Vehicle
The OnCommand® Link device connects to the 9-pin diagnostic port connector in the vehicle’s cab.
Figure 1. OnCommand® Link Device
1. Turn Ignition ON.
2. Install the OnCommand® Link by connecting it to the 9-pin diagnostic port connector in the
vehicle.
3. If the collar is accessible, turn the collar of the OnCommand® Link clockwise to lock it into the 9-
pin connector. Confirm that the green PWR light is illuminated.
4. Wait 2 to 5 minutes for the OnCommand® Link to connect automatically to the vehicle’s CAN
bus. Successful connection to the CAN bus is indicated by two beeps and illumination of the
amber APP light.
Connecting Personal User Device to OnCommand® Link
Communication to the OnCommand® Link device to control programming is done through a personal
user device, such as a smartphone, tablet or laptop, with the following specifications:
•Supported browsers: Firefox, Chrome, Safari, Internet Explorer, Microsoft Edge
•Supported operating systems: Windows, iOS, Android
Note: The USB port located on the OnCommand® Link device does not serve any function at this time.

Page 7of 31
To establish communication between the personal user device and OnCommand® Link, perform the
following steps:
1. If using your phone/tablet, turn on Wi-Fi and scan for devices. When using a laptop, make sure
Wi-Fi is turned on and click Network Settings to view available devices.
2. When a personal user device has completed its scan for available networks, select the network
name containing the last 8 digits of device’s Serial Number (S/N) or MAC address (you can use
the last 8 digits (without colons) from the SSID on the OnCommand® Link’s label provided with
device packaging).
3. Enter the entire 14-character, alphanumeric password or PASS located on the OnCommand®
Link’s label. The device password is case sensitive.
Figure 2. OnCommand® Link SSID and Password
The personal user device should now be shown as connected to the OnCommand® Link in network
settings.
Re-establishing Connection
If the personal user device loses the connection to the Link device, a popup message will appear from
the application within 30 seconds. You will then be required to repeat this section to re-establish the
connection to the OnCommand® Link device. Once you have successful re-connected with the device,
this popup will be dismissed automatically.
Figure 3. Lost connection message

Page 8of 31
Changing the SSID to match the last 9 digits of your VIN
If you want to change the OnCommand® Link device’s SSID to match the last 9 digits of the VIN it is
connected to, go to MENU in the application and select last 9 digits of VIN, and click Apply.
Example: For a device with a Serial Number of 00:40:9D:8E:D4:DC, the SSID will be “9D8ED4DC”by
default. You will need to reconnect your personal device to the OnCommand® Link after changing the
SSID option in the Change SSID window (below).
Figure 4. Change SSID
Multiple users connected to OnCommand® Link
As a security measure, OnCommand® Link does not allow connections from multiple user devices at a
given time. If an attempt is made to connect to OnCommand® Link from multiple user devices,
application page shows the below error to all the connected user devices. The error goes away
automatically as soon as all but one user device remain connected.
Connecting OnCommand® Link to Internet
1. Open a supported browser window on the personal user device (smartphone, tablet or laptop).
2. Type in the following URL in the browser address field to open the device application page:
http://192.168.100.1

Page 9of 31
(If your browser prompts for authentication, that may be because your OnCommand® Link
Application version is old (1.2.xx or earlier). Try using http://192.168.100.1/navistar)
If the OnCommand® Link is already connected to a Wi-Fi network, the SSID will be displayed in the top
right corner of the device application page. At this point, skip the remaining part of this section and
follow procedure under ‘Programming with OnCommand® Link’(For Navistar Engines) Or ‘Programming
Cummins Engine with OnCommand® Link’(For Cummins engines).
Figure 5. Connected to Wi-Fi network
If the OnCommand® Link is not already connected to a Wi-Fi network, No Network is shown at the top
right corner...
Figure 6. Not connected to Wi-Fi network
…. click the MENU button and then Network Settings to configure an available Wi-Fi network.
Figure 7. Application Menu
View Health Report
Click View Health Report under MENU, to view the latest health report on your personal user device.
Look at ‘Standard Health Report’ for more details on Health reports.

Page 10 of 31
Figure 8. Network Settings
Select your network from the ‘Available Wireless Devices’, then enter the network key and click Save.
Security type will be auto-selected, but it can be changed manually if incorrect. You will need to re-
establish connection between your personal device and OnCommand® Link (Connecting Personal User
Device to OnCommand® Link). Once connected, you should see the SSID displayed in the top right
corner of device application page.

Page 11 of 31
OnCommand® Link will save your Wi-Fi hotspot information and will automatically connect to the saved
wireless network when in range. List of saved wireless networks can be viewed in ‘Saved Wireless
Devices’.
OnCommand® Link supports following wireless security protocols to connect to the local Wi-Fi hotspot.
Wireless security
protocol
Description
Open
Connection to Open wireless network does not need a
network key.
WEP
Wireless network that supports WEP (Wireless
Equivalent Privacy) would need a network key to
connect.
WPA/WPA2 Personal
Personal wireless network that supports WPA/WPA2
(Wi-Fi protected access) would need a network key to
connect.
WPA/WPA2 Enterprise
Enterprise wireless network that supports WPA/WPA2
(Wi-Fi protected access) would need a user id and
network key to connect.
To remove a network from the saved wireless network list, select a network from saved wireless list and
click Forget ‘Network name’.
Figure 9. Forget network successful
Proxy Settings

Page 12 of 31
If your network needs proxy settings to connect to Internet, you can enable the checkbox that says ‘Use
a proxy for this network’ and enter proxy server information. Check with your IT department to know
more about your proxy server details.
Connection to OnCommand® Link device management server
When connected to internet, OnCommand® Link communicates with our device management server in
the background that helps Navistar support team to better maintain your device and helps in
troubleshooting. Your Wi-Fi network should allow outgoing traffic on TCP ports 3197 and 3199 for the
device to communicate with device management server.
You will notice the below warning message displayed when ports 3197 and 3199 are blocked in your Wi-
Fi network. Please contact your IT department to allow outgoing traffic on these ports.
Updating OnCommand® Link Firmware/Application Software
The OnCommand® Link device will update its firmware and application software automatically if it is
connected to Internet if there is no personal device (Laptop/Phone/Tablet etc) connected to the
OnCommand® Link.
If your personal device is connected to the OnCommand® Link and the Link device receives either a
firmware or application update package from the Navistar backend servers, you will see the below
screen:
Figure 10. New application/firmware available
You need to update the OnCommand® Link before proceeding to use the device for other purposes.
Click ‘Install Latest Version’ to start the installation procedure.
During the installation, the OnCommand® Link will reboot one or more times. When you hear the beep
and amber App light is illuminated, reconnect your personal device to the OnCommand® Link.

Page 13 of 31
Programming Cummins Engine with OnCommand® Link
Important points to note about updating calibrations on Cummins engines
•The calibration update process for Cummins engines is divided into four phases. Each phase is
triggered when the OnCommand® Link is connected to the Internet. For the first three phases,
the OnCommand Link™ only needs to be connected to the Internet for a period of 5-10 minutes.
For the ‘Update Calibration’ phase, the OnCommand® Link device should stay connected to the
Internet until the user sees the message ‘Engine calibration up-to date’ on the application page.
•The simplest approach for obtaining updates to Cummins engines for the first time is to leave
the OnCommand® Link device on a vehicle for at-least 10 hours.
•If your OnCommand® Link has already completed a calibration update once on a given vehicle,
from next time onwards you will not be required to wait for 10 hours (as registration phases is a
one- time process as far as OnCommand® Link stays on the same vehicle) to perform a
calibration update. You would just need to occasionally connect OnCommand® Link to Internet
source with key ON/Engine running and it will automatically start with ‘Preparing update’phase
when an update is available for your vehicle.
•If the OnCommand® Link device is connected to another vehicle, the 10 hours process will start
all over again.
•Calibration updates for Cummins engines are prepared based on data collected by the
OnCommand® Link from engine modules. This data is transmitted to the backend servers
whenever the OnCommand® Link is connected to the Internet. The data received from your
engine module is analyzed and used to determine if your engine module needs a calibration
update.
•If your engine needs a calibration update, a unique calibration file is prepared for your engine
based on the data received from the OnCommand® Link. The OnCommand® Link device
application page will indicate when a calibration update is available.
•Currently, Over-The-Air calibration updates are supported on 2017 or later Cummins engines
only. The below message is displayed when OnCommand® Link is connected to an incompatible
Cummins engine (2016 or earlier Cummins engine).

Page 14 of 31
Detailed process to update/check calibrations on your Cummins-powered
vehicle
1. Device Registration phase (Triggered when the OnCommand® Link device is connected to the
Internet the first time on a new vehicle):
a. To update Cummins engines, the OnCommand® Link must first be registered with a
particular Cummins engine (by engine serial number). This process is initiated when
the OnCommand® Link is first connected to the Internet. Registration takes at-least
4 hours to complete. Once the OnCommand® Link application indicates that
egistration process is initiated, it does not need to remain connected to internet
source for 4 hours to complete this process. The registration phase completes on its
own in the background.
Figure 11. Device Registration phase
b. As long as the Link device remains on the same vehicle, the registration process is
performed only once for a given vehicle. The registration process must be repeated
each time an OnCommand® Link is connected to a different vehicle. During this
process, vehicle can be turned off.
2. Checking for Update phase (Triggered each time the OnCommand® Link connects to the
Internet after the “Device Registration phase” and key is ON/Engine Running):
a. The OnCommand® Link gathers engine data from your vehicle and sends it to the
backend for processing. The backend system processes this information to
determine if your engine needs a calibration update. This process takes at least 5
hours to complete. Once the OnCommand® Link application indicates that checking
for update process is initiated, it does not need to remain connected to internet
source for 5 hours to complete this process. The checking for updates phase
completes on its own in the background.

Page 15 of 31
Figure 12. Checking for update phase
3. Preparing Update phase (Triggered when the OnCommand® Link device connects to the
Internet—after the “Checking for Update phase”):
a. Connect your personal device to the OnCommand® Link and open the application
page.
b. If your application displays ‘Engine calibration up-to date’, wait for 5 minutes. If you
still see ‘Engine Calibration up-to date’, your vehicle calibration is up-to date.
Figure 13. Preparing update phase: Engine calibration up-to date
c. If your vehicle needs a calibration update, the application will start preparing your
engine for the update. Preparing the engine takes about 30 minutes. The engine can
be prepared while the vehicle is in motion or in a KEY-ON, ENGINE-OFF state. If the
key is turned OFF, the engine preparation pauses and continues again after the key
is turned ON.

Page 16 of 31
Figure 14. Preparing Update phase: Update available and preparation in progress
4. Update Calibration phase (Triggered when the OnCommand® Link connects to Internet—
after the “Preparing Update phase”):
a. Connect your personal device to the OnCommand® Link and open the OTA
application.
b. This phase is only required if your vehicle needs a calibration update.
c. Click on the ‘Update Calibration’ button to initiate the calibration update process.
Please read the warning message and click Accept and Update Calibration to
confirm that all mandatory conditions are satisfied before initiating a calibration
update.
This process takes 5 minutes to complete.
Note: If fault codes are noticed with flashing lights on the dash after calibration update, please perform
a key cycle (KEY OFF followed by KEY ON) and confirm that no further faults are seen on the dash. If
faults are still seen on the dash, please contact Technical Support
Figure 15. Update Calibration phase

Page 17 of 31
Figure 16. Update Calibration phase: Calibration update in progress
Rollback Calibration on Cummins Engine
In cases where Cummins engine has been updated with an invalid calibration and needs to be reverted
back to an earlier calibration version, backend systems may trigger a rollback command. If you notice a
‘Rollback Calibration’ button on application page, this means backend systems have triggered a
calibration rollback for your engine. Click Rollback Calibration to initiate calibration rollback process.
Please read the warning message and click Accept and Update Calibration to confirm that all mandatory
conditions are satisfied before initiating a calibration rollback.
This process takes 5 minutes to complete.
Figure 17. Rollback Calibration

Page 18 of 31
Programming with OnCommand® Link
To program a calibration update, perform the following:
1. Open a supported browser window on the personal user device (smartphone, tablet or
laptop).
2. Type in the following URL in the browser address box:
http://192.168.100.1
This address must be entered exactly as shown.
3. Application will check for available updates
This is the initial message displayed when the OnCommand® Link connects to and collects data from the
vehicle CAN bus.
Figure 18. Checking for Updates Screen
Calibration Update Available
This message means that the OnCommand® Link has detected that a calibration update is available for
this vehicle. Click the Update Calibration button to start the calibration update procedure.

Page 19 of 31
Figure 19. Available Updates Screen
To complete the calibration programming operation, read and follow the instructions on the popup
screen to ensure safe operation, and click Accept and Update Calibration.

Page 20 of 31
Figure 20. Calibration Update Pop-up Window
Updating Calibration
This message indicates that the OnCommand® Link is performing the calibration update operation,
including saving parameters, downloading the new calibration file, installing the new calibration file, and
restoring parameters.
A white/gray progress bar will be displayed and will start to fill in with blue as the update progresses.
The update will take from 15 to 25 minutes to complete. The progress bar represents an estimate of the
actual status of the calibration update.
Expect a series of beeps and flashing lights during the calibration update process at different times
based on certain operations performed by OnCommand® Link device. You may also see an Electrical
Fault on the dash, which is normal if it occurs during an update.
Figure 21. Updating Calibration Screen
Note: You will need to perform Key ON/Key OFF a few times during the calibration update process
whenever prompted on the application page.
Engine Calibration Up-to-Date
This message means the OnCommand® Link has read the CAN bus and the ECM calibration is up-to-date.
This message is also displayed after a completed OTA programming operation.
Table of contents
Popular Automobile Accessories manuals by other brands

Metra Electronics
Metra Electronics 99-2008 installation instructions

Rainbow
Rainbow Experience Series installation manual

STO N SHO
STO N SHO SNS 46 Installation procedures

Compass
Compass TRIPLE 02 112 Assembly and use instructions

On the Rox
On the Rox Folding Windshield installation guide

Volvo
Volvo 31213723 installation instructions