hc-cargo 161048 User manual
Vedpak 203_Version 1_05.2015
7” Digital Wireless Car Rear View System - User Manual ................... 3
Rückfahrhilfe mit 7”-Farbschirm, drahtlos - Bedienungsanleitung...... 10
Système de vision arrière numérique sans l de 7” pour voiture
- Manuel de l’utilisateur ...................................................... 17
Sistema de visión trasera de 7” inalámbrico y digital para
coches - Manual de usuario ..................................................... 24
Digitalt trådløst bakkamerasystem m/ 7” skærm –
Brugervejledning
....
31
7-tums digitalt trådlöst backkamerasystem – Användarhandbok ..... 38
Sistema retrovisore per auto wireless digitale da 7”
- Manuale utente................................................................... 45
7” Digitaal Draadloos achteruitkijksysteem voor auto’s
- Gebruikshandleiding ............................................................ 52
7-calowa bezprzewodowa cyfrowa kamera cofania
— Instrukcja użytkowania ....................................................... 57
D
I
PL
E
S
NL
F
DK
GB
161048
Specications and manual content are subject to change without any notice.
Before using the products, please read the manual and store it well.
Der Inhalt dieser Anleitung und die technischen Daten können ohne Vorankün-
digung geändert werden. Vor Ingebrauchnahme des Produktes ist die Anleitung
durchzulesen und anschließend für den späteren Gebrauch aufzubewahren.
Les caractéristiques et le contenu du manuel peuvent
être modiés sans préavis. Avant d'utiliser les produits,
veuillez lire le manuel et le conserver en lieu sûr.
Las especicaciones y el contenido del manual están sujetos
a cambios sin previo aviso. Antes de utilizar los productos, le
rogamos que lea el manual y lo guarde en un lugar seguro.
Specikationerne og indholdet i denne vejledning kan
ændres uden forudgående varsel. Læs brugervejledningen,
inden produkterne tages i brug, og gem den.
Specikationer och innehåll i handboken kan ändras utan att
detta meddelas. Läs handboken innan du använder produk-
terna och förvara den ordentligt.
Le speciche e il contenuto del manuale possoni essere soggetti
a modiche senza notica. Prima di utilizzare i prodotti, leggere
attentamente il manuale di istruzioni e conservarlo.
Specicaties en inhoud van de handleiding kunnen zonder aankondiging vooraf
gewijzigd worden. Lees de handleiding door voordat u de producten gaat
gebruiken en berg de handleiding goed op.
Dane techniczne i treść instrukcji obsługi mogą ulec zmianie bez powiadomienia.
Przed użyciem produktów prosimy o zapoznanie się z instrukcją i przechowywanie
jej w bezpiecznym miejscu.
D
I
PL
E
S
NL
F
DK
GB
161048
Vedpak 198_Version 1_15.09.14
161048
3
Vedpak 203_Version 1_05.2015
GB
Features
• 7" High Resolution Color TFT-LCD. LED backlight.
• 8V-32V DC power input, suitable for all kinds of vehicles.
• Removable sun visor.
• Double Digital Wireless signal transmit. Support sub-screen and two screens.
• After pairing successfully, you can switch between the two channels manually or automatically.
• PAL/NTSC optional, suitable for various countries;
• No image reverse function, default CAM1 mirror image, CMA2 normal image.
• Monitor abides by the idea of energy-saving, low carbon and environment protection.
• High shock resistant rating: 8G.
• Menu manual operation.
• Monitor housing is made by ABS and is high temperature resistant.
• Load dump V=87V, Td=400mS.
• Monitor circuit has protector for battery reverse(+/-).
iNotes
1) Please read this manual before using our products.
2) Before connecting to power, check the connection of cables. If improperly connected, damage
may be done to the picture.
3) The monitor is not waterproof; do not place the monitor outdoors.
4) In order to avoid damage to components, do not activate or use these products while carrying out
Welding operations on your vehicle
5) For awless function make sure that all cables are connected tightly.
6) Do not open the housing of the camera, as this will damage the waterproof device and chipset
inside.
7) Do not put the cables together with high temperature and rotary objects.
8) In order to evacuate the high temperature inside the monitor, do not block the holes in the
shell.
9) High voltage inside the monitor; non-specialists should not open the back shell.
10) While driving, do not watch DVDs etc.
11) Do not use caustic chemicals to wipe the camera and monitor.
Warning
There are no reparable parts in the system, so avoid taking apart the CCD camera or the monitor due to high
voltage danger in the products. Repair and regulation of the products should be done by special workers.
Notice
This manual is for reference only. You will receive no notication about changes in the information. Any wrong
or un-detailed information is the responsibility of the manufacturer.
Before you request a repair
The problems below do not necessarily indicate a failure in the display.
Please check through the following methods before you request for repair.
Problem Possible Causes
No picture
Improper connection with automobile adapter.
Use of unauthorized power supply. Power Switch is in OFF position.
Dark picture Please check contrast and brightness.
No color Check if color is adjusted, or check if the color system (PAL/NTSC) is right.
161048
4
Vedpak 203_Version 1_05.2015
GB
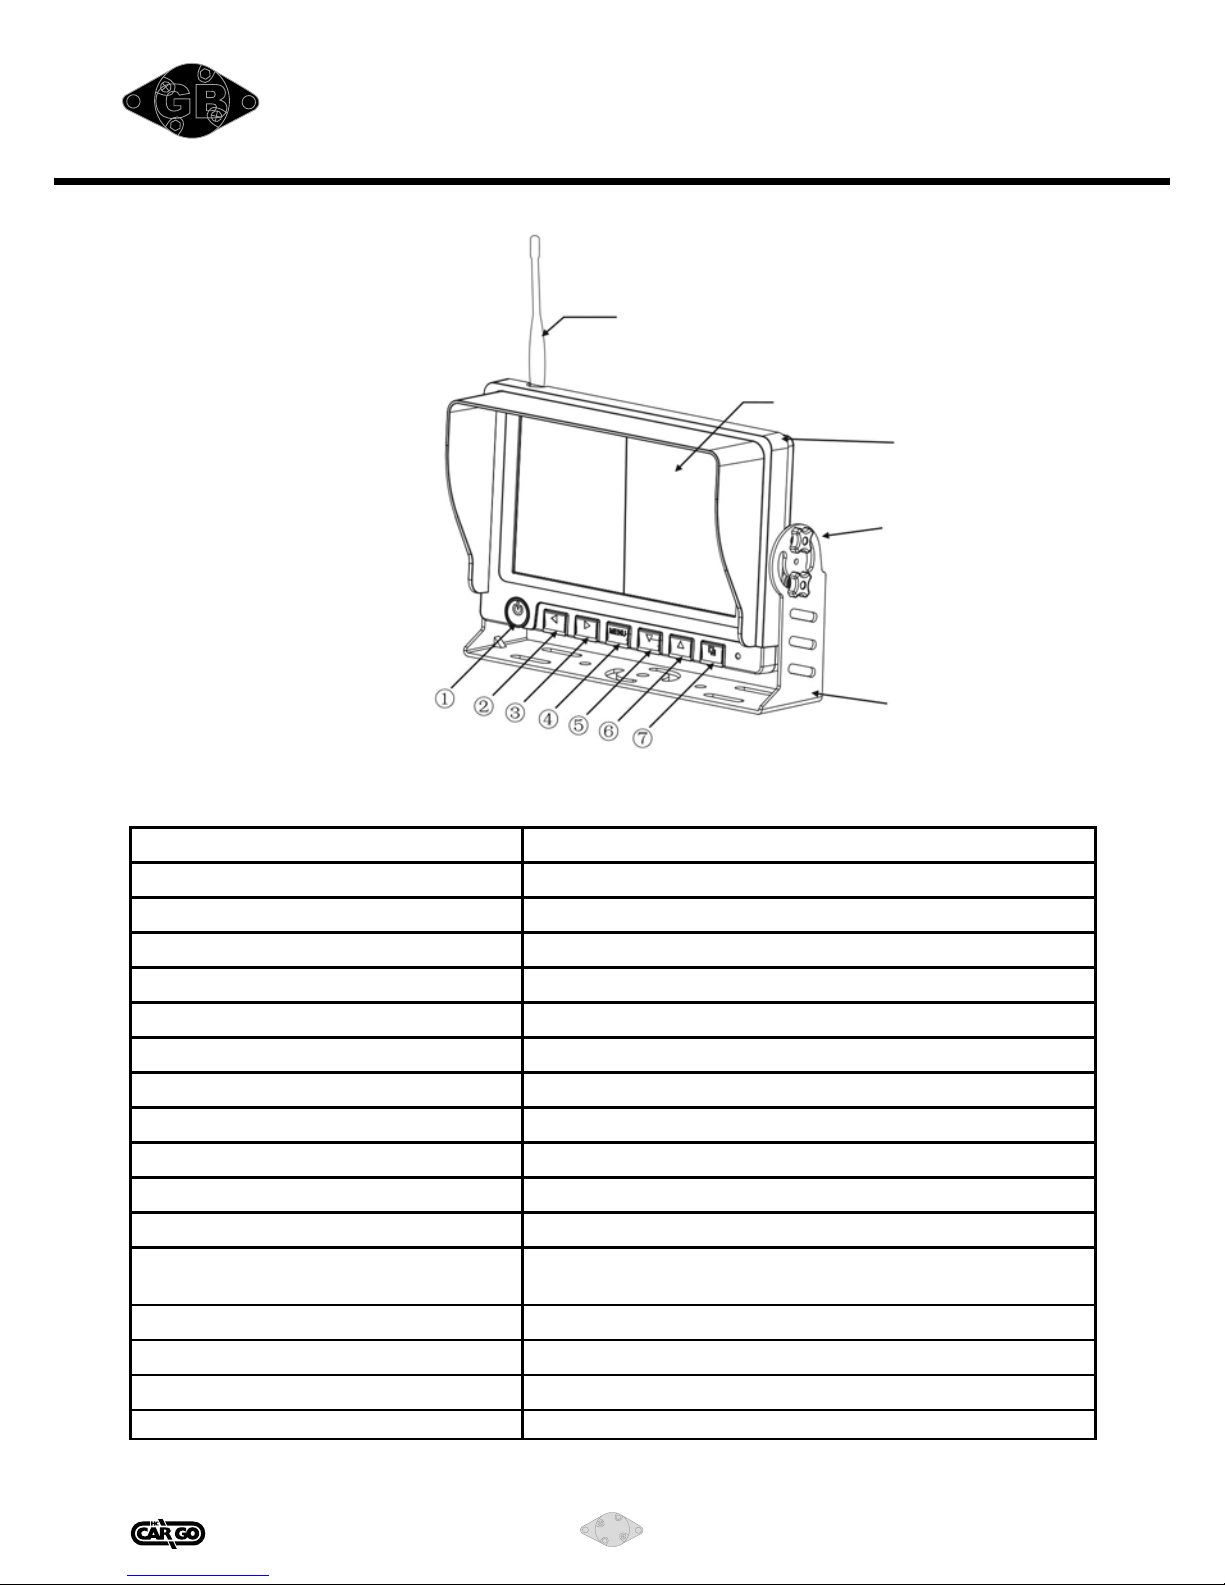
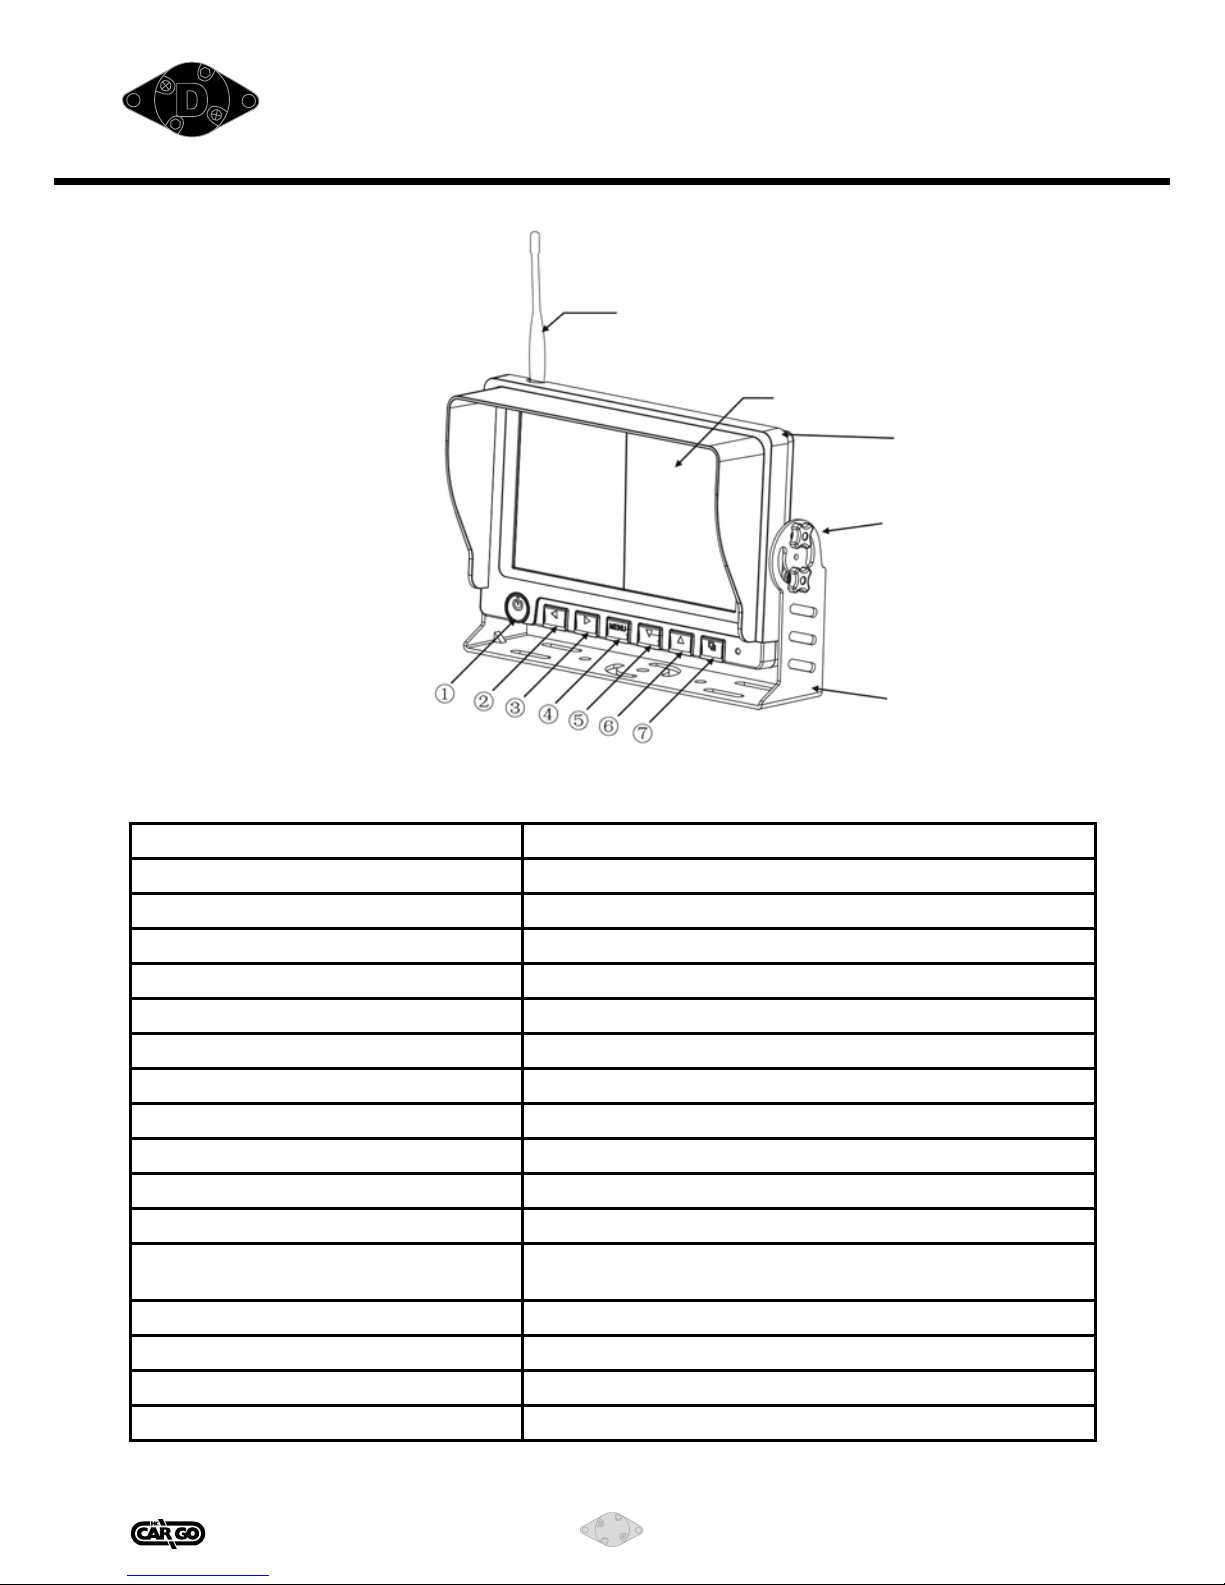
Monitor
I. Appearance and accessories
• Power
• Left (Vol-)
• Right (Vol+)
• Menu/Esc
• Down (CH switch)
• Up (CH switch)
• OK
II. Technical parameters
Antenna
Color TFT-LCD screen
Sun visor
Bracket screw
Bracket
Display Device Color TFT-LCD
Size 7" Wide Screen(LED backlit)
Interface Digital TTL
Resolution 800×RGB×480
Active Area (mm) 153.60×86.64
View Angle (LR/UD) 140 / 110
Contrast Ratio 500:1
Luminance (nits) 450
Response Time (ms) 25
Operating Temperature -20°C ~ +70°C
Storage Temperature -30°C ~ +80°C
Connector DC Female
Application Power
Supply
1.AC power supply-AC Adapter (DC8V-32V)
2.Automobile storage battery (12V/24V) Automobile adapter
Power Consumption 4.5W Max
Outer Dimension W218 mm × H149 mm × T82 mm
Transmission Distance 100 m
Audio Output ≤ 1 W

161048
5
Vedpak 203_Version 1_05.2015
GB
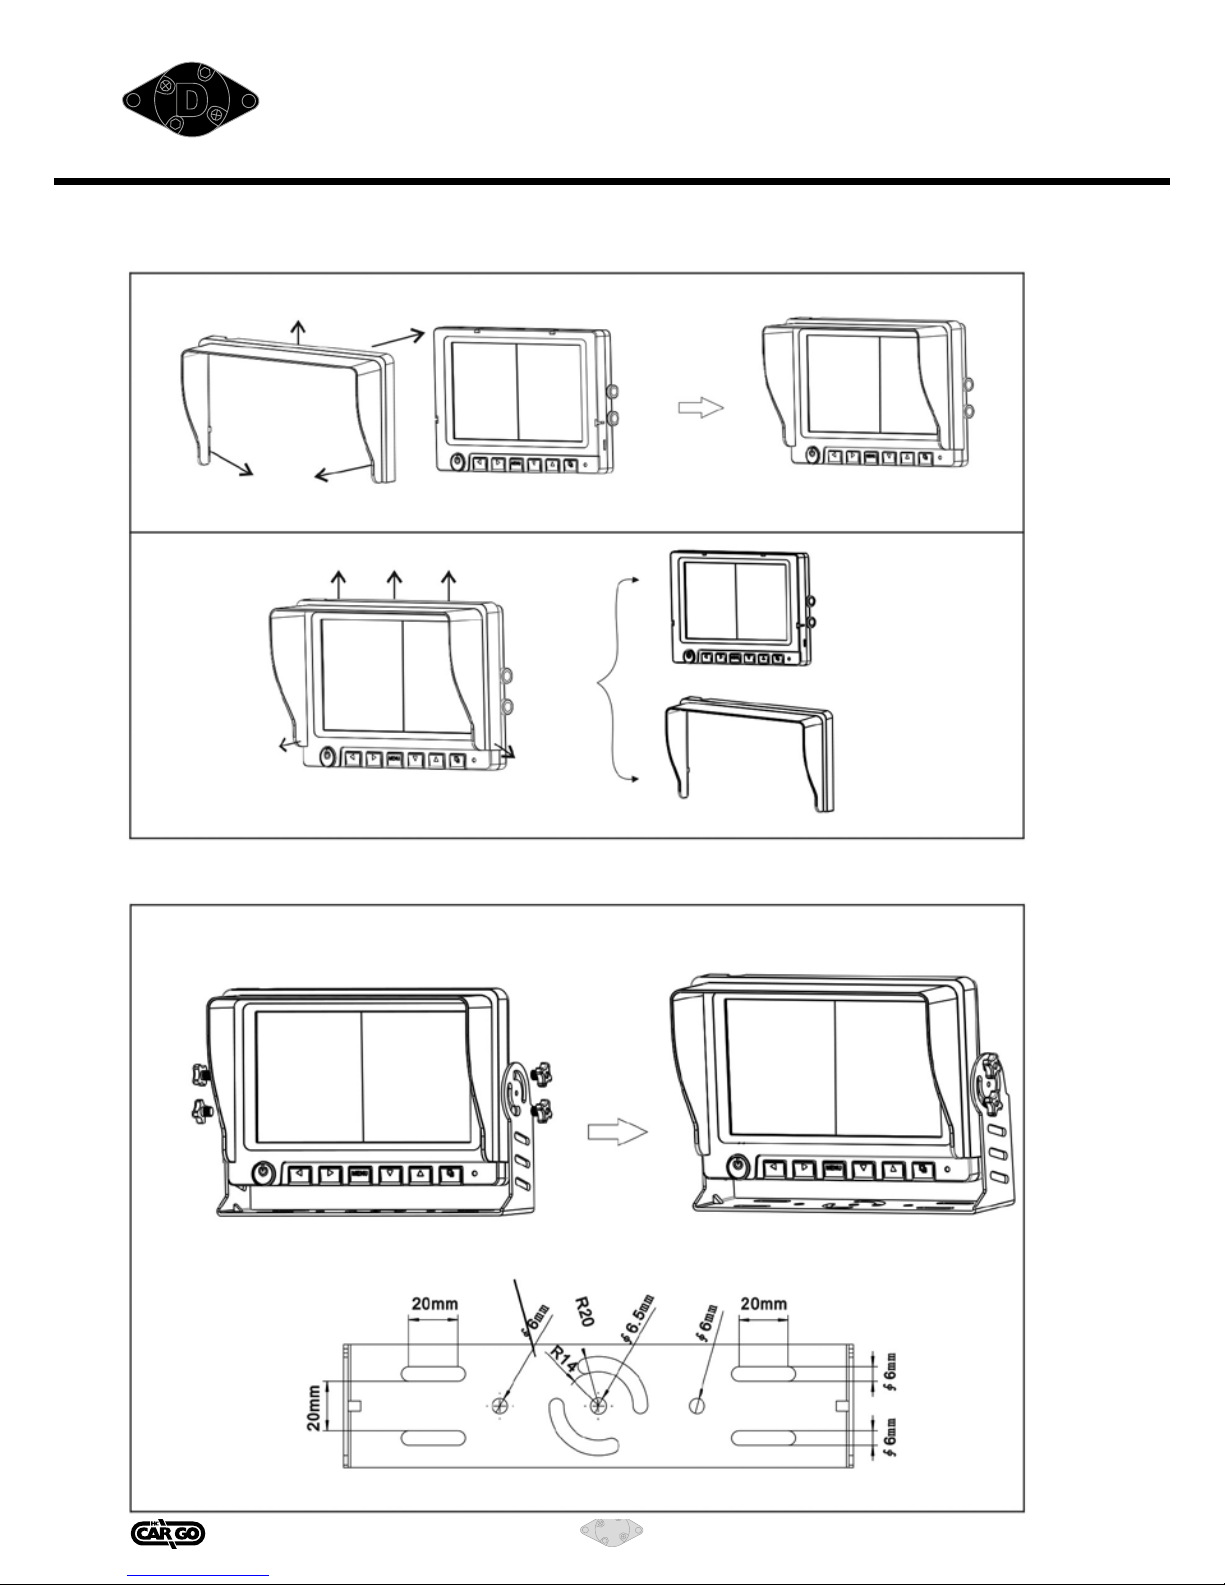
III. Install/Remove Monitor Sun Visor
IV. Monitor Bracket Mount
Monitor
Install
Clip Push
Finish
Remove
Clip
Sun Visor Monitor
Lift
Monitor
Sun visor
Bracket Mount
Screw Screw
Finish
Bracket Mounted bracket
Bracket dimension
161048
6
Vedpak 203_Version 1_05.2015
GB
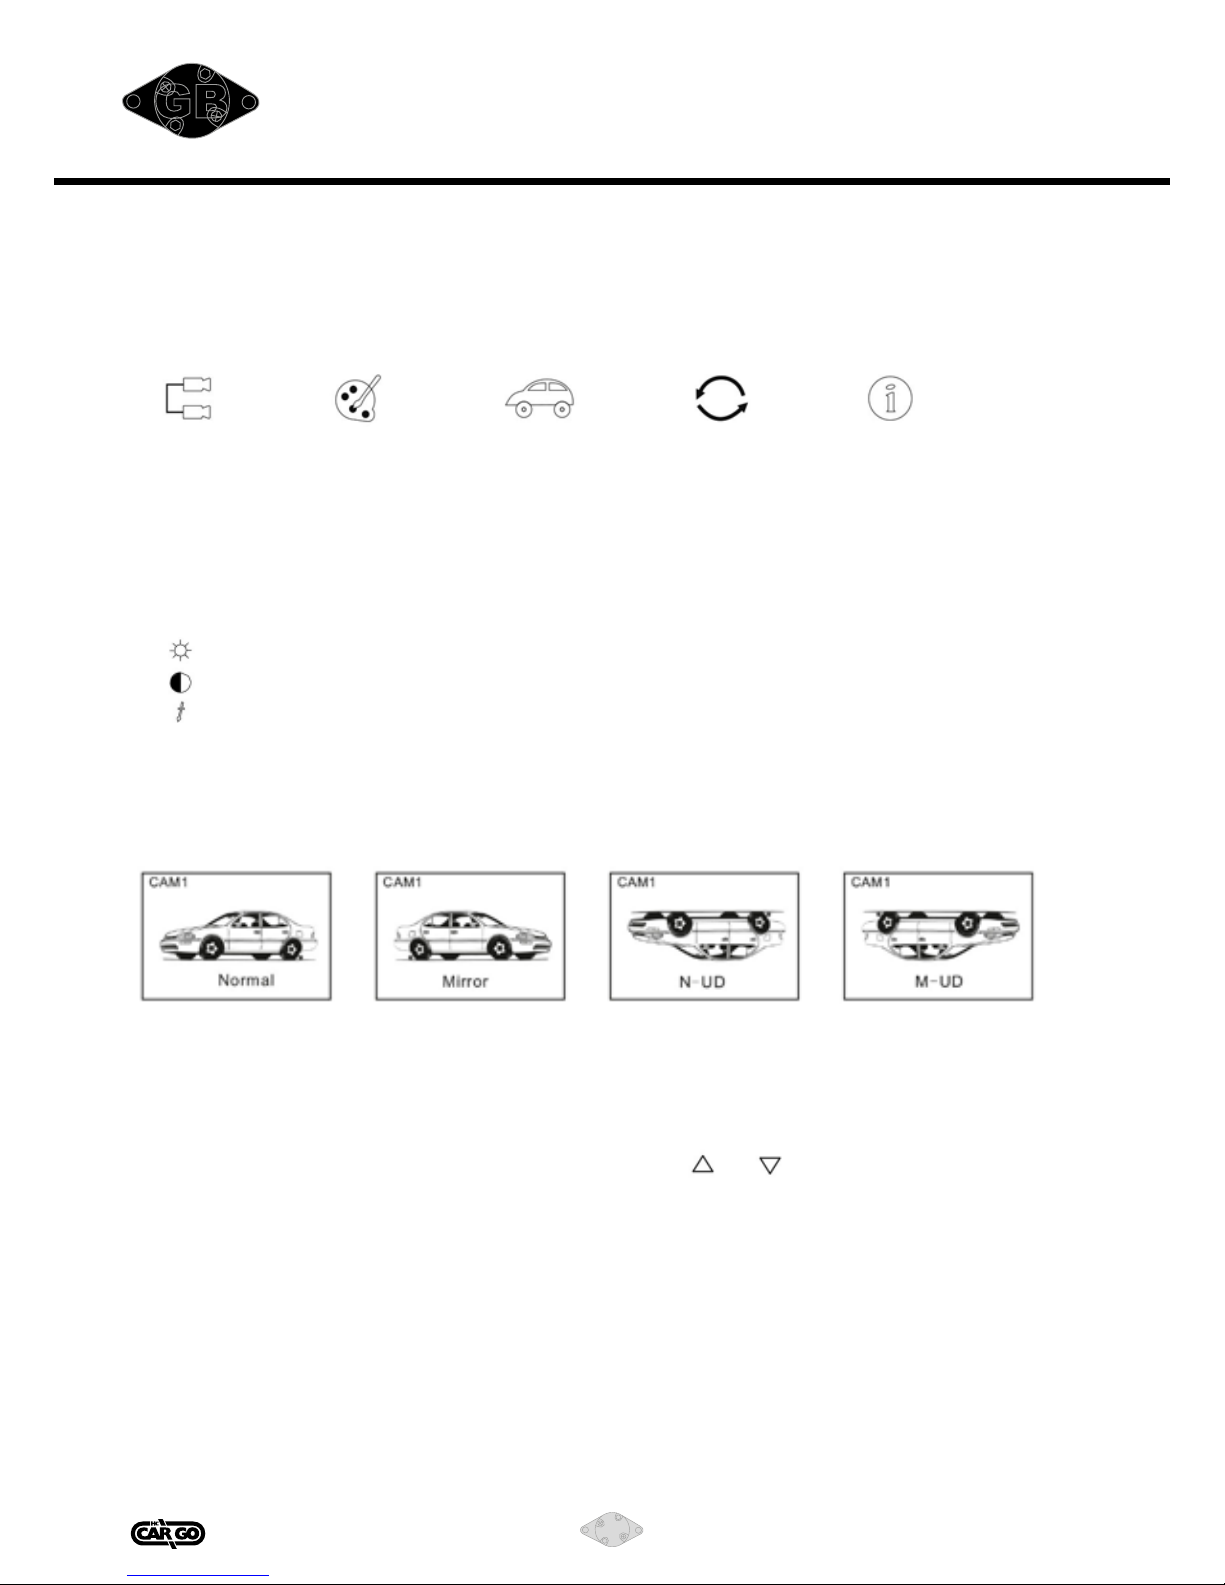
V. Menu operation:
Press MENU to enter the operation:
PAIR PICTURE Electronic Label Nor/Mir Program edition No.
1) Choose PAIR and press OK to enter the pair. The pair will last 30S.
Purpose: To establish connection between the monitor and camera to make the system work
properly.
2) Choose PICTURE and press OK to enter the image set up:
1. Brightness: 0-5 (press left/right to adjust)
2. Contrast: 0-5 (press left/right to adjust)
3. Color: 0-5 (press left/right to adjust)
3) Choose Electronic Label and press OK to turn on/off the electronic label.
The electronic label is only for CAM1.
4) Mirror/Normal image setting: 4 models as below
5) Program Edition No.
Note:
1.Turn on the monitor and under auto search mode press or to enter the normal mode,
or the keys cannot work.
2.Under the AUTO mode, if only CAM1 or CAM2 is working, the monitor will switch to the working
CH automatically, if the CAM1 and CAM2 work together, the monitor will show the CAM1 image.
Special notication:
A bright or dark spot on the screen is normal. Please do not open the case of the monitor to repair
it yourself, but inform the distributor or our company. Opening or dismantling the monitor will
cause damage to the screen.
Monitor
161048
7
Vedpak 203_Version 1_05.2015
GB
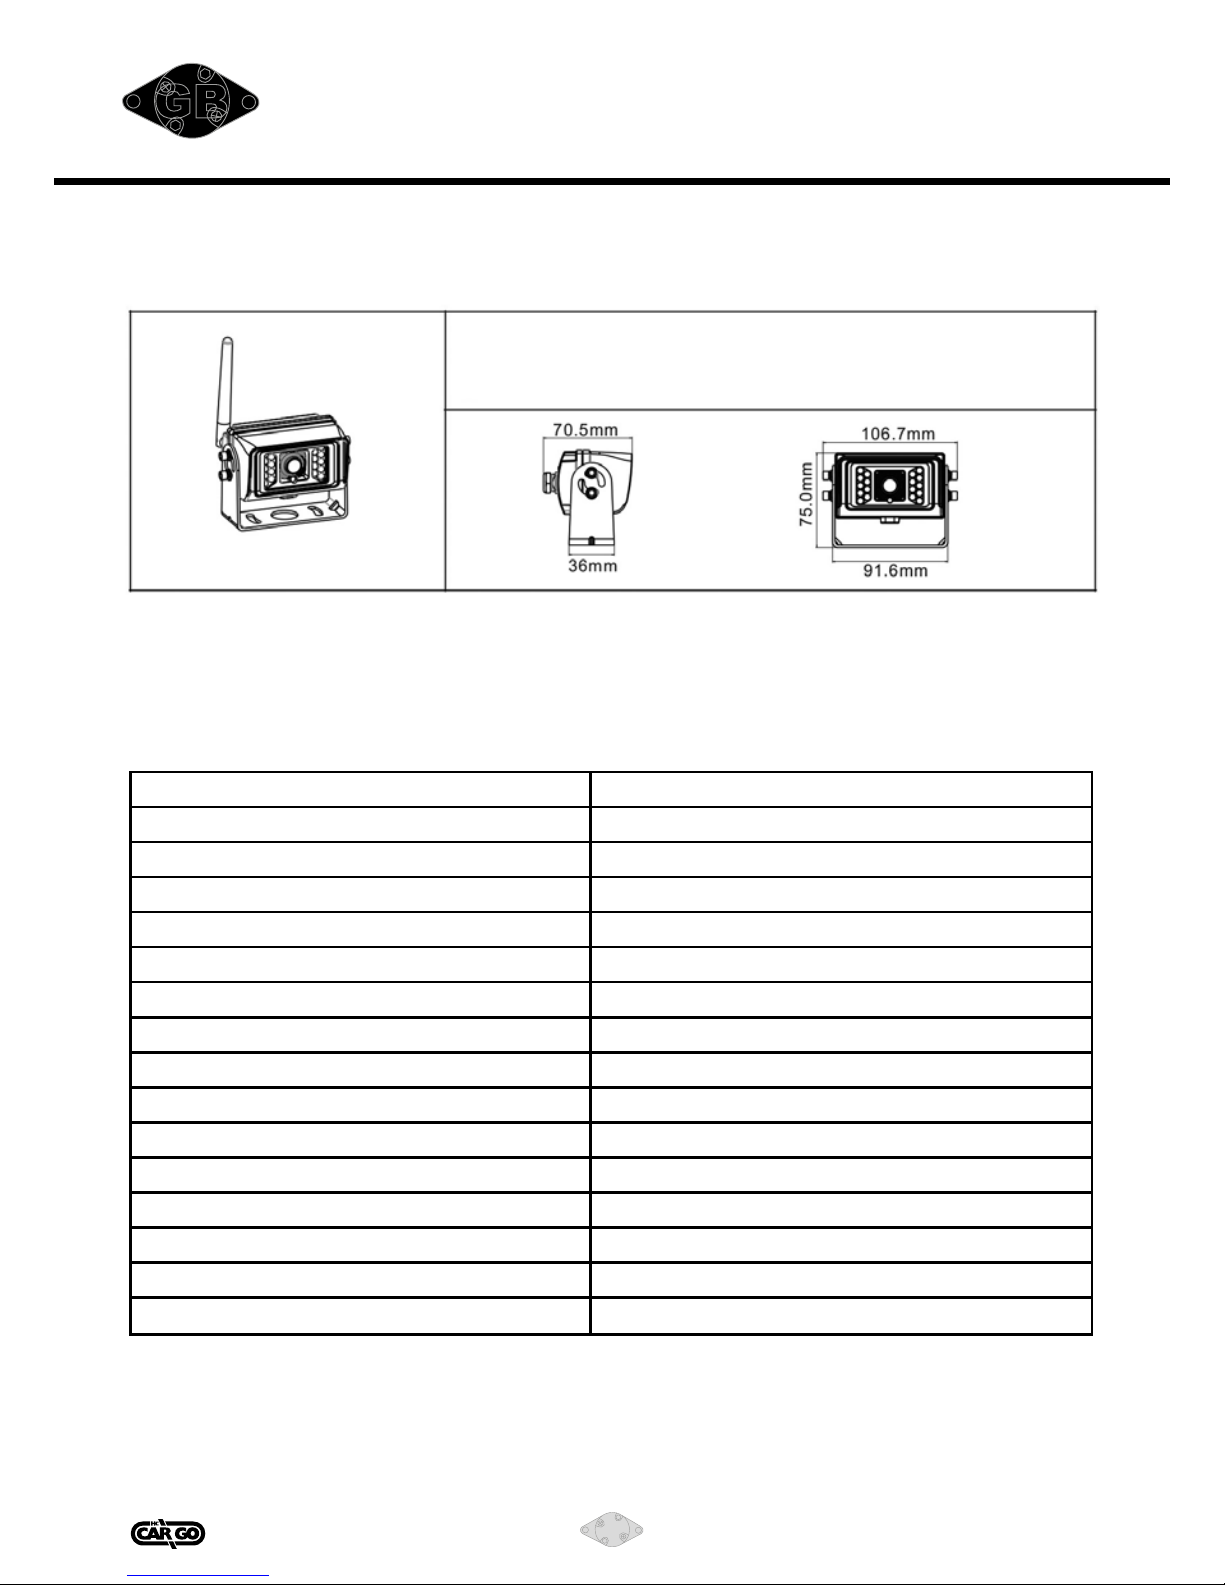
Camera
Digital Wireless Camera appearance and dimension
Technical Parameters
CAMERA COLOR CMOS CAMERA
image Pick-up Device 1/4" COLOR CMOS
Picture Elements 640(H) × 480(V)
Horizontal Resolution 420 TV Lines
Minimum illumination 3.0 Lux(F:2.0) / 0 Lux At Night (IR LED ON)
Lens furnished Board lens 2.9 ~ 3.6mm/F2.0 (optional)
Electronic Shutter Time 1/50(1/60)-1/10,000(sec)
Gain Control Automatic
S/N Ratio More than 48db
Sync system Internal synchronization
White Balance Automatic (2500K to 9500K)
Electronic Shutter Control Automatic
Transmission Power 17dbm
Operating Temperature -20°C ~ +70°C
Storage Temperature -30°C ~ +80°C
Audio Output 100 Hz-8KHz
● Field of View: 120°
● Wide Voltage input: 11-32V(optional)
● Image pick-up Device : 1/4 COLOR CMOS
● Waterproof: IP69K
Digital Wireless Camera
161048
8
Vedpak 203_Version 1_05.2015
GB
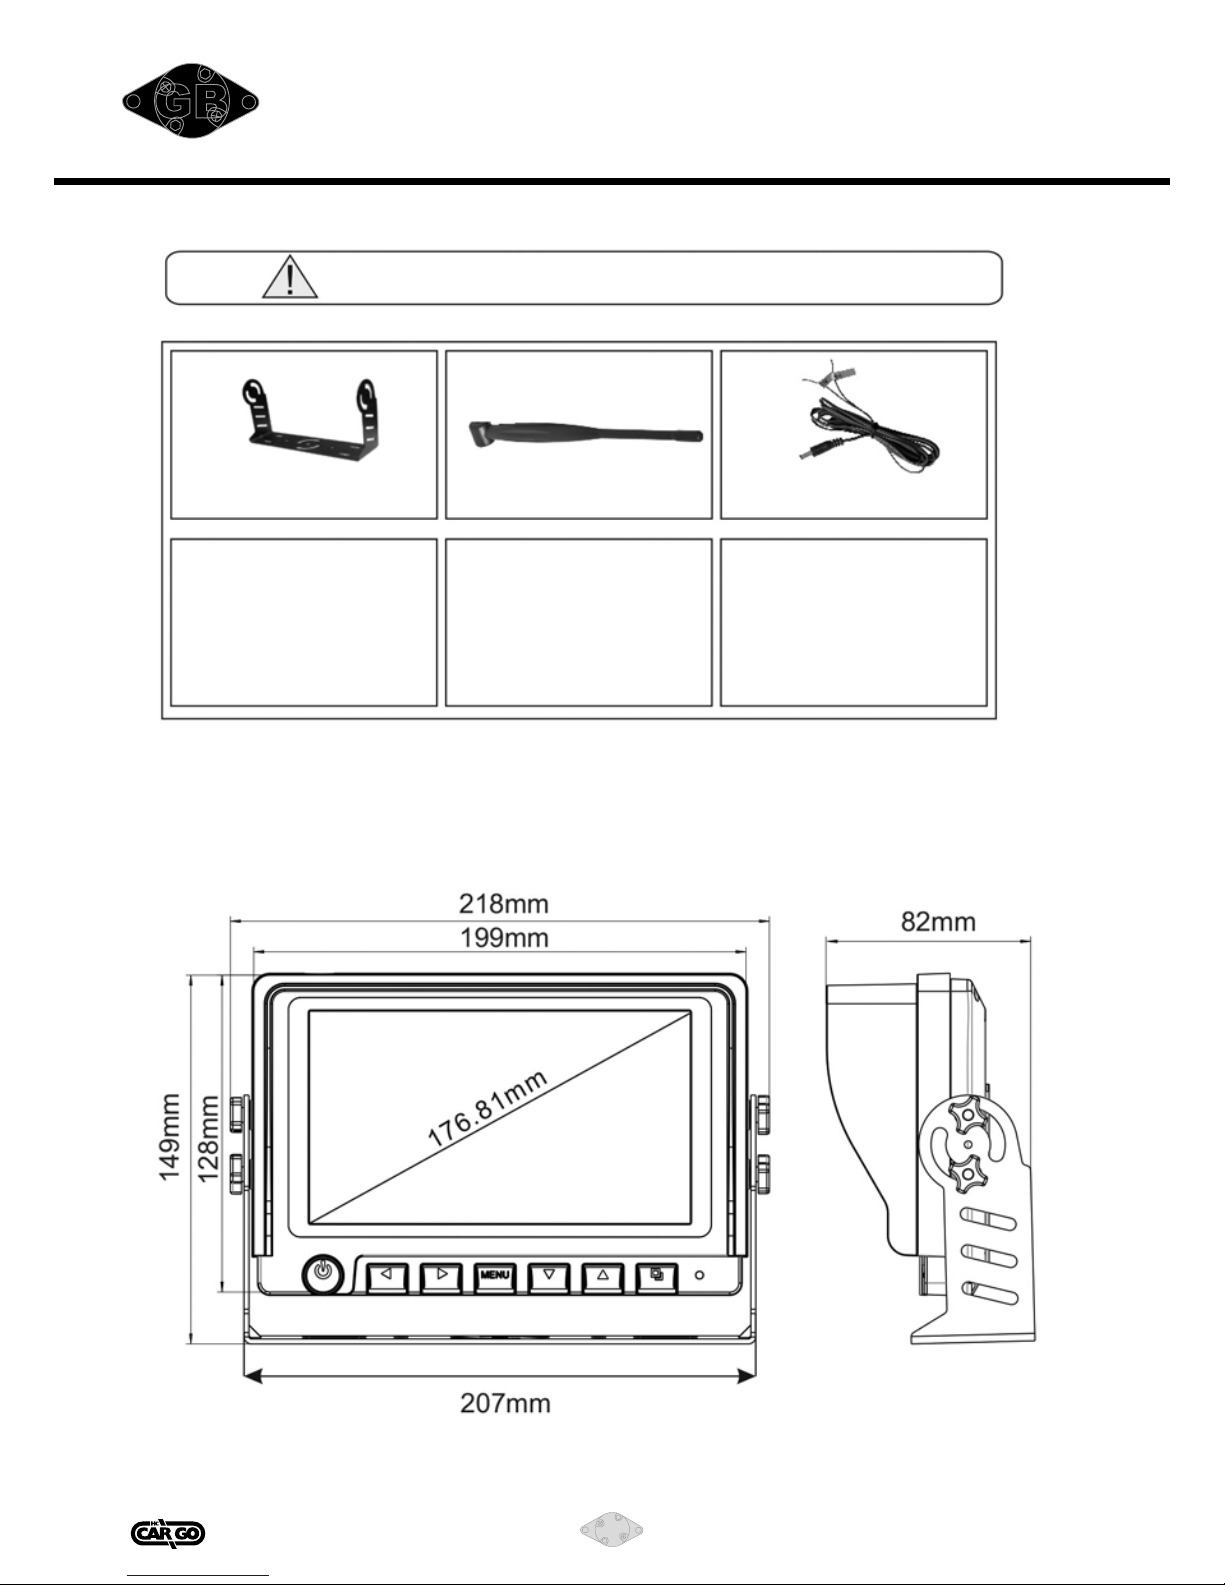
Note: Different system with different accessories
Accessories
U-shape mount Indoor antenna DC Power cable
Mounting Dimensions:
161048
9
Vedpak 203_Version 1_05.2015
GB
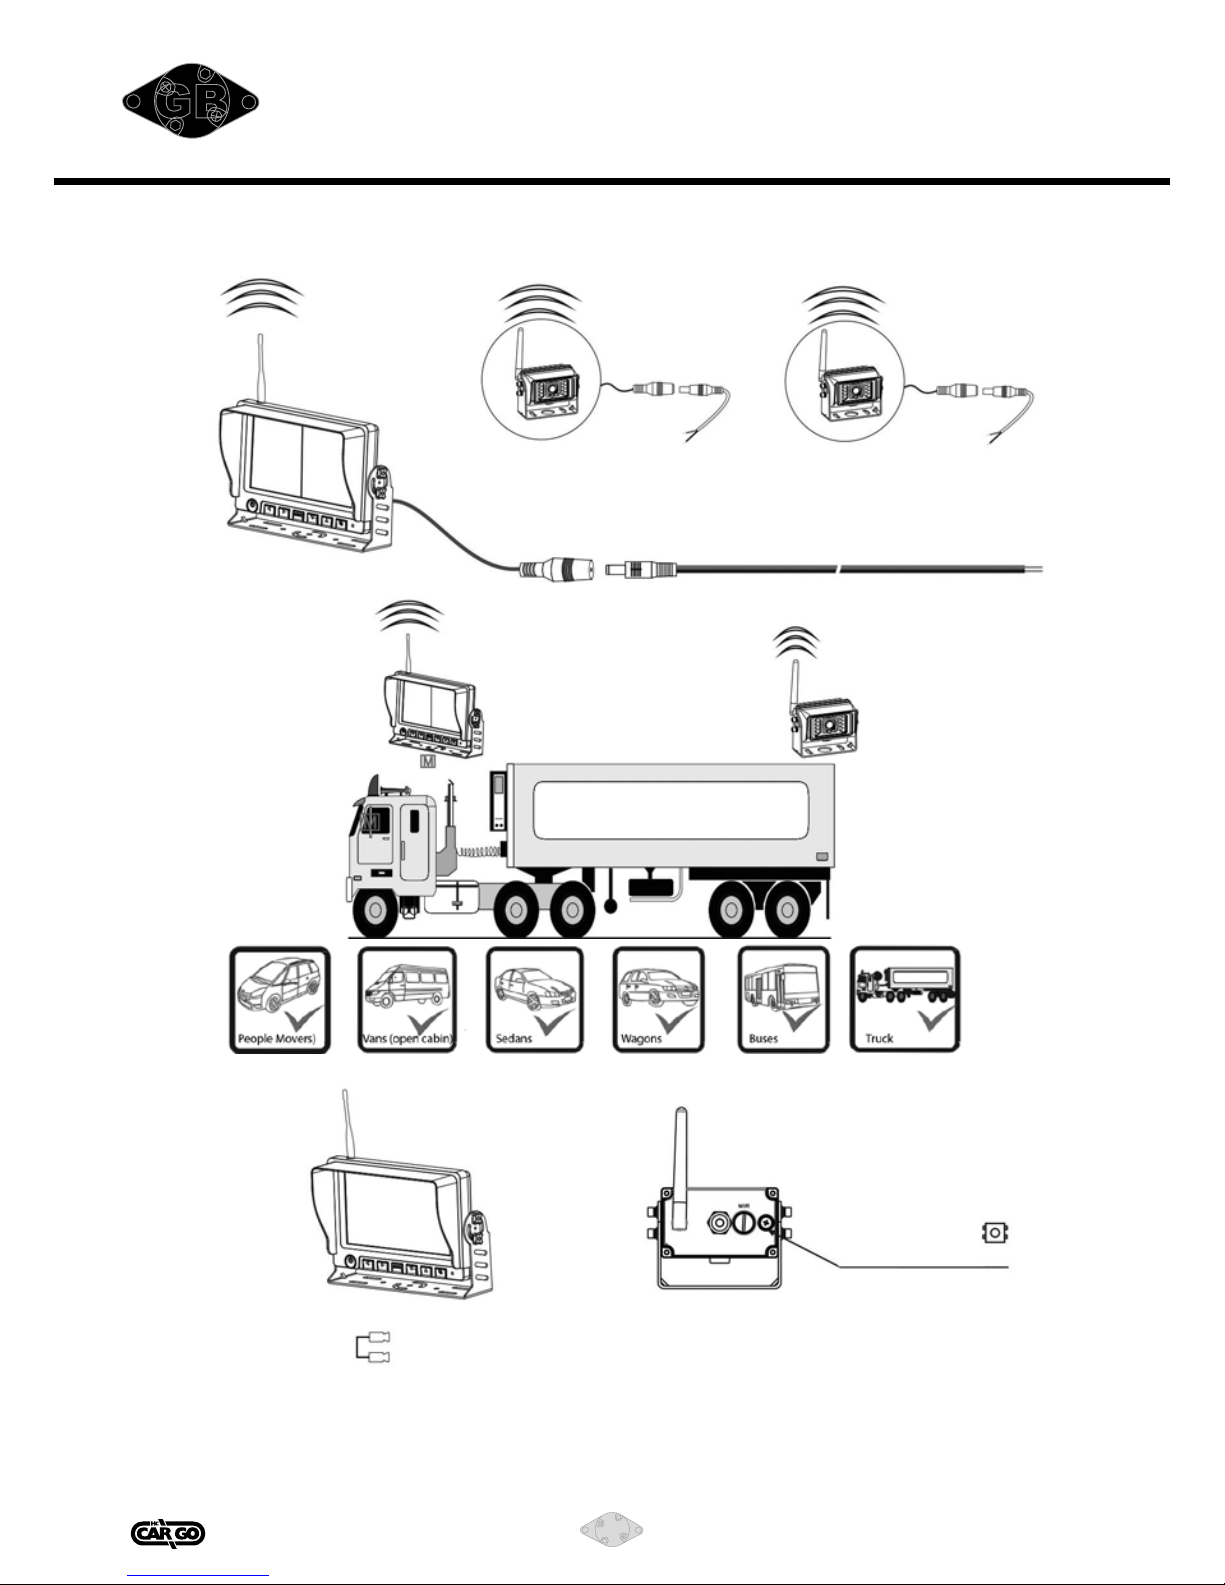
I. Digital Wireless System Connection Diagram
System connection:
Power(Red)
Ground(Black)
CAM1 CAM2
DC Input: 11-32V DC Input: 11-32V
Power input Power input
Power(Red)
Ground(Black)
II. How to pair the Digital Wireless Monitor and Camera:
Camera Pair Key
(Inside the screw)
Step 1. Turn on the monitor, press down or up key to normal mode, press menu
and choose press OK to begin the pair, which will last for 30S.
Step 2. Open the screw on the back of the camera, and press the pair key within the 30S. When
the monitor displays the image the pair has been successful.
Attention: Please only pair if the monitor cannot receive the wireless signal properly.

161048
10
Vedpak 203_Version 1_05.2015
GB
D
Eigenschaften
• Hochauösender 7”-Farbschirm (TFT-LCD). LED-Hintergrundbeleuchtung
• 8 V-32 V-Stromversorgung (DC), geeignet für alle Fahrzeuge.
• Abnehmbare Sonnenblende
• Schnurlose, digitale Signalübertragung. Unterstützung von Nebenbildschirm bzw. zwei Bildschirmen.
• Nach d
em erfolgreichen Verbindungsaufbau (Pairing) kann zwischen den beiden Kanälen manuell
oder automatisch umgeschaltet werden.
• PAL/NTSC optional, geeignet für verschiedene Länder.
• Keine Bildumkehrfunktion, standardmäßig CAM1 Spiegelbild und CAM2 Normalbild.
• Der Bildschirm spart Energie und trägt somit zur Senkung des Kohlendioxid-Ausstoßes und zum
Umweltschutz bei.
• Hohe Stoßfestigkeit: 8G.
• Menü für manuellen Betrieb
• Das Monitorgehäuse besteht aus hochtemperaturbeständigem Kunststoff (ABS).
• Lastabfall V=87V, Td=400mS.
• Der Bildschirm verfügt über einen Batterieverpolungsschutz (+/-).
Wichtige Hinweise
1) Machen Sie sich vor Inbetriebnahme mit der Anleitung vertraut!
2) Vor dem Anschließen des Stroms alle Kabelverbindungen überprüfen. Bei fehlerhafter Verbindung
kann das Bild falsch angezeigt werden.
3) Der Monitor ist nicht wasserdicht – den Monitor daher nicht im Freien anbringen.
4) Um Schäden an den Teilen zu vermeiden, darf das Produkt nicht im Auto verwendet werden,
wenn am Auto geschweißt wird.
5) Zur einwandfreien Funktion müssen alle Kabel fest verbunden sein.
6) Das Gehäuse der Kamera nicht öffnen, da der Chip und das Dichtungsmaterial Schaden nehmen
könnten und Wasser eindringen kann.
7) Die Kabel nicht eng an heißen oder drehenden Gegenständen vorbeiführen.
8)
Die Gehäuseöffnungen am Bildschirm dürfen nicht verdeckt werden, damit die Abwärme entweichen kann.
9)
Hohe Spannung im Monitor – die Gehäuserückseite darf daher nur von Fachleuten geöffnet werden.
10) Während der Fahrt ist vom angucken von DVDs abzuraten.
11) Bitte keine ätzenden Chemikalien zur Reinigung von Kamera und Monitor verwendet.
Warnhinweis
Auf Grund der Stromschlaggefahr und da sich in Kamera und Monitor keine reparaturfähigen Teile benden,
sollten die Geräte nicht geöffnet werden. Reparaturen und Einstellungen an den Produkten sollten nur von
Fachleuten vorgenommen werden.
Bitte beachten!
Diese Anleitung dient nur zur Information. Sollten sich die Angaben der Anleitung ändern, werden Sie darüber
nicht automatisch informiert. Der Hersteller haftet für ungenaue oder falsche Informationen.
Hilfe bei der Fehlersuche
Die nachfolgend aufgeführten Probleme sind nicht zwangsläug auf Displayfehler zurückzuführen.
Bitte gehend Sie die nachfolgenden Punkte durch, bevor Sie eine Reparatur veranlassen.
Problem Mögliche Ursache
Kein Bild
Fehlerhafte Verbindung mit dem Autoadapter.
Eine zulässige Stromversorgung verwenden. Der Netzschalter ist in der Position OFF.
Dunkler Bildschirm Kontrast und Helligkeit überprüfen.
Keine Farbe Farbeinstellung überprüfen oder feststellen, ob das richtige Farbsystem eingestellt
ist (PAL/NTSC)
161048
11
Vedpak 203_Version 1_05.2015
GB
D
Monitor
I. Erscheinungsbild und Zubehör
• Power
• Links (Vol-)
• Rechts (Vol+)
• Menü/Esc
• Abwärts (CH-Schalter)
• Aufwärts (CH-Schalter)
• OK
II. Technische Parameter
Antenne
Farbschirm (TFT-LCD)
Sonnenblende
Bügelschraube
Bügel
Anzeigeeinheit Farbschirm (TFT-LCD)
Größe 7"-Bildschirm (LED-Hintergrundbeleuchtung)
Schnittstelle Digital TTL
Auösung 800×RGB×480
Sichtbarer Bereich (mm) 153,60 × 86,64
Blickwinkel (LR/UD) 140 / 110
Kontrastverhältnis 500:1
Leuchtdichte (nits) 450
Ansprechzeit (ms) 25
Betriebstemperatur -20 °C ~ +70 °C
Lagertemperatur -30°C ~ +80°C
Anschluss DC-Buchse
Strom-
Versorgung
1. AC-Netzteil (DC8V-32V)
2. Anschlussstecker für Autobatterie (12V/24V)
Leistungsaufnahme 4,5 W Max
Außenabmessungen: W 218 mm × H 149 mm × T 82 mm
Übertragungsstrecke: 100 m
Audio-Ausgang ≤ 1 W
161048
12
Vedpak 203_Version 1_05.2015
GB
D
III. Sonnenblende des Monitors befestigen/entfernen
IV. Bildschirmhalterung (U-Bügel)
Monitor
Befestigen
Arretierung Drücken
Fertig
Entfernen
Arretierung
Sonnenblende Monitor
Anheben
Monitor
Sonnenblende
U-Bügel
Schraube
Schraube
Fertig
U-Bügel Bügel befestigt
Abmessungen des Bügels

161048
13
Vedpak 203_Version 1_05.2015
GB
D
V. Menübedienung:
MENÜ klicken, um in das entsprechende Menü zu gelangen.
PAIR BILD Elektronisches Label Nor/Spiegel Programm-Edition Nr.
1) PAIR auswählen und OK drücken, um die Gerätesuche (Pairing) zu beginnen. Es dauert ca. 30
Sekunden.
Zweck: Damit wird die Verbindung zwischen Bildschirm und Kamera aufgebaut.
2) BILD auswählen und OK drücken, um Bildeinstellungen vorzunehmen.
1. Helligkeit: 0-5 (zum Einstellen links/rechts drücken)
2. Kontrast: 0-5 (zum Einstellen links/rechts drücken)
3. Farbe: 0-5 (zum Einstellen links/rechts drücken)
3) Elektronisches Label auswählen und OK drücken, um das elektronische Label ein- und
auszuschalten.
Es gibt nur ein elektronisches Label für CAM2.
4) Spiegel/Normale Bildeinstellung: 4 unterschiedliche Modelle
5) Programm-Edition Nr.
Hinweis:
1.Den Bildschirm einschalten und im Autosuchmodus Symbol oder drücken, um den normalen
Modus einzugeben. Ansonsten funktionieren die Tasten nicht.
2. Wenn nur CAM1 oder CAM2 arbeitet, wird der Monitor im AUTO-Modus automatisch zum aktiven
Kanal schalten. Wenn CAM1 und CAM2 zusammenarbeiten, wird der Monitor das Bild von CAM1
zeigen.
Wichtige Mitteilung:
Ein heller oder dunkler Fleck auf dem Monitor ist ganz normal. Bitte das Gehäuse des Monitors
nicht öffnen, um eigenständig Reparaturen durchzuführen. Wenden Sie sich stattdessen an den
Händler oder den Hersteller. Durch das Öffnen und die Demontage des Monitors kann dieser
Schaden nehmen.
Monitor

161048
14
Vedpak 203_Version 1_05.2015
GB
D
Kamera
Drahtlose Digitalkamera, Erscheinungsbild und Abmessungen
Technische Parameter
KAMERA COLOR CMOS CAMERA
Bildsensor 1/4" COLOR CMOS
Pixel 640(H) × 480(V)
Horizontale Auösung 420 TV-Linien
Mindestwert der Beleuchtungsstärke 3.0 Lux(F:2.0) / 0 Lux nachts (IR-LED ON)
Objektiv Objektiv 2,9 ~ 3,6mm/F2,0 (optional)
Elektronische Abschaltung 1/50(1/60)-1/10.000(sec)
Verstärkungseinstellung Automatisch
Rauschabstand: Mehr als 48 db
Sync System Interne Synchronisation
Weißabgleich Automatisch (2500K bis 9500K)
Elektronische Abschaltung Automatisch
Energieübertragung 17 dbm
Betriebstemperatur -20 °C ~ +70 °C
Lagertemperatur -30°C ~ +80°C
Audio-Ausgang 100 Hz-8KHz
● Weitwinkel: 120°
● Spannungsversorgung: 11-32 V (optional)
● Bildsensor: 1/4 COLOR CMOS
● Wasserdicht: IP69K
Drahtlose Digitalkamera

161048
15
Vedpak 203_Version 1_05.2015
GB
D
Hinweis: Anderes System mit anderem Zubehör
Zubehör
U-förmige Halterung Innenantenne DC-Stromkabel
Einbaumaße:

161048
16
Vedpak 203_Version 1_05.2015
GB
D
I. Drahtloses Digital-System Anschlussplan
Systemanschluss
Plus(rot)
Masse(schwarz)
CAM1 CAM2
DC-Eingang: 11-32V DC-Eingang: 11-32V
Versorgungseingang Versorgungseingang
Plus(rot)
Masse(schwarz)
II. Reparatur von Monitor und Kamera:
Taste zur Gerätesuche (Pairing)
(in der Schraube)
Schritt 1: Monitor einschalten, Taste abwärts oder aufwärts betätigen, um in den Normal-Modus zu
gelangen, Menü drücken
und das Symbol auswählen, OK drücken und die Gerätesuche (Pairing) beginnen
(Dauer: ca. 30 Sekunden).
Schritt 2: Die Schraube auf der Rückseite der Kamera öffnen und die Pair-Taste innerhalb der 30
Sekunden drücken. Wenn der Monitor ein Bild anzeigt, war die Gerätesuche erfolgreich.
Achtung: Die Gerätesuche nur dann vornehmen, wenn der Monitor das Funksignal empfangen kann.

161048
17
Vedpak 203_Version 1_05.2015
GB
F
Caractéristiques
• Écran couleur haute résolution TFT-LCD de 7". Rétro-éclairage à LED.
• Entrée d'alimentation 11 VCC-32 VCC convenant à tous les types de véhicules.
• Pare-soleil amovible.
• Double transmission de signal numérique sans l. Supporte un sous-écran et deux écrans.
• Une fois le couplage effectué, vous pouvez basculer entre les deux canaux manuellement ou automa-
tiquement.
• PAL/NTSC en option, adapté à différents pays ;
• Pas de fonction d'inversion d'image, image miroir CAM1 par défaut, image normale CMA2.
• Moniteur respectueux de environnement à faible consommation d'énergie et faibles émissions de
carbone.
• Classe élevée de résistance aux chocs : 8G.
• Menu sélection manuelle.
• La coque du moniteur est fabriquée en ABS et est résistante aux hautes températures.
• Perte de charge V=87 V, Td=400 mS.
• Le circuit du moniteur comporte une protection contre l’inversion de polarité (+/-).
iNotes
1) Veuillez lire ce manuel avant d'utiliser nos produits.
2) Avant la mise sous tension, vériez la connexion des câbles. Une mauvaise connexion peut
causer des dommages à l'image.
3) Le moniteur n'est pas étanche ; ne le placez pas à l'extérieur.
4) An de ne pas endommager les composants, n'utilisez pas les produits pendant que vous soudez
dans votre voiture.
5) Pour un fonctionnement sans faille, veillez à ce que tous les câbles soient bien connectés.
6) N'ouvrez pas le boîtier de la caméra ; cela pourrait endommager l'appareil étanche et les puces
à l'intérieur.
7)
N'exposez pas les cables à des températures élevées et ne les placez pas à proximité d'objets rotatifs.
8) Pour qu
e la chaleur élevée à l'intérieur du moniteur puisse être évacuée, n'obstruez pas les
trous dans la coque.
9)
Haute tension à l'intérieur du moniteur ; les non-professionnels ne doivent pas ouvrir la coque arrière.
10) Pendant la conduite, ne regardez pas de DVD, etc.
11) N'utilisez pas de produits chimiques caustiques pour nettoyer la caméra et le moniteur.
Avertissement
Le système ne comporte pas de pièces réparables. Évitez donc de démonter la caméra CCD ou le moniteur en
raison du danger de haute tension dans les produits. Les réparations et les réglages des produits doivent être
effectués par des techniciens qualiés.
Remarque
Ce manuel est pour référence seulement. Vous ne recevrez aucune notication en cas de changements des
informations. Toute information erronée ou non détaillée est de la responsabilité du fabricant.
Avant de demander une réparation
Les problèmes ci-dessous n'indiquent pas nécessairement une panne de l'écran.
Veuillez vérier en utilisant les méthodes suivantes avant de demander une réparation.
Problème Causes possibles
Pas d'image
Mauvaise connexion avec l'adaptateur automobile.
Utilisation d'une alimentation électrique non autorisée. L'interrupteur est sur la
position OFF.
Image sombre Veuillez vérier le contraste et la luminosité.
Pas de couleurs Vériez si la couleur est réglée ou si le système couleur (PAL/NTSC) est correct.

161048
18
Vedpak 203_Version 1_05.2015
GB
F
Moniteur
I. Aspect et accessoires
• Alimentation
• Gauche (Vol-)
• Droite (Vol+)
• Menu/Echapp
• Bas (interrupteur CH)
• Haut (interrupteur CH)
• OK
II. Paramètres techniques
Antenne
Écran couleur TFT-LCD
Pare-soleil
Vis de console
Console
Dispositif d'afchage Couleur TFT-LCD
Taille Écran d'une largeur de 7" (rétro-éclairage à LED)
Interface Numérique TTL
Résolution 800×RGB×480
Zone active (mm) 153.60×86.64
Angle de vue (LR/UD) 140 / 110
Rapport de contraste 500:1
Luminance (nits) 450
Temps de réponse (ms) 25
Température de service -20 °C ~ +70 °C
Température de stockage -30 °C ~ +80 °C
Connecteur femelle CC
Alimentation électrique
de l'application
1.Alimentation électrique CA-Adaptateur CA (8 VCC-32 VCC)
2.Accumulateur automobile (12 V/24 V) Adaptateur automobile
Consommation électrique 4,5 W max.
Dimensions externes l218 mm × H149 mm ×Tl82 mm
Distance de transmission 100 m
Sortie audio ≤ 1 W
161048
19
Vedpak 203_Version 1_05.2015
GB
F
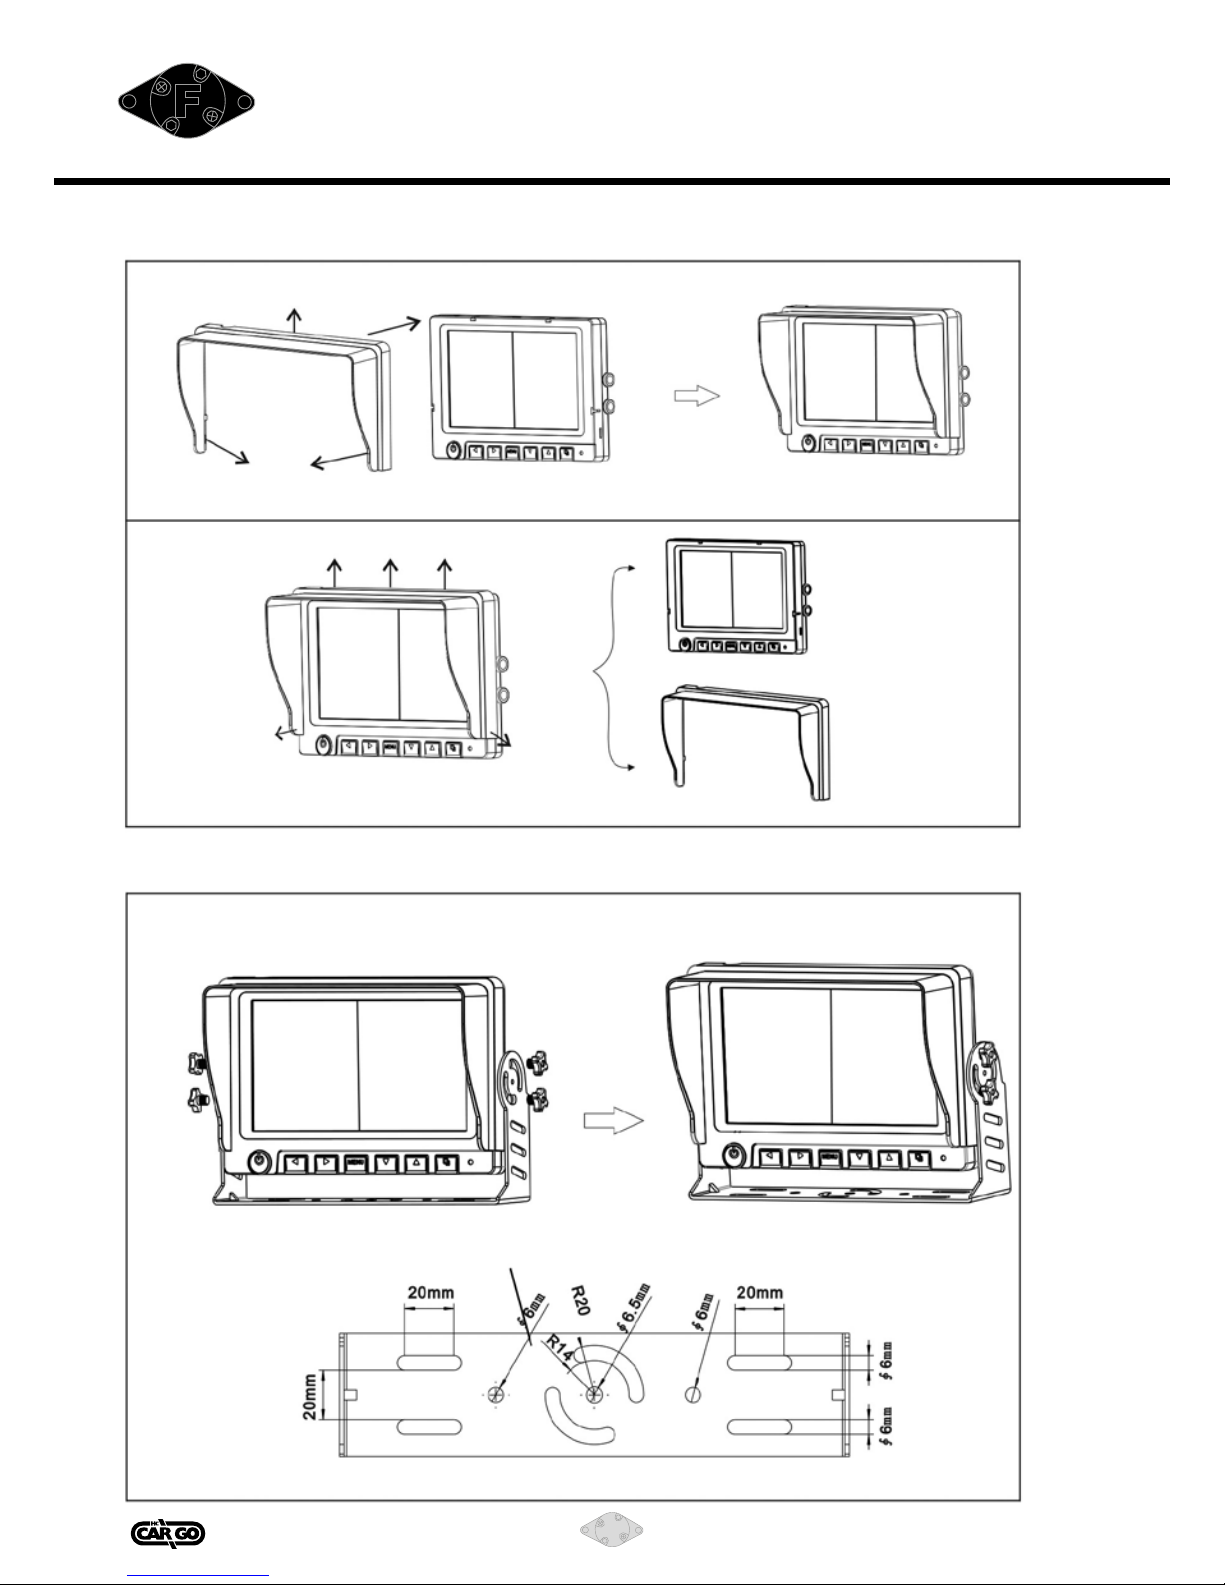
III. Installation/Dépose du pare-soleil du moniteur
IV. Fixation de la console du moniteur
Moniteur
Installer
Clip Pousser
Terminer
Enlever
Clip
Pare-soleil Moniteur
Lever
Moniteur
Pare-soleil
Console du moniteur
Vis Vis
Terminer
Console Console montée
Dimensions de la console

161048
20
Vedpak 203_Version 1_05.2015
GB
F
V. Menu :
Appuyez sur MENU pour accéder au fonctionnement :
COUPLAGE IMAGE Étiquette électronique nor/mir N° d'édition du programme.
1) Sélectionnez COUPLAGE et appuyez sur OK pour accéder au couplage. Le couplage dure 30 s.
Objectif : Établir une connexion entre le moniteur et la caméra pour que le système fonctionne
correctement.
2) Sélectionnez IMAGE et appuyez sur OK pour accéder à la conguration de l'image.
1. Luminosité : 0-5 (appuyez sur gauche/droite pour ajuster)
2. Contraste : 0-5 (appuyez sur gauche/droite pour ajuster)
3. Couleur : 0-5 (appuyez sur gauche/droite pour ajuster)
3) Sélectionnez Étiquette électronique et appuyez sur OK pour activer/désactiver l'étiquette
électronique.
L'étiquette électronique est seulement pour CAM1.
4) Miroir/Normal Réglage de l’image: 4 modèles comme ci-dessous
5) N° d'édition du programme
Note :
1.Allumez le moniteur et dans le mode de recherche automatique et appuyez sur ou pour
accéder au mode normal. Autrement, les touches ne peuvent pas fonctionner.
2.Sous le mode AUTO, si seulement CAM1 ou CAM2 fonctionne, le moniteur passera automatique-
ment au CH (canal) fonctionnant. Si CAM1 et CAM2 fonctionnent ensemble, l'écran afche l'image
de CAM1.
Notication spéciale :
La présence d'une tache lumineuse ou sombre sur l'écran est normale. N'ouvrez pas le boîtier du
moniteur pour le réparer vous-même, contactez le distributeur ou notre entreprise. L'ouverture
ou le démontage du moniteur risque d'endommager l'écran.
Moniteur
Table of contents
Languages:
Other hc-cargo Automobile Accessories manuals


