Crocodile Tail Loop Wing OC10W
Specifications
ALL COPYRIGHT RESERVED BY LEP INTERNATIONAL CO., LTD. 2021|http://www.one-control.com/
LEP INTERNATIONAL CO., LTD.
User’s Manual V1.01
1/2
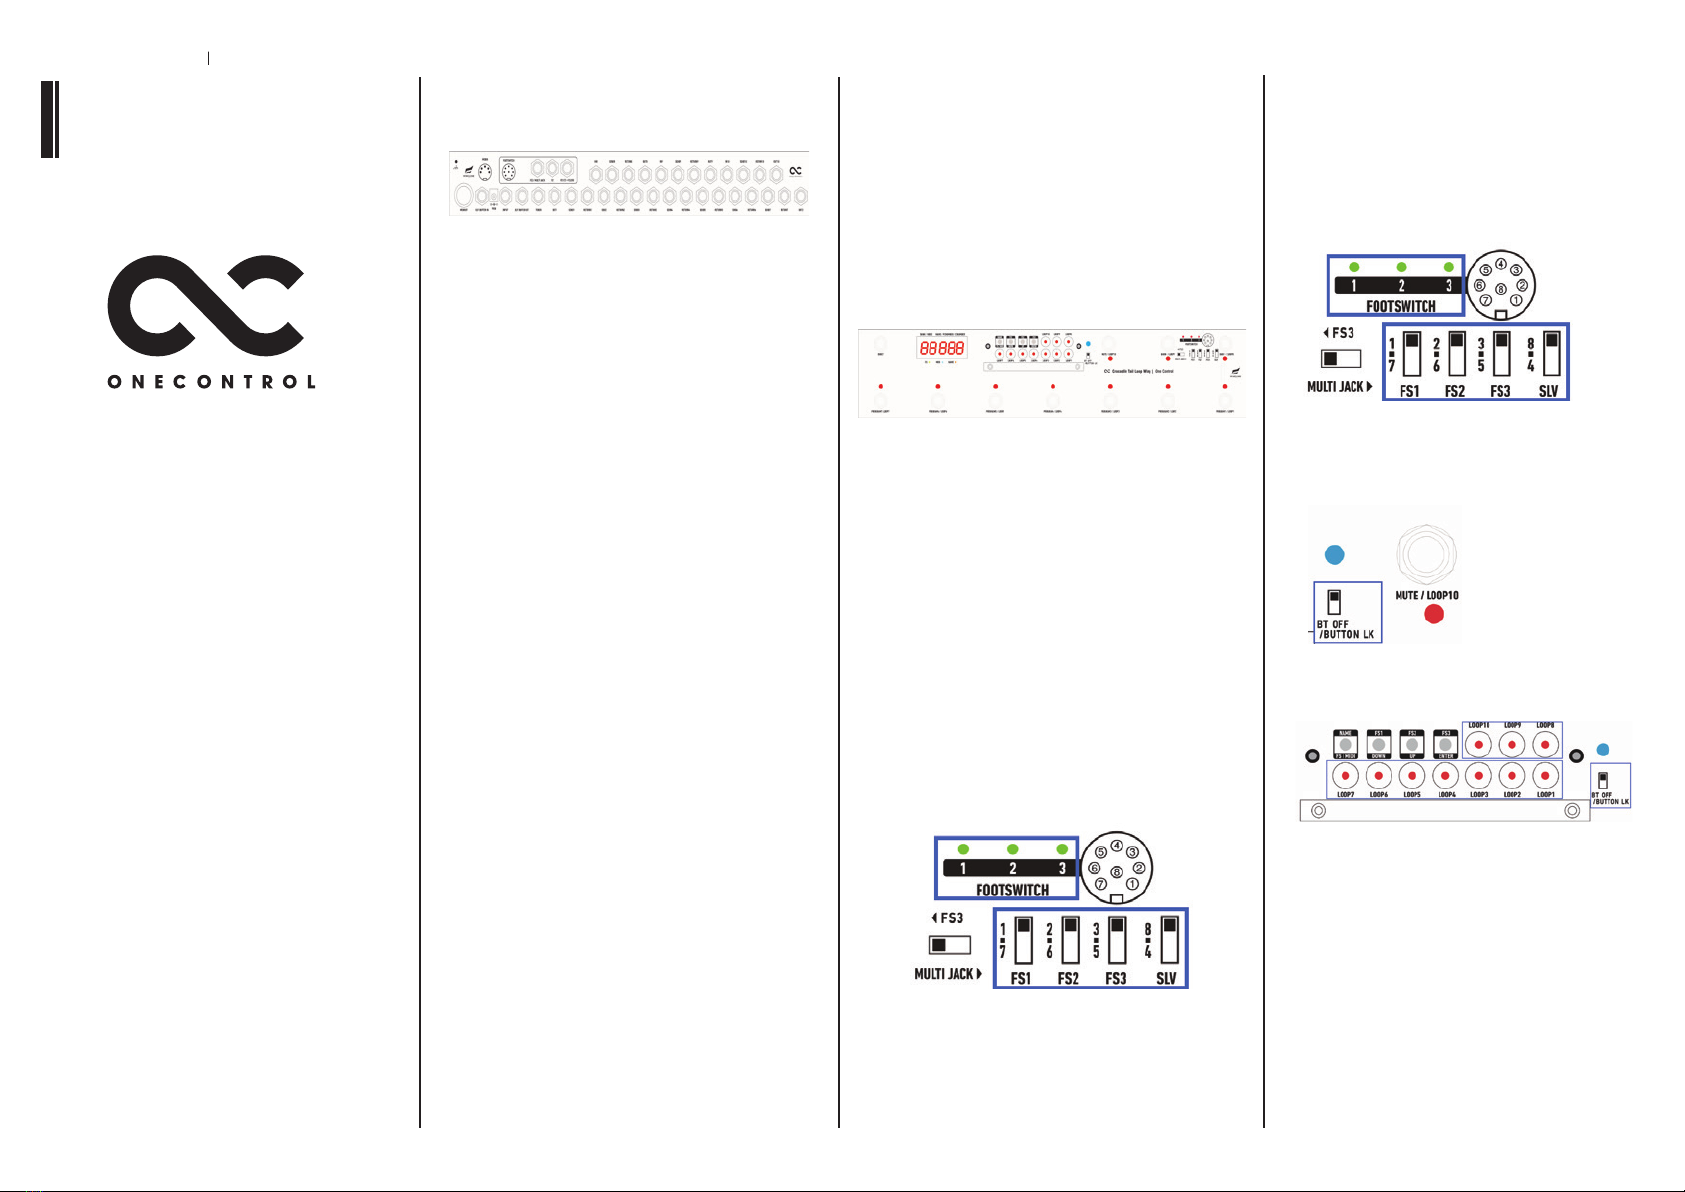
1.Rear Panel
-9V IN
Power supply, 9V DC, negative center.
-BJF BUFFER IN
When a guitar is connected to this jack, the signal will be
buered before sent to loop1.
-INPUT
When a guitar is connected to this jack, the non-buered
signal will be sent to loop1 directly.
-BJF BUFFER OUT
When a guitar connects to BJF BUFFER IN jack, this BJF
BUFFER OUT will output the buered guitar signal.
-TUNER
This jack will output the guitar signal when the MUTE switch
is engaged.
-OUT1, OUT2
The two jacks are in parallel and output the signal after
loop7.
-SEND1~7
The send jacks of loop1~7 connect to the input jack of a
guitar pedal.
Loop1~7 are in series, signal goes into loop1 first and then
finally reaches to loop7.
-RETURN1~7
The return jacks of loop1~7 connect to the output jack of a
guitar pedal.
-IN8/9/10, SEND8/9/10, RETURN8/9/10, OUT8/9/10
Loop8/9/10 are parallel loops which are isolated from the
major loops1~7. The 3 loops are internally connected in
series unless a cable is inserted into the “IN” or “OUT” jack.
IN: Connect with a lead of patch cable to input signal, insert
a cable will isolate the loop from the prior loop. For
example, if IN9 insert a cable, loop9 will isolate from loop8.
SEND: Connect the input jack of a guitar pedal.
RETURN: Connect the output jack of a guitar pedal.
OUT: Output jack of a parallel loop, insert a cable will isolate
the loop from the back loop. For example, if OUT9 insert a
cable, loop9 will isolate from loop10.
-FOOTSWITCH
There are 3 footswitches FS1/FS2/FS3 and one 8P DIN jack
which are for amp switching.
FS1(TRS): Normal open latch type footswitch, fs1 relay
shorts/opens the tip and sleeve of FS1, the fs2 relay
shorts/opens the ring and sleeve of FS1 when FS2 jack
doesn’t have a plug inserted.
FS2: Normal open latch type mono footswitch. Fs2 relay
shorts/opens the tip and sleeve of FS2 jack, the fs2 relay
also shorts/opens the ring and sleeve of FS1 when FS2 jack
doesn’t have a plug inserted.
FS3/MULTI JACK: As a normal open latch footswitch or as
an output of switching module.
8P DIN JACK: The 8P DIN footswitch jack is an amp
switching jack for those amps which have a DIN jack,
instead of midi control, this is a latch type jack.
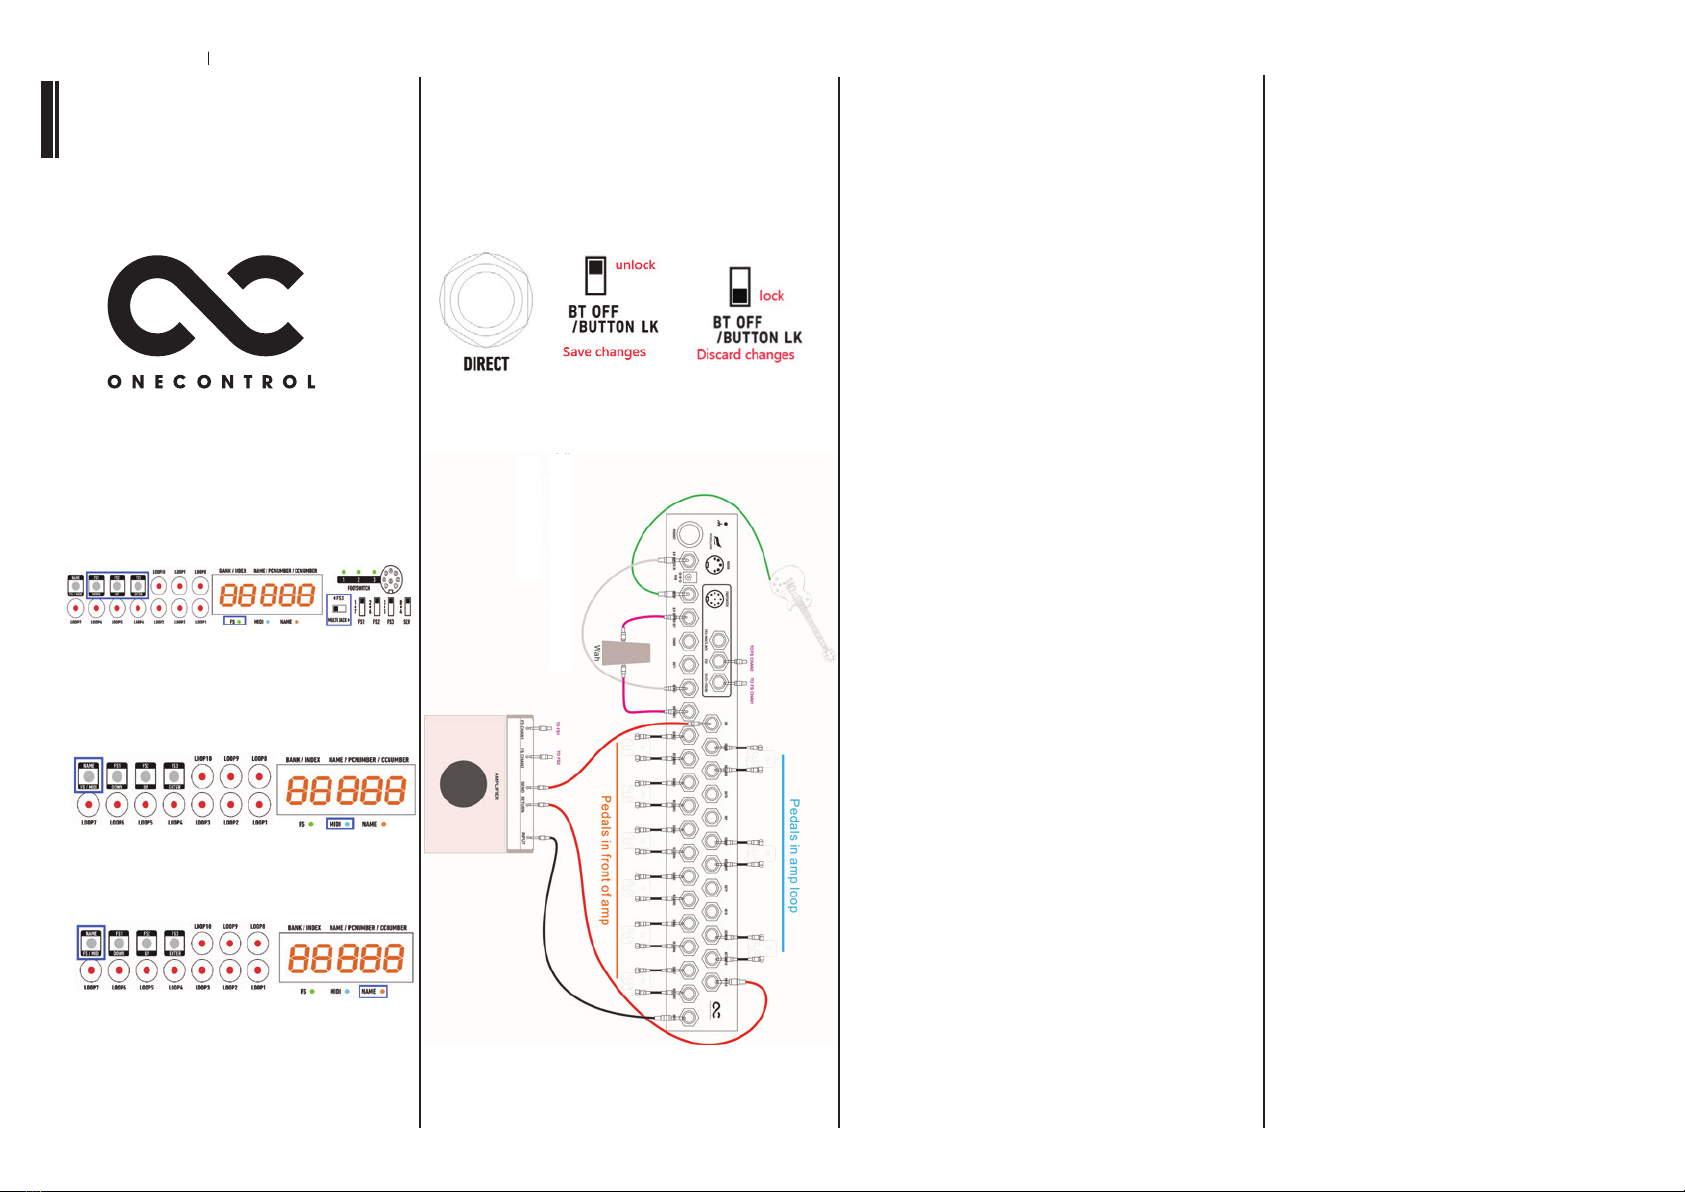
-PROGRAM/LOOP SWITCH
These switches recall presets or turn on/o loop1~7 when
DIRECT mode is on.
-DIRECT SWITCH
Switches unit to DIRECT mode, which allows user to turn
on/o loop1~7 by pressing PROGRAM/LOOP switches, loop8
by BANK UP switch, loop9 by BANK DOWN switch, loop10 by
MUTE switch.
-MUTE SWITCH
This switch mutes the outputs (OUT1 and OUT2) of OC10W
and outputs the INPUT/BUFFERED INPUT signal to the
TUNER jack. The side blue led lights on when OC10W is
muted.
-BANK+, BANK- SWITCH
There are 24 banks in total, these switches scroll the bank
up/down or control loop8 and loop9 in DIRECT mode.
-FOOTSWITCH CONFIG PANEL
On the top panel, the FS3/MULTI JACK switch at left position
configures the FS3 jack to work as a latch type jack. The tip
and sleeve are controlled by fs3 relay, or at right position, as
a multi jack which is an output of a switching module, to
replace the original footswitch of some vintage amps. Check
switching module section for more details.
PC#: 0~167, recall the stored 168 presets.
CC#: Master bypass/engage Controller number:
102, value = 0~63 bypass, value = 64~127 engage.
Master Mute Controller number:
103, value = 0~63 on, value = 64~127 mute.
-MIDI OUT
Outputs MIDI messages.
-PROGRAM BUTTONS
The program buttons are for preset editing. Recall a
preset, unlock the “BUTTON LK” switch, and turn
on/o loop1~10 by pressing button loop1~10.
Controls:Foot Switch x11(PGM/LOOP1-7,
BANK+/LOOP8,BANK-/LOOP9,MUTE/LOOP10,DI-
RECT),FS1-3,NAME,BT OFFF/BUTTON LK、FS1-FS3
Slide Switch,FS3/MULTI JACK
Input/Output:Inputx2 (BJF BUFFER IN/NBUF IN)
Outputx3(Parallel out x2 andBUFFER OUT),TUNER
OUT,SEND/RETURN x7,Separate Loop(IN/SEND/RE-
TURN/OUT)x3, FS1(FS1+FS2 Stereo Out),FS2,FS3/-
MULTI JACK, 8PIN DCIN, MIDI IN, MIDI OUT
Power: DC9-12V Center Negative 2.1mm barrel type
Current Draw:400mA
size:44(L) x 10(W) x 6.4(H) cm
weight:約1.34kg
-MIDI IN
Receives MIDI messages from midi controllers, the midi
receiving channel is 1.
2.Top Panel
The DIN jack is configured by 4 toggle switches as below.
Relay fs1 can be chosen to connect PIN1 or PIN7 of
DIN jack, or no connection, relay fs2 connects to
PIN2 or PIN6, or no connection, relay fs3 connects to
PIN3 or PIN5, or no connection, SLV switch sets the
sleeve of DIN, which is also a common point of fs1,
fs2 and fs3, to connect PIN8 or PIN4, or no connection
with any PIN.
-BLUE TOOTH OFF and BUTTON LOCK SWITCH
When the switch is in the bottom position, it locks the
program buttons and also turns o the Bluetooth. In
DIRECT mode, if the switch is at lock position the
changes of the loops will not be saved, while the preset
will be updated if the switch is at top position.