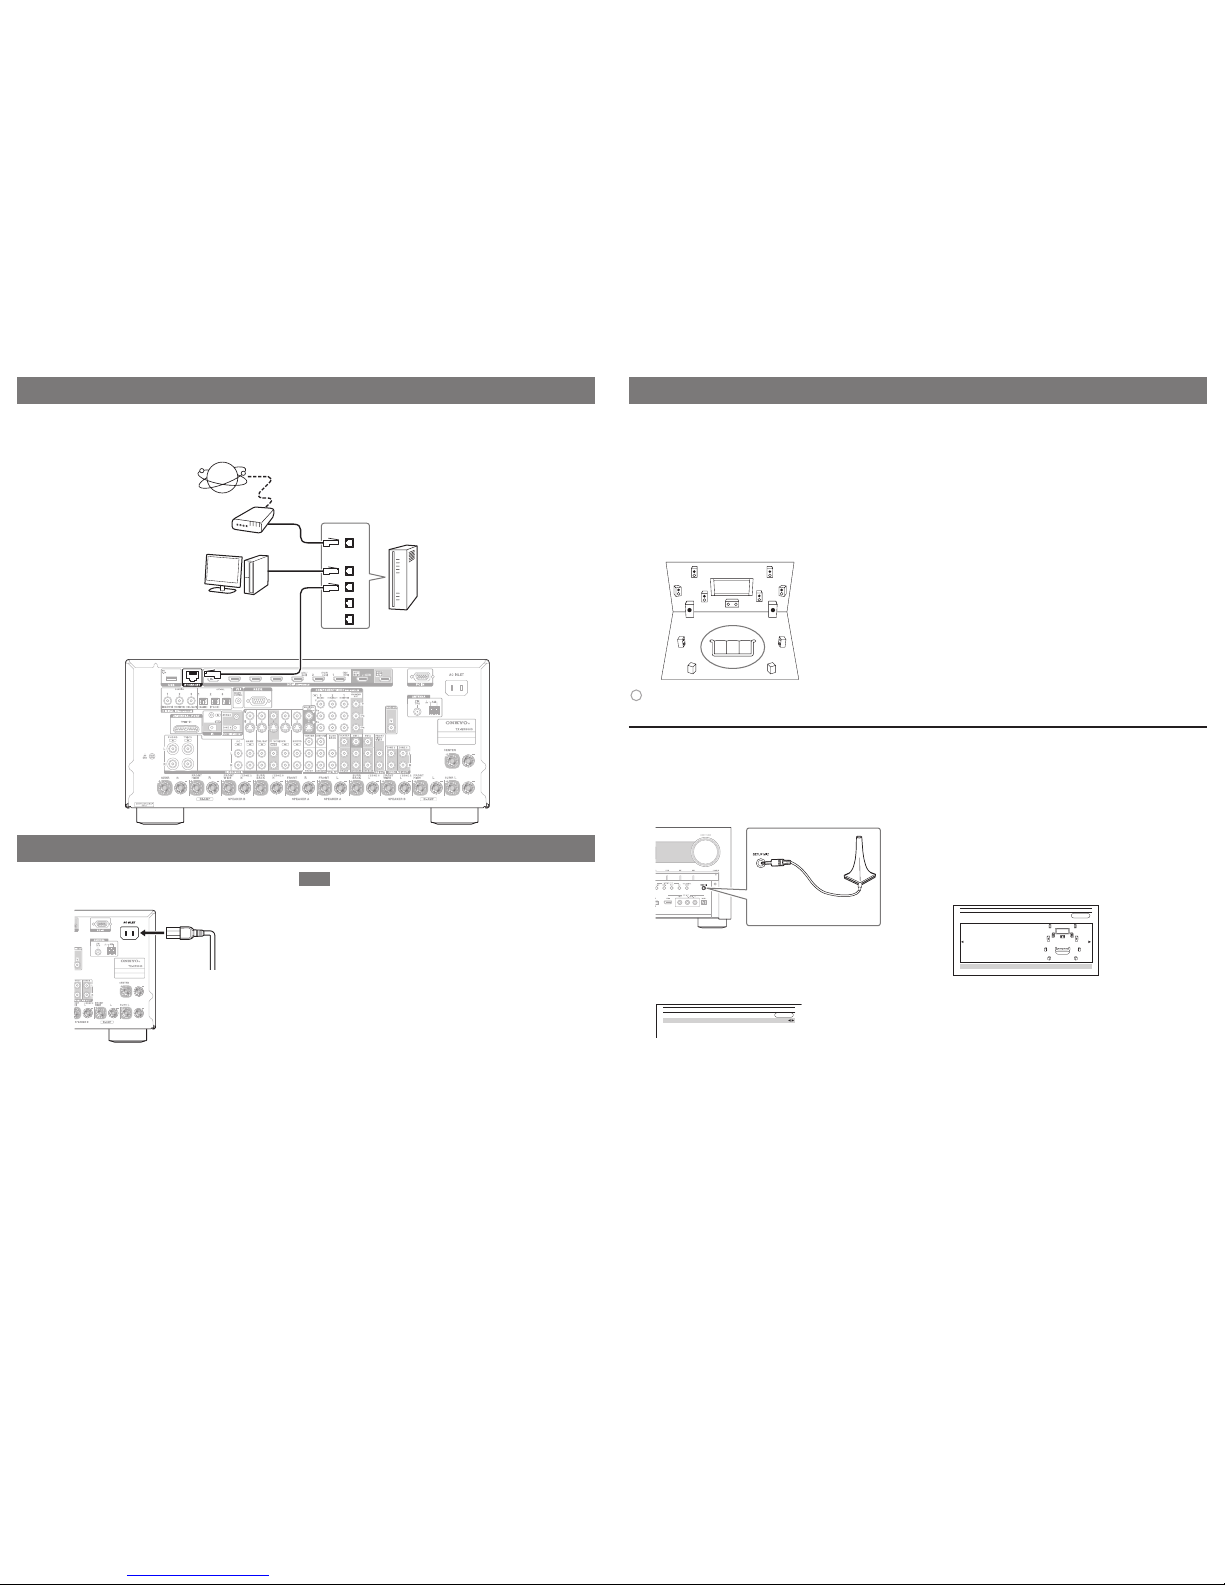
4. Connecting to the Network (Optional)
The following diagram shows how you can connect the AV receiver to your home network. In this example, it’s connected to a LAN
port on a router, which has a 4-port 100Base-TX switch built-in.
Router
Internet radio
Modem
Computer or media server
5. Connecting the Power Cord
1Connect the supplied power cord to the AV
receiver’s AC INLET.
To AC wall outlet
Note
Before connecting the power cord, connect all of your
speakers and AV components.
Turning on the AV receiver may cause a momentary power surge
that might interfere with other electrical equipment on the same
circuit. If this is a problem, plug the AV receiver into a different
branch circuit.
Do not use a power cord other than the one supplied with the AV
receiver. The supplied power cord is designed exclusively for use
with the AV receiver and should not be used with any
other equipment.
Never disconnect the power cord from the AV receiver while the
other end is still plugged into a wall outlet. Doing so may cause
an electric shock. Always disconnect the power cord from the
wall outlet first, and then the AV receiver.
•
•
•
•
2Plug the power cord into an AC wall outlet.
6. Using the Automatic Speaker Setup (Optional)
To create a listening environment in your home theater that all listeners will enjoy, Audyssey MultEQ®XT32 takes measurements
at up to eight positions within the listening area.
With the supplied calibrated microphone, Audyssey MultEQ XT32 automatically determines the number of speakers connected,
their size for purposes of bass management, optimum crossover frequencies to the subwoofer (if present), and distances from the
primary listening position.
Audyssey MultEQ XT32 offers two ways of measuring: the “Audyssey Quick Start” and “Audyssey MultEQ XT32 Full
Calibration”.
“Audyssey Quick Start” uses the measurement from one position to perform the speaker setting only.
“Audyssey MultEQ XT32 Full Calibration” uses the measurement from eight positions to correct room response in addition to
the speaker setting.
The Quick Start takes 2 minutes and Full Calibration takes about 20 minutes. Total measurement time varies depending on the
number of speakers.
: Listening area ato h: Listening position
Preparation
Connect and position all of your speakers.
Make sure that headphones are removed.
If any of your speakers is 4 ohms, change the “Speaker
Impedance” setting (see the instruction manual) before
starting.
•
•
•
Measurement Procedure
•
•
1Turn on the AV receiver and the connected TV.
On the TV, select the input to which the AV receiver
is connected.
2Set the speaker setup microphone at the Main
Listening Position a, and connect it to the SETUP
MIC jack.
Speaker setup microphone
The speaker setting menu appears.
3When you've finished making the settings,
press ENTER.
For more details on these settings, see the
instruction manual.
MultEQ XT32: Auto Setup
AUDYSSEY
Speakers Type(Front A) Normal
Speakers Type(Front B) No
Powered Zone 2 No
Powered Zone 3 No
4Adjust the subwoofer volume level to 75 dB, and
then press ENTER.
Test tones are played through the subwoofer. Use the
volume control on the subwoofer.
If your subwoofer does not have a volume control,
disregard the displayed level and press ENTER to
proceed to the next step.
If you set the subwoofer's volume control to its
maximum and the level displayed is lower than 75 dB,
leave the subwoofer's volume control at its maximum
and press ENTER to proceed to the next step.
If you use two subwoofers, perform this step twice.
•
•
•
5Use q/wto select “Audyssey Quick Start” or
“Audyssey MultEQ XT32 Full Calibration”.
6Press ENTER.
Test tones are played through each speaker.
Follow the steps on the screen.
Make the room as quiet as possible.
Turn off your cell phone.
Do not stand between speakers and the microphone.
Do not disconnect the speaker setup microphone.
Doing so will cancel the setup.
•
•
•
•
7Use q/wto select “Save”, and then press ENTER.
The calculated settings are saved.
Save
Cancel
AUDYSSEY
MultEQ XT32: Auto Setup
Subwoofer 2ch
Front 40Hz
Center 40Hz
Surround 100Hz
Front Wide None
Front High 100Hz
Surround Back 120Hz
Surround Back Ch 2ch
-- Review Speaker Configuration --
8Use q/w/e/rto change the settings.
For more details on these settings, see the
instruction manual.
9Press ENTER.
10
Disconnect the speaker setup microphone.
- 5 - - 6 -