Onn 100008761OA User manual

DVD PLAYER
PRODUCT GUIDE
October 27,2020_v1
Model: 100008761OA

2
CAUTION: TO REDUCE THE RISK OF
ELECTRIC SHOCK, DO NOT REMOVE
COVER (OR BACK). NO USER-
SERVICEABLE PARTS INSIDE. REFER
SERVICING TO QUALIFIED SERVICE
PERSONNEL.
CAUTION:
THIS DIGITAL VIDEO DISC PLAYER
EMPLOYS A LASER SYSTEM.
TO ENSURE PROPER USE OF THIS
PRODUCT:
PLEASE READ THIS OWNER`S MANUAL
CAREFULLY AND RETAIN FOR FUTURE
REFERENCE. SHOULD THE UNIT
AUTHORIZED SERVICE LOCATION-SEE
SERVICE PROCEDURE.
USE CONTROLS, ADJUSTMENTS OR
THE PERFORMANCE OF PROCEDURES
OTHER THAN THOSE SPECIFIED HEREIN
MAY RESULT IN HAZARDOUS RADIATION
EXPOSURE.
TO PREVENT DIRECT EXPOSURE TO
LASER BEAM, DO NOT TRY TO OPEN THE
ENCLOSURE. VISIBLE LASER RADIATION
MAY BE PRESENT WHEN THE ENCLOSURE
IS OPENED. DO NOT STARE INTO BEAM.
WARNING:
TO REDUCE THE RISK OF FIRE OR
ELECTRIC SHOCK, DO NOT EXPOSE THIS
PRODUCT TO RAIN OR MOISTURE.
WARNING:
TO REDUCE THE RISK OF FIRE OR
ELECTRIC SHOCK, AND ANNOYING
INTERFERENCE, USE THE RECOMMENDED
ACCESSORIES ONLY.
SURGE PROTECTORS:
It is recommended to use a surge protector for
AC connection. Lightning and power surges
ARE NOT covered under warranty for this
product.
CAUTION
RISK OF ELECTRIC SHOCK
DO NOT OPEN
The lightning flash with arrowhead
symbol within an equilateral triangle
is intended to alert the user to the
presence of uninsulated dangerous
voltage within the product`s enclosure that may
be of sufficient magnitude to constitute a risk of
electric shock to persons.
The exclamation point within an
equilateral triangle is intended
to alert the user to the presence
of important operating and
maintenance(servicing) instructions in the
literature accompanying the appliance.
DANGER:
Invisible and hazardous laser
radiation when open and interlock
failed or defeated. Avoid direct
exposure to beam.
REQUIRE MAINTENANCE , CONTACT AN
WARNING
USE UNDER SUPERVISION OF AN ADULT
DUE TO LONG CORD
This unit has a long AC cord or other long
cord that can easily be tripped on or pulled on,
causing injury, Please make sure it is arranged
so it will not drape over a tabletop, etc, where
it can be pulled on by children or tripped over
accidentally.
EXERCISE CAUTION AS UNIT HAS SHARP
POINTS.
Before using the unit, be sure to read all
operating instructions carefully. Please note
that these are general precautions and may
not pertain to your unit.
1 ) Read these instructions.
All the safety and operating instructions should
be read before the product is operated.
2 ) Keep these instructions.
The safety and operating instructions should
be retained for future reference.
3 ) Heed all warnings.
All warnings on the product and in the
operating instructions should be adhered to.
4 ) Follow all instructions.
All operating and use instructions should be
followed.

3
5 ) Do not use this apparatus near water.
Do not use this product near water and
moisture, for example: near a bathtub,
washbowl, kitchen sink or laundry tub; in a wet
basement; or near a swimming pool.
6 ) Clean only with dry cloth.
Unplug this product from the wall outlet before
cleaning. Do not use liquid cleaners or aerosol
cleaners. Use a dry cloth for cleaning.
7)Do not block any ventilation
openings. Install in accordance with the
manufacturer's instructions.
Slots and openings in the cabinet and in the
back or bottom are provided for ventilation, to
ensure reliable operation of the product and
to protect it from overheating. These openings
must not be blocked or covered. The openings
should never be blocked by placing the product
on a bed, sofa, rug or other similar surface.
This product should never be placed near or
over a radiator or heat source. This product
should not be placed in a built-in installation
such as a bookcase or rack unless proper
ventilation is provided or the manufacturer's
instructions have been adhered to.
8 ) Do not install near any heat sources such
as radiators, heat registers, stoves, or other
apparatus (including amplifiers) that produce
heat.
9 ) Do not defeat the safety purpose of the
polarized or grounding-type plug. A polarized
plug has two blades with one wider than the
other. A grounding type plug has two blades
and a third grounding prong. The wide blade or
the third prong are provided for your safety. If
the provided plug does not fit into your outlet,
consult an electrician for replacement of the
obsolete outlet.
10 ) Protect the power cord from being
walked on or pinched particularly at plugs,
convenience
the apparatus.
11 ) Only use attachments/accessories
specified by the manufacturer.
12 ) Use only with the cart, stand, tripod,
bracket, or table specified by the manufacturer,
or sold with the apparatus. When a cart is
used, use caution when
moving the cart/apparatus
combination to avoid injury
from tip-over.
An appliance and cart
combination should be
receptacles, and the point where
they exit from
moved with care.
Quick stop, excessive force and uneven
surfaces may cause the appliance and cart
combination to overturn.
13 ) Unplug this apparatus during lightning
storms or when unused for long periods of
time.
To protect your product from a lightning storm,
or when it is left unattended and unused for
long periods of time, unplug it from the wall
outlet and disconnect the antenna or cable
system.
This will prevent damage to the product due to
lightning and power-line surges.
14 ) Refer all servicing to qualified service
personnel. Servicing is required when the
apparatus has been damaged in any way, such
as power supply cord or plug is damaged, liquid
has been spilled or objects have fallen into the
apparatus, the apparatus has been exposed to
rain or moisture does not operate normally, or
has been dropped.
15 ) Power source.
This product should be operated only from the
type of power source indicated on the marking
label.
If you are not sure of the type of power supply
to your home, consult your appliance dealer or
local power company. For products intended
to operate from battery power, or other source,
refer to the operation instructions.

4
17 ) Overloading
Do not overload wall outlets and extension
cords as this can result in a risk of fire or
electric shock.
18 ) Object and liquid entry
Never push objects of any kind into the
product through openings as they may touch
dangerous voltage points or short out parts
that could result in fire or electric shock. Never
spill or spray any type of liquid on the product.
19 ) Outdoor antenna grounding
If an outside antenna is connected to the
product, be sure the antenna system is
grounded so as to provide some protection
against voltage surges and built up static
charges. Section 810 of the National Electric
Code ANSI/NFPA 70 provides information with
respect to proper to grounding of the mast and
supporting structure, grounding of the lead-
in wire to an antenna discharge product, size
of grounding conductors, location of antenna-
discharge product, connection to grounding
electrodes and requirements for the grounding
electrodes.
20 ) Service
Do not attempt to service this product yourself
as opening or removing covers may expose
you to dangerous voltage or other hazards.
Refer all servicing to qualified service
personnel.
21 ) Replacement parts
When replacement parts are required, be sure
the service technician uses replacement parts
specified by the manufacturer or those that
have the same characteristics as the original
parts.
Unauthorized substitutions may result in fire or
electric shock or other hazards.
22 ) Safety check
Upon completion of any service or repairs
ANTENNA LEAD
IN WIRE
ANTENNA DISCHARGE UNIT
( NEC SECTION 810-20 )
GROUNDING CONDUCTORS
( NEC SECTION 810-21 )
POWER SERVICE GROUNDING
ELECTRODE SYSTEM
( NEC ART 250, PARTH )
GROUND CLAMPS
16 ) Power lines
An outside antenna system should not be
located in the vicinity of overhead power lines
or other electric light or power circuits, or where
it can fall into such power lines or circuits.
When installing an outside antenna system,
extreme care should be taken to keep from
touching such power lines or circuits as contact
with them might be fatal.
to this product, ask the service technician to
perform safety checks to determine that the
product is in proper operational condition.
23 ) Wall or ceiling mounting
The product should be mounted to a wall
or ceiling only as recommended by the
manufacturer.
24 ) Damage requiring service
Unplug this product from the wall outlet and
refer service to qualified service personnel
under the following conditions.
a ) When the power-supply cord or plug is
damaged.
b ) If liquid has been spilled or objects have
fallen into the product.
c ) If the product has been exposed to rain or
water.
d ) If the product does not operate normally
by following the operating instructions. Adjust
only those controls that are covered by the
operating instructions, as an adjustment of
other controls may result in damage and will
and require extensive work by a qualified
technician to restore in the product to its
normal operation.
e ) If the product has been dropped or the
cabinet has been damaged.
f ) When the product exhibits a distinct change
in performance-this indicates a need for
service.

5
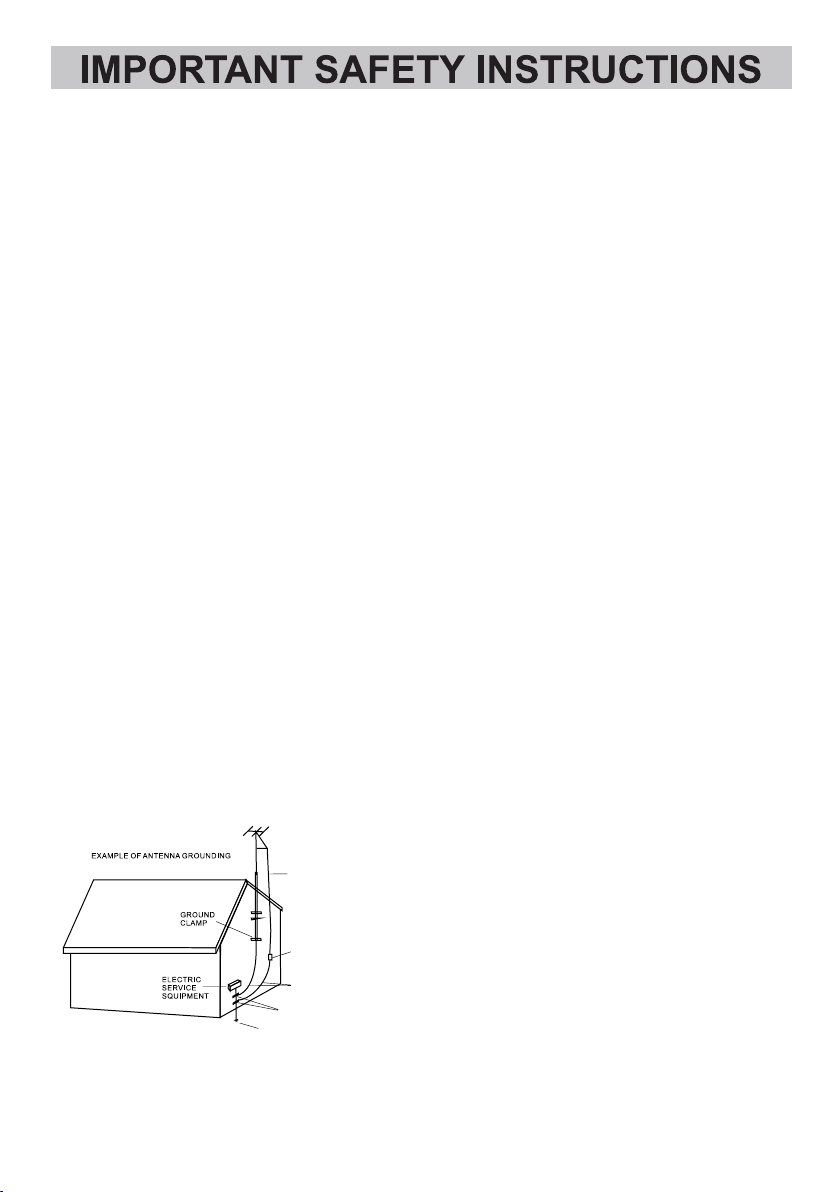
25 ) Note to CATV system installer
This reminder is provided to call the CATV
system installer's attention to Article 820-40
of the NEC that provides guidelines for proper
grounding and, in particular, specifies that
the cable ground shall be connected to the
grounding system of the building, as close to
the point of cable entry as practical.
NOTE: Refer all servicing to qualified service
personnel Servicing is required when the unit
has been damaged in any way such as the
has been damaged, liquid has been spilled
into unit, the unit has been exposed to rain or
moisture, the unit has been dropped or the unit
does not operate normally.
NOTES ON HANDLING:
● When shipping the unit, always use the
original shipping carton and packing materials.
For maximum protection, repack the unit as it
was originally packed at the factory.
● Do not use volatile liquids, such as insect
spray, near the unit. Do not leave rubber or
plasic products in contact with the unit for a
long time. They will leave marks on the finish.
● The top and rear panels of the unit may
become warm after a long period of use. This is
normal and not a malfunction.
● When the DVD player is not in use, be sure
to remove the disc and turn off the power.
NOTES ON LOCATING THE DVD PLAYER:
When you place this unit near a TV, radio or
VCR, the playback picture may become poor
and the sound may be distorted. In this case,
move the unit away from the TV, radio or VCR.
NOTES ON CLEANING:
Use a soft, dry cloth for cleaning
● For stubborn dirt, soak the cloth in a weak
detergent solution, wring well and wipe. Use a
dry cloth to wipe it dry. Do not use any type of
solvent, such as thinner and benzene, as they
may damage the surface of the unit.
● If you use a chemical-saturated cloth to clean
the unit, follow that product's instructions.
Warning: Cleaning and adjustment of
lenses and /or other components of playback
mechanism should be performed by a qualified
service technician.
NOTES ON MOISTURE CONDENSATION:
Moisture condensation damages the DVD
player.
Please read the following carefully.
●Moisture condensation occurs, for example,
when you pour a cold drink into a glass on a
warm day. Drops of water form on the
outside of the glass. In the same way,
moisture may condense on the optical pick-
up lens inside this unit, one of the most
crucial internal parts of the DVD player.
following: the power-supply cord or plug
Moisture condensation occurs during the
following cases:
●When you bring the DVD player directly from
a cold place to a warm place.
●When you use the DVD player in a room
where you just turned on the heater, or a
place where the cold wind from the air
conditioner directly hits the unit.
●ln summer, when you use the DVD player in
a hot and humid place just after you moved
the unit from an air conditioned room.
●When you use the DVD player in a humid
place.
Do not use the DVD player when moisture
condensation may occur.
●lf you use the DVD player in such a situation,
it may damage discs and internal parts.
Remove the disc, connect the AC/DC
Adaptor to the DVD player and the wall
outlet, turn on the DVD player and leave it
ON for two or three hours. After two or three
hours, the DVD player will have warmed up
and evaporated any moisture.
This equipment is a Class II or
double insulated electrical appliance.
It has been designed in such a way
that it does not require a safety
connection to electrical earth.

6
The region number for this DVD Player is: 2
See the following page for information regarding region numbers.
PLAYABLE DISCS:
The following discs can be played back on this DVD player:
DISC TYPES:
DVD
Data on most DVDs is divided into sections called titles
and then into subsections called chapters, each of which
is given a title or chapter number. Some features of this
DVD player will not operate with some DVD discs as they
are preset. If a function you selected does not run as
desired, refer to the manual accompanying the DVD disc.
AUDIO CD
Data on an audio CD is divided into sections called tracks,
each of which is given a track number.
IMPORTANT:
It is important that you read the manual that accompanies the DVD disc, as there are features that
are on the DVD player that cannot be used with certain DVDs.
There are also extra features on the DVD disc that are different for each DVD disc, so they are not
explained in this owner's manual.
This player conforms to the NTSC and PAL color systems. However, if you are in the USA, Canada
or Mexico, leave this setting on NTSC. If incorrectly set to PAL, the TV picture may roll vertically.
In this case, set the TV system to NTSC.
Notes on Copyright:
It is forbidden by law to copy, broadcast, show, broadcast on cable, play in public and rent
copyrighted material without permission. DVD video discs are copy protected, and any recordings
made from these discs will be distorted. This product incorporates copyright protection technology
that is protected by method claims of certain U.S. Patents and other intellectual property rights
owned by Macrovision Corporation, and is intended for home and other limited viewing uses only, unless
otherwise authorized by Macrovision Corporation. Reverse engineering or disassembly is prohibited.
Region Management Information:
This DVD Player is designed and manufactured to respond to the Region Management Information
that is recorded on a DVD disc. If the Region number described on the DVD disc does not
correspond to the Region number of this DVD player, this DVD player cannot play that disc. You may
not be able to play back some DVD video discs on this player if they were purchased from outside
your geographic area or made for business purposes. When you try to play back an unauthorized
disc, Wrong Region appears on the TV screen.
ABOUT DISCS
2

7
LOCATION OF CONTROLS
FRONT VIEW
REAR VIEW
12 3
4 5 6 7
8 9 10
11 13
1. Disc Door
2. Display
3. Remote Sensor
4. TTS (Text to Speech) Button
5. Open/Close Button
6. Play/Pause Button
7. Power Button
8. Power Cord
14. VIDEO Jack
12. Audio L (Left) Jack
10. COAXIAL Jack
13. Audio R (Right) Jack
9. Y,Pb/Cb,Pr/Cr Output Jacks
12 14
11. HDMI Output Port

8
REMOTE CONTROL
ENTER
VOL
OSD P/N A-B
PROG ANGLE SUBTITLE VIDEO
1 2 3
4 5 6
789
0/10 10+ GOTO
REV FWD PREV NEXT
L/R
PLAY/PAUSE
STOP
SETUP TITLE
MENU
RETURN
MUTE AUDIO REPEAT RESET
ZOOM SLOW
TTS
1
2
3
4
5
6
7
8
9
10
11
12
13
14
15
16
18
19
20
21
23
24
25
26
27
28
29
30
31
17
32
33
1. Power Button
2. PROG(program) Button
3. ANGLE Button
4. Numeric Buttons
5. REV(reverse) Button
6. FWD(forward) Button
7. L/R Button
8. PLAY/PAUSE Button
9. SETUP Button
10. ENTER Button
11. MENU Button
12. MUTE Button
13. AUDIO Button
14. (volume up) Button
15. OSD(on screen display) Button
16. (volume down) Button
17. ZOOM Button
18. Open/Close Button
19. VIDEO Button
20. SUBTITLE Button
22. NEXT Button
23. PREV(previous)Button
24. STOP Button
25. TITLE Button
26. Navigation Buttons
27. RETURN Button
28. RESET Button
29. REPEAT Button
30. A-B Button
31. P/N(PAL/NTSC) Button
32. TTS(text to speech) Button
33. SLOW Button
22
21. GOTO Button
***When using a universal remote with
this product, Please enter: 00FF
Client code: 00FF

9
BATTERY INSTALLATION (REMOTE CONTROL)
Remote Control Sensor
Remarks:
1. When there is an obstacle between the unit and the transmitter, the transmitter may not operate.
2. When direct sunlight, an incandescent lamp, fluorescent lamp or any other strong light shines on
the remote sensor of the unit, the remote operation may be unstable.
Battery installation:
1. Press the tab on the battery door and lift it off.
2. Install two (2) x AAA size batteries ( included) into the battery
compartment as the figure on right and the polarity
markings inside battery compartment.
3. Replace the battery door.
Battery Precautions:
Follow these precautions when using a battery in this device:
1. Use only the size and type of battery specified.
2. Besure to follow the correct polarity when installing the battery as indicated in the battery
compartment. A reversed battery may cause damage to the device.
batteries to prevent damage or injury from possible battery leakage.
manufacturer's directions).
6. Do not dispose of battery in fire. Battery may explode or leak.
7. Clean the battery contacts and also those of the device prior to battery installation.
3. Do not mix different types of batteries together (e.g. Alkaline and Carbon-zinc) or old batteries
with fresh ones.
4. If the batteries in the device are consumed or the device is not to be used for a long period
of time, remove the
5. Do not try to recharge the battery not intended to be recharged; it can overheat and rupture.
(Follow battery
+-
15 feet (5m)
ENTER
VOL
OSD P/N A-B
PROG ANGLE SUBTITLE
VIDEO
1 2 3
4 5 6
789
0/10 10+ GOTO
REV FWD PREV NEXT
L/R
PLAY/PAUSE
STOP
SETUP TITLE
MENU PBC
MUTE AUDIO REPEAT RESET
ZOOM SLOW
TTS
+
-

10
CONNECTIONS
1.Connecting through Video, L&R Jacks.
Yellow
Red
White
Video
L
R
2.Connecting through COAXIAL Jack.
Yellow
Red
White
Video
L
R
Audio/Video Cable (not included)
Video input jack (Yellow)
Audio left channel input jack (White)
Audio right channel input jack (Red)
Coaxial Cable (Not included)
Audio/Video Cable (not included)
Video input jack (Yellow)
Audio left channel input jack (White) (Do not plug)
Audio right channel input jack (Red) (Do not plug)
Yellow
White
Yellow
Red
White
(amplifier with built-in digital audio decoder)
Red

11
CONNECTIONS
3.Connecting through Y, Pb/Cb, Pr/Cr (YUV) Jacks.
4.Connecting through HDMI output port.
Red
White
Red
White
(HDMI Cable not included)
(Cable not included)

12
Repeat Playing:
(CD)
Repeat Playing:
OPERATIONS
(DVD)
(CD/DVD)Program:
1. Connect the Adapter to the wall outlet.
2. Press the button on the unit or remote control to power on the unit.
press the button again to close the disc door.
4. During playing:
~ Press the TTS button on the unit or remote control to turn on VOICE GUIDE, press it again to turn off VIOCE GUIDE.
~ Press the button on the unit or remote control to pause, press it again to resume normal playing.
~ Press the REV or FWD button on remote control repeatedly to fast rewind or fast forward, press the button on
remote control to resume normal playing.
~ Press the PREV or NEXT button on remote control repeatedly to skip to specific track or chapter.
~ Press the VOL- or VOL+ button on remote control repeatedly to adjust the volume.
~ Press the STOP button on remote control to pre-stop, the unit will remember the point where disc was stopped.
When press the button, the unit will continue to play from this point.
~ Press the REPEAT button on remote control to "Repeat 1", the current track will be played repeatedly.
~ Press the REPEAT button on remote control again to "Repeat All", all tracks will be played repeatedly.
~ Press the REPEAT button on remote control the third time to "Repeat Off ", repeat will be cancelled.
~ Press the REPEAT button on remote control to "Repeat Chapter", the current chapter will be played repeatedly.
~ Press the REPEAT button on remote control again to "Repeat Title", the ttitle will be played repeatedly.
~ Press the REPEAT button on remote control the third time to "Repeat All", all files will be played repeatedly.
~ Press the REPEAT button on remote control the fourth time to "Repeat Off", repeat will be cancelled.
DVD:
T C T C
5 -- :--
T C
9 -- :--
T C
13 -- :--
2 -- :-- 6 -- :-- 10 -- :-- 14 -- :--
3 -- :-- 7 -- :-- 11 -- :-- 15 -- :--
4 -- :-- 8 -- :-- 12 -- :-- 16 -- :--
PROGRAM PLAY CLEAR PROGRAM PLAY CLEAR
1
2
3
4
5
6
7
8
9
10
11
12
13
14
15
16
----
----
----
----
----
----
----
----
----
----
----
----
----
----
----
CD:
----
1 -- :--
3. During setting, highlight the CLEAR button on screen, then press the ENTER button on remote control
4.
2. Using the direction and numeric buttons to select and set the desired Title, Chapter or Tracks.
clear all settings.
After programming, using the direction buttons to highlight the PLAY button on the screen then press
the ENTER button on remote control to start program playing.
1. During DVD or CD playback, press the PROG button on remote control, the program setting menu will
appear as below:
3. Press the button on the unit or remote control to open the disc door, place the disc on the center spindle with the
label side facing up,
Press the STOP button on remote control twice to stop completely, the unit will fully stop, press the button to
play the disc from the very beginning. (It depends on the disc.)

13
OPERATIONS
Press to turn off the sound, press again to resume.
Press to power on the unit from standby mode, press again to turn to standby mode.
MUTE
(Function depends on the recording of
During playback a DVD disc with multi-angle recording, press repeatedly to select the viewing angle.
disc).
ANGLE
SUBTITLE
During DVD playback, press repeatedly to select the desired subtitle (Function depends on the
recording of disc).
VIDEO
During playback, press repeatedly to select the desired audio language.
(Function depends on the recording of disc).
AUDIO
L/R
Press to change to Mono L, Mono R, Mix Mono or Stereo channel (it depends on the disc).
SETUP
Press to enter or exit setup menu.
depends on the recording of the disc).
Press to return to disc's title page (Function
TITLE
depends on the recording of the disc).
Press to return to disc's menu page (Function
MENU
RETURN
GOTO
During DVD playback, press the GOTO button once, the Title, Chapter and Time selection menu will
appear on screen. Use the Direction and Numeric buttons to select the desired title, chapter and
time, then press the ENTER button to start playback.
During CD playback, press the GOTO button once, the Track and Time selection menu will appear on
screen. Use the Direction and Numeric buttons to select the desired track and time, then press
the ENTER button to start playback.
DVD:
CD:
Press to return to previous menu.
Press to switch to YPbPr, CVBS or YUV video mode.

14
OPERATIONS
During playback, press the SLOW button repeatedly to activate and set the slow motion speed.
Press (Play/Pause) button to resume normal playback.
A-B
During playback, press the A-B button to define the starting point, press again to define the ending
ponit, the unit will then plays the selected section repeatedly and continuously.
To cancel, press the A-B button again. (This function is not available on all discs).
SLOW
During movies playback, press repeatedly to zoom in or zoom out the picture.
ZOOM
Press repeatedly to select and set the color system to NTSC, PAL or AUTO to match the color
system of the connected TV.
P/N (PAL/NTSC)
(On Screen Display)
During playback, press repeatedly to
OSD
display playing status or turn it off.
Press to reset to default settings.
RESET
VOL +/–
Press to adjust volume level.
Press to turn on or off the voice guide.
TTS
(It depends on the recording of the disc).

15
SETUP
ʉ ʇ
Setting Menus:
Press the SETUP button, the setting menu will appear on the screen as below. Using the Direction
ʉ
ʉ
buttons to select and hightlight the function you need to set or reset. Press the ENTER
button to enter or confirm the selection. After setting, press SETUP button to save the settings and exit.
, , ,
TV SYSTEM
SCREEN SAVER
TV TYPE
PASSWORD
RATING
DEFAULT
3. If TV TYPE is selected, using the Direction and ENTER buttons to set the aspect ratio to
1. If TV SYSTEM is selected, using the Direction and ENTER buttons to set the TV Type to AUTO,
NTSC or PAL to match the color system of the connected TV. (Note: The default TV color system
is PAL).
16:9 ; 4:3 LB (4:3 LB "Letter Box") or 4:3 PS (4:3 PS "Progressive Scan") to match the aspect ration
of connected TV.
System Se :
4. If PASSWORD is selected:
To release the lock and set/reset the rating level:
When PASSWORD is selected and highlighted, press the ENTER button to enter. “ ” on the
screen will be highlighted, enter the default password “0000” by press the numeric buttons then press
the ENTER button to unlock. “ ” will appearing. Then press the Direction button to
highlight RATING on the screen to set or reset the rating level.
To set or reset new password and rating level:
When PASSWORD is selected and highlighted, press the ENTER button to enter. “ ” on the
screen will be highlighted, enter the default password “0000” by press the numeric buttons then press
the ENTER button to unlock. “ ” will appearing.
Using the direction button to highlight the “
” on screen again. Enter the new four (4) digit
password by press the numeric buttons then press the ENTER button to save the settings and exit.
Press the Direction button to highlight RATING on the screen to set or reset the rating level .
2. If SCREEN SAVER is selected, if set to On, the screen saver will come on when the unit idles or
the image is paused for several minutes.
tup
RESUME
ʇ
ʇ
5. If RATING is selected after unlock, using the Direction and ENTER buttons to change the rating
level as follows.
Press the or buttons to select the desired level as the list below.
Press the ENTER button to confirm the selection.

16
OSD LANGUAGE
AUDIO LANG
SUBTITLE LANG
MENU LANG
1. If OSD LANGUAGE (On Screen Display Language) is selected, using the Direction and ENTER
buttons to set the priority of the available language. (Function depends on the recording of the disc.)
If AUDIO LANG (Audio Language) is selected, using the Direction and ENTER buttons to set the
priority of the available language.
If MENU LANG (Menu Language) is selected, using the Direction and ENTER buttons to set the
priority of the available language of the on screen menu.
available language or set it off.
Language
2.
3. If SUBTITLE LANG (Subtitle Language) is selected, using the Direction and ENTER buttons to set
the priority of the
4.
~ Rate levels:
7. If DEFAULT is selected, using the Direction and ENTER buttons to reset to factory settings
or press the SETUP button to exit without changes.
1. KID SAFE: Kid safe
2. G: All ages
3. PG: Parental Guidance
4. PG 13: Parental Guidance less than 13 years old
5. PG-R: Under 17 years old, Parental Guidance suggested
6. R: Under 17 years old, Parental Guidance strongly
7. NC-17: 17 years old or above
8. ADULT: Adult only
Se :tup
6. If RESUME is selected, using the Direction and ENTER buttons to set it On or Off.
If set to On,
when replays the same disc, the unit will start playback from the point where the disc stopped.
VIDEO
Se :tup
Video
TV connected through Video jack, set it to YUV or Y,Pb,Pr when connected through Y, Pb/Cb, Pr/Cr
HDMI OUTPUT
1. If HDMI OUTPUT is selected, set it to different resolution of output signal to match the connected TV.
2. If VIDEO is selected, using the Direction and ENTER buttons to set it to CVBS to match the connected
jacks.

2.
Note: Function depends on the recording of disc.
If DOWNMIX is selected, using the Direction and ENTER buttons to set it to LT/RT or STEREO.
~ If set to LT/RT, the rear left or rear right channels in Dolby 5.1 recording DVD disc will plays on
both Left and Right Speakers.
~ If set to STEREO, the rear left channel will play on Left Speaker; the rear right channel will play on
Right Speaker.
1. If AUDIO OUT is selected, using the Direction and ENTER buttons to set it to SPDIF/OFF,
SPDIF/RAW or SPDIF/PCM.
SPDIF/OFF: Digital audio output off.
SPDIF/RAW: When the player is connected to an amplifier through the coaxial cable.
SPDIF/PCM: When the player is connected to a 2 channel digital stereo amplifier.
Se :tup
Digital
DUAL MONO
1. If DUAL MONO is selected, using the Direction and ENTER buttons to set it to STEREO, MONO-L
(Plays Left channel on all speakers), MONO-R (Plays Right channel on all speakers) or MIX-MONO
(Mixed Right and Left channel then plays on all speakers) as desired.
(Functions depend on the recording of the disc).
17
3. If VOICE GUIDE is selected, using the Direction and ENTER buttons to set it On or Off, when set
to On, the unit will sound when each button is pressed.
DOWNMIX
Se :tup
AUDIO OUT
Audio
VOICE GUIDE

18
Treat the disc carefully. Handle the disc only by its edges.
Never allow your fingers to contact with the shiny, unprinted side of the disc.
● Do not attach adhesive tape, stickers, etc. to the disc label.
● Clean the disc periodically with a soft, lint-free,dry cloth, Never use detergents or abrasive cleaners
to clean the disc. If necessary, use a CD cleaning kit.
● If a disc skips or gets stuck on a section of the disc, it is probably dirty or damaged (scratched).
● When cleaning the disc, wipe in straight lines from the center of the disc to the outer edge of the
disc. Never wipe in circular motions.
● Discs should be stored in their cases after each use to avoid damage.
● Do not expose discs to direct sunlight, high temperatures or dust, etc. Prolonged exposure or
extreme temperatures can warp the disc.
● Do not stick or write anything on either side of the disc. Sharp writing Instruments, or the ink, may
damage the surface.
Cleaning the Unit
● To prevent fire or shock hazard, disconnect your unit from the AC power source when cleaning.
● The finish on your unit may be cleaned with a dust cloth and cared for as other furniture. Use
caution when cleaning and wiping the plastic parts.
● Mild soap and a damp cloth may be used on the front panel.
CARE AND MAINTENANCE
Caring for Discs

Check the following before requesting service:
SYMPTOM POSSIBLE CAUSE POSSIBLE SOLUTION
No power. Adapter plug unplugged. Plug the power plug in the outlet.
Disc can not be play.
Condensation has formed.
Wrong type of discs or the disc is corrupted.
The disc is dirty or inserted incorrectly.
Unplug the unit and wait it about one to
two hours until the player is dry.
Try other discs
Clean disc and insert with label side up.
Playing picture rolling.
No picture and/or
no sound.
Picture quality no good.
Remote control
not working.
The unit does not
start playback.
Some functions do not
operates.
Password has been
forgotten.
The connected TV power is off.
The disc is dirty.
The batteries are not installed properly.
Color system of the player has wrong
settings.
The connection cables are not installed
correctly.
Re-install the connection cables.
Press the VIDEO Button repeatedly
until correct picture appears on TV.
Turn on TV.
Press the P/N Button repeatedly to set to
correct system to match connected TV.
Clean the disc.
Replace batteries.
Install batteries as the polarity markings
inside battery compartment.
The remote is not aimed at the sensor.
Distance is too far.
There is an obstacle in the path of the beam.
Aim the remote to the sensor.
Operate within 15 feet.
Remove obstacle.
DVD not inserted, or inserted
upside-down.
Insert DVD disc correctly.
A non-playable disc is inserted. Try other CD, DVD discs.
The disc is not placed on the tray.
The disc is dirty. Clean the disc.
Some features and functions are
not available on the current discs.
Try other discs.
Use the default password "1234" to unlock
The video output of the player are
incorrectly.
Place the disc on the disc tray with label
side face up.
The batteries are weak or dead.
and/or reset a new password.
TROUBLESHOOTING GUIDE
19

20
Power Source:
Disc Compatibility:
SPECIFICATIONS
DVD/CD/CD-R/CD-RW/DVD±R/DVD±RW
AC Power Input: AC100-240V~ 50/60Hz, 0.5A Max
DC Power Output: DC 5.0V 1.2A
Connection: Composite, Coaxial, HDMI, Component
Maximum operating temperature of the product:40℃
SPECIFICATIONS ARE SUBJECT TO CHANGE WITHOUT NOTICE
Power adapter informations:
Manufacturer: Shenzhen Shi GuangKaiYuan Technology Ltd
Model:GKYPS0120050EU/GKYPS0120050UK
Technical data: AC Input: 100~240V, 50/60Hz, 0.5A max,DC Output: 5V 1.2A
ACCESSORIES
1 x DVD Player
1 x User's Manual
1 x AC/USB Adapter
1 x Remote Control with 2 "AAA" size batteries
Table of contents
Other Onn DVD Player manuals