Opale-Paramodels Trike M User manual

!"#$%&'()*+!,&!-%./012.'.3$40/5!6788!98:7! !2.)0!1!;!12!
!
!
!
t
trI
rIk
ke
eM
M
User’s&Guide&
&
Please read carefully this manual before using your equipment for the first
time.

!"#$%&'()*+!,&!-%./012.'.3$40/5!6788!98:7! !2.)0!2!;!12!
&
&
Thanks for having chosen an Opale-Parmodels product. We truly believe this radio-controlled paraglider is going to
give you hours of enjoyment and will enable you to go through new outstanding piloting experiences.
This user’s guide content includes all the information you need to get your wing fly and to ensure you will take good
care of it. A good knowledge of your equipment will allow you to safely make the most of its performances for your
greatest pleasure!
Thanks for giving this manual to the new owner in case you decided to sell you radio-controlled paragldier.
Best regards,
The Opale-Parmodels Team
Safety Information
You should be properly insured according to the country regulation you are using
our equipment in. You hereby accept the inherent risk of flying radio-controlled
models.
Using our equipment in a bad way may increase risks. Neither Opale-Paramodels
nor any other seller will be liable for any damage caused by any accident
whatever the circumstances are. The way our equipment is used is incumbent
upon the final user, including towards the law.

!"#$%&'()*+!,&!-%./012.'.3$40/5!6788!98:7! !2.)0!3!;!12!
Contents
1. Kit content……………………………..……………………………………………………………………………………………………………………….3
2. Assembly Steps……...……..……………………………………………………………………………………………………………………………….3
Technical data:
-Width: 39 cm
-Height: 39 cm
-Length: 39 cm
-Empty weight: 850 gr (chassis + locking plates)
-Recommended motorization: 350 to 500W depending on the overall weight brought up in the air
-Maximum propeller size: 12 inches
-Chassis: Steel
-Locking plates: Aluminium
-Epoxy Paint
Made in Boulogne Sur Mer, France.

!"#$%&'()*+!,&!-%./012.'.3$40/5!6788!98:7! !2.)0!4!;!12!
1. Trike M kit content
Ttrike M kit content:
1x Red steel frame
2x Black aluminium locking plates
3x Aluminium wheels (77 mm diameter)
1x HSHC M5-40 screw
3x Nylstop M5 nuts
9x HSHC M2-8 screws
9x Nylstop M2 nuts
2x 10 kg.cm servomotors
2x Plastic arms
2x Stainless-steel shackles (4mm diameter)
2. Assembly steps
•Rear and landing wheels assembly:

!"#$%&'()*+!,&!-%./012.'.3$40/5!6788!98:7! !2.)0!5!;!12!
Use the 5 screws wrapped in the plastic sachet as shown above (on the right side of the picture). Verify (and adjust if necessary) that the
2 holes of the aluminium rims are properly aligned and facing each other.
Insert the 5 screws in the designed holes of the rim.
Insert the nuts on the other side of the rim. Screw the screws and the nuts
firmly.
Insert the spacer ring (5mm diameter).
Do the exact same thing on the other side of the rim.
Secure the nuts using thread sealant or some Loctite super glue.
Go through the exact same process for the 3 wheels.

!"#$%&'()*+!,&!-%./012.'.3$40/5!6788!98:7! !2.)0!6!;!12!
•Front wheel mounting
To go through this steps you will need:
•1x Already assembled wheel
•1x HSHC M5-40 screw
•1x Nylstop M5 nut
Do not hesitate to push the spacer rings aside to limit the
play between the wheel and the frame before mounting the
wheel.
•Rear wheels mounting
To go through this step you will need:
- 2x Already assembled wheels
- 2x Nylstop M5 nuts
Insert the wheel on the axle turning it clockwise till it
stops. Keep turning it to make sure it rotates freely.
The trike is now equipped with its 3 wheels as shown
on the picture below:

!"#$%&'()*+!,&!-%./012.'.3$40/5!6788!98:7! !2.)0!7!;!12!
•Motor locking plate mounting :!
!
To go through this step you will need:
•1x Aluminium locking plate
•4x HSHC M2-8 screws
•4x Nylstop M2 nuts

!"#$%&'()*+!,&!-%./012.'.3$40/5!6788!98:7! !2.)0!8!;!12!
•Lower locking plate mouting:
To go through this step you will need:
•1x Aluminium locking plate
•5x HSHC M2-8 screws
•5x Nylstop M2 nuts
•Installing the shackles to fasten the wing risers
To go through this step you will need:
-2x Stainless-steel shackles (4mm
diameter)
-Red frame
Put the shackle as shown on the picture
to fasten the wing risers later on.

!"#$%&'()*+!,&!-%./012.'.3$40/5!6788!98:7! !2.)0!9!;!12!
•Servomotors mounting
Please grab the parts shown on the picture below:
Assembling the plastic arms onto the servomotors:
Put the clear plastic arm aligned with the
black plastic part in order to match the
holes location. Then screw using the
screws provided with the servomotor.

!"#$%&'()*+!,&!-%./012.'.3$40/5!6788!98:7! !2.)0!10!;!12!
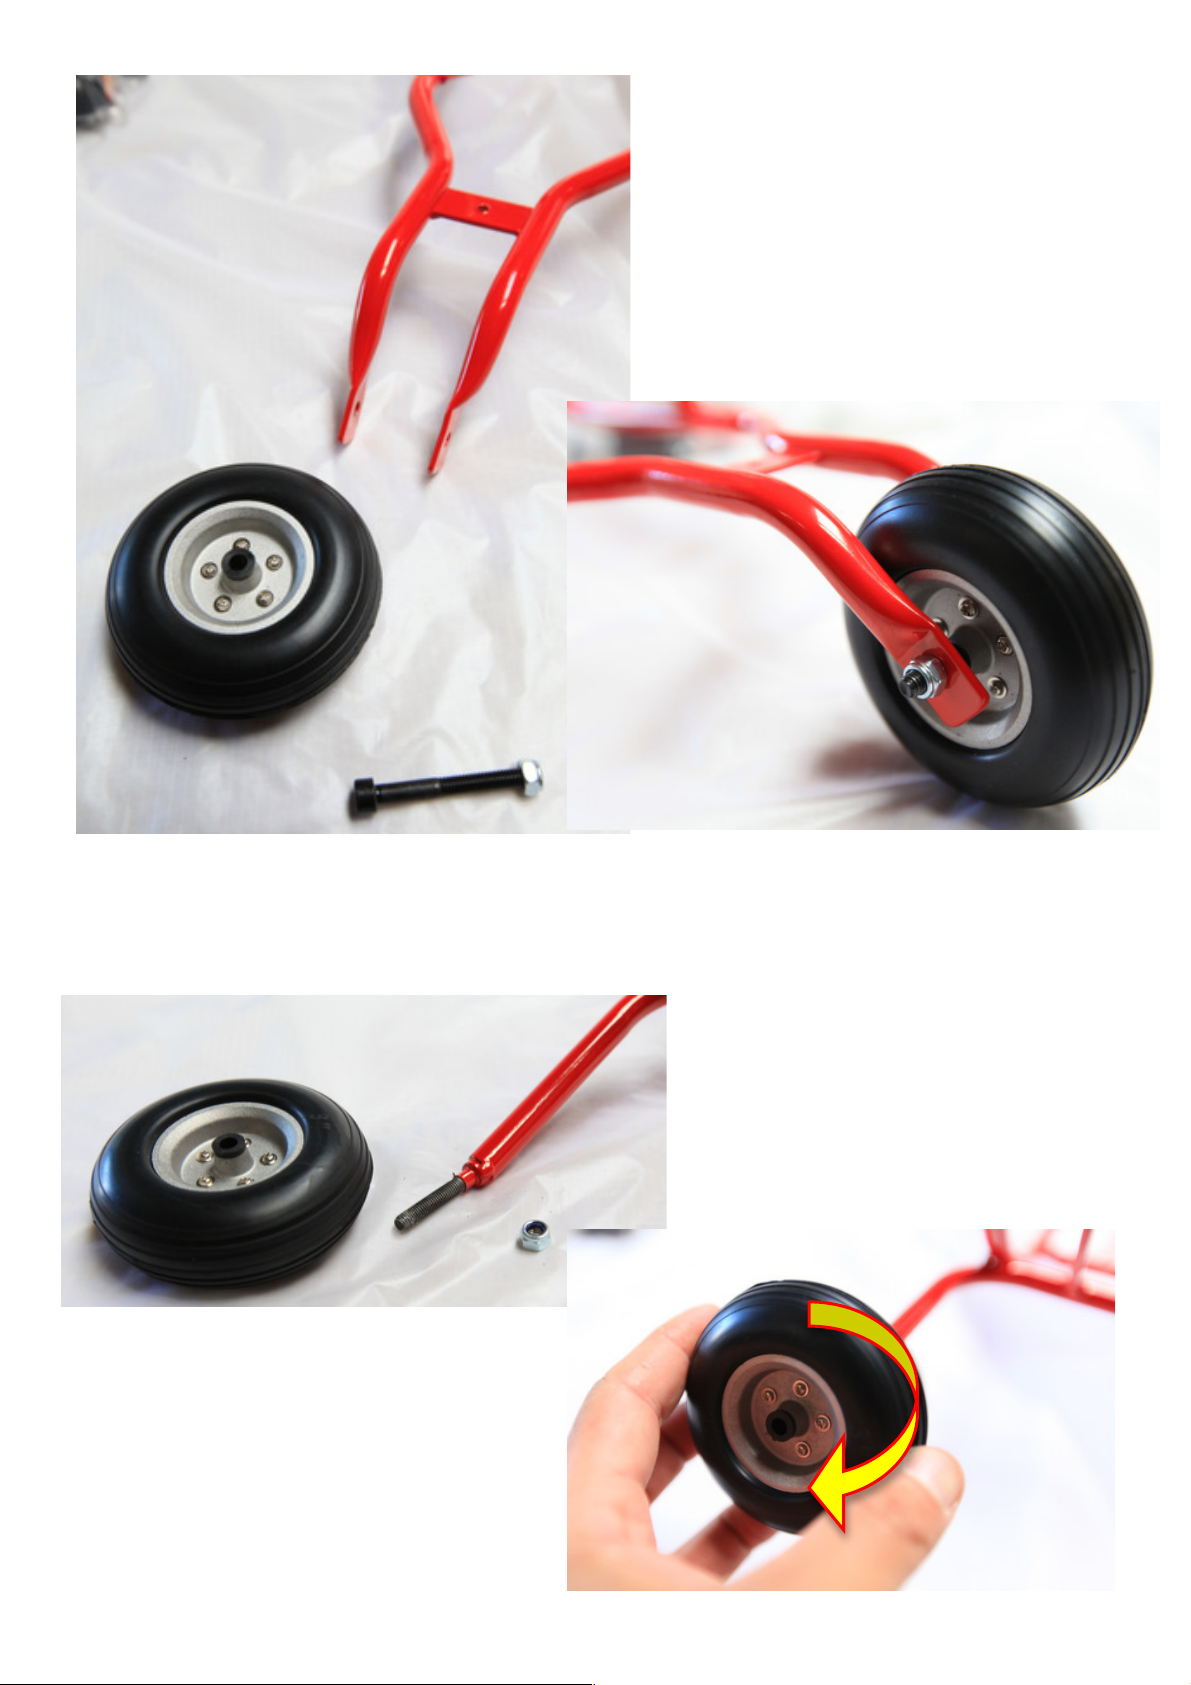
Cut the screw parts that are staying free on the other side of the plastic
arms (on the black side).
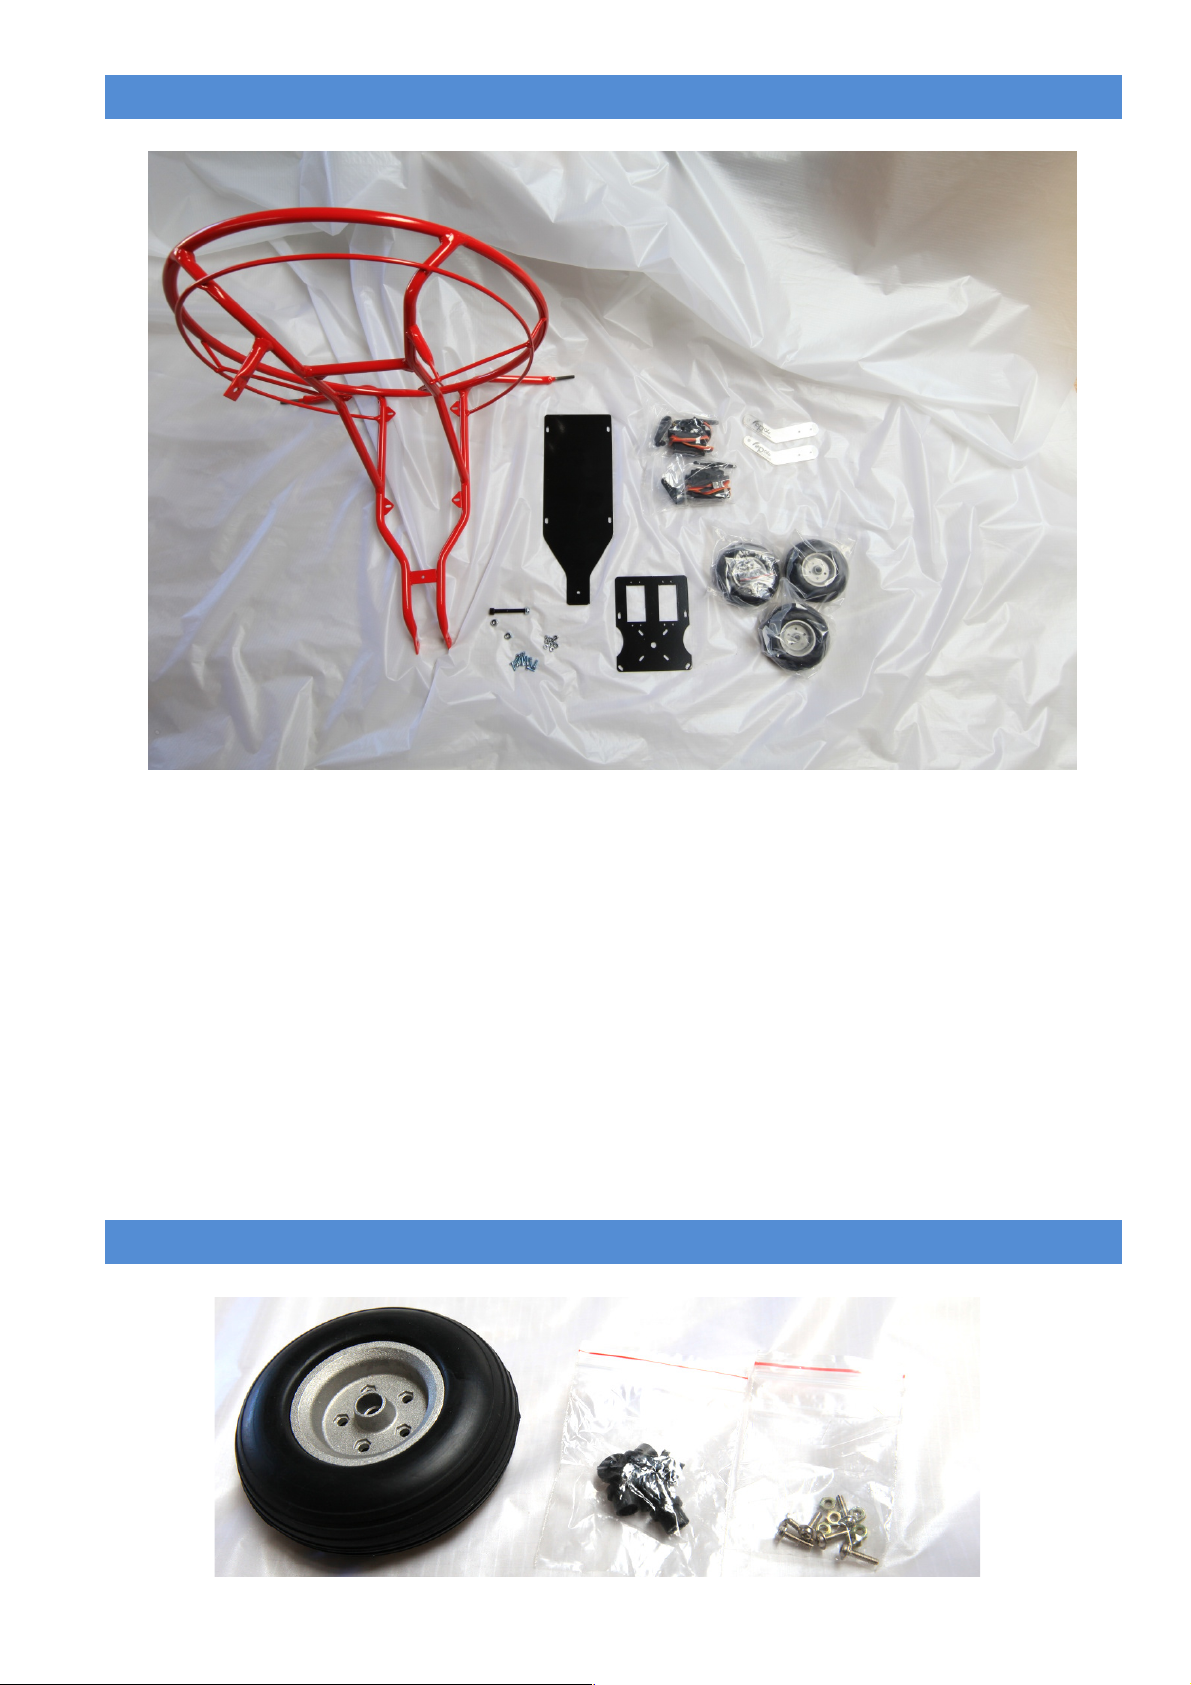
•Mounting the servomotors onto the locking plate:
Please place the servomotors the way shown on the picture below:
Use the last 2 screws that come with each servomotor to screw it onto the locking plate.
Then plug you radio receiver and the servomotors
and turn you radio transmitter on.
Put the sticks in neutral position and screw the arms
the way the servomotors are.
Use the delta mixing mode of you radio transmitter
and program it properly according to your own
setting preferences.
The trike is now assembled and ready for receiving the electronic onboard.

!"#$%&'()*+!,&!-%./012.'.3$40/5!6788!98:7! !2.)0!11!;!12!

!"#$%&'()*+!,&!-%./012.'.3$40/5!6788!98:7! !2.)0!12!;!12!
•Propelling system mounting :
Screw the motor using 4 HSHC M2-15 (at least this size) screws.
Place the blocks (spacer rings) that come with the wheels in between the motor and the locking plate. Doing so enables the motor to move
backwards thus positioning the propeller in plane with the back red hooping. It also optimizes the way your lines are protected.
The battery has to be placed the way shown on the picture thus positioning the
center of gravity properly. Doing so will enable you to bring up to 500 gr
onboard using the front side of your trike.
Please check your system trim before every single flight.
Hold the trike in the air by the shackles on both sides. Your setting is correct
when the front wheel is about 3 centimeters higher than the rear ones. Doing
so will enable the trike to be really steady and stabilized when taking off and
landing. It is also important to note it will ensure a thrust perpendicular to the
wing width projected axis. In other words, your trike will gain height!
You will find all the information you may need about piloting your paramotor in
your wing manual user and, of course, in the numerous videos available on our
website.
Should you have more questions, feel free to visit our FAQ section on our
Enjoy your flights!
Table of contents
Other Opale-Paramodels Aircraft manuals
Popular Aircraft manuals by other brands

Cessna
Cessna 172S Skyhawk Pilot operating handbook

Mooney
Mooney M20J 1978 Pilot operating handbook

Wildridge
Wildridge LCC-406 Assembly instructions

Tecnam
Tecnam P92 Echo MK2 Flight manual

S.E.A. Paragliders
S.E.A. Paragliders FireStarter Pilot's manual

Aeros
Aeros NANOLIGHT TRIKE FOX13-T 2020 Owner's service manual