OpenEye E-Series User manual

LED STATUS INDICATOR
ENTER / EXIT BUTTONS
Power Illuminates when power is supplied to the DVR.
HDD Flashes when the hard drive is being accessed.
Record Flashes when live video is recording.
Network Illuminates when the DVR is connected to a network.
Fan Illuminates when the fan is working. Flashes when the fan is working
improperly. Unlit when the fan is not working.
Enter Input data, make selections, and open pop-up menus.
NUMERIC BUTTONS AND REC
Numeric In live and search modes, press to watch that channel full screen.
Record In live mode, press to start instant recording of all channels.
Exit Return to the previous mode or menu, without saving.
LOGGING IN FOR THE FIRST TIME
DVR User ID: admin Remote Software User ID: admin1
Password: <none> Password: <none>
Note After logging in for the first time, change the admin password for the DVR and
remote software to establish user level security. See the Manual for instructions.
All manuals and user guides at all-guides.com
all-guides.com

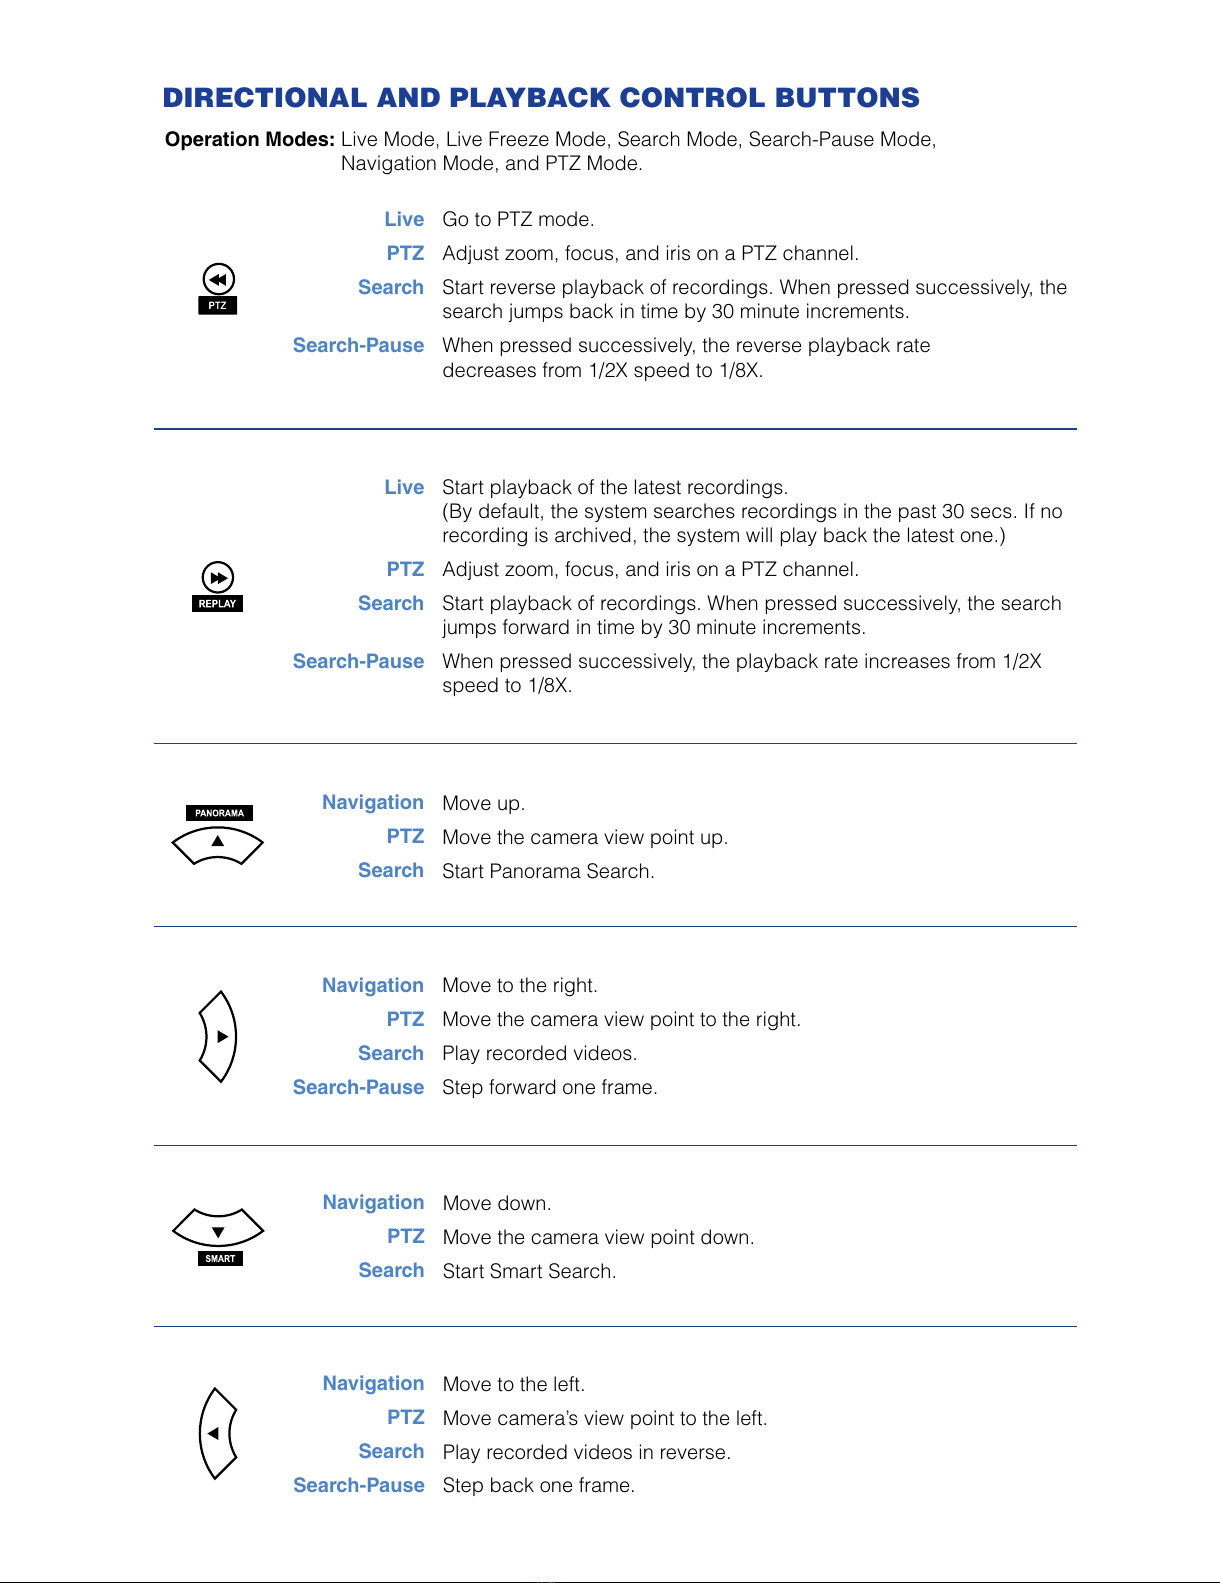
DIRECTIONAL AND PLAYBACK CONTROL BUTTONS
Live Go to PTZ mode.
PTZ Adjust zoom, focus, and iris on a PTZ channel.
Search Start reverse playback of recordings. When pressed successively, the
search jumps back in time by 30 minute increments.
Search-Pause When pressed successively, the reverse playback rate
decreases from 1/2X speed to 1/8X.
Live Start playback of the latest recordings.
(By default, the system searches recordings in the past 30 secs. If no
recording is archived, the system will play back the latest one.)
PTZ Adjust zoom, focus, and iris on a PTZ channel.
Search Start playback of recordings. When pressed successively, the search
jumps forward in time by 30 minute increments.
Search-Pause When pressed successively, the playback rate increases from 1/2X
speed to 1/8X.
Navigation Move up.
PTZ Move the camera view point up.
Search Start Panorama Search.
Navigation Move to the right.
PTZ Move the camera view point to the right.
Search Play recorded videos.
Search-Pause Step forward one frame.
Navigation Move to the left.
PTZ Move camera’s view point to the left.
Search Play recorded videos in reverse.
Search-Pause Step back one frame.
Navigation Move down.
PTZ Move the camera view point down.
Search Start Smart Search.
Operation Modes: Live Mode, Live Freeze Mode, Search Mode, Search-Pause Mode,
Navigation Mode, and PTZ Mode.
All manuals and user guides at all-guides.com

FUNCTION BUTTONS
Live Freeze live channels.
Live Freeze Resume live view.
Search Pause playback channels.
Search Pause Resume playback.
Rotate Rotate through to the remaining channels in the current display mode or
rotate the display configuration.
Preset In PTZ mode, press to use the Preset function.
Setup Open the setup menu.
Live Change the display mode. Display switches in the following order when
the LIVE key is pressed successively: (Single > 4 > 7 > 9 > 10 > 13 > 16
> Single > 4 > 7 > 9 ...split screen mode)
Search Open the search menu.
Focus In PTZ mode, press to use the Focus function.
Use the buttons to adjust.
Backup In live mode, press to open the backup menu.
In the search mode,
Press once, to set the start time for Backup.
Press twice, to set the end time for Backup.
Press three times, to complete Backup.
•
•
•
Zoom In PTZ mode, press to use PTZ Zoom function.
Use the buttons to adjust.
Key Log out the current user. Use to prevent accidental or unauthorized sys-
tem-wide changes.
Iris In PTZ mode, press to use the IRIS function.
Use the buttons to adjust.
All manuals and user guides at all-guides.com

Connect cameras to video inputs, and if using, connect PTZ camera control lines to RS485
connector.
Connect the main monitor to the VGA monitor output or main video output - BNC.
Connect analog monitors to looping video outputs. (optional)
Connect the monitor to SPOT video outputs (up to 3 on 16CH only). (optional)
Connect sensors to alarm signal inputs. (optional)
Connect alarm devices such as buzzers to alarm signal outputs. (optional)
Connect external controllers to RS232 connector. (optional)
Connect a speaker and microphone to the audio inputs and output. (optional)
Connect a network cable to the network port.
Power on all the connected equipment.
Connect the power cord to the DVR.
Turn the power switch on.
1.
2.
3.
4.
5.
6.
7.
8.
9.
10.
11.
12.
QUICK INSTALLATION
When more than one E-Series DVR is installed in the same location, use one remote controller
to control multiple DVRs. To control multiple DVRs, you must change the remote controller ID to
match the SYSTEM ID of the DVR.
Follow the instructions below to change the remote controller ID.
On the DVR
Press SETUP on the front of the DVR or the Remote Controller.
Go to SYSTEM > SYSTEM SETUP.
Enter the desired SYSTEM ID number.
On the Remote Controller
Press and hold the ID button on the remote controller and enter the desired SYSTEM ID
number to operate the corresponding DVR.
Note The SYSTEM ID must be input as two numbers on the remote controller. Therefore you
should input 00 for the DVR ID 0 and input 01 for 1.
1.
2.
3.
4.
HOW TO USE IR REMOTE CONTROLLER
All manuals and user guides at all-guides.com

SEARCH RECORDED VIDEO WITH QUICK SEARCH
All manuals and user guides at all-guides.com

SET UP CONTINUOUS RECORDING
Recording This icon always appears in conjunction with the Motion or
Continuous Recording icon.
Motion Motion Recording
Sensor Sensor (Alarm) Recording
Continuous Continuous Recording
VVideo Loss Video Loss Detected
FFreeze Pause Live View
PPTZ PTZ Camera Channel
1: Channel Channel Number
C1: Channel Name User Defined Channel Name
SSmart Smart Search Mode
PPanorama Panorama Search Mode
Play Playback Mode
Pause Pause Search Video
SCREEN ICONS
All manuals and user guides at all-guides.com
all-guides.com

PLAY BACKUP FILE ON A PC
BACK UP RECORDED VIDEO
QUICK BACKUP
Copyright ©2009 OpenEye. All Rights Reserved. Information contained in this
document is subject to change without prior notice. OpenEye does its best to provide
accurate information but cannot be held responsible for typos or mistakes.
28971AB
A12931
23221 E Knox Ave
Liberty Lake, WA 99019
1.888.542.1103
All manuals and user guides at all-guides.com
Other manuals for E-Series
4
Table of contents
Other OpenEye Recording Equipment manuals