OpenSprinkler OpenSprinkler v3 User manual

OpenSprinkler User Manual
Firmware 2.1.9(9) (Sep 4, 2021)
Contents
Introduction
What's New in this Firmware?
Hardware Interface
Zone Wire Connection Diagrams
Installation
LCD and Button Functions
Firmware 2.1.9 User Manual
1. Overview
2. Accessing the Controller
3. Homepage
3.1 Device Status
3.2 Zone Attributes
4. Menu Buttons
4.1 Rain Delay
4.2 Stop All Zones or an Individual Zone
5. Edit Options
6. Run-Once Program
7. Programs
7.1 Program Data
7.2 Program Preview
7.3 Zone's Sequential Attribute
8. Logging
9. Firmware Update, FAQ, Support, and Github
Advanced Topics
1. Installing Radio Frequency (RF) Transmitter
Specifications
OpenSprinkler Firmware 2.1.9 User Manual 1

Introduction
OpenSprinkler is an open-source, web-based sprinkler/irrigation controller. It’s a drop-in replacement for
conventional sprinkler controllers that do not have web connectivity. OpenSprinkler’s advantages include an
intuitive user interface, remote access, and smart weather-based watering control. It is ideal for homeowners or
business owners with applications in lawn/garden watering, plant irrigation, drip irrigation, hydroponics etc.
OpenSprinkler has several hardware versions: OpenSprinkler v3 (with built-in WiFi, two independent sensor
terminals, and optionally wired Ethernet module), OpenSprinkler 2.3 (wired Ethernet only), and OpenSprinkler Pi
(or OSPi, driven by an RPi). OpenSprinkler v3 and 2.3 are fully assembled and come with pre-flashed firmware.
OSPi requires some assembly steps (e.g. plugging in your Raspberry Pi) and firmware installation. For all versions,
the main controller can switch 8 zones; and additional zones are supported by adding zone expanders (each
expander adds 16 zones). OpenSprinkler 2.3 and v3 supports up to 72 zones; OpenSprinkler Pi supports up to 200
zones. In addition, OpenSprinkler v3 has three variants: AC-powered, DC-powered, and LATCH:
●AC-powered version comes with an orange terminal block. 24VAC power adapter is NOT included by default
but can be purchased as an optional add-on (or use your own 24VAC power adapter).
●DC-powered version comes with a black power barrel, and a 7.5VDC adapter is included by default for North
American users. You can also use your own DC adapter with output voltage between 7.5VDC to 12VDC, or use
a 12VDC solar panel. Though it's powered by a DC adapter, it can operate 24VAC sprinkler valves.
●Similar to the DC-powered version, the LATCH version comes with a black power barrel, and a 7.5VDC adapter
is included for North American users. It's designed specifically for latching solenoid valves only.
What's New in this Firmware?
Firmware 2.1.9(9) is a new minor revision of firmware version 2.1.9, with the following changes:
●Allows program's interval day to be as small as 1 (previously the minimum is 2)
●Support for using a program to trigger controller reboot on a regular basis (details are in Section 7. Programs)
●Improves NTC sync by using multiple NTP servers and cycle through them if one is not available. Also
improves handling of RTC in case RTC doesn't exist or doesn't work.
●Support for OpenSprinkler Latch 3.2
●Improved factory reset function for OS 3.x.
●For OS 3.2 with wired Ethernet module: changed wired Ethernet to use the new EthernetENC library
(https://github.com/jandrassy/EthernetENC), replacing the previous UIPEthernet library.
OpenSprinkler Firmware 2.1.9 User Manual 2

Hardware Interface
OpenSprinkler Firmware 2.1.9 User Manual 3

Zone Wire Connection Diagrams
●Each valve has two wires. Typically, one wire from each valve (regardless of whether it's on the main controller
or an expander) is connected together into a COM (common) wire, and that COM wire should go to the COM
terminal port (NOT GND!!!) on OpenSprinkler.
●OpenSprinkler has two COM ports: you can use either -- they are internally wired together so are the same.
●The other wire of each valve goes to an individual zone port.
●If you have a master or pump start relay wire, you can insert it into any zone port -- OpenSprinkler uses
software defined master / pump zone so you can dedicate any zone as a master zone.
Installation
Important Notes
●OpenSprinkler is NOT waterproof.For outdoor use, please purchase a waterproof enclosure.
●International customers: for the OpenSprinkler AC-powered version, please find a 24VAC transformer
compatible with your country’s powerline voltage standard. Failure to observe the powerline voltage standard
can result in damage to your controller. If you cannot find a 24VAC transformer, you may consider the
OpenSprinkler DC-powered version, which uses a low-voltage (7.5~12VDC) adapter.
Wiring and Installation Tutorial Video (video is based on version 2.3):
OpenSprinkler Firmware 2.1.9 User Manual 4

Instructions:
Step 1: Label wires and remove your existing sprinkler controller.
●Carefully label and remove the wires from your existing sprinkler controller, then remove it from the wall.
Typically you will see the power supply wires, the COM (common) wire, one or more Zone wires. Depending
on your setup, you may also find a Master Zone (or Pump Start Relay) wire, and Rain / Soil / Flow Sensor
wires (if using any such sensor).
Step 2: Attach OpenSprinkler to the wall, and re-insert the wires:
●Refer to the Hardware Interface diagram and Zone Wire Connection diagrams on the previous pages. All
terminal blocks on OpenSprinkler can be unplugged for easy wiring. To unplug, firmly grab both ends of the
terminal block, wiggle, and pull it out.
●Insert COM and zone wires to their corresponding terminal ports on OpenSprinkler.
○For OpenSprinkler DC and LATCH: OpenSprinkler's COM terminal is positive (+). If your solenoid wires
have polarity, make sure its positive wire (typically red) goes to COM.
●For OpenSprinkler AC, insert and tighten the 24VAC wires into the Orange terminal block (AC has no polarity
so the two wires have no distinction);
For OpenSprinkler DC or LATCH, insert the DC power adapter into the power barrel on OpenSprinkler.
●Asensor should be connected between SN1 and GND (or SN2 and GND if using a second sensor).
Do NOT plug in any sensor wire to COM -- OpenSprinkler uses GND (not COM) as common for sensors. For
additional details on how to connect sensors (e.g. rain or flow sensor), refer to later sections in this manual.
Step 3: Link OpenSprinkler Zone Expanders (Optional):
●To link zone expanders: first, power off the main controller; then plug one end of the zone extension cable
into OpenSprinkler’s Zone Expander Connector: the connector is polarized so you can only plug it in one way.
○For OpenSprinkler 2.3 or OSPi: plug the other end of the cable to Zone Expander's IN connector. If you
have multiple expanders, daisy chain them by following the OUT → IN links.
○For OpenSprinkler v3: plug the other end of the cable to either of Zone Expander's connectors on the side.
If you have multiple expanders, use additional cables to link them (again, the two ports on each expander
are identical so you can use either). Because all Zone Expanders are hooked onto the same (I2C) bus, you
must set for each Zone Expander a unique index (1, 2, 3, or 4). Each Zone Expander has a DIP
switch (see picture on the right) that allows setting the index. The first expander (directly
connected to the main controller) should have an index of 1(OFF OFF on the DIP switch), the
second expander should be 2(ON OFF), the next is 3 (OFF ON), and the last is 4 (ON ON).
Zones on the main controller correspond to indices 1 to 8; zones on the first expander (DIP position OFF
OFF) correspond to indices 9 to 24; and so on. The firmware can detect the expander with the highest
index, however, you still need to manually set the number of zones in settings. You can set more zones
than physically available, to take advantage of 'Virtual Zones' features (e.g. Remote, HTTP, RF zones).
Step 4: Setting Up Ethernet or WiFi
●For OpenSprinkler 2.3: plug in a wired Ethernet cable to OpenSprinkler's Ethernet jack, the other end to your
router. If you prefer using WiFi connection, we recommend you to purchase OpenSprinkler v3, which has
built-in WiFi. (If you have an OpenSprinkler 2.3 and want WIFi connection, you can use a powerline Ethernet
adapter, or a pocket-size travel router. Check our Video Tutorial for specific instructions).
OpenSprinkler Firmware 2.1.9 User Manual 5

●For OpenSprinkler v3:
○In WiFi mode, the first time you power on OpenSprinkler (or every time after a factory reset), it starts as a
WiFi AP (Access Point), creating an open WiFi network with SSID displayed on the LCD screen (e.g.
OS_xxxxxx). Use your phone or laptop to connect to this WiFi network (Note: on Android phones, you may
receive a warning: WiFi has no Internet connection. Select Yes to stay connected).
○Once your phone or laptop is connected to the AP, open a browser and type in the AP IP address
192.168.4.1. Follow the instructions to complete the WiFi setup. In particular, you need to select (or type
in) your home WiFi router's SSID and password (NOT OpenSprinkler's password!) Then click on Connect.
●Once the device connects to your WiFi successfully, it will automatically reboot into WiFi Station mode. To
access the controller in station mode, simply click push-button B1 -- that will display the device IP
address to the LCD screen.
●On your phone or computer, open the OpenSprinkler mobile app, or simply launch a web browser and type
in the device IP address, you will see the OpenSprinkler web interface and homepage.
The default device password is opendoor.
❏NEW from OpenSprinkler v3.2: from v3.2, the controller has dual support for WiFi and
wired Ethernet. You can purchase an add-on Ethernet module. When the Ethernet module
is plugged in, the controller boots in wired Ethernet mode; when the module is unplugged,
it boots in WiFi mode. The controller comes with a built-in module cable: plug the cable
connector firmly to the Ethernet module as showN on the right -- the connector is polarized
so there is only one way to plug it in. Then you can plug in a wired Ethernet cable (RJ45) to
the other end of the module.
Reset WiFi / Password Reset / Factory Reset
●Reset WiFi: for OpenSprinkler v3, if you need to reset or switch WiFi network (without erasing program
settings): after controller is powered on, press B3 followed by B2 (B3+B2 like how you press Ctrl+C) until the
screen displays 'Reset to AP mode?'. Then Click B3 to confirm. You can also trigger a WiFi reset using the
OpenSprinkler mobile app. To do so, go to Edit Options -> Reset -> Reset WiFi.
●Reset Device Password: if you have forgotten your device password, you can use buttons to bypass the
password. To do so, first remove power from OpenSprinkler; then plug the power back in, as soon as you see
the OpenSprinkler Logo, press and hold push-button B3, and continue holding B3 until the LCD displays
'Setup Options'. Then click B3 as many times as you need until it shows 'Ignore Password'. Click B1 to select
Yes, and finally press and hold B3 until the controller reboots itself. Now you can access the controller with
any password. For security reasons, we recommend you to immediately change the password and set the
Ignore Password option back to No.
●Factory Reset: to perform a factory reset, first remove power from OpenSprinkler; then plug the power back
in, as soon as you see the OpenSprinkler Logo, press and hold push-button B1, and continue holding B1
until the LCD displays 'Reset?' Make sure the answer is Yes, then press and hold push-button B3 until the
controller reboots itself and completes the resetting process.
○Upon factory reset, the device password is reset back to the default, which is opendoor.
OpenSprinkler Firmware 2.1.9 User Manual 6

LCD and Button Functions
LCD (the illustration below is captured on OpenSprinkler 3.0's LCD)
●Master Zone 1 (if defined) is marked by M; and Master Zone 2 (if defined) is marked by N.
●By default the LCD displays the first 8 zones. If you have any expanded zones, click B3 (see below) to switch
to another group of 8 zones. Each running/open zone is displayed with a three-letter animation: . o O
●If the controller is configured to Remote Extension mode, a radar icon will be shown.
●If a manually triggered rain delay is active, a clock icon will be shown.
●If Sensor1 (available on all versions) is defined, a letter will be shown: rfor rain sensor, sfor soil sensor, pfor
program switch, ffor flow sensor. When the sensor is detected to be active, the letter will be capitalized. In
addition, a rain icon will be shown for the rain sensor, and a soil icon will be shown for the soil sensor.
●If Sensor2 (available only on OS3.x) is defined, the display is similar to Sensor1.
Buttons
After the controller is powered on, the buttons are assigned the following functions:
Click
Press and Hold (i.e. Long Press)
B1:
Display device IP address
Stop all zones immediately
B2:
Display device MAC address
Reboot the controller
B3:
Toggle between the main controller (MC)
and each expansion board (E1, E2, E3 etc).
Manually start an existing program or a test program.
B1 + B2
Display gateway (router) IP (i.e. press and hold B1, then press B2, similar to how you press Ctrl+C etc.)
B2 + B1
Display external (WAN) IP.
B2 + B3
Display timestamp of the last weather server response
B3 + B2
For OpenSprinkler v3: reset controller to AP mode (for re-configuring WiFi).
B1 + B3
(for internal testing only) Start a very quick (2 seconds each zone) test program.
B3 + B1
Display the last system reboot timestamp and reboot reason.
Pressing and holding the following buttons while the OpenSprinkler Logo is displayed at reboot:
If B1 is pressed and held while the logo is displayed at reboot: enter Factory Reset.
If B2 is pressed and held while the logo is displayed at reboot: enter internal test mode (for OS v3 only)
If B3 is pressed and held while the logo is displayed at reboot: enter Setup Options.
OpenSprinkler Firmware 2.1.9 User Manual 7

Firmware 2.1.9 User Manual
1. Overview
OpenSprinkler’s built-in web interface works with both desktop and mobile browsers. It allows you to change
settings and modify programs at any time using either a web browser or the free OpenSprinkler mobile app. To
install the mobile app, just search opensprinkler in your app store.
Watch Firmware Tutorial Video (the video below is based on an earlier firmware 2.1.0):
2. Accessing the Controller
Once the controller establishes a valid connection, you can find out its IP address and HTTP port number on the
LCD by clicking button B1. In the following we will refer to the IP address as os-ip (for example: 192.168.1.122).
Next, open a browser and type in the URL http://os-ip (e.g. http://192.168.1.122). In case you have set a custom
HTTP port number (other than the default 80), include the port number in the URL as well. For example, if you have
changed OpenSprinkler’s port number to 8080, type in http://os-ip:8080.
Device Password: the factory default password is opendoor. For security
reasons, please change this password upon the first use.
TIP: the OpenSprinkler mobile app has an additional feature that can automatically
scan your network for available OpenSprinkler devices.
3. Homepage
At the home page you will find a weather icon and the list of all stations and their current status. The bell button in the
upper-right corner (when visible) indicates notifications are present and opens a sidebar with all notifications. The button on
the upper-left corner activates the left-side menu, which shows additional menu items such as:
●Export/Import Configuration: save/restore controller settings and programs. This is useful during firmware upgrade or in
preparation for factory reset.
●About: display the app version, firmware version, and hardware version.
OpenSprinkler Firmware 2.1.9 User Manual 8

●Localization: change the display language.
●OpenSprinkler.com Login: log in with your opensprinkler.com account name and password. This allows cloud synced data
such as station photos, notes, site configurations etc.
●Disable Operation: disables zone operations. This is useful if OpenSprinkler will not be used for a period of time.
●Change Password: change device password (default is opendoor).
●Reboot OpenSprinkler: trigger a software reboot of the controller.
●System Diagnostics: displays diagnostic information, including timestamp and cause of the last reboot; timestamp of the
last weather call, response received, and response code etc.
TIP:at any time, you can activate the left-side menu by dragging your mouse pointer from left to right (on desktop browses)
or swiping your finger from left to right (on mobile browsers).
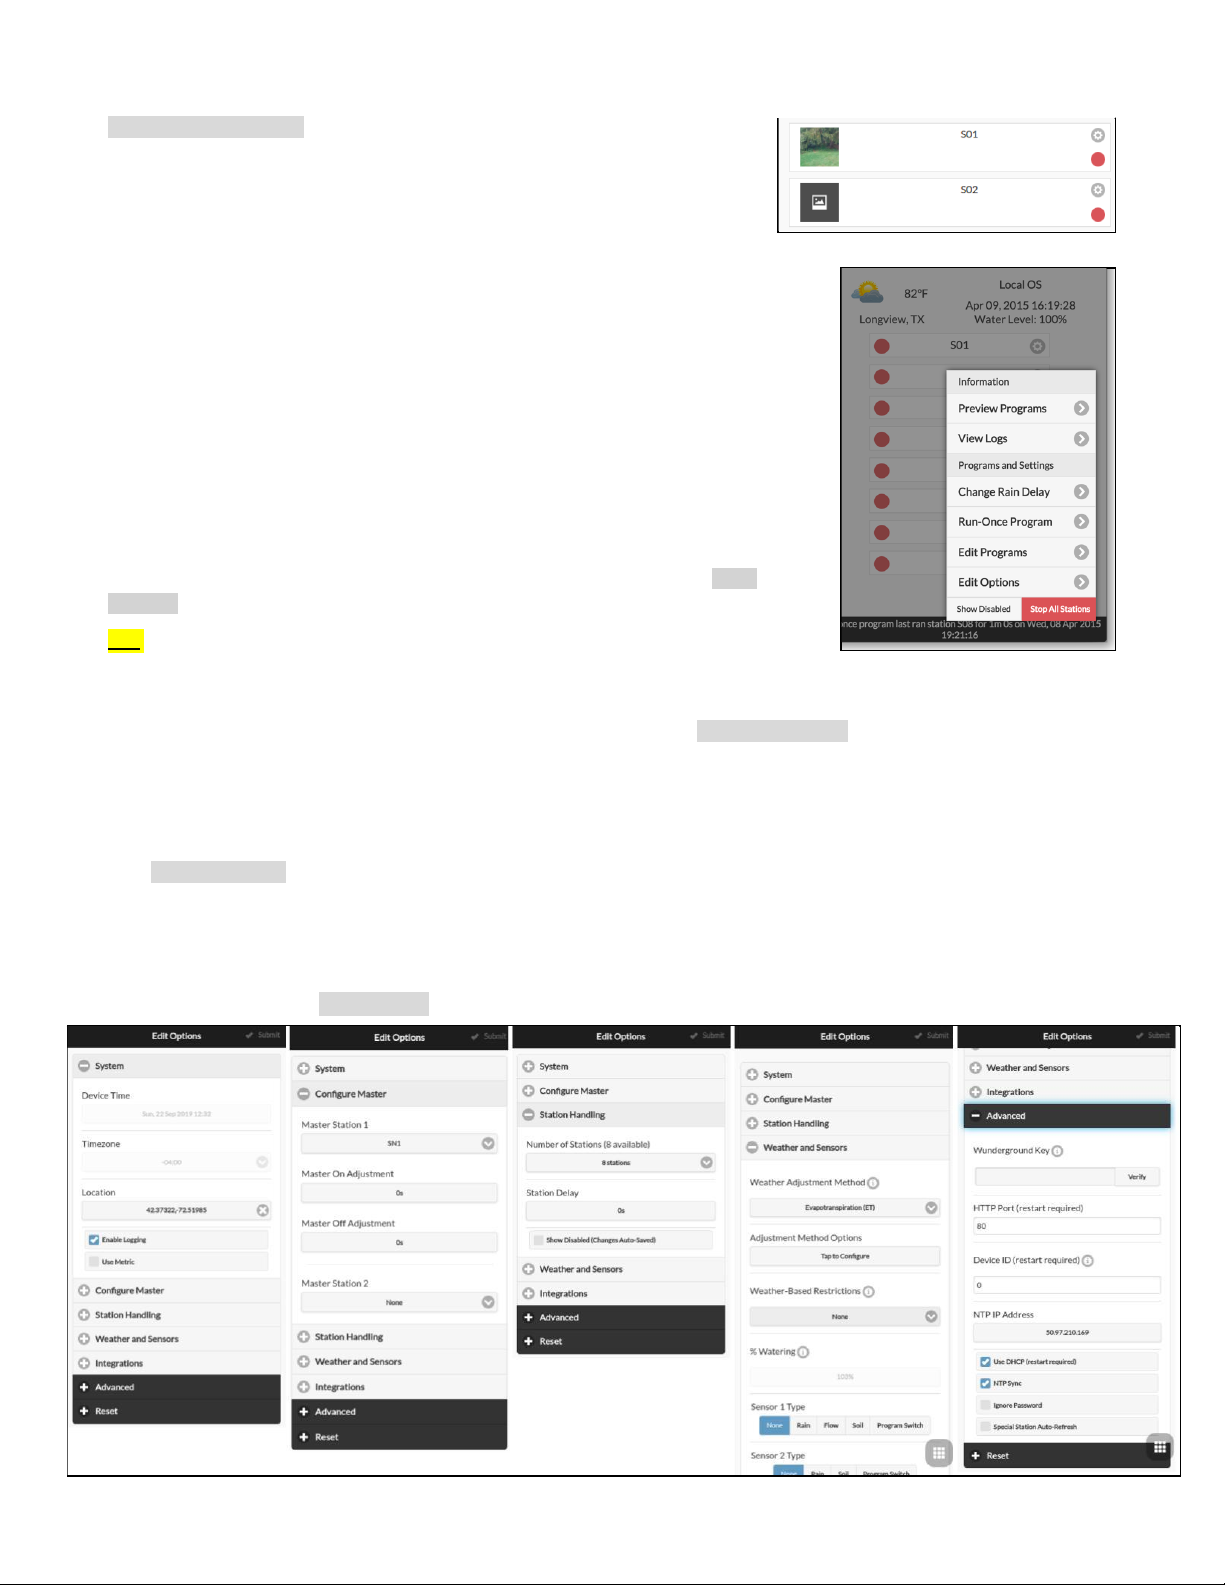
3.1 Device Status
The footer shows the device’s current status. It shows information in the following priority: system enable status, currently
running stations, or active rain delay status. If no active events are detected the system will display information of the last run
station and if not available will read ‘System Idle’. If a flow sensor is installed, the status bar shows the real-time flow rate
(updated every 30 seconds). If any zone is active, the status bar also shows the total current draw
of all solenoid valves.
3.2 Zone Attributes
Click the gear icon next to each zone name and a zone attribute box will pop up:
●Station Name: give each zone a custom name (up to 32 characters).
●Use Master: when checked, the associated Master zone(s) will turn on whenever this zone is
activated. This attribute is only visible if a Master zone is defined.
●Ignore Rain Delay / Sensor1 / Sensor2: when checked, this zone will bypass manual
raindelay, sensor1 or sensor2. These attributes allow you to customize if a zone is affected
by any of them. By default these flags are off.
●Disable: when checked, this zone will not run and is hidden from the user interface.
●Sequential: when checked, this zone will be serialized with other zones that also have the
Sequential attribute turned on. In other words, at most one sequential zone will be running at
any given time. Default is on.
Station Type (Advanced tab): the default type is Standard; you can also choose from several
types of special/virtual stations as explained below:
●RF zone: by installing a RF (radio frequency) transmitter (see Advanced Topics section), OpenSprinkler can switch many
common RF remote power sockets. To do so, you need to purchase an RFtoy and use it to decode RF signal code from
your remote power sockets. Once the code is set, whenever this zone is turned on/off, OpenSprinkler will send the on/off
code through RF transmitter to remotely switch the power socket. This allows your OpenSprinkler to control powerline
devices, such as Christmas lights, heaters, pumps, etc.
●Remote zone: a remote station is a physical station on another OpenSprinkler. This allows one master controller to send
commands to remote controllers in order to turn on their valves. Each remote station is specified by the IP address,port
number, and station index on the remote controller. For example, you can map master controller's zone 1 to remote
controller's zone 5. However, the master and remote controllers must share the same password.
●GPIO zone: allows the zone to directly switch a spare GPIO pin available on the controller. Only valid GPIO pins are visible.
You can also define the active state (i.e. Active High or Active Low).
●HTTP zone: allows the zone to trigger a generic HTTP GET command. To define an HTTP station, you need to provide a
server name (either domain name or IP address), port number,on command (without the starting slash /), and off
command. When this zone is turned on, it automatically sends a HTTP GET command server:port/on_command; similarly,
when it’s turned off, it sends a HTTP GET command in the form of server:port/off_command.
●Note that the above special zones are virtual – you do NOT need to have physical zones to use them. In other words, even
if you don’t have any zone expander, you can still use special zones up to the maximum number of zones supported.
OpenSprinkler Firmware 2.1.9 User Manual 9

Cloud Synced Attributes: once you log in to opensprinkler.com in the UI/app
(through sidebar menu), cloud-synced attributes will become available, including
station photos and notes. You can take a custom photo for each station by using
the OpenSprinkler mobile app.
4. Menu Buttons
The menu button is on the bottom right corner of all pages and allows quick navigation
between pages relevant to the controller. This menu has the following options:
●Preview Programs, or use keyboard shortcut ALT+V
●View Logs, or ALT+L
●Change Rain Delay, or ALT+D
●Run-Once program, or ALT+R
●Edit Programs, or ALT+P
●Edit Options, or ALT+O
●Stop All Stations (Section 4.2).
Additionally, when you are at the home page, the menu has a button labeled Show
Disabled, which allows disabled zones (if any) to show up in the zone list.
TIP:at any time, you can activate the menu by pressing the Mkey on your keyboard.
4.1 Rain Delay
To manually trigger a rain delay time, click on the menu button, and select Change Rain Delay to set a custom rain delay time
(in hours). Any zone affected by rain delay will immediately stop, and will not run until the rain delay time is over. To cancel an
existing rain delay, simply set 0 as rain delay time.
4.2 Stop All Zones or an Individual Zone
Click Stop All Stations to stop all zones immediately, including those in the queue waiting to run. To stop an individual zone
(either running or in the queue waiting to run), tap/click the station card on the homepage, and select Yes to confirm.
5. Edit Options
At the home page, click Edit Options (or use keyboard shortcut ALT+O) to configure the basic settings.
OpenSprinkler Firmware 2.1.9 User Manual 10

System Settings
●Location: click on Location to open a map, where you can search, locate, and select your address.
○PWS location: if you prefer using WUnderground PWS location, you need to provide a valid WU key in the Advanced
tab, submit, then come back to Location settings, and the blue dots will show PWS locations.
●Time Zone: OpenSprinkler uses your location to automatically detect your time zone, Daylight Savings Time (DST) setting,
and obtain weather data online. If you would like to manually set the timezone, you should: 1) leave the Location field
empty, and 2) disable NTP Sync (in the Advanced tab).
●Enable Logging: enable logging (data will be stored in the internal flash or microSD card). Default is on.
●Use Metric: the UI will automatically detect unit system (imperial vs. metric), but you can also manually set unit system.
Configure Master
This firmware supports up to 2 independent Master Stations, each with their own settings as listed below.
●Master Station: define a master station/zone, also known as pump station. Master is a zone that turns on together with
other zones. Any zone can be set as a master. Default is none (i.e. not using master station).
●Master On Adjustment: fine tune the exact time at which the master turns on. The acceptable range is 0 to 600 seconds,
in steps of 5 seconds. For example, when set to 15, the master station will turn on 15 seconds after a station opens.
●Master Off Adjustment: fine tune the exact time at which the master turns off. The acceptable range is -600 to 0 seconds,
in steps of 5 seconds. For example, when set to -15, the master station will turn off 15 seconds before a station closes.
Station Handling
●Number of Stations: OpenSprinkler can automatically detect the number of available expansion boards; nonetheless, the
user still needs to manually set the number of zones, because it's allowed to exceed the number of physical zones. This is
particularly useful when using the virtual stations feature (e.g. remote or RF stations). Default is 8.
●Station Delay: the delay time between two consecutive stations. The acceptable range is -600 to 600 seconds, in steps of
5 seconds. For example, when set to 60, the second zone will open 1 minute after the first zone closes. When set to -15
seconds, the second zone will open 15 seconds prior to the closing of the first. A negative station delay is sometimes
useful to solve water throttling issues. Default is 0 (i.e. the next zone will run immediately after the previous).
Weather and Sensors
●Weather Adjustment Method: select weather-based adjustment method. If Manual is selected, the % Watering is
configured manually. Otherwise the % Watering is set automatically by the selected method. Explanations of supported
adjustment methods can be found on the support page of OpenSprinkler.com.
●Adjustment Method Options: tap to configure options for the selected adjustment method.
●Weather-Based Restriction: select weather-based restriction. If None is selected, no restriction will take effect. If
California Restriction is selected, no watering will occur if more than 0.1” of rain has accumulated in the past 48 hours.
●% Watering: global scaling factor applied to station water times. For example, if set to 150%, all station water times will be
multiplied by 150% (except in programs that do not use weather adjustment). Default is 100%. This option is disabled if
automatic adjustment method has been selected
●Sensors: OpenSprinkler supports several types of sensors: Rain, Soil (digital output only), Flow, or Program Switch.
OpenSprinkler v3 supports two independent sensors (SN1 and SN2), allowing you to use two sensors at the same time
(except flow sensor is only supported on SN1). Note that a sensor should be connected between SN1 and GND (or SN2
and GND). Do NOT plug in any sensor wire to COM as that may damage the controller.
○Sensor Installation: all sensors described below have two wires (except the 3-wire flow sensor). To install Sensor1:
insert the two wires to the sensor terminals. On OpenSprinkler v3, insert the two wires to SN1 and GND. To install a
second sensor, insert the two wires to SN2 and GND.
○Rain/Soil Sensor: rain or soil sensor allows the controller to automatically stop zones from running if rain or soil
moisture is detected. You can additionally select the sensor option: normally open or normally closed. A rain sensor is
essentially a rain-activated switch. They are typically 'normally closed'. Note that while many soil sensors on the
market output analog signals, OpenSprinkler only supports those that output digital signals (binary ON or OFF). If your
soil sensor is analog, you can use a threshold adapter to convert it to a digital sensor.
OpenSprinkler Firmware 2.1.9 User Manual 11

○Delayed On / Off Times: you can optionally set delayed on / off times for rain and soil sensors. For example, 'delayed
on time of 10 minutes' means the sensor must remain on for at least 10 minutes for it to be regarded as activated;
'delayed off time of 30 minutes' means the sensor must remain off for 30 minutes for it to be regarded as
deactivated. The 'delayed on time' can prevent false triggering of sensors; and 'delayed off time' allows you to extend
the sensor activation for a specified amount of time (e.g. extend rain sensor activation after rain stops).
○Program Switch: if this sensor is selected, you can connect a switch / button to the sensor port. When the switch is
pressed for at least 1 second, the controller will trigger Program 1 (or Program 2 if the switch is installed on SN2).
○Flow Sensor: when using a flow sensor, the controller will detect flow sensor pulses, display real-time flow rate at the
footer, and log the flow volume at the end of each station run and program run. By default Dry-contact, 2-wire flow
sensors are supported: these sensors are essentially flow-activated reed switches which close and open repeatedly
as water flows through the meter. They do not need power, and typically come with 2
wires. Insert the two wires to the sensor terminals on OpenSprinkler (there is no
polarity). (Note: on OpenSprinkler v3, only SN1 supports flow sensor, SN2 does NOT
support flow sensor). Then set the 'flow pulse rate' -- which you can find out in your
flow sensor’s datasheet -- it's used to convert the pulse count to actual volume. We
recommend you to keep the unit as L/pulse, even if you normally use Gallon/pulse (i.e.
you can keep it as 1L/pulse even if the actual unit should be 1Gallon/pulse): only the
numbers matter, the unit is for display only.
○Flow sensors with 3 wires and runs on 5V can also be used with OpenSprinkler. In this
case, insert the ground wire (typically black colored) GND, 5V wire (typically red
colored) to VIN, and the sensor wire (typically yellow) to SN1.
Integrations: MQTT notifications
This firmware supports notifications through MQTT. For details, please refer to this MQTT support article.
Integrations: IFTTT notifications
This firmware also supports notifications through IFTTT. For details, please refer to this IFTTT support article.
OpenSprinkler Firmware 2.1.9 User Manual 12

Advanced Settings
●Wunderground Key: Wunderground (WU) API key. Useful if you want to use WU as a weather data source. If you have an
existing WU key, fill it here and use the Verify button to check if the key is valid. If you don't have an existing WU key, follow
this support article to create one. When this key is provided, AND if you have selected a PWS station as your location, the
OpenSprinkler weather algorithm will automatically use WU as a data source. Otherwise DarkSky is the data source.
●HTTP Port: customize the device’s HTTP port. Default is 80. There is typically no need to change this setting.
●Boost Time: this option is only applicable to DC-powered OpenSprinkler. It sets the DC voltage boost time (from 0 to
1000ms). Default is 320ms. When using a low-voltage DC power adapter, such as 5VDC, to drive 24VAC sprinkler valves,
you may want to suitably increase the boosting time to allow valves to be successfully energized.
●Special Station Auto-Refresh: whether to periodically auto-refresh special stations (e.g. RF, remote, HTTP stations etc.)
●NTP Sync: automatic time-sync based on your location. When off, you can set the device time manually. Default is on.
●NTP IP Address: set a custom NTP time-sync server.
●Use DHCP: when checked, OpenSprinkler’s IP is dynamically assigned by the router. When off, the IP is statically assigned,
in which case you will need to manually set a Static IP,Gateway IP,Subnet Mask, and DNS IP. Default is on.
Note: instead of turning off DHCP, it’s highly recommended that you use the router’s DHCP reservation, or Bind IP to MAC
feature to manage static IP assignment.
Reset
●Clear Log Data: Clear all log data.
●Reset All Options: Restore all options back to factory settings.
●Reset All Station Data: Restore all station names and settings to factory settings.
●Reset Wireless Settings: for OpenSprinkler v3 only, reset controller to WiFi AP mode.
6. Run-Once Program
To manually start a program, go to the home page, and click Run-Once Program (or use
keyboard shortcut ALT+R). You can load preset water times from any of the existing
programs, or a test program (1 minute each station). You can also manually edit the water
time for each station.
●If the controller is already running an existing program, you will be prompted to stop it
in order to continue.
●Zone attributes are obeyed, such as Use Master1 or Master2 etc. Controller settings,
such as Sequential Mode,Station Delay Time,Master On / Off Time, are also obeyed.
●Rain Delay and All Sensor settings are ignored, and % Watering Adjustment is ignored,
because the run-once program is treated as a manual override program.
TIP 1: you can start a run-once program on the controller using buttons. This is useful for
landscapers/gardeners to perform routine checks without having to give them WiFi access.
To do so, press and hold button B3 until the LCD displays ‘Run a Program’. Then click B3 to
navigate through the list of available programs. Once you have found the program, press and hold B3 until the controller starts
to run that program.
TIP 2: If you’d like to set a test program which is not intended to run normally, but only for run-once program, or for starting
using buttons on the controller manually: you can create a new program, and set it as ‘disabled’ (refer to the next section for
setting a program as disabled.). This way the program will not run normally, but will appear in the list of available programs
that you can load as a run-once program, or using buttons to start the program manually.
OpenSprinkler Firmware 2.1.9 User Manual 13

7. Programs
At the home page, click Edit Programs (or ALT+P) to see the list of existing
programs. Here you can:
●Create a program by either adding a new program or copying an existing
program.
●Modify or Delete an existing program.
●Reorder existing programs by using the arrow keys.
●This firmware supports a maximum number of 40 programs.
7.1 Program Data
Click on the + Add button at the upper-right corner to create a new program. Each program contains the following data:
Basic Settings
●Program Name: a custom program name, up to 20 characters.
See the next page for special program names.
●Enabled: program enable flag. Default is enabled.
●Use Weather Adjustment: when checked, the % Watering
applies to all station water times in this program. Default is on.
●Start Time: the first start time of the program (e.g. 8:00 AM).
Also supports sunrise or sunset time +/- offset as start time.
Program Type
●Weekday: program will run on the selected weekdays.
●Interval Day: program will run every N days, where N is between
2 to 128. You will also need to set the Starting in days. For
example, a program that repeats every 5 days starting in 0 day
will run today, and every 5th day from today. A program that
repeats every 3 days starting in 1 day will run tomorrow, and
every 3 days from then.
●Restrictions: odd/even day restrictions. Odd day means the
program will run only if it’s an odd day of the month (except the
31st, or Feb 29th). Similarly for even days. Default is no
restrictions.
Station Water Times
●Set the water time for each station. A value of 0 means the
station will not run. The range of water time is 0 to 64800
seconds (18 hours). Unlike previous firmware, this firmware
does not use compression of water time anymore, so it allows
full precision in units of seconds.
●Also supports sunrise-to-sunset and sunset-to-sunrise
durations.
Additional Start Times
There are two choices of additional start times:
●Fixed: up to 3 given additional start times. Any time of a day.
●Repeating: repeating start times at regular time intervals. For
example, repeat every 90 minutes for 7 times. This is useful for
breaking down long water times into shorter cycles. Unlike
previous firmwares, this firmware allows repeating start times
to go overnight to the next day.
OpenSprinkler Firmware 2.1.9 User Manual 14

Special program names can be used to trigger a controller reboot on a regular basis:
●If the program name is :>reboot it will trigger a reboot when the controller is idle (i.e. no program is running).
●If the program name is :>reboot_now will trigger a reboot regardless of its running status.
Both reboots will be delayed by 1 minute or so from the start time to avoid the action triggered again right after rebooting. As
an example: create a program that starts every day at 2:00am with name :>reboot will trigger a reboot every day at 2am. When
creating the program, at least one zone must be selected to run but it will be ignored because the firmware recognizes the
special program name and does not actually run any zone included in this program.
7.2 Program Preview
To verify that all programs are set correctly, go to the home page and click Preview Programs to visualize how the programs
are scheduled to run each day.
●Today’s schedule is shown by default. Click on the left
and right arrows at the top to change to a different day.
●Current time is indicated by a pink line. You can zoom
in/out or drag the plot left/right to check details.
●Colored bars show the program name and time span of
each station run. Clicking on each bar directs you to the
specific program editing page.
NOTE 1: The program preview is implemented using a
software simulation of the scheduling algorithm:
●What you see accurately reflects how the programs are
scheduled to run on the controller.
●All controller settings, such as Master zones, Sequential
Mode,Station Delay Time,Master On / Off Time, are
observed; and all station attributes such as Use Master
Station,Activate Relay are also observed.
NOTE 2:
●Rain Delay and Rain Sensor are ignored because these dynamic events cannot be predicted during preview.
●Programs that are set to Use Weather Adjustment will be scaled by the current % Watering parameter.
○When using the Manual Adjustment method, the same % Watering is applied to every day.
○When using the Zimmerman Adjustment method, the current % Watering (dynamically calculated on a day-to-day
basis) is only applied on today’s schedule, while 100% is applied to all other days.
○When the watering level is less than 20%, any station with a resulting water time less than 10 seconds will be skipped
(due to the water time being too short).
7.3 Zone's Sequential Attribute
OpenSprinkler supports running multiple zones in sequence (one after another) or parallel (concurrently). This can be set
using each zone's Sequential attribute. Zones that have the Sequential attribute turned on will be automatically serialized. For
example, if zones 1, 2, 3 are sequential, the controller will make sure only one of them is running at any given time. If their
scheduled times overlap, for example, zone 2 is scheduled to open while zone 1 is still running, it will be automatically pushed
behind zone 1. This is the most common way as it helps conserve the water pressure by running one zone at a time.
If a zone’s Sequential attribute is turned off, the controller will open that zone whenever it’s scheduled to run, regardless of
whether other zones are running or not. This is useful if you want multiple zones to run simultaneously, or are using
OpenSprinkler to switch non-sprinkler devices, such as lights, pump, and heater.
OpenSprinkler Firmware 2.1.9 User Manual 15

8. Logging
OpenSprinkler supports logging, which stores zone runs as well as rain delay, sensor
status changes, and watering percentage changes.
At the home page, click View Logs (or ALT+L) to see a graphical plot of the log:
●In the Options tab, select the start and end dates of the query. The default is the
past 7 days.
●Select Table at the top of the page to switch to a table view of the data.
9. Firmware Update, FAQ, Support, and Github
Go to www.opensprinkler.com to find Firmware Update Guide and detailed FAQs. You can submit a support ticket
on our Support Website and also find various support articles, including details of the weather adjustment
methods, IFTTT, and firmware compilation instructions. OpenSprinkler is a fully open-source product. Source code
and all hardware design files are available at the OpenSprinkler Github repository.
Advanced Topics
1. Installing Radio Frequency (RF) Transmitter
OpenSprinkler supports standard 434MHz or 315MHz Radio Frequency (RF) transmitters. This can be used to replicate RF
signals sent to remote power sockets for switching powerline devices, such as lights, heaters, fans, pumps. To do so, you need
to purchase an RFtoy and use it to decode RF signal code from your remote power sockets. Each code is a 16-digit long string
(e.g. 51001A0100BA00AA) that encodes the on-signal, off-signal, and signal timing information.
●The RFToy package contains a pair of 433MHz transmitter and receiver, and also a pair of 315MHz ones. Pick the one that
matches the frequency of your wireless device. To maximize transmission range, you should solder a 17cm-long wire
antenna to the ANT pin on the transmitter. The wire can be straight or curled like shown in the picture below.
●OpenSprinkler v3 has a built-in receptacle pin header for the RF transmitter. You can directly plug in an RF transmitter
(3-pin) on the top side. The orientation is such that it's facing up. See the Hardware Interface
diagram for the locations of the RF pin header.
●OpenSprinkler 2.3 and OSPi do not have a receptacle pin header for the transmitter, but PCB
pins. You can solder a transmitter to the pins. Specifically, open the enclosure, then locate the
RF pins on the circuit board: A3 (or DATA), VIN, GND, and solder the transmitter to the
corresponding pins. Finally, carefully reassemble the enclosure.
●Additional details about the RF Station Feature can be found on this blog post.
OpenSprinkler Firmware 2.1.9 User Manual 16

Specifications
OpenSprinkler v3.x
OpenSprinkler 2.3
OpenSprinkler Pi
Input Voltage:
22~28V AC (AC-powered version and OSPi); 7.5~12V DC (DC and LATCH versions).
Power Consumption:
1~1.5 Watt
Number of Zones:
8 on the main controller, expandable to 72 zones.
Max Output Current:
800mA continuous per zone (AC); 2A continuous per zone (DC).
Over-voltage Protection:
Bi-directional TVS on each zone, power input, and sensor terminal
Product Size:
140mmx68mmx34mm
135mmx105mmx30mm
135mmx105mmx38mm
Product Weight:
140g
250g
200g
Expander Size:
130mmx75mmx25mm
Expander Weight:
100g
OpenSprinkler Firmware 2.1.9 User Manual 17
Other manuals for OpenSprinkler v3
2
This manual suits for next models
2
Table of contents
Other OpenSprinkler Irrigation System manuals