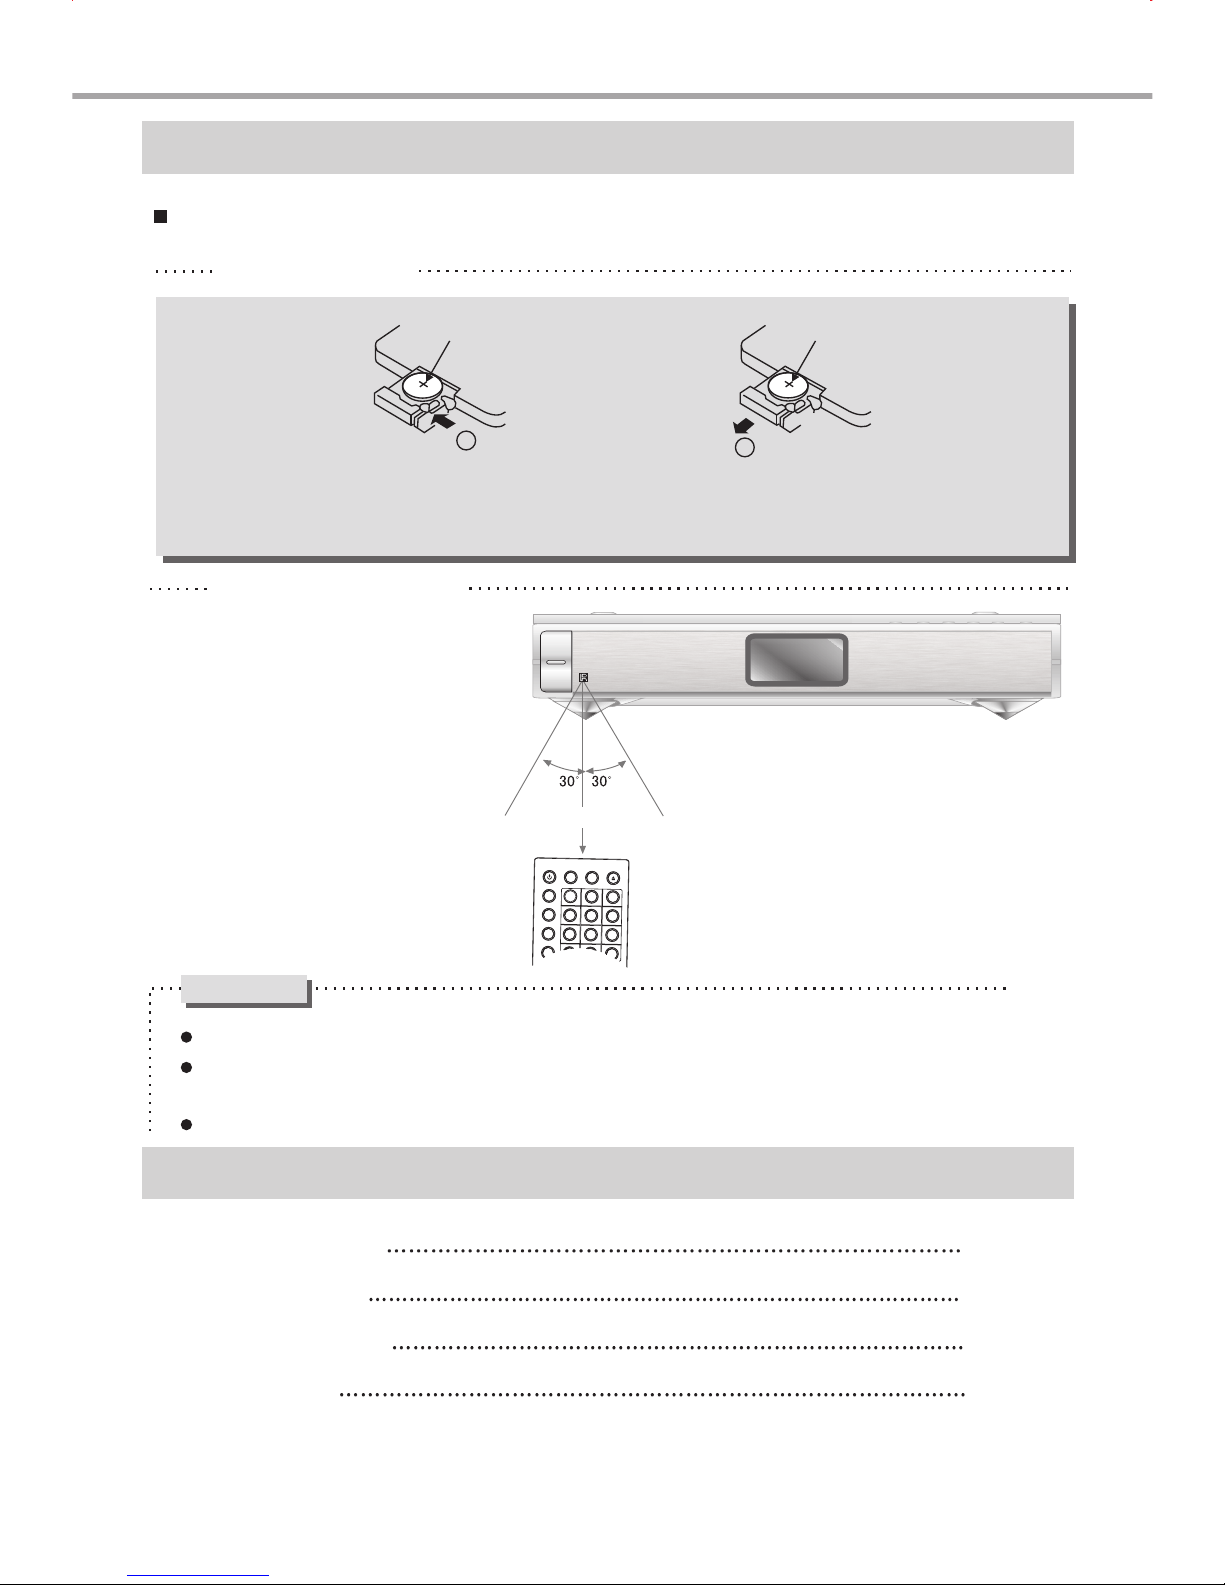
Oppo DVD-DL317 User manual

USER MANUAL
V 2.0
DVD PLAYER
DVD-DL317

Safety Instructions
This product incorporates copyright protection technology that is protected by method
claims of certain U.S. patents and other intellectual property rights owned by Macrovision
Corporation and other rights owners. Use of this copyright protection technology must be
authorized by Macrovision Corporation, and is intended for home and other limited viewing
uses only unless otherwise authorized by Macrovision Corporation. Reverse engineering
or disassembly is prohibited.
All images in this manual are sketch illustrations for reference only. The actual displays
are contingent upon discs.
WARNING:
To prevent the risk of fire or electric shock, do not expose this unit to rain or moisture.
High voltage components in it so do not attempt to open the enclosure. Only qualified personnel
are allowed for maintenance.
CAUTION:
This DVD player contains laser system.
To prevent direct laser radiation, do not attempt to open the enclosure. Visible laser beam will radiate
when the enclosure is opened or when the interlock device is released. Do not stare at the laser-beam.
To avoid damaging the loader of the unit, please don't pull or drag the tray of the loader when operating
and switch off the power supply only when the "NO DISC" is displayed.
Never place other things or articles upon the player, otherwise it may cause improper playback.
After reading this manual, please keep it for future reference. Please contact your local dealer or
our technical service center for maintenance.
Read this manual carefully and get familiar with the instructions before operating.
Reminding the user of the dangerous voltage!
Danger Symbol
Reminding the user of the important instructions for operation and maintenance.
Warning Symbol
is a trademark of DVD Format/Logo Licensing Corporation, registered in the U.S.,
Japan and other countries.

CONTENTS
Front Panel Illustration
Rear Panel Illustration
LCD Display WindowIllustration
Remote Control Illustration
Control Button Locationsand
Explanations
Accessories
Connected to TV set withprogressive-scan video input
Connected to TV set
Connected to OrdinaryAudio System
Connected toAmplifier with DTSDigital Decoder
Connected toAmplifier with 5.1CHAudio Input
Playback
Progressive/Interlacing Output Mode
TV System Selection
Pause/Step Playback
OSD
Volume Control
Fast Playback
Repeat Playback
Repeat the SelectedSection
Subtitle selection
Angle Selection
playback from theDesired Point
Function Setup
General Settings
Speaker Setup
Useful Notes
Troubleshooting
Specifications
How to Usethe Remote Control
Compatible Disc Types
Features
Cautions
Brief Introduction toDVD
DVD Menu Playback
PBC Playback
Direct Selection Playback
Function by Number Buttons
Language/Audio Channel
Selection
Mute
Headphone Enjoying
MPEG4,Mp3 and JPEGFile
Playing
Disc INFO
Virtual Keyboard
Power Spectrum Metre(PSM)
Initial Setup
Video Setup
Audio Setup
Terms
Language Code List
PREFACE FUNCTION
SETUP
OTHERSSYSTEM
CONNECTIONS
PLAY
OPERATION
BASIC
OPERATION
Zooming the DisplayedFrame
Slow playback
Connected toAmplifier with Dolby Digital Decoder

1
Brief Introduction to DVD
Disc Pictures
TV Screen
4:3 16:9
Pan-Scan Letterbox
16:9
4:3
DVD is well known for its extraordinarily large capacity and outstanding audio-video effects. Its capacity is as high
as 4.7-17 GB (approximately 7-26 times the CD capacity).With 500-line horizontal resolution of picture and Dolby
Digital 5.1 Channel surround sound, it brings a new era to the household AV products.
Analog
Linear PCM
FM modulation
Linear PCM
One
430 lines or more
350 lines or more
250 lines or more
CDROM
650MB
12cm/8cm
VCD
Super VCD
Digital/MPEG1 Digital Digital
Digital/MPEG2
650MB
44.1kHz
12cm/8cm
74min.
650MB
12cm/8cm
45min.
CD
650MB
44.1kHz/16bit
12cm/8cm
74min.
LD
44.1kHz/16bit
30cm/20cm
1 side 60min.
2 sides 120min.
Digital/MPEG2
Single-
sided
1 layer
4.7G
Single-
sided
2 layers
8.5G
Double-
sided
1 layer
9.4G
Double-
sided
2 layers
17G
133min.
500 lines or more
Multiple
Dolby Digital/Linear PCM
32 types
242min. 266min. 484min.
DVD
48kHz,96kHz/16,20,24bit
12cm/8cm
Recording Method
Capacity
Playback time
Disc Diameter
Horizontal
Resolution
Aspect Ratio
Subtitle
Audio
Sound Quality
Max. 16 types
DVD disc can support as many as 8 dubbing languages and 32 subtitle languages.
DVD disc may support as many as 9 camera angles.
User can select to play the desired plots (the beginning, development or ending) of the same disc.
Multiple aspect ratios support various TV screens.
Multiple languages and subtitles
Multiple angles
Multiple story plots
Multiple aspect ratios
Comparison Between DVD and Other Discs
Function Introduction
PREFACE

2
PREFACE
Cautions
Features
Please remove the power plug from the socket when you are not going to use the player for a long time.
Ensure that all wires and the power supply are properly connected befor turning the Power on.
The player uses the switching power supply .The range of the power supply: AC 110V~250V, 50/60HZ.
Before turning on the power of the player, please adjust the volume level knob of audio system speakers and amp-
lifiers to minimum. Adjust the volume as necessary only after starting normal playback to avoid damage to your
amplifiers or speakers.
Do not put your player near any high power speaker or put both on the same table-board so as to avoid any
influence on its nomal operation due to vibration.
Please put the player at a dry and ventilated area. Do not put it near heat source, or expose it to direct sunlight, me-
chanical vibration, humidity or dust-rich environment ,and also do not put it over heat releasing substances.
When moving the player from a cold place to a warm one, or vice versa, the laser head may have condensation.
Then the player will not work properly. In such a case, please turn the power on for 1-2 hours(without disc) before playing.
It is allowed to use a small amount of neutral detergent to clean the player. Never use sandpaper or organic solvent
such as alcohol or gasoline for cleaning.
Do not place objects full of liquid such as vase on the player.
This player hasemployed the newgeneration DV decode chip with built-inDolby Digital decoderwhich will
bring you toa brand-newAV ententainment world. The 2-lasersuper error-correction mechanism supports CD-R.
Brand-new AV Effects
Progressive-scan video outputsto eliminate theflickers hardly overcome by interlacing scanand therefore your
eyesight will bewell-protected. Atthe same time, the pictures definition is sharply enhanced and the pictures will
be finer,smoother and stabler
Brightness, chroma andcontrast adjustment functionsto render youreyes more comfortable.
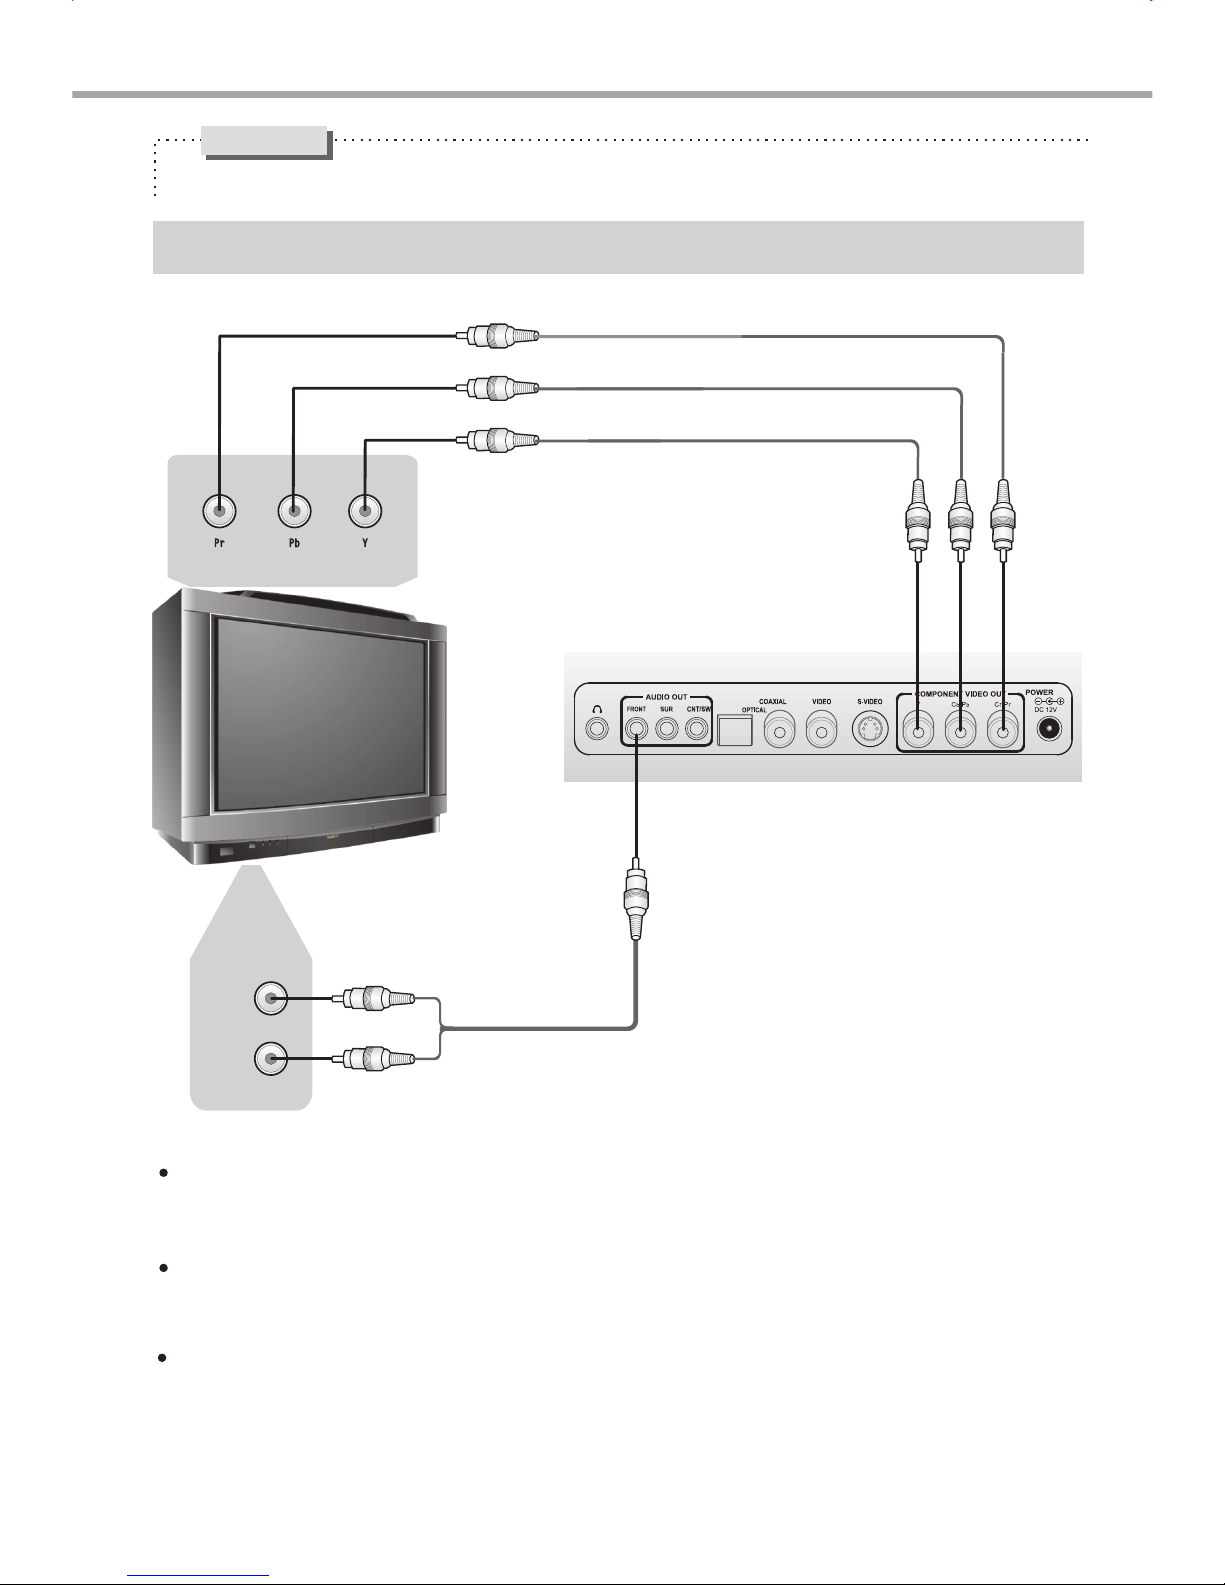
Composite Video, S-Videoand Component Videooutputs.
Bullt-in Dolby Digitaldecoder, separate5.1Ch Outputs.
Dolby output for2channel(DOWNMIX)
High Quality Digital Audio
Optical and coaxialoutputs for Digitalaudio.
Dobly Digital, PCMDigital audio outputsto satisfy the Fans’ acoustic requirements.
Many Convenient Features
Screen saver protectsyour TV setcarefully.
The novel Mp3playback window GUIprovides you a new way to appreciate Mp3 music.
Multi-angle playback functionmakes it possiblefor you to view a scene from different cameraangles.
It’s possible toselect the desiredbeginning, development andending of astory.
Direct entry intodesired scenes(title/chapter/time/track search).
Zooming function tozoom up anyplaying picture.
Capable of playingPAL/NTSC discs.
Multiple aspect ratiosto fit TVsets of variousscreen ratios.
Parental lock functionto prevent childrenfrom watching unsuitable discs.
Multiple dubbing languagesand subtitle languagesbring you the best entertainment status all the time.
Super Compatibility with superVCD, VCD, CD, CD-R ,MP3,HDCD,
KODAK PICTURE CDetc.
Compatible with DivX,MPEG4 discs to produce wonderful pictures.
108MHz/12bit video DAC,with more vivid and brilliant pictures.
NOTE: DivX versionis still upgradingcontinuously and the latest version of this unit is DivX 5.1. Some discs
labelled with MPEG4on the marketactually are*.rm/*.ram/*.rmm and others which are imcompatible.
Please take carewhen buying discs.
DVD-Audio decoding output to reproduce original and realistic sound effects.

3
5
6
7
5
4
2
4
3
6 7 9
2
8
PREFACE
Control Button Locations and Explanations
Front Panel Illustration
Power indicator
IR SENSOR
OPEN/CLOSE button
PLAY/PAUSE button
STOP button
PREV button
NEXT button
POWER switch
Compatible Dise Types
Types Sizes Recorded Contents
12cm or 8cm
12cm or 8cm
12cm or 8cm
12cm or 8cm
12cm
DVD: Compressed digital audio + compressed digital video(dynamic picture)
Super VCD: Compressed digital audio + compressed digital video(dynamic picture)
VIDEO CD: Compressed digital audio + compressed digital video(dynamic picture)
CD-DA: Digital audio
Mp3: Compressed digital audio
MPEG4
12cm MPEG4: Compressed digital audio + compressed digital video(dynamic picture)
NOTES
These icons on the top banner indicate the disc types that the function described in this section applies to.
Press the effective button again.
2Issues related to MP3
CDVCD
Super VCD
DVD
Applies to VCD disc
VCD
Applies to Super VCD disc
Super VCD Applies to MP3 disc
MP3
Applies to CD disc
CD
Applies to DVD disc
DVD
1When the button is invalid, on TV screen display:
MPEG4
Applies to Super MPEG4 disc
MPEG4
3
9
Display window
8
12cm or 8cm DVD: Compressed digital audio + compressed digital video(still picture)

5
2
3
4 7
8
6
4
PREFACE
1 3 4 5 6 1
71
8
1
2
Control Button Locations and Explanations (Continued)
Rear Panel Illustration
Headphone jack
5.1CH Audio Out jacks
Digital Audio Optical Out jack
Digital Audio Coaxial
Out jack
Video Out jack
Component Video/
Y Pb Pr Out jacks
Power socket
LCD Display Window Illustration
S-Video
2
3
4
6
8
5
7
SVCD C D MP3
21 3 4
6 875
DVD disc
VCD, SVCD disc
CD disc
Mp3 disc
PLAY or PAUSE
Chapter or Track
DOLBY DIGITAL
Playback time
9
9DTS

5
1 2 3
456
78
0
9
+10
P-SCAN
I-SCAN
STANDBY
GOTO
ZOOM
ANGLE
AUDIO
SUBTITLE
EJECT
MUTE
INFO
SETUP MENU TITLE
RETURN
2/5.1CH
PLAY PAUSE
STOP
VOL
REV FWD SKIP
PSM
SELECT
P/N
SLOW
REPEAT A-B
KEYBOARD
OSD
6
3
2
5
7
8
9
12
11
13
14
16
35
34
31
33
32
22
20
18
21
19
23
24
28
27
25
26
15
17
4
30
29
10
Control Button Locations and Explanations (Continued)
PREFACE
Press once to standby, Press twice to play.
STANDBY Button
Change the audio language or audio channel.
AUDIO Button
2
Play from the desired location.
GOTO button
3
Zoom in/out the displayed frame.
ZOOM Button
4
Fast forward play.
FWD Button
14
Change camera angles,MP3/JPEG playback
modes switch.
ANGLE Button
5
Press once to mute, twice to unmute.
6MUTE button
INFO button
7
Fast backward play.
REV Button
13
Function setup.
10 SETUP Button
Normal playback.
PLAY Button
11
Stop playback.
STOP Button
12
8CURSOR Buttons
SELECT Button
9
Repeat play.
REPEAT button
15
Switch video output to the interlacing mode.
I S Button
19
Increase volume.
VOLUME+
22
26
Skip forward.
NEXT Button
24
25 PAUSE Button
Pause play.
TITLE Button
28
DVD titles..
Skip backward.
PREV Button
23
Display DVD menu or open/close PBC.
27 MENU Button
Switch video to the progressive YPbPr mode.
PS Button
20
Switch the TV system between PAL,NTSC and
AUTO.
P/N Button
17
Power Spectrum Meter on/off.
PSM Button
18
Open or close the disc tray.
EJECT Button
35
2/5.1CH Button
29
Switch stereo and multi-channel.
Open/close the virtual keyboard function.
KEYBOARD Button
30
2731
NUMBER Buttons
27
33
Change subtitle language,Switch JPEG
display modes.
SUBTITLE Button
34
Display or hide disc information.
OSD Button
2732
Remote Control illustration
16
Repeat the select.
A-B button
VOLUME-
21
Decrease volume..
Browse the disc s information.
SLOW Button
Slow play.
RETURN Button
Back to the previous menu/Clearing
input numbers.

6
Within about 3m
Cr2025
1
Cr2025
2
PREFACE
Control Button Locations and Explanations (Continued)
How to Use the Remote Control
Battery Installation
Step 1: Push the button toward left
Step 2: Pull the battery holder out
Using the Remote Control
When using the remote control,
the front window of the remote
control should be pointed to the
infrared sensor on the front panel
within an angle of +/- 30 and a
range of 3 metres.
Cautions
Never drop the remote control or expose it to moisture.
Never expose the infrared remote sensor on the front panel to direct sunlight or
strong beams.
When the batteries become low, replace it in time.
Accessories
Audio/Video Cord 1pcs
Remote Control 1pcs
3V Button Battery 1pcs
User Manual 1pcs

7
SYSTEM CONNECTIONS
Caution
Make sure that the player and other equipments are unplugged before connecting.
Connected to TV set with Progressive-scan Video Input
Rear Panel
TV set with progressive-scan
video input
Audio In Audio Cord
If you want to enjoy progressive-scan video, please press PS button to switch the player to
progressivescan video output mode. In this mode, the interlacing output cannot be used.
If the progressive-scan TV set has Y, Pb, Pr video inputs, you can use the Y, Pb, Pr outputs of
the player. Please press PS button to switch the progressive-scan outputmode into YPbPr when
using Y, Pb, Pr outputs.
If the audio outputs of the player are also connected to the TV set, the L/R channels of the front
Audio OUT ought to be connected to the TV AUDIO IN terminals accordingly.

8
Or
SYSTEM CONNECTIONS
Connect to TV set
To enjoy the interlacing video, press IS button to switch the video of the DVD player into interlacing-
scan mode. The progressive-scan outputs cannot be used in the interlacing-scan outputs mode.
If the TV set has S-Video inputs, an S-Video cord can be used to connect this player with the TV set.
If the Tv set has component video input, the component video output of this DVD player can be used.
Please press 2/5.1CH button to set the stereo, or set the audio output mode in DOLBY STEREO,
STEREO, V SURR instead of 5.1CH mode in the speaker settings (please refer to page 22 for details).
If the AUDIO OUT of this player is also connected to the TV set, the L/R channels of the front AUDIO
OUT ought to be connected to TV AUDIO IN terminals in the same group with VIDEO IN.

9
SYSTEM CONNECTIONS
Connected to Ordinary Audio System
Amplifier equipped with Dolby Pro Logic Surround
Front Left Speaker
Surround Left Speaker
Centre Speaker
Front Right Speaker
Subwoofer
Surround Right Speaker
When set the speakers, please set the AUDIO OUT mode to STEREO (please refer to page 22 for details).
.10.
Video In

Amplifier with Dolby Digital Decoder
10
SYSTEM CONNECTIONS
Connected to Amplifier with Dolby Digital Decoder
Connect either of the cords
Optical In
Coaxial In
Optical Cord
75 Coaxial Cord
Dolby Laboratories. All rights reserved.
Manufactured under license from Dolby Laboratories. "Dolby" and the double-D symbol
are trademarks of Dolby Laboratories. Confidential unpublished works. 1992-1997

Front Left Speaker Front Right Speaker
Center Speaker
Subwoofer
Surround Left Speaker Surround Right Speaker
"DTS" and "DTS Digital Out" are the trademarks of Digital Theater Sys tems,
Inc.
Connected to Amplifier with DTS Digital Deconder
11
SYSTEM CONNECTIONS
Amplifier with DTS Digital Decoder
Connect either of the cords
Optical In
Coaxial In
Optical Cord
75 Coaxial Cord

12
SYSTEM CONNECTIONS
Connected to Amplifier with 5.1CH Audio Input
Amplifier with 5.1CH Audio input
Video In 1 2 3 4 5 6
1
2
3
4
5
6
The white refers to front left.
The red refers to front right.
The white refers to surround left.
The red refers to surround right.
The red refers to subwoofer.
The white refers to centre.
Built-in Dolby Digital decoder makes it possible to play the DVD discs recorded with Dolby Digital surround
technology. If the DVD player is connected to AV amplifier with 5.1CH inputs and plays the discs recorded with
Dolby Digital surround, you may enjoy the same audio and video effect as that inthe theatre when you are
at home.
Press 2/5.1CH button to set 5.1CH, or set the audio output mode to 5.1CH in the speaker settings. Set the
corresponding channel of any connected speaker not in use as OFF. (Please refer to page 22 forDetails)
Distance between the surround speakers and the listener should not be shorter than that between the Front
speakers and the listener.

MP3
CDVCDSVCDDVD
13
BASIC OPERATION
Playback
1. Connect the DC output socket of the power adaptor
with the power input jack of the player to turn on
working power supply
2. Press OPEN/CLOSE button to open the disc tray.
Disc tray ejects automatically, and then place the
disc with the label side facing up.
3. Press OPEN/CLOSE button again and the disc
retracts.
.
The player begins to read the disc information.
4. Press PLAY button and playback automatically
begins.
5. Press STOP button to stop playback.
Press STOP button for the first time and the player
enters pre-stop status. Now if you press PLAY
button, the player continues to play from the stopped
point; press STOP button again and the player enter
the stop status.
When playing MP3 discs, press STOP button to
enter stop mode directly.
6. Press STANDBY button to enter standby mode
when finish playing. Please pull out the power
adaptor plug from the power source outlet if you
do not intend to usethis player for an extended
period of time.
STANDBY
NOTES
Please change your TV settings accordingly and
connect the cords according to the instructions in
pages 7&8.
To help you to recognize more clearly in which
output mode this player is, character appears on
the LCD when opening the disc tray or reading a
disc. I indicates the interlacing-scan mode, while
P indicates the progressive-scan mode.
This player's interlacing-scan mode does not
support the old-style 100Hz color TV set.
When there are no audio and video outputs if you
switched on this player or pressed the above two
buttons and the LCD works normally, please check
whether this player's progressive-scan or
interlacing-scan mode corresponds to that of the
TV set.
MPEG4
NOTES
Please turn off power supply when you are not
going to use the player for a long time.
Press STOP button twice when playing DVD
disc so switch into stop status.
PAL
NTSC
TV System Selection
Set the system of this player according to the connected
TV set system in order to match to the TV set.
1. Press P/N button to select PAL system if the system of
TV set is PAL.The TV screen displays:
2. Press P/N button to select NTSC system if the system
of TV set is NTSC. The TV screen displays:
3. Press P/N button to set automatic system when using
multi-system TV set. The TV screen displays:
AUTO
P/N
NOTES
MP3
CDVCDSVCDDVD MPEG4
The system cannot be switched when playing a
disc in the interlacing scan mode. The system can
be switched in the stop mode or no disc inside.
Some functions of certain discs can not be
performed very well when not in the very system
status.
It is recommended that you set the system of both
the TV set and this player to be AUTO.
Progressive/Interlacing OutputMode
You can adjust this player's video output mode
according to TV settings.
Press IS to switch the video to the interlacing scan
output mode.
Press PS to switch the video to the Y Pb Pr mode.
1. Press the IS button.
2. Press the PS button.
PS
IS

DVD
VCDSVCD
1.
3.
2.
CDVCDSVCDDVD
14
PAUSE
PLAY
BASIC OPERATION
Pause/Step Playback
1. Press PAUSE button in playback status.
Press PAUSE button once to pause
playback. The TV screen displays:
2. Press PAUSE button in pause mode to realize
step playback function. Each press moves
one frame forward. The TV screen displays:
No step playback function available when
playing CD or MP3 discs.
3. Press PLAY button to restore playback.
NOTES
OSD
1. Press OSD button.
Disc information and operation function
hint will display on TV screen when in
operation.
Press OSD button to display the following
function:
OSD
Volume Control
1. Press VOLUME button on TV set or
Amplifier to adjust volume.
2. Press VOLUME button on the remote
control of this unit.
Press VOL+ button to increase volume.
Press VOL- button to decrease volume.
The maximum volume is 20.
DVD Menu Playback
Some DVD discs are made with title menu
or chapter menu function.
1. Press MENU button to display menu on
TV screen for selection. Operate according
to the hint of menu and press number
buttons to select.
2. Press CURSOR button to select the track
you desired, and then press PLAY or SELECT
button.
NOTES
Press TITLE button the first time to return to
title menu.
Press MENU button the first time to return to
initial menu.
The return location varies with discs.
PBC Playback
You can enjoy the menu playback alternate]
function when playing SVCD, VCD 2.0 discs
with menu playback function. In the setup
menu, you can set the menu playback
mode and select menu playback or
sequence playback. Please refer to page
24 for details.
For example: Play VCD2.0 disc.
1. Main menu displays on TV screen.
Press number buttons to select. For example:
press number button 1 to select main menu 1.
VOL -
VOL +
NUMBER
SELECT
MENU
TITLE
CURSOR
PLAY
CHAPTER ELAPSED
TITLE REMAIN
CHAPTER REMAIN
TITLE ELAPSED
TT/ CH/ ::
DISPLAY OFF
SINGLE ELAPSED
TRACK / :
DISPLAY OFF
SINGLE REMAIN TOTAL ELAPSED
TOTAL REMAIN
SVCD, VCD, CD discs:
MP3
CDVCDSVCDDVD MPEG4 MP3
CDVCDSVCDDVD MPEG4
When you set the screen saver mode to ON (See
Page 21 for details), the display on TV screen
turns to screen saver status after the picture on
TV screen keep still for about 2 minutes ( in mode
such as pause mode, stop mode, menu select, set
up menu, no disc mode and so on).

15
CDVCDSVCDDVD
CDVCDSVCDDVD
10 + 6
6
+10
7
MUTE
2.
3.
4.
5.
1.
2.
3.
4.
1.
5.
AUDIO
MUTE
NUMBER
NUMBER
NEXT
PREV
PLAY
MENU
BASIC OPERATIONS
2. Submenu displays on TV screen after
entering into main menu 1.
3. Press NEXT or PREV button to turn to
adjacent page.
4. Press NUMBER buttons to select in submenu.
For instance, press number 5 and the player
begins to play the fifth track.
5. Press TITLE button to return main menu
when in menu playback.
6. Press MENU button to realize sequence
playback function when in menu playback;
press MENU button to realize menu
playback function when in sequence
playback.
7.Press RETURN button to submenu.Press
again to return to main menu.
Direct Selection Playback Function
by Number Button
1. Input disc, after the player begins
reading, press number buttons to select
track for playback.
Press the number buttons 1-9 directly
to select the according track if the track
number is below 10.
For example, select the track 7:
Press the +10 button and then the number
buttons 0-9 to select the according track if
the track number is above 10 (including 10).
For example, select the track 16:
Press the +10 button twice and then press
the number buttons 0-9 to select the
according track if the track number is
above 20 (including 20). The rest can be
performed by analogy.
Language/Audio Channel Selection
1. Press AUDIO button.
You may select the language you desire when
playing multi-language DVD, SVCD discs.
DVD disc:
SVCD disc:
You may select audio output from left or right
channel or stereo audio output when playing
multi-channel CD or VCD discs.
For example: to VCD disc, dubbing is recorded
in left audio channel and singing in right
audio channel, you can select left channel for
dubbing
.
VCD, CD discs:
NOTES
Language kinds varies with different disc
recording.
To dual-language VCD disc, you may press
AUDIO button to select your desired language.
When playing some DVD discs, pressing
AUDIO button may result in playing the track
from its beginning.
MUTE
When playing discs, mute function can be
used to switch off audio output.
1. MUTE
* Press MUTE button and the word MUTE
displays on TV screen.
2. Resume audio output.
* Press MUTE button again to unmute.
MUTE OFF
NOTE
Press MUTE button when the player has
not audio output.
AUDIO 2
AUDIO 3
AUDIO 1
AUDIO 4
AUDIO 1/2: AUDIO 2/2:
LEFT MONO
STEREO
RIGHT MONO
MP3
CDVCDSVCDDVD MPEG4
MPEG4

16
CDVCDSVCDDVD
2X
16X32X
8X
4X
2X
16X32X
8X
4X
A
AB
REPEAT OFF
TITLECHAPTER ALL
REPEAT ONE FOLDER
REPEAT
FOLDER
SINGLE
REV
FWD
REPEAT
A-B
PLAY OPERATION
Fast Playback
You can select forward or reward playback to
search the point you desire when playing discs.
1. Press Forward button and the player starts
forward playback.
Each press of FWD button switches the
playback speed of DVD, SVCD, VCD and CD
discs in the following sequence circularly:
2. Press REV button and the player starts
reward playback.
Each press of REV button switches the
playback speed of DVD, SVCD, VCD and CD
discs in the following sequence circularly.
Repeat Playback
The repeat function enables a title/chapter/
track/disc repeated.
1. Each press of REPEAT button performs
different repeat functions.
DVD disc:
SVCD, VCD and CD discs:
The repeat playback can be performed to
SVCD or VCD2.0 only when the PBC is off
and to VCD1.1 or CD whether the PBC is on
or off.
REPEAT OFF
The repeat function is not available for SVCD
and VCD2.0 discs when the PBC is on.
MP3 disc:
Repeat the Selected Section
When playing discs, you may press A-B button
to repeat playback of certain section you desire.
1. Under normal playback, press A-B button at
the desired point (point A) to set the beginning.
TV screen displays:
2. Under normal playback, press A-B button at
the desired point (point B) to set the ending.
TV screen displays:
The player returns to point A automatically to
repeat the selected section (A-B).
3. Press A-B button for the third time.
Normal playback resumes.
NOTE
The A-B repeat function may be not available
for some discs.
Sections can only be selected in the same track
in PBC mode.
TRACK ALL
MPEG4
MP3
CDVCDSVCDDVD MPEG4
MP3
CDVCDSVCDDVD MPEG4
VCDSuper VCDDVD
Slow Playback
You may enjoy slow playback according to the
following step
1.Press SLOW button to turn to slow playback mode,
the following displays on TV screen
DVD Playback
Press PLAY button in slow playback status resumes
normal playback.
Super VCD, VCD Playback
Press PLAY button in slow playback status to resume
nomal playback.
PLAY SLOW
When playing a DVD audio disc, the slow function
cannot be persormed if you press the slow button.
However, when pressing the SLOW button, the
screen will show the previous picture provided that
the disc supports this function.

17
DVD
SUBTITLE 01/03 SUBTITLE 02/03
SUBTITLE 03/03
SUBTITLE OFF
DVD
1/4
2/4
3/4
4/4
SUBTITLE
ANGLE
GOTO
NUMBER
CURSOR
SELECT
PLAY OPERATION
Subtitle Selection
1. Press SUBTITLE button.
When playing the DVD disc recorded with
subtitles of different languages, it is possible
to select different subtitle languages.
Each press of SUBTITLE button switches
one subtitle language and the TV screen
displays:
The number of the switchable subtitle
languages varies with discs. DVD disc has
32 selected subtitle language at the most.
Angle Selection
1. Press ANGLE button and the TV screen
displays:
2. Press number buttons to select your
desired playback angle.
3. Press ANGLE button to select the default
angle to resume normal playback.
NOTE
The number of angles varies with different
DVD discs. You can change as many as
they have.
This function only applies to the discs
recorded with different angles.
Playback from the Desired Point
Playing DVD disc
Input the time, title or chapter directly, the
content can be found quickly and played from
the selected point.
1. Title, Chapter search. For example: search
Chapter 2, Title 6:
Press GOTO button and the TV screen displays:
Press CURSOR button to lighten the title number,
as shown in the figure:
Press number button 6 to select Title 6, as shown
in the figure:
And then press number button 2 to select
Chapter 2, as shown in the figure:
2. Title time search
Press GOTO button until the TV screen displays
the following picture. Then press number buttons
to input hour, minute and second.
3. Chapter time search
Press GOTO button until the TV screen
displays the following picture. Then press
number buttons to input hour, minute and
second.
Playing SVCD, VCD and CD discs
1. Disc time search
Press GOTO button until the Tv screen displays
the following picture. Then press number buttons
to input hour, minute and second.
2. Track time search
Press GOTO button until the TV screen
displays the following picture. Then press
number buttons to input hour, minute and
second.
3. Select a track
Press GOTO button until the TV screen displays
the following picture. Then press number
buttons to input the track number.
TITLE 03/30 CHAPTER /02
SELECT TRACK --/15
TRACK GOTO --:--
DISC GOTO --:--
CHAPTER 01/04 TIME : :
TITLE 06/30 TIME : :
TITLE 06 /30 CHAPTER 02/02
TITLE 06 /30 CHAPTER /02
TITLE /30 CHAPTER 01/02
CDVCDSVCDDVD MPEG4
Table of contents
Other Oppo DVD Player manuals