Opsytec Dr. Grobel FlowMissio-C User manual

Opsytec Dr. Gröbel GmbH
Goethestraße 17
76275 Ettlingen
Tel.: 07243 94 783 50
Fax: 07243 94 783 65
info@uv-groebel.de
UV-Photometer
FlowMissio-C
manual
Version: 3.0

1 Change history 2
Content
1Change history ........................................................................................................2
2Symbols Overview...................................................................................................3
3General description .................................................................................................4
4Important Notes.......................................................................................................5
5Installation ...............................................................................................................6
6Operation.................................................................................................................7
7Settings ...................................................................................................................8
7.1 Calibration (formerly reference value) ...............................................................8
7.2 Threshold 1 and 2..............................................................................................8
7.3 Hysteresis..........................................................................................................8
7.4 Layer thickness .................................................................................................9
7.5 Language ..........................................................................................................9
8Calculations.............................................................................................................9
9Maintenance and service.......................................................................................10
9.1Exchange of the UV-lamp................................................................................10
9.2 Cleaning of the cuvette....................................................................................10
9.3 Exchange of the silica gel................................................................................10
10 Technical data .......................................................................................................12
10.1 Device .............................................................................................................12
10.2 Lamp ...............................................................................................................12
10.3 Connections ....................................................................................................13
10.4 Spare parts......................................................................................................14
10.5 drawing............................................................................................................15
1 Change history
Date
Version
Changed by
Comment
31.03.00
1.0
S. Rau
Build
30.08.00
1.0
S. Rau
Exchange of silica gel
19.11.01
1.1
S. Rau
Translation
29.06.11
1.2
S. Rau
Update
20.05.14
3.0
Paravia
Update Controller Board

2 Symbols Overview 3
2 Symbols Overview
Meaning:
Failure to observe the mentioned instructions can
result in an injury of the user.
Meaning:
Failure to observe the mentioned instructions can
result in a damage of the device.
Meaning:
Instructions are to be observed for the regular
operation.
*
Meaning:
Optional functions, not available for every device

3 General description 4
3 General description
The flow process photometer FlowMissio-C is a double-beam photometer for the con-
trol of fresh and process water and other liquids at 254 nm. The photometer is out-
standingly suitable for control of water quality in water plants or in production process-
es.
An internal sensor is measuring the power of the lamp and an external sensor the
transmitted power of lamp. Transmission is calculated out of power ratio. A calibration
factor allows the setup of the value of a calibration solution. The instrument comprises
a 4-20 mA analog output, is menu driven and controlled via touch switches. For pro-
cess controlling two variable switch thresholds are available.
The photometer is designed for an absorption path length of 50 mm. The graphical dis-
play shows the measured transmission and transmission for other pre-selectable ab-
sorption path length. Furthermore the absorption coefficients are displayed.
Two threshold values can be set and read out by external PLC contact.
Operate the FlowMissioC with closed housing only. The radiation of the
UVC-lamp
inside is harmful. Only trained technical personnel may
open the equipment!
UV radiation is harmful for humans, animal and plant. Consider the
protection regulations. Scattered light could lead to damages of the
retina. Keep the transparent cover always closed.

4 Important Notes 5
4 Important Notes
The operation manual is to be read completely prior to the startup and
operation of the system.
Before opening the system it has to be disconnected from the power
supply and the absence of voltage is to be checked.
The system is equipped with UV-C lamp. There is a risk of photochem-
ical damage of the eye, erythema and skin cancer. The operating staff
is to be trained appropriately.
For protection of the operating staff, do not look into the lamp
and do
not expose the skin to UV radiation.

5 Installation 6
5 Installation
Please read the operating instructions carefully, before taking the equipment in action.
Consider particularly the connection of the clamps (see chapter: Connections ).
A wrong connection can lead to damages at the equipment
Connect water inlet and water outlet.
Then connect clamps and mains.
After the power on of the equipment the following start logo appears:
Afterwards the transmission measurement is started. The internal and the external
sensor are simultaneous measuring. This results in stable measuring values already
during warming-up of the lamp. So warming-up phase of 90 s is short, but recommend-
ed.

6 Operation 7
6 Operation
After the first measurement the display shows the actual transmission:
This value is directly determined using the two sensor signals.
Use the cursor keys , to change screens.
Screen 2, showing thresholds Screen 3, showing calculated transmission and extinction
coefficients
In screen 2 the threshold values are shown in lower left and upper left corner. Upper
left corner shows threshold 1, lower left corner shows threshold 2. Inverted text high-
lights reached thresholds.
In the upper right corner the threshold are indicated with a two line pictogram. Again:
upper line indicates threshold 1, lower line indicates threshold 2. In this example the
threshold 2 is reached.
In screen 3 the measured transmittance in percent is displayed as T ( 50). This value is
directly determined using the two sensor signals.
The extinction coefficient k on the left side and the decadic extinction coefficient m on
the right side are shown as well.
The calculated transmittance is shown as T ( XX) on the bottom for an adjustable layer
thickness. In the example above this layer thickness is 10 mm.
The formulas for these calculations are shown in chapter Calculations.

7 Settings 8
7 Settings
To enter main menu press the key.
Use the four cursor keys , , , and the center ok key () to navigate through the
menu. Inverted text highlights the selected menu item.
To confirm the selected function press the key.
If you press the key on the menu, you will be back in the measurement mode.
7.1 Calibration (formerly reference value)
This submenu option allows you to recalibrate the FlowMissio. Fill the cuvette with the
reference liquid (e.g. distilled water) of known transmission for calibration. Don’t start
recalibration before measurements are stable.
Use , , and keys to set desired reference value. Confirm with to start the
recalibration. The FlowMissio determines a calibration factor for the actual measure-
ment made to achieve the reference value. This calibration factor is stored and you are
back in the main menu.
Press for 2 seconds to abort calibration.
7.2 Threshold 1 and 2
This menu option permits successive changing of the threshold levels for the two ex-
ternal switching PLC contacts. Use , , and keys to set desired value. Con-
firm with or press for 2 seconds to abort.
7.3 Hysteresis
This menu option permits successive changing of the hysteresis. Use , , and
keys to set desired value. Confirm with or press for 2 seconds to abort.
Theshold and hysteresis values change the exter-
nal PLC contacts. A contact is active if transmission
is higher than
threshold value plus hysteresis
value
and stays active until transmission is lower
than threshold value minus hysteresis value.

8 Calculations 9
7.4 Layer thickness
This submenu permits configuration of the layer thickness for transmittance calculation.
A change of the layer thickness is possible from 1 mm to 999 mm in 1 mm steps.
7.5 Language
Language can be set to English or German with key.
8 Calculations
The UV photometer FlowMissio C is a two-ray photometer. It consist of a UVC lamp
and two detection channels. The first detection channel is measuring constantly the
lamp power ILamp. The second detection channel is measuring constantly the transmit-
ted lamp power ITrans. Using these two values the transmission T(50) is calculated:
Lampe
Trans
I
I
cT *)50( =
The constant c is a calibration factor, which is determined in the menu reference value
(see Calibration (formerly reference value). During production this value is set to one.
The extinction coefficient k is calculated from the transmission T(50) using the following
formula:
d
T
k))50
(ln(−
=
In this formula d is the thickness of the cuvette in centimeter.
The calculation of the decadic extinctions coefficient uses the logarithm rule
lg(x)=lg(e)*ln(x). Only the extinction coefficient must be multiplied by lg(e) and the re-
sult is the decadic extinction coefficient m.
For the calculation of the transmission T(x) for an adjustable layer thickness dx (in cm)
the following formula is used:
d
dT
x
exT
*))50(ln(
)( =

9 Maintenance and service 10
9 Maintenance and service
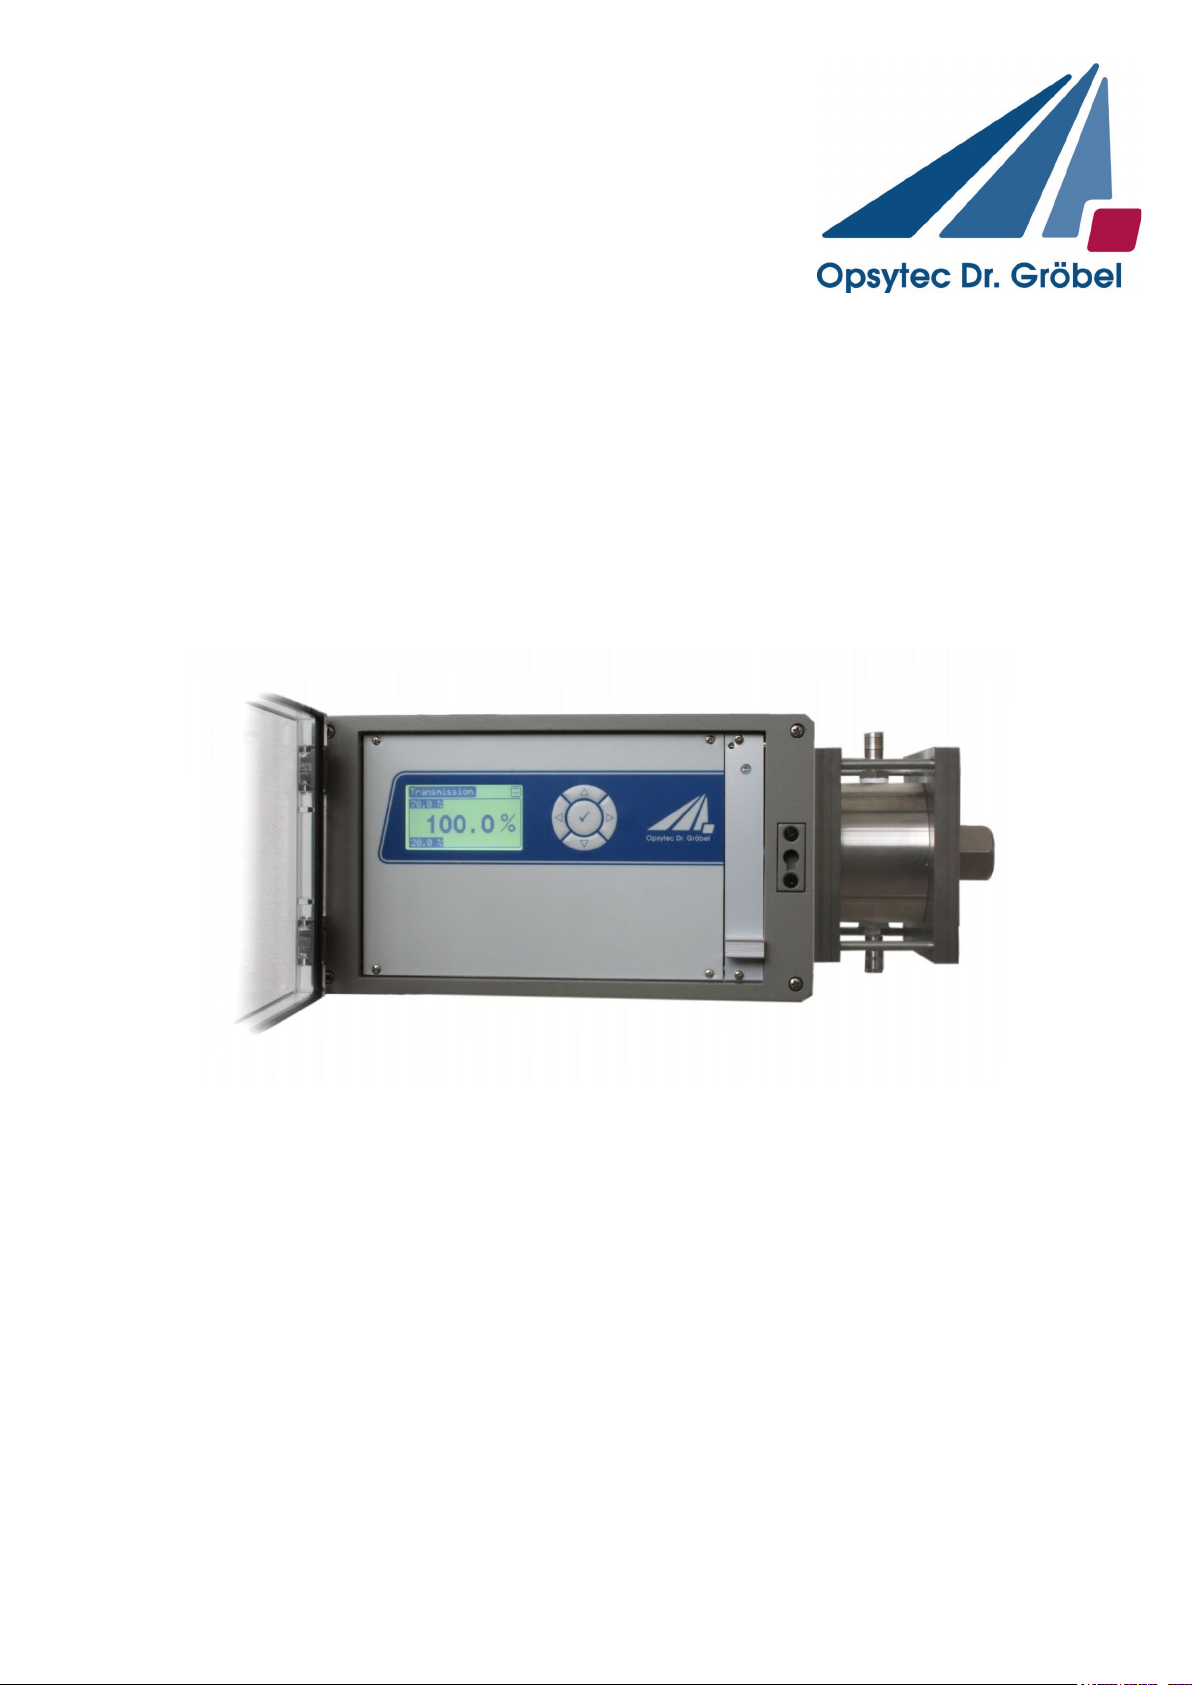
The UV photometer FlowMissio C does not require a lot of maintenance and care ser-
vicing. The assigned UV lamp should be changed after 2000 operation hours (2 ½
months).
9.1 Exchange of the UV-lamp
Switch-off the supply voltage for the photometer. Open the transparent cover and flip it
to the side. The lamp insert is attached at the right hand side of the housing. Open the
two retaining screws and pull the module out. Put the new module into the guidance
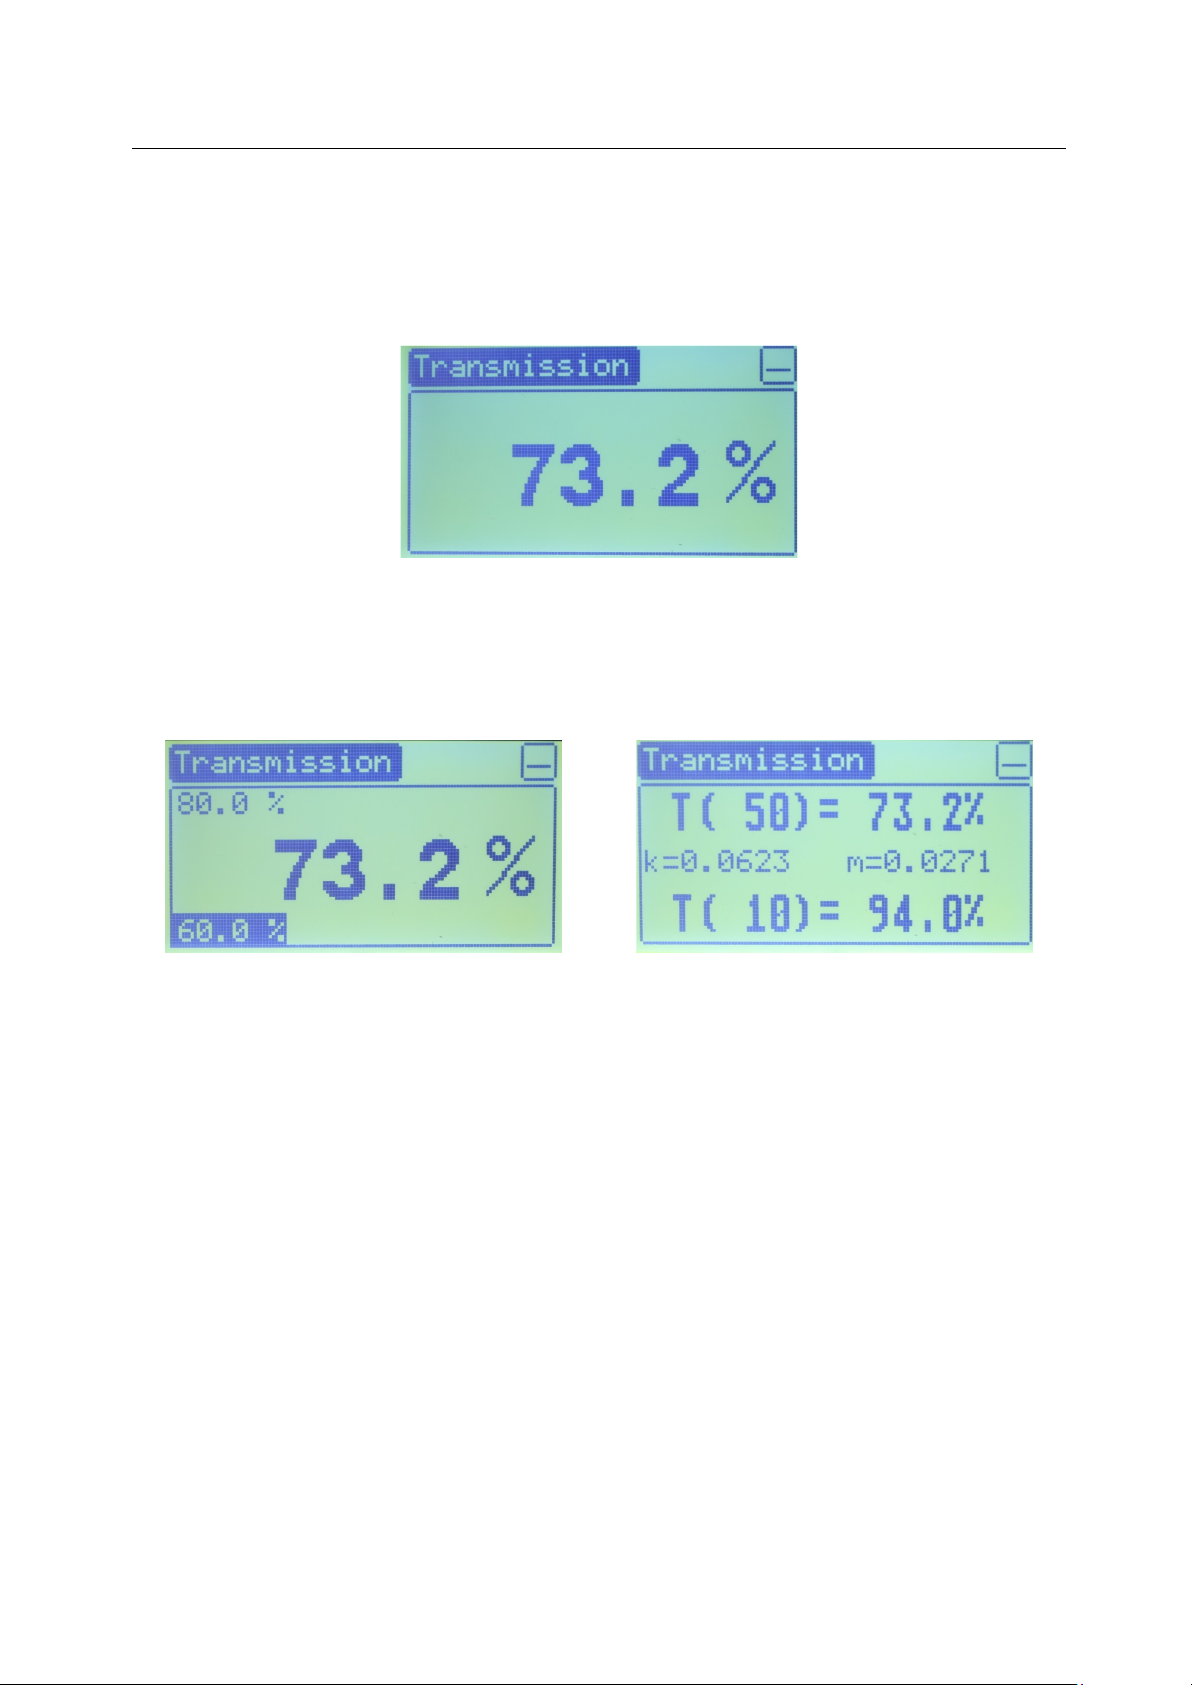
and fasten it with the retaining screws. Check the calibration with distilled water and
recalibrate if necessary (see Calibration (formerly reference value).
9.2 Cleaning of the cuvette
Only the cuvette is sensitive to impurities. It should be cleaned regularly at least with
each lamp change. To clean the cuvette, switch off the supply voltage. Ensure that the
cuvette is pressure-free.
Avoid a vacuum during removing the water from the cuvette. Always keep the water
inlet open.
Never open the cuvette with water pressure pre-
sent. The cuvette is not vacuum resistant.
Disconnect the plug from the sensor. Open thereafter the four knurled nuts at the cu-
vette. Now, you can remove the sensor plate.
Clean the two windows and the cuvette. Check the sealings. Sealings with the smallest
damage have to be exchanged. Assemble the cuvette in reverse order again. Bolt the
knurled nuts and attach the connector to the sensor.
Test tightness of the cuvette and test the calibration.
9.3 Exchange of the silica gel
Silica gel is inside the housing. This prevents the window from getting misty.
For the exchange of the desiccant the housing must be opened. To open the housing
turn the screw on the right hand side of the housing approx. 90° counterclockwise. Now
you can flip the front housing with the cuvette to the left. Remove the bags with the
desiccant from the housing. These bags are fastened with cable straps to the housing.
This is only a transport lock. The cable straps must be cut to remove the bags.

9 Maintenance and service 11
Put new desiccant into the housing. The function of the bags will remain longer, if you
put more bags into the housing. Now close the housing again. Be sure the housing is
closed and no cables are jammed. Also note that the transparent front cover should
always be closed. Close the cable inlets at the terminal box when no cable attached.
This prevents humidity from entering the housing and the windows from getting misty.

10 Technical data 12
10 Technical data
10.1 Device
Device number : 830701
Dimensions : approx. 400 x 250 x 340
Weight : 12.1 kg
Operating temperature : 0 to 40 °C
Housing : IP65
Signal output : 2 voltage free commutators 250V/1A
Analog output : 4 - 20 mA, 20mA=110%
Power supply : 100 - 240 V / 50 60 Hz / 500 mA
10.2 Lamp
Lamp : low pressure Mercury vapor lamp, ozone free
Power : 4 Watt
Current : 30 mA
Lifetime : about 2000 h
Running voltage : 150 V
Initial voltage : 190 V

10 Technical data 13
10.3 Connections
X1
1 PE
2 L1
3 N
X2
1 PE
2 NO theshold 1 (similar: alarm)
3 NC theshold 1 (similar: alarm)
4 Alarm
5 NO theshold 2 (similar: Pre-alarm)
6 NC theshold 2 (similar: Pre-alarm)
7 Pre- alarm
X3
1 PE
2 4-20 mA High = 0-110%
3 4-20 mA Low
X4 RS232 1200Baud, 8 Data, 1 Stop, None
1 Transmit Data
(TxD – connect with Pin 2 at PC)
2 Receive Data
(Rxd – connect with Pin 3 at PC)
3 Ground
(Ground – connect with Pin 5 at PC)

10 Technical data 14
10.4 Spare parts
Description Order number
Lamp insert 93070101
Sealing set cuvette 93070102
Silica gel 93070103
UVCS Sensor 810312
Subject to changes

10 Technical data 15
10.5 drawing
215,0
330,0
305,0
401,5
167
241,0
220,0
285,0
Schlauch DN11
Table of contents
Other Opsytec Dr. Grobel Measuring Instrument manuals