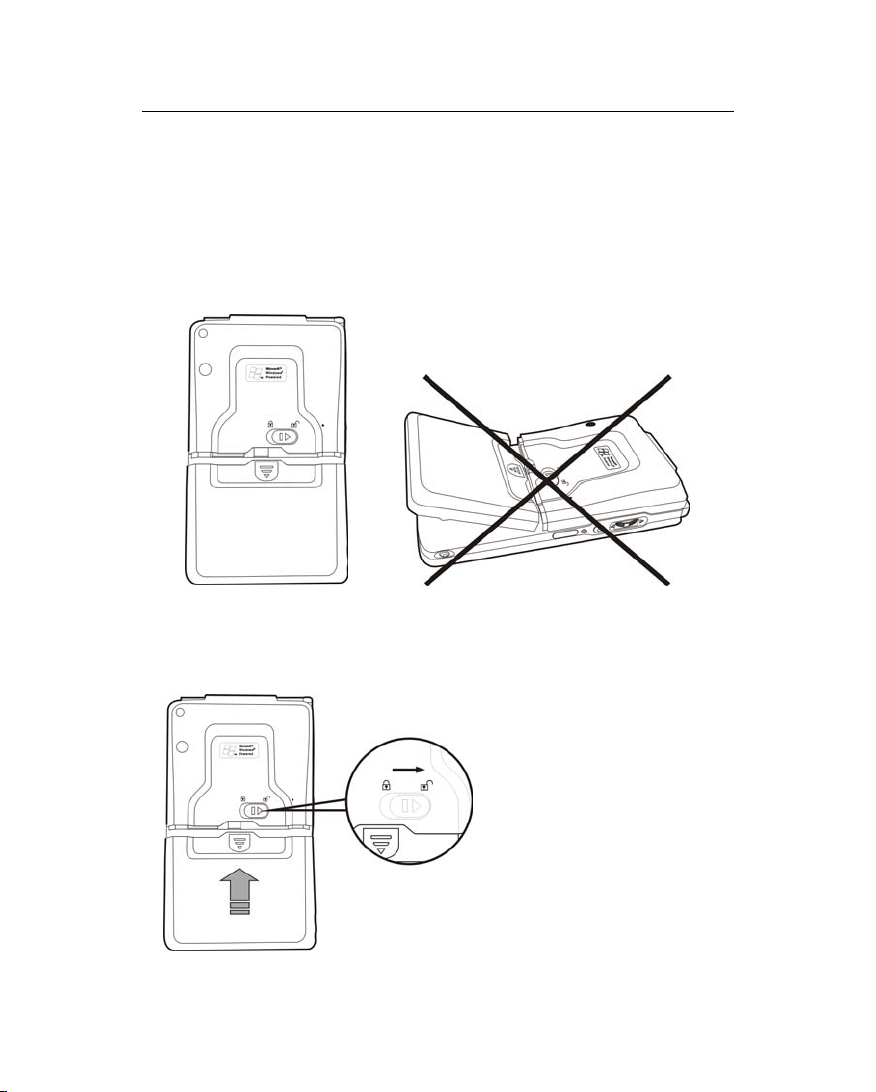
Opticon PHL-5000 Series User manual

P
Po
oc
ck
ke
et
t
P
PC
C
P
PH
HL
L
5
50
00
00
0
S
Se
er
ri
ie
es
s
Q
Qu
ui
ic
ck
k
S
St
ta
ar
rt
t
G
Gu
ui
id
de
e
Package Contents_______________________________________ 1
Appearances___________________________________________ 2
Front ___________________________________________ 2
Top_______________________________________________ 3
Right _____________________________________________ 3
Back ____________________________________________ 4
Use for the First Time ___________________________________ 5
Install Supporting Backboard___________________________ 5
Install Battery_______________________________________ 6
Charging and Power Supply ___________________________ 8
Screen Alignment____________________________________ 10
Turn on Screen______________________________________ 10
Power On and Off ______________________________________ 10
Sleep Mode ________________________________________ 10
Reboot ____________________________________________ 11
Use Cell Phone ______________________________________ 12
Turn the Phone On and Off ____________________________ 13
Bluetooth Wireless Transmission ________________________ 14
WLAN _____________________________________________ 17
In this guide, the sections marked with “” indicate that whether the
features described here are supported or not depends on the actual product
specifications.

Backup Utility _________________________________________ 19
About Backup Utility_________________________________ 19
About Available Storage Space _________________________ 19
Backup File ________________________________________ 20
Auto Backup _______________________________________ 21
Restore File ________________________________________ 23

1
Thank you very much for purchasing this product. This document mainly
provides you the references needed when you use this product for the first
time. Meanwhile, hardware descriptions will also help you to get familiar with
every basic function quickly.
Package Contents
Pocket PC, stylus, USB cradle (including USB cable), AC adapter, headset,
companion CD, leather case, user manual.
nUSB cradle oAC Adapter pUSB Cable
qHeadset rStylus sPocket PC
When this product was shipped, the charger’s supporting backboard and
cradle were packaged separately. After open the package, please install the
backboard into the slot on the cradle as shown in the figure above. Remind
you that, once the backboard is installed, you cannot take it off. Otherwise,
the blackboard’s safety hook will be broken and cannot be used again.
nop
q
rs

2
Appearances
Front (applicability depends on model)
1Indicator 2Power Button
3Cell Phone Speaker 4Antenna
5Depends on the program that is
running at the time, it can be used
as volume adjusting or windows
scrolling button.
6Recording Button
7Reset Button 8Infrared Port
9Headset Jack 10 Send Button
11 Microphone 12 “Contact” Hot Key
13 Navigation Button 14 “Today Screen” Hot Key
15 Speaker 16 End Button
17 Touch Panel Status icons on the navigation bar:
Cell Phone Off Cell Phone On
GPRS is Online
4
2
1
17
15
14
13
12
11
9
6
5
8
7
3
10
16

3
Top
1Barcode Scanner
Right
1Stylus slot, pull to take out
stylus.
2SD/MMC card slot on the side of the
device.
1
1
2

4
Back
1Main battery lock, follow the
illustrations on Pocket PC to use.
2Main battery, follow the arrow’s
direction to slide and release it.
Merchandise label on the top of
battery cover.
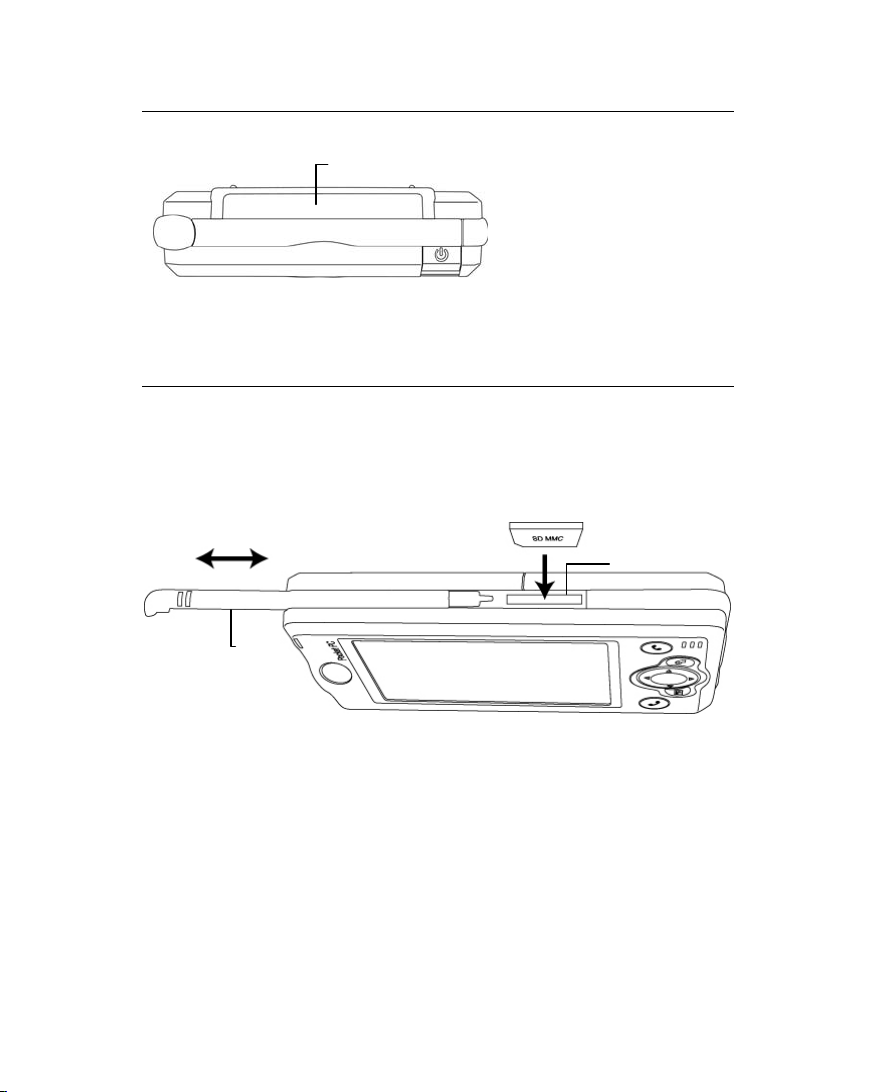
3Note the cut-corner position and
insert the SIM card accordingly
into the retainer.
4Turn over the retainer and insert
the SIM card into the slot.
Note that the metal surface of the
SIM card should face downward.
5Back-up power switch, follow the
illustrations on Pocket PC to use.
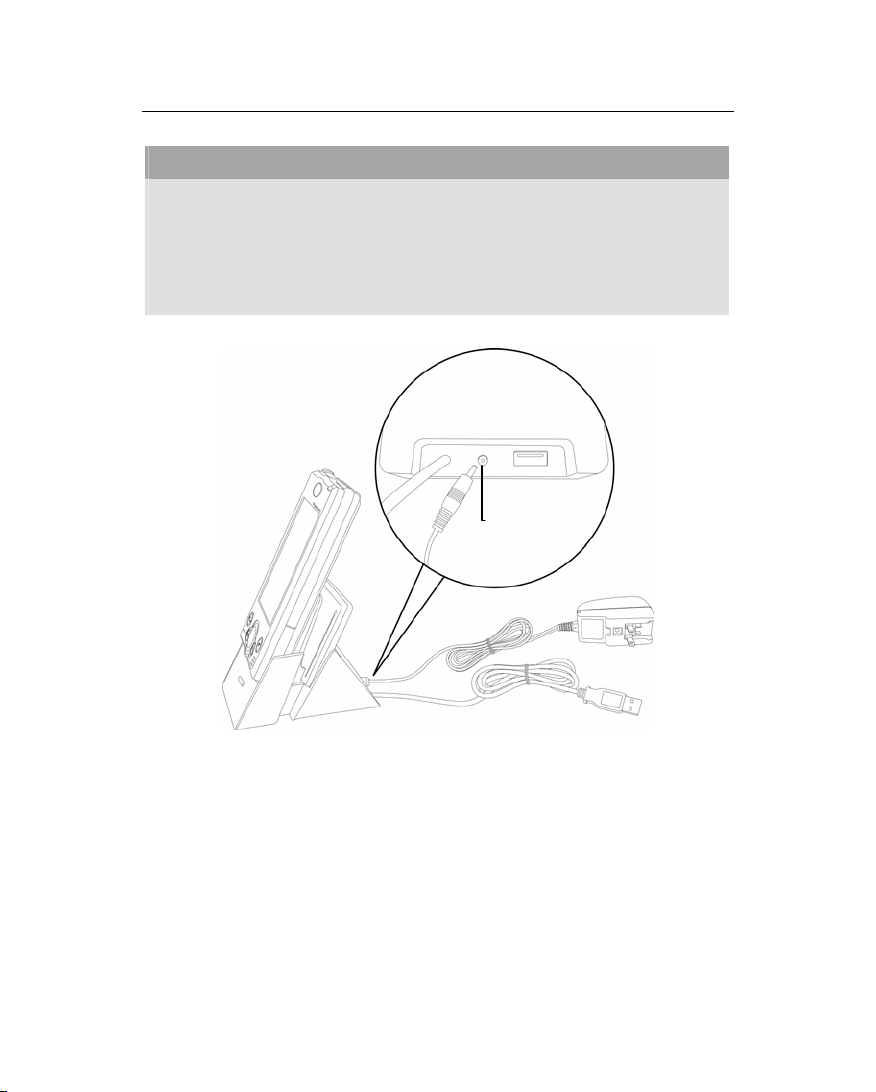
6Cradle connection port
yPlease note carefully!
1. You need to turn on back-up power switch when you use this device for
the first time. When back-up power switch is set to be “ON”, the system
operation will temporarily rely on back-up battery to supply its power if
you need to pull out or replace main battery. Back-up battery is charged by
main battery.
2. If back-up power switch is set to be “OFF”, the back-up battery will not
function. Once the main battery is taken out, the device will only retain
Microsoft Windows and manufacture’s pre-installed programs. Any other
data input, programs newly installed, and customised settings setup by you
will be lost.
1
2
3
4
2
5
6

5
Use for the First Time
Install Supporting Backboard
When this product was shipped, the charger’s supporting backboard and
cradle were packaged separately. After open the package, please install the
backboard into the slot on the cradle as shown in the figure above. Remind
you that, once the backboard is installed, you cannot take it off. Otherwise, the
blackboard’s safety hook will be broken and cannot be used again.

6
Install Battery
1. Use the tip of the stylus to flip the back-up battery switch located on the
back of the Pocket PC to “On” position.
2. Place the battery in parallel with the Pocket PC and push into the
compartment first. Do not install the battery with an angle as shown in the
bottom right figure.
3. Note the instructions on the Pocket PC to make sure you have unlocked the
main battery lock. Then push the battery all the way in.

7
4. Follow the instructions on the Pocket PC to lock the main battery lock.
If you need to take out the battery, please unlock the main battery lock and
then pull in the direction of the arrow shown.
yReplacing Battery
1. If cell phone or GPRS connecting fuction has been turned on, you should
turn them off first before going on the next step. Otherwise, the connection
will be interrupted abnormally.
2. Unlock the main battery lock located on the back of this device and take
out the battery.
3. Replace main battery and lock the main battery lock. When the main
battery is taken out, system operation’s power will be supplied temporarily
by back-up battery. However, if you do not install the main battery back
within 1 minute, data will be lost.

8
Charging and Power Supply
yPlease note carefully!
Manufacturer’s Instructions: Don’t recharge the battery under a
temperature higher than 45 ºC and don’t store or use it under a temperature
higher than 60 ºC; otherwise, expansion or leakage of the battery may
occur.
1. Unlock main battery lock and releast the main battery. (If you just unpack
the package, please omit this step. Main battery and Pocket PC are packed
separately when Pocket PC was shipped.)
2. Use stylus to set back-up power switch on the back of the device to be On.
Remind you that, you only need to turn on back-up power switch when
you use this device for the first time. You will not need to touch this
switch again in any other situations.
3. Install main battery and lock the main battery lock.
Power jack

9
4. Plug the AC adapter’s (specifically for this product) round connector into
the power jack located in the back of charging cradle. Then plug the other
end of AC adapter into a normal home-use wall outlet. The device will then
start charging automatically.
5. Cold Boot: Use one finger to press and hold the “Power” button on the top
of the Pocket PC, meanwhile, use the tip of the stylus to press down the
“Reset” button located on the left side of the Pocket PC. Then release the
“Power” button and the “Reset” button simultaneously. After rebooting,
follow the instructions on the screen to finish screen alignment…etc, tasks.
6. A brand new Pocket PC takes approximately 8 hours to be fully charged. It
takes about 3 hours to be charged in full thereafter. After charging is
finished, you can then unplug AC adapter and carry around the device
freely. Please charge the device regularity in the future to keep the device
functioning smoothly.
7. “Indicator on the top right corner of this device” will indicate charging or
various other functions in-use.
Charging Charging Finished Low Power
Red light glows Red light off Red light blinks
Cell phone on Reminder or warning
Green light blinks Orange light blinks
If secondary main battery is purchased, it can be charged by plugging in the
charging slot located in the back of charging cradle. “Indicator in the front
of charging cradle” will indicate the charging status.
Charging Charging Finished No Battery
Red light glows Green light glows Indicator off

10
Screen Alignment
When you use this Pocket PC for the first time or cold-boot it, system will
require you to do screen positioning. When the device doesn’t respond
properly to screen taps, you can also redo screen positioning by following the
instructions in this section.
1. Tap on and then
Settings. On the
System tab, tap Screen to align the
screen.
2. Tap on the “Align Screen” button.
When the screen adjustment window
appears, use stylus to tap the center of
the cross (+) until the next cross
appears. Please follows the instructions
on screen to finish the rest of the
operations. Tap “ok” button to exit.
Turn on Screen
This product is designed to provide you power-save functions. When the
screen is off, you can turn the screen back on by pressing “Power” button on
the top right corner of the device.
If using backlight is desired, tap on , Settings, System tab, and then
Backlight.
Power On and Off
Sleep Mode
1. Press the “Power” button on the top right corner of the device to enter Sleep
mode. During the Sleep mode, screen is off and some peripherals will enter
power-save mode. But the cell phone is still on stand-by.
2. Press “Power” button again to turn on the screen.
You can also tap on and then
Settings. On the System tab, tap Power
to setup “automatically turn off the device” after being stand-by for a
period of time.

11
Reboot
VWarm-boot (Reset): Use the tip of stylus to press down the “Reset”
button located in the left side of Pocket PC.
VCold-boot: Use one finger to press and hold the “Power” button on the top
of the Pocket PC, meanwhile, use the tip of the stylus to press down the
“Reset” button located on the left side of the Pocket PC. Then release the
“Power” button and the “Reset” button simultaneously. After rebooting,
follow the instructions on the screen to finish screen alignment…etc, tasks.

12
Use Cell Phone
Applicability of this feature depends on your model.
Using
Methods Operations Receive a Call or
Hang-Up
Adjusting
Earphone Volume
Hand-hold
the Pocket
PC itself to
talk.
Put your ear near
the speaker
(receiver) and
mouth near the
microphone of
Pocket PC.
Press the
button to answer
a call or button
to hang-up.
During a call,
using the volume
adjusting button on
the left side to
adjust speaker
volume.
Plug-in
external
headset.
Place the
earphone piece
into ear and
microphone piece
near mouth.
Using the remote
function. Pressing
the button on
earphone and
microphone
headset to receive
a call or hang-up.
During a call, use
the volume
adjusting button on
the headset to
adjust the volume
of earphone.
Cell phone microphone
Cell phone speaker
(receiver)
Ear
p
hone
Microphone

13
Turn the Phone On and Off
1. Unlock main battery lock and take out the main battery.
2. Install SIM card: follow the illustration shown on the Pocket PC to install
cell phone SIM card. Please note the positioning angle of SIM card. The
metal side should face the Pocket PC. Place the SIM card into the retainer,
and then insert the SIM card into the slot.
3. Turn on cell phone: Tap on icon located in the navigation bar on the
top, wait until message window appears, then tap “Turn off flight mode”
button and wait for the turn-on procedure to finish. Icon will become
.
4. If password (PIN) is set, key in the
password and then tap “Talk” button.
5. Make a call: Press “Dial” button on
the Pocket PC’s down left corner to enter
the phone screen. Using stylus to select
phone number, then tap “Talk” button.
6. Answer a call: Press “Talk” button
on the down left corner.
7. End a call (hang-up): Press
“Hang-up” button on the down right
corner.
8. Turn off cell phone: Tap on icon,
and then tap “Turn on flight mode” button
after message windows appears.
Send Button
End Button
Earphone volume
adjusting button
Back of device: SIM card
is located below battery
OOOOO

14
Bluetooth Wireless Transmission
Applicability of this feature depends on your model. Bluetooth relates to a
short-distance wireless communication technology having a valid application
range of 10 meters (30 feet). It is necessary to power on the Bluetooth before
using the Bluetooth functions. On the menu of Mode tab under Bluetooth,
select “On” or “Discoverable” to enable the Bluetooth functions.
1. Bluetooth Power
nPower On: Tap the Wireless Power
Manager icon at the lower right corner of
the Today screen, and select Bluetooth
Power to turn on the bluetooth power. The
BT MAC address will appear in a few
seconds.
oPower Off: Tap the Bluetooth Power
once to turn off the bluetooth power.
2. Bluetooth Connection Mode
v
Tap on ,
Settings, Connections tab,
Bluetooth

15
v
Tap Mode tab
nOn (Connect other devices): Turn on the
Bluetooth online functions. Your Pocket
PC can send data to other devices, but
other devices cannot detect your Pocket
PC.
oOff (Offline): You can not use the
Blueetooth online functions. Set your
device to Off mode if you need to save
power or are on an airplane or in a
hospital where radio waves are prohibited.
When setting offline also turn off at the
Wireless Power Manager icon.
pDiscoverable (Allow other devices to be
connnected to your device.): You can use
the Bluetooth online functions. Within the
valid range of 10 meters, all devices
supporting Bluetooth functions can detect
your Pocket PC and transmit data after
being confirmed by the opposite party.

16
3. Create Bonds to Device
v
Tap Bonded Devices tab
nTap on “New” and the sytem will start
searching for any Bluetooth device.
oTap on the bonded name, which will have
the reverse attribute, and then tap on
“Next.”
pEnter Device PIN and tap on “Next.”
Enter the same PIN for the two specified
bonded devices.
qAs far as the bonded end agrees, you will
be on the list of bonded devices.
rFollow the rest of the instructions given on
the screen to create a new bond to the
device.
sTap and hold the created device name to
execute related functions such as Rename
or Delete, etc.

17
WLAN
Applicability of this feature depends on your model.
1. WLAN Power
Before using WLAN online functions,
you must turn on the WLAN power.
nPower On: Tap on the Wireless
Power Manager icon at the lower right
corner of the Today screen, and then select
WLAN Power to turn on the WLAN
power.
oPower Off: Tap on the WLAN Power
once to turn off the WLAN power.
2. WLAN Online Settings
v
Tap on ,
Settings, Connections tab,
Wireless Ethernet

18
v
Tap Wireless tab
nTap and hold on the wireless network
name to select Connect for online
settings.
oIf you only want to connect to your set
network, do not select “Automatically
connect to non-preferred networks.”
Table of contents
Other Opticon Handheld manuals

Opticon
Opticon H15 User manual

Opticon
Opticon H25 User manual

Opticon
Opticon H-16 Series User manual

Opticon
Opticon H-19R User manual

Opticon
Opticon H15 User manual

Opticon
Opticon OPH-1005 User manual

Opticon
Opticon H-15AJ User manual

Opticon
Opticon OPH 1004 User manual

Opticon
Opticon H-16 Series User manual

Opticon
Opticon PHL-7100 User manual