Optoma DC455 User manual

DC455
User Manual
Visualizer
Document
Camera
TS-82-925-90020

:HOFRPH
7KDQNVIRUSXUFKDVLQJWKLVSURGXFW3OHDVHUHDGWKHLQVWUXFWLRQVFDUHIXOO\EHIRUHXVLQJWKLV
SURGXFW
)&&&RPSOLDQFH6WDWHPHQW&ODVV$
7KLVGHYLFHFRPSOLHVZLWK3DUWRIWKH)&&5XOHV2SHUDWLRQLV
VXEMHFWWRWKHIROORZLQJWZRFRQGLWLRQVWKLVGHYLFHPD\QRWFDXVH
KDUPIXOLQWHUIHUHQFHDQGWKLVGHYLFHPXVWDFFHSWDQ\LQWHUIHU
HQFHUHFHLYHGLQFOXGLQJLQWHUIHUHQFHWKDWPD\FDXVHXQGHVLUHG
RSHUDWLRQ
)HGHUDO&RPPXQLFDWLRQV&RPPLVVLRQ)&&6WDWHPHQW
7KLV(TXLSPHQWKDVEHHQWHVWHGDQGIRXQGWRFRPSO\ZLWKWKHOLPLWV
IRUD&ODVV$GLJLWDOGHYLFHSXUVXDQWWR3DUWRIWKH)&&UXOHV
7KHVHOLPLWVDUHGHVLJQHGWRSURYLGHUHDVRQDEOHSURWHFWLRQDJDLQVWKDUPIXOLQWHUIHUHQFH
ZKHQWKHHTXLSPHQWLVRSHUDWHGLQDFRPPHUFLDOHQYLURQPHQW7KLVHTXLSPHQWJHQHUDWHV
XVHVDQGFDQUDGLDWHUDGLRIUHTXHQF\HQHUJ\DQGLIQRWLQVWDOOHGDQGXVHGLQDFFRUGDQFHZLWK
WKHLQVWUXFWLRQVPD\FDXVHKDUPIXOLQWHUIHUHQFHWRUDGLRFRPPXQLFDWLRQV2SHUDWLRQRIWKLV
HTXLSPHQWLQDUHVLGHQWLDODUHDLVOLNHO\WRFDXVHKDUPIXOLQWHUIHUHQFHLQZKLFKFDVHWKHXVHU
ZLOOEHUHTXLUHGWRFRUUHFWWKHLQWHUIHUHQFHDWKLVRZQH[SHQVH
(XURSHDQ&RPPXQLW\&RPSOLDQFH6WDWHPHQW&ODVV$
7KLVLVDFODVV$SURGXFW,QDGRPHVWLFHQYLURQPHQWWKLVSURGXFWPD\
FDXVHUDGLRLQWHUIHUHQFHLQZKLFKFDVHWKHXVHUPD\EHUHTXLUHGWRWDNH
DGHTXDWHPHDVXUHV
7KHV\PERORIWKHFURVVHGRXWZKHHOHGELQLQGLFDWHVWKLVSURGXFWVKRXOG
QRWEHSODFHGLQPXQLFLSDOZDVWH,QVWHDG\RXQHHGWRGLVSRVHRIWKH
ZDVWHHTXLSPHQWE\KDQGLQJLWRYHUWRDGHVLJQDWHGFROOHFWLRQSRLQWIRU
WKHUHF\FOLQJRIZDVWHHOHFWULFDODQGHOHFWURQLFHTXLSPHQW

1
Warning
1. Do not look directly at the
LED light source,which may
cause retinal damage.
2. Carry the product by holding the lower part of the main unit in both
hands. Never hold the product by the arm or the camera head only.
3. The camera can be damaged if it hits a desk surface or any hard
object.
4. Never turn the arm in the opposite direction.

2
Preparing the Document Camera
»Knowing the Document Camera Parts
&DPHUD+HDG
/('/DPS
/HQV5RWDU\
&RQWURO3DQHO
6'&DUG6ORW
5HPRWH&RQWURO6LJQDO5HFHLYHU
6SHDNHU
5HPRWH&RQWURO6LJQDO5HFHLYHU
$QWLWKHIW6ORW
+'0,,QSXW3RUW
+'0,2XWSXW3RUW
9*$,QSXW3RUW
9*$2XWSXW3RUW
86%3RUW
'&93RZHU6RFNHW
0LFURSKRQH

3
»Control Panel
Button Function
Power on/off
Invert image 180°
"Freeze" the current image or
"Pause" the clip while playing
video
Capture a still image
Show or hide Menu
Direction button
Zoom out
Zoom in
One-time auto focus
Button Function
Pass the signal from PC
Show/hide brightness adjustment
bar.
Turn on/off the LED lamp and
adjust the brightness.
Record a video clip
Enter playback mode to display
recorded still images and video
clips
HDMI/VGA output switch
HDMI
FREEZE
FLIP
LAMP
PC RECORD SNAP
ZOOM - ZOOM+
VGA
OUTPUT
BRIGHT
PLAY MENU
AF
OUTPUT
4
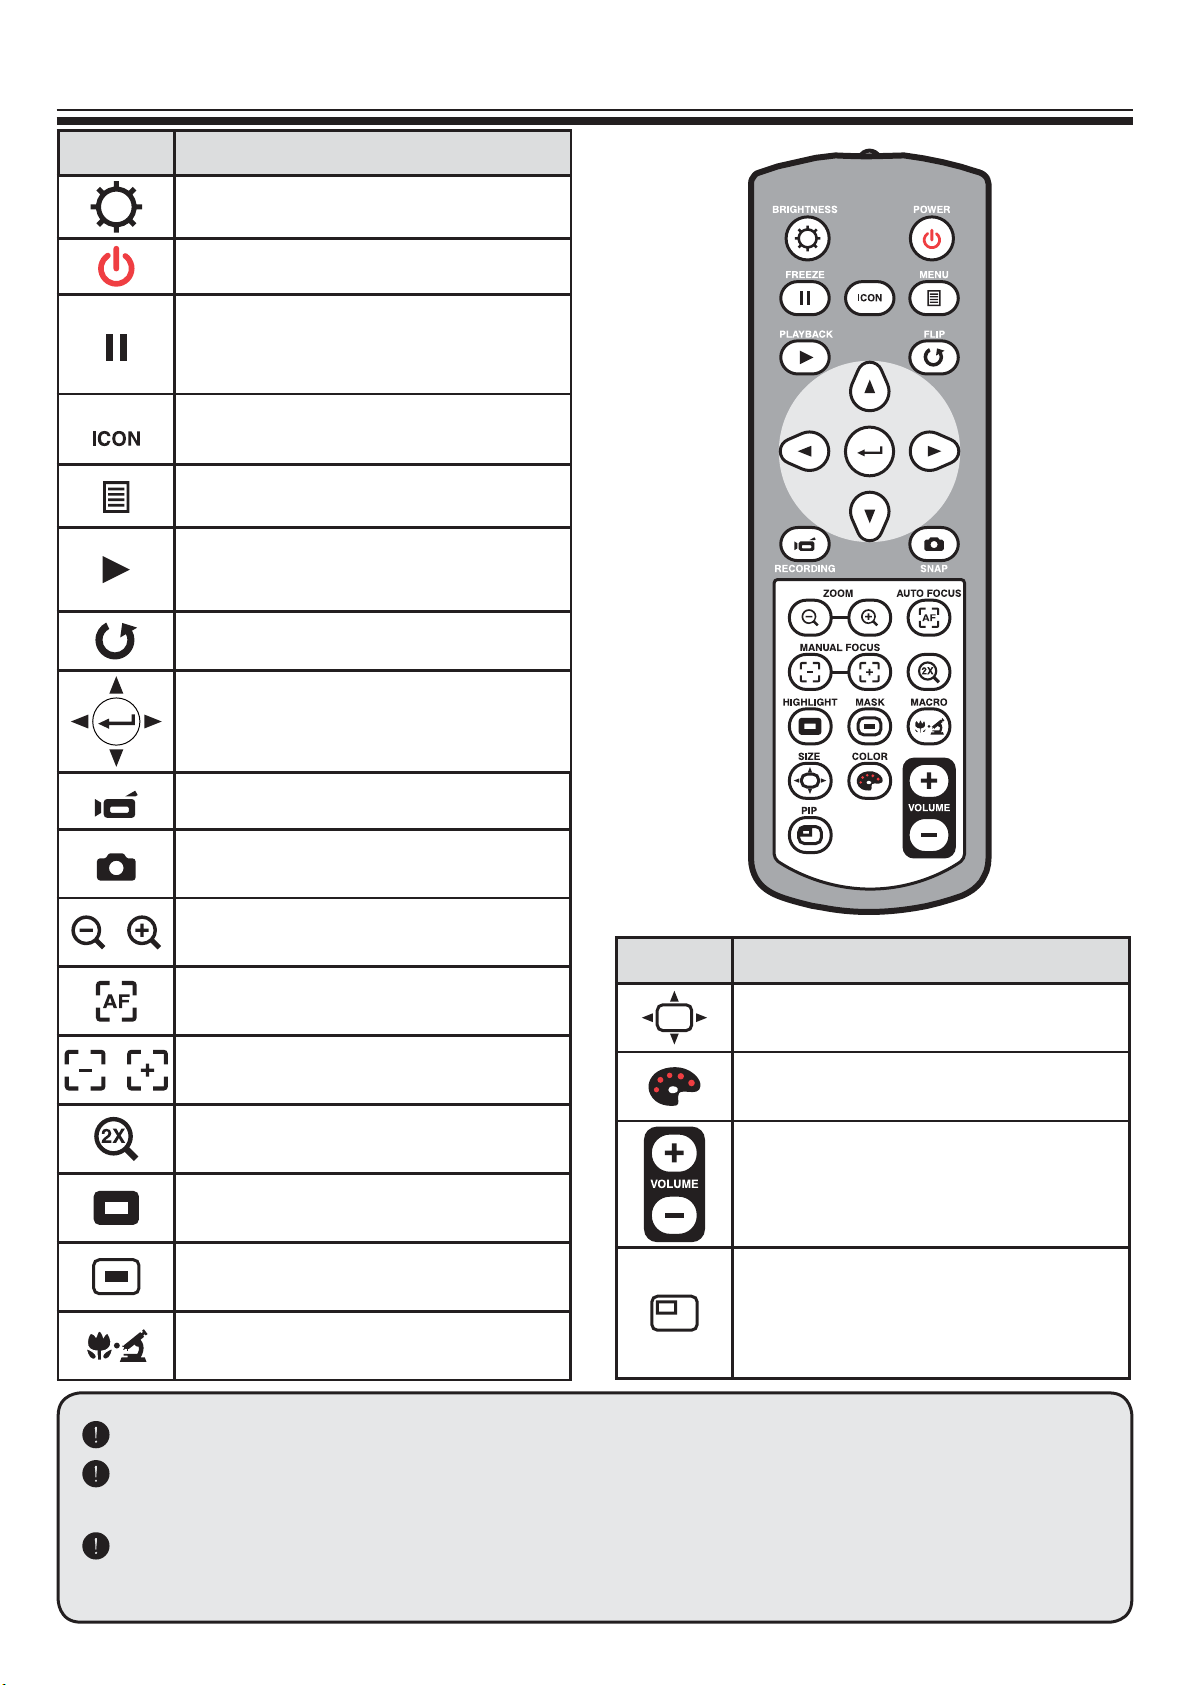
»Remote Control
Button Function
Brightness hotkey
Power on / off
Freeze current image.
* Pause the clip while playing
videos
Show or hide on-screen icons
To show or hide OSD menu
Playback mode to display
recorded pictures and video clips
Invert image 180°
Select and adjust
Record a video clip
Capture a still image
/ Zoom out / Zoom in
One-shot auto focus
/ Use the level bar to adjust the
focus manually
Not available (Only supported in
optical zoom lens models)
Highlight function on / off
Mask function on / off
Macro / Normal switch
,QIUDUHGUHPRWHFRQWUROFDQRQO\EHXVHGLQSUR[LPLW\WRWKHXQLW
5HPRYHWKHEDWWHU\FRYHUDQGORDGWKHEDWWHULHVLQWRWKHEDWWHU\FRPSDUWPHQWFRU
UHFWO\DFFRUGLQJWRWKHĩĪDQGĩĪV\PEROV
%HVXUHWRXVHWZR$$$EDWWHULHV'RQRWXVHQHZDQGROGEDWWHULHVRUGLIIHUHQWEDW
WHU\W\SHVWRJHWKHU
Button Function
Adjust highlighted / masked area
size
Set color for highlighted / masked
area
Increase / decrease the sound
volume.
Picture in Picture function on / off
*For displaying a still image as
an insert while displaying another
image.

5
»Setting up
Camera Head
Roll the lens rotator to rotate image 90°.
Illumination Lamp
,I\RXDUHLQDGDUNHQYLURQPHQWSOHDVHWXUQ
WKH/('ODPSRQWRPDNHEHWWHUH[SRVXUH
1. 3UHVVWKH/('ODPSEXWWRQ RQWKHEDVHWR
WXUQRQRIIWKH/('ODPS
$GMXVWLQJWKHEULJKWQHVVE\SUHVVLQJWKHODPS
EXWWRQ
90°
90°

6
»Basic Operation
Menu options in Preview Mode
Name Icon Option Description
Brightness - Use the Right / Left buttons to make the
image brighter / darker
Effect
Graphic To improve the tint of color-based subjects
Text
The function is designed especially for
text-based documents to which can be
enhanced white and black subjects such
as characters and lines.
B&W
To output a black & white camera image.To
make the image easier to view,select this
when shooting black & white documents
etc.
Negative To output a negative image.
Sketch To output a sketch image
White Balance
Auto
There are various modes (Auto, Flures-
cent, Tungsten and Custom) for user to
Fluorescent
Tungsten
Custom
Quick Zoom 2X / 4X Set the quick zoom to 2X or 4X.
Image Size 0.8M / 2M / 5M / 13M Select the desired still image resolution.
Video Mode
High Quality
Select the desired video quality.
High Frame Rate
7
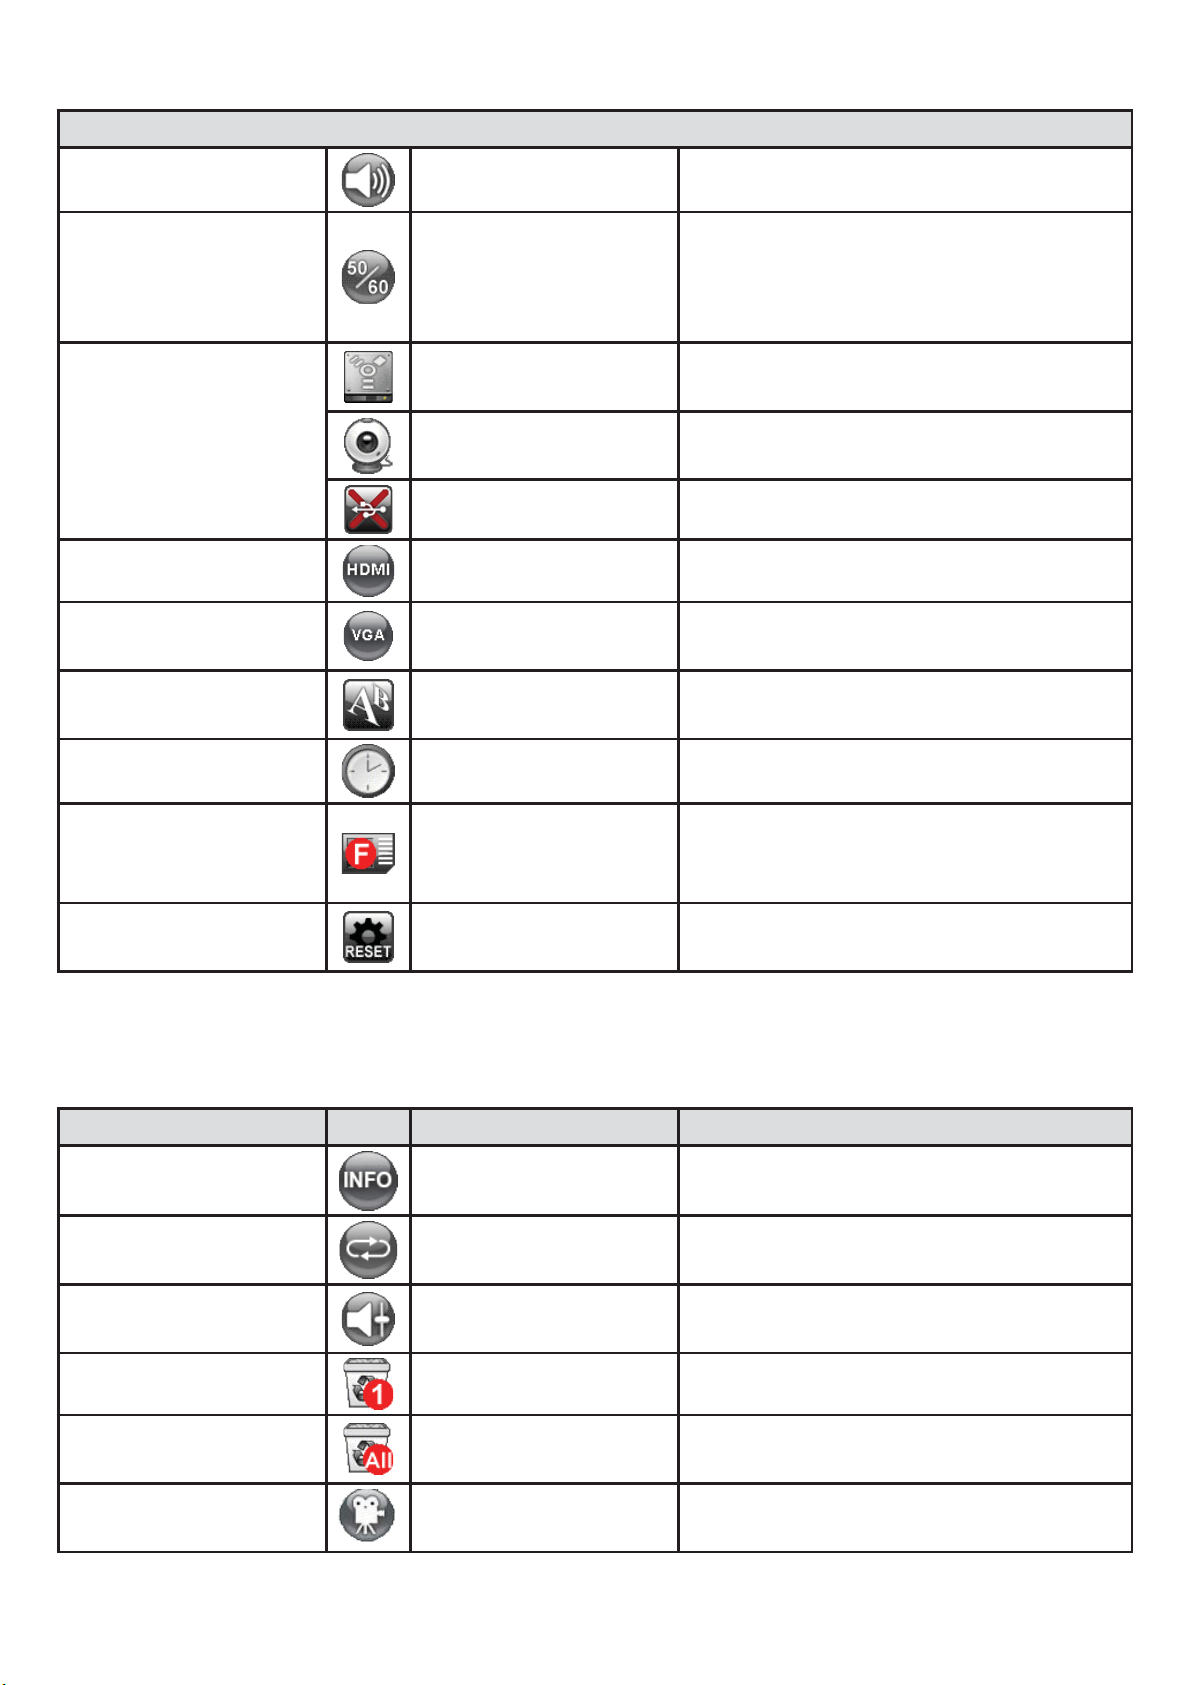
Setting
Beep On / Off Enable beep sound on / off
Flicker 50Hz / 60Hz
the frequency standard of your local
power supply.
USB Connection
Disk Select “Disk” to enter Mass storage
Mode
PC cam Select “PC Cam“ to enter PC Cam
Mode
Off Disable USB function
HDMI Out 720p / 1080i Select output resolution
VGA Out XGA / UXGA / 720P /
WXGA Select output resolution
Language - Allows you select the language used
for OSD
Clock - Set date and time
Format No / Yes
Format the storage medium. Note that
gone.
Reset default No / Yes Restore factory defaults. Note that
your current settings will disappear.
Menu options in Playback Mode
Function Icon Option Description
File Info -
time , size and the length of recording.
Slide show On / Off Start a slide show with selected
interval time.
Volume - Use the Right / Left buttons to adjust
volume
Delete one Yes / No
Delete all Yes / No Delete all images of the same type
stored in the memory.
Camera - Exit playback mode and back to pre-
view mode.

8
Adjusting the brightness
3UHVV%5,*+71(66EXWWRQRQWKHFRQWUROSDQHO RUUHPRWH
FRQWURO
8VH RU EXWWRQVWRLQFUHDVHRUGHFUHDVHWKHEULJKQHVVOHYHO
Zoom Function
1. Use the Zoom button ( / ) to zoom in or zoom out the screen.
Adjusting the focus
Automatic focus
Press AF button ( ) to do an one-time auto focus.
This function provides a one-shot auto focus.
Manual focus
Use the manual focus buttons ( / ) on remote control to
Anti-glare
Anti-glare sheet is a transparent plastic that is overlaid on top of shiny
object or glossy surface to reduce the glare.
To use, simply place the anti-glare sheet on top of shiny object to
Table of contents
Other Optoma Document Camera manuals


