Optoma ThemeScene HD3000 User manual

Prepared by SI :
_______ Vivian Lai _______________
Prepared by TSE :
________________________________________
Checked by :
________________________________________
Approved by :
________________________________________
Model Name : HD3000
Date Version Description
2006/05/29 V1.0 Initial Issue
2006/11/1 V2.0 amend content of Chapter 4-3 Inspection Procedure
2007/11/1 V3.0 Delete Lattice function upgrade procedure in Ch.5
Copyright Nov., 2006 . All Rights Reserved
P/N#36.R0102.001 . Document#R01-G04-01A
SERVICE MANUAL

Preface
This manual is applied to HD3000 professional video scaler and color management
system. The manual gives you a brief description of basic technical information to help in
service and maintain the product.
Your customers will appreciate the quick response time when you immediately
identify problems that occur with our products. We expect your customers will appreciate
the service that you offer them.
This manual is for technicians and people who have an electronic background.
Please send the product back to the distributor for repairing and do not attempt to do
anything that is complex or is not mentioned in the troubleshooting.
Notice:
The information found in this manual is subject to change without prior notice. Any
subsequent changes made to the data herein will be incorporated in future edition.
HD3000 Service Manual
Copyright November, 2007
All Rights Reserved
Manual Version 2.0
P/N#36.R0102.001
Document#R01-G04-01A
HD3000
I

Table of Contents
Chapter 1 Introduction 1-1
Product Highlight 1-1
Computer CVompatible 1-3
Chapter 2 Disassembly Procedure 2-1
Equipment Needed 2-1
Disassemble CONNT-2 Board, CONNT-1 Board. Power Board
and Main Board 2-1
Disassemble AC plug, CONNT-3 Board, Keypad Board and
IR Board 2-5
Disassemble Geer Wheel, Front Cover, Left and right Cover,
Front Panel and Stamping Foot 2-7
Chapter 3 Troubleshooting 3-1
Equipment Needed 3-1
Main procedure 3-1
Chapter 4 Function Test and Alignment Procedure 4-1
Test Equipment Needed 4-1
Inspection Item 4-1
Inspection Procedure 4-2
Chapter 5 Firmware Upgrade Procedure 5-1
Comparison Table 5-1
HDMIRX & HDMITX 5-2
Gennum (System Bias) 5-5
OSD 5-7
MCU 5-9
Chapter 6 EDID Upgrade Procedure 6-1
EDID Introduction 6-1
Equipment Needed 6-1
Setup Procedure 6-2
HD3000
II

HD3000
III
EDID Key-In Procedure 6-2
Appendix Appendix A 7-1
Exploded Overview 7-1
Appendix B 7-4
I.SerialNumberSystemDenition 7-4
Reader’s Response 7-5

1-1 HD3000
Chapter 1
Introduction
1-1 Highlight
No Item Description
1 Weight around 9.2 Lbs
2 Dimension (W x D x
H) 433 x 285 x 50 (mm)
3 Cooling system No Fan cooling supported for all system.
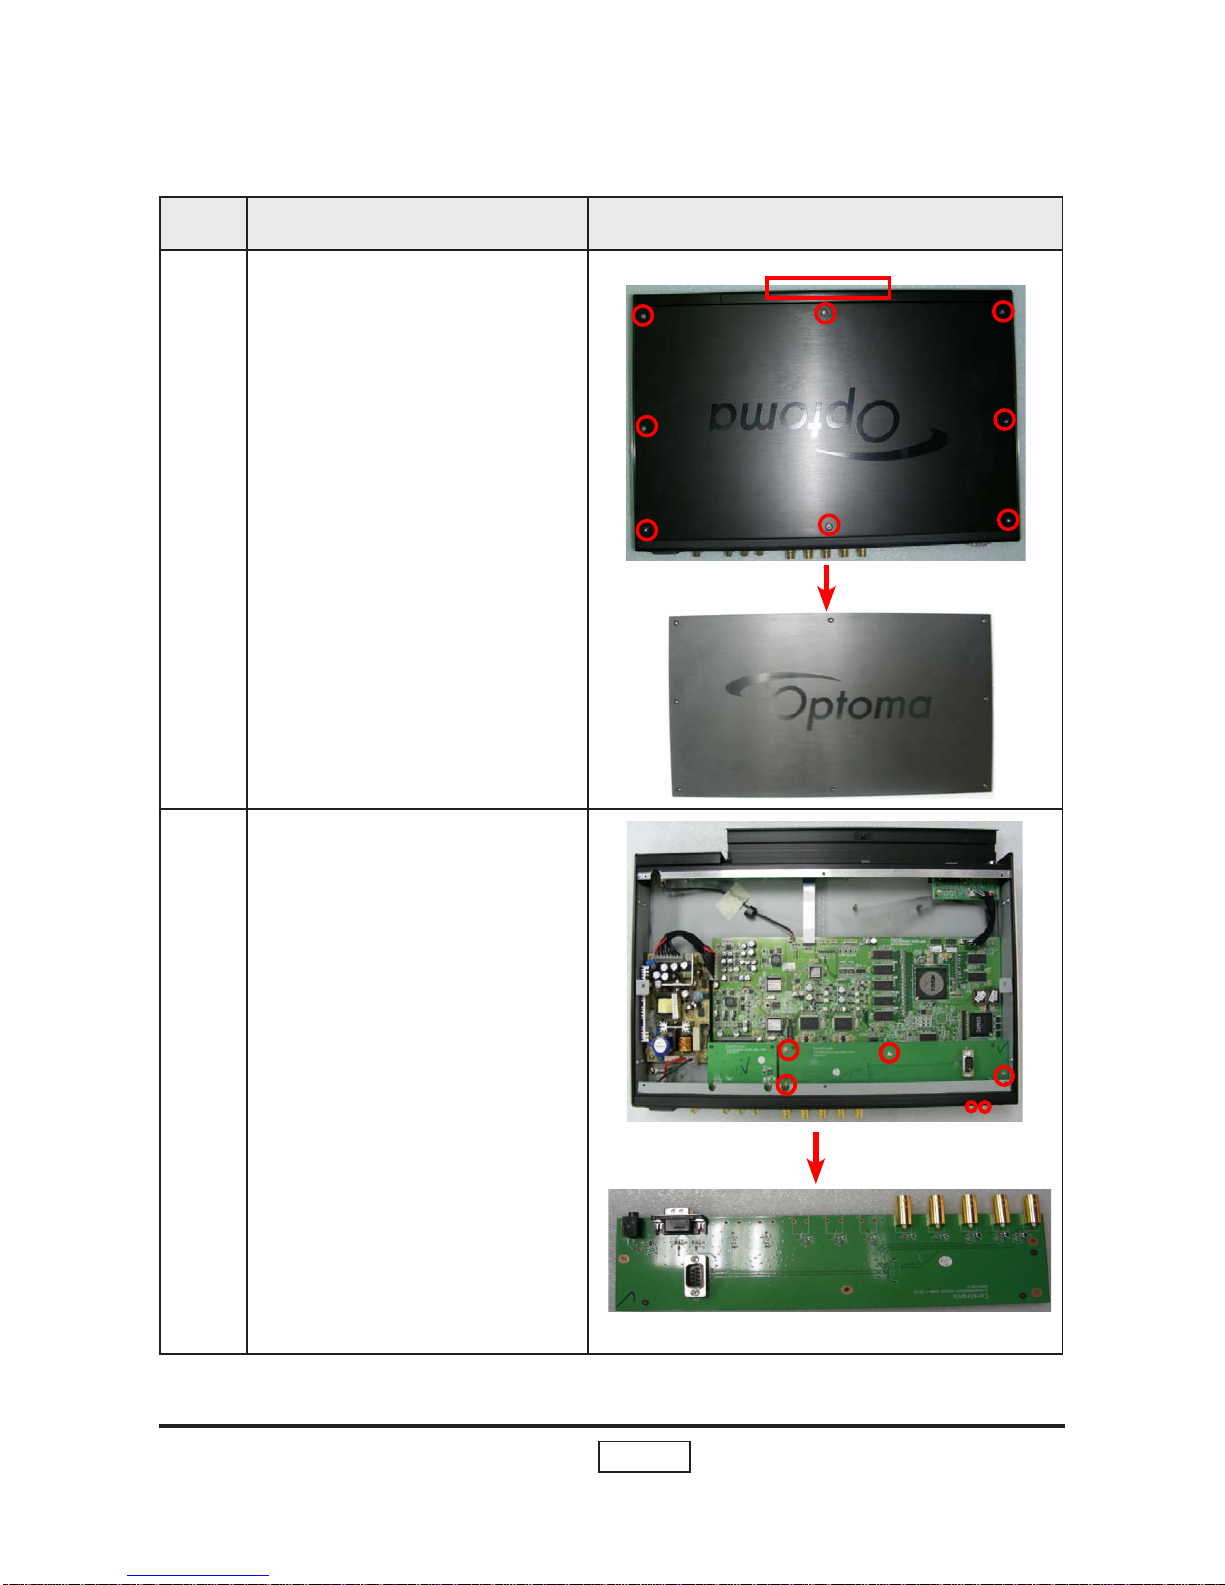
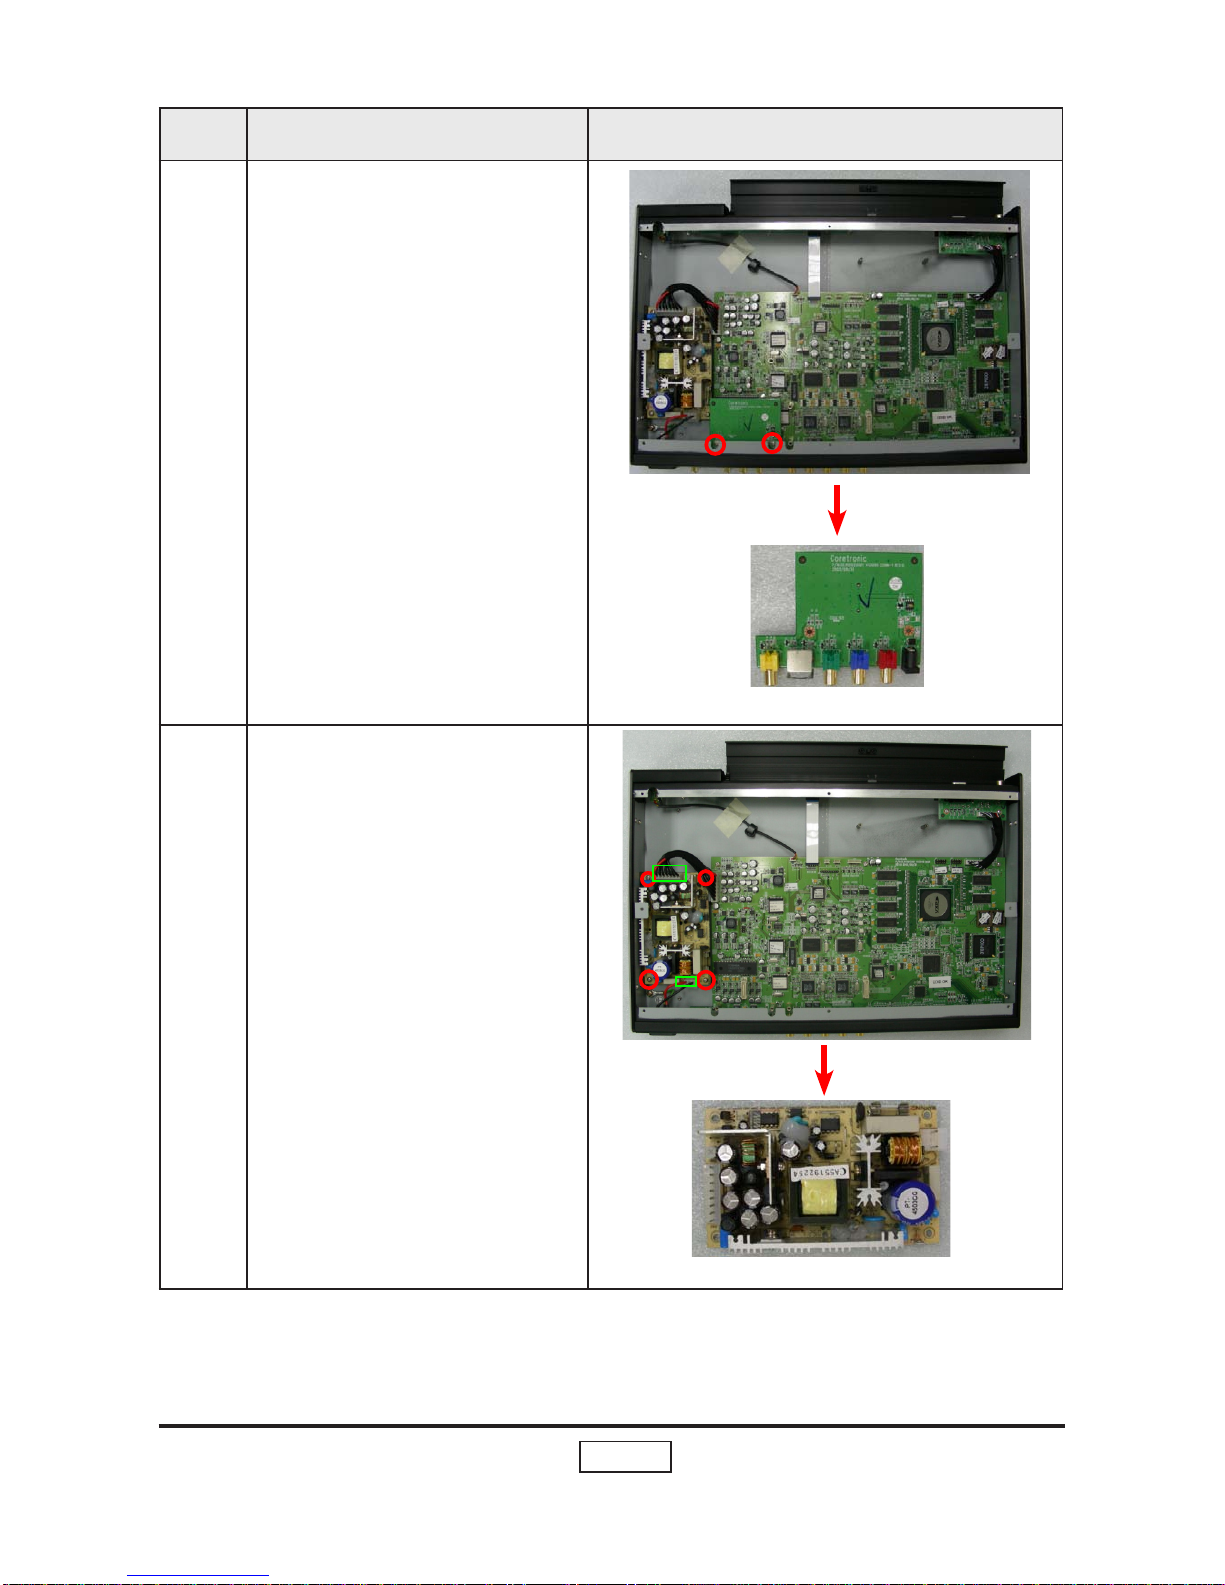
4 Cabinet Provides space for PCB boards, power supply.
5 Color - “Top & Front & Lateral :Anodised Black.”
- “Bottom : Metal Black. “
6 One HDMI output (To
AV receiver) connec-
tor supported output
resolutions
1024X576, 50Hz ,1024X576, 60Hz, 1024X576, 72Hz.
1024X768, 50Hz ,1024X768, 60Hz, 1024X768, 72Hz.
1280X720, 50Hz, 1280X720, 60Hz, 1280X720, 72Hz.
1280X768, 50Hz, 1280X768, 60Hz, 1280X768, 72Hz.
1366X768, 50Hz, 1366X768, 60Hz.1920x1080p, 48Hz,
1920x1080p, 50Hz, 1920x1080p, 60Hz
7 Connect I/O port - Input :
3 HDMI input for HDMI signal switching.
1 HDMI-in from AV receiver.
2 YPbPr through RCAconnector.
2 YPbPr/RGBHV through BNC connector.
1 VGA-in through Dsub-15 connector.
3 S-video.
3 composite.
1 IR module with phone jack connector.
- Output :
1 HDMI output (ToAV receiver).
1 HDMI output (To display).
2 programmable 12V trigger.
8 Power Consumption - 26.4W +/- 10% (Operating@264V), 0.48A +/- 10%
(Operating@90V)
4.5W +/- 10% (Stand-by@90V), 6.4W +/- 10%
(Stand-by@264V)
9 Power supply - Iput : Universal AC 90—264V, 43~67Hz input.
Output rated spec. : 3.3V/4A, 5V/4A, 12V/1A.
10 Control Key Pad - 7 keys
Power. Menu/Exit. Enter/Source. Up.
Down. Left. Right/Resync.

1-2 HD3000
No Name Description
11 Analog input signal
spec - Hsync Frequency(PC) 31.5 k ~ 60.1 kHz
- Vsync Frequency(PC) 56 ~ 75 Hz
- Hsync Frequency(Video) 15.6 k ~ 45 kHz
- Vsync Frequency(Video) 50 ~ 50 Hz
- Graphic Signal RGB (PC)
Analog RGB 0.7Vp-p, 75 ohm
Analog RGB with Sync. 1Vp-p, 75 ohm
Separate TTL H,V Sync.
Composite TTL Sync.
- Video
Composite video 1Vp-p,75 ohm
S-video Luminance 0.714Vp-p,75 ohm
S-video Chrominance 0.286Vp-p,75 ohm
12 Video Compatibility
(Analog input) - Standards :
NTSC - NTSC M/J, NTSC 4.43
PAL - PAL B/D/I/G/H, PAL M, PAL N
SECAM - SECAM B/D/G/K/L
SDTV - 480i, 480p, 576i, 576p
HDTV - 720p, 1080i
13 HDMI Compatibility
(Digital input) (1) Video for “HD3000 stand alone” :
[email protected]/60Hz,
(3)Audio : Linear PCM audio (2 channel).
14 HDMI output (To
Display) - Video :
1024X576@50Hz ,1024X576@60Hz, 1024X576@72Hz
1024X768@50Hz ,1024X768@60Hz, 1024X768@72Hz
1280X720@50Hz ,1280X720@60Hz, 1280X720@72Hz
1280X768@50Hz, 1280X768@60Hz, 1280X768@72Hz
1366X768@50Hz, 1366X768@60Hz,
1920x1080p@48Hz,1920x1080p@50Hz,
1920x1080p@60Hz
- Audio :
Linear PCM audio

1-3 HD3000
NO Name Description
15 HDMI input signal
switch - 3 HDMI input port receive from HDMI source and then
switch to HDMI-out (ToAV receiver) connector.
16 HDMI output (To AV
receiver) - Switch 3 HDMI source to one HDMI output, this
output can be connected to “AV receiver” device or
HDMI-in (From AV receiver) connector.
17 LED Indicator - Stand-by Red LED
- Power-On Blue LED
18 Auto Detect & Install - Automatically recognizes the input signal and
congures itself accordingly.
- Automatically saves adjustments for future use.
19 On-Screen Menu - Multi-language: English, Spanish, French
- 4 main items ( Image, Display, System, Setup)
1-2 Computer Compatible (Analog input)
Compatibility Resolution V-Sync [Hz] H-Sync [KHz]
VGA 640x480 60 31.5
640x480 72 37.9
640x480 75 37.5
US TEXT 720x400 70 31.5
SVGA 800x600 56 35.2
800x600 60 37.9
800x600 72 48.1
800x600 75 46.9
XGA 1024x768 60 48.4
1024x768 70 56.5
1024x768 75 60.0
Wide 848x480 60 31.1
1280x720 60 45
1280x768 60 48
1280x768 75 60.1
1366x768 60 48.1

2-1 HD3000
2-1 Equipment Needed
Chapter 2
Disassembly Process
Item Photo Item Photo
Screw Bit
(+) :107 Hex Sleeves
5mm
Hex
Sleeves
6mm
Hex Socket
Insert Bit

2-2 HD3000
2-2 Disassemble CONNT-2 Board, CONNT-1 Board, Power
Board and Main Board
No Procedure Photo
1
(1) Press to open the front
cover.
(2) Unscrew 8 HEX
SOCKET CAP SCREWS
to remove Top Cover.
2Unscrew 4 screws and 2 hex
screws to remove CONNT-2
Board
Press to open front cover
CONNT-2 Board

2-3 HD3000
No Procedure Photo
3Unscrew 2 screws to
remove CONNT-1 Board.
4Unscrew 4 screws and un-
plug 2 connectors to remove
Power Board.
CONNT-1 Board
Power Board

2-4 HD3000
No Procedure Photo
4
Unscrew 3 screws (red cir-
cle), 6 copper pillars (yellow
circle and unplug 4 connec-
tors (red square) to remove
Main Board and Back End
Metal.
Main Board
Back End
Metal

2-5 HD3000
No Procedure Photo
1Unscrew 3 screws to re-
move AC Plug.
2Unscrew 2 screws and 2 hex
screws to remove CONNT-3
Board and Back End Metal.
AC Plug
CONNT-3 Board Back End Metal.
2-3 Disassemble AC Plug, CONNT-3 Board, Keypad Board
and IR Board

2-6 HD3000
No Procedure Photo
3Unscrew 6 screw nuts to
remove Keypad Board.
4Unscrew 1 screw and tear
the masking tape to remove
IR Board.
5 Remove mylar
Keypad Board
IR Board

2-7 HD3000
No Procedure Photo
1Unscrew 1 screws to re-
move Gear Wheel.
2Unscrew 3 screws to re-
move front cover.
3Unscrew 2 screws to re-
move the Door Lock.
Gear Wheel
Door Lock
2-4 Disassemble Geer Wheel, Front Cover, Left and right
Cover, front panel and Stamping Foot

2-8 HD3000
No Procedure Photo
5Unscrew 4 screws each to
remove left and right Lateral
Panel.
6Unscrew 10 screws to re-
move Front Panel
Left and Right Lateral
Front Panel

2-9 HD3000
No Procedure Photo
7Unscrew 4 screws to re-
move Stamping Foot.
Stamping Foot

3-1 HD3000
3-1 Equipment Needed
- Display Device (ex: Projectors)
- Signal Source (Video, S-Video, HDMI)
- Speaker
- PC
3-2 Main Procedure
No Symptom Procedure
1Color
Abnormal - Ensure the Signal Cable and Source work
- Calibration
- Check Connect Board
- Check Main Board
2No Image
/ Image
Abnormal
- Ensure the Signal Cable and Source work
- Check Main Board
- Check Connect Board
3Sound
Abnormal - Ensure the Signal Cable and Source work
- Check Speaker
- Check Main Board
- Check Connect Board
Chapter 3
Troubleshooting

4-1 HD3000
Chapter 4
Function Test & Alignment Procedure
4-1 Test Equipment Needed
- Display Device (ex: Projectors)
- Signal Source (HDMI, Video, S-Video)
- Speaker
- PC
4-2 Inspection Item
No Item
1- Image
HDMI1, HDMI2, S-Video 1&2, Video 1&2&3,
YPbPr 1&2&3, VGA, BNC 1&2
2- Sound
Speaker
3- Remote Control
4-3 Inspection Procedure
No Inspec-
tion item Inspection spec. Equipment setting Test pattern
1 VGA port Image can not
with icker, color
abnormal, shadow,
abnormal line and
other abnormal
condition.
If icker and noise,
get in to OSD
menu to adjust
Frequency or
Phase.
PC VGA --
>HD3000 VGA IN
--> Projector

4-2 HD3000
No Inspec-
tion item Inspection spec. Equipment setting Test pattern
2 HDMI 1
HDMI 2 1. Image can not
with icker, color
abnormal, shadow,
abnormal line and
other abnormal
condition.
2. Connected
speaker should
be ok and normal
voice output.
3. Test condition
should be under
both 16:9 and 4:3.
DVD Player(480P)
-->HD3000 HDMI
In -->Projector
DVD
Note: When HD72 is
used for test projec-
tor, screen bottom will
get green. It’s normal
and don’t reject the
HD3000.
3 S-Video 1
S-Video 2 Image can not
with icker, color
abnormal, shadow,
abnormal line and
other abnormal
condition.
DVD Player(480P)
-->HD3000 S-Video
In -->Projector
DVD
4 Video 1
Video 2
Video 3
Image can not
with icker, color
abnormal, shadow,
abnormal line and
other abnormal
condition.
DVD Player(480P)
-->HD3000 Video
In -->Projector
DVD
5 YPbPr 1
YPbPr 2
YPbPr 3
Image can not
with icker, color
abnormal, shadow,
abnormal line and
other abnormal
condition.
DVD Player(480P)
-->HD3000 Compo-
nent In -->Projector
DVD

4-3 HD3000
No Inspec-
tion item Inspection spec. Equipment set-
ting Test pattern
6 BNC1
BNC2 Image can not with
icker, color abnor-
mal, shadow, abnor-
mal line and other
abnormal condition.
Chroma 2326 -->
HD3000 BNC In
--> Projector
7 Calibra-
tion 1.Get into ser-
vice mode (Hot
key to get into
service mode:
press these button
sequentially , ,
, )
2. Choose Video
Calibration then
press enter.
Chroma 2326 Signal: 720P
Pattern: 94% White
Note: If the image
color is abnormal,
please do calibration
rst.
8 Speaker
function If the sound is nor-
mal
Other manuals for ThemeScene HD3000
4
Table of contents
Other Optoma Media Converter manuals