optrel medmaxx User manual

swiss made

2
ASSEMBLY INSTRUCTIONS � 3
SVENSKA ��������������������������� 13
ITALIANO ���������������������������� 14
ESPAÑOL ��������������������������� 15
PORTUGUÊS ��������������������� 16
NEDERLANDS ������������������� 17
SUOMI �������������������������������� 18
DANSK �������������������������������� 19
NORSK ��������������������������������� 20
POLSKI �������������������������������� 21
ČEŠTINA ������������������������������ 22
中文
������������������������������������ 24
MAGYAR ������������������������������ 25
TÜRKÇE ������������������������������� 26
ΕΛΛΗΝΙΚΑ
������������������������������� 28
日本語 ���������������������������������� 27
БЪЛГАРСКИ������������������������� 29
SLOVENSKÝ ������������������������ 30
SLOVENSKI����������������������������31
ROMÂNĂ ������������������������������ 32
EESTI������������������������������������ 33
LIETUVI������������������������������ 34
LATVIEŠU ����������������������������� 35
HRVATSKI����������������������������� 38
GAEILGE������������������������������� 37
MALTI ������������������������������������ 36
РУССКИЙ ����������������������������� 23
DEUTSCH ��������������������������� 12
FRANÇAIS �������������������������� 11
ENGLISH���������������������������� � 10
SPARE PARTS ������������������� � 8
HEADBAND ������������������������ � 7

3
1
What you need:
1x 1x 1x
inside
Peel o the protection foil on both sides as shown
(inside and outside) - only the edges, not the whole foil
RightLeft
!Please make sure that the
bolt ts into the cutout
section
2
3
inside
outside clear lens
!Press together, use your thenar to get
the needed pressure or an item to get a
targeted hit. 4!As soon as you hear
the click, this section
is nished.
RightLeft
Hints before we start
!Make sure that none of the
parts is in the threaded area,
and all plates are guided by
the notch.
Correct Wrong 5Assembly of the right side
First of all, insert the pencil as shown. Then only remove the screw nut and the plate from the
headband, place the cover lens in between, hold the headband and the cover lens in one
hand and if possible stabilize the other side of the cover lens on a desk / table. Assemble the
plate and the screw nut.
! Use a pencil
There is a hint how you get the plates rightly assembled (tted on the bolt with the
notch and not in the threaded area), you only need a pencil - use it as shown in the
drawing below (green marked space on the headband).
Move the bolt to the
middle position
Put a pencil in between the gap to
ensure that the bolt will stay up to
assemble your plates.
Pencil
6Assembly of the left side:
First of all, insert the pencil again on the left side. Place the headband on a desk / table and
only remove the screw nut and the plate (as shown). Hold the headband and the cover lens
with one hand and assemble the plates and screw nut as shown (use the additional plate
from the separate bag).
Face
shield
Hints Right
side
Left
side
!Make sure that the
Excenter bolt is ush with
the excenter knob (as shown
in the views).
!Remember
table
click
inside
outside
Assembly instruction medmaxx
instruction video : scan QR-Code or following link:
https://medical.optrel.com/medmaxx/
Correct Wrong
Pencil
headband
settings
1
2
3
get the headband perfectly tted on your head.
Headband: Adjust the upper
adjustment band to your head
size. Press the ratchet button at
the back and turn it until the
headband ts snugly but
without pressure
Face distance: Loosen the
locking knobs to adjust the
distance between the face shield
and the face. Adjust both sides
equally and do not tilt them.
Then tighten the locking knobs
again.
Helmet inclination: can be
adjusted by turning the
eccentric knob.
Pencil
Screw nut
plate
desk / table
What you need: 1x
Screw nut
plate
Pencil
desk / table
fold the cover lens
plate
!Remember
Correct Wrong
Cover lens
Cover lens
!In case of an accidental disassemble of all parts, use the sequential arrangement below
What you need: 1x 1x
1.
2.
3.
5.
6.
7.
1. 2.
3.
5. 6.
4.
4.
Cover lens
Cover lens

4
1
What you need:
1x 1x 1x
inside
Peel o the protection foil on both sides as shown
(inside and outside) - only the edges, not the whole foil
RightLeft
!Please make sure that the
bolt ts into the cutout
section
2
3
inside
outside clear lens
!Press together, use your thenar to get
the needed pressure or an item to get a
targeted hit. 4!As soon as you hear
the click, this section
is nished.
RightLeft
Hints before we start
!Make sure that none of the
parts is in the threaded area,
and all plates are guided by
the notch.
Correct Wrong
5Assembly of the right side
First of all, insert the pencil as shown. Then only remove the screw nut and the plate from the
headband, place the cover lens in between, hold the headband and the cover lens in one
hand and if possible stabilize the other side of the cover lens on a desk / table. Assemble the
plate and the screw nut.
! Use a pencil
There is a hint how you get the plates rightly assembled (tted on the bolt with the
notch and not in the threaded area), you only need a pencil - use it as shown in the
drawing below (green marked space on the headband).
Move the bolt to the
middle position
Put a pencil in between the gap to
ensure that the bolt will stay up to
assemble your plates.
Pencil
6Assembly of the left side:
First of all, insert the pencil again on the left side. Place the headband on a desk / table and
only remove the screw nut and the plate (as shown). Hold the headband and the cover lens
with one hand and assemble the plates and screw nut as shown (use the additional plate
from the separate bag).
Face
shield
Hints
Right
side
Left
side
!Make sure that the
Excenter bolt is ush with
the excenter knob (as shown
in the views).
!Remember
table
click
inside
outside
Assembly instruction medmaxx
instruction video : scan QR-Code or following link:
https://medical.optrel.com/medmaxx/
Correct Wrong
Pencil
headband
settings
1
2
3
get the headband perfectly tted on your head.
Headband: Adjust the upper
adjustment band to your head
size. Press the ratchet button at
the back and turn it until the
headband ts snugly but
without pressure
Face distance: Loosen the
locking knobs to adjust the
distance between the face shield
and the face. Adjust both sides
equally and do not tilt them.
Then tighten the locking knobs
again.
Helmet inclination: can be
adjusted by turning the
eccentric knob.
Pencil
Screw nut
plate
desk / table
What you need: 1x
Screw nut
plate
Pencil
desk / table
fold the cover lens
plate
!Remember
Correct Wrong
Cover lens
Cover lens
!In case of an accidental disassemble of all parts, use the sequential arrangement below
What you need: 1x 1x
1.
2.
3.
5.
6.
7.
1. 2.
3.
5. 6.
4.
4.
Cover lens
Cover lens

5
1
What you need:
1x 1x 1x
inside
Peel o the protection foil on both sides as shown
(inside and outside) - only the edges, not the whole foil
RightLeft
!Please make sure that the
bolt ts into the cutout
section
2
3
inside
outside clear lens
!Press together, use your thenar to get
the needed pressure or an item to get a
targeted hit. 4!As soon as you hear
the click, this section
is nished.
RightLeft
Hints before we start
!Make sure that none of the
parts is in the threaded area,
and all plates are guided by
the notch.
Correct Wrong
5Assembly of the right side
First of all, insert the pencil as shown. Then only remove the screw nut and the plate from the
headband, place the cover lens in between, hold the headband and the cover lens in one
hand and if possible stabilize the other side of the cover lens on a desk / table. Assemble the
plate and the screw nut.
! Use a pencil
There is a hint how you get the plates rightly assembled (tted on the bolt with the
notch and not in the threaded area), you only need a pencil - use it as shown in the
drawing below (green marked space on the headband).
Move the bolt to the
middle position
Put a pencil in between the gap to
ensure that the bolt will stay up to
assemble your plates.
Pencil
6Assembly of the left side:
First of all, insert the pencil again on the left side. Place the headband on a desk / table and
only remove the screw nut and the plate (as shown). Hold the headband and the cover lens
with one hand and assemble the plates and screw nut as shown (use the additional plate
from the separate bag).
Face
shield Hints
Right
side
Left
side
!Make sure that the
Excenter bolt is ush with
the excenter knob (as shown
in the views).
!Remember
table
click
inside
outside
Assembly instruction medmaxx
instruction video : scan QR-Code or following link:
https://medical.optrel.com/medmaxx/
Correct Wrong
Pencil
headband
settings
1
2
3
get the headband perfectly tted on your head.
Headband: Adjust the upper
adjustment band to your head
size. Press the ratchet button at
the back and turn it until the
headband ts snugly but
without pressure
Face distance: Loosen the
locking knobs to adjust the
distance between the face shield
and the face. Adjust both sides
equally and do not tilt them.
Then tighten the locking knobs
again.
Helmet inclination: can be
adjusted by turning the
eccentric knob.
Pencil
Screw nut
plate
desk / table
What you need: 1x
Screw nut
plate
Pencil
desk / table
fold the cover lens
plate
!Remember
Correct Wrong
Cover lens
Cover lens
!In case of an accidental disassemble of all parts, use the sequential arrangement below
What you need: 1x 1x
1.
2.
3.
5.
6.
7.
1. 2.
3.
5. 6.
4.
4.
Cover lens
Cover lens

6
1
What you need:
1x 1x 1x
inside
Peel o the protection foil on both sides as shown
(inside and outside) - only the edges, not the whole foil
RightLeft
!Please make sure that the
bolt ts into the cutout
section
2
3
inside
outside clear lens
!Press together, use your thenar to get
the needed pressure or an item to get a
targeted hit. 4!As soon as you hear
the click, this section
is nished.
RightLeft
Hints before we start
!Make sure that none of the
parts is in the threaded area,
and all plates are guided by
the notch.
Correct Wrong 5Assembly of the right side
First of all, insert the pencil as shown. Then only remove the screw nut and the plate from the
headband, place the cover lens in between, hold the headband and the cover lens in one
hand and if possible stabilize the other side of the cover lens on a desk / table. Assemble the
plate and the screw nut.
! Use a pencil
There is a hint how you get the plates rightly assembled (tted on the bolt with the
notch and not in the threaded area), you only need a pencil - use it as shown in the
drawing below (green marked space on the headband).
Move the bolt to the
middle position
Put a pencil in between the gap to
ensure that the bolt will stay up to
assemble your plates.
Pencil
6Assembly of the left side:
First of all, insert the pencil again on the left side. Place the headband on a desk / table and
only remove the screw nut and the plate (as shown). Hold the headband and the cover lens
with one hand and assemble the plates and screw nut as shown (use the additional plate
from the separate bag).
Face
shield Hints Right
side
Left
side
!Make sure that the
Excenter bolt is ush with
the excenter knob (as shown
in the views).
!Remember
table
click
inside
outside
Assembly instruction medmaxx
instruction video : scan QR-Code or following link:
https://medical.optrel.com/medmaxx/
Correct Wrong
Pencil
headband
settings
1
2
3
get the headband perfectly tted on your head.
Headband: Adjust the upper
adjustment band to your head
size. Press the ratchet button at
the back and turn it until the
headband ts snugly but
without pressure
Face distance: Loosen the
locking knobs to adjust the
distance between the face shield
and the face. Adjust both sides
equally and do not tilt them.
Then tighten the locking knobs
again.
Helmet inclination: can be
adjusted by turning the
eccentric knob.
Pencil
Screw nut
plate
desk / table
What you need: 1x
Screw nut
plate
Pencil
desk / table
fold the cover lens
plate
!Remember
Correct Wrong
Cover lens
Cover lens
!In case of an accidental disassemble of all parts, use the sequential arrangement below
What you need: 1x 1x
1.
2.
3.
5.
6.
7.
1. 2.
3.
5. 6.
4.
4.
Cover lens
Cover lens

7
1
What you need:
1x 1x 1x
inside
Peel o the protection foil on both sides as shown
(inside and outside) - only the edges, not the whole foil
RightLeft
!Please make sure that the
bolt ts into the cutout
section
2
3
inside
outside clear lens
!Press together, use your thenar to get
the needed pressure or an item to get a
targeted hit. 4!As soon as you hear
the click, this section
is nished.
RightLeft
Hints before we start
!Make sure that none of the
parts is in the threaded area,
and all plates are guided by
the notch.
Correct Wrong 5Assembly of the right side
First of all, insert the pencil as shown. Then only remove the screw nut and the plate from the
headband, place the cover lens in between, hold the headband and the cover lens in one
hand and if possible stabilize the other side of the cover lens on a desk / table. Assemble the
plate and the screw nut.
! Use a pencil
There is a hint how you get the plates rightly assembled (tted on the bolt with the
notch and not in the threaded area), you only need a pencil - use it as shown in the
drawing below (green marked space on the headband).
Move the bolt to the
middle position
Put a pencil in between the gap to
ensure that the bolt will stay up to
assemble your plates.
Pencil
6Assembly of the left side:
First of all, insert the pencil again on the left side. Place the headband on a desk / table and
only remove the screw nut and the plate (as shown). Hold the headband and the cover lens
with one hand and assemble the plates and screw nut as shown (use the additional plate
from the separate bag).
Face
shield Hints Right
side
Left
side
!Make sure that the
Excenter bolt is ush with
the excenter knob (as shown
in the views).
!Remember
table
click
inside
outside
Assembly instruction medmaxx
instruction video : scan QR-Code or following link:
https://medical.optrel.com/medmaxx/
Correct Wrong
Pencil
headband
settings
1
2
3
get the headband perfectly tted on your head.
Headband: Adjust the upper
adjustment band to your head
size. Press the ratchet button at
the back and turn it until the
headband ts snugly but
without pressure
Face distance: Loosen the
locking knobs to adjust the
distance between the face shield
and the face. Adjust both sides
equally and do not tilt them.
Then tighten the locking knobs
again.
Helmet inclination: can be
adjusted by turning the
eccentric knob.
Pencil
Screw nut
plate
desk / table
What you need: 1x
Screw nut
plate
Pencil
desk / table
fold the cover lens
plate
!Remember
Correct Wrong
Cover lens
Cover lens
!In case of an accidental disassemble of all parts, use the sequential arrangement below
What you need: 1x 1x
1.
2.
3.
5.
6.
7.
1. 2.
3.
5. 6.
4.
4.
Cover lens
Cover lens

8
2
14
3
Optrel medmaxx
Designation Part. Nº
1medmaxx (complete, for self-assembly) 1100.200
2Clear cover lens (wear part) 5000.280 (10pc)
3Comfort band (wear part) 5004.020
4Sweatband (wear part) 5004.073

9
Nummer der Norm
Number of the standard
Numero della norma
Hersteller
Manufacturer
Medium energy impact
Impacts moyenne énergie
Impatto media energia
Kennzeichnung
Sicherheitsschutztscheibe: Marking safety protection lens: Marquages écran de protection : Marcaggi vetro di protezione:
at extreme temperatures
aux températures extrêmes
a temperature estreme
OS 1 F T EN 166 CE OS 1 F T EN 166 CE OS 1 F T EN 166 CE OS 1 F T EN 166 CE
EN 166
Optische Klasse
Optical class
Classe optique
bei extremen Temperaturen
Mittlere Stossenergie
Die auf dem
medmaxx
angebrachte
Kennzeichnung
bedeutet:
The marking
on the
madmaxx
indicates:
Le marquage
apposé sur
le medmaxx
signie :
IIl contrassegno
riportato sul
medmaxx
contiene
i seguenti dati:
Zulassungen:
EN166
AS/NZS 1337
ANSI OS U5 Z87
ANSI Z87
OS 1 FT EN 166 CE
complies with
CSA Z.94.3
Approvals:
EN166
AS/NZS 1337
ANSI OS U5 Z87
ANSI Z87
OS 1 FT EN 166 CE
complies with
CSA Z.94.3
Homologations:
EN166
AS/NZS 1337
ANSI OS U5 Z87
ANSI Z87
OS 1 FT EN 166 CE
complies with
CSA Z.94.3
Omologazioni:
EN166
AS/NZS 1337
ANSI OS U5 Z87
ANSI Z87
OS 1 FT EN 166 CE
complies with
CSA Z.94.3

10
Introduction
This product is eye and face protection with a clear view and is intended for use by
medical professionals or emergency services personnel�
Safety instructions
Read these operating instructions carefully before using the equipment� Incorrect
use could endanger life and limb and void warranty claims against the manufacturer�
Performance of the PPE / Applications / Risks
The product offers an unlimited, clear view of your patient� If the air humidity /
temperature difference is high, the visor can fog up, resulting in poor visibility�
If the headband is set incorrectly, there is a risk that the product will detach from
the head and fall�
Precautions and protective restrictions
•
Before using the product, always check that the equipment is complete and that no
damage has occurred during transport� Never use faulty or damaged equipment�
•
The user must be familiar with the correct use of his/her personal protective
equipment�
• Appropriate protective clothing must also be worn to protect the rest of your body�
Materials in contact with the skin of the product can cause allergic reactions in
sensitive individuals�
• There is a risk of bumping due to the larger size (head with visor)�
• If the headband is set incorrectly, there is a risk that the product will detach from
the head and fall�
• The product is intended for use by medical professionals or emergency services
personnel�
• The product protects against drops and splashes of liquids� This reduces the risk
of droplet infection� Due to its design, full protection against viruses, bacteria or
other biological agents is only given to a limited extent�
• The product can be combined with face masks�
Warranty & liability
For the warranty conditions, please refer to the instructions provided by your national
sales organisation� For more information, please contact your retailer� The warranty
only applies to material and manufacturing defects� In the event of damage caused by
unintended use, tampering or any use not intended by the manufacturer, the warranty
orliabilityshallbevoid�Similarly,liability andwarrantyarevoid ifspare parts otherthan
those sold by the manufacturer are used�
Estimated service life
The product does not have an expiration date� The product can be used as long as no
visible or invisible damage or malfunctions occur�
How to use (Quick Start Guide) p� 3
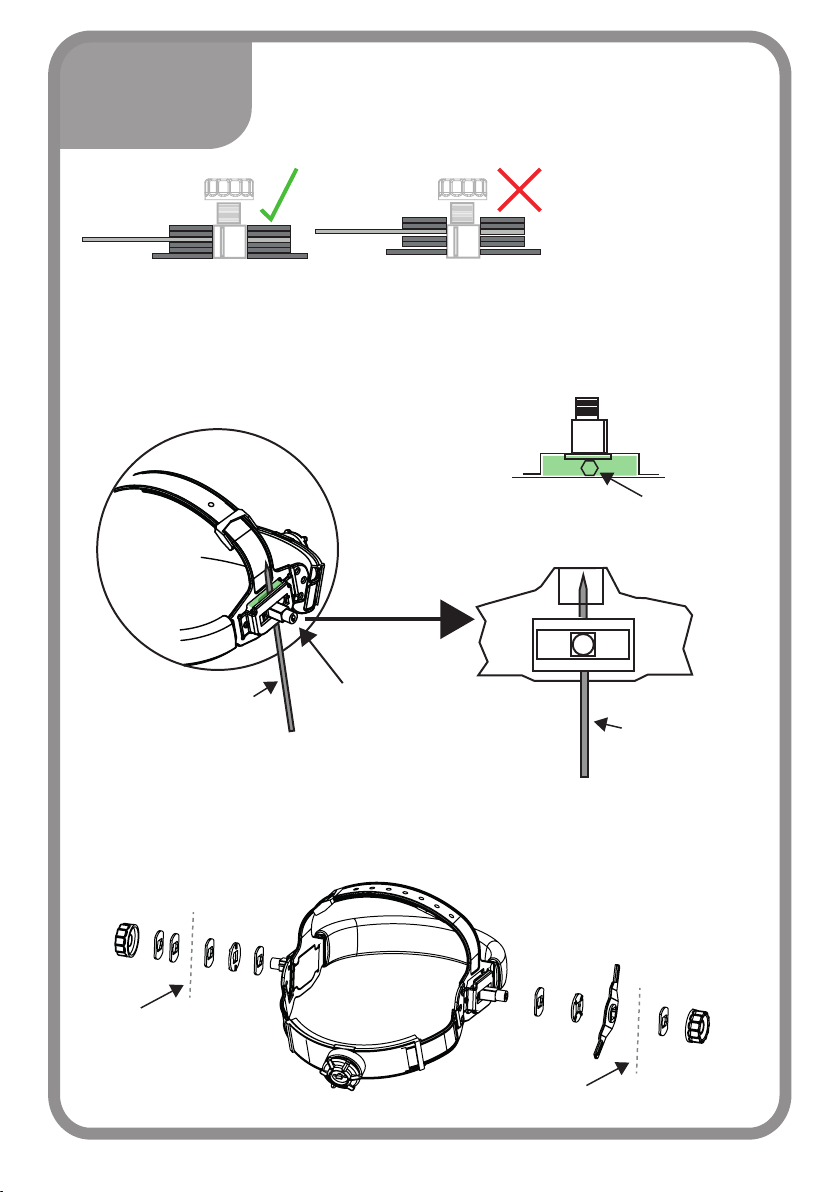
1� Head strap� Set the upper adjusting strap to suit your head size� Push in the locking
knobandturn it untilthe head strap isfittingsecurely but withoutapplying pressure�
2� Distance from eyes� The distance between the protective glass and the eyes can
be adjusted by releasing the locking knobs� Adjust both sides equally and do not
tilt� Then tighten the locking knobs again�
3� The vizor angle can be adjusted using the rotary knob�
4� After use, the product must be cleaned and disinfected thoroughly�
Cleaning, disinfection and Maintenance
Manual cleaning: remove sweatband and comfort band� Use a clean cloth dampened
with soapy water to clean the visor inside and out and allow it to dry in a clean
environment�
Machine cleaning: remove sweatband and comfort band� Select a cleaning program
with a maximum temperature of 70 ° C�
Manual disinfection: by wiping or spraying with a commercially available disinfectant�
Machine disinfection: Select a disinfection program with a maximum temperature
of 70 ° C�
UV disinfection is possible�
Maintenance: The visor is to be replaced if it is
- deformed or cloudy due to high temperature
- has been scratched or deformed by a shock or mechanical influence
- became cloudy due to chemical influence
Storage
The product must be cleaned and disinfected thoroughly before storage� Storage at
room temperature and low humidity�
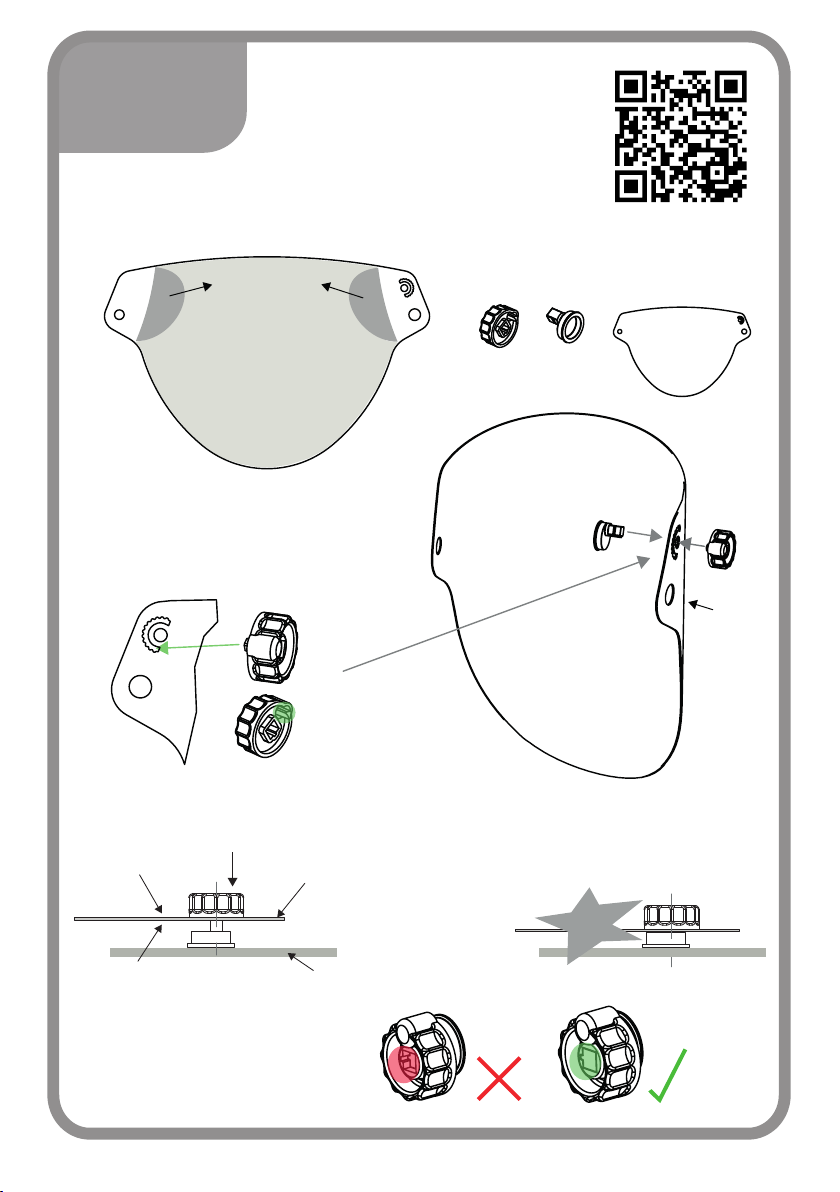
Removing / installing the visor (p� 2)
To remove the visor:
• Unscrew the knobs
• Remove spacers
• Take off four
Attaching the visor: in reverse order�
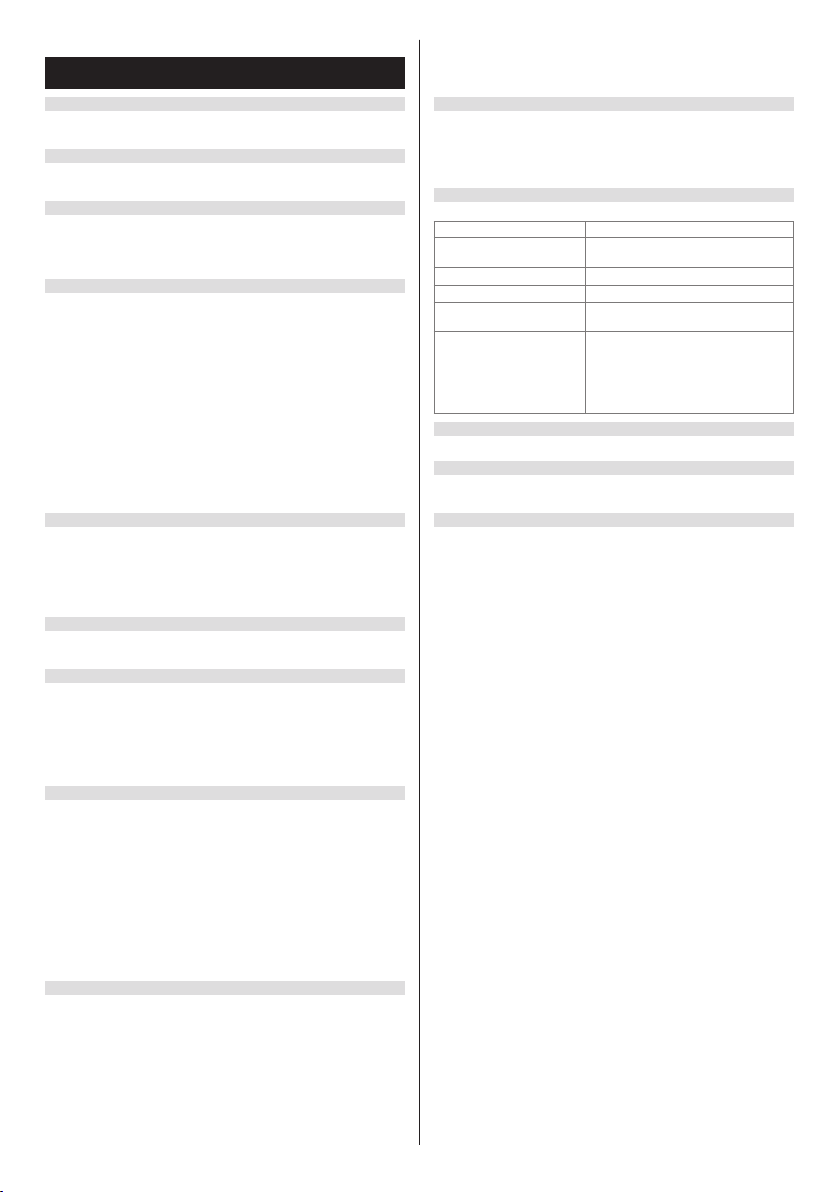
Technical data
(We reserve the right to make technical changes at any time)
Weight 250g / 8�82 oz
Material Headband: Polyethylene
Visor: Polycarbonate
Opterating temperature – 10°C to + 55°C / 14°F to 131°F
Storage temperature – 20°C to + 80°C / – 4°F to 176°F
Shape stability Headband: up to 220°C / 428°F
Visor: up to 137°C / 279°F
Approvals EN166
AS/NZS 1337
ANSI OS U5 Z87
ANSI Z87
OS 1 FT EN 166 CE
complies with CSA Z�94�3
Declaration of conformity
See the Internet address on the last page�
Legal information
This document complies with the requirements of EU Regulation 2016/425 section
1�4 of Annex II�
Notified body
For detailed information see last page�
English

11
Introduction
Ce produit est une protection pour les yeux et le visage avec une vue claire et est destiné
àêtre utilisé par des professionnels de la santé ou du personneldes services d'urgence�
Consignes de sécurité
Veuillez lire attentivement les instructions d’utilisation avant d’utiliser l’équipement�
Une utilisation incorrecte pourrait mettre en danger la vie et l’intégrité corporelle peut
annuler tout recours en garantie contre le fabricant�
Applications
Le produit offre une vue illimitée et claire de votre patient� Si la différence d'humidité /
température de l'air est élevée, la visière peuts'embuer, ce qui entraîne unemauvaise
visibilité� Si le bandeau n'est pas réglé correctement, il y a un risque que le produit se
détache de la tête et tombe�
Précautions et restrictions en matière de protection / risques
•
Avant d’utiliser le produit, vérifiez toujours que l’équipement est complet et qu’il
n’a subi aucun dommage pendant le transport� N’utilisez jamais un équipement
défaillant ou endommagé�
• L’utilisateur doit être familiarisé avec l’utilisation correcte de son équipement de
protection individuelle�
•
Des vêtements de protection appropriés doivent également être portés pour
protéger le reste de votre corps Les matériaux en contact avec la peau du produit
peuvent provoquer des réactions allergiques chez les personnes sensibles�
• Il y a un risque de se cogner en raison de la plus grande taille (tête avec visière)�
•
Si le bandeau n'est pas réglé correctement, il y a un risque que le produit se détache
de la tête et tombe�
•
Le produit est destiné à être utilisé par des professionnels de la santé ou du
personnel des services d'urgence�
• Le produit protège contre les chutes et les éclaboussures de liquides� Cela réduit
le risque d'infection par gouttelettes� En raison de sa conception, une protection
complète contre les virus, les bactéries ou d'autres agents biologiques n'est
accordée que dans une mesure limitée�
• Le produit peut être combiné avec des masques faciaux�
Garantie et responsabilité
Veuillez consulter les instructions de l’organisation commerciale nationale d’Optrel
pour les dispositions relatives à la garantie� Veuillez contacter votre distributeur Optrel
pour plus d’informations à ce sujet� La garantie couvre uniquement le matériel et les
défauts de fabrication� Nous déclinons toute garantie ou responsabilité dans le cas
de dommages causés par une utilisation inadaptée, une intervention non autorisée
ou par une utilisation non prévue par le fabricant� De même, toute responsabilité ou
garantie perd sa validité en cas d’utilisation de pièces de rechange autres que celles
vendues par Optrel�
Durée de vie théorique
Le produit� n’a pas de date d’expiration� Le produit peut être utilisé tant qu’il ne présente
aucun dommage visible ou invisible ni aucun problème fonctionnel�
Utilisation (Quick Start Guide) p� 3
1� Serre-tête� Ajustez le serre-tête réglable supérieur à la taille de votre tête� Enfoncez
le bouton à cliquet et tournez-le jusqu’à ce que le serre-tête soit parfaitement ajusté,
mais sans exercer de pression�
2� Distance des yeux� Vous pouvez régler la distance entre la visière de protection et
les yeux en libérant les boutons de verrouillage � Réglez les deux côtés de la même
manière et sans inclinaison� Resserrez ensuite les boutons de verrouillage�
3� Vous pouvez régler l’angle de visière à l’aide du bouton rotatif�
4� Après utilisation, le produit doit être nettoyé et désinfecté soigneusement�
Nettoyage, désinfection et entretien
Nettoyage manuel: retirez la bande anti-transpiration et la bande de confort� Utilisez
un chiffon propre imbibé d'eau savonneuse pour nettoyer la visière à l'intérieur et à
l'extérieur et laissez-la sécher dans un environnement propre�
Nettoyage en machine: Retirez le bandeau anti-transpiration et le bracelet de confort�
Sélectionnez un programme de nettoyage avec une température maximale de 70 ° C�
Désinfection manuelle:enessuyantouenpulvérisantavecundésinfectantdisponible
dans le commerce�
Désinfection en machine: Sélectionnez un programme de désinfection avec une
température maximale de 70 ° C�
La désinfection aux UV est possible�
Entretien: La visière doit être remplacée si elle est
- déformé ou trouble en raison de la température élevée
- a été rayé ou déformé par un choc ou une influence mécanique
- est devenu trouble en raison de l'influence chimique
Stockage
Le produit doit être nettoyé et désinfecté soigneusement avant stockage� Stockage à
température ambiante et faible humidité�
Dépose / pose de la visière (p� 2)
Pour retirer la visière:
• Dévissez les boutons
• Supprimer les entretoises
• Décoller quatre
Fixation de la visière: dans l'ordre inverse�
Caractéristiques
(Nous nous réservons le droit d’apporter des modifications techniques)
Poids 250g / 8,82 oz
Matériau Bandeau: Polyéthylène
Visière: Polycarbonate
Température de service – 10°C à + 55°C / 14°F à 131°F
Température de stockage – 20°C à + 80°C / – 4°F à 176°F
Stabilité de la forme Bandaeu: jusqu'à 220°C / 428°F
Visière: jusqu'à 137°C / 279°F
Homologations EN166
AS/NZS 1337
ANSI OS U5 Z87
ANSI Z87
OS 1 FT EN 166 CE
complies with CSA Z�94�3
Certificat de conformité
Voir l’adresse Internet à la dernière page�
Informations légales
Le présent document est conforme aux exigences du Règlement UE 2016/425, alinéa
1�4 de l’Annexe II�
Organisme notifié
Voir les informations détaillées à la dernière page�
Français

12
Einführung
Bei diesem Produkt handelt es sich um einen Augen- und Gesichtsschutz mit klarer
Sicht und ist für die Verwendung von medizinischen Fachkräften oder von Mitarbeitern
der Rettungsdienste vorgesehen�
Sicherheitsanweisungen
Lesen Sie diese Betriebsanweisungen vor dem Gebrauch der Ausrüstung
sorgfältig durch� Eine falsche Verwendung könnte Leib und Leben gefährden und
Gewährleistungsansprüche gegenüber dem Hersteller ungültig machen�
Leistung der PSA / Anwendungen / Risiken
Das Produkt bitetet eine unbegrenzt klare Sicht auf Ihre(n) Patient/in/en� Bei hoher
Luftfeuchtigkeit / Temperaturdifferenz kann das Visier beschlagen was zu einer
schlechten Sicht führt� Bei unsachgemäss eingestellten Kopfband besteht die Gefahr
dass das Produkt sich vom Kopf löst und herabfällt�
Vorsichtsmaßnahmen, protektive Einschränkungen und Risiken
• Vor Verwendung des Produkts immer prüfen, dass die Ausrüstung vollständig ist
und dass während des Transports keine Schäden entstanden sind� Niemals eine
fehlerhafte oder beschädigte Ausrüstung verwenden�
•
Der Benutzer muss mit der richtigen Nutzung seiner persönlichen
Schutzausrüstung vertraut sein�
•
Um den Rest Ihres Körpers zu schützen, muss außerdem eine angemessene
Schutzkleidung getragen werden�Materialien des Produkts die in Kontakt mit
der Haut kommen, können bei empfindlichen Personen allergische Reaktionen
verursachen�
• Es besteht eine Anstossgefahr aufgrund des größeren Umfangs (Kopf mit Visier)�
• Bei unsachgemäss eingestellten Kopfband besteht die Gefahr dass das Produkt
sich vom Kopf löst und herabfällt�
•
Das Produkt ist für den Einsatz von medizinischen Fachkräften oder von
Mitarbeitern der Rettungsdienste vorgesehen�
•
Das Produkt schützt gegen Tropfen und Spritzer von Flüssigkeiten� Damit reduziert
es die Gefährdung durch eine Tröpfcheninfektion� Ein vollumfänglicher Schutz
gegenViren,Bakterien oderanderebiologischeAgenzien istkonstruktionsbedingt
nur eingeschränkt gegeben�
• Das Produkt ist kombinierbar mit Gesichtsschutzmasken�
Gewährleistung und Haftung
Fürdie Gewährleistungsbestimmungenbitte BezugaufdieAnweisungender nationalen
optrel-Verkaufsorganisation nehmen� Für weitere Informationen dazu bitte Kontakt
mit Ihrem optrel-Händler aufnehmen� Die Gewährleistung gilt nur für Material- und
Herstellungsfehler� Verschleissteile sind von der Garantie ausgenommen� Im Falle
von Schäden, die durch unsachgemäßen Gebrauch, unerlaubte Eingriffe oder durch
einen vom Hersteller nicht beabsichtigten Gebrauch verursacht werden, sind die
Gewährleistungoder Haftungungültig�Ebenso sindHaftung undGewährleistungnicht
längergültig,wenn andereErsatzteile alsdievonOptrel verkauftenverwendetwerden�
Voraussichtliche Nutzungsdauer
Das Produkt hat kein Ablaufdatum� Das Produkt kann solange verwendet werden, wie
keine sichtbaren oder unsichtbaren Schäden oder funktionale Störungen auftreten�
Gebrauch (Quick Start Guide) S� 3
1� Kopfband� Das obere Einstellband auf die Größe Ihres Kopfes anpassen� Den
Rastknopf eindrücken und drehen, bis das Kopfband sicher und druckfrei sitzt�
2� Abstand von den Augen� Durch Lösen der Feststellknöpfe kann der Abstand
zwischen dem Schutzglas und den Augen justiert werden� Beide Seiten gleich
justieren und nicht neigen� Dann die Feststellknöpfe wieder festziehen�
3� Der Visierwinkel kann mit dem Drehknopf justiert werden�
4� Nach Gebrauch ist das Produkt gründlich zu reinigen und desinfizieren�
Reinigung, Desinfektion und Wartung
Reinigung manuell: Schweißband und Komfortband entfernen� Ein sauberes, mit
SeifenwasserbefeuchtetesTuchverwenden,umdas Visierinnenundaußen zureinigen
und in einer sauberen Umgebung trocknen lassen�
Reinigung maschinell: Schweißband und Komfortband entfernen� Ein
Reinigungsprogramm mit einer maximalen Temperatur von 70°C wählen�
Desinfektion manuell: mit Wisch- oder Sprühverfahren mit einem handelsüblichen
Desinfektionsmittel�
Desinfektion maschinell: Desinfektionsprogramm mit einer maximalen Temperatur
von 70°C wählen�
Eine UV Desinfektion ist möglich�
Wartung:Das Visier ist zu ersetzen wenn es
- durch hohe Temperatur verformt oder trüb wurde
- durch einen Schlag odere mechanischen Einfluss zerkratzt oder verformt wurde
- durch chemischen Einfluss trüb wurde
Lagerung
Das Produkt ist vor der Lagerung gründlich zu Reinigen und zu Desinfizieren� Lagerung
bei Zimmertemperatur und niedriger Luftfeuchtigkeit�
Entfernen/Installieren des Visiers (S� 2)
Entfernen des Visiers:
• Knöpfe abschrauben
• Distanzscheiben entfernen
• Vizier abnehmen
Befestigen des Visiers: un umgekehrter Reihenfolge�
Technische Daten
(Technische Änderungen vorbehalten)
Gewicht 250g / 8�82 oz
Material Kopfband: Polyethylen
Visier: Polycarbonat
Betriebstemperatur – 10°C bis + 55°C / 14°F bis 131°F
Lagertemperatur – 20°C bis + 80°C / – 4°F bis 176°F
Formbeständigkeit Kopfband: bis zu 220°C / 428°F
Visier: bis zu 137°C / 279°F
Zulassungen EN166
AS/NZS 1337
ANSI OS U5 Z87
ANSI Z87
OS 1 FT EN 166 CE
complies with CSA Z�94�3
Konformitätserklärung
Siehe Internet-Adresse auf der letzten Seite�
Rechtliche Informationen
Dieses Dokument entspricht den Anforderungen der EU-Verordnung 2016/425 Punkt 1�4
von Anhang II�
Benannte Stelle
Detaillierte Informationen siehe letzte Seite�
Deutsch

13
Introduktion
Denna produkt är ögon- och ansiktsskydd med en tydlig vy och är avsedd för användning
av medicinsk personal eller räddningspersonal�
Säkerhetsanvisningar
Läs noga igenom bruksanvisningen innan du använder utrustningen� Felaktig
användningkanäventyralivs- ochlemmer ochogiltigagarantianspråk mottillverkaren�
Användning / Risker
Produkten erbjuder en obegränsad, tydlig bild av din patient� Om luftfuktigheten /
temperaturskillnaden är hög, kan visiret dimma upp, vilket resulterar i dålig sikt� Om
pannbandet är felaktigt finns det risk att produkten lossnar från huvudet och faller�
Förberedelser och skyddsåtgärder
•
Innan du använder produkten ska du alltid kontrollera att utrustningen är komplett
och att den inte har skadats under transport� Använd aldrig felaktig eller trasig
utrustning�
•
Användarenmåstekännatillhurden personligaskyddsutrustningenskaanvändas
korrekt�
•
Lämpliga skyddskläder måste också bäras för att skydda resten av kroppen�
Material som är i kontakt med huden på produkten kan orsaka allergiska reaktioner
hos känsliga individer�
• Det finns en risk för stötar på grund av den större storleken (huvudet med visir)�
• Om pannbandet är felaktigt finns det risk att produkten lossnar från huvudet och
faller�
•
Produkten äravsedd för användning avläkare ellerpersonal inom räddningstjänster�
•
Produkten skyddar mot droppar och stänk av vätskor� Detta minskar risken för
droppinfektion� På grund av dess utformning ges fullt skydd mot virus, bakterier
eller andra biologiska medel endast i begränsad utsträckning�
• Produkten kan kombineras med ansiktsmasker�
Garanti och ansvar
Läs informationen från optrels säljavdelning angående garantivillkor� För mer
information, kontakta din optrel återförsäljare� Garantin täcker endast materialskador
och tillverkningsdefekter� Om skadan har uppstått på grund av inkorrekt användning,
utan tillstånd eller på sätt som tillverkaren inte föreskriver så gäller inte garantin eller
ansvarsvillkoren� Detsammagälleromreservdelar användssom inte har såltsav optrel�
Förväntad livslängd
Produkten har inget utgångsdatum� Produkten kan användas så länge det inte
förekommer några synliga eller osynliga skador eller funktionsfel�
Användning (Quick Start Guide) s� 3
1� Pannband� Justera den övre remmen så att den passar ditt huvud� Tryck in
spännvredet och vrid tills pannbandet passar ordentligt utan att trycka�
2� Avstånd från ögonen� Genom att lossa på låsvreden kan avståndet mellan det
skyddslinsen och ögonen justeras� Justera båda sidor och se till att hålla en rak
linje� Dra sedan åt låsvreden igen�
3� Du kan justera Visirvinkel genom att vrida på rotationsvredet�
4� Efter användning måste produkten rengöras och desinficeras noggrant�
Rengöring, desinfektion och underhåll
Manuell rengöring: ta bort svettband och komfortband� Använd en ren trasa fuktad med
tvålvatten för att rengöra visiret inifrån och ut och låt det torka i en ren miljö�
Maskinrengöring:Tabortsvettbandet ochkomfortbandet�Välj ettrengöringsprogram
med en högsta temperatur på 70 ° C�
Manuell desinfektion: genom att torka eller spruta med ett kommersiellt tillgängligt
desinfektionsmedel�
Maskinens desinfektion: Välj ett desinfektionsprogram med en maximal temperatur
på 70 ° C�
UV-desinfektion är möjlig�
Underhåll: Visiret ska bytas ut om det är det
- deformerad eller molnig på grund av hög temperatur
- har repats eller deformerats av en chock eller mekanisk påverkan
- blev molnigt på grund av kemisk påverkan
Förvaring
Produkten måste rengöras och desinficeras noggrant före lagring� Förvaring vid
rumstemperatur och låg luftfuktighet�
Ta bort/montera visir (s� 2)
Så här tar du bort visiret:
• Skruva loss knopparna
• Ta bort distanser
• Ta av fyra
Montering av visiret: i omvänd ordning�
Tekniska uppgifter
(Vi förbehåller oss rätten att göra tekniska ändringar)
Vikt Vikt 250 g / 8,82 oz
Material Pannband: Polyeten
Visir: Polykarbonat
Användningstemperatur – 10°C till + 55°C / 14°F till 131°F
Förvaringstemperatur – 20°C till + 80°C / – 4°F till 176°F
Formstabilitet Pannband: upp till 220°C / 428°F
Visor: upp till 137°C / 279°F
Godkännanden EN166
AS/NZS 1337
ANSI OS U5 Z87
ANSI Z87
OS 1 FT EN 166 CE
complies with CSA Z�94�3
Försäkran om överensstämmelse
Se Internetadressen på den sista sidan�
Juridisk information
Detta dokument uppfyller kraven i EU-förordning 2016/425 avsnitt 1�4 i bilaga II�
Anmäld organ
För detaljerad information se sista sidan�
Svenska

14
Introduzione
Questo prodotto protegge gli occhi e il viso con una visione chiara ed èdestinato all'uso
da parte di professionisti medici o personale dei servizi di emergenza�
Istruzioni di sicurezza
Leggerelepresenti istruzionioperativecon attenzioneprimadiusare l’equipaggiamento�
L’uso scorretto potrebbe mettere in pericolo la propria vita e incolumità, invalidando
eventuali diritti di garanzia rispetto a Optrel�
Applicazioni / Rischi
Il prodotto offre una visione illimitata e chiara del paziente� Se la differenza di umidità
/ temperatura dell'aria è elevata, la visiera può appannarsi, con conseguente scarsa
visibilità� Se la fascia non è impostata correttamente, esiste il rischio che il prodotto si
stacchi dalla testa e cada�
Precauzioni e restrizioni protettive
• Prima di usare il prodotto, verificare sempre che l’equipaggiamento sia completo
e che non ci siano stati danni durante il trasporto� Non usare un equipaggiamento
difettoso o danneggiato�
•
L’utente deve avere familiarità con il corretto utilizzo del suo equipaggiamento
protettivo personale�
• Indossare indumenti protettivi adeguati anche per proteggere il resto del corpo�I
materiali a contatto con la pelle del prodotto possono causare reazioni allergiche
in soggetti sensibili�
• Vi è il rischio di urtare a causa delle dimensioni maggiori (testa con visiera)�
•
Se la fascia non è impostata correttamente, esiste il rischio che il prodotto si stacchi
dalla testa e cada�
•
Il prodotto è destinato all'uso da parte di professionisti medici o personale dei
servizi di emergenza�
• Il prodotto protegge da cadute e schizzi di liquidi� Ciò riduce il rischio di infezione
da goccioline� Grazie al suo design, la protezione completa contro virus, batteri o
altri agenti biologici è data solo in misura limitata�
• Il prodotto può essere combinato con maschere per il viso�
•
Garanzia e responsabilità
Si vedano le istruzioni dell’organizzazione di vendita nazionale di Optrel per le
disposizioni di garanzia� Per ulteriori informazioni in merito, si prega di contattare il
rivenditore Optrel� La garanzia copre soltanto difetti materiali e di produzione� In caso
di danni dovuti a uso improprio, intervento non autorizzato o utilizzo non previsto dal
produttore, la garanzia e la responsabilità non sono più valide� Parimenti, risultano
invalidate garanzia e responsabilità se sono usate parti di ricambio diverse da quelle
vendute da Optrel�
Durata prevista
Il prodotto non ha data di scadenza� Il prodotto può essere usato finché non si
manifestano danni visibili o invisibili oppure problemi funzionali�
Guida all’uso (Quick Start Guide) p� 2-3
1� Fasciaper ilcapo�Regolarela fasciasuperiore sulledimensionidellatesta� Premere
la manopola a cricchetto e ruotare fino all’adesione sicura ma priva di pressione
della fascia�
2� Distanza dagli occhi� Allentando le manopole di blocco è possibile regolare la
distanza tra la lente di protezione e gli occhi� Regolare allo stesso modo entrambi
i lati, senza inclinare� Quindi stringere nuovamente le manopole di blocco�
3� L’angolazione del visiera può essere regolata mediante la manopola rotante�
4� Dopo l'uso, il prodotto deve essere pulito e disinfettato accuratamente�
Igiene, disinfezione e manutenzione
Puliziamanuale:rimuoverela fasciaantisudoreela fasciacomfort� Utilizzare unpanno
pulito inumidito con acqua insaponata per pulire la visiera dentro e fuori e lasciarla
asciugare in un ambiente pulito�
Pulizia della macchina: rimuovere la fascia antisudore e la fascia comfort� Selezionare
un programma di pulizia con una temperatura massima di 70 ° C�
Disinfezione manuale: pulendo o spruzzando con un disinfettante disponibile in
commercio�
Disinfezione della macchina: selezionare un programma di disinfezione con una
temperatura massima di 70 ° C�
È possibile la disinfezione UV�
Manutenzione: la visiera deve essere sostituita se lo è
- deformato o nuvoloso a causa dell'alta temperatura
- è stato graffiato o deformato da uno shock o un'influenza meccanica
- è diventato nuvoloso a causa dell'influenza chimica
Conservazione
Il prodotto deve essere pulito e disinfettato accuratamente prima della conservazione�
Conservazione a temperatura ambiente e bassa umidità�
Rimozione / montaggio del visore (p� 2)
Per rimuovere la visiera:
• Svitare le manopole
• Rimuovere i distanziali
• Decollare quattro
Applicazione della visiera: in ordine inverso�
Specifiche
(Ci riserviamo il diritto di apportare modifiche tecniche)
Peso 250g / 8�82 oz
Materiale Fascia: Polietilene
Visore: Policarbonato
Temperatura operativa Da – 10°C a + 55°C / 14°F a 131°F
Temperatura di conservazione Da – 20°C a + 80°C / – 4°F a 176°F
Stabilità di forma Fascia: fino a 220°C / 428°F
Visore: fino a 137°C / 279°F
Omologazioni EN166
AS/NZS 1337
ANSI OS U5 Z87
ANSI Z87
OS 1 FT EN 166 CE
complies with CSA Z�94�3
Dichiarazione di conformità
Vedi l'indirizzo Internet nell'ultima pagina�
Informazione legale
Questo documento è conforme ai requisiti del Regolamento UE 2016/425, sezione 1�4,
dell'allegato II�
Corpo notificato
Per informazioni dettagliate vedere l'ultima pagina�
Italiano

15
Introducción
Este producto es protección para los ojos y la cara con una visión clara yestá diseñado
para ser utilizado por profesionales médicos o personal de servicios de emergencia�
Instrucciones de seguridad
Lea estas instrucciones de uso atentamente antes de usar el equipo� Si el mismo se
usa de forma incorrecta, puede poner en peligro su vida ointegridad física yesto podría
invalidar toda reclamación referente a la garantía por parte del fabricante�
Aplicaciones / Riesgos
El producto ofrece una visión clara e ilimitada de su paciente� Si la diferencia de
humedad / temperatura del aire es alta, la visera puede empañarse, lo que da como
resultado una visibilidad deficiente� Si la banda para la cabeza está configurada
incorrectamente, existe el riesgo de que el producto se desprenda de la cabeza y
se caiga�
Precauciones y restricciones de protección
•
Antes de usar el producto, compruebe que el equipo está completo y que no
ha sufrido ningún daño durante el transporte� Nunca use un equipo defectuoso
o dañado�
•
El usuario debe estar familiarizado con el uso correcto de su equipo de protección
individual�
•
También se debe usar ropa protectora adecuada para proteger el resto de su
cuerpo�Los materiales en contacto con la piel del producto pueden causar
reacciones alérgicas en personas sensibles�
• Existe el riesgo de golpes debido al tamaño más grande (cabeza con visera)�
• Si la banda para la cabeza está configurada incorrectamente, existe el riesgo de
que el producto se desprenda de la cabeza y se caiga�
• El producto está destinado a ser utilizado por profesionales médicos o personal
de servicios de emergencia�
•
El producto protege contra gotas y salpicaduras de líquidos� Esto reduce el riesgo
de infección por gotitas� Debido a su diseño, la protección total contra virus,
bacterias u otros agentes biológicos solo se brinda de forma limitada�
• El producto se puede combinar con mascarillas�
•
Garantía y responsabilidad
Consulte las instrucciones de la red nacional de distribución de Optrel para ver la
garantía� Para más información al respecto, póngase en contacto con su distribuidor
de Optrel� La garantía solo afecta a los defectos materiales y de fabricación� En caso de
dañosprovocadosporun usoincorrecto,noautorizadoso noprevistosporelfabricante,
la garantía o responsabilidad dejará de ser válida� Asimismo, la responsabilidad y la
garantía dejarán de ser válidas si se usan piezas distintas a las vendidas por Optrel�
Vida útil prevista
El producto no tiene fecha de vencimiento� El producto se puede usar siempre que no
haya daños visibles o invisibles o se dé algún problema funcional�
Modo de empleo (Quick Start Guide) pág� 3
1� Diadema� Ajuste la diadema de ajuste superior al tamaño de su cabeza� Presione
la perilla de ajuste y gírela hasta que la diadema se ajuste con firmeza pero sin
provocar presión�
2� Distancia de los ojos� Se puede ajustar la distancia entre las lentes de protección y
los ojos soltando las perillas de cierre� Ajuste ambos lados por igual y no la incline�
Después, apriete de nuevo las perillas de cierre�
3� El ángulo de visera se puede ajustar con el botón giratorio�
4� Después de su uso, el producto debe limpiarse y desinfectarse a fondo�
Limpieza, desinfección y mantenimiento
Limpieza manual: quitar la banda de sudor y la banda de confort� Use un paño limpio
humedecido con agua jabonosa para limpiar el visor por dentro y por fuera y permitir
que se seque en un ambiente limpio�
Limpieza de la máquina: retire la banda de sudor y la banda de confort� Seleccione un
programa de limpieza con una temperatura máxima de 70 ° C�
Desinfección manual: limpiando o rociando con un desinfectante disponible en el
mercado�
Desinfección de la máquina: seleccione un programa de desinfección con una
temperatura máxima de 70 ° C�
La desinfección UV es posible�
Mantenimiento: la visera se debe reemplazar si está
- deformado o nublado debido a la alta temperatura
- ha sido rayado o deformado por un impacto o influencia mecánica
- se volvió turbio debido a la influencia química
Almacenamiento
El producto debe limpiarse y desinfectarse a fondo antes de almacenarlo�
Almacenamiento a temperatura ambiente y baja humedad�
Quitar/colocar el visor (pág� 2)
Para quitar la visera:
• Desenroscar las perillas
• Eliminar espaciadores
• Quítate cuatro
Colocación de la visera: en orden inverso�
Especificaciones
(Nos reservamos el derecho a realizar cambios técnicos)
Peso 250 g / 8�82 oz
Material Diadema: polietileno
Visor: policarbonato
Temperatura de funcionamiento – 10°C a + 55°C / 14°F a 131°F
Temperatura de almacenamiento – 20°C a + 80°C / – 4°F a 176°F
Estabilidad de la forma Diadema: hasta 220°C / 428°F
Visor: hasta 137°C / 279°F
Homologaciones EN166
AS/NZS 1337
ANSI OS U5 Z87
ANSI Z87
OS 1 FT EN 166 CE
complies with CSA Z�94�3
Declaración de conformidad
Ver la dirección de Internet en la última página�
Información legal
Este documento cumple con los requisitos de la sección 1�4 del Anexo 2016 del
Reglamento de la UE 2016/425�
Cuerpo notificado
Para información detallada vea la última página�
Español

16
Introdução
Este produto é uma proteção ocular e facial com uma visão clara e destina-se ao uso
por profissionais médicos ou pessoal de serviços de emergência�
Instruções de segurança
Leia atentamente estas instruções de operação antes de usar o equipamento� O uso
incorreto pode colocar em risco a vida e a integridade física e invalidar as reclamações
de garantia contra o fabricante�
Aplicações/ Riscos
O produto oferece uma visão clara e ilimitada do seu paciente� Se a diferença de
umidade / temperatura do ar for alta, o visor pode embaçar, resultando em baixa
visibilidade� Se a faixa da cabeça estiver ajustada incorretamente, existe o risco de o
produto se soltar da cabeça e cair�
Precauções e restrições de proteção
•
Antes da utilização do produto, verifique sempre se o equipamento está completo e
sem danosde transporte� Nuncauseequipamentoque apresentefalhasou danos�
• O utilizador deve estar familiarizado com a utilização correta deste equipamento
de proteção individual�
•
Roupas de proteção apropriadas também devem ser usadas para proteger o
resto do seu corpo�Os materiais em contato com a pele do produto podem causar
reações alérgicas em indivíduos sensíveis�
• Existe o risco de colidir devido ao tamanho maior (cabeça com viseira)�
• Se a faixa da cabeça estiver ajustada incorretamente, existe o risco de o produto
se soltar da cabeça e cair�
• O produto é destinado ao uso por profissionais médicos ou pessoal de serviços
de emergência�
•
O produto protege contra quedas e respingos de líquidos� Isso reduz o risco
de infecção por gotículas� Devido ao seu design, a proteção total contra vírus,
bactérias ou outrosagentesbiológicos é dadaapenas em umaextensão limitada�
• O produto pode ser combinado com máscaras faciais�
•
Garantia e responsabilidade
Consulteas instruções dorepresentante nacionalda Optrelrelativamente àscláusulas
da garantia� Para mais informações a este respeito, contacte o seu revendedor Optrel� A
garantia aplica-se apenas a defeitos de material ede fabrico� A garantia perde a validade
em caso de danos causados por utilização indevida, intervenções não autorizadas
ou utilização não prevista pelo fabricante� Da mesma forma, a responsabilidade e a
garantiaperdem avalidadeemcasodeutilizaçãodepeçasdereposiçãonão vendidas
pelo fabricante�
Vida útil esperada
O produto não tem data de expiração� O produto pode ser usado desde que não haja
danos visíveis ou invisíveis ou problemas de funcionamento�
Como usar (Quick Start Guide) p� 3
1� Fita de cabeça� Regule a fita de ajuste superior para o tamanho da sua cabeça�
Empurre o botão de catraca e rode até a fita de cabeça ficar bem assente, mas
sem pressão�
2� Distância dos olhos� Soltando os botões de bloqueio, a distância entre a lente de
proteção e os olhos pode ser ajustada� Ajuste os dois lados uniformemente e sem
inclinação� Volte a apertar os botões de bloqueio�
3� O ângulo da viseira pode ser ajustado com o botão rotativo�
4� Após o uso, o produto deve ser limpo e desinfetado completamente�
Limpeza, desinfecção e manutenção
Limpeza manual: remova a faixa de suor e a faixa de conforto� Use um pano limpo
umedecido com água e sabão para limpar a viseira por dentro e por fora e deixe secar
em um ambiente limpo�
Limpeza da máquina: Remova a faixa de suor e a faixa de conforto� Selecione um
programa de limpeza com uma temperatura máxima de 70 ° C�
Desinfecção manual: limpando ou pulverizando com um desinfetante disponível no
mercado�
Desinfecção da máquina: Selecione um programa de desinfecção com uma
temperatura máxima de 70 ° C�
Desinfecção UV é possível�
Manutenção: A viseira deve ser substituída se for
- deformado ou nublado devido à alta temperatura
- foi arranhado ou deformado por um choque ou influência mecânica
- ficou nublado devido à influência química
Armazenamento
O produto deve ser limpo e desinfetado completamente antes do armazenamento�
Armazenamento em temperatura ambiente e baixa umidade�
Remoção/instalação da viseira (pp� 2)
Para remover a viseira:
• Desaparafusar os botões
• Remover espaçadores
• Tire quatro
Colocar a viseira: na ordem inversa��
Especificações
(reservamo-nos o direito a fazer alterações técnicas)
Peso 250g / 8,82 oz
Material Faixa para a cabeça: Polietileno
Viseira: Policarbonato
Temperatura de serviço – 10°C a + 55°C / 14°F a 131°F
Temperatura de
armazenamento – 20°C a + 80°C / – 4°F a 176°F
Estabilidade da forma Faixa para a cabeça: até 220°C / 428°F
Viseira: até 137°C / 279°F
Normas EN166
AS/NZS 1337
ANSI OS U5 Z87
ANSI Z87
OS 1 FT EN 166 CE
complies with CSA Z�94�3
Declaração de conformidade
Veja o endereço da Internet na última página�
Informação legal
Este documento está em conformidade com os requisitos do Regulamento UE 2016/425,
seção 1�4, do Anexo II�
Corpo notificado
Para informações detalhadas, consulte a última página�
Português

17
Invoering
Dit product is oog- en gezichtsbescherming met een duidelijk zicht en is bedoeld voor
gebruik door medische professionals of hulpdiensten�
Veiligheidsinstructies
Lees deze bedieningsinstructies zorgvuldig door voordat u de apparatuur gebruikt�
Onjuist gebruik kan levensgevaar en ledematen in gevaar brengen en garantieclaims
ten aanzien van de fabrikant ongeldig maken�
Toepassingen / Risico's
Het product biedt een onbeperkt, duidelijk zicht op uw patiënt� Als het luchtvochtigheid
/ temperatuurverschil hoog is, kan het vizier beslaan, wat resulteert in slecht zicht� Als
de hoofdband verkeerd is ingesteld, bestaat het risico dat het product van het hoofd
losraakt en valt�
Veiligheidsmaatregelen en voorgeschreven gebruik
•
Controleer voordat u dit product gebruikt altijd of het compleet is en er tijdens
transport geen schade is ontstaan� Gebruik nooit defecte of beschadigde
apparatuur�
•
De gebruiker moet vertrouwd zijn met het gebruik van zijn/haar persoonlijke
beschermingsmiddelen�
•
Er moet ook geschikte beschermende kleding worden gedragen om de rest van uw
lichaam te beschermen Materialen die in contact komen met de huid van het product
kunnen bij gevoelige personen allergische reacties veroorzaken�
• Door de grotere maat (kop met vizier) bestaat het risico op stoten�
• Als de hoofdband verkeerd is ingesteld, bestaat het risico dat het product van het
hoofd losraakt en valt�
•
Het productis bedoeldvoorgebruik door medischeprofessionalsof hulpdiensten�
• Het product beschermt tegen vallen en spatten van vloeistoffen� Dit verkleint het
risico op een druppelinfectie� Door het ontwerp wordt volledige bescherming
tegen virussen, bacteriën of andere biologische agentia slechts in beperkte mate
gegeven�
• Het product kan gecombineerd worden met gezichtsmaskers�
•
Verwachte levensduur
Het product heeft geen vervaldatum� Het product kan worden gebruikt zolang er geen
zichtbare of onzichtbare schade of problemen met de werking optreden�
Gebruiksaanwijzing (Quick Start Guide) p� 3
1� Hoofdband� Pas de bovenste instelband aan op de grootte van uw hoofd� Druk de
arrêteerknop in en draai deze tot de hoofdband stevig maar niet te strak vast zit�
2� Afstand tot de ogen� Door losdraaien van de vergrendelknoppen kan de afstand
tussen het vizier en de ogen worden aangepast� Stel beide kanten gelijkmatig en
niet scheef in� Draai de vergrendelknoppen vervolgens weer vast�
3� De hoek van de Vizier kan worden aangepast met behulp van de draaiknop�
4� Na gebruik moet het product grondig worden gereinigd en gedesinfecteerd�
Reiniging, desinfectie en onderhoud
Handmatige reiniging: verwijder zweetband en comfortband� Gebruik een schone
doek die is bevochtigd met een sopje om het vizier van binnen en van buiten schoon te
maken en laat het in een schone omgeving drogen�
Machinereiniging:verwijderzweetbandencomfortband� Kieseenreinigingsprogramma
met een maximale temperatuur van 70 ° C�
Handmatige desinfectie: door af te vegen of te besproeien met een in de handel
verkrijgbaar desinfectiemiddel�
Machinedesinfectie: selecteer een desinfectieprogramma met een maximale
temperatuur van 70 ° C�
UV-desinfectie is mogelijk�
Onderhoud: Het vizier moet worden vervangen als dat zo is
- vervormd of troebel door hoge temperatuur
- is bekrast of vervormd door een schok of mechanische invloed
- werd troebel door chemische invloed
Opslag
Het product moet voor opslag grondig worden gereinigd en gedesinfecteerd� Opslag
bij kamertemperatuur en lage luchtvochtigheid�
Verwijderen / monteren van het vizier (p� 2)
Om het vizier te verwijderen:
• Schroef de knoppen los
• Afstandhouders verwijderen
• Vier opstijgen
Het vizier bevestigen: in omgekeerde volgorde�
Specifications
(We behouden ons het recht voor technische wijzigingen aan te brengen)
Gewicht 250 g / 8,82 oz
Materiaal Hoofdband: Polyethyleen
Vizier: Polycarbonaat
Bedrijfstemperatuur – 10°C tot + 55°C / 14°F tot 131°F
Opslagtemperatuur – 20°C tot + 80°C / – 4°F tot 176°F
Vormstabiliteit Hoofdband: tot max� 220°C / 428°F
Vizier: tot max� 137°C / 279°F
Goedkeuringen EN166
AS/NZS 1337
ANSI OS U5 Z87
ANSI Z87
OS 1 FT EN 166 CE
complies with CSA Z�94�3
Conformiteitsverklaring
Zie het internetadres op de laatste pagina�
Juridische informatie
Dit document voldoet aan de vereisten van paragraaf 1�4 van bijlage 2016 van de
EU-verordening 2016/425�
Aangemelde instantie
Zie de laatste pagina voor gedetailleerde informatie�
Nederlands

18
Esittely
Tämä tuote on silmien ja kasvojen suojaus, jolla on selkeä näkymä, ja se on tarkoitettu
lääketieteen ammattilaisten tai pelastushenkilöstön käyttöön�
Turvaohjeet
Lue nämä käyttöohjeet huolellisesti ennen laitteen käyttöä� Väärä käyttö voi vaarantaa
valmistajan aiheuttamat henkivakuutukset ja takuuvaatimukset�
Käyttö / Riskit
Tuote tarjoaa rajoittamattoman, selkeän kuvan potilaastasi� Jos ilmankosteus /
lämpötilaero on suuri, visiiri voi sumuutua, mikä huonon näkyvyyden� Jos pääpanta
on asetettu väärin, on olemassa vaara, että tuote irtoaa päästä ja putoaa�
Varotoimet ja suojarajoitukset
•
Tarkista aina ennen tuotteen käyttöä, että laite on täydellinen eikä kuljetuksen
aikana ole aiheutunut vaurioita� Älä koskaan käytä viallista tai vahingoittunutta
laitetta�
•
Käyttäjän on oltava perehtynyt henkilökohtaisten suojavarusteidensa oikeaan
käyttöön�
•
Sopiviasuojavaatetuksiaonkäytettävämyösmuunkehonsuojelemiseksi�Tuotteen
ihonkanssa kosketuksiinjoutuvatmateriaalit voivataiheuttaaallergisiareaktioita
herkille henkilöille�
• Suuremman koon (pää visiirillä varustetun) takia on törmäysvaara�
•
Jos pääpanta on asetettu väärin, on olemassa vaara, että tuote irtoaa päästä
ja putoaa�
•
Tuoteon tarkoitettulääketieteenammattilaistentai pelastushenkilöstönkäyttöön�
• Tuote suojaa nesteiden pisaroilta ja roiskeilta� Tämä vähentää pisaroitartunnan
riskiä� Suunnittelusta johtuen täysi suojaus viruksilta, bakteereilta tai muilta
biologisilta tekijöiltä saadaan vain rajoitetusti�
• Tuote voidaan yhdistää kasvonaamioihin�
•
Takuu ja vastuu
Katsooptrelinkansallisenmyyntiorganisaationohjeettakuuehdoille�Jos tarvitsettästä
lisätietoa, ota yhteyttä optrel-jälleenmyyjääsi� Takuu myönnetään vain materiaali-
ja valmistusvirheille� Takuu tai vastuu ei ole enää voimassa, jos vahinko johtuu
asiattomasta käytöstä, luvattomasta interventiosta tai valmistajan määrittämästä
tarkoituksenvastaisesta käytöstä� Vastuu ja takuu eivät myöskään ole voimassa, jos
käytetään muita kuin optrelin myymiä varaosia�
Odotettu elinikä
Tuotteella ei ole viimeistä voimassaolopäivää� Tuotetta voi käyttää niin kauan kuin
näkyviä tai näkymättömiä vaurioita tai toimintahäiriöitä ei ilmene�
Käyttöohje (Quick Start Guide) s� 3
1� Pääpanta� Säädä ylempää säätönauhaa pääsi kokoa vastaavaksi� Työnnä nuppi
sisään ja kierrä, kunnes pääpanta istuu varmasti, mutta ilman painetta�
2� Etäisyys silmistä� Suojalasin ja silmien etäisyyttä voidaan säätää vapauttamalla
lukitusnupit�Säädämolemmatpuoletsamallatavalla,älä kallista�Kiristälukitusnupit
sitten uudelleen�
3� Kvadratuurikulma voidaan säätää kiertonupilla�
4� Käytön jälkeen tuote on puhdistettava ja desinfioitava huolellisesti�
Puhdistus, desinfiointi ja huolto
Manuaalinen puhdistus: Poista hikinauha ja mukavuusnauha� Puhdista visiiri sisä-ja
ulkopuolelta ja anna sen kuivua puhtaassa ympäristössä saippuavedellä kostutetulla
puhtaalla kankaalla�
Koneen puhdistus: Poista hikinauha ja mukavuuspanta� Valitse puhdistusohjelma,
jonka maksimilämpötila on 70 ° C�
Manuaalinen desinfiointi: pyyhkimällä tai suihkuttamalla kaupallisesti saatavalla
desinfiointiaineella�
Koneen desinfiointi: Valitse desinfiointiohjelma, jonka maksimilämpötila on 70 ° C�
UV-desinfiointi on mahdollista�
Huolto: visiiri on vaihdettava, jos se on
- muodonmuutos tai samea korkean lämpötilan vuoksi
- on naarmuuntunut tai muodonmuutos iskun tai mekaanisen vaikutuksen vuoksi
- muuttui sameaksi kemiallisen vaikutuksen vuoksi
Säilytys
Tuote on puhdistettava ja desinfioitava huolellisesti ennen varastointia� Varastointi
huoneenlämmössä ja alhaisessa kosteudessa�
Visiirin irrotus/asennus (p� 2)
Visiirin poistaminen:
• Kierrä nupit irti
• Poista välikappaleet
• Ota neljä
Visiirin kiinnittäminen: päinvastaisessa järjestyksessä�
Tekniset tiedot
(Pidätämme oikeuden tehdä teknisiä muutoksia)
Paino 250 g / 8,82 unssia
Materiaali Pääpanta: Polyeteeniä
Visiiri: Polykarbonaatti
Käyttölämpötila – 10°C - + 55°C / 14°F - 131°F
Säilytyslämpötila – 20°C - + 80°C / – 4°F - 176°F
Muodon vakaus Pääpanta: enintään 220°C / 428°F
Visiiri: enintään 137°C / 279°F
Hyväksynnät EN166
AS/NZS 1337
ANSI OS U5 Z87
ANSI Z87
OS 1 FT EN 166 CE
complies with CSA Z�94�3
Vaatimustenmukaisuusvakuutus
Katso Internet-osoite viimeiseltä sivulta�
Oikeudelliset tiedot
Tämä asiakirja on EU-asetuksen 2016/425 liitteen II kohdan 1�4 vaatimusten mukainen�
Ilmoitettu laitos
Lisätietoja on viimeisellä sivulla�
Suomi

19
Introduktion
Dette produkt er øjen- og ansigtsbeskyttelse med en klar oversigt og er beregnet til
brug af medicinske fagfolk eller nødhjælpspersonale�
Sikkerhedsanvisninger
Læs disse betjeningsvejledninger nøje, inden du bruger udstyret� Ukorrekt brug kan
true livs- og lemmer og ugyldige garantikrav mod fabrikanten�
Applikationer / Risici
Produktet giver et ubegrænset, klart overblik over din patient� Hvis luftfugtigheden /
temperaturforskellen er høj, kan visiret tåge op, hvilket resulterer i dårlig synlighed� Hvis
pandebåndet er indstillet forkert, er der en risiko for, at produktet løsnes fra hovedet
og falder�
Forholdsregler & beskyttende restriktioner
•
Før du bruger dette produkt, skal du altid kontrollere, at udstyret er komplet, og at der
ikkeeropstået skader undertransport�Brug aldrigdefekteller beskadigetudstyr�
•
Brugeren skal være fortrolig med anvendelse af de korrekte personlige
værnemidler�
• Der skal også bæres passende beskyttelsesbeklædning for at beskytte resten af
dinkrop�Materialer,derer i kontakt medproduktets hud, kan forårsage allergiske
reaktioner hos følsomme personer�
• Der er risiko for stød på grund af den større størrelse (hoved med visir)�
• Hvis pandebåndet er indstillet forkert, er der en risiko for, at produktet løsnes fra
hovedet og falder�
• Produktet er beregnet til brug af medicinske fagfolk eller nødhjælpspersonale�
• Produktet beskytter mod dråber og sprøjt med væsker� Dette reducerer risikoen
for infektion med dråber� På grund af dens design gives fuld beskyttelse mod vira,
bakterier eller andre biologiske midler kun i begrænset omfang�
• Produktet kan kombineres med ansigtsmasker�
Forventet levetid
Produktet har ingen udløbsdato� Produktet kan anvendes så længe, ingen synlige eller
usynlige skader eller funktionelle problemer opstår�
Hvordan man bruger (Quick Start Guide) s� 3
1� Hovedrem� Juster den øverste justering rem til størrelsen på dit hoved� Skub
skraldeknap og drej til hovedremmen passer godt, men uden at trykke�
2� Afstand fra øjnene� Ved at slippe låseknapperne kan afstanden mellem linsen og
øjne justeres� Juster ligeligt i begge sider og undlad at vippe� Derefter spændes
låseknapperne igen�
3� Visirvinkel kan justeres med drejeknap�
4� Efter brug skal produktet rengøres og desinficeres grundigt�
Rengøring, desinfektion og vedligeholdelse
Manuel rengøring: Fjern svedbånd og komfortbånd� Brug en ren klud fugtet med
sæbevand til at rengøre visiret indvendigt og udvendigt og lad det tørre i et rent miljø�
Maskinrensning: Fjern svedbånd og komfortbånd� Vælg et rengøringsprogram med
en maksimal temperatur på 70 ° C�
Manuel desinfektion: ved at tørre eller sprøjte med et kommercielt tilgængeligt
desinfektionsmiddel�
Maskin desinfektion: Vælg et desinfektionsprogram med en maksimal temperatur
på 70 ° C�
UV-desinfektion er mulig�
Vedligeholdelse: Visiret skal udskiftes, hvis det er tilfældet
- deformeret eller overskyet på grund af høj temperatur
- er blevet ridset eller deformeret af et stød eller mekanisk indflydelse
- blev overskyet på grund af kemisk påvirkning
Opbevaring
Produktet skal rengøres og desinficeres grundigt inden opbevaring� Opbevaring ved
stuetemperatur og lav luftfugtighed�
Afmontering / montering af visir (s� 2)
Sådanfjernesvisiret:
• Fjern skruerne
• Fjern afstandsstykker
• Start fire
Montering af visiret: i omvendt rækkefølge�
Specifikationer
(Vi forbeholder os retten til at foretage tekniske ændringer)
Vægt 250 g / 8,82 oz
Materiale Pandebånd: Polyethylen
Visir: Polykarbonat
Driftstemperatur – 10°C til + 55°C / 14°F til 131°F
Opbevaringstemperatur – 20°C til + 80°C / – 4°F til 176°F
Formstabilitet Pandebånd: op til 220°C / 428°F
Visir: op til 137°C / 279°F
Godkendelser EN166
AS/NZS 1337
ANSI OS U5 Z87
ANSI Z87
OS 1 FT EN 166 CE
complies with CSA Z�94�3
Overensstemmelseserklæring
Se internetadressen på den sidste side�
Juridiske oplysninger
Dette dokument opfylder kravene i afsnit 1�4 i bilag 2016 til EU-forordning 2016/425�
Bemyndiget organ
Se den sidste side for detaljerede oplysninger�
Dansk

20
Introduksjon
Dette produktet er øye- og ansiktsbeskyttelse med oversikt og er ment for bruk av
medisinsk fagpersonell eller nødetatspersonell�
Sikkerhetsinformasjon
Les denne bruksanvisningen nøye før du bruker utstyret� Feil bruk kan true livs- og
lemmer og ugyldige garantikrav mot produsenten�
Bruk / Risikoer
Produktet tilbyr et ubegrenset, oversikt over pasienten� Hvis luftfuktigheten /
temperaturforskjellen er høy, kan visiret tåke, noe som resulterer i dårlig sikt� Hvis
pannebåndet er satt feil, er det fare for at produktet løsner seg fra hodet og faller�
Forholdsregler og beskyttelsesbegrensninger
• Før du bruker produktet, må du alltid kontrollere at utstyret er komplett og at det
ikke oppsto skade under transporten� Bruk aldri mangelfullt eller skadet utstyr�
• Brukeren må være vite hvordan det personlige verneutstyret skal brukes korrekt�
•
Passende beskyttelsesklær må også brukes for å beskytte resten av kroppen
din� Materialer i kontakt med hudens produkt kan forårsake allergiske reaksjoner
hos sensitive personer�
• Det er fare for støt på grunn av større størrelse (hode med visir)�
•
Hvis pannebåndet er satt feil, er det fare for at produktet løsner seg fra hodet
og faller�
•
Produktet er beregnet for bruk av medisinsk fagpersonell eller personell i
nødetatene�
• Produktet beskytter mot dråper og sprut av væsker� Dette reduserer risikoen for
smitt avdråper�På grunnavdens utforminggis full beskyttelsemotvirus,bakterier
eller andre biologiske midler bare i begrenset grad�
• Produktet kan kombineres med ansiktsmasker�
•
Garanti og ansvar
Vennligst se instruksjonene til den nasjonale salgsorganisasjonen for optrels
garantibetingelser� For ytterligere informasjon i denne forbindelse, vennligst kontakt
din optrel-forhandler� Garantien dekker kun material- og produksjonsfeil� Dersom
skader skyldes feil bruk, uautorisert intervensjon eller bruk som ikke er beregnet av
produsenten, bortfaller garantien og ansvaret� På samme måte bortfaller ansvar og
garanti dersom det benyttes andre reservedelerenn dem som selges av optrel�
Forventet levetid
Produktet har ingen utløpsdato� Produktet kan brukes så lenge det ikke har synlige eller
usynlige skader eller funksjonsproblemer�
Hvordan bruk hjelmen (Quick Start Guide) s� 3
1� Hodebånd� Juster det øvre justeringsbåndet i forhold til størrelsen på hodet ditt�
Skyv inn sperreknappen og vri inntil hodebåndet sitter godt uten å trykke�
2� Avstand fra øynene� Ved å løsne låseknappene, kan avstanden mellom
beskyttelsesglasset og øynene justeres� Juster begge sider likt, pass på at det
ikke blir skjevt� Deretter lukkes låseknappene igjen�
3� Visir vinkel kan justeres med rotasjonsknappen�
4� Etter bruk må produktet rengjøres og desinfiseres grundig�
Rengjøring, desinfeksjon og vedlikehold
Manuell rengjøring: fjern svettebånd og komfortbånd� Bruk en ren klut fuktet med
såpevann for å rengjøre visiret inne og ute og la det tørke i et rent miljø�
Maskinrensing:Fjernsvettebåndog komfortbånd�Velgetrengjøringsprogrammed en
maksimumstemperatur på 70 ° C�
Manuell desinfisering: ved å tørke eller sprøyt med et kommersielt tilgjengelig
desinfeksjonsmiddel�
Maskin desinfisering: Velg et desinfeksjonsprogram med en maksimumstemperatur
på 70 ° C�
UV-desinfisering er mulig�
Vedlikehold: Visiret skal skiftes ut hvis det er det
- deformert eller overskyet på grunn av høy temperatur
- har blitt riper eller deformert av et sjokk eller mekanisk påvirkning
- ble overskyet på grunn av kjemisk påvirkning
Oppbevaring
Produktet må rengjøres og desinfiseres grundig før lagring� Oppbevaring ved
romtemperatur og lav luftfuktighet�
�
Fjerning/montering av visir (p� 2)
Slikfjernerduvisiret:
• Skru ut knottene
• Fjern avstandsstykker
• Ta av fire
Montering av visir:
Spesifikasjoner
(Vi forbeholder oss retten til å gjøre tekniske endringer)
Vekt 250 g / 8,82 oz
Materiale Pannebånd: Polyetylen
Visir: Polycarbonate
Driftstemperatur – 10°C til + 55°C / 14°F til 131°F
Lagringstemperatur – 20°C til + 80°C / – 4°F til176°F
Formstabilitet Pannebånd: opptil 220°C / 428°F
Visir: opptil 137°C / 279°F
Godkjenninger EN166
AS/NZS 1337
ANSI OS U5 Z87
ANSI Z87
OS 1 FT EN 166 CE
complies with CSA Z�94�3
Samsvarserklæring
Se Internett-adressen på den siste siden�
Juridisk informasjon
Dette dokumentet oppfyller kravene i EU-forordning 2016/425, avsnitt 1�4 i vedlegg II�
Bemyndiget organ
For detaljerte opplysninger, se siste side�
Norsk
This manual suits for next models
1
Table of contents
Languages:
Other optrel Protection Device manuals