optris Outdoor protective housing User manual

Operator’s Manual
optris®Outdoor protective housing
for PI/Xi camera, CSlaser LT, CTlaser LT, USB server and
industrial PIF

Optris GmbH
Ferdinand-Buisson-Str. 14
13127 Berlin
Germany
Tel.: +49 30 500 197-0
Fax: +49 30 500 197-10
Internet: www.optris.global

Table of Contents 3-
Table of Contents
Table of Contents .............................................................................................................................................3
1General Information.................................................................................................................................5
1.1 Description ....................................................................................................................................... 5
1.2 Warranty........................................................................................................................................... 6
1.3 Scope of Supply ............................................................................................................................... 6
2Technical Data..........................................................................................................................................7
2.1 General Specifications ..................................................................................................................... 7
2.2 Dimensions....................................................................................................................................... 8
2.3 Electrical Connections.................................................................................................................... 10
2.4 Air Purge Laminar .......................................................................................................................... 11
2.5 Protective window .......................................................................................................................... 11
3Installation ..............................................................................................................................................12
3.1 Electrical installation (w/o visible camera) [hier Variante A]........................................................... 12

-4 -
3.2 Installation (with visible camera) [hier Variante B] ......................................................................... 14
3.3 Mounting of the USB server........................................................................................................... 14
3.4 Mounting of the PI camera............................................................................................................. 16
3.5 Mounting of the Xi camera ............................................................................................................. 20
3.6 Mounting of CSlaser/CTlaser......................................................................................................... 21
4Accessoires............................................................................................................................................23
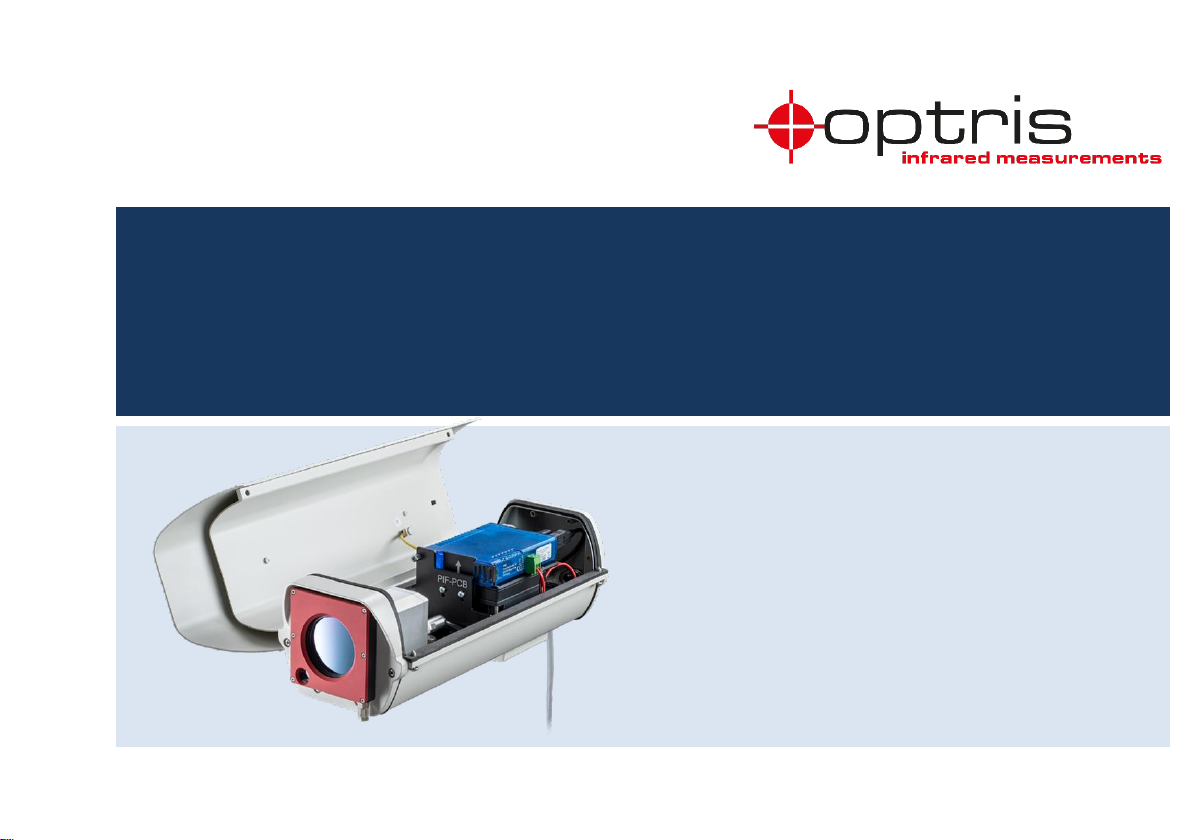
4.1 Industrial Process Interface (PIF)................................................................................................... 23
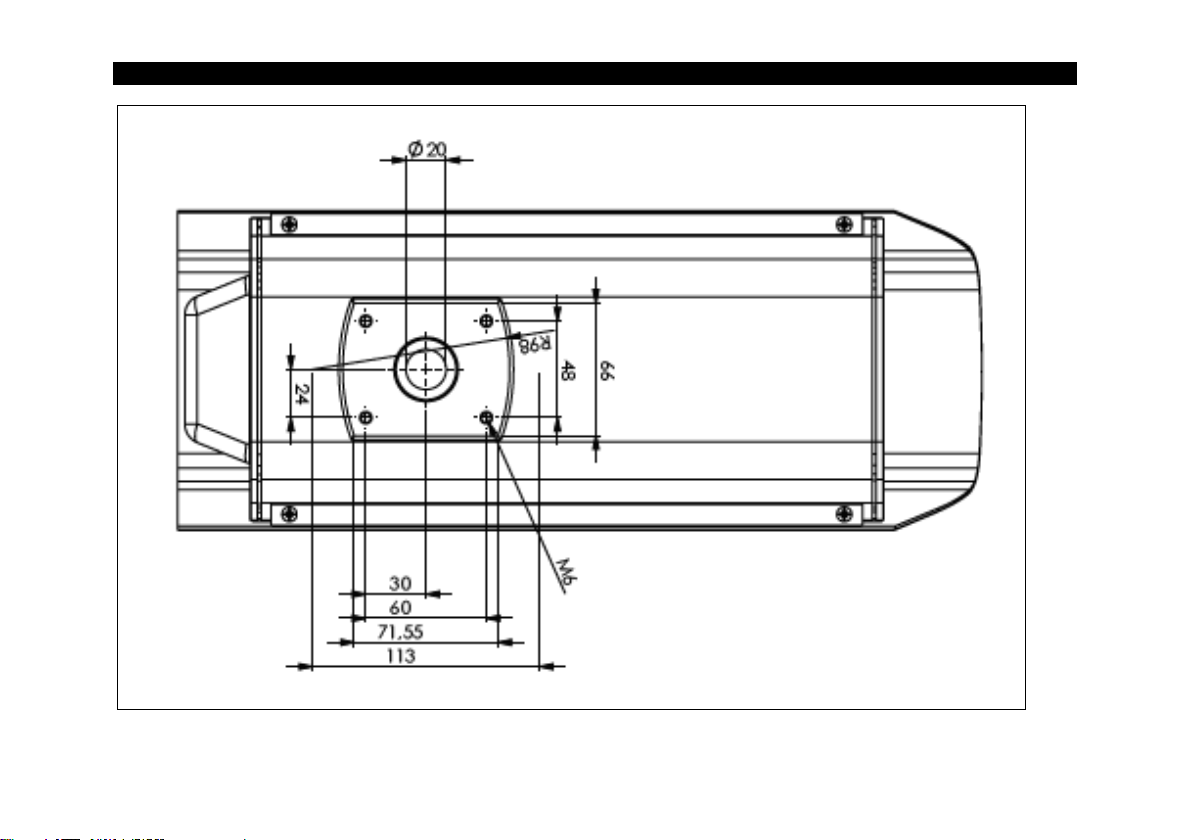
4.2 Wall mount ..................................................................................................................................... 24
5Replacement of protective foil / protective window...........................................................................25
5.1 Disassembling air purge laminar.................................................................................................... 25
5.2 Removing and inserting the protective foil..................................................................................... 27
5.3 Cut the protective foil...................................................................................................................... 29
5.4 Assembly protective window.......................................................................................................... 31
Appendix A - Declaration of Conformity ......................................................................................................32

General Information 5-
1 General Information
1.1 Description
Thank you for choosing the optris®Outdoor protective housing.
The outdoor protective housing is an ideal complement for the PI/Xi camera, CSlaser LT, CTlaser LT and the
USB server for applications with additional influences of different kinds. It protects the devices among things
like dirt, dust, and moisture. The outdoor protective housing can be used for any PI camera (lenses up to
90° FOV) and for CSlaser LT and CTlaser LT. The integrated heating and the blower result in an extended
operating temperature. An optional visual camera is also available and can be also integrated to your process.
•Avoid abrupt changes of the ambient temperature.
•Avoid mechanical violence –this may destroy the system (expiry of warranty).
•If you have any problems or questions, please contact our service department.
Read the manual carefully before the initial start-up. The producer reserves the right to change
the herein described specifications in case of technical advance of the product.

-6 -
1.2 Warranty
Each single product passes through a quality process. Nevertheless, if failures occur please contact the
customer service at once. The warranty period covers 24 months starting on the delivery date. After the
warranty is expired the manufacturer guarantees additional 6 months warranty for all repaired or substituted
product components. Warranty does not apply to damages, which result from misuse or neglect. The
manufacturer is not liable for consequential damage or in case of a non-intended use of the product.
If a failure occurs during the warranty period the product will be replaced, calibrated or repaired without further
charges. The freight costs will be paid by the sender. The manufacturer reserves the right to exchange
components of the product instead of repairing it. If the failure results from misuse or neglect the user has to
pay for the repair. In that case you may ask for a cost estimate beforehand.
1.3 Scope of Supply
▪Protection housing with integrated heating incl. protection window or foil window and air purge laminar
▪Optional: visual camera with installation description
▪Operators manual

Technical Data 7-
2 Technical Data
2.1 General Specifications
Temperature range
-40 °C … +50 °C
Heating
PTC heater (automatically starting at T < 15 °C) / fan for homogeneous
temperature distribution 1)
Power supply
24 V DC
Power
70 W
Current draw
3 A (short term: 6 A)
Protective window 2)
Germanium (Ge), zinc sulfide (ZnS), Borofloat or foil
Environmental rating
IP66
Air purge laminar
Integrated
Air pressure
Absolute pressure 1,1 - 8 bar at 20 -100 l/min
Max. FOV
90 ° (HFOV)
Integrated additional components
USB-Server Gigabit / Industrial Process interface (PIF)
Material
Aluminum
Weight
2 kg (with wall mount 2,5 kg)
1) The fan is switched parallel to the heater. When the heater starts, the fan will also run.
2) There is no protection window for the Xi version

-8 -
2.2 Dimensions
Figure 1: Dimensions [mm] with wall mount

Technical Data 9-
Figure 2: Dimensions for wall mount

-10 -
2.3 Electrical Connections
Figure 3: Connection circuit board
Power supply
Industrial PIF
and USB server

Technical Data 11-
2.4 Air Purge Laminar
The lens must be always kept clean from dust, smoke, fumes, and other contaminants in order to avoid reading
errors. These effects can be reduced by using an air purge laminar. Make sure to use oil-free, technically clean
air only.
The needed amount of air (approx. 20...100 l/min.) depends on the application and the installation
conditions on-site. Pipe connection of air purge laminar is 6x4 mm.
2.5 Protective window
Protective window
Description
Spectral range
Transmission 1)
Germanium
Protective window (50,8 x 3 mm/ Ge) for PI 450i G7, 640i G7
7,9 µm
0.96
Protective window (50,8 x 3 mm/ Ge) for PI 400i, 450i, 640i
8-14 µm
0.92
Zinc sulfide
Protective window (50,8 x 3 mm/ ZnS) for PI 450i G7, 640i G7
7,9 µm
0.93
Protective window (50,8 x 3 mm/ ZnS) for PI 400i, 450i, 640i
8-14 µm
0.91
Protective window (50,8 x 3 mm/ ZnS) for LT models of CTlaser-, CSlaser serie
8-14 µm
0,91
Borofloat
Protective window (50,8 x 3 mm/ Borofloat 33) for PI 1M, 08M, 05M
0,85-1,1 µm, 780-820 nm,
500-540 nm
0.92
1) The displayed values are standard values and can vary between different delivery units.
When using the foil [part number: ACOPHSF], the transmission must be set on 0.85 (deviations possible).

-12 -
3 Installation
3.1 Electrical installation (w/o visible camera)
Loosen the two screws and open the outdoor protective housing, as shown in Figure 4.
Figure 4: Opening the housing
Inside the protective housing is the electronic circuit board, where all loads are connected (see Figure 3). The
heating element and the fan are already integrated and connected. To supply the outdoor protective housing

Installation 13-
with voltage, you must connect a 24 V line. This is connected to the marked side of the board. Observe the
correct polarity and ensure that no voltage is present. The USB server and the industrial PIF are connected to
the board as shown and are supplied by 24 V.
To get the cables into the housing, you must loosen the two cable glands, as shown in Figure 6. On the left
side is a cable gland with 8 mm sealing insert and on the right is a cable gland with two 6 mm sealing inserts.
It is recommended to pull the Ethernet cable or the USB cable through the 8 mm sealing insert. The PIF cable
and the 24 V cable are passed through the two 6 mm sealing inserts.
Figure 5: Cable glands on the backside of the outdoor
protective housing
Cable gland 1
Cable gland 2
1 x 8 mm sealing insert
2 x 6 mm sealing insert
For Ethernet or USB
cable
For PIF cable and
24 V line
To get the Ethernet cable with a plug through the opening, you have to cut the rubber insert.

-14 -
3.2 Installation (with visible camera) [hier Variante B]
Connect the network cable to a PoE
3.3 Mounting of the USB server
Insert the USB server at a slanted angle to the designated disk (Figure 6). If necessary, remove the clip from
the USB server (Figure 7) and turn the USB server (Figure 6) until the clip is locked into the bracket (Figure 8).
Figure 6: Insertion of the USB server into the provided board
Figure 7: USB server clip
Figure 8: USB server holding plate

-18 -
Step 3: Mounting the PI cameras
Figure 12: PI 400i/ 450i/ 640i/ 1M/ 08M/
05M attachment
Mount the PI 400i/ 450i/ 640i/ 1M/ 08M/ 05M to the mounting plate using the supplied 1/4 x 3/8 UNC inch
screw and a washer DIN125A-6,4 A2 (Figure 12).
After the camera is fully assembled, the mounting plate can be attached back to the outdoor protective
housing with the provided screw.

Installation 19-
Figure 13: Fully assembled PI camera on mounting plate
Figure 14: Fully assembled PI camera in outdoor protective housing

-20 -
3.5 Mounting of the Xi camera
Loosen the mounting nut and mounting bracket from the Xi camera. Now screw the camera into the provided
adapter plate. For an exact positioning of the camera, the camera can also be attached by turning the clamping
ring.
Figure 15: Xi camera mounted in adapter plate
Figure 16: Fully assembled Xi camera in outdoor protective housing
Other manuals for Outdoor protective housing
1
Table of contents
Other optris Camera Accessories manuals