Opvimus ME-200C User manual


9I327 16/10/2018 V3.2.000

MD-30C version 3.2.000
3
Microphone desk and
voice alarm fireman's panel
ME-200C
Table of contents
1. INTRODUCTION ................................................................................................................................................................................ 4
2. FRONT VIEW..................................................................................................................................................................................... 4
3. REAR VIEW........................................................................................................................................................................................ 6
4. CONFIGURATION.............................................................................................................................................................................. 7
5. CONNECTION .................................................................................................................................................................................... 8
5.1. Powe r suppl y................................................................................................................................................................... 8
5.2. Audio and CAN bus connection....................................................................................................................................... 8
5.2.1. CAN Bus and audio conne ction be twee n ME-200C a nd COMPACT uni t ...................................................... 9
5.2.2. CAN Bus and audio conne ction be twee n se veral ME-200C.......................................................................... 9
5.2.3. Conne cti on be twee n ME-200C a nd COMPACT-E e xpansion uni t............................................................... 10
6. COMMISSIONING THE UNIT........................................................................................................................................................... 11
7. WORK MODES................................................................................................................................................................................ 11
8. NORMAL MODE OPERATIONS ....................................................................................................................................................... 11
8.1. Sendin g a li ve voi ce ann oun ce ment.............................................................................................................................. 11
8.2. Re pea t fu n ction ............................................................................................................................................................. 11
9. OPERATIONS IN EMERGENCY MODE............................................................................................................................................. 12
9.1. Entering the Emergency Mode...................................................................................................................................... 12
9.2. Activatinga WARNINGmessage................................................................................................................................... 12
9.3. Activatingan EVACUATION message............................................................................................................................ 12
9.4. Sending a live voice message in Emergency Mode....................................................................................................... 12
9.5. Repeatfunction in Emergency Mode............................................................................................................................ 12
9.6. Exi tin g the Eme rgen cy Mode ........................................................................................................................................ 12
10. SYSTEM ALARMS ............................................................................................................................................................................ 13
11. DIMENSIONS................................................................................................................................................................................... 13
12. TECHNICAL CHARACTERISTICS ....................................................................................................................................................... 14
13. SOFTWARE AND FIRMWARE VERSIONS........................................................................................................................................ 14
14. DOCUMENT VERSION TRACKING................................................................................................................................................... 14
15. GUARANTEE.................................................................................................................................................................................... 15
WARNING. This is a Class A unit. In a domestic environment this unit may cause radio interferences. In this case the user
must take the necessary precautions.

MD-30C version 3.2.000
4
Microphone desk and
voice alarm fireman's panel
ME-200C
1. INTRODUCTION
Microphonedeskand voice alarm fireman’s panel withCAN Bus communications for COMPACT Systems.
As a mi cro phone console, i t allows the user to s end live messages and re petitions to predetermined zones. Asa voicealarm panel
allows the remote activation of warning and evacuationmessageshousedinthe COMPACT matrix, as well as to launch live an-
nouncements, to a group of preset zones.
Access to the emergency mode is protected by a key switch.
Principal characteristics:
•Activation of emergency mode by key.
•WARNING Message activation button.
•EVACUATION Message activation button.
•Emergency mode exit button.
•Dynamic microphone.
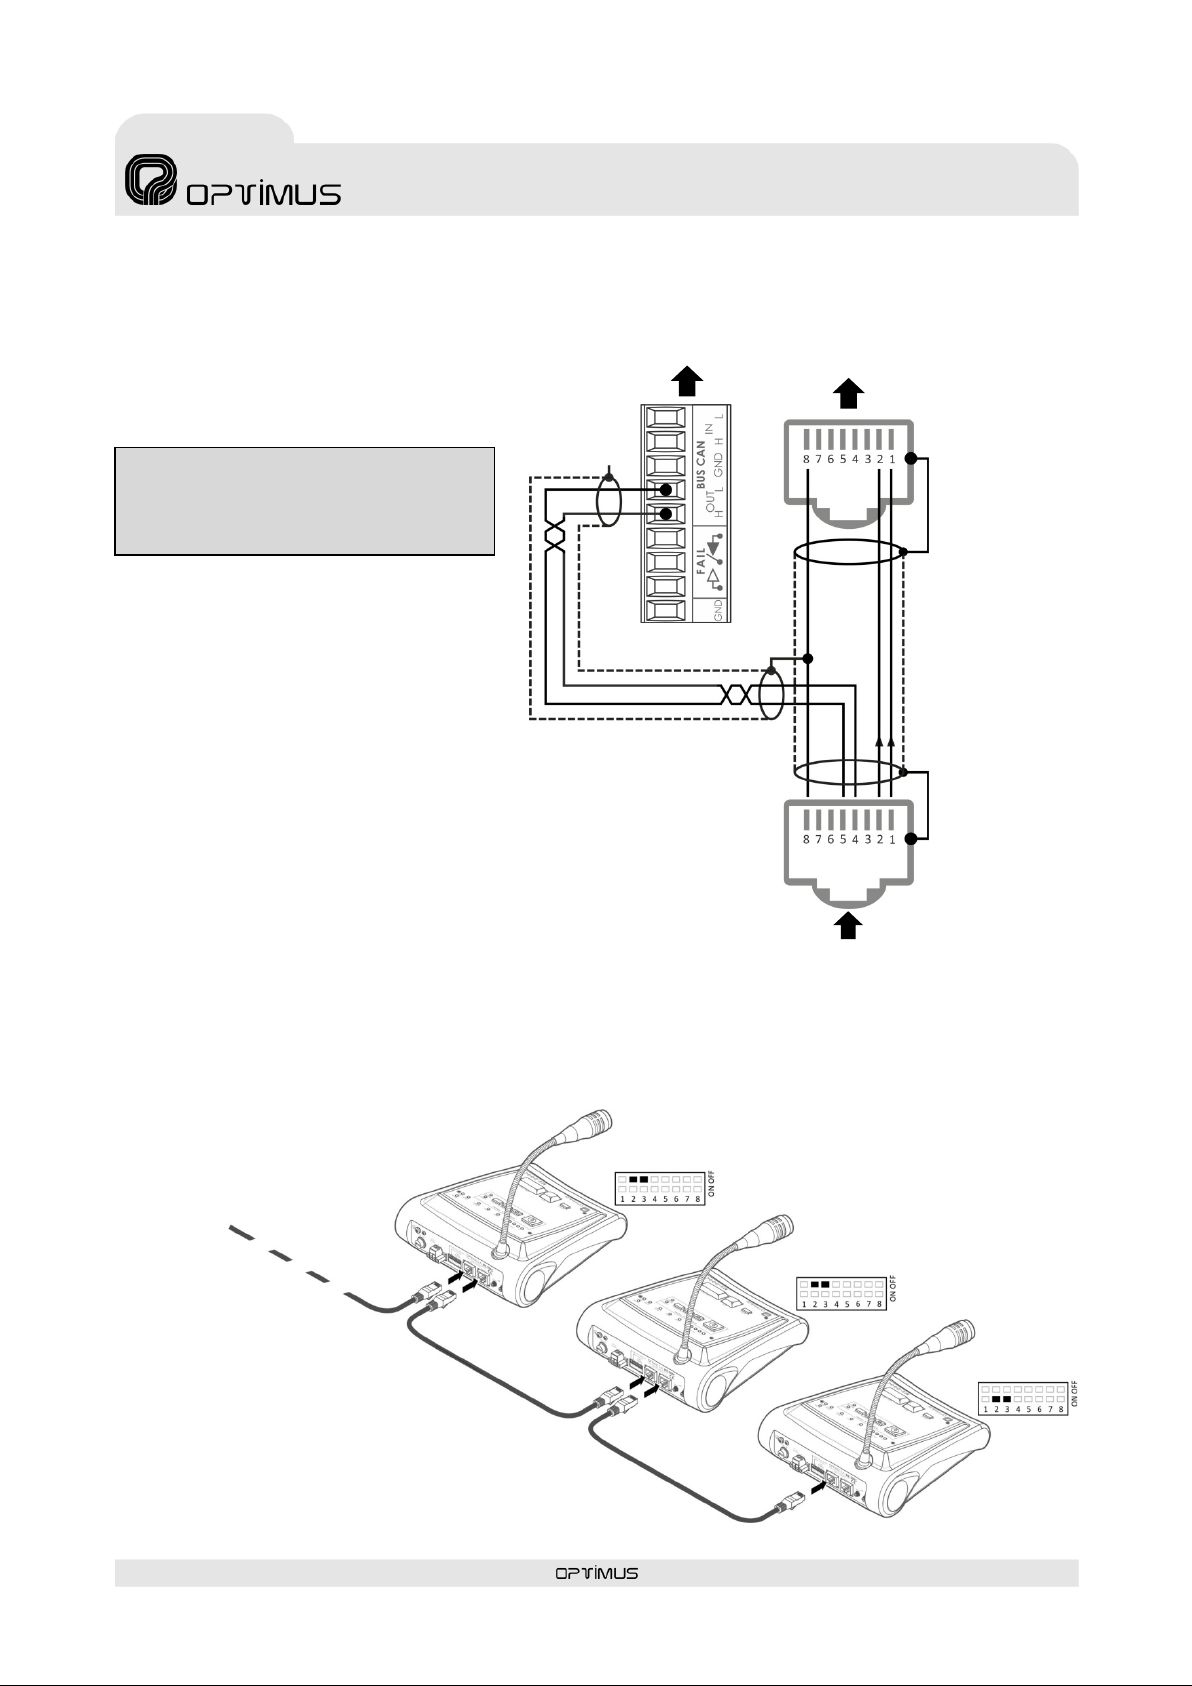
•Communication withthe COMPACT audio matrix via CAN
bus.
•Input &output RJ45 connectors foraudioa nd commu ni-
cation signals.
•Warning and Evacuationpre-recorded messages housed
in the COMPACT unit.
•Announcements with or without a pre-announcement
tone and final tone (Gong).
•3 or 4 tones configurable Gong.
•Repeat Key, for repetition of the last live voicemessage.
•Speech filter.
•Compressor.
•GONG volume adjustment.
•Microphone volume adjustment.
•Capsule surveillance.
•Internal status surveillance.
•Genericfault, internal error and microphone capsule
error or communication error with audio matrix LEDs in-
dicators.
•Acoustic alarm indicator.
•Microphone audio level indicator.
•Powered by 24V DC.
•Eve ry COMPACT ma tri x un it allows connecting 16 units of
ME-200C microphone desks.
2. FRONT VIEW
(1) Microphone
(2) EMERGENCY LED. Lights up when the emergencymode is
acti vated from the desk or from any other element of the
system. The LED remains illuminated while the system is in
Emergency Mode.
(3) Lock and Key to access the EMERGENCY MODE. Swi tches
to Emergency Mode. If a ctivated, the LOGGED LED lights up
and the WARNING, EVACUATION and RESET emergency
buttons become operative.
After60 seconds without anyoperation from the desk (this
time canbe modified bythe CallPoint software),theLOGGED
LED goes off and theemergencybuttons of the microphone
des k a re no longer operative, beingnecessary to activate the
keyagain to operate with the microphone desk.
Includes two keys.
(4) WARNING push-button. Activate the warning message.
Incorporates a push-button ON indicator light.
(5) EVACUATION push-button. Activates the evacuation
message. Incorporates a push-button ON indicator light.
(6) RESET push-button. End Emergency Mode.
(7) REPEAT Key. Keyfor repeatingthe last live voice message
that was sent.
(8) TALK Key. Is used to send live voice announcements. It
must remain pressed while talking.
(9) GONG+TALK Key.Is used to send live voice
a nnouncement precededbya gong.It mustremain pressed
while talking.

MD-30C version 3.2.000
5
Microphone desk and
voice alarm fireman's panel
ME-200C
(10) GENERIC FAULT indicator.Sys te m a larm indicator.
(11) LOGGED LED.Indicates that the Emergency Mode
has beenactivatedfromthe microphonedeskitself through
the emergencykey.The system is in emergency mode and
the microphone desk buttons are operative.
(12) CPU FAULT LED. Indicates internal error of the
application.
(13) POWER LED. Indicates that power is applied to the
paging desk.
(14) LOCAL FAULT LED. Indicatesmicrophone ca psul e error
or communication error with audio matrix.
(15) TALK / REPEAT LED. Illuminates when TALK or
GONG+TALK is pressed, indicating that you can begin
speaking. When theREPEATkeyispressed,it indicates that
the repeat message is playing.
(16) GONG LED. When illuminated, it indicates that the
paging desk is generating the GONG.
(17) BUSY LED. When lit, it indicates that the system is bus y.
(18) MIC LEVEL LEDs. Theyindicate the audio level of the
microphone orthe repeatmessagethat is playing. The LED
ma rke d as Peak indicates that the signal is saturated. This LED
should never light up.
Figure 1

MD-30C version 3.2.000
6
Microphone desk and
voice alarm fireman's panel
ME-200C
3. REAR VIEW
(1) Ground connection.
(2) Power supply fuse (0.5A).
(3) 24 VDC Power supply input (see section 5.1.).
(4) Configuration DIP switches (see section 4).
DIP switch 1. RJ45 SHLD-GND LINK. Allows separating the PIN
8 and theshield of the RJ45 connectors from the ME-200C
internal ground (GND).
DIP switches 2 and 3. BUS CAN END. Co nfi gure DIP s wi tches
2 and 3 to indicatethe positiononthe CAN bus occupied by
the ME-200C(end elementorintermediate element). If the
microphone desk is the final bus element, set these DIP
s wi tches to ON position. Ifit is an intermediate element, set
them OFF.
DIP switches 5, 6, 7 and 8. CAN ADDRESS. The microphone
deskcommunicates with the COMPACT system through a
CAN bus.Each ME-200Cconnectedto the CAN bus must have
a di fferent communication a ddress. Th ese DIP switches allow
you to assign this address.
(5) INPUT and (6) OUTPUT connectors.
RJ45 Connectors.Theyare used to connectthe equipment to
the COMPACT s ys te m. Theytransmitand receive the audio
and CAN data signals.
To connect them follow the section 5.2. Audio and CAN bus
connection.
The combination of the I NPUT and OUTPUT connecto rs a llow
the connection ofseveral ME-200C mi crophone desks (up to
a maximumof16) forming a BUS between elements. See
s e cti on 5.2.2. CAN Bus and audio connection between several
ME-200C.
(7) GONG volume.
(8) Microphone volume.
Figure 2

MD-30C version 3.2.000
7
Microphone desk and
voice alarm fireman's panel
ME-200C
4. CONFIGURATION
Use the DIP switches on the back of the microphone to configure it:
DIP switch 1. RJ45 SHLD-GND LINK. Al lows separating the PIN 8 and the s hield of the RJ45 connectors from the ME-200C internal
ground (GND).
DIP switches 2 and 3. BUS CAN END. Configure DIP switches2 and3to indicate thepositiononthe CAN bus occupied by the ME-
200C (end element or intermediate element). If the microphone desk is the final bus element, set these DIP switches to ON. If i t is
an intermediate element, set them OFF.
DIP switch 4. No used.
DIP switches 5, 6, 7 and 8. CAN ADDRESS. The microphone desk communicates with the COMPACT system through a CAN bus.
Ea ch ME-200C connectedto the CAN bus musthave a different communication address. Assign an address between 0 and 15.
CONNECTION TO GND
OF PIN 8 AND SHIELD OF
RJ45 CONNECTORS
BUS CAN END
ON/OFF
BUS CAN
ADDRESS
CONNECTED
NOT CONNECTED
END POSITION.
BUS CAN END: ON
INTERMEDIATE POSITION.
BUS CAN END: OFF
*
FACTORY SETTINGS
*
*
*

MD-30C version 3.2.000
8
Microphone desk and
voice alarm fireman's panel
ME-200C
5. CONNECTION
5.1.Power supply
The microphone desk should be powered at 24VDC through the DC IN 24V terminal strip on the back plate.
5.2.Audio and CAN bus connection
Through the RJ45 INPUTand OUTPUTconnectors, the console transmits and receives CAN communicationandaudio signals to the
COMPACT system. For connection use RJ45 connectors with metal housing and STP CAT 5 cable.
Pin 1: AUDIO H (HOT)
Pin 2: AUDIO C (COLD)
Pin 3: Not us ed
Pin 4: CAN H
Pin 5: CAN L
Pin 6: Not us ed
Pin 7: Not us ed
Pin 8:
Metal Shield:
24V DC
POWER SUPPLY
I924UP
(Not included)
GND
DIP switch 1
Figure 3
Figure 4

MD-30C version 3.2.000
9
Microphone desk and
voice alarm fireman's panel
ME-200C
5.2.1. CAN Bus and audio connection between ME-200C and COMPACT unit
Figure 5 shows the most common connection
between an ME-200C and the COMPACT audio
matrix with the UMX-EA3 input card. To facilitate
the connection it is recommended to use an
Optimus Z-52A patch panel or similar.
5.2.2. CAN Bus and audio connection between several ME-200C
Use the INPUT and OUTPUT connectors to connect
various (up to a maximum of 16), forming a BUS
between elements.
Figure 5
Figure 6
CAN End
termination = ON
CAN End
termination = OFF
CAN End
termination = OFF
(RJ45 Connector
front view)
To UMX-EA3 card
To COMPACT unit
From RJ45 OUTPUT
ME-200C
(RJ45 Connector
front view)
(Not connected)
ATTENTION: For the connection of the CAN bus
itis recommendedto use a shielded twisted
pair AWG24 cable.

MD-30C version 3.2.000
10
Microphone desk and
voice alarm fireman's panel
ME-200C
5.2.3. Connection betweenME-200C and COMPACT-E expansion unit
The CAN communicationspeedof the ME-200C is 33.3
kbi t/s. For installation with COMPACT-E e xpa nsion units
with a communication speed of 500 kbit/s, a CAN-AV
speedadapter(codeA465AV)mustbeinserted in the
bus to match the transmission speed betweendevices.
The a ttached ta ble shows the tra nsmission speed of the
equipments:
To connectan ME-200C to the COMPACT-E fo l low
figure 7.
EQUIPMENT SPEED TRANSMISSION
COMPACT 33.3 kbit/s o 500 kbit/s (built-
i n s peed a dapter )
COMPACT-E
500 kbit/s
MD-30C
33.3 kbit/s
ME-200C
33.3 kbit/s
NS-CAN
33.3 kbit/s
(RJ45 Connector
front view)
To UMX-EA3 card
To COMPACT-E
expansion unit
From RJ45 OUTPUT
ME-200C
(RJ45 Connector
front view)
Figure 7
24VDC
POWER
SUPPLY
(Shield not
connected)
(Shield not
connected)

MD-30C version 3.2.000
11
Microphone desk and
voice alarm fireman's panel
ME-200C
6. COMMISSIONING THE UNIT
Commi ssioning the unit re quires s ending of configurations to the COMPACT a udio ma tri x to whose CAN bus the ME200C is con-
nected.To dothis, you needa PCequippedwith a network card and connectedto the COMPACT matrix,eitherthrough an Ethernet
switch, or directly through a network cable. The PC must have the Call Point software installed.
1. Set the CAN a ddress of the ME-200C and its position in the BUS (end or intermediate element) according to s ection 4.
CONFIGURATIONS.
2. Make the connections between units.
3. Apply power to the units.
4. Via theCall Point s oftware, configure the parameters of theME-200C and send the configurations to the COMPACT unit.
7. WORK MODES
There are two distinct workmodes: Normaland Emergencymodes. Normal mode is the default working mode. Using a key switch
accesses Emergency Mode.
Normal Mode:
It allows you to send live messages and replays ofthosemessages. The destination zones of the messages are predetermined via
the Call Point s oftware.
Emergency Mode:
It has a warningmessage push-button, an evacuation message push-button and microphone for live messages. Access to the emer-
gency mode is protected by a key switch.
The WARNING and EVACUATION messages are assigned and configured via the Call Point software
All the emergencymessages (live messages as well as pre-recorded WARNING a nd EVACUATIONmessages) willbe broadcast to the
Associated Group. The Associated Group must have been previously configured via the Call Point softwa re.
NORMAL MODE EMERGENCY MODE
Default mode Access to emergency mode with key switch
Messages are sent to the predetermined zones previously
configured via Call Point software
Mes sages are sent to the Associated Group (predetermined
group via Call Point s oftware)
Allows live voice messages
There is a REPEAT key whose function is to repeat the last live message.
WARNING push-button non operative WARNING push-button activates the warning message
EVACUATION pus h-button non operative EVACUATION push-button activates the evacuation message
RESET push-button non operative RESET push-button to exit emergency mode
8. NORMAL MODE OPERATIONS
8.1.Sending a live voice announcement
1 Press and hold GONG+TALK (or TALK).
2 You can begin speaking when the blue TALK LED
illuminates.
3 To finish the broadcast, release the GONG+TALK (or
TALK).
8.2.Repeat function
The mi cropho ne desk i ncorporates a function that enables to
repeat the last live voice message that was sent.
To activate select the REPEAT key. The TALK/REPEAT
indicator light remains illuminated while the message is being
repeated.
You can stop a repeat message that is being played bypress-
ing the REPEAT keyagain.

MD-30C version 3.2.000
12
Microphone desk and
voice alarm fireman's panel
ME-200C
9. OPERATIONS IN EMERGENCY MODE
9.1.Entering the Emergency Mode
Insert the key into the lock and turn 90° cl ockwise. The
LOGGED LED should light up.
9.2.Activating a WARNING message
1. Press the WARNING button (the system must be in
Emergency Mode). The WARNINGbutton indicator light
illuminates and the warning message begins to play.
2. Press theRESET button to stop the message. The s ystem
exits the Emergency Mode.
Ifan EVACUATIONmessage is played while the WARNING
message is playing, the WARNING message will stop.
If a live voice message is sent while the WARNING message is
playing, the WARNING messagestops playing while the live
voice announcement isbeingbroadcast.When the live voice
messageends,theWARNING message will automatically
resume playing.
9.3.Activating an EVACUATION message
1. Press the EVACUATION button (the system must be in
emergency mode). The EVACUATION button indicator
light illuminates and the evacuation message begins to
play.
2. Press theRESET button to stop the message. The s ystem
exits the Emergency Mode.
The EVACUATION message takes priority over the WARNING
message: the activation of the evacuation message stops the
WARNING message.
If a live voice message is sent while the EVACUATION
message is playing, the EVACUATION message stops playing
while the live voice announcement is being broadcast. When
the li ve voice message ends, theEVACUATIONmessage will
automaticallyresume playing.
9.4.Sending a live voice message in
Emergency Mode
1. Wi th the microphone desk in emergency mode, press and
hold the GONG+TALK (or TALK) button.
2. You can beginspeaking when the TALK indicator light
illuminates.
3. To finish the broadcast, release the button.
Li ve voi ce a nnouncements ta ke p riority ove r a n EVACUATION
me s sage a nd i n turn, an EVACUATI ON message takes pri ori ty
over a WARNING message.
9.5.Repeat function in Emergency Mode
With the microphonedesk in emergency mode, select the
REPEAT key.The TALK/REPEAT indicator light up while the
message is being repeated.
You can stop a repeat message that is being played bypress-
ing the REPEAT keyagain
9.6.Exiting the Emergency Mode
Press theRESET key.TheEMERGENCY button light goes out
to indicate that thedesktop paging system is no longer in
Emergency Mode
All theemergencymessages (live messages as well as pre-recorded WARNINGand EVACUATIONmessages) willbe broadcast to
the ASSOCIATED GROUP. The ASSOCIATED GROUP must have been previously configured via the Call Point s oftwa re.
The WARNING and EVACUATION messages are assigned and configured via the Call Point software
The WARNING,EVACUATION andRESETpushbuttons are not operative until emergency mode is entered using the key.
I n EMERGENCY MODE, l ive voice a nnouncements take priorityover an EVACUATION message and in turn, an EVACUATION
message takes priority over a WARNING message.
After60seconds withoutanyoperation fromthedesk(thistimecanbe modified bythe Call Point s oftware), the LOGGED LED
goes off and the emergencybuttons ofthe microphone deskare nolonger operative, being necessary to reactiva te the key
switch to operate again with the microphone desk.

MD-30C version 3.2.000
13
Microphone desk and
voice alarm fireman's panel
ME-200C
10. SYSTEM ALARMS
The microphone desk incorporates several alarm indicators:
LOCAL FAULT indicator: Front yellow LED. Indicates microphone capsule error or communication error with audio matrix.
CPU FAULT indicator: Front yellow LED. Illuminates when the microphone desk detects an internal application error (firmware).
GENERIC FAULT indicator: Front yellow LED. Illuminates when the microphone desk receives one or several alarms from the
system.
Acoustic alarm indicator (buzzer): Acoustic indication that is generated by the unit when it receives an alarm. The acoustic
indication is a buzzing sound that lasts 10 seconds and is periodically repeated every 20. This acoustic indication may be
deactivated through the Call Point software.
11.DIMENSIONS

MD-30C version 3.2.000
14
Microphone desk and
voice alarm fireman's panel
ME-200C
12.TECHNICAL CHARACTERISTICS
ME-200C
Inputs 1 Input, through RJ45connector
Outputs 1 Output, through RJ45 connector
Power supply 24 VDC
Consumption 150 mA
Weight 1.7 kg
Finishes Desk: RAL7021 Bayblend plastic
FlexoMICROPHONE
Capsule Dyn a mic
Polar diagram Unidirectional
Frequency response 150 Hz ∼12 kHz
Sensitivity 2.2mV/Pa/1kHz
Output impedance 500 Ohm ±30% (at 1kHz)
Material Aluminium
13.SOFTWAREAND FIRMWARE VERSIONS
The functionalitiesdescribed in this user manual are valid for software andfirmware versions that are the same or later versions of:
ME-200C Firmware Vers ion 5.11
COMPACT Firmware Application version 3.2
Linuxversion 2.6.35.14
Call Point Software Ve rs ion 3.2
14.DOCUMENT VERSION TRACKING
Reference system Type of Document Confidentiality N/A
COMPACT/ME-200C Installationand operation guide
Rev Date Modifications Content Written by:
3.1.000
Ma rch 2017
Translation ofthe Spanish language version 3.1.000
R+D Department
3.2.000 October 2018 5.2. Audio and CAN bus connection.
13. Softwa re and firmware version. R+D Department
Approved by Function Date
Ferran Gironèsi Puig R+D Director 10/2018

MD-30C version 3.2.000
15
Microphone desk and
voice alarm fireman's panel
ME-200C
15.GUARANTEE
1. GUARANTEE CERTIFICATE
1. OPTIMUS S.A. guarantees that its products are free from material and
manufacturing defects when they are first delivered to the purchaser.
2. In accordance with the conditions outlined here, OPTIMUS S.A. guarantees
its products for two (2) years from the date on which the purchaser acquires the
product. If, within this guarantee period, defects appear which are not due to
factors outlined in section 2, OPTIMUS S.A. shall replace or repair the unit using
equivalent, new or reconstructed replacement parts, as it deems fit. If
replacement parts are applied which improve the unit, OPTIMUS S.A. reserves
the right to charge the client for the additional cost of these components.
3. No guarantee benefits shall be provided other than those cited here.
4. In order to claim the guarantee rights, it shall be an essential requirement
to present the original purchase invoice or the guarantee certificate.
2. GUARANTEE PROVISIONS
1. In the event that the product had to be modified or adapted to comply with
local requirements concerning technical specifications or safety, and if the
country in question is not the country for which the product was originally
designed and manufactured, defects are not cons idered to be material or
manufacturing defects. Furthermore, the guarantee does not cover the
execution of these modifications or adaptations, regardless of whether or not
they have been carried out correctly.
Nor shall OPTIMUS S.A. be responsible for any costs under this guarantee for
these types of modifications.
2. The guarantee shall not entitle the purchaser to inspection or free
maintenance or repair of the unit, particularly if the defects are due to
inappropriate use. Nor do the guarantee rights cover defects in wearing parts
that become worn as a result of normal wear and tear. Wearing parts are, in
particular, potentiometers, switches/keys, and similar parts.
3. The guarantee does not cover defects in the equipment unit caused by:
•Abuse or incorrect use of the unit for purposes other than those for which it
is intended, in non-compliance with the service and maintenance
instructions specified in the Manual and/or Technical Instructions for the
unit.
•Connection or use of the product in a manner that does not correspond to
the technical or safety requirements of the country in which the unit is
used.
•Installation in conditions other than those indicated in the Manual and/or
Technical Instructions.
•Deficiency or interruptions in the electricity supply or installation defects
which imply use in abnormal conditions.
•Damage caused by other equipment units that are connected to the
product.
•The use or installation of Software (programmes), interfaces, parts or
supplies not provided and/or not authorised by OPTIMUS S.A.
•Failure to use the original packaging for transportation.
•Damage caused by force majeure or other causes not attributable to
OPTIMUS S.A.
4. The following elements are not covered by this guarantee:
•All plastic surfaces and all parts exposed to outdoor conditions which have
been scratched or damaged as a result of normal or abnormal use.
•Breakages, knocks, damage due to a fall or scratches caused by moving the
unit in any way.
•Damage caused by tests, use, maintenance, installation or inappropriate
adjustments, or as a result of any alteration or modification of any kind not
carried out by a Service Authorised by OPTIMUS S.A. in compliance with this
guarantee.
•Damage to persons or property that might be caused by the improper use
of the equipment, including lack of maintenance.
5. The guarantee shall not bevalid whenever the following is observed:
•Amendments or corrections made to the details of the guarantee certificate
or purchase invoice.
•Failure to produce the original invoice or the absence of a date on this.
•Absence of the serial or batch number on the equipment.
6. In the case of personal computers, the guarantee will not cover the
elimination of computer viruses, the restoration of programmes damaged by
these or the reinstallation of the disk following its deletion.
7. The rights of this guarantee are invalidated if the product has been repaired
or opened by staff unauthorised by OPTIMUS S.A. or by the client himself.
8. If OPTIMUS S.A. were to establish before the client that the damage
affecting the unit does not entitle a claim to be made under the guarantee, the
costs of checking the equipment incurred by OPTIMUS S.A. shall be borne by the
client.
9. Products not covered by the guarantee shall only be repaired once payment
has been effected by the client. In the event that the guarantee rights do not
apply, OPTIMUS S.A. shall duly inform the client. If, within a period of 6 weeks
from this communication, no written repair order is received from the client
confirming acceptance of the costs, OPTIMUS S.A. shall return the unit in
question to the client. In this case, the transport and packaging costs shall be
invoiced separately and payment shall be made on delivery. In the event that a
repair order is sent by the client, confirming that he assumes the costs of repair,
the transport and packaging costs shall be invoiced additionally, and also
separately.
10. If the equipment needs to be trans ferred to the Authorised Service Centre,
transportation shall be effected by the responsible party according to the
guarantee, who will also bear the freight and insurance costs.
11. In the event of a defect, OPTIMUS S.A. guarantees that the repair and/or
replacement of parts so that the unit operates correctly will be made within a
period of no more than 30 days. Nevertheless, OPTIMUS S.A. would like to clarify
that the normal period does not exceed 30 days.
12. All parts or products replaced as part of the guarantee services shall
become the property of OPTIMUS S.A.
3. TRANSFER OF GUARANTEE
The guarantee is solely awarded to the original purchaser (principal client) and is
not transferable. With the exception of OPTIMUS S.A., no third party (dealers,
etc.) is authorised to award additional guarantees on behalf of OPTIMUS S.A.
4. CLAIMS FOR DAMAGE
In the event that OPTIMUS S.A. cannot provide a suitable guarantee service, the
purchaser shall not be entitled to claim any indemnity for damages arising. The
responsibility held by OPTIMUS S.A. is limited in all cases to the invoicing price of
the product.
5. RELATION WITH OTHER GUARANTEE RIGHTS AND NATIONAL LAW
1. This guarantee does not affect the rights of the purchaser with respect to the
vendor arising from the contract of sale accomplished.
2. These conditions of the guarantee provided by OPTIMUS S.A. are valid as long
as they do not contradict the corresponding national law on guarantee
provisions.
3. OPTIMUS S.A. guarantees that this product complies with the safety
regulations in force in the country.
THIS LIMITED GUARANTEE DECLARATION IS THE EXCLUSIVE GUARANTEE
OFFERED BY OPTIMUS S.A. ALL OTHER EXPLICIT OR IMPLICIT GUARANTEES ARE
EXCLUDED, AND THIS ALSO APPLIES TO GUARANTEES OF MARKETABILITY AND
SUITABILITY FOR A PARTICULAR PURPOSE. (EXCEPT WHEN THESE GUARANTEES
ARE REQUIRED BY AN APPLICABLE LAW). NO GUARANTEE, EITHER EXPLICIT OR
IMPLICIT, SHALL BE APPLIED ONCE THE GUARANTEE PERIOD HAS EXPIRED.
OPTIMUS S.A.
After Sales Service
C/ Barcelona 101
17003 - GIRONA
Tel. 902 151 96 / 972 203 300
Fax. 972 21 84 13
e-mail:girona@optimus.es 1999/44/CE

9I327 16/10/2018 V3.2.000


9I327 16/10/2018 V3.2.000

ME-200C versión 3.2.000
3
Pupitre microfónico y
panel de bomberos de alarma por voz
ME-200C
Contenido
1. INTRODUCCIÓN ................................................................................................................................................................................ 4
2. VISTA FRONTAL ................................................................................................................................................................................ 4
3. VISTA POSTERIOR............................................................................................................................................................................. 6
4. CONFIGURACIÓN.............................................................................................................................................................................. 7
5. CONEXIONES..................................................................................................................................................................................... 8
5.1. Alimenta ció n del p upi tre................................................................................................................................................. 8
5.2. Cone xión del audi o y del b us de comuni caci ón CAN...................................................................................................... 8
5.2.1. Cone xión del p upi tre ME-200C a la matriz de audio COMPACT.......................................................................... 9
5.2.2. Cone xión del audi o y del bus de comuni caci ón CAN e ntre pupi tres ME-200C................................................... 9
5.2.3. Cone xión del p upi tre ME-200C a la matrizesclava COMPACT-E....................................................................... 10
6. PUESTA EN MARCHA DEL EQUIPO................................................................................................................................................. 11
7. MODOS DE TRABAJO...................................................................................................................................................................... 11
8. OPERACIONES EN MODO NORMAL............................................................................................................................................... 11
8.1. E n vi a r u n a vi s o de vi va vo z............................................................................................................................................ 11
8.2. Función de re pe ti ción.................................................................................................................................................... 11
9. OPERACIONES EN MODO EMERGENCIA........................................................................................................................................ 12
9.1. Entraren Modo Emergencia......................................................................................................................................... 12
9.2. Activar un mensaje de alerta (WARNING).................................................................................................................... 12
9.3. Acti va r un mensaje de e va cuaci ón (EVACUATI ON)....................................................................................................... 12
9.4. Envia r un mensa je de vi va voz e n Mod o Eme rgencia................................................................................................... 12
9.5. Función de re pe ti ción.................................................................................................................................................... 12
9.6. Sali r del Modo Emergencia ........................................................................................................................................... 12
10. ALARMAS DEL SISTEMA ................................................................................................................................................................. 13
11. MEDIDAS......................................................................................................................................................................................... 13
12. CARACTERÍSTICAS TÉCNICAS.......................................................................................................................................................... 14
13. VERSIONES DE SOFTWARE YFIRMWARE...................................................................................................................................... 14
14. DOCUMENT VERSION TRACKING................................................................................................................................................... 14
15. CONDICIONES DE GARANTÍA......................................................................................................................................................... 15
ATENCIÓN. Este es un equipo de Clase A. En un ambiente doméstico podría llegar a causar radio interferencias. En este caso
el usuario debería tomar las medidas adecuadas.
Table of contents
Languages:
Other Opvimus Microphone manuals