ORA VERA F2401 User manual

ESPAÑOL
1
MANUAL DE USUARIO
USER MANUAL
MANUEL D’UTILISATION

2
MI TELÉFONO
1. Receptor
2. Pantalla
3. Botón echa (arriba): Acceso directo a mensajes de texto en
modo de espera
4. Tecla izquierda de menú / Menú principal
5. Botón verde de llamada / lista de llamadas: Llamada en modo
espera/ Botón OK
6. Botón echa (abajo): Marcar números
de contactos en modo espera
7. Botón directo de marcado M1 / Mover a la izquierda

ESPAÑOL
3
8. Tecla #1 / Buzón de voz (pulsa y mantén 2sg)
9. Botón *: Pulsa este botón en modo espera para usar los ca-
racteres: * /+ /P / W.
10. Botón echa (abajo): Marcado rápido de contactos en modo
espera.
11. Tecla OK
12. Botón de encendido (pulsa y mantén 8sg), nalizer llamada,
rechazar llamada
13. Botón de marcado directo M2 / Mover a la derecha
14. Botón Cámara / Conmutador Altavoz
15. Linterna: Presiona la tecla 0 durante 3 segundos para acti-
var/desactivar la linterna
16. Tecla #: En el modo espera, con una presión larga habilitas/
deshabilitas el modo silencio.
En el modo editar: cambia el método de entrada.
17. Cámara
18. LED Roja: Batería baja (intermitente) / modo de carga (luz
permanente)
19. Linterna LED
20. Botón de Emergencia SOS
21. Tonos polifónicos
22. Micrófono
23. Conexión para Auriculares (3.5mm)
24. Cargador con Conexión Micro USB

4
PUESTA EN MARCHA
Insertar tarjeta SIM
• Extrae la carcasa de la batería
(abriendo la solapa situada en la
esquina inferior izquierda).
• Inserta la tarjeta SIM en la ranu-
ra SIM con la parte dorada hacia
abajo.
• Inserta la tarjeta MicroSD en la
ranura MicroSD con la parte do-
rada hacia abajo.
Introducir Batería
• Introduce la batería asegurán-
dote que hace contacto. A con-
tinuación coloca la carcasa de
la batería y presiona hasta que
notes que se ha colocado co-
rrectamente.

ESPAÑOL
5
USO DEL TELÉFONO
El teléfono no ejecuta aplicaciones en modo espera.
> Uso del menú
Pulsa la Tecla Izquierda del menú (Tecla izquierda de tres pun-
tos) para abrir el menú.
• Pulsa las teclas Arriba/Abajo para desplazarte entre las opcio-
nes del menú.
• Pulsa la Tecla Izquierda del menú para abrir cada elemento
del mismo.
• Para regresar al modo de espera, pulsa el botón Rojo o cierra
el teléfono.
> Teclas de Doble Función
Algunas teclas tienen funciones adicionales si se realiza una pul-
sación prolongada durante unos segundos.
• Tecla número 1: Escuchar el buzón de voz.
• Tecla #: Cambiar entre modo normal y modo reunión (sólo vi-
bración).
• Tecla número 0: Linterna activada de forma continua cuando el
teléfono está encendido.
GUARDAR CONTACTOS EN AGENDA
Puedes acceder a Contactos/ Agenda pulsando la tecla dere-
cha del menú (tecla derecha de 3 puntos) or pulsando la tecla
izquierda de menú (tecla izquierda de 3 puntos) en modo repo-
so, seleccionando Contactos >OK
1. Pulsar Opciones > Nuevo > OK
2. Para introducir el nombre del contacto, usa la tecla de la e-

6
cha (abajo) para mover el cursor a Nombre, después pulsa Editar.
Presiona OK cuando termines.
3. Para introducir el número de teléfono, pulsa la tecla de la echa
(abajo) para mover el cursor a Móvil o Número de Casa, pulsa
Editar y OK para terminar.
Aviso: Puedes asignar un tono de llamada especíco para cada
contacto. Simplemente mueve el cursor a Tono por Defecto, pulsa
Editar y después selecciona un tono de llamada en Melodías o en
tus propios cheros de sonido.
CAMBIAR EL TONO
Pulsa la Tecla Izquierda de Menú en el Modo reposo.
Haz scroll y selecciona Ajustes
1. Selecciona Perles
2. Selecciona Normal (o tu Perl actual)
3. Selecciona Opción > Ajustes > OK
4. Haz scroll y selecciona Ajustes de Timbre > Tono de llamada
> Select
5. Escoger el tono de llamada de Tonos por Defecto (vienen con
el teléfono) o Más Tonos (descargados del ordenador a la memo-
ria de tu teléfono o a una tarjeta opcional MicroSD)
6. Pulsa OK > Hecho para volver al menú anterior.
7. Repetir paso 3 y 4, seleccionar Tono Mensajes para cambiar la
melodía de los mensajes entrantes.
CONFIGURAR FUNCIÓN SOS
1. Pulsa la Tecla Izquierda del Menú (en el teclado)

ESPAÑOL
7
2. Haz scroll y selecciona Ajustes
3. Selecciona Ajustes SOS > OK (Asegúrate de que Estado está
marcado), haz scroll a Congurar números SOS > Seleccionar
4. Seleccionar No. 1. (si no hay números previamente programa-
dos, estará vacío)
5. Puedes usar el teclado para marcar los números de contacto
SOS o pulsar Contactos para escoger uno de los que tengas
registrados en la Agenda.
6. Pulsa Guardar.
7. Repite los pasos 5-7 para añadir hasta 6 contactos SOS.
Cuando se hayan introducido, el teléfono mostrará los números
de teléfono en orden de entrada.
8. Selecciona un mensaje SOS.
9. El SMS por defecto es “SOS!!”. Para cambiarlo, pulsa la Tecla
Derecha del menú para borrar y Editar con tus palabras. Pulsar
Guardar al terminar.
Aviso: El mensaje SOS únicamente puede ser enviado a los te-
léfonos móviles registrados (en la lista SOS). Las llamadas SOS
necesitan ser aceptadas por el receptor dentro de un tiempo espe-
cíco. Comprueba antes de usar la función SOS que los números
que has registrado, no tienen guardadas respuestas automáticas.
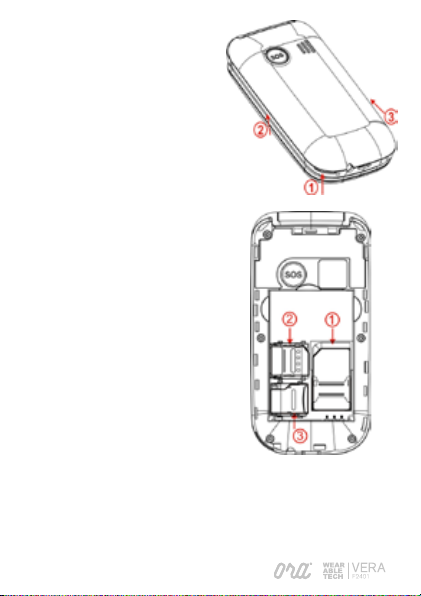
CONFIGURAR LOS DIALES M1/M2
Aviso: Es necesario instalar una tarjeta SIM válida para congurar
la función de velocidad dial.
1. Pulsa el botón Menú (en el teclado)
2. Haz scroll y selecciona Ajustes
3. Haz scroll y selecciona Velocidad Dial
4. Selecciona Opción > Editar > Insertar númerio > OK

8
Aviso: Una vez hayas establecido el número la próxima vez que
accedes a la interfaz podrás “Ver/Editar/Modicar/Contacto/
Llamar/Borrar”.
MODO REUNIÓN (VIBRACIÓN)
En modo reposo, el teléfono puede cambiarse a modo reunión
(sólo vibración) presionando y manteniendo la tecla (#) durante
tres segundos. Repite este paso cuando desees volver al modo
normal.
HABILITAR LLAMADA/SONIDO DE MARCA-
DO
1. Pulsa el botón Menú (en el teclado)
2. Haz scroll y selecciona Ajustes
3. Haz scroll y selecciona Sonido Números
4. Pulsa OK y después selecciona
“Número en llamada”
RESTAURAR VALORES DE FÁBRICA
1. Pulsa el botón Menú (en el teclado)
2. Haz scroll y selecciona Ajustes
3. Haz scroll y selecciona Restaurar valores de fábrica
4. Introducir contraseña (por defecto 1234)
5. Pulsa OK, después conrma en OK

ESPAÑOL
9
Aviso: Con esta función, toda la conguración se restaurará a
cómo el dispositivo llegó congurado de fábrica. Toda la infor-
mación, incluyendo a los contactos, serán eliminados. Por favor,
asegúrate de hacer una copia de seguridad de todos tus contac-
tos en la tarjeta SIM antes de ejecutar esta función.

10
MY PHONE
1. Receiver
2. Screen
3. Arrow button (up): Shorcut to text message in standby mode
4. Left menu key / main menu
5. Green call button / call list: Call in standby mode/ OK button
6. Arrow button (down): Call the Speed
Dial contacts in standby mode
7. Direct dial button M1 / Move to the left
8. #1 key /Voice mail (press and hold 2 sec)
9. * Button: Press this key in standby mode to enter the following
characters: * /+ /P / W.

ENGLISH
11
10. Arrow button (down): Call the Speed dial contacts in stan-
dby mode
11. OK key
12. Power button (press and hold 8 seconds), ending call, reject
call
13. Direct dial button M2 / Move to the right
14. Camera button / Speaker switch
15. Flashlight: By long press 0 key for 3 seconds to activate /
deactivate the ashlight
16. # Key / Pound: In the standby mode, by long pressing enable
/ disable the silent mode. In the edit mode: change the input
method
17. Camera
18. Red LED: Low battery (ashing) / charging mode (lights up)
19. LED Torch
20. SOS Emergency button
21. Polyphonic speaker
22. Microphone
23. Connection for Headset (3.5mm)
24. Micro USB charger connect

12
GETTING STARTED
Inserting a SIM card
• Remove the battery cover
(opening in the bottom left-hand
corner)
• Slide the SIM card into the SIM
card holder with gold contacts
facing down.
• Slide your MicroSD card into
the card holder with gold con-
tacts facing down
Inserting and battery
• Insert the battery, making sure
that battery contacts touch the
gold contacts, then place the ba-
ttery cover and press down until
it clicks into place.

ENGLISH
13
USING THE PHONE
In standby mode the phone is one, but is not running any appli-
cations (call, SMS message, etc.).
> Using the menu
Press Left menu key (left 3-dot key) to open the menu.
• Press Up/Down arrow keys to ick through the menu items.
• Press Left menu key to open a menu item.
• To return to standby mode, press Red button or close the pho-
ne.
> Dual-function keys
Some keys have additional functions if they are pressed and held
down for a few seconds.
• Number 1 key: Listen to mailbox.
• # (Pound) key: Switch between normal mode and meeting (vi-
brate only) mode.
• Number 0 key: Torch on continuously when the phone is on.
SAVING CONTACTS TO PHONEBOOK
Contacts/Phonebook can be accessed by pressing the right
menu key (right 3-dot key) OR pressing the left menu key (left
3-dot key) in standby mode, selecting Contacts -> OK
1. Press Options > New > OK
2. To input contact’s name, use down arrow key to move the
highlight to Name, then press Edit. Press OK when nish.
3. To input phone number, press the down arrow button to move
the highlight to Mobile or Home number, press edit, press OK
when nish.

14
Please note: You can assign specic ringtone to each contact. Sim-
ply move the highlight to Default ringtone, press Edit then select
ringtone from Phone ringtones or your own sound les.
CHANGING THE RINGTONE
Press the Left Menu key in standby Mode
Scroll to and select Settings
1. Select Proles
2. Select Normal (or your current Prole)
3. Select Option > Settings > OK
4. Scroll to and select Ring Settings > Caller ringtone > Select
5. Choose ringtone from Fixed ringtones (comes with the phone)
or More ringtones (download from your computer to phone me-
mory or optional Micro SD card)
6. Press OK > Done to return to the previous menu.
7. Repeat step 3 and 4, select Message ringtone to change inco-
ming message ringtone.
SETTING UP THE SOS FUNCTION
1. Press the Left Menu key (on keypad)
2. Scroll to and select Settings
3. Select SOS setting > OK (Ensure Status is checked), scroll to
Set SOS numbers > Select
4. Select No. 1. (if no numbers have been previously programmed
it will be empty)
5. You can use keypad to key in the SOS contact numbers, or
press Contacts to choose a saved contact from Phonebook.

ENGLISH
15
6. Press Save.
7. Repeat steps 5-7 to add up to 6 SOS contacts. When acti-
vated, the phone will dial the phone numbers in order of entry.
8. Select SOS message.
9. The default SMS is “SOS!!” To change this, press the right
menu key to clear the message and Edit your own words. Press
Save after done.
Please note: SOS message will only be sent to mobile phone num-
bers (in SOS list). SOS calls need to be accepted by the receiver
within a specic timeframe. If you are programming a phone num-
ber that has an automatic answering feature please test before
use.
SETTING UP THE M1/M2 DIAL
Please note: A valid SIM card needs to be installed in order to
set up the Speed dial function.
1. Press Menu button (on keypad)
2. Scroll to and select Settings
3. Scroll to and select Speed dial
4. Select Option > Edit > Input number > OK
Note: Once you set the number, next time you go the interface, you
can “View/Edit/Modify contactor/call/delete” it
MEETING (VIBRATE ONLY) MODE
When in standby mode, the phone can be changed to meeting
(Vibrate only) mode by pressing and holding the pound (#) key

16
for three seconds. Repeat the step will switch the phone back
to normal mode.
ENABLE CALL/DIAL NUMBER SOUND
1. Press the Menu button (on keypad)
2. Scroll to and select Settings
3. Scroll to and select Number sound
4. Press OK then press select
“Dial number sound”
“Call in number”
RESTORE FACTORY SETTINGS
1. Press the Menu button (on keypad)
2. Scroll to and select Settings
3. Scroll to and select Restore factory settings
4. Enter password (default 1234)
5. Press OK, then OK to conrm
Please note: By performing this function, all settings will be res-
tored to factory default. All information includes contacts will be
erased. Please ensure backup all your contacts to SIM card befo-
re performing this function.

ENGLISH
17

18
MON TÉLÉPHONE
1. Récepteur
2. Écran
3. Bouton Arrow (ci - dessus): Accès direct aux messages texte
en mode veille
4. Touche de fonction gauche / Menu principal
5. Bouton d’appel vert / liste d’appels: Appel en attente / OK
6. Bouton éché (vers le bas): Mark numéros
Contacts en mode veille
7. Bouton ligne directe M1 / Déplacer vers la gauche
8. Touche # 1 / voix (appuyez et maintenez 2SG)
9. Appuyez sur ce bouton en mode veille pour utiliser les carac-

FRANÇAIS
19
tères: * / + / P / W
10. Bouton éché (ci - dessous): Speed Dial Contacts en mode
veille.
11. Touche OK
12. Bouton d’alimentation (appuyez et maintenez 8SG), appel
naliseur, rejeter un appel
13. Touche de numérotation directe M2 / Déplacer vers la droite
14. Bouton caméra / haut-parleur Interrupteur
15. Lampe de poche: Appuyez sur la touche 0 pendant 3 secon-
des pour activer / désactiver la lampe de poche
16. Touche #: En mode veille, avec une habilitas longue pression
/ désactiver le mode silencieux.
En mode édition: changer la méthode d’entrée.
17. Caméra
18. LED rouge: Pile faible (clignotant) / mode de charge (lumière
continue)
19. LED lampe de poche
20. SOS bouton d’urgence
21. Sonneries polyphoniques
22. Microphone
23. Prise pour casque (3,5 mm)
24. Chargeur avec connexion Micro USB

20
MISE EN MARCHE
Insérez la carte SIM
• Retirez le couvercle de la bat-
terie (ouverture dans le coin infé-
rieur gauche)
• Faites glisser la carte SIM dans
le support de la carte SIM avec
les contacts dorés vers le bas.
• Faites glisser votre carte Mi-
croSD dans le porte-carte avec
les contacts dorés vers le bas
Insérer la batterie
• Insérez la batterie, en veillant à
ce que les contacts de la batterie
touchent les contacts dorés, puis
placez le couvercle de la batterie
et appuyez jusqu’à ce qu’il s’en-
clenche.
Table of contents
Languages:
Other ORA Cell Phone manuals