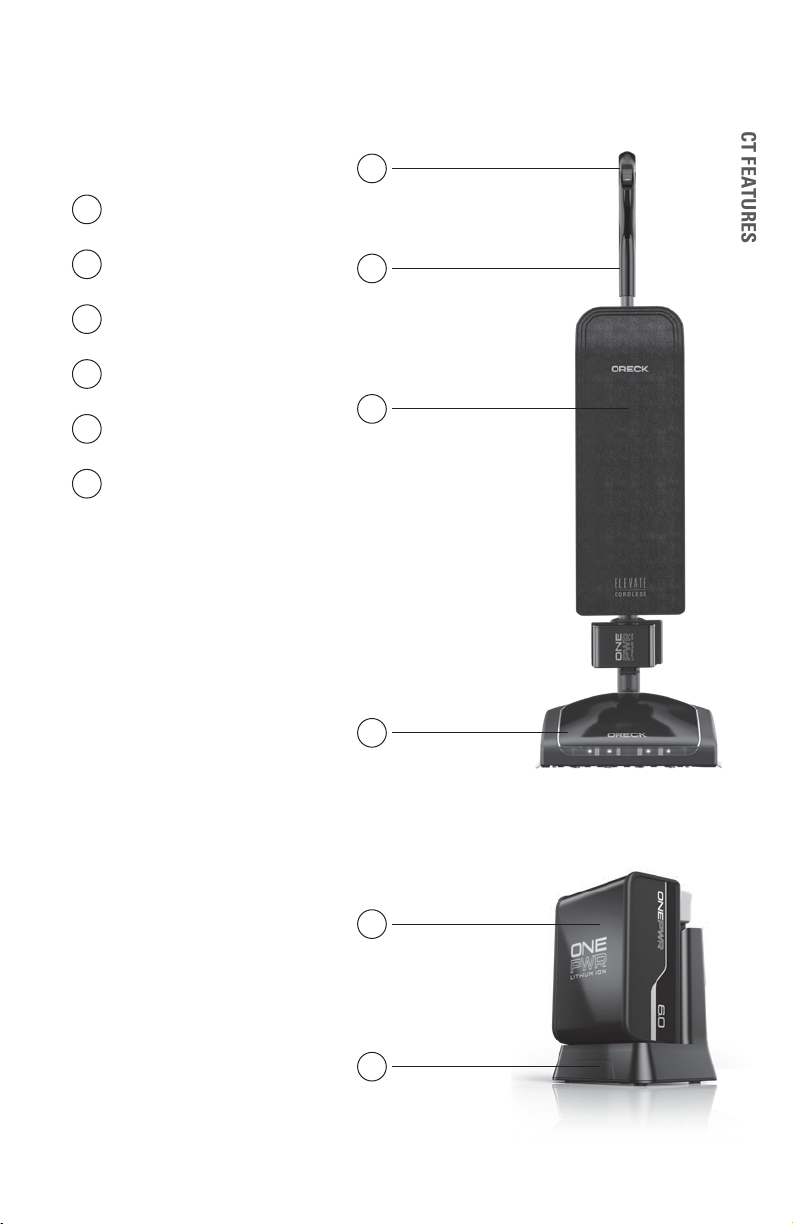
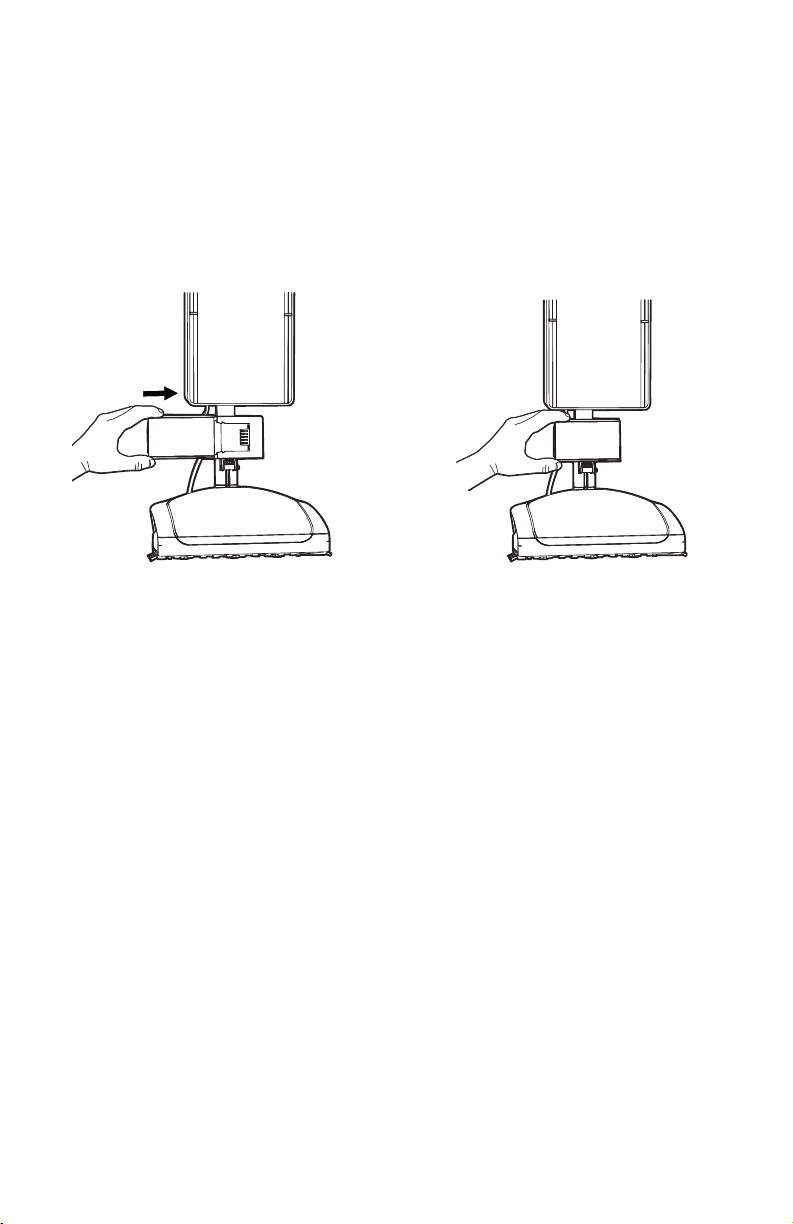
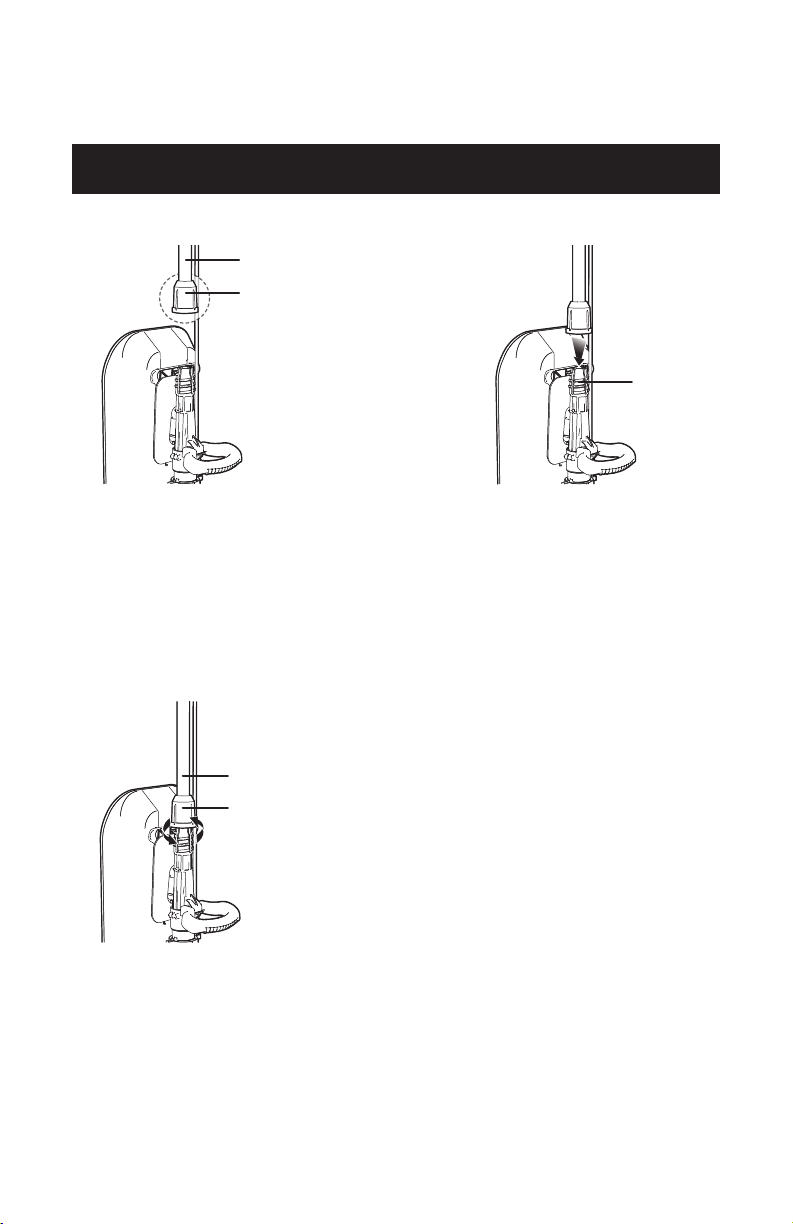
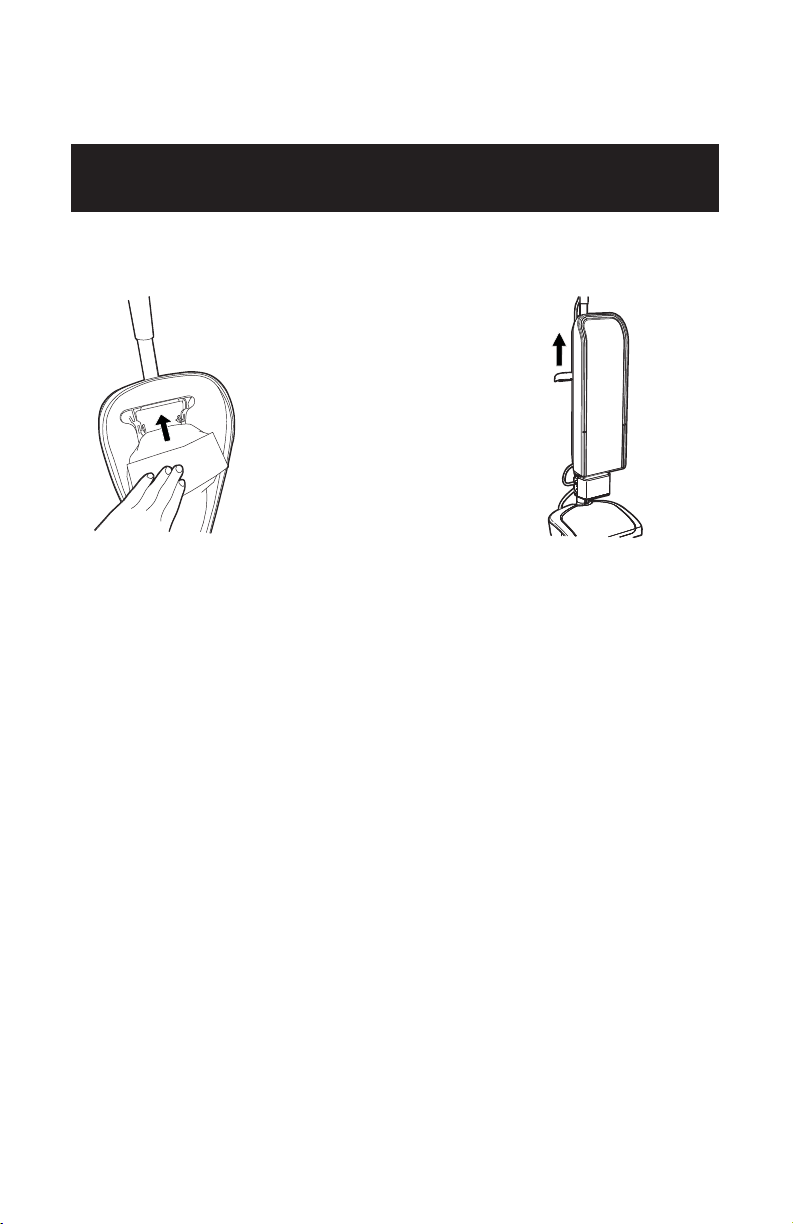
Oreck BK95519 User manual

CORDLESS UPRIGHT VACUUM
USER MANUAL
For use with model BK95519.
IMPORTANT:
READ CAREFULLY BEFORE
ASSEMBLY AND USE.
Appearance of the product may differ slightly from the images depicted.
ELEVATE

5
PRODUCT FEATURES
Product Features
Carton Contents
AOn/Off Fingertip Controls
BErgonomic Handle
COuter Bag
DPower Head
EBattery
FCharger
+ Manual
B
A
C
D
E
F

6
18V ONE PWR™Battery & Charger
Every ONEPWR
™
battery works with every ONEPWR
™
product.
1To charge align the ribs on the battery
pack to the grooves in the charger.
Slide the battery pack into the charger.
3When charge is complete the
lights on the battery will turn off
and the light on the charger will
be solid.
2When charging, the lights on the
battery will illuminate to show the
state of charge. The light on the
charger will ash.
4To remove the battery pack from
the charger, press the latches and
pull up on the battery pack.
NOTE: Batteries are shipped in a low charge condition to prevent possible problems. You should
charge them before rst use.
NOTE: If the light on the charger ashes red, there is an error with the battery or the charger. Try
again or call customer service for support at 800-406-2005.
CHARGING AMBIENT TEMPERATURE RANGE:
5 °C – 40 °C (41 °F – 104 °F)
BATTERY MODEL NUMBER
2.0Ah BH15020
3.0Ah BH15030
3.0Ah MAX BH25030
4.0Ah BH15240
4.0Ah MAX BH25040
6.0Ah BH15260
NOTE: Use with any thing other than the 6Ah pack will yield lower runtime.

7
How To Insert The Battery
1Insert battery into housing by
aligning grooves with ribs on the
battery and sliding battery into
until it clicks into battery dock.
2To remove battery press both grey
side tabs and slide battery out of
battery dock.
HOW TO INSERT THE BATTERY

8
Getting Started
1
Make sure Upper
Tube Connector
(A) is installed on
Upper Tube (B).
2Insert Upper Tube
into the top of Debris
Transfer Tube (C) until
it locks in place.
3Twist Upper Tube
Connector (A) clockwise
until it clicks to secure
Upper Tube (B).
(A)
(A)
(B)
(B)
(C)
CAUTION:
NOT TO BE USED FOR GROOMING A PET. FULLY ASSEMBLE PRODUCT TO USE.

9
GETTING STARTED
1
Make sure the ltration bag
(A) is attached properly to the
ltration bag dock (B). Attachment
instructions are located on
the ltration bag and in the
maintenance section of this
manual. Your vacuum comes
with a bag preinstalled for your
convenience. Do not operate
without a bag.
2
Step on (A) power head and
pull handle back to lower into
operating position. Return handle
to full upright position to engage
lock. This product features Auto
Stop and will not operate in the
upright position by disengaging
power to the motor.
3
Push ngertip controls forward
to select hard oor or carpet.
Push the controls back to the off
position when the product is not
in use.
Getting Started
Please read “Important Safety Instructions” before use.
(A)
(B)
(A)

10
1Unzip the Filtration
Bag Case completely. 2Pull the cardboard
collar on the ltration
bag downward to
release the bag dock
from the dock port.
3Gently pull the cardboard
collar on the ltration
bag up to engage the self
sealing lock and remove
from the bag dock.
Discard.
4Slide a new ltration
bag collar rmly into
the bag dock ensuring
all hooks on dock door
are inserted on the
cardboard collar.
Maintenance - How To Replace The Filter Bag
WARNING:
TO REDUCE THE RISK OF PERSONAL INJURY, BEFORE CLEANING OR SERVICING. DO
NOT USE VACUUM WITHOUT FILTRATION BAG IN PLACE.
WARNING:
IF APPLIANCE OR CHARGER IS NOT WORKING AS IT SHOULD, HAS BEEN DROPPED,
DAMAGED, LEFT OUTDOORS, OR DROPPED INTO WATER, CALL CUSTOMER SERVICE AT 1-800-406-2005 PRIOR TO CONTINUING USE.
WARNING:
VERY FINE MATERIALS, SUCH AS FACE POWDER OR CORNSTARCH MAY SEAL THE
FILTRATION BAG AND CAUSE IT TO BURST EVEN THOUGH IT IS ONLY PARTIALLY FULL. CHANGE THE BAG OFTEN WHEN CLEANING THIS
TYPE OF MATERIAL.

11
HOW TO REPLACE THE FILTER BAG
5Rotate bag dock up
and press rmly on
the ltration bag at
indicated points until
it snaps into place.
6Zip up the ltration bag
case completely.
Maintenance - How To Replace The Filter Bag
WARNING:
IF APPLIANCE OR CHARGER IS NOT WORKING AS IT SHOULD, HAS BEEN DROPPED,
DAMAGED, LEFT OUTDOORS, OR DROPPED INTO WATER, CALL CUSTOMER SERVICE AT 1.800.406.2005 PRIOR TO CONTINUING USE.

12
Maintenance - Quick Access Brushroll Cleaning
1Remove the two black
screws. 2Lift wiper blade from
the bottom plate.
3Lift up metal guards
to access the brushroll
channel. 4Clear brushroll
of debris and
obstructions by using
scissors to cut across
the channel.
5Put metal guards back
into place and secure
wiper back into place
with the two black
screws.
WARNING:
RISK OF PERSONAL INJURY-BRUSHROLL MAY SUDDENLY RESTART-TURN POWER
SWITCH OFF AND REMOVE BATTERY BEFORE CLEANING OR SERVICING.

13
REMOVING THE BRUSHROLL AND BELT
2Remove the brushroll
belt and brushroll from
the holding channels
inside of the power
head nozzle.
1Lay the unit at to access
the power head nozzle.
Remove the 7 screws to take
off the baseplate from the
power head.
3Rotate both plastic black
endcaps at the ends of the
brushroll to show a single notch
“NORMAL” position. Insert
back into the holding channels
of the power head nozzle.
Maintenance - Removing the Brushroll and Belt
NORMAL
4When rotating the black
endcaps on the brushroll,
make sure both endcap
settings are the same and
faceup when you insert
the brushroll.

14
Maintenance - Removing the Brushroll and Belt
IF YOU NEED ASSISTANCE
Please call 1-800-406-2005 (Mon-Fri 8am-5pm EST) to speak with a customer
service representative; or visit our website at Oreck.com.
6Manually spin the
brushroll to see that it
turns freely.
5Reassemble the brushroll belt.
7Replace the 7 screws to
secure the baseplate to the
power head nozzle.

15
CLEARING CLOGS
1An overloaded ltration bag may
cause dirt and debris to back up
into the air ow system. Open the
bag dock and check for visible clogs
at the bag port. Change ltration
bag if contents have reached the
MAXIMUM FILL LINE.
2Also, check for blockages in the
power head nozzle.
Maintenance - Clearing Clogs
3If blockage is not in
the power head nozzle,
remove the lower tube.
Detach rubber straps
at bottom of bag and
remove screws to tilt
battery dock forward.
4Twist lower tube connector
counterclockwise and slide
up. Pull the lower tube out
of the fan housing. Once
removed, check for blockage.
WARNING:
TO REDUCE THE RISK OF INJURY FROM MOVING PARTS — REMOVE BATTERY
BEFORE CLEANING OR SERVICING.

16
Maintenance - Clearing Clogs
5If the lower tube is not blocked, look
into the fan housing for blockage. Be
sure to reassemble lower tube and
tighten the lower tube connector
before continuing use.
Lubrication
The motor and brushroll are equipped with bearings which contain sufcient lubrication for their
lifetime. The addition of lubricant could cause damage. Do not add lubricant to motor or brushroll.
The Belt
This vacuum is equipped with the Enduralife
™
Belt, which is designed for long life and doesn’t need changing.
Motor Protections
If the vacuum becomes overloaded (which could occur when a large obstruction is sucked up or
when vacuuming extremely thick carpet), the electronics are designed to shut down the vacuum. If
this happens, the vacuum will automatically shut off. To reset the vacuum, turn the unit to “O” or off,
then turn on to continue use. If it shuts down again there may be a large obstruction in the vacuum.
See Clearing Clogs for the steps on clearing a clog from the air path.
Service
Annual Service Tune-ups will keep your Oreck
®
vacuum operating at optimal performance
for years to come. Oreck
®
Clean Home Centers and Oreck
®
Authorized Retail Dealers offer
customized maintenance, expert repair and specialized service to ensure the best cleaning
experience at every use.
IF YOU NEED ASSISTANCE
Please call 1-800-406-2005 (Mon-Fri 8am-5pm EST) to speak with a customer
service representative; or visit our website at Oreck.com.
WARNING:
TO REDUCE THE RISK OF INJURY FROM MOVING PARTS — REMOVE BATTERY
BEFORE CLEANING OR SERVICING.

17
Troubleshooting
Problem Possible Cause Possible Solution
Vacuum won’t run 1. Auto Stop feature has been
triggered.
1. Unit may have been put in upright position while on.
Recline the unit turn the power to “0” or Off and
then turn back on.
2. Your battery may not be inserted
properly.
2. Make sure the battery is fully seated in battery
cavity.
3. Your battery may not be charged.3. Check the Charge Level Indicator and charge the
battery if it’s low.
4. Your battery may be too hot.4. Remove battery and let cool for 30 minutes, replace
battery and retry or replace with second charged
battery.
5. There may be internal
component damage.
5. Call for service: 1-800-406-2005.
Vacuum won’t pick
up OR Low suction 1. Filter Bag full and/
or lower tube clogged.
1. Empty Filter Bag - Pg. 10
2. Broken or worn belt. 2. Replace belt - Pg. 13-14
3. Brushroll and/ or Lower
Tube.
3. Check Lower Tube- Pg. 15-16
Check Brushroll - Pg. 13-14
WARNING:
IF APPLIANCE OR CHARGER IS NOT WORKING AS IT SHOULD, HAS BEEN DROPPED,
DAMAGED, LEFT OUTDOORS, OR DROPPED INTO WATER, CALL CUSTOMER SERVICE AT 1-800-406-2005 PRIOR TO CONTINUING USE.
MODE BATTERY PACK RED LED ON
CHARGER WHITE LED ON
CHARGER ACTION
NEEDED
POWER Without Battery Pack On for 3 seconds On for 3 seconds Ready to charge battery
pack
TESTING
Hot Battery Pack ON OFF
When battery pack reach-
es normal temperature,
charger begins charge
mode
COLD Battery Pack ON OFF
When battery pack reach-
es normal temperature,
charger begins charge
mode
DEFECTIVE Defective Flashing OFF Battery pack or charger is
defective
• If defective, try to repeat the conditions a second time be removing and reinstalling the battery pack. If LED status repeats a second time,
try charging a different battery.
• If a different battery charges normally, dispose of the defective pack
• If a different battery also indicates “Defective”, the charger may be defective.
CHARGING Charging – LED lights
will ash depending on
charge level
OFF Flashing Battery is being charged
FULL Charged – lights will
go off OFF On for 15 seconds
Charging is complete;
charger maintains charge
mode
TROUBLESHOOTING

18
3 YEAR LIMITED WARRANTY
SERVICE INFORMATION & LIMITED WARRANTY FOR Oreck®PRODUCTS
If you require warranty assistance or have questions about your Oreck product, contact Oreck Customer Service. For service in the U.S. or
Canada, dial 800-406-2005. Costs of any shipping and/or transportation to and from any place of repair are to be paid by the owner. Identify
your product by the model number and manufacturing code when requesting information or ordering replacement parts. (The model number
and manufacturing code for the product appears on the bottom of the vacuum foot and on the back of the charger). LIMITED Three YEAR
WARRANTY (DOMESTIC USE) (LIMITED THREE YEAR BATTERY WARRANTY)
WHAT THIS WARRANTY COVERS:
This limited warranty provided by Royal Appliance Mfg. Co., doing business as TTI Floor Care North America (referred to hereafter as “Oreck”)
applies only to products purchased in the U.S. (including its territories and possessions), a U.S. Military Exchange, or Canada. When used and
maintained in normal household use and in accordance with the Owner’s Guide, your Oreck product and battery are warranted against original
defects in material and workmanship for three years from the date of original purchase (the “Warranty Period”). If Oreck determines that the
issue you are experiencing is covered under the terms of the product warranty (a “covered warranty claim”), we will, at our sole discretion and
free of charge (subject to the cost of shipping), either repair your product or ship you a replacement product, subject to availability. Parts and
replacements may be new, refurbished, lightly used, or remanufactured, in Oreck’s sole discretion. If parts and replacements are unavailable,
we may, at our discretion, provide a similar product of equal or greater value, a store credit (if applicable), or a refund of the actual purchase
price at the time of the original purchase, as reected on the original sales receipt.
WHO THIS WARRANTY COVERS:
Limited warranty extends only to the original retail purchaser, with original proof of purchase from Oreck or an authorized dealer of Oreck
products, in the U.S., U.S. Military Exchanges, and Canada.
HOW TO MAKE A WARRANTY CLAIM:
If this product is not as warranted, contact Oreck Customer Service. Please have available the proof of purchase and model number for the
warranted product.
WHAT THIS LIMITED WARRANTY DOES NOT COVER:
This warranty does not cover use of the product in a commercial operation (such as maid, janitorial, and equipment rental services, or any
other income-generating activity); improper maintenance of the product; the product if it has been subject to misuse, negligence, neglect,
vandalism, or the use of voltages other than that on the data plate of this product. This warranty does not cover damage resulting from an act
of God, accident, owner’s acts or omissions, service of this product by other than Oreck or a Oreck authorized service provider (if applicable), or
other acts beyond the control of Oreck. This warranty also does not cover use outside the country in which the product was initially purchased,
or resale of the product by the original owner. Pick-up, delivery, transportation, and house calls are not covered by this warranty. In addition,
this warranty does not cover any product that has been altered or modied; repairs made necessary by normal wear; or the use of parts or
accessories which are either incompatible with the Oreck product or adversely affect its operation, performance, or durability. Normal wear
items that are not covered under this warranty include, but are not limited to, belts, lters, brush rolls, blower fans, blower and vacuum tubes,
and vacuum bags and straps. Please call Oreck Customer Service at 800-406-2005, for information on how to ship this product. This warranty
does not apply to products purchased outside the United States, a U.S. Military Exchange, or Canada.
OTHER IMPORTANT TERMS:
This warranty is not transferable and may not be assigned; any assignment made in contravention of this prohibition is void. This warranty
shall be governed and construed under the laws of the state of North Carolina. The Warranty Period will not be extended by any replacement
of batteries or parts or repair performed under this warranty. THIS WARRANTY IS THE EXCLUSIVE WARRANTY AND REMEDY, AND ALL
EXPRESS AND IMPLIED WARRANTIES OTHER THAN THE LIMITED WARRANTY SET FORTH ABOVE, INCLUDING IMPLIED WARRANTIES
OF MERCHANTABILITY AND FITNESS FOR A PARTICULAR PURPOSE, ARE EXPRESSLY DISCLAIMED. IN NO EVENT WILL HOOVER BE
LIABLE FOR ANY SPECIAL, INDIRECT, INCIDENTAL OR CONSEQUENTIAL DAMAGES OF ANY KIND OR NATURE TO OWNER OR ANY PARTY
CLAIMING THROUGH OWNER, WHETHER BASED IN CONTRACT, NEGLIGENCE, TORT, OR STRICT PRODUCTS LIABILITY OR ARISING FROM
ANY CAUSE WHATSOEVER. TO THE EXTENT PERMITTED BY APPLICABLE LAW, NO WARRANTIES THAT ARISE BY OPERATION OF LAW,
IF APPLICABLE, SHALL EXCEED THE DURATION OF THE LIMITED WARRANTY PROVIDED HEREIN. HOOVER’S LIABILITY FOR DAMAGES TO
YOU FOR ANY COSTS WHATSOEVER ARISING OUT OF THIS STATEMENT OF LIMITED WARRANTY SHALL BE LIMITED TO THE AMOUNT
PAID FOR THIS PRODUCT AT THE TIME OF ORIGINAL PURCHASE AND HOOVER SHALL NOT BE LIABLE FOR ANY DIRECT, INDIRECT,
CONSEQUENTIAL, OR INCIDENTAL DAMAGES ARISING OUT OF THE USE OR INABILITY TO USE THIS PRODUCT. Some states do not allow
the exclusion or limitation of incidental or consequential damages, disclaimers of implied warranties, or limitations on the duration of implied
warranties, so the above exclusions, disclaimers, and/or limitations may not apply to you. This warranty gives you specic legal rights, and
you may also have other rights, which vary from state to state.
Dust escaping
from vacuum
1. Filter Bag full. 1. Empty Filter Bag - Pg. 10
2. Filter Bag not installed
correctly.
2. Review Filter Bag removal &
replacement - Pg. 10
3. Tubes not installed correctly. 3. Review Tube installation.
Vacuum is difcult
to push or won’t
move forward
1. Wiper blade and metal guards. 1. Refer to Pg. 12
Smoky/burning
smell detected
1. Belt broken or stretched. 1. Replace brushroll belt - Pg. 13-14
2. Brushroll is clogged. 2. Clear/ remove debris from
brushroll - Pg. 12
Table of contents
Other Oreck Vacuum Cleaner manuals

Oreck
Oreck VENTURE User manual

Oreck
Oreck XL3605HH User manual

Oreck
Oreck Magnesium OK2 User manual

Oreck
Oreck ElectrikBroom BR225 User manual

Oreck
Oreck Pro-12 User manual

Oreck
Oreck XLPRO6 User manual

Oreck
Oreck ELEVATE Conquer UK30300COM User manual

Oreck
Oreck XL U2555RH User manual

Oreck
Oreck 600 ECC User manual

Oreck
Oreck Grab It & Steam It User manual

Oreck
Oreck XL2606HH User manual

Oreck
Oreck XL BB877-RD User manual

Oreck
Oreck XL U2000RB2L-1 User manual

Oreck
Oreck XLPRO6 User manual

Oreck
Oreck XL2800HAY User manual

Oreck
Oreck XL PLATINUM PLUS 79030-01REVA User manual

Oreck
Oreck XL U3760HH User manual

Oreck
Oreck Vacuum Cleaners User manual

Oreck
Oreck XL2000RH User manual

Oreck
Oreck XL2330HS User manual