Oregon Scientific TW339 User manual

EN
2.4GHz Digital Cordless Telephone with Caller ID and
Indoor/Outdoor Temperature
Teléfono Inalámbrico Digital de 2,4GHz con Identificación
de llamada y lectura de la Temperatura interior/exterior
Model: TW339/TW339H
User Manual
Manual de Usuario
TW339 manual_Eng 6.p65 3/9/05, 4:21 PM1

EN
TW339 manual_Eng 6.p65 3/9/05, 4:21 PM2

EN
IMPORTANT SAFETY INSTRUCTIONS . . . 1
SAFETY TIPS . . . . . . . . . . . . . . . . . . . . . . 2
INTRODUCTION . . . . . . . . . . . . . . . . . . . 2
Key Features . . . . . . . . . . . . . . . . . . . .2
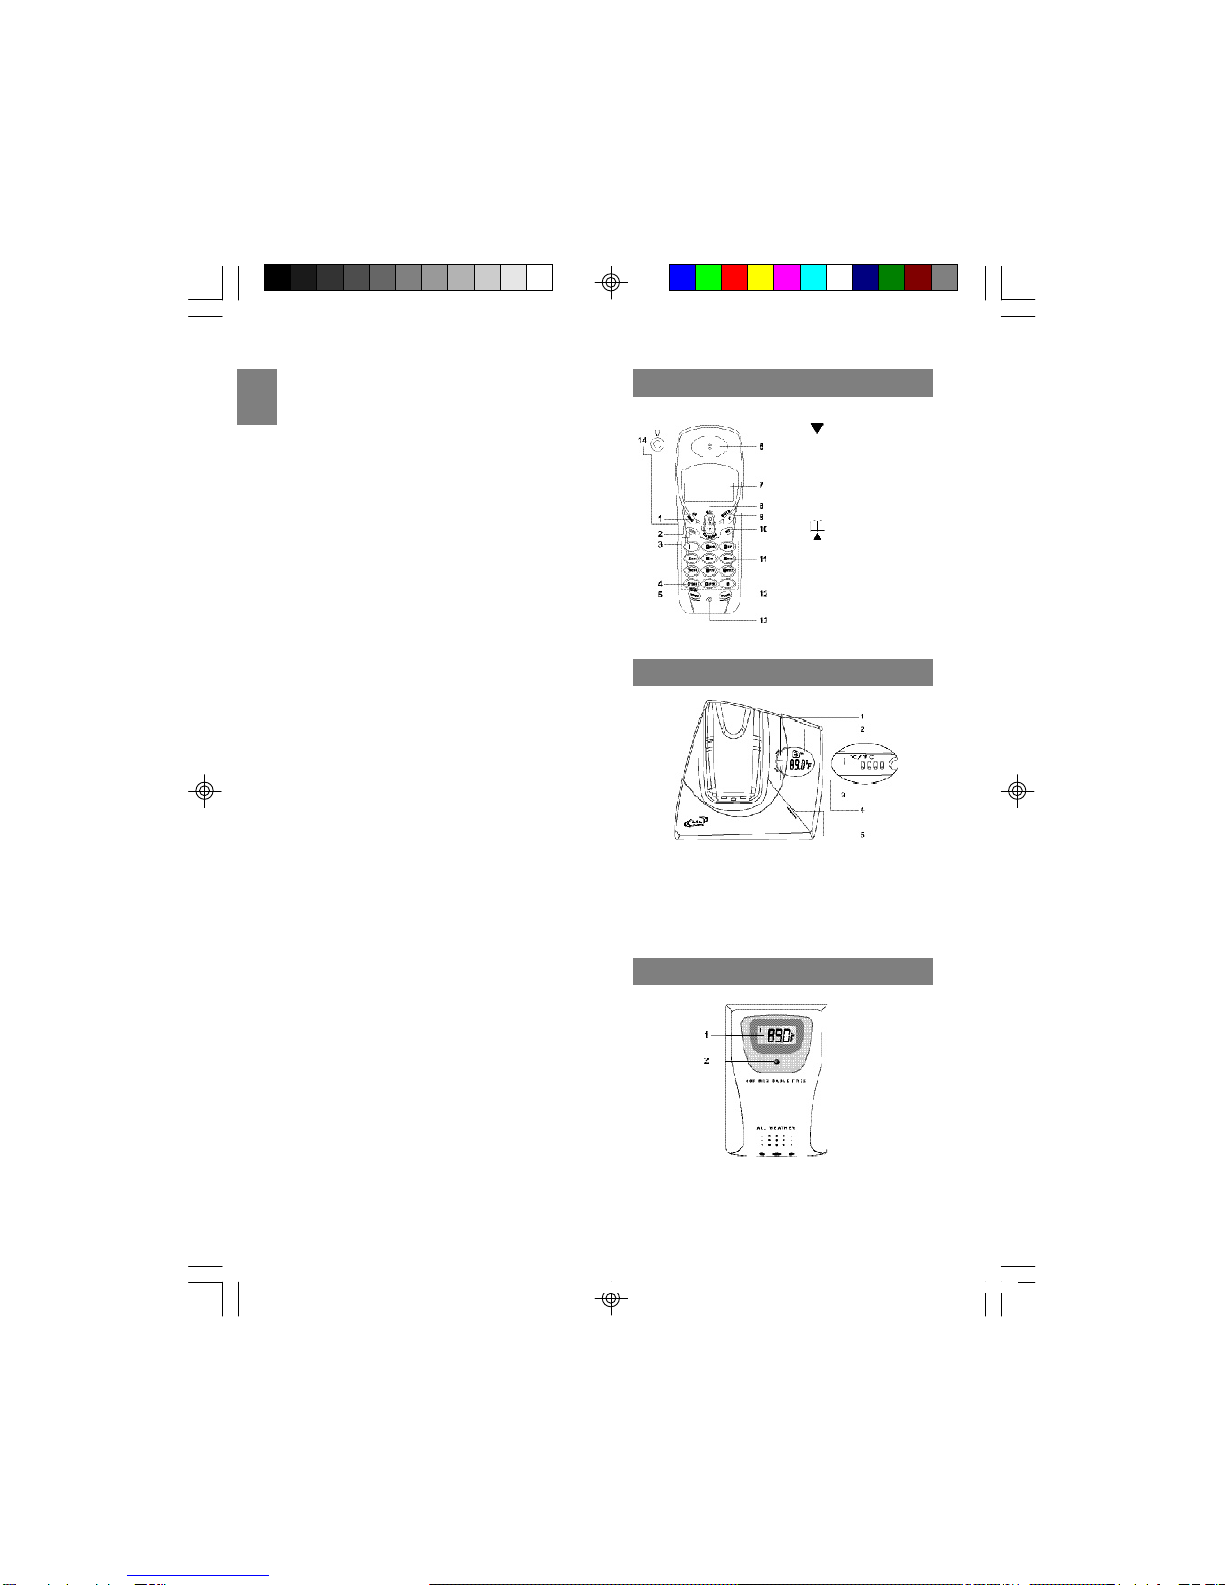
Handset – Front View . . . . . . . . . . . . . . . 3
Base Charger – Front View . . . . . . . . . . . 3
Remote Sensor – Front View . . . . . . . . . . 3
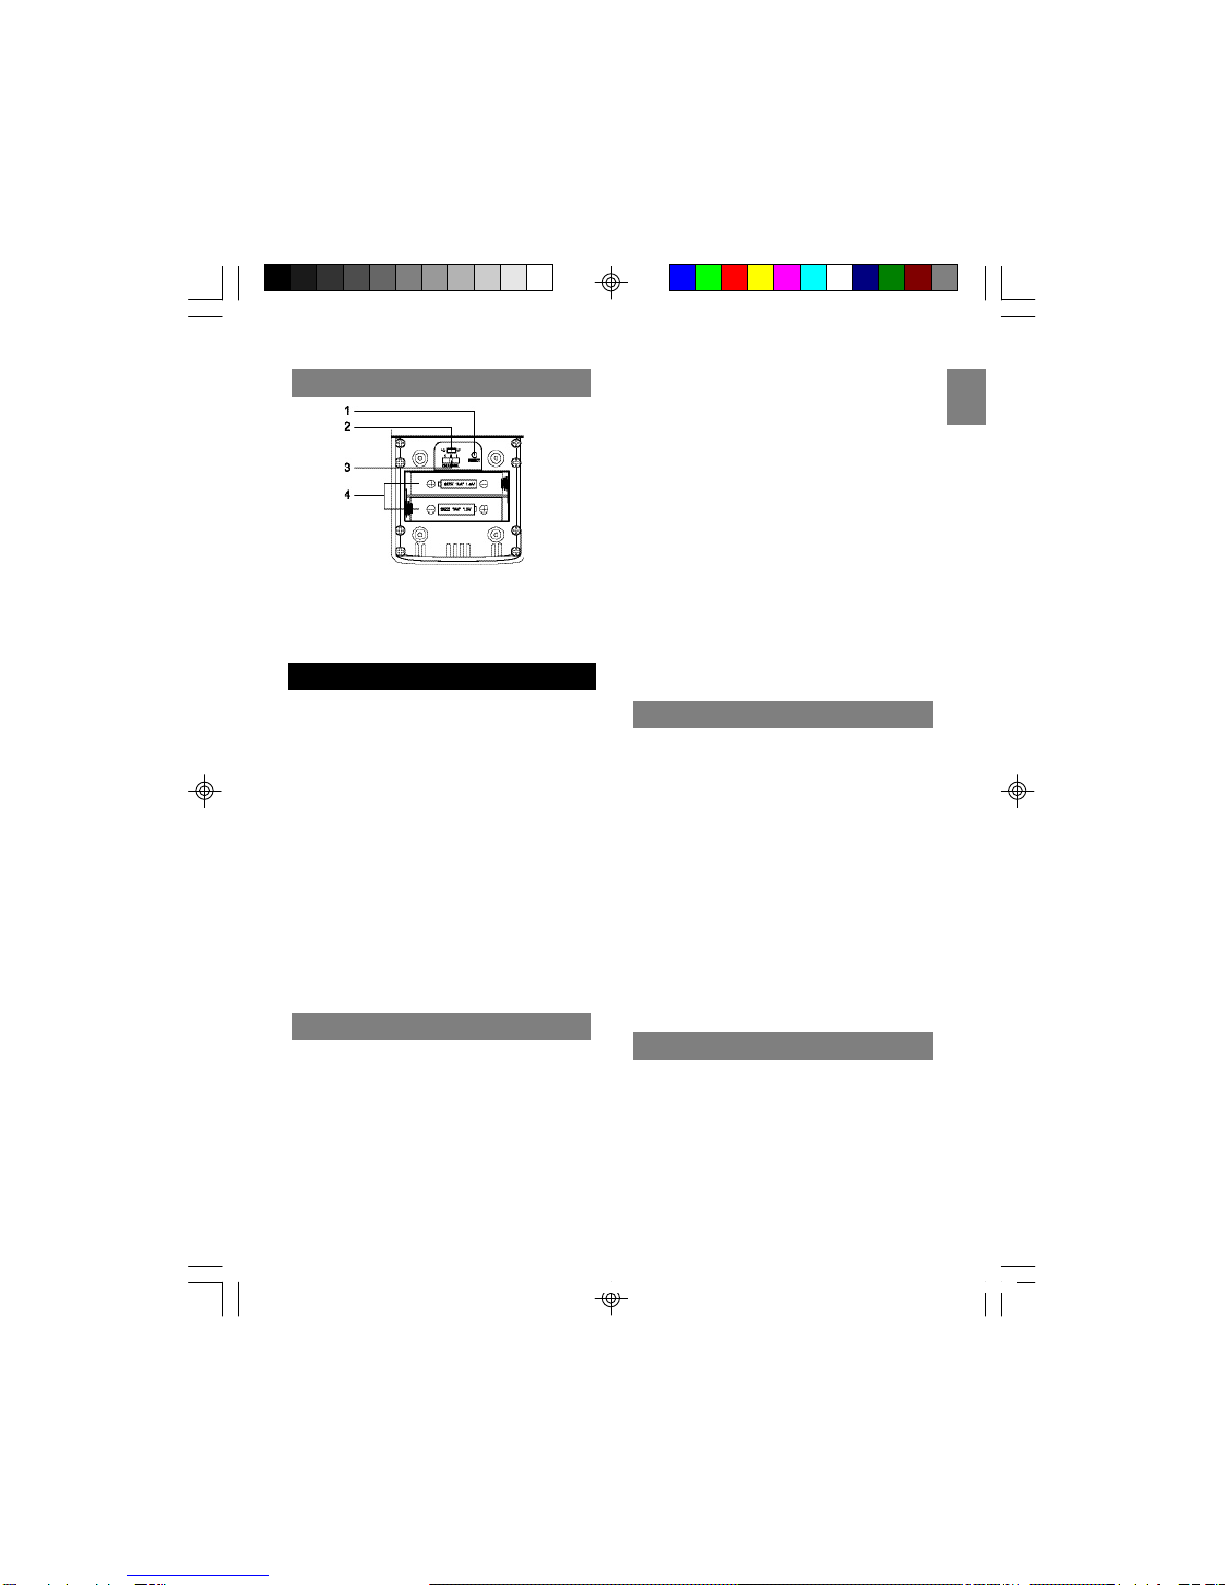
Remote Sensor – Back View . . . . . . . . . . .4
GETTING STARTED . . . . . . . . . . . . . . . . . . 4
Choosing a Base Unit Location . . . . . . . . 4
Connecting the Base Unit . . . . . . . . . . . . 4
Remote Sensor Set-up . . . . . . . . . . . . . . 4
Changing the Remote Sensor Channel . . . 5
Battery Set-up . . . . . . . . . . . . . . . . . . . . 5
Charging Handset Batteries . . . . . . . . . . . 5
Temperature Unit . . . . . . . . . . . . . . . . . . 5
INITIAL PROGRAMMING . . . . . . . . . . . . . . . 6
Language Setting . . . . . . . . . . . . . . . . . . 6
Handset Name . . . . . . . . . . . . . . . . . . . 6
Dial Mode . . . . . . . . . . . . . . . . . . . . . . . 6
Flash Time . . . . . . . . . . . . . . . . . . . . . . 6
Key Lock . . . . . . . . . . . . . . . . . . . . . . . 6
Key Tone . . . . . . . . . . . . . . . . . . . . . . . 7
Handset Ring Tone . . . . . . . . . . . . . . . . 7
Handset Ring Volume Level . . . . . . . . . . 7
Earpiece Volume Level . . . . . . . . . . . . . . 7
Auto Answer On/Off . . . . . . . . . . . . . . . . 7
Clear Message Waiting . . . . . . . . . . . . . . 8
BASICS . . . . . . . . . . . . . . . . . . . . . . . . . . . 8
Stand-by Mode . . . . . . . . . . . . . . . . . . . 8
Receiving a Call . . . . . . . . . . . . . . . . . . 8
Making a Call . . . . . . . . . . . . . . . . . . . . 8
Correcting a Call . . . . . . . . . . . . . . . . . . 8
Redialing . . . . . . . . . . . . . . . . . . . . . . . 8
Returning Missed Calls . . . . . . . . . . . . . . 9
The Mute Key . . . . . . . . . . . . . . . . . . . . 9
Handset Locator . . . . . . . . . . . . . . . . . . 9
Low Battery Warning . . . . . . . . . . . . . . . 9
Voice Mail Indicator . . . . . . . . . . . . . . . . 9
TABLE OF CONTENTS
CALLER ID FEATURES . . . . . . . . . . . . . . . . .9
Caller ID with Call Waiting . . . . . . . . . . . . .9
Caller ID List . . . . . . . . . . . . . . . . . . . . . .10
Reviewing Your Caller ID List . . . . . . . . . . 10
Deleting Entries From Caller ID List . . . . . . 10
DIRECTORY . . . . . . . . . . . . . . . . . . . . . . . . .10
Storing a Name/Numbers in Your Directory ..11
Making Calls from Your Directory . . . . . . . .11
Deleting an Entry . . . . . . . . . . . . . . . . . . .11
Changing a Stored Entry . . . . . . . . . . . . . .12
Store Caller ID Entries in Your Directory . . .12
MULTI-HANDSET CONFIGURATION. . . . . . . . 12
To Register a New Handset . . . . . . . . . . . .12
Identifying a Handset on the Network . . . . 13
Intercom (Internal) Calls . . . . . . . . . . . . . . 13
Intercom Ring Tone . . . . . . . . . . . . . . . . . 13
Call Togging . . . . . . . . . . . . . . . . . . . . . . 13
3-Way Conference Call . . . . . . . . . . . . . . 13
Call Waiting . . . . . . . . . . . . . . . . . . . . . . 14
Transfer Calls Between Handsets . . . . . . . 14
Call Back . . . . . . . . . . . . . . . . . . . . . . . . 14
TEMPERATURE MONITORING . . . . . . . . . . . . 14
Indoor Temperature . . . . . . . . . . . . . . . . . 14
Outdoor Temperature . . . . . . . . . . . . . . . . 15
Sensor Search . . . . . . . . . . . . . . . . . . . . .15
Change Remote Control . . . . . . . . . . . . . . 15
CHANGING THE HANDSET BATTERY . . . . . . . 15
Replacing the Battery . . . . . . . . . . . . . . . .15
RECYCLINGNICKEL-METAL HYDRIDE
BATTERIES . . . . . . . . . . . . . . . . . . . . . . . . . 16
HEADSET JACK AND BELT CLIP . . . . . . . . . . 16
Belt Clip . . . . . . . . . . . . . . . . . . . . . . . . . 16
POWER FAILURE . . . . . . . . . . . . . . . . . . . . 16
LCD SCREEN MESSAGES . . . . . . . . . . . . . . 16
Light Signals . . . . . . . . . . . . . . . . . . . . . . 17
Sound Signals . . . . . . . . . . . . . . . . . . . . . 17
TROUBLESHOOTING . . . . . . . . . . . . . . . . . .17
Telephone . . . . . . . . . . . . . . . . . . . . . . . . 17
Multi-handset Use . . . . . . . . . . . . . . . . . . 18
Caller ID . . . . . . . . . . . . . . . . . . . . . . . . .18
Remote Sensor . . . . . . . . . . . . . . . . . . . . 18
Causes of Poor Reception . . . . . . . . . . . . 18
MAINTENANCE AND CARE . . . . . . . . . . . . . . 19
MAXIMIZING BATTERY PERFORMANCE . . . . . 19
SPECIFICATIONS . . . . . . . . . . . . . . . . . . . . .19
ABOUT OREGON SCIENTIFIC . . . . . . . . . . . 20
FCC STATEMENT . . . . . . . . . . . . . . . . . . . . . 20
CONSUMER INFORMATION . . . . . . . . . . . . . 21
DECLARATION OF CONFORMITY . . . . . . . 22
2.4GHzDigitalCordlessTelephone
withCaller ID andIndoor/Outdoor
Temperature
Model: TW339/TW339H
USER MANUAL
TW339 manual_Eng 6.p65 3/9/05, 4:21 PM3

EN
IMPORTANT SAFETY INSTRUCTIONS
1
Some of the following information may not apply
to your particular product; however, when using
conference phone equipment, basic safety
precautions should always be followed to reduce
the risk of fire, electric shock and injury to
persons, including the following:
1. Read and understand all instructions.
2. Follow all warnings and instructions marked
on the product.
3. Unplug this product from the wall outlet
before cleaning. Do not use liquid cleaners or
aerosol cleaners. Use a damp cloth for
cleaning.
4. This product should not be used while you are
in a bathtub, shower or pool. Immersion of
the product in water could cause an electrical
shock.
5. Slots and openings in the cabinet back or
bottom are provided for ventilation, to protect
it from overheating. These openings must not
be blocked or covered. The openings should
never be blocked by placing the product on a
bed, sofa, rug, or other similar surface.
This product should not be placed in a built-in
installation unless proper ventilation is
provided.
6. This product should be operated only from
the type of power source indicated on the
marking label. If you are not sure of the type
of power supply to your home, consult your
dealer or local power company.
7. Do not allow anything to rest on the power
cord.Do not locate this product where the
cord will be abused by persons walking on it.
8. Do not overload wall outlets and extension
cords as this can result in the risk of fire or
electric shock.
9. Never push objects of any kind into this
product through the cabinet slots as they
may touch dangerous voltage points or short
out parts that could result in a risk of fire or
electric shock. Never spill liquid of any
kind on the product.
10. To reduce the risk of electric shock, do not
disassemble this product, but take it to a
qualified serviceman when service or repair
work is required. Opening or removing covers
may expose you to dangerous voltages or
other risks. Incorrect reassembly can cause
electric shock when the telephone equipment
is subsequently used.
11. Do not expose the product to extreme
temperatures such as areas near a hot radiator,
or stove, or in a hot car.
12. Do not place lighted candles, cigarettes, cigars,
etc., on the telephone.
13. Never touch uninsulated telephone wires or
terminals unless the telephone line has been
disconnected at the network interface.
14. Never install or modify telephone wiring during
a lightning storm.
15. Never install telephone jacks in wet locations
unless the jack is specifically designed for wet
locations.
16. Use caution when installing or modifying tele-
phone lines to prevent electrical shock and / or
fire.
17. Unplug this product from the wall outlet and
refer servicing to qualified service personnel
under the following conditions:
•When the power supply cord or plug is
damaged or frayed.
•If the product has been exposed to rain or
water.
•If the product does not operate normally by
following the operating instructions.
•If the product’s cabinet has been damaged.
•If the product exhibits a distinct change in
performance.
18. Avoid using a telephone (other than a cordless
type) during an electrical storm. There may be a
remote risk of electric shock from lightning.
19. Do not use the telephone to report a gas leak in
the vicinity of the leak.
20. Do not place this product on an unstable cart,
stand or table. The product may fall, causing
serious damage to the product.
21. Plug the adaptor to a socket-outlet which is near
the equipment and is easily accessible.
22. Risk of explosion if battery is replaced by
an incorrect type, use only SANIK, 3SN-
AAA75H-S-J1F. Dispose of used batteries
TW339 manual_Eng 6.p65 3/9/05, 4:21 PM4

EN
2
SAFETYTIPS
INTRODUCTION
This product is designed to give you years of
service if handled properly. Observe the following
guidelines:
•Clean the unit with a damp cloth and mild
detergent. Avoid dropping the unit or placing it in
a high-traffic location.
•Never immerse the unit in water. This can cause
electrical shock and damage the unit.
•Do not subject the Base Unit to extreme force,
shock, or fluctuations in humidity.
•Do not tamper with the internal components.
•Do not mix new and old batteries or batteries of
different types.
•Remove the batteries if storing this product for
a long period of time.
•Do not scratch the LCD display.
•Do not make any changes or modifications to
this product. Unauthorized changes may void
your right to use this product.
•The technical specifications for this product and
the contents of the user manual are subject to
change without notice.
CAUTION
To reduce the risk of fire, use only No. 26 AWG
or larger telecommunication line cord.
CAUTION
You must use a Class 2 power source
that provide in package. Its plug must
fit the phone’s DC IN 9V jack. The
supplied adapter meets these specifications.
Using an adapter that does not meet these
specifications could damage the phone or the
adapter. Always connect the AC adapter to the
phone before you connect it to AC power.
When you finish, disconnect the adapter from
AC power before you disconnect from the
phone.
SAVE THESE INSTRUCTIONS
Congratulations on your purchase of this Oregon
Scientific telephone. Your 2.4GHz digital cordless
telephone is a high-quality home communications
product with many advanced features.
It is carefully designed and produced by a world
leader of consumer electronic equipment. With
proper maintenance and care, your new telephone
will provide you with years of enjoyment and
service.
KEYFEATURES
Your 2.4GHz Digital Cordless Telephone With
Caller ID and Indoor/Outdoor Temperature
features:
Superior Range - The use of the 2.4GHz
frequency band for signal transmission means
greater communication range for you, compared
to conventional 46–49MHz cordless telephones.
Ultra-low Noise - High frequency communication
will significantly reduce unwanted noise levels.
Channel Auto Scan - Your new telephone uses
one of the channels in the 2.4GHz frequency
band. It automatically selects a clear channel
every time you receive or place a call.
COMPANDER PLUS Noise Reduction -This
fourth generation noise reduction technology
filters out even more background noise to give
you clear communication.
Other features of this product include:
•Caller ID memory that holds up to 30 numbers.
•Electronic telephone book that holds up to 70
numbers.
•Recognition of up to 4 additional handsets for
making handset-to-handset calls (intercom) and
3-way calls. Two handsets are shipped with this
product. Additional handsets are sold sepa-
rately.
•Microphone mute function.
•Adjustable ring tones, volume levels, language
display, handset IDs and low-battery / out-of-
rangewarningsignals.
•Rechargeable batteries and up to 7-hours of
continuous talk time.
•Indoor and outdoor temperature display (Celsius
or Fahrenheit).
according to the instructions.
23. For servicing or replacement, you can purchase
a suitable headset through service center or
retailer shop (see in www. oregonscientic.com).
TW339 manual_Eng 6.p65 3/9/05, 4:21 PM5

EN
3
•Wireless, splash-proof remote sensor.
•Register up to 2 additional remote sensors for
displaying individual room or outdoor tempera
ture information.
IMPORTANT: To use all of the features of this
telephone, you must subscribe to either the
standard Name/Number Caller ID Service or
Caller ID with Call Waiting Service from your local
telephone company.
The following items should be included in the
TW339/TW339Hpackage:
•Base unit
•Handset cradle (for TW339H)
•1 handsets (2 handsets for TW339H)
•1 AC adaptor (2 AC adaptors - Base: PI-41-
735US, Handset charger: A10920(T) for
TW339H)
•1 belt clip (2 belt clips for TW339H)
•Telephonelinecord
•Handset batteries
•Battery order sheet
•Remotesensor
•Sensor table stand
•Sensorwallmount
•Sensorbatteries
•User manual
NOTE: You need an RJ11 type modular phone
jack. If you do not have a modular jack, call your
local phone company to find out how to get one
installed.
NOTE : Please keep this manual handy as you
use your new product. It contains practical step-
by-step instruction, as well as technical specifica-
tions and warnings you should know.
HANDSET-FRONTVIEW
BASECHARGER-FRONTVIEW
1. TEMP button
2. LCD display
3. °C / °F hole (on bottom of base)
4. PAGE button
5. CHARGE/IN USE indicator
REMOTESENSOR-FRONTVIEW
1. LCD (temperature) display
2. LED indicator
1. MENU/OK key
2. key
3. TALK key
4. TONE key
5. REDIAL/PAUSE key
6. Earpiece
7. LCDscreen
8. key
9. C/MUTEkey
10.INT key
11. NUMBER keys
12.FLASH/DEL key
13.Microphone
14.Headset jack
TW339 manual_Eng 6.p65 3/9/05, 4:21 PM6

EN
4
REMOTESENSOR-BACKVIEW
1. RESET button
2. °C / °F switch
3. Channel selection switch
4. Battery compartment
GETTINGSTARTED
Some cordless telephones operate at frequencies
that may cause interference to nearby TVs,
microwave ovens and VCRs. To minimize or
prevent such interference, the base of the
cordless telephone should not be placed near or
on top of a TV, microwave oven or VCR. If such
interference continues, move the cordless
telephone farther away from these appliances.
Certain other communication devices may also
use the 2.4GHz frequency for communication
and, if not set properly, these devices may
interfere with your new telephone.
Typical devices that may use the 2.4GH
frequency include wireless audio/video senders,
wireless computer networks and multi-handset
cordless telephone systems.
CHOOSINGBASE UNITLOCATION
When selecting a location for your base unit
(which records and displays the indoor tempera-
ture), please observe the following guidelines:
•Choose a location that provides easy access
to a 120-volt AC power source.
•Choose a location that will allow the telephone
cable to reach a telephone jack. (You can use
an extension cable if necessary).
•Place the base unit as high as possible to get
a better radio frequency range with the
handset. You may need to try several
locations – such as upstairs, or near a first-
floor landing – to find the best range. Solid
structures, such as walls and doors, may
reduce the signal strength.
•Do not place the base unit near a sink, bathtub
orshower.
•Do not place the base unit near large metal
objects or electronic appliances that may
cause radio interference. Some of these
include: mirrors, filing cabinets, electric
stoves, washing machines, microwave ovens,
televisions, fluorescent lights or other
telephones.
•Do not place the unit near heat sources, such
as radiators or air ducts, or in a place subject
to direct sunlight.
CONNECTINGTHEBASEUNIT
To connect the base unit:
1. Plug the AC adaptor into the power jack on
the back of the base, and then plug the
other end into an electrical outlet.
2. Plug the telephone line cord into the
telephone line jack on the back of the base
unit, and then plug the other end into a
modular phone jack.
NOTE: The adaptor is shipped with the product.
Please check the label on the adaptor to make
sure you are using the right one.
NOTE: You need a RJ11 modular phone jack. If
you do not have a modular jack, call your local
phone company to find out how to get one
installed.
REMOTESENSORSETUP
This product measures the outdoor temperature
and then transmits the information to the base
unit. It can be used with up to 2 other remote
sensors to transmit data back to the base unit.
Additional remote sensors that measure tempera-
ture are sold separately.
NOTE: If you are using more than one remote
sensor, be sure to select a different channel for
TW339 manual_Eng 6.p65 3/9/05, 4:21 PM7

EN
5
eachsensor.
To setup your remote sensor:
1. Place the remote sensor as close as
possible to the base unit.
2. Remove the battery compartment cover by
using a Philips screwdriver to loosen the
screws, and then insert the batteries. (Be
sure to match polarities as shown).
3. Assign channel numbers 1, 2, or 3. If you
are using more than one remote sensor,
select a different channel number for each
sensor.
4. Select the temperature measurement units
°C or °F (Celsius or Fahrenheit).
5. Press the RESET button with the point of a
blunt object (such as a ball point pen).
6. Replace the battery compartment cover.
Secure.
7. Position the remote sensor using either the
stand (included) or the recess hole on the
back of the sensor.
8. Connect the adaptor to the base unit, press
and hold TEMP on the base until the CH icon
blinks. (It will take 3 minutes for the base to
search for available remote sensors even if
you only have one sensor).
9. Once the batteries are in place, the sensor
will transmit signals every 40 seconds.
NOTE: The readings shown on the base unit
depend on which remote sensor (1, 2 or 3) is
selected.
CHANGINGTHEREMOTESENSOR
CHANNEL
To change the channel on your remote sensor,
select a different channel number and then press
RESET onthesensor.
To install the battery in
your handset:
1. Open the battery
compartment cover
located at the back
of the handset.
2. Plug the battery
connector into the
socket.
3. Replace the battery
compartment cover
by sliding it in the
direction shown by the
arrow in the diagram to
the right. The cover
clicks into place when
it is secured.
BATTERYSETUP
CHARGINGHANDSETBATTERIES
You must charge the handset batteries for 15
continuous hours the first time you use them.
When the icon appears empty and “CHARGE
BATTERY” shows on the LCD screen, or if you
hear a warning beep during a call, please:
•End the call as soon as possible.
•Charge the handset by putting it back on the
base cradle with the keypad facing outwards.
(The blue CHARGE LED on the base unit
steadily lights to indicate that the handset is
charging).
NOTE: It is normal for the handset and base to
get warm when the handset is charging on the
base.
TEMPERATUREUNIT
The temperature display switch is located on the
bottom of the base unit. Use the tip of a pointed
object (such as an unfolded paperclip) to switch
between Celsius and Fahrenheit. The unit of
measurement should match the unit you selected
for the remote sensor.
NOTE: When the outdoor temperature reaches 40
1.
2.
3.
TW339 manual_Eng 6.p65 3/9/05, 4:21 PM8

EN
6
INITIALPROGRAMMING
Before using this telephone, the following initial
settings must be completed.
LANGUAGESETTING
To set the language:
1. Press MENU/OK to enter the options menu.
2. Scroll or until you see “LANGUAGE”.
3. Press MENU/OK to enter settings.
4. Press or to select the desired
language (English, Spanish or French). The
default language is English.
5. Press MENU/OK to confirm.
°C (104 °F) or higher, the base unit will display
“HI”. When the outdoor temperature falls below
-20 °C, the base unit will display ‘LO”.
HANDSETNAME
You can use up to 16 characters to name a
handset. The name will appear in the handset
display screen while in standby mode.
To name your handset:
1. Press the MENU/OK key.
2. Press or to select “HANDSET
NAME”.
3. Press MENU/OK to begin settings, “NAME”
will appear on the handset display.
4. Enter a name for your handset. (Please refer
to the STORING A NAME/NUMBER IN THE
DIRECTORY section for details about how to
input characters).
5. Press MENU/OK to save the name.
DIALMODE
This phone is compatible with pulse-dialing (rotary)
and tone-dialing (DTMF) systems. If your have
touch-tone service, do nothing as your phone has
been set to DTMF by default prior to shipment. If
you do not know which type of service you have,
contact your local telephone company.
To set the dial mode:
1. Press the MENU/OK key.
2. Press or to select “DIALING” from
the options.
3. Press the MENU/OK key.
4. Press or to select “DIAL METHOD”
from the submenu.
5. PressMENU/OK.
6. Press or to select “PULSE” or
“DTMF”mode.
7. Press MENU/OK to confirm your selection.
To return to standby mode, pressC/MUTE
repeatedly.
FLASHTIME
Consult with your telephone company before
changing the flash time setting. Changing this
setting may cause your telephone company
service (such as call waiting) to not work properly.
To select flash time:
1. Press the MENU/OK key.
2. Press or to select “DIALING” from
the options.
3. Press the MENU/OK key.
4. Press or to select “FLASH TIME”
from the submenu.
5. PressMENU/OK.
6. Press or to select “LONG” or
“SHORT”. (The default setting is LONG).
7. Press MENU/OK to confirm your selection.
KEYLOCK
You can lock the keypad to prevent keys from
accidentally being pressed.
To lock the keypad:
1. PressMENU/OK.
2. Press or to scroll to “KEY LOCK”.
3. Press MENU/OK to enter the “KEY LOCK”
submenu.
4. Press or to select “ON”.
5. Press MENU/OK to confirm settings. (The
default setting is OFF).
To unlock the keypad, press 1, 5, and 9 to unlock
the keypad. (The key lock is disabled in the event
of an incoming call, but returns to key lock when
TW339 manual_Eng 6.p65 3/9/05, 4:21 PM9

EN
7
the call ends).
NOTE : To dial an emergency number while the
keypad is locked, press TALK, followed by the
emergency number (000, 110, 112, 119, 911,
999).
KEYTONE
Turn this feature on to hear a tick every time a
key is pressed on the keypad. (This option is not
available when the keypad is locked).
To activate the key tone option:
1. Press theMENU/OK.
2. Press or to scroll to “KEY CLICK”.
3. PressMENU/OK.
4. Press or to select ON or OFF.
5. Press MENU/OK to confirm settings. (The
default setting is ON).
HANDSETRINGTONE
You have a choice of 10 ring tones for both
internal and external calls. Therefore you can tell
from the sound of the ring whether the call is
coming from an external or internal source if you
want.
To select a ring tone:
1. Press the MENU/OK key.
2. Press or to select “RING PATTERN”
from the options.
3. Press MENU/OK toselect.
4. Select the ring tone you wish to change
(internal or external) by pressing or .
5. Press MENU/OK to enter the ring tone
selection submenu.
6. Press the or keys, or the number
keys (0-9) to choose a ring tone sound (0-9).
7. Press MENU/OK to confirm settings. (The
external ring default setting is 0. The internal
ring default setting is 1).
NOTE: To return to standby mode, pressC/MUTE
repeatedly.
HANDSETRINGVOLUMELEVEL
To change the ring volume level while the handset
is in standby mode:
1. Press the MENU/OK key.
2. Press or to select “RING VOLUME”
from the options. (There are 7 volume
levels).
3. Press MENU/OK to enter settings.
4. Press (to increase) (to decrease) the
volume, or press the number keys (0-6) to
select the desired ring level.
5. Press MENU/OK to confirm settings. (The
default setting is 4).
NOTE : You can turn the ringer off by setting the
volume level to zero.
EARPIECEVOLUMELEVEL
To change the volume level while the handset is in
standby mode:
1. Press the MENU/OK key.
2. Press or to select “HANDSET
VOLUME” from the menu. (There are 8
volume levels for the handset).
3. Press MENU/OK to enter settings.
4. Press (to increase) (to decrease) the
volume, or press the number keys (0-7) to
select the desired volume level.
5. Press MENU/OK to confirm settings. (The
default setting is 4).
NOTE: To change the volume while a call is in
progress, press or until you reach the
desired level.
AUTOANSWERON/OFF
The auto-answer feature allows you to answer a
telephone call as soon as you lift the handset
from the cradle in the base unit.
To activate the auto-answer feature:
1. Press the MENU/OK key.
2. Press or to find “AUTO ANSWER”
from the options.
TW339 manual_Eng 6.p65 3/9/05, 4:21 PM10

EN
8
3. Press MENU/OK to enter settings.
4. Press or to select “OFF” or “ON”.
5. Press MENU/OK to confirm your selection.
(The default setting is OFF).
CLEARMESSAGEWAITING
To clear message waiting:
1. Press the MENU/OK key.
2. Press or to select “CLEAR MSG
WAIT”.
3. PressMENU/OK.Thescreen willshow
“CONFIRM?”
4. Press MENU/OK again to confirm, or press
C/MUTE repeatedly to return to stand-by
mode.
BASICS
When you first set up your telephone, you may
hear a beeping tone and see “OUT OF SERVICE”
on the handset display area. This is normal. It
means that the handset needs to synchronize with
the base unit before you can use it.
Place the handset on the charger for a few
seconds until “READY” appears on the handset
display.
STAND-BYMODE
If the handset is synchronized with the base unit
and is not “in use” or in “programming mode”,
“READY” (or a name if entered) will appear on the
LCD display. This is standby mode.
RECEIVINGACALL
When an incoming call is received, the handset
will ring, “EXTERNAL CALL” will show on the
display and the in-use LED on the base unit will
flash. If you are already on the line, a beep will
announce you have a call waiting.
NOTE: If you subscribe to a caller ID service
from your phone company, caller ID information
will be shown on the display instead of “EXTER-
NAL CALL”.
To receive a call:
1. Press TALK, the #key or any number key
(0-9) to answer a call.
2. Press the TALK button again to hang up.
NOTE: If the handset is in the base cradle,
remove it from the base before pressing the TALK
key. If “AUTO ANSWER” is enabled, you can
accept an incoming call by simply lifting the
handset off the base.
NOTE: If you place the handset back to the base
cradle, the handset will automatically hang up.
MAKINGACALL
To make a call, press TALK to get a dial tone then
enter the number, or dial the number first (up to 24
digits) then pressTALK.
To end the call, press TALK again or place the
handset on the base cradle so the handset
automatically hangs up. (“ENDED” will appear on
the display to confirm that the call has ended).
CORRECTINGACALL
You can correct a dialing error before the number
hasbeendialed(i.e.beforepressingtalk).Tocorrect
a dialing error you can do one of the following:
•Press the FLASH/DEL key to clear the digits
one by one.
•Press and hold FLASH/DEL to clear all the
digits at once.
•Press C/MUTE to clear all the digits at once.
REDIALING
To redial one of the last 5 numbers called, you can
do one of the following:
1. Make sure the phone is OFF (not in TALK
mode).
2. Press REDIAL/PAUSE repeatedly to select a
desired last number, and then pressTALK to
redial the selected number.
OR
1. Make sure the phone is ON by pressing TALK.
TW339 manual_Eng 6.p65 3/9/05, 4:21 PM11

EN
9
2. Press REDIAL/PAUSE repeatedly to scroll
through a list of numbers, and then press
MENU/OK to redial the selected number.
RETURNINGMISSEDCALLS
If you subscribe to a caller ID service through
your local network provider, this telephone can
keep track of all missed call information. When
you miss a call, the handset will display “New
Calls” along with the number of calls you missed.
To review a call history with caller ID information,
press .
Then press or to review.
To dial the selected number, press the TALK key.
THEMUTEKEY
To have an off-line conversation, use the mute
feature. The caller on the other end of the line
cannot hear you, but you will be able to hear
them.
To mute the telephone:
1. While a call is in progress, press C/MUTE on
the handset. (“MIC MUTE” will appear on the
handset display).
2. Press C/MUTE again to return to your phone
conversation. (“EXTERNAL CALL” will be shown
on the handset display).
HANDSETLOCATOR
To locate a misplaced handset, press the PAGE
key on the base unit. All handsets will beep and
the screen will show “BASE PAGING”.
To end a page, do one of the following:
•Press TALK or any key (0-9) * or # on the
handset.
OR
•Press PAGE on the base unit.
If the battery is low and the phone is in TALK
mode, a warning tone consisting of 2 short beeps
will sound from the handset earpiece every
VOICEMAILINDICATOR
When you subscribe to a voice mail service
offered by your phone company, the phone alerts
you when voice mail has been received.
“MESSAGE WAITING” appears on screen when a
voice mail is received. The orange LED on the
base unit flashes slowly to indicate there is voice
mail waiting.
After the voice mail has been viewed, the
messageindicatordisappears.
CALLERIDFEATURES
This phone receives and displays incoming call
information transmitted by your local phone
company, provided you subscribe to Voice Mail,
Caller ID, and/or Call Waiting services. This
information can include the phone number and/or
the name, date and time. The phone can store up
to 30 calls for review.
IMPORTANT: To use all of the features of this
telephone, you must subscribe to either the
standard Name/Number Caller ID Service or
Caller ID with Call Waiting Service from your
telephone company.
CALLERIDWITHCALLWAITING
When you subscribe to Caller ID with Call Waiting
(Visual Call Waiting TM ) service from your phone
company, you are able to see who is calling when
you hear the Call Waiting tone. Caller identifica-
tion information appears on screen after you hear
the tone.
Press FLASH/DEL to put the current call on hold
so that you can answer the incoming call.
NOTE: Do not use the TALK key to activate
LOWBATTERYWARNING
15 seconds. “CHARGE BATTERY” will show on
screen.
If the battery is low and the phone is in STANDBY
mode, a warning tone consisting of 2 short beeps
will sound from the handset every 15 seconds.
(“CHARGE BATTERY” shows on screen).
TW339 manual_Eng 6.p65 3/9/05, 4:21 PM12

EN
10
custom calling services such as Call Waiting, or
you will end the current call.
To return to the call, pressFLASH/PROG again.
IMPORTANT: Toknowwhoiscallingwhileyouare
on the phone, you must subscribe to Caller ID
with Call Waiting Service from your telephone
company.
CALLER ID LIST
The incoming caller information transmitted from
the phone company is received by your phone
between the first and second rings and stored in
the Caller ID list. If you answer a call before the
second ring, the caller information may not be
stored.
When the Caller ID list memory is full, a new call
automatically replaces the oldest call in memory.
An exclamation mark appears on screen for calls
received that have not been reviewed.
IMPORTANT: Toknowwhoiscallingwhileyouare
on the phone, you must subscribe to Caller IDwith
Call Waiting Service from your telephone
company.
REVIEWINGYOURCALLERIDLIST
All incoming calls with valid Caller ID information
are stored in a call log. Call log numbers shown to
the right of the telephone number marks the
number of calls in the order that they are received
(1 = the most recent). Each time a new call is
received, the call log will be resorted to display
the most recent call.
To review the Caller ID log:
1. Press MENU/OK to enter the menu.
2. Press MENU/OK to select “CALL LOG”.
3. Press to scroll through the Caller
ID list from the most recent to the oldest.
4. Press to scroll through the Caller
ID list from the most oldest to the recent.
5. Press C to exit the call log.
TIP: Press in standby mode to enter call log
quickly or press TALK to dial the number currently
displayed.
NOTE: “CALL LOG EMPTY” will show if there are
no calls.
All handsets share a common call log that is
stored in the base unit memory.
IMPORTANT: Whenmorethanonehandsetis
registered to a base unit, a call log deleted in one
handset will affect all handsets.
Deleting the displayed entry:
1. Make sure the phone is OFF (not in TALK
mode).
2. Press or to find the entry you want
to delete.
3. Press FLASH/DEL while the number you wish
to delete is displayed. “DELETE?” will show
on screen.
4. Press MENU/OK to confirm the deletion or C/
MUTEto cancel the delection.
Deleting all entries
1. Make sure the phone is OFF (not in TALK
mode.)
2. Press or to display any entry.
3. Press and hold FLASH/DEL.“DELETEALL?”
will show on screen.
4. Press MENU/OK to confirm the deletion or C/
MUTE to cancel the deletion.
DELETINGENTRIESFROMCALLER
IDLIST
This telephone can store up to 70 names and
telephone numbers. Entries are limited to 15
characters for names and 16-digit numbers for
telephone numbers and all handsets share a
common phone book that is stored in the base
unit memory.
IMPORTANT: Whenmorethanonehandsetis
registered to a base unit, any entry stored or
deleted in one handset will affect all handsets.
DIRECTORY
TW339 manual_Eng 6.p65 3/9/05, 4:21 PM13

EN
NOTE: Shared configurations are available where
individual handsets are sold. Please check with
your local distributor to find out if this option is
available in your area.
To store a name/number in your directory:
1. Press MENU/OK in standby mode.
2. Press or to select “PHONEBOOK”,
then pressMENU/OK.
3. Press or to select “STORE”, then
pressMENU/OK.
4. At the “STORE NUMBER” display, enter the
number using the keypad, including any
prefixes or country codes. (If you make a
mistake, press the FLASH/DEL key to delete
a digit one at a time. If you wish to add a
pause, press REDIAL/PAUSE once at the
desired location. Each pause counts as 1 digit
in the dialing sequence).
5. PressMENU/OK.
6. At the “STORE NAME” display, enter the
name using the keypad. The cursor advances
1 space after each key press. Within 1 sec-
ond, you can press the same key again to
select another character. If you make a mis
take, press FLASH/DEL to delete a character
one at a time. (Use the chart below as a
guide).
7. Press MENU/OK to confirm. A beep tone will
confirm that the number has been saved.
[PLEASE LAYOUT IN CHART FORMAT]
Key key of times pressed
1st 2nd 3rd 4th 5th 6th 7th8th9th
1Space1
2A B C2abc
3DEF3def
4GHI4ghi
5JKL 5 jkl
6MNO6mn o
7PQRS7 p qrs
8TUV8tuv
9WX Y Z9wxyz
00
**?! / )
# # ‘,-.&
STORING A NAME/NUMBER IN
DIRECTORY
TIP: Press FLASH/DEL to clear the last
character, then press and hold FLASH/DEL to
clear all. To return to “STANDBY MODE”, press C/
MUTE repeatedly.
NOTE: If you try to store a new number in the
phonebook when it is full, the message
“PHONEBOOK FULL” is displayed and the phone
returns to the phonebook menu after 5 seconds.
You need to delete some numbers to free up the
phonebook memory so that you can store new
numbers.
1. PressMENU/OK.
2. Press or to select “PHONEBOOK”,
then pressMENU/OK.
3. Press or to select “RECALL”, then
pressMENU/OK.
4. Press or , or enter the first character
of the desired name to select the desired
phonebook entry.
5. Press TALK tocall.
TIP: Press in standby mode to enter
phonebook quickly.
MAKING CALLS FROM THE
DIRECTORY
DELETINGANENTRY
To delete an entry from the telephone book:
1. PressMENU/OK.
2. Press or to select “PHONEBOOK”,
then pressMENU/OK.
3. Press or to select “RECALL”, then
pressMENU/OK.
4. Press or , or enter the first character
of the desired name to select the desired
phonebook entry.
5. PressFLASH/DEL.“DELETE?”showson
screen.
6. Press MENU/OK to confirm or C/MUTEto go
back. A confirmation tone can be heard and
the menu steps to the next entry.
11
TW339 manual_Eng 6.p65 3/9/05, 4:21 PM14

EN
To change an entry in the telephone book:
1. Press MENU/OK, then select “PHONE
BOOK” by pressing or .
2. PressMENU/OK.
3. Press or to select “RECALL”, then
pressMENU/OK.
4. Press or , or enter the first character
of the desired name to find the desired
phonebook entry.
5. Press MENU/OK to edit the number, “STORE
NUMBER” will appear.
6. Press FLASH/DEL or to erase a digit.
Press and hold FLASH/DEL to erase the
entire number. Then enter the corect number.
7. Press MENU/OK to edit the name. “STORE
NAME” will appear.
8. Press FLASH/DEL or to erase a character.
Press and hold FLASH/DEL to erase the
entire name. Then enter the correct name.
9. Press MENU/OK to confirm that the change
has been saved.
CHANGINGASTOREDENTRY
12
STORE CALLER ID ENTRIES IN
DIRECTORY
You can store received numbers into your
phonebook memory. Before you save an entry,
make sure the number appears in proper digits for
your dialing area. If not, change it using the
REDIAL/PAUSE key.
For example, if the Caller ID number appears 1-
416-222-5555, but it is not a long distance
number, press REDIAL/PAUSE key until it shows
416-222-5555 (without 1). The REDIAL/PAUSE key
lets you select how many digits of the number are
displayed:
•7 = 7-digit telephone number.
•10 = 3-digit area code + 7-digit telephone
number.
•11 = 1-digit long distance code + 3-digit area
code + 7-digit telephone number.
To store caller ID entries in your directory:
1. Press in standby mode to enter call log
quickly.
2. Press or to select desired Caller ID
entry.
3. PressREDIAL/PAUSE torearrangethe
format of the number displayed.
4. PressMENU/OK.“STORENUMBER”will
appear on screen.
5. Edit the number if necessary.
6. Press MENU/OK to edit the name. “STORE
NAME” will appear.
7. Edit the number if necessary.
8. Press MENU/OK to confirm the change. (A
beep wil sound to confirm the changes).
MULTI-HANDSETCONFIGURATION
The TW339H is shipped with 2 handsets (the
TW339 is shipped with one handset only) and can
work with up to 4. To purchase additional
handsets, please check the place of purchase for
more information.
TOREGISTERANEWHANDSET
The original handset(s) received with your base
unit and the cradle are automatically registered
the first time you set up the telephone. You can
add up to 2 additional handsets by registering
them with the base unit.
NOTE: If you register a handset to more than one
base, you will need to rename the handset for that
base. Otherwise, the base will recognize it as
“Handset 1”.
To register a new handset:
1. Press the MENU/OK key.
2. Press or to select “REGISTER”, and
then press MENU/OK to choose it.
3. When the handset display shows “PLEASE
WAIT”, press and hold PAGE on the base unit
until the orange in-use LED flashes quickly.
4. If the registration is successful, “SUCCESS”
will show on the handset display.
NOTE: If the registration is unsuccessful, “FAIL”
will show on the handset display. In this case, you
should try again.
TW339 manual_Eng 6.p65 3/9/05, 4:21 PM15

EN
13
IDENTIFYING A HANDSET ON THE
NETWORK
If you have more than one handset registered to
a base unit, you can identify each handset by
assigning a name to it. Please see the HANDSET
NAME section for more information.
INTERCOM(INTERNAL)CALLS
This feature only works if you have 2 or more
handsets registered to the base unit.
To make an internal call:
1. Press INT on the first handset.
2. Press or to select the desired handset
or choose “CALL ALL”.
3. Press TALK to place the call. The selected
handset will ring. If you select “CALL ALL”, all
other handsets registered to the base unit will
ring. If the selected handset is not available
(off hook or on another call), “BUSY” shows.
4. To accept the intercom call on the handset,
pressTALK.
5. To exit intercom mode on the first handset,
pressTALK.
NOTE: During the first handset calls the other
handset, there may be an incoming call in which
the first handset will hear a call waiting tone and
the other handset will return to normal incoming
call tone.
INTERCOMRINGTONE
You can change the ring tone for an intercom call
to differentiate internal from external calls. To
change the ring tone, please see HANDSET RING
TONE SETTING on page 16 for more information.
CALLTOGGLING
This feature only works if you have two or more
handsets registered to the base unit. The feature
allows you to put an external call on hold while
you place an intercom call to another handset.
To toggle between two calls:
3-WAY CONFERENCE CALL
If you have more than one handset registered
with your base unit, you can make 3-way
conference calls between an external call party
and two internal handset holders.
To initiate a 3-way conference call:
1. Establish contact with the external party by
either placing a call to that person, or
answering an incoming call.
2. Press INT then press or to choose a
handset name.
3. Press TALK to connect to the selected
handset. (The handset you paged rings. The
internal party can answer the call by pressing
the TALK key).
4. The caller who made the conference call
should press and hold the INT key for
approximately 2 seconds until “CONFER-
ENCE CALL” shows on the display and you
hear a confirmation beep. (All three parties
are connected into the call and can thus talk
together).
1. Establish contact with an external party by
either placing a call or answering an incoming
call.
2. Press INT to put the external call on hold and
enter intercom mode.
3. Press the number (1-4) for the handset you
wish to select, or use the or keys to
select the handset.
4. Press TALK to place an intercom call to the
selected handset. “H” shows on the display to
indicate the external call is on hold.
5. Press INT on the handset. This initiates call
toggling to place the intercom call on hold and
return to the external call.
6. Press the TALK key on the selected handset
to end the intercom call and return to the
external call.
NOTE: If the selected handset is not available,
“BUSY” shows and then a call back is generated.
“CALL BACK” is displayed on the handset display.
You can press TALK to return to the caller.
TW339 manual_Eng 6.p65 3/9/05, 4:21 PM16

EN
14
NOTE: You can end a 3-way conference call
exactly as you would any other call. Just press
TALK. The connection continues between the
remaining handset and the external party.
NOTE: If a handset is connected to the external
line, you can initiate a conference call from
another handset by simply picking up the handset
and pressing TALK. The first handset can hear a
beeping sound and “CONFERENCE CALL” will
show on the display.
CALLWAITING
If you receive an external call while you are
talking to someone through the intercom, you will
hear a call waiting tone. To end the intercom call
and answer the external call, press the TALK key
on any handset.
The other handset will beep and “BUSY” will show
on the screen. To end the intercom call without
answering the external call, press and hold INT for
several seconds.
You can transfer an external call from one
handset to another if you have registered more
than one handset with the base unit.
To transfer a call:
1. During a telephone conversation, press the
INT key to place the caller on hold.
2. Press or to choose the handset name
to which you wish to transfer the call.
3. Press TALK, then wait for the other handset to
answer. The handset you paged will ring, with
“INTERNAL CALL” showing on the LCD
display. Another party can answer the call by
pressingTALK.
4. Press the TALK key on the first handset, and
another handset will connect the external line.
If there is no answer, press INT again to
return to the caller.
OR
1. During a telephone conversation, press the
INT key to place the caller on hold.
TRANSFERING CALLS BETWEEN
HANDSETS
2. Press or to choose the handset name
to which you wish to transfer the call.
3. Press TALK to connect to the selected
handset. Then pressTALK again or place the
handset in the charger. You do not need to
wait for the other handset to answer.
4. The selected handset will ring and “FOR-
WARDED CALL” will show on the LCD
display. Another party can answer the call by
pressingTALK.
NOTE: If you forward a call to all handsets, all
handsets (including the one from which you are
making the call) will ring at the same time.
CALLBACK
After a call forward function has been executed, a
call back is generated in the forwarding handset if
the forwarding call is not answered within 30
seconds.
If no Caller ID information is available, “CALL
BACK” is displayed on the handset display. You
can press the TALK key to return to the caller.
NOTE: If the returned call isn’t answered within 30
seconds, the call is automatically cancelled.
The temperature is shown on the handset display
area and base unit display. You can choose to
show the temperature in Celsius or Fahrenheit
units of measurement on both the base unit and
the remote sensor(s).
TEMPERATUREMONITORING
INDOORTEMPERATURE
The handset and base unit displays indicate where
the temperature reading is coming from.
To select the Indoor Temperature, pressTEMP
(located on the base unit) repeatedly until “IN”
appears on the base unit display.
NOTE: It may take a few seconds for the handset
display to be updated.
TW339 manual_Eng 6.p65 3/9/05, 4:21 PM17

EN
15
OUTDOORTEMPERATURE
To monitor the outdoor temperature, pressTEMP
on the base unit repeatedly until “OUT” appears on
the base. (It may take a few seconds for the
handset display to be updated).
If no temperature reading displayed, press TEMP
repeatedly until the temperature is displayed
together with the “OUT” icon.
When the outdoor temperature reaches 40 °C (104
°F) or higher, the base unit will show “HI”. When
the outdoor temperature falls below –20 °C, the
base unit will show “LO“.
NOTE: This product supports up to 3 remote
sensors. Each sensor must be assigned a
different channel number (1, 2, or 3). If you
cannot locate a sensor, refer to the SENSOR
SEARCHsection below.
TIP: Place up to 3 remote sensors in important
areas of your home, such as the baby’s room,
wine cellar, greenhouse, etc. (Additional remote
sensors are sold separately).
SENSORSEARCH
Sometimes interference causes the base unit to
lose connection with a sensor. When this
happens, press and hold TEMP for 5 seconds to
initiate a remote sensor search. The CH icon will
blink while the search is in progress.
NOTE: Batteries must be installed in the remote
sensor and be in good working order. Under
normal usage, the batteries should be replaced
after one year.
NOTE: The search may take up to 3 minutes. The
remote sensor should be no further than 25
meters (82 feet) from the base unit.
CHANGING REMOTE SENSOR
CHANNELS
The wireless remote sensor uses radio frequen-
cies to communicate with the base unit. Channels
can be assigned for up to three sensors so you
can monitor the temperature in three different
locations.
When the handset operating time becomes short
even after a battery has been recharged, please
replace the battery. With normal usage, your
battery should last about one year.
For a replacement battery, please contact your
place of purchase.
CAUTION: Use only the specified battery type
(3.6V, 750mAh), and do not remove the battery
from the handset to charge it. Remember never
throw the battery into a fire, disassemble it, or
heat it, and never remove or damage the battery
casing.
NOTE: Remove the battery only if you are
storing the phone for more than 30 days.
CHANGINGTHEHANDSETBATTERY
REPLACINGTHEBATTERY
1. Make sure the telephone is turned OFF.
2. Slide off the battery compartment cover.
3. Disconnect the battery plug from the jack in
the compartment and remove the battery
pack.
4. Insert the new battery pack and connect the
cord into the jack.
5. Put the battery compartment cover back on.
6. Place handset on the base to charge the new
battery for 15 hours.
NOTE: Charge the new handset battery for 15
continuous hours prior to first use. The initial
battery charge is important to ensure best
performance.
CAUTION: To reduce the risk of fire or personal
To change the channels:
1. Remove the back cover.
2. Select the channel by sliding the channel
selector switch located inside the battery
compartment.
3. Press the RESET button with the tip of a
ballpoint pen or unfolded paper clip.
4. Replace the cover.
5. Press and hold TEMP on the base unit for 5
seconds to search for the sensor.
TW339 manual_Eng 6.p65 3/9/05, 4:21 PM18

EN
16
injury, use a 3.6 V, 750mAh battery (replacement
partnumber:001-800369-30014).
RECYCLINGNICKEL-METAL
HYDRIDEBATTERIES
Nickel-metal hydride batteries must be disposed of
properly.
Please take your used battery pack to a store
that recycles Ni-MH batteries.
An optional headset can be used with your
telephone for hands-free conversation.
To use a headset, plug it into the HEADSET jack
located on the side of the handset. When the
headset is connected, the handset earpiece and
microphone are disabled.
While the headset is connected, pressTALK to
answer or place a call.
TIP: Use the belt clip for a real hands-free
conversation experience.
NOTE: Headsets are not included.
HEADSETJACKANDBELTCLIP
BELTCLIP
To attach the belt clip to the back of the handset:
1. Slide the belt clip over the back of the
handset until the ventilation holes are aligned.
2. Gently push the belt clip until it clicks into
place.
During the period that the power is off, you will
not be able to make or receive calls with the
telephone.
After a power outage, it may take a few seconds
for the handset to reconnect to the base unit.
POWERFAILURE
The following indicators show the status of a
message or of the phone:
BASE PAGING - Someone has pressedPAGE on
the base unit.
BUSY- The dialed number or handset is busy.
CALL ALL - An intercom call has been placed to
all registered handsets.
CALL BACK - A forwarded call was not answered.
CH- Remote sensor channel. The selected
channel number will display.
CHARGING - Battery is charging.
CONFERENCE CALL - 2 handsets are on a
conference call.
ENDED - The call has ended. The elapsed time
for the call also shows.
EXT IN USE-Another handset is already on an
external call.
EXTERNAL CALL - A call was received with no
Caller ID information provided.
FAIL -Registration did not occur.
H- A call has been placed on hold.
HI - Temperature is over 60 ° C.
IN - Indoor temperature is shown.
INTERNAL CALL HANDSET # / HANDSET NAME
-An intercom call has been placed from the
displayed handset.
MIC MUTE - The handset is in mute mode.
OUT - Outdoor temperature is shown.
PRIVATE # / NAME / CALLER - Some or all of the
Caller ID information was blocked.
READY- Phone is charged and ready to make or
receive calls.
TALK - Phone is in Talk mode ready to place a
call. If on a call, the duration of the call also
shows.
UNKNOWN # / NAME / CALLER - Some or all of
the Caller ID information was not sent with the
call.
FORWARD CALL - A call is being forwarded.
DELETE? - Prompt asking if you want to erase
the current Caller ID entry or a directory entry
that is shown on screen.
DELETE ALL? -Prompt asking if you want to
erase all Caller ID information.
MESSAGE WAITING - Caller has left a message
but you must subscribe to a voice mail service
offered by your local phone company for this to
work.
LCDSCREENMESSAGES
TW339 manual_Eng 6.p65 3/9/05, 4:21 PM19

EN
STORE NUMBER -Prompt telling you to enter the
telephone number for directory.
STORE NAME - Prompt telling you to enter the
name in directory.
PHONEBOOK EMPTY- There is no record stored
in the selected directory location.
CALL LOG EMPTY- There is no record stored in
the selected call log location.
NO LINE - Telephone line is disconnected from
the base unit.
KEY LOCKED - The keypad is locked.
OUT OF SERVICE - When the handset is out of
range or the base unit experiences power failure.
CHARGE BATTERY - When the battery is low.
PLACE IN CHARGER -The battery voltage is too
low.
RINGER OFF - The ringer is switched off.
LO - Temperature falls below –20 ° C.
17
LIGHTSIGNALS
The charge / in use indicator will change under the
following conditions:
Talking Lit steadily (orange)
Charging Lit steadily (blue)
Incoming call Flashes in same pattern
as telephone ring (orange)
Voice mail Flashes every 2 seconds
(orange)
No telephone line Flashes every second
(orange)
SOUNDSIGNALS
A long warbling tone Signals an incoming call
Single tone A key is pressed
Two short beeps Call waiting / MIC mute
One long beep Confirmation tone / page
signal / call back
Threeshort beeps Error tone / out of range
Two short beeps Low battery warning
(every 15 seconds)
No dial tone
Check installation:
•Is the base unit plugged into the telephone
TROUBLESHOOTING
TELEPHONE
line and AC power source?
•If the telephone line is not properly
connected to the base unit “NO LINE” will
appear on the handset display.
•Is the AC power source turned on at the
socket?
•Are the batteries properly installed in the
handset?
Dial tone is OK, but cannot dial out
Try moving the handset closer to the base unit.
•If this doesn’t work, try a different position
for the base unit. (Typically, the higher you
place the base unit, the better the recep-
tion).
•The battery charge level may be low. Check
the LCD display for the low battery-warning
signal. If the battery is low, place the
handset in the base unit’s charging cradle to
charge.
•Check the power connection by switching
off the power at the main socket. Wait a
few seconds, then switching it back on.
•Check to make sure that the phone and
base unit are within the range of transmis-
sion.
•The handset may be unable to find the base
unit. Try moving the handset closer to the
base unit. If the problem persists, try
moving the base unit in a suitable position
nearer to the handset.
•If you have registered additional handsets
to the same base unit, make sure they are
not already on a call. The LCD display on
your handset will display EXT IN USE if the
line is engaged.
•The dial mode setting may be incorrect. See
the DIAL MODE section for instructions on
how to change the dial mode.
Handset does not ring
Check that you have not turned off the ringer
volume level. Also, you may have too many
extension phones on your line. Try unplugging
somephones.
Call was disconnected
Please move the handset closer to the base unit.
Also, you may want to consider moving the base
unit to achieve a greater range of transmission.
Keys do not work / [KEY] shows on screen
The symbol means that the keypad lock feature
has been activated.
TW339 manual_Eng 6.p65 3/9/05, 4:21 PM20
This manual suits for next models
1
Table of contents
Other Oregon Scientific Cordless Telephone manuals

Oregon Scientific
Oregon Scientific OS6976 User manual

Oregon Scientific
Oregon Scientific OS5851L-BR User manual

Oregon Scientific
Oregon Scientific ThermoDECT User manual

Oregon Scientific
Oregon Scientific LS328 User manual

Oregon Scientific
Oregon Scientific WD338HSC User manual

Oregon Scientific
Oregon Scientific ThermoDECT TD338 User manual

Oregon Scientific
Oregon Scientific LS328 User manual

Oregon Scientific
Oregon Scientific wd338 User manual