Orion OBDtrac User manual

© 2007 ORION Technology LTD. All rights reserved. 1/40
OBDtrac Dongle Getting Started
Version:1.01.01
Date:2011/12/12

© 2007 ORION Technology LTD. All rights reserved. 2/40
Table of Contents
1.OBDtrac Dongle Hardware Introduction...............................................................3
I.Package contents:...........................................................................................3
II.Front panel: ....................................................................................................4
III.Rear panel:......................................................................................................4
IV.Product Installation: .......................................................................................5
V.Basic Configuration .......................................................................................6
2.Configuration by Hyper Terminal ..........................................................................8
I.Hardware and Software preparation ..............................................................8
II.Basic Configuration ..................................................................................... 11
III.GPRS Connection Configuration.................................................................12
IV.Gateway Server Configuration.....................................................................19
V.Function Variables Configuration – .............................................................20
VI.Function Variables Configuration – Mileage Report...................................21
VII.Function Variables Configuration – Idle Report..........................................23
VIII.Function Variables Configuration – Speed Limit Report............................25
IX.Running in Normal Mode ............................................................................27
3.Update firmware by Hyper Terminal ...................................................................30
4.Update firmware over the air (OTA) by GPRS....................................................32
5.OBDtrac Dongle troubleshooting guideline.........................................................34
6.OBDtrac Dongle Wiring Diagram........................................................................38

© 2007 ORION Technology LTD. All rights reserved. 3/40
1. OBDtrac Dongle Hardware Introduction
I. Package contents:
1. OBDtrac Dongle x 1 (with Li-ion backup battery)
2. OBDII Port Extension Y-Cable
*Y Cable PHOTO

© 2007 ORION Technology LTD. All rights reserved. 4/40
II. Front panel:
1. OBDII Connection Jack
*PHOTO
III. Rear panel:
1. LED indicators
PWR
OFF: Power OFF
Flash: Power ON
GSM
OFF: GSM module OFF or Error
Flash: No SIM Card, Searching networks (0.25sec ON 0.5sec OFF)
Flash: GSM registered (0.5sec ON 0.5sec OFF)
Flash: GPRS connecting (0.25sec ON 0.25sec OFF)
ON: Socket session online (connect to Gateway Server)
GPS
OFF: GPS module OFF or Error
Flash: Searching GPS signal
ON: GPS fixed
*PHOTO

© 2007 ORION Technology LTD. All rights reserved. 5/40
IV. Product Installation:
‐Remove the cover by gently sliding backwards from the device itself.
‐Insert SIM card into the card holder.
‐Secure the cover back to its original position.
‐Since the GPS module is still being fine tuned, there may be position fix
issues if the device is plugged directly onto the OBDII port and hidden
within the vehicle. It is recommended to use the Y cable included to test
the device for more exposure to open sky, once the device is plugged into
the vehicle through Y cable, the device should power up immediately.

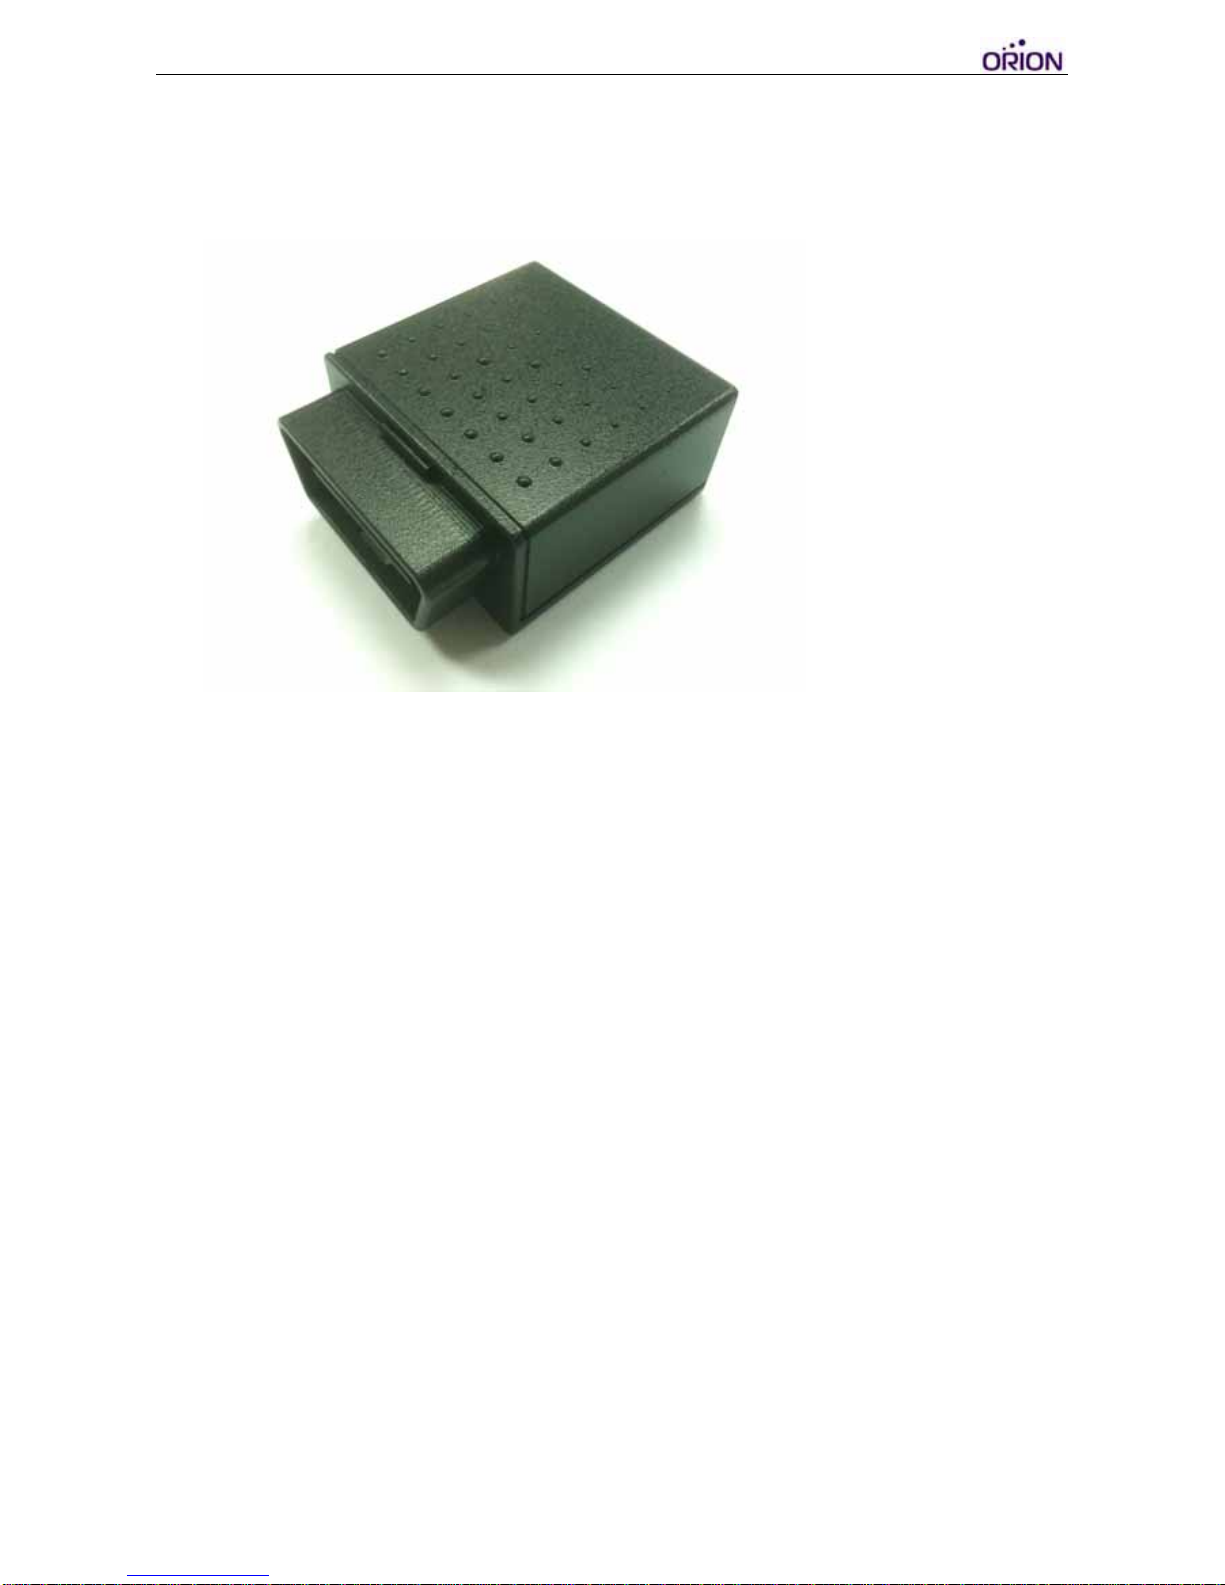
© 2007 ORION Technology LTD. All rights reserved. 6/40
V. Basic Configuration
‐Basic configuration of the device can be done by using the Orion protocol
command $SetCFG via SMS by a mobile device. The command syntax is
as follows:
$SetCFG,<seq>,<pw>,<APN>,<GPRS username>,<GPRS
password>,<server IP>,<server port>,<GPRS enable>,<GPRS report
interval>,<GPRS data mode>,<power control>&
‐Example of the $SetCFG command would be:
$SetCFG,1234,0000,internet,,,211.79.38.93,9996,YES,START,30,0,0&
‐Once device configuration setup is complete, send another command
$ATR to the device in order to search and reset the device for the vehicle’s
OBDII protocol. The command syntax is as follows:
$ATR,<seq>,<pw>,<Initial Mileage>&
‐Example of the $ATR command would be:
$ATR,1234,0000,1000&
Note: 1000 is an example value of initial mileage. Once entered, the total
mileage counter shown in the event reports will start incrementing from 1000.
Important: The return message for the $ATR command must display
“DONE” (after an initial return of “OK” for receiving the command). If the
message returns “MIL” or “FAIL”, they both indicate failure to input the vehicle
protocol or mileage value. The ATR return message can take up to 5 minutes
to report back depending on the vehicle protocol search, do not send $ATR
again consecutively during this period of search process.
Example of $ATR return messages:
$ATR,1234,DONE,020101000432& -> ATR command input is successful
$ATR,1234,MIL,020101000432& -> Previous input is not reset
$ATR,1234,FAIL,020101000432& -> ATR command input failed

© 2007 ORION Technology LTD. All rights reserved. 7/40
‐Use the command $Actgetpos,1234,0000& to double check if the mileage
value has been properly entered. The mileage value within the returned
LGPS message must be correct in order to deem the ATR configuration
successful.
Note: $ActGetPos return message will display not only the mileage value but
also the speed, RPM, and coolant temperature as well. Make sure all the
OBD values are correct when the vehicle is stationary before allowing the
vehicle to begin its trip.
Example of $LGPS return message:
$LGPS,120,261011092752,A,12131.0365,E,2502.9594,N,7,27,216,37.0,100
0.0,6308,79C,8,0,111026092753&
1000.0 = Mileage input
6308 = RPM
79C = Coolant temperature value
‐Once all the configuration steps are completed, OBDtrac Dongle will begin
tracking and sending position event reports along with the predefined
OBDII information.

© 2007 ORION Technology LTD. All rights reserved. 8/40
2. Configuration by Hyper Terminal
I. Hardware and Software preparation
1. Insert SIM card. Use the configuration RS-232 cable (DB-9) to connect
OBDtrac Dongle to a PC COM port.
2. Open Hyper Terminal (or other terminal program) at Windows Start
Menu:
All Programs\Accessories\Communications\Hyper Terminal.
3. Add a new connection, enter a name as desired. Click “OK” and select
the COM Port for the OBDtrac connection.

© 2007 ORION Technology LTD. All rights reserved. 9/40
4. Set the Baud rate as 115200 bps and Flow control as none. Press “OK”.
5. Connect the 10pin cable to OBDtrac.
6. Connect the 10pin cable power-plug to the AC adapter and press the

© 2007 ORION Technology LTD. All rights reserved. 10/40
‘ESC’ key of the PC keyboard within 3 second after the tracker is
powered on and starts showing text messages on the Hyper Terminal
screen (The tracker itself may need to be slightly shaken to power up if
the tracker is originally set to vibration power control mode). In doing
so, OBDtrac will enter ‘Debug Mode’ (Configuration Mode).
[]
- Version : 0.12
- Serial Number : BH1234567890
- Unit ID : 1000000001
- IMEI :
$>
7. If you do not see the above messages on the Hyper Terminal screen,
please check the settings of Hyper Terminal and reconnect the power
adapter, or press the RESET button on the OBDtrac rear panel.
technical support.

© 2007 ORION Technology LTD. All rights reserved. 11/40
II. Basic Configuration
1. Use ‘SCFG’ command to enter ‘Main Setting Menu’. Then type ‘1’ to
enter ‘Basic Setting Menu’. For initialization or regular application, no
basic setting needs to be changed.
$>scfg <Press Enter>
Main Setting Menu :
1. Basic Setting
2. GSM/GPRS Connection Setting
3. Gateway Server Setting
4. Function Variables Setting
5. Report Settings Setting
E. Exit
Selection ? 1 <Press Enter>
Basic Setting Menu :
1. Firmware Version : 0.7
2. UnitID : 1000000001 : [0000000000-4294967296]
3. User Password : 0000
5. COM1 Baudrate : 38400 : [115200|38400|19200|9600|4800]
7. Sync RTC with GPS Time : YES
Time Zone of RTC : GMT+0
C. GPS Fix Timeout : 300 : [60-65535]
D. Vibration Timeout : 60 : [30-65535]
G. Power Control : 1 : [0(Disabled)|1(PowerOff)|2(Standby)|3(Sleep)|4(Deep
Sleep)]
H. Event Mask(1) : FFFFFFFF
I. Event Mask(2) : FFFFFFFF
E. Exit
Selection ?
Basic Setting Menu :
Field Mandatory Description
UnitID 5Device Unit ID. Default value is the same as the serial
number.
Range from ‘0000000000’ to ‘4294967296’. Other
characters are not allowed. Maximum: 10 digits
Password 5Default value : ”0000”.
Range from “0000” to “9999”.
COM1 5Default value: “38400”

© 2007 ORION Technology LTD. All rights reserved. 12/40
Baud rate [115200|57600|38400|19200|9600|4800]
Sync RTC
with GPS
Time
5YES: To enable the tracker to synchronize RTC Time with
GPS UTC Time according to the Time Zone Offset.
NO: To disable the tracker to synchronize RTC Time with
GPS UTC Time.
Time Zone
Offset
5Format is +hh:mm or -hh: mm
GPS Fix
Timeout
5GPS Timeout setting (sec) when every time the schedule
timer wakes up the OBDtrac Basic
Vibration
Timeout
5Vibration Timeout to shut down OBDtrac Basic to enter
deep sleep mode
Power
Control
5Control power off shut down mode, 0 = disable, 1 = enable
power off mode, 2 = standby mode, 3=sleep mode, 4=
deep sleep mode, functional only in conjunction with
VACCON mode in GSM/GPRS connection settings.
Event Mask
(1)
Configure event mask bits to enable/disable event
transmissions. Details refer to 970817T007 Event Mask
App Note
Event Mask
(2)
Configure event mask bits to enable/disable event
transmissions. Details refer to 970817T007 Event Mask
App Note
2. When you finish the ‘Basic Settings’, type ‘E’ to return to ‘Main Setting
Menu’.
III.GPRS Connection Configuration
1. Type ‘2’ to enter ‘GSM/GPRS Connection Setting Menu’. For
initialization or regular application, no setting of this menu needs to be
changed.
Main Setting Menu :
1. Basic Setting
2. GSM/GPRS Connection Setting
3. Gateway Server Setting
4. Function Variables Setting
5. Report Settings Setting
E. Exit
Selection ? 2 <Press Enter>

© 2007 ORION Technology LTD. All rights reserved. 13/40
GSM/GPRS Connection Setting Menu :
1. Switch Mode : GPRS : [AUTO|GPRS|LOG|SMS]
2. GPRS Reconnect (min) : 3 : [2-65535]
3. SMS Duration (sec) : 180 : [180-65535]
4. SIM PIN1&2 Setting
SIMPIN1:
SIMPIN2:
5. GPRS Connection Setting
6. SMS Connection Setting
7. Enable Roaming : NO : [YES|NO]
8. Roaming Profile Settings
A. Enable RGTK/RMTK : YES : [YES|NO]
E. Exit
Selection ?
GSM/GPRS Connection Setting Menu :
Field Mandatory Description
Switch
Mode
5GPRS : Set the tracker to send reports by GPRS
connection only. But the tracker can receive commands
over GPRS from the server and to receive commands by
SMS from the mobile phone as well.
LOG : Set the tracker to send log reports only.
SMS : Set the tracker to send reports and receive
commands by SMS only. All event reports are supported
in SMS mode. It helps to use the tracker in the area
without GPRS coverage. Multiple protocol commands and
event reports are can be in one SMS as long as the size
less than 140 Bytes.
AUTO : Set the tracker to send reports by GPRS mainly
and to send reports by SMS as backup when the GPRS
connection fails.
GPRS
Reconnect
5The reconnecting time duration to open GPRS
connection. In GPRS Mode, After retrying N minutes with
error, the tracker will reboot and do it over. In AUTO Mode,
the tracker will switch to SMS mode and send ‘$RMTK’
SMS as a backup solution.
Range from “2” to “65535”. The unit is ‘minute’
Default Value=”2”
Tip: Enlarge this number properly according to the
GSM/GPRS environment can reduce the rebooting. In
some countries, it takes longer to open a GPRS
connection.
SMS
Duration
The time duration to stay in SMS mode when the
SwitchMode is set to ‘AUTO’ mode. After the duration, the

© 2007 ORION Technology LTD. All rights reserved. 14/40
tracker will switch back to GPRS mode automatically.
Default Value = “180”. The unit is ‘second’.
Range from “180” to “65535”
Tip: Set this number smaller will let the tracker back to
GPRS mode as soon as possible. Enlarge the ‘SMS
Report Interval’ in the meantime (Ex. 2 hrs = 3600
seconds). It can reduce SMS cost accordingly.
SIM PIN1 PIN1 of the SIM card to be used in the tracker
Default Value = “”.
SIM PIN2 PIN2 of the SIM card to be used in the tracker
Default Value = “”.
Enable
Roaming
5YES : Enable roaming to any network as long as the SIM
card support it.
NO : Disable roaming
Default Value = “NO”
Roaming
Profile
Setting
Set roaming profile configurations and roaming event
masks.
Enable
RGTK/
RMTK
YES: Generate the latest GPS position and send it as
$RGTK event with highest priority
NO: No $RGTK event will be generated because all GPS
position will be $LGTK and will be sent by FIFO sequence
2. Type ‘5’ to enter ‘GPRS Connection Setting Menu’. The GPRS
connection parameters are provided by the GSM operator. Note: All
GPRS connection parameters have to be correct, otherwise the
tracker cannot open GPRS connection successfully.
GSM/GPRS Connection Setting Menu :
1. Switch Mode : GPRS : [AUTO|GPRS|LOG|SMS]
2. GPRS Reconnect (min) : 3 : [2-65535]
3. SMS Duration (sec) : 180 : [180-65535]
4. SIM PIN1&2 Setting
SIMPIN1:
SIMPIN2:
5. GPRS Connection Setting
6. SMS Connection Setting

© 2007 ORION Technology LTD. All rights reserved. 15/40
7. Enable Roaming : NO : [YES|NO]
8. Roaming Profile Settings
A. Enable RGTK/RMTK : YES : [YES|NO]
E. Exit
Selection ? 5 <Press Enter>
GPRS Connection Setting Menu :
1. GPRS Dial Number :
2. GPRS User Name :
3. GPRS Password :
4. GPRS APN : internet
5. GPRS Enable : START : [STOP|START|ACCON|VACCON]
6. GPRS Report Interval (sec) : 30 : [10-65535]
7. GPRS SYNC Interval (sec) : 300 : [0(Disable)|300-65535]
8. GPRS Resync Interval (min) : 1 : [0(Disable)|1(Once)|5-65535]
9. GPRS Filter : NO : [YES|NO]
A. GPRS DNS : 0.0.0.0
B. GSM Not Ready Re-Connect Time (sec) : 210 : [210-65535]
C. GPRS Not Ready Re-Connect Time (sec) : 300 : [300-65535]
D. Protocol : TCP : [TCP|UDP]
F. Require Server ACK : NO : [YES|NO]
G. Include Cell ID Info in Report : NO : [YES|NO]
H. Nonstop GPRS Tracking: NO : [YES|NO]
J. Binary Report: NO : [YES|NO]
E. Exit
Selection ?
GPRS Connection Setting Menu :
Field Mandatory Description
Dial Number GPRS dialup phone number.
User Name GPRS Login User Name
Password GPRS Login Password
APN 5Access Point Name
GPRS
Enable
(Track Mode)
5STOP : Stop the GPRS tracking action. The tracker
sends SYNC packet by SYNC interval to the Gateway
server to keep alive.
START : The tracker sends GPS data over GPRS as
long as it is powered ON. No matter the ACC (Ignition)
is ON or OFF.
ACCON : The tracker sends GPS data over GPRS only
when the ACC is ON. When the ACC is OFF, the tracker

© 2007 ORION Technology LTD. All rights reserved. 16/40
sends SYNC packet by SYNC interval to the Gateway
server to keep alive.
VACCON : Report RGTK at either LGSK (vibration on)
or LACN (engine on), and stop reporting RGTK when
both LGEK (vibration off) and LACF (engine off ) events
appear. If actual ACC is not connected, report RGTK
between LGSK and LGEK vibration events.
Report
Interval
5GPS data Report Interval. The unit is ‘second’.
Default Value = “30”.
Range from [10-65535].
SYNC
Interval
5SYNC packet Interval: The unit is ‘second’
Range from [0(Disable)|300-65535]. “0” means to
disable SYNC packet.
Default = 300 Seconds. Set longer Sync Interval to save
GPRS cost.
Note: The SYNC packet is now only applicable in
‘STOP’ mode or when ACC=OFF in ‘ACCON’ mode or
‘VACC’ mode.
Resync
Interval
5Compulsory SYNC packet Interval: The unit is ‘minute’
Range from [0(Disable)|1(Once)|5-65535]. “0” means to
disable SYNC packet. “1” means the tracker only sends
a SYNC packet every time it open a new GPRS
session.
Default value = 1 (Once)
The Resync packet is now applicable in ‘START’ mode
or when ACC=ON in ‘ACCON’ more or ‘VACC’ mode.
Filter 5YES : Filter the invalid GPS data. Only send the valid
GPS data
NO : Not Filter GPS data. Send all GPS data, no matter
the GPS data is valid or invalid.
DNS DNS Server IP address
GSM Not
Ready
5If the device can’t register to GSM network, the tracker
will wait ‘GSM Not Ready Re-Connect Time’ to reboot.

© 2007 ORION Technology LTD. All rights reserved. 17/40
Re-Connect
Time The unit is ‘second’.
Default Value = “210”.
Range from “210” to 65535”.
GPRS Not
Ready
Re-Connect
Time
5If the device register to GSM network but can’t open
GPRS connection successfully, the tracker will wait
‘GPRS Not Ready Re-Connect Time’ to reboot. The unit
is ‘second’.
Default Value = “300”.
Range from “300” to 65535”.
Protocol 5TCP: To use TCP/IP in GPRS communication
UDP: To use UDP/IP in GPRS communication
Default = TCP
Require
Server ACK 5YES: To require the Gateway Server send back an ACK
for every event report for confirmation to send next one.
NO: Disable requiring Server ACK of every event report
Default = NO
ACK Timeout 5Time to wait for the Sever ACK. Everytime when
timeout, the tracker will send the event report again.The
unit is ‘second’.
Range from [5-65535]
Retry 5How many times to retry to send the event report. If it
keeps failing, the tracker will re-open the GPRS
connection and do it over. The unit is ‘count’.
Range from [1-65535]
Include Cell
ID Info
5YES: To include Cell ID information in every event
report. If enabled, two new columns [PLMN] (Network
ID), [Cell ID] (Base station ID) will be added into every
event report.
NO: Not to include Cell ID information in all event
reports.
Nonstop
GPRS
Tracking
This feature is applicable to Switch Mode = ‘AUTO’.
YES: When the tracker switches to SMS, it still logs
GPS data in flash memory according to GPRS tracking
interval. All data will be sent when the GPRS is back.
This features helps to generate complete route even in
the area without GPRS.
NO: When the tracker switches to SMS, it only sends
the GPS data according to SMS tracking interval

© 2007 ORION Technology LTD. All rights reserved. 18/40
Binary
Report
YES: Enable binary encryption report mode
NO: Disable binary encryption report mode
For more details refer to “binary report app note”
Notes: This console menu corresponds to ORION Protocol commands:
$SetGPRSConfig, $SetConnection,
3. When you finish the ‘GPRS Connection Settings’, type ‘E’ to return to
‘GSM/GPRS Connection Setting Menu’. Then type ‘E’ to return to
‘Main Setting Menu’.

© 2007 ORION Technology LTD. All rights reserved. 19/40
IV.Gateway Server Configuration
1. Type ‘3’ to enter ‘Gateway Server Setting Menu’. Note: The Gateway
Server settings have to be 100% accurate, otherwise the tracker will
be unable to open GPRS connections and build a socket session with
the Gateway Server correctly.
Main Setting Menu :
1. Basic Setting
2. GSM/GPRS Connection Setting
3. Gateway Server Setting
4. Function Variables Setting
5. Report Settings Setting
E. Exit
Selection ? 3 <Press Enter>
Gateway Server Setting Menu :
1. Primary Gateway Server
IP:220.128.135.215
Port : 9998 : [0-65535]
E. Exit
Selection ?
Gateway Server Setting Menu :
Field Mandatory Description
Server IP 5Primary Gateway Server IP address or Domain Name, if
using Domain Name. DNS Server IP address of GPRS
connection settings is needed.
Server Port 5The port number of the Primary Gateway Server to
receive GPS data
Notes: This console menu corresponds to ORION Protocol command: $SetPriServer
2. When you finish the ‘Gateway Server Settings’, type ‘E’ to return to
‘Main Setting Menu’.

© 2007 ORION Technology LTD. All rights reserved. 20/40
V. Function Variables Configuration –
1. Use ‘SCFG’ command to enter ‘Main Setting Menu’. Then type ‘4’ to
enter ‘Function Variables Setting Menu’.
Main Setting Menu :
1. Basic Setting
2. GSM/GPRS Connection Setting
3. Gateway Server Setting
4. Function Variables Setting
5. Report Settings Setting
E. Exit
Selection [1-3]? 4 <Press Enter>
Function Variables Setting Menu :
1. Mileage Report Setting
4. Idle Report Setting
5. Speed Limit Report Setting
E. Exit
Selection ?
Table of contents