Orion 32FXT906 User manual

LCD-TV
Model nr:
32FXT906
Instrukcja obsługi
NAUDOJIMO INSTRUKCIJA
Przed użyciem należy dokładnie przeczytać niniejszą instrukcję.
OPERATING INSTRUCTIONS
COLOUR TELEVISION WITH REMOTE CONTROL
Spalvoto vaizdo televizoriai su distanciniu valdymu

English - 1 -
Contents
Features ................................................................. 2
Introduction............................................................. 2
Preparation............................................................. 2
Safety Precautions ................................................. 2
Connection to a Television Distribution System
(Cable TV etc.) from Tuner................................. 3
Package Contents.................................................. 4
Environmental Information ..................................... 5
Repair Information.............................................. 5
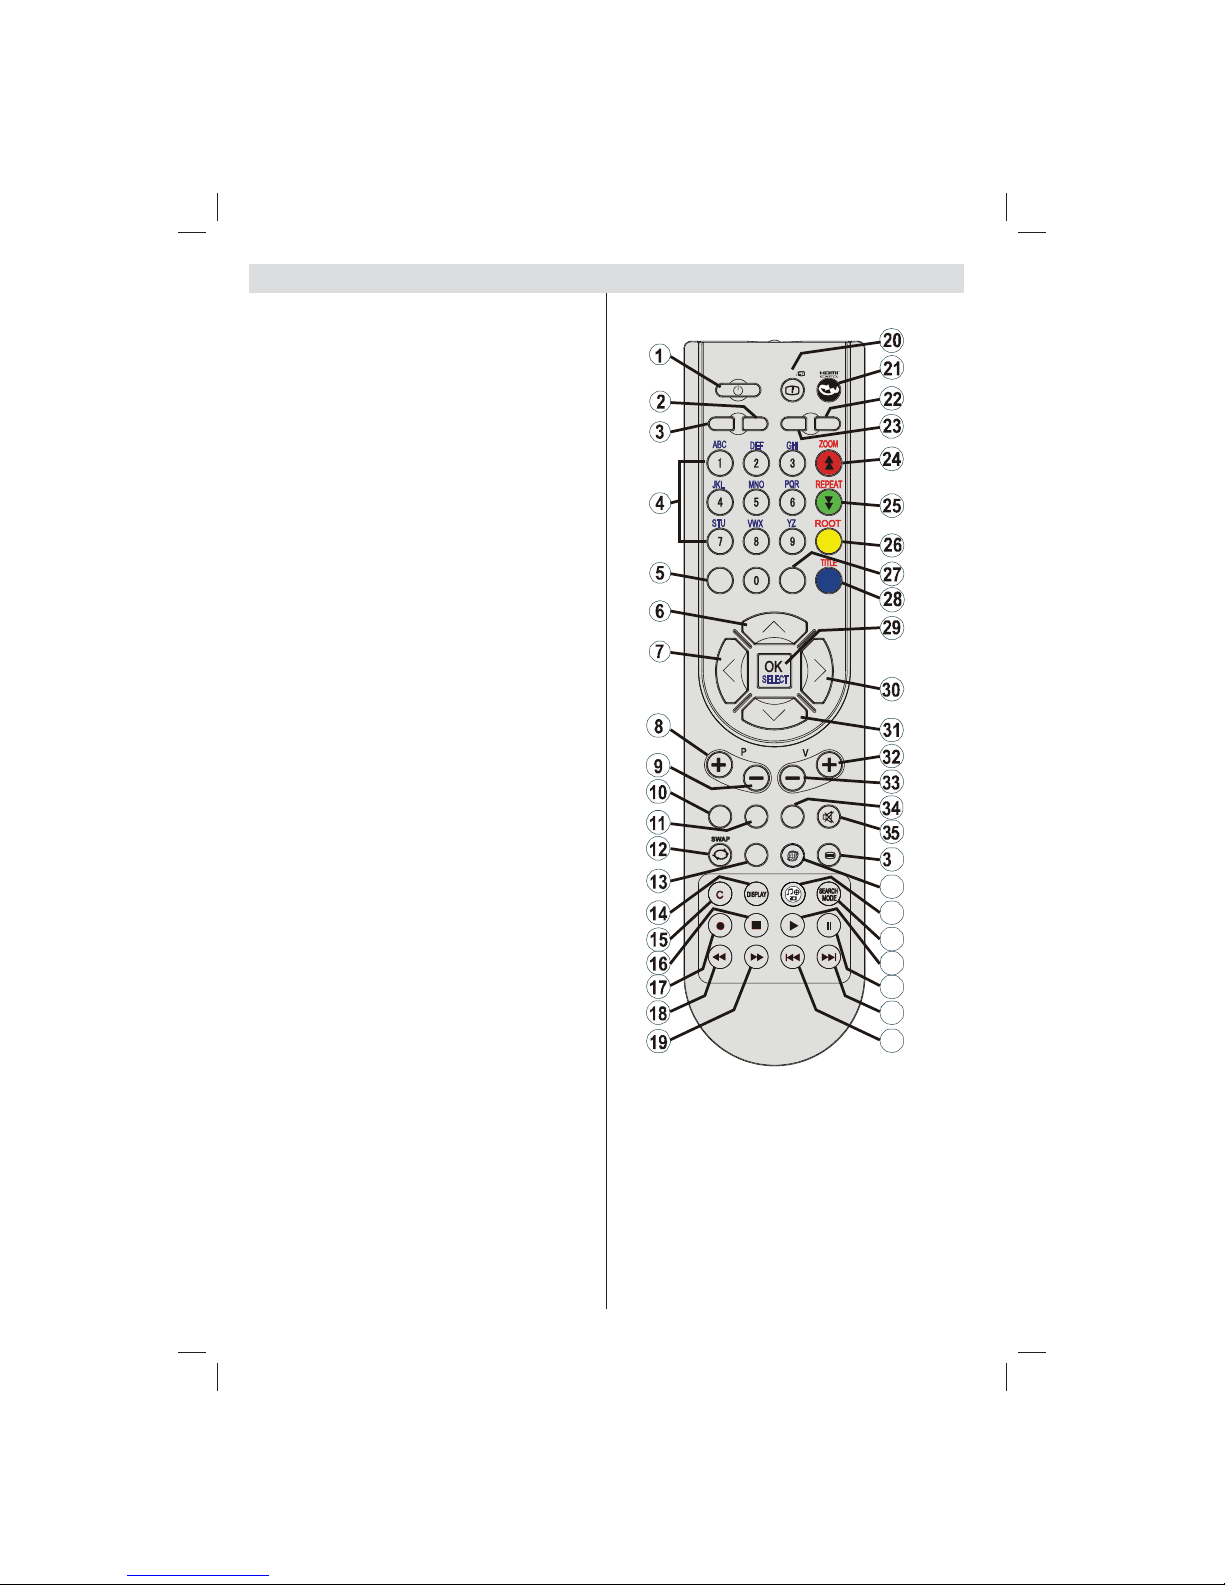
Remote Control Buttons......................................... 6
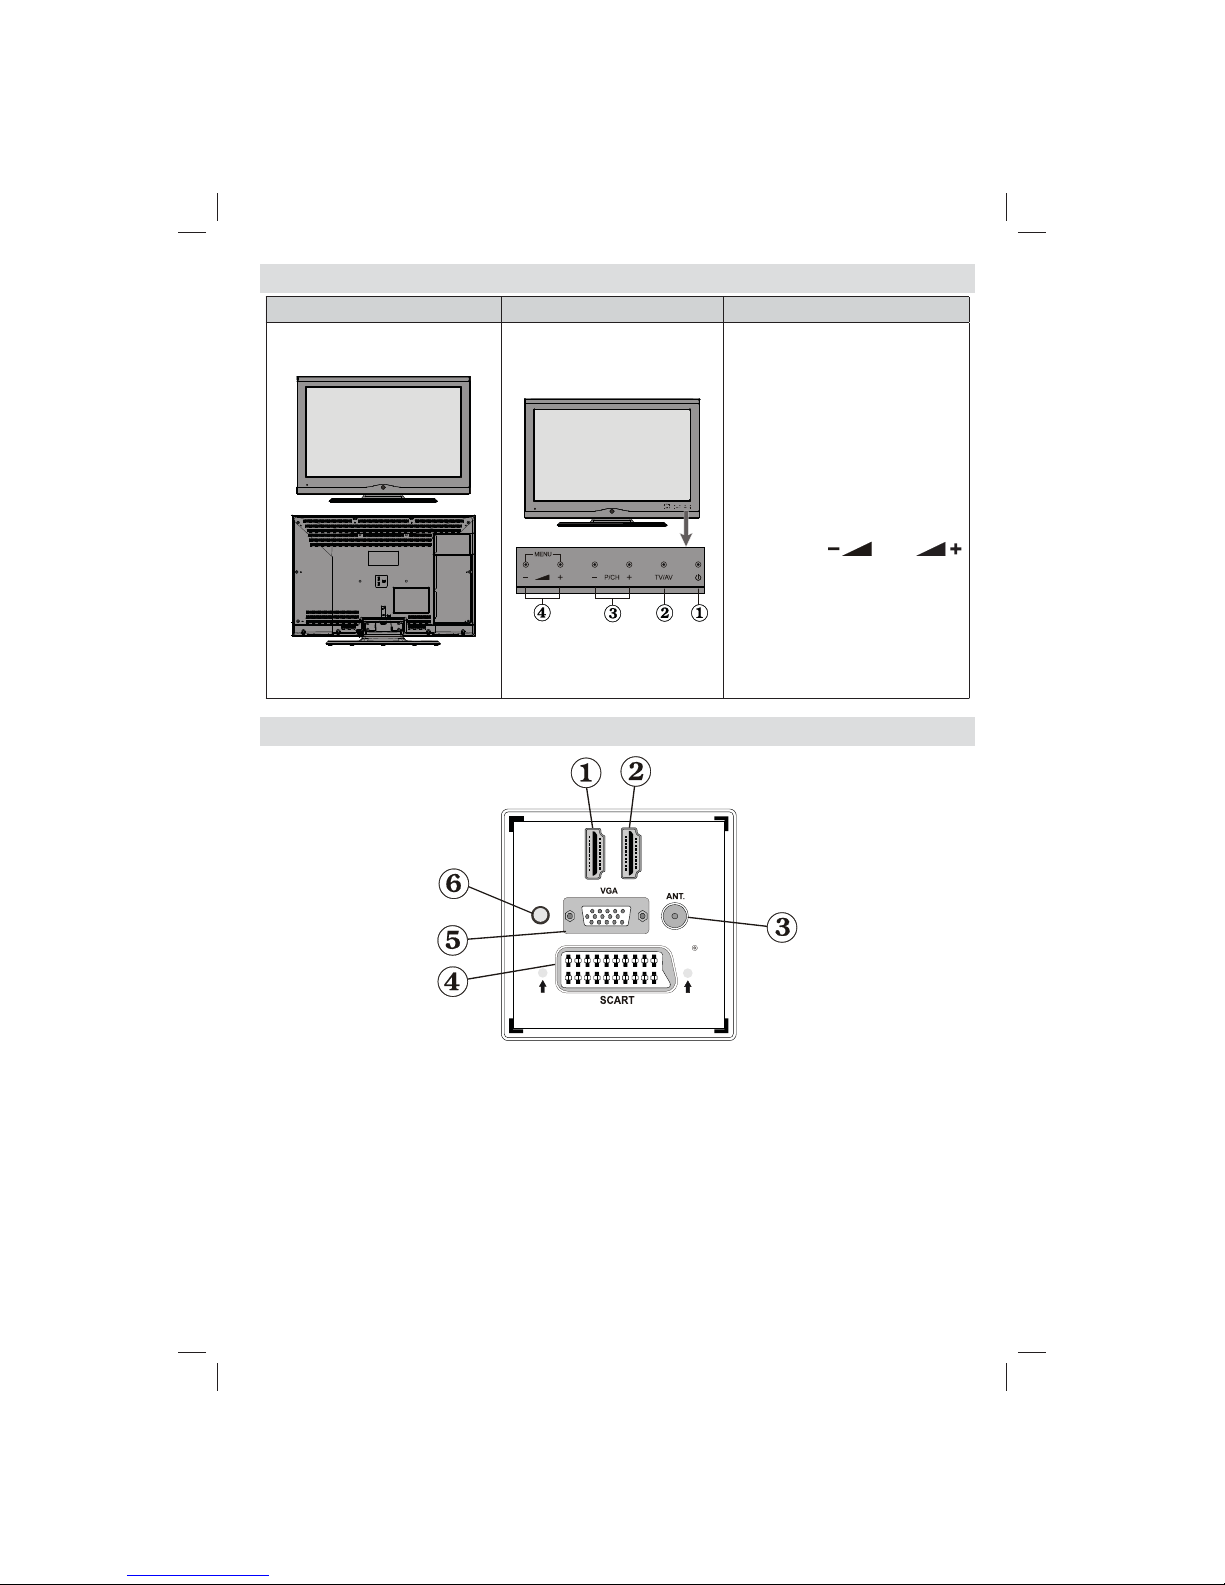
TV and Operating Buttons...................................... 7
Viewing the Connections - Back Connectors ......... 7
Viewing the Connections - Side Connectors.......... 8
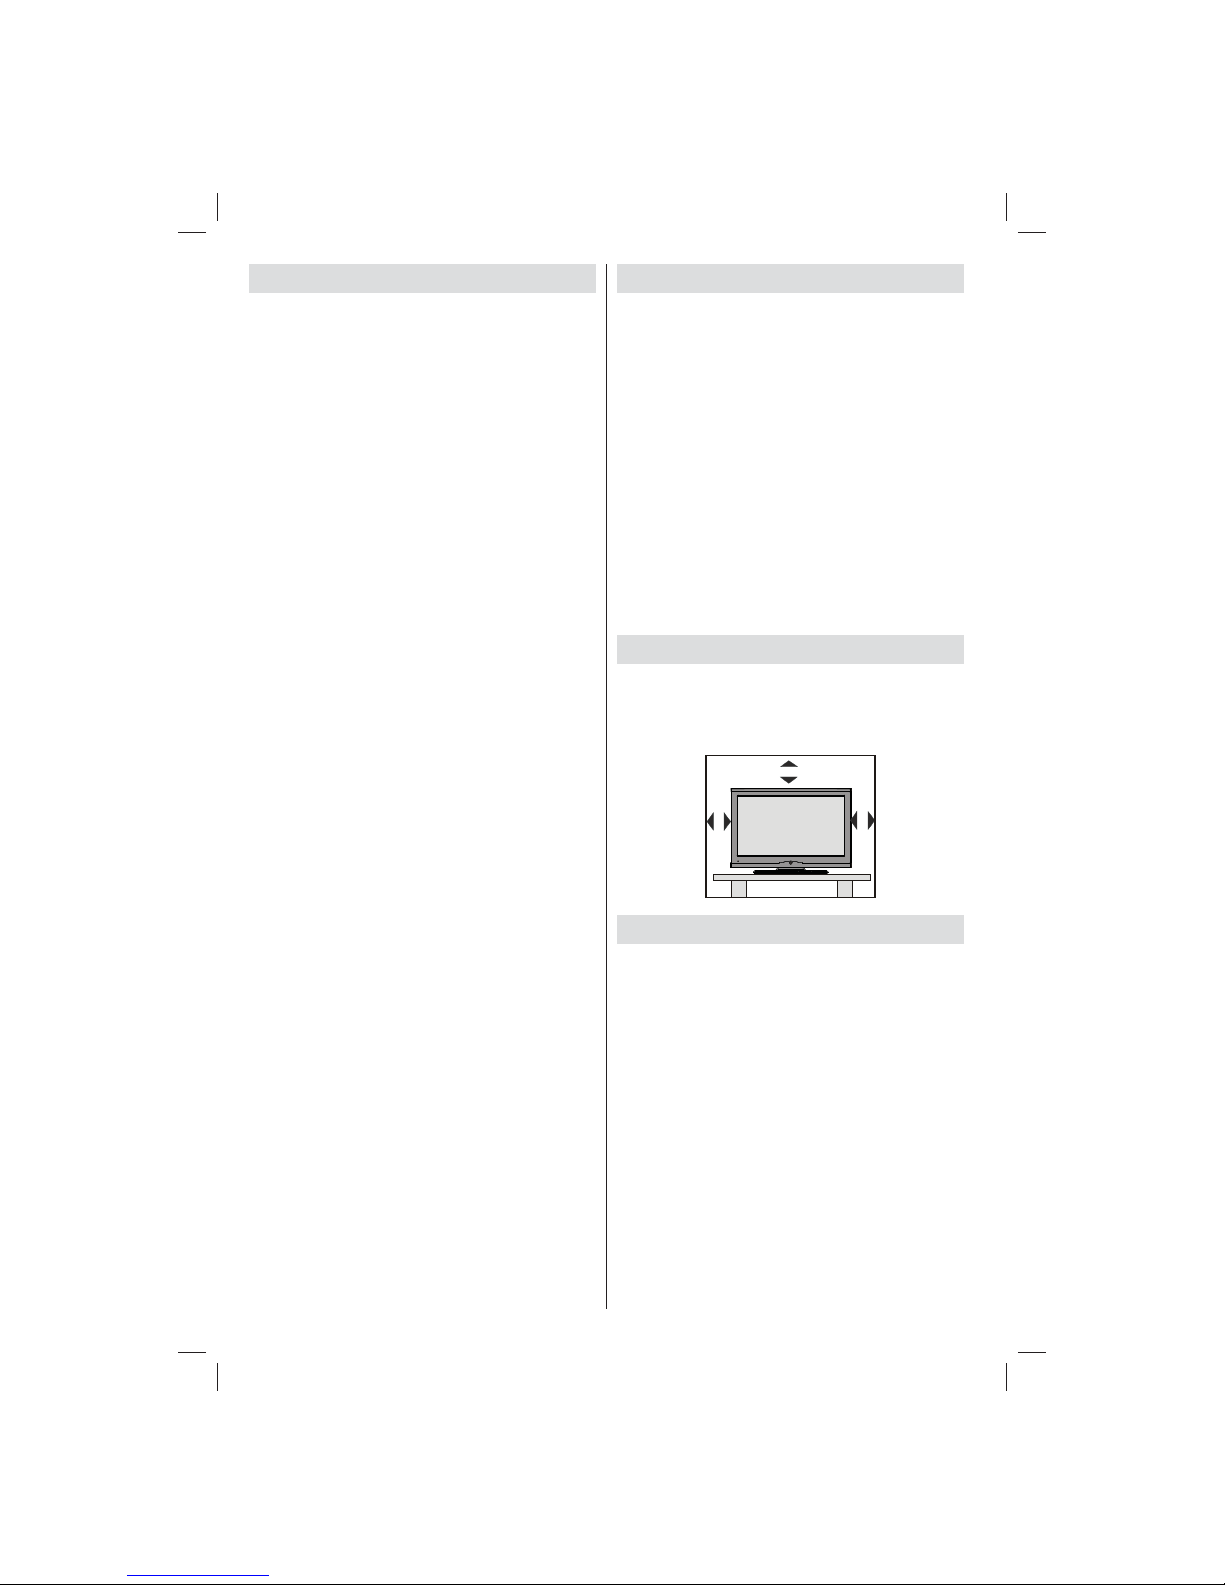
Power Connection.................................................. 8
Aerial Connection ............................................... 8
Using USB Media................................................... 9
USB Memory Connection................................... 9
Connecting the TV to a PC..................................... 9
Using Side AV Connectors.....................................9
Connecting to a DVD Player via HDMI................. 10
Connecting to a DVD Player................................. 10
Remote Control Handset...................................... 10
Inserting Batteries............................................. 10
Switching On/Off....................................................11
To Switch the TV On..........................................11
To Switch the TV Off..........................................11
Input Selection.......................................................11
Basic Operations...................................................11
Operation with the Buttons on the TV................11
Volume Setting...............................................11
Programme Selection....................................11
Viewing Main Menu........................................11
AV Mode ........................................................11
Operation with the Remote Control...................11
Volume Setting...............................................11
Programme Selection (Previous or Next
Programme)...................................................11
Programme Selection (Direct Access)...........11
Viewing Electronic Programme Guide (EPG)....... 12
Digital Teletext (** for UK only) .........................12
Analogue Teletext ............................................. 13
First Time Installation............................................ 13
Installation ............................................................ 14
Auto Channel Scan (Retune) Menu Operation.14
Manual Tuning ..................................................... 14
Manual Search.................................................. 14
Digital Cable Manual Search............................ 14
Analogue Manual Search.................................15
Analogue Fine Tune.......................................... 15
Clear Service List (*).........................................15
Managing Stations: Channel List.......................... 15
Operating the Channel List...............................15
Moving a Channel.............................................15
Deleting a Channel........................................... 15
Renaming a Channel........................................16
Locking a Channel............................................16
Managing Stations: Favourites............................. 16
Button Functions............................................... 16
Managing Stations: Sorting the Channel List ....... 16
On-Screen Information......................................... 16
Media Playback Using Media Browser................. 17
Viewing Photos via USB...................................17
Media Browser Settings....................................18
Changing Image Size: Picture Formats................ 19
Configuring Picture Settings................................. 20
Operating Picture Settings Menu Items............20
Picture Settings Menu Items.............................20
PC Picture Settings...........................................20
Configuring Sound Settings.................................. 21
Operating Sound Settings Menu Items.............21
Sound Settings Menu Items..............................21
Configuring Your TV’s Settings............................. 22
Operating Settings Menu Items........................ 22
Settings Menu Items.........................................22
Using a Conditional Access Module (not
included)............................................................... 22
Viewing ConditionalAccess Menu (*)............... 22
Configuring Language Preferences......................23
Language Settings............................................ 23
Parental Control.................................................... 23
Parental Settings Menu Operation ...................24
Timers................................................................... 24
Configuring Date/Time Settings............................25
Configuring Source Settings................................. 25
Configuring Other Settings................................... 26
Operation.......................................................... 26
Other Features ..................................................... 26
Teletext................................................................. 27
Tips....................................................................... 27
Appendix A: PC Input Typical Display Modes....... 28
Appendix B: AV and HDMI Signal Compatibility
(Input Signal Types).............................................. 28
Appendix C: Supported DVI Resolutions..............29
Appendix D: Software Upgrade............................ 29
Appendix E : Supported File Formats for USB
Mode..................................................................... 30
Specifications ....................................................... 31
Digital Reception (DVB-C).................................... 31
01_MB62_[GB]_woypbpr_IDTV_TC_NICKEL17_1900UK_32906W_10078529_50216712.indd 101_MB62_[GB]_woypbpr_IDTV_TC_NICKEL17_1900UK_32906W_10078529_50216712.indd 1 06.04.2012 19:47:5406.04.2012 19:47:54

English - 2 -
Features
Remote controlLCD colour LCD TV.• Fully integrated Terrestrial digital-cable TV (DVB-T C-• MPEG2) (DVB-T-C MPEG4).
HDMI connectors for digital video and audio.• USB input.• Programme recording• Programme timeshifting• 1000 programmes (analogue+digital).• On Screen Display (OSD) menu system.•
•Integrated tuner DVB-T-C HD, MPEG 2 / MPEG 4
compatible.
Scart socket for external devices.• Stereo sound system. (Nicam)• Teletext, fastext, TOP text.• Headphone connection.• Automatic programming system.• Forward or backward manual tuning.• Sleep timer / Child lock.• Automatic sound mute when no transmission.• NTSC playback.• AVL (Automatic Volume Limiting).• Auto power down.• PLL (Frequency Search).• PC input.• Plug&Play for Windows 98, ME, 2000, XP, Vista,• Windows 7.
Pixellence• Game Mode•
Introduction
Thank you for choosing this product. This manual
will guide you through the proper operation of your
TV. Before operating the TV, please read this manual
thoroughly. Please keep this manual in a safe place
for future reference.
This device is intended to receive and display TV
programmes. The different connection options make
an additional expansion of the reception and display
sourcespossible(receiver,DVDplayer,DVDrecorder,
VCR, PC etc.).
This device is only suitable for dry indoor use. This
appliance is intended solely for private domestic use
and may not be used for industrial and commercial
purposes.Weexcludeliability inprinciple,if the device
isnotused asintended,orunauthorized modifications
havebeenmade.To operateyourLCDTV in extreme
ambient conditions may cause the damage of the
device.
Preparation
For ventilation, leave a free space of at least 10 cm
all around the set. To prevent any fault and unsafe
situations, please do not place any objects on top of
the set. Use this device in moderate climates.
10 cm
10 cm
10 cm
Safety Precautions
Read the following recommended safety
precautions carefully.
Power Source
The TV set should be operated only from a 220-240
VAC, 50 Hz outlet. Ensure that you select the correct
voltage setting for your convenience.
Power Cord
Do not place the set, a piece of furniture, etc. on the
power cord or pinch the cord. Handle the power cord
by theplug. Do notunplug the appliance bypulling from
thepower cordand nevertouch thepower cordwith wet
handsasthiscouldcauseashortcircuitorelectricshock.
Never make a knot in the cord or tie it with other cords.
Thepowercordshouldbeplacedinsuchawaythatthey
are not likely to be stepped on.Adamaged power cord
can cause fire or give you an electric shock. When it is
damaged and needs to be replaced, it should be done
by qualified personnel.
01_MB62_[GB]_woypbpr_IDTV_TC_NICKEL17_1900UK_32906W_10078529_50216712.indd 201_MB62_[GB]_woypbpr_IDTV_TC_NICKEL17_1900UK_32906W_10078529_50216712.indd 2 06.04.2012 19:47:5406.04.2012 19:47:54

English - 3 -
Moisture and Water
Do not use this device in a humid and
damp place (avoid the bathroom, the
sink in the kitchen etc). Do not expose
this device to rain or water, as this may
be dangerous and do not place objects
filLCDwith liquids,suchas flowervases,
on top.
Ifanysolid objectorliquidfalls intothecabinet, unplug
the TV and have it checked by qualified personnel
before operating it any further.
Cleaning
Before cleaning, unplug the TV set
from the wall outlet. Do not use liquid or
aerosol cleaners. Use a soft, dry cloth.
Ventilation
The slots and openings on the TV set
are intended for ventilation and to ensure reliable
operation. To prevent overheating, these openings
must not be blocked or covered in anyway.
Heat and Flames
The set should not be placed near to
open flames or sources of intense heat
such as an electric heater. Ensure that
no open flame sources, such as candles,
are placed on top of the TV. Batteries should not be
exposed to excessive heat such as sunshine, fire or
the like.
Lightning
In case of storm and lightning or when
going on holiday, disconnect the power
cord from the wall outlet.
Replacement Parts
Whenreplacementparts are required,makesurethat
the service technician has used replacement parts,
which are specified by the manufacturer or have the
samespecificationsas the originalone.Unauthorized
substitutions may result in fire, electrical shock or
other hazards.
Servicing
Please refer all servicing to qualified
personnel. Do not remove the cover
yourselfasthismay result in an electric
shock.
Waste Disposal
Instructions for waste disposal:
• Packaging and packaging aids are recyclable
and should principally be recycLCD. Packaging
materials, such as a foil bag, must be kept away
from children.
• Batteries, including those which are heavy metal-
free, should not be disposed of with household
waste. Please dispose of used batteries in an
environmentallyfriendlymanner.Findoutaboutthe
legal regulations which apply in your area.
Do not try to recharge batteries, there is a danger• of explosion. Replace batteries only with the same
or equivalent type.
This symbol on the product or on its
packaging means that your electrical
device should be disposed at the end
of its service life separately from your
household wastes. There are separate
collection systems for recycling in
the EU. For more information, please
contact the local authority or the dealer where you
purchased the product.
Disconnecting the Device
The mains plug is used to disconnect the TV set
from the mains and therefore it must remain readily
operable.
Headphone Volume
Excessivesoundpressurefrom earphones
and headphones can cause hearing loss.
Installation
To prevent injury, this device must be securely
attachedtothe wall inaccordancewiththe installation
instructions when mounted to the wall (if the option
is available).
LCD Screen
TheLCDpanelis a very high technologyproductwith
about a million thin film transistors, giving you fine
picture details. Occasionally, a few non-active pixels
may appear on the screen as a fixed blue, green or
red point. Please note that this does not affect the
performance of your product.
Warning!Donot leaveyourTV instandbyor operating
mode when you leave your house.
Connection to a Television Distribution
System (Cable TV etc.) from Tuner
Devices connected to the protective earthing of the
building installation through the mains connection or
throughother apparatuswithaconnectiontoprotective
earthing-and to a television distribution system using
a coaxial cable, may in some circumstances create
a fire hazard.
Connection to a cable distribution system has
therefore to be provided through a device providing
electrical isolation below a certain frequency range
(galvanic isolator, see EN 60728-11).
01_MB62_[GB]_woypbpr_IDTV_TC_NICKEL17_1900UK_32906W_10078529_50216712.indd 301_MB62_[GB]_woypbpr_IDTV_TC_NICKEL17_1900UK_32906W_10078529_50216712.indd 3 06.04.2012 19:47:5406.04.2012 19:47:54

English - 4 -
Package Contents
MENU
INFO
EPG
FAV
PRESETS
SUBTITLE
RETURN
SOURCE
SLEEP SCREEN
LANG.
Remote Control
LCD TV
Batteries: 2 X AA
Instruction Book
Note: You should check the contents after opening
your purchase and make sure that every item is
included.
Note: The HDMI connection between PC and TV
may cause radio interference in which case it is
recommended to use VGA(DSUB-15) connection.
TRADEMARK ACKNOWLCDGMENT
“Dolby” and the double-D symbol are trademarks of
Dolby Laboratories.
Licence Notification (Optional)
Manufactured under license from Dolby
Laboratories.
Electrical devices not in the hands of children
Neverletchildren useelectricaldevices unsupervised.
Children cannot always recognize properly any
possible danger. Batteries / accumulators can be life
threatening when swallowed. Store batteries out of
the reach of small children. In case of swallowing a
battery, medical aid has to be sought immediately.
Also keep the packaging away from children as there
is danger of suffocation.
Note:The HDMI connection between PC and TV
may cause radio interference in which case it is
recommended to use VGA(DSUB-15) connection.
The Standby button does not fully switch off this
product. Moreover, the device continues to consume
power in standby mode. In order to separate the
device completely from mains, the mains plug has to
bepulLCDfrom the mainssocket.Because of thatthe
deviceshouldbe set upina way, thatanunobstructed
access to the mains socket is guaranteed, so that in
case of emergency the mains plug can be pulLCD
immediately. During periods of prolonged non-use,
theTV should be disconnected fromthemainspower
supply.
Note: While installing the TV to the wall with the
supplied wall mounting kit, you must use the screws
which are supplied in the package (if the kit is
supplied). For using with a mounting kit that you
purchase from stores, you should use max. M 4X16
mm screws while installing the TV to the wall.
01_MB62_[GB]_woypbpr_IDTV_TC_NICKEL17_1900UK_32906W_10078529_50216712.indd 401_MB62_[GB]_woypbpr_IDTV_TC_NICKEL17_1900UK_32906W_10078529_50216712.indd 4 06.04.2012 19:47:5506.04.2012 19:47:55

English - 5 -
Environmental Information
This television is designed to consume less energy to save environment.•
You notonlyhelp to savetheenvironment butalsoyoucan savemoneyby reducing electricitybillsthanks tothe
energy efficiency feauture of this TV. To reduce energy consumption, you should take the following steps:
You can use Power Save Mode setting, located in the Feature menu. If you set Power Save Mode as On,• the TV will switch to energy-saving mode and luminance level ofTV set will be decreased to optimum level.
Note that some picture settings will be unavailable to be changed when the TV is in Power Save Mode.
When the TV is not in use, please switch off or disconnect the TV from the mains plug. This will also reduce• energy consumption.
Disconnect power when going away for longer time.• Note that annually, using the TV set in Power Save Mode has more power efficiency than disconnecting the• TV from the mains plug instead of keeping stand-by mode. Therefore it is highly recommended to activate
PowerSaveMode settingtoreduceyourannual powerconsumption.Andalso itisrecommended todisconnect
the TV from the mains plug to save energy more when you do not use.
• Please helps us to save environment by following these steps.
Repair Information
Please refer all servicing to qualified personnel. Only qualified personnel must repair the TV. Please contact
your local dealer, where you have purchased this TV for further information.
01_MB62_[GB]_woypbpr_IDTV_TC_NICKEL17_1900UK_32906W_10078529_50216712.indd 501_MB62_[GB]_woypbpr_IDTV_TC_NICKEL17_1900UK_32906W_10078529_50216712.indd 5 06.04.2012 19:47:5606.04.2012 19:47:56

English - 6 -
Remote Control Buttons
MENU
INFO
EPG
FAV
PRESETS
SUBTITLE
RETURN
SOURCE
SLEEP SCREEN
6
37
38
39
40
41
42
43
LANG.
Standby1. Image size / Zooms videos (in Media Browser2. video mode)
Sleep timer3. Numeric buttons4. Exit (in DTV mode) / Return / Index page (in5. TXT mode)
Cursor up / Page up (in TXT mode)6. Cursor left7. Programme Up -Page down8. Programme Down - Page up9. Favourite mode selection10. Mono/Stereo - Dual I-II / Current Language (*) /11. Play preview (in Media Browser mode)
Previous programme / Now (in EPG mode)12. Electronic Programme Guide13. Recordings Library14. No function15. Stop (in Media Browser mode)16. Programme recording17. Rapid reverse (in Media Browser mode)18. Rapid advance (in Media Browser mode)19. Info / Reveal (in TXT mode)20. No function21. Picture mode selecion / Changes picture mode22. (in Media Browser video mode)
AV / Source23. Red button24. Green button / List Schedule(in EPG) / Tag/25. Untag All (in favourite list)
Yellow button / Timeline Schedule (in EPG)26. Menu on/off27. Blue button28. OK / Select / Hold (in TXT mode) / Channel List29. Cursor right30. Cursor down31. Volume up32. Volume down33. Subtitle on-off / TXT subtitle (analogue34. TVmode) / Subtitle (in Media Browser mode).
Mute35. Teletext / Mix36. No function37. No function38.
Search Mode39. Play (in Media Browser mode)40. Pause / Timeshift recording41. No function42. No function43.
01_MB62_[GB]_woypbpr_IDTV_TC_NICKEL17_1900UK_32906W_10078529_50216712.indd 601_MB62_[GB]_woypbpr_IDTV_TC_NICKEL17_1900UK_32906W_10078529_50216712.indd 6 06.04.2012 19:47:5606.04.2012 19:47:56

English - 7 -
TV and Operating Buttons
FRONT and REAR VIEW Control buttons VIEW Control Buttons
1. Standby/On button
2. TV/AV button
3. Programme Up/Down buttons
4. Volume Up/Down buttons
Note: Press “ ” and
buttons at the same time to view
main menu.
Viewing the Connections - Back Connectors
DI
HM1
SPDIF
Coax.OUT
DI
HM2
HDMI 2: HDMI Input1. HDMI 1: HDMI Input2. HDMI Inputs are for connecting a device that has a HDMI socket. Your TV is capable of displaying
High Definition pictures from devices such as a High Definition Satellite Receiver or DVD Player. These
devices must be connected via the HDMI or Component source. These sockets can accept either 720p
or 1080i signals. No sound connection is needed for a HDMI to HDMI connection.
RF Input3. connects to an aerial antenna system or a cable.
Note: If you use a decoder or a media recorder, you should connect the aerial cable through the device to
the television with an appropriate antenna cable, as shown in the illustration in the following pages.
SCART4. input or output for external devices. Connect the SCART cable between the SCART socket on the
TV and the SCART socket on your external device (such as a decoder, a VCR or a DVD player).
Note: If an external device is connected via the SCART socket, the TV will automatically switch toAV mode.
Note: S-VHS signal is supported via the scart socket (optional).
01_MB62_[GB]_woypbpr_IDTV_TC_NICKEL17_1900UK_32906W_10078529_50216712.indd 701_MB62_[GB]_woypbpr_IDTV_TC_NICKEL17_1900UK_32906W_10078529_50216712.indd 7 06.04.2012 19:47:5706.04.2012 19:47:57

English - 8 -
Note: When receiving DTV channels (Mpeg4 H.264) or while in Media Browser mode, output will not
be available via the scart socket.
VGA Input5. is for connecting a personal computer to the TV set.
Connect the PC cable between the PC INPUT on the TV and the PC output on your PC.
SPDIF Out6. outputs audio signals of the currently watched source.
Use an SPDIF cable to trasfer audio signals to a device that has SPDIF input.
Viewing the Connections - Side Connectors
The CI Slot is used for inserting a CI card. A CI card allows you to view all the channels1. that you subscribe to. For more information, see “Conditional Access” section.
Side USB input.2. Video Input is used for connecting video signals of external devices.Connect the video3. cable between the VIDEO IN socket on the TV and the VIDEO OUT jack on your device.
Audio Inputs are used for connecting audio signals of external devices. Connect the audio4. cable between theAUDIO INPUTS on the TV and theAUDIO OUTPUTjacks on your device.
Note: If you connect a device to the TV via the VIDEO INPUT, you should also connect your
device with an audio cable to the AUDIO INPUTS of the TV to enable audio.
The headphone jack is used for connecting an external headphone to the system.5. Connect to the HEADPHONE jack to listen to the TV from headphones.
Power Connection
IMPORTANT: The TV set is designed to operate on 220-240V AC, 50 Hz.
After unpacking, allow the TV set to reach the ambient room temperature before you connect the set to the• mains. Plug the power cable to the mains socket outlet.
Aerial Connection
Connect the aerial ,cable TV plug to the• AERIAL INPUT (ANT) socket located at the rear of the TV.
DI
H M1
SPDIF
Coax.OUT
DI
H M2
Aerial or Cable
USB Connection
You can connect a USB hard disk drive or USB memory stick to your TV by using the USB inputs of the TV.• This feature allows you to play files stored in a USB drive or record programmes.
2.5” and 3.5” inch (hdd with external power supply) external hard disk drives are supported.• Torecorda programme,youshould firstconnecta USBdiskto yourTV whiletheTV isswitchedoff.Youshould• then switch on the TV to enable recording feature. Otherwise, recording feature will not be available.
IMPORTANT !
You may back up your files before making any connections to the TV set in order to avoid any possible data• loss. Note that manufacturer will not be responsible for any file damage or dataloss.
It is possible that certain types of USB devices (e.g. MP3 Players) or USB hard disk drives/memory sticks• may not be compatible with this TV.
01_MB62_[GB]_woypbpr_IDTV_TC_NICKEL17_1900UK_32906W_10078529_50216712.indd 801_MB62_[GB]_woypbpr_IDTV_TC_NICKEL17_1900UK_32906W_10078529_50216712.indd 8 06.04.2012 19:47:5806.04.2012 19:47:58

English - 9 -
IMPORTANT: The TV supports only FAT32 disk
formatting. NTFS format is not supported. If you
connectaUSBdisk with NTFS format,theTVwill ask
you to format the content. See the section, “Format
Disk” in the following pages for more information on
disk formatting.
Note that ALL the data stored on the USB disk will
be lost and then the disk format will be converted to
FAT32 in such a case.
USB Disk Connection
• Plug your USB device to the USB input of the TV.
Note: Plug or unplug your USB disk while the TV is
switched off.
Note:Ifyou aregoingto connectaUSB harddiskdrive
to the TV set, USB connection cable used between
the disk drive and the TV should have a USB logo
and should be as short as possible.
Note: While formatting a USB hard disk that has 1TB
(Tera Byte) or more file capacity, you can experience
problems with the formatting process. In such a
case, you should format the disk with your personal
computer and the formatted disk type should be
FAT32. SIDE VIEW USB MEMORY
5Vdc
Max:500mA
USB
CAUTION !
Quickly plugging and unplugging USB devices,• is a very hazardous operation. Especially, do not
repeatedly quickly plug and unplug the drive. This
may cause physical damage to the USB player and
especially the USB device itself.
Do not pull out USB module while playing or• recording a file.
Programme Recording
To record a programme, you should first connect a
USB disk to your TV while the TV is switched off.
You should then switch ontheTV to enable recording
feature.
IMPORTANT: Whenusinga new USBharddisk drive,
it is recommended that you first format the disk using
your TV’s “Format Disk” option.
For using recording function, you should connect a• USB disk or an external hard disk drive to the TV
and connected USB disk should have at least 1 GB
capacity and should have 2.0 speed compatibility.
If the connected USB device does not support 2.0
speed, an error message will be displayed.
Note: Recorded programmes are saved into the
connected USB disk. If desired, you can store/copy
recordings on a computer; however, these files will
not be available to be played on a computer. You can
play the recordings only via your TV.
For more information on recording programmes,• see sections “Instant Recording”, “Timeshifting”,
“ElectronicProgrammeGuide”, “RecordingsLibrary”
or “Recording Timers” in the following parts.
Recorded programmes are split into 4GB
•
•
partitions.
partitions.
Recorded programmes are stored in the following• directory of the connected USB disk: \DVR\RECS.
All recordings are indicated with a number. A text
(txt) file is created for each recording. This text
file includes information such as broadcaster,
programme, and recording time.
Timeshifting may be stopped according to USB• device write speed. If the USB device speed is not
enough for video stream bitrate, timeshifting may
be stopped and recording may fail. If HD service
bitrate is greater than 13 Mbp/sec. some freeze can
be seen during timeshifting on both USB disk and
on external HDD.
Recordings of HD programmes can occupy bigger• size on the USB disk depending on the broadcast’s
resolution. For this reason it is recommended
to use USB hard disk drives for recording HD
programmes.
Do not plug out the USB/HDD during the recording.• This may harm the connected USB/HDD.
Multipartiton support is available. Maximum two• different partitions are supported. If the disk have
more than two partitions, crash may occur. First
partition of the usb disk is used for PVR ready
features. It also must be formatted as primary
partition to be used for PVR ready features.
Somestreampackets maynotberecorded because• ofsignalproblems, sosometimesvideo mayfreezes
during playback.
Record, Play, Pause, Display (for PlayListDialog)• keys could not be used when teletext is ON. If a
recording starts from timer when teletext is ON,
teletext is automatically turned off. Also teletext
usage is disabled when there is ongoing recording
or playback.
• Radio record is not supported.
• The Tv can record programmes up to ten hours.
01_MB62_[GB]_woypbpr_IDTV_TC_NICKEL17_1900UK_32906W_10078529_50216712.indd 901_MB62_[GB]_woypbpr_IDTV_TC_NICKEL17_1900UK_32906W_10078529_50216712.indd 9 06.04.2012 19:48:0006.04.2012 19:48:00

English - 10 -
Connecting the TV to a PC
For displaying your computer’s screen image on your
LCD TV, you can connect your computer to the TV set.
Power off both computer and display before making
any connections. Use 15-pin D-sub display cable to
connect a PC to the LCD TV. When the connection is
made,switch toPC source.See Inputselectionsection.
Set the resolution that suits your viewing requirements.
Resolution information can be found in the appendix
parts.
PC audio cable
(not supplied)
to AUDIO INPUTS
on the TV
Audio
Inputs
PC Input
(back)
PC RGB Cable
(Not supplied)
Using Side AV Connectors
You can connect a range of optional equipment to
your LCD TV.
For connecting a camcorder, connect to the VIDEO• INsocketand theAUDIO SOCKETS.Donot connect
the camcoder to VIDEO IN socket at the same time
since it can cause noise in the picture. For selecting
the related source, see the section “Input selection”
in the following parts.
To listen the TV sound from headphones, connect• to the HEADPHONE jack of theTV.
Connecting to a DVD Player
via HDMI
Please refer to your DVD player’s instruction book
for additionalinformation. Poweroffboththe TVand
the device before making any connections.
Note: Not all cables shown in the illustration are
supplied.
If your DVD player has an• HDMI socket, you can
connect via HDMI for better video and audio quality.
DI
H M1
SPDIF
Coax.OUT
DI
HM2
External device
(not supplied)
HDMI Cable
Whenyou connectto DVDplayer asillustrated above,• switch to the connected HDMI source. See, Input
Selection section for more information on changing
sources.
Connecting to a DVD Player
If you want to connect a DVD player to your LCD
TV, you can use connectors of the TV set. DVD
players may have different connectors. Please refer
to your DVD player’s instruction book for additional
information. Power off both the TV and the device
before making any connections.
Note: Cables shown in the illustration are not
supplied.
If your DVD player has an HDMI socket, you can• connectvia HDMI. Whenyouconnect toDVDplayer
as illustrated below, switch to HDMI source. See,
“Input Selection” section.
Most DVD players are connected through• COMPONENT SOCKETS. Use a component video
cable to connect video input. For enabling audio,
use a component audio cable as illustrated below.
When the connection is made, switch to YPbPr
source. See, “Input selection” section.
You may also connect through the SCART. Use a• SCART cable as shown below.
Note:Thesethree methods ofconnectionperformthe
same function but in different levels of quality. It is not
necessary to connect by all three methods.
01_MB62_[GB]_woypbpr_IDTV_TC_NICKEL17_1900UK_32906W_10078529_50216712.indd 1001_MB62_[GB]_woypbpr_IDTV_TC_NICKEL17_1900UK_32906W_10078529_50216712.indd 10 06.04.2012 19:48:0006.04.2012 19:48:00

English - 11 -
HDMI
inputs
Scart sockets
DVD Player
Scart Cable
(not supplied)
HDMI Cable
(not supplied)
HDMI
SCART
Remote Control Handset
Inserting Batteries
Remove the battery cover located on the back of• the handset by gently pulling backwards from the
indicated part.
Insert two• AAA/R3 or equivalent type batteries
inside. Observe the correct polarity (+/-) when
inserting batteries and replace the battery cover.
+
+
--
Note: Remove the batteries from the remote control
handset when it is not to be used for a long period.
Otherwise it can be damaged due to any leakage of
batteries. Remote range is approximately 7m/23ft.
Switching On/Off
To Switch the TV On
Connect the power cord to the 220-240VAC 50 Hz.• Then the standby LCD lights up (The LCD will blink
during the standby On/Off).
To switch the TV on from standby mode either:•
Press the “• ” button, P+ or P- or a numeric button
on the remote control.
Press the “• ” button, P/CH - or P/CH + button on
the TV. The TV will then switch on.
Note:Ifyouswitch on yourTVviaP+ or P- buttons on
the remote control or on the TV set, the programme
that you were watching last will be reselected.
To Switch the TV Off
Pressthe“• ”button on theremotecontrolor press
the “ ” switch on the TV, so the TV will switch to
standby mode.
Topowerdown theTVcompletely, unplug thepower• cord from the mains socket.
Note: When the TV is switched to standby mode, the
standby LCD can blink to indicate that features such
as Standby Search, Over Air Download or Timer is
active.
Input Selection
Once you have connected external systems to
your TV, you can switch to different input sources.
Press “SOURCE” button on your remote control
consecutively for directly changing sources.
Note : YPbPr mode can be used only when you
connectadevicethat has aYPbProutput through the
PC input with YPbPr to PC cable (not supplied).
(optional)
01_MB62_[GB]_woypbpr_IDTV_TC_NICKEL17_1900UK_32906W_10078529_50216712.indd 1101_MB62_[GB]_woypbpr_IDTV_TC_NICKEL17_1900UK_32906W_10078529_50216712.indd 11 06.04.2012 19:48:0006.04.2012 19:48:00

English - 12 -
EPG menu displays available information on all• channels.
Please note that event information is updated• automatically. If there are no event information data
available for channels, EPG will be displayed with
blanks.
OK (Options): views/records or sets timer for future
programs.
INFO (Event Details): Displays the programmes in
detail.
Green button: Programme schedule will be listed
Yellowbutton:DisplayEPGdata inaccordanewithtimeline
schedule
Blue button (Filter): Views filtering options.
(RECORD): the TV will start to record the
selected progamme. You can press again to stop
the recording.
Redbutton(PrevTimeSlice):Displaystheprogrammes
of previous time slice.
Green button (Next Time Slice): Displays the
programmes of the next time slice.
Yellow button (Prev Day): Displays the programmes
of previous day.
Blue button (Next day): Displays the programmes of
the next day.
Numeric buttons (Jump): Jumps to the preferred
channel directly via numeric buttons.
Basic Operations
You can operate your TV using both the remote
control and onset buttons.
Operation with the Buttons on the TV
Volume Setting
You can use the control switch to change the• volume of the TV. To increase volume, please move
the switch upward. Move the switch downward to
decrease the volume. A volume level scale (slider)
will be displayed on the screen.
Programme Selection
First press the control switch once to change• channel. You can move the switch upward to select
the next programme or move it downward to select
the previous programme.
Viewing Main Menu
TheMainMenu screencannotbe displayedbyusing• the control switch on the TV.
AV Mode
Press the control switch consecutively until the• source OSD is displayed on the screen.
Operation with the Remote Control
Theremotecontrolof yourTVisdesigned to control• all the functions of the model you selected. The
functions will be described in accordance with the
menu system of your TV.
Volume Setting
Press• V+ button to increase the volume. Press V-
buttontodecreasethe volume.Avolumelevelscale
(slider) will be displayed on the screen.
Programme Selection (Previous or Next
Programme)
Press• P- button to select the previous programme.
Press• P+ button to select the next programme.
Programme Selection (Direct Access)
Press the numeric buttons on the remote control to• select programmes between 0 and 9. The TV will
switch to the selected programme.
Viewing Electronic Programme
Guide (EPG)
You can view the electronic programme guide (EPG)
to view information about available programmes.To
view the EPG menu please press EPG button on the
remote control.
Press “• ”/“ ” buttons to navigate through channels.
Press“• ”/“ ”buttonstonavigatethroughtheprogramme
list.
01_MB62_[GB]_woypbpr_IDTV_TC_NICKEL17_1900UK_32906W_10078529_50216712.indd 1201_MB62_[GB]_woypbpr_IDTV_TC_NICKEL17_1900UK_32906W_10078529_50216712.indd 12 06.04.2012 19:48:0106.04.2012 19:48:01

English - 13 -
OK (Options): views/records or sets timer for future
programs.
Text button (Filter): Views filtering options.
INFO (Event Details): Displays the programmes in
detail.
(RECORD): the TV will start to record the
selected progamme. You can press again to stop
the recording.
Red button (Prev Day): Displays the programmes of
previous day.
Green button (Next day): Displays the programmes
of the next day.
Yellow button (Zoom): Expands programme information.
Blue button (Filter): Views filtering options.
INFO (Event Details): Displays the programmes in
detail.
Numeric buttons (Jump): Jumps to the preferred
channel directly via numeric buttons.
OK (Options): views/records or sets timer for future
programs.
Text (Search): Displays “Guide Search” menu.
SUBTTL:PressSUBTITLEbuttontoviewSelectGenre
menu.Usingthisfeature,youcansearchtheprogramme
guide database in accordance with the genre. Info
available in the programme guide will be searched and
results matching your criteria will be listed.
(Now) : Shows the current programme.
Recording via EPG Screen
IMPORTANT: To record a programme, you should
first connect a USB disk to your TV while the TV is
switched off. You should then switch on the TV to
enablerecordingfeature. Otherwise,recordingfeature
will not be available.
(RECORD): the TV will start to record the
selected progamme. You can press again to stop
the recording.
Note: Switching to a different broadcast or source is
not available during the recording.
/ : Page left / Page right.
Programme Options
InEPGmenu, press theOKbuttonto enter the“Event
Options” menu.
Select Channel
In EPG menu, using this option, you can switch to the
selected channel.
Record / Delete Record Timer
IMPORTANT: To record a programme, you should
first connect a USB disk to your TV while the TV is
switched off. You should then switch on the TV to
enablerecordingfeature. Otherwise,recordingfeature
will not be available.
Afteryouhave selected aprogrammein EPG menu,• press the OK button and and Options screen will
be displayed. Select “Record” option and press the
OKbutton.After thisoperation,a recordingbecomes
set to the selected programme.
To cancel an already set recording, highlight that• programme and press the OK button and select
the option “Delete Rec. Timer”. The recording will
be cancelled.
Note: You cannot switch to any other channel or
source while there is an active recording on the
current channel.
Set Timer / Delete Timer
After you have selected a programme in EPG menu,
press the OK button and and Options screen will
be displayed. Select “Set Timer on Event” option
and press OK button. You can set a timer for future
programmes.
To cancel an already set reminder, highlight that
programme and press the OK button. Then select
“Delete Timer” option. The timer will be cancelled.
Note: It is not possible to record or set timer for two or
more individual events at the same time interval.
First Time Installation
IMPORTANT: Ensure that the aerial or cable is
connected and a Common Interface module is not
inserted before switching on the TV for the first
time installation.
WhentheTVisoperated forthefirst time,installation• wizard will guide you through the process. First,
language selection screen will be displayed:
01_MB62_[GB]_woypbpr_IDTV_TC_NICKEL17_1900UK_32906W_10078529_50216712.indd 1301_MB62_[GB]_woypbpr_IDTV_TC_NICKEL17_1900UK_32906W_10078529_50216712.indd 13 06.04.2012 19:48:0106.04.2012 19:48:01

English - 14 -
Use “• ” or “ ” buttons to select your language
and press OK button to set selected language and
continue.
Afterselectingthe language,“• Welcome!”screen will
be displayed, requiring you to set Country,Teletext
Language and Scan Encrypted options.
By pressing “• ” or “ ” button, select the country
you want to set and press “ ” button to highlight
Teletext Language option. Use “ ” or “ ” button
to select desired Teletext Language.
Press “• ” button after setting Teletext Language
option. Scan Encrypted will be then highlighted.
You can set Scan Encrypted as Yes if you want to
scan coded stations.Afterwards select the desired
Teletext Language.
Press• OK button on the remote control to continue
and the following message will be displayed on the
screen:
Toselectthe “Yes”or“No” option, highlighttheitem by
using “ ” or “ ” buttons and press OK button.
Afterwards, the following OSD will be displayed on
the screen:
If you select CABLE option, the following screen will
be displayed:
You canselectfrequency ranges fromthisscreen. For
highlighting lines you see, use “ ” or “ ” button. You
can enter the frequency range manually by using the
numeric buttons on the remote control. Set Start and
Stop Frequency as desired by using numeric buttons
ontheremote control.Afterthisoperation, you canset
Search Step as 8000 KHz or 1000 KHz. If you select
1000 KHz, the Tv will perform search process in a
detaiLCD way. Searching duration will thus increase
accordingly. When finished, press OK button to start
automatic search.
If you select AERIAL option from the Search Type
screen, the television will search for digital terrestrial
TV broadcasts.
Note: You can press• “M” button to cancel.
After all the available stations are stored, Channel• List will be displayed on the screen. If you like the
sort channels, according to the LCN, please select
“Yes” and than press “OK”.
01_MB62_[GB]_woypbpr_IDTV_TC_NICKEL17_1900UK_32906W_10078529_50216712.indd 1401_MB62_[GB]_woypbpr_IDTV_TC_NICKEL17_1900UK_32906W_10078529_50216712.indd 14 06.04.2012 19:48:0206.04.2012 19:48:02

English - 15 -
Press• OK button to quit channel list and watch TV.
Installation
Press MENU button on the remote control and
select Installation by using “ ” or “ ” button. Press
OK button and the following menu screen will be
displayed.
SelectAutomatic ChannelScan(Retune) by using“
”/“ ”buttonand press OK button.Automatic Channel
Scan (Retune) options will be displayed. You can
select options by using “ ”/“ ” and OK buttons.
Auto Channel Scan (Retune) Menu
Operation
Analogue: Searches and stores analogue stations.
Digital & Analogue: Searches and stores both
analogue and aerial DVB stations.
Whenever you select an automatic search type and• press OK button, a confirmation screen will appear
on the screen. To start installation process, select
Yes, to cancel select No by using .“ ” or “ ” and
OK button.
After the auto channel scan type is set and selected• andconfirmed,the installation process willstartand
the progress bar will move along. Press “M” button
to cancel process. Located channels are not stored
if the process is cancelLCD.
Manual Tuning
HINT: This feature can be used for direct broadcast
entry.
Select• Manual Channel Scan from the Installation
menu by using “ ”/“ ” and OK buttons. Manual
Scan options screen will be displayed.
Select the desired• Search Type using “ ” or “
” button. Manual search options will change
accordingly.Use“ ”/“ ”button to highlight an item
and then press “ ” or “ ” button to set an option.
You can press “M” button to cancel.
Manual Search
In manual channel scan, the number of the multiplex
or frequency are entered manually and only that
multiplexorfrequencyare searched for thechannels.
After selecting search type as Digital, you can enter
the multiplex or frequency number using the numeric
buttons and press OK button to search.
Digital Cable Manual Search
In cable manual scan, you can enter frequency,
modulation, symbol rate and network channel scan
options. After selecting search type as Digital Cable,
you can set the desired options and press OK button
to search.
01_MB62_[GB]_woypbpr_IDTV_TC_NICKEL17_1900UK_32906W_10078529_50216712.indd 1501_MB62_[GB]_woypbpr_IDTV_TC_NICKEL17_1900UK_32906W_10078529_50216712.indd 15 06.04.2012 19:48:0306.04.2012 19:48:03

English - 16 -
Analogue Manual Search
After selecting search type as analogue, you can use
“ ”/“ ” button to highlight an item and then press “
” or “ ” button to set an option.
Enter the channel number or frequency using the
numeric buttons. You can then press OK button
to search. When the channel is located, any new
channels that are not on the list will be stored.
Analogue Fine Tune
Select• Analogue Fine Tune from the Installation
menubyusing “ ”or“ ” andOKbuttons.Analogue
fine tune screen will be displayed. Analogue Fine
Tune feature will not be available if there are no
analog channels, digital channels and external
sources stored.
Press• OK button to proceed. Use “ ” or “ ” button
to set Fine Tune. When finished, press OK button
again.
Clear Service List (*)
(*)Thissettingis visible only whentheCountryoption
is set to Denmark, Sweden, Norway or Finland.
Usethissetting to clearchannelsstored.Press “ ” or
“”buttontoselect Clear Service List andthenpress
OK. The following OSD message will be displayed
on the screen:
PressOKtocancel. SelectYesbypressing“ ” or “ ”
button and press OK to delete all of the channels.
Managing Stations: Channel List
The TV sorts all stored stations in the Channel List.
You can edit this channel list, set favourites or set
active stations to be listed by using the Channel List
options.
Press• MENU button to view main menu. Select the
Channel List item by using “ ” or “ ” button. Press
OK to view menu contents.
Select Edit Channel List to manage all stored
channels. Use “ ” or “ ” and OK buttons to select
Edit Channel List.
Operating the Channel List
Press “• ” or “ ” button to select the channel that
will be processed. Press “ ” or “ ” button to select
a function on Channel List menu.
Use• P+ or P- buttons to move page up or down.
Press• BLUE button to view filtering options.
Press• MENU button to exit.
Moving a Channel
Firstselectthedesired channel. Select Moveoption• in the channel list and press the OK button.
Edit Number screen will be displayed. Enter the• desired channel number by using the numeric
buttonsonthe remote control.Ifthere is apreviously
stored channel on that number, a warning screen
willbedisplayed.Select Yes if youwanttomove the
channel and press OK.
Press the• OK button to process. Selected channel
is now moved.
Deleting a Channel
You can press GREEN button to tag/untag all
channels; YELLOW button to tag/untag channel.
Selectthechannel thatyouwant to deleteandselect• Delete option. Press the OK button to continue.
A warning screen will appear. Select• YES to
delete, select No to cancel. Press the OK button
to continue.
Renaming a Channel
Select the channel that you want to rename and• select Edit Name option. Press OK button to
continue.
01_MB62_[GB]_woypbpr_IDTV_TC_NICKEL17_1900UK_32906W_10078529_50216712.indd 1601_MB62_[GB]_woypbpr_IDTV_TC_NICKEL17_1900UK_32906W_10078529_50216712.indd 16 06.04.2012 19:48:0406.04.2012 19:48:04

English - 17 -
Pressing “• ” or “ ” button moves to the previous/
next character. Pressing “ ” or “ ” button toggles
the current character, i.e., ‘b’ character becomes ‘a’
by “ ” and ‘c’by “ ”. Pressing the numeric buttons
‘0...9’ replaces the highlighted character with the
characters printed above the button one by one as
the button is pressed.
When finished, press the• OK button to save. Press
MENU to cancel.
Locking a Channel
You can press GREEN button to tag/untag all
channels; YELLOW button to tag/untag a single
channel.
Select the channel that you want to lock and select• Lock option. Press OK button to continue.
You will be asked to enter parental control PIN.• Default PIN is set as 0000. Enter the PIN number.
Press• OK button when the desired channel is
highlighted to lock/unlock the channel. The Lock
symbol will be displayed next to the selected
channel.
Managing Stations: Favourites
You can create a list of favourite programmes.
Press• MENU button to view the main menu. Select
Channel List item by using “ ” or “ ” button. Press
OK to view menu contents.
Select• Favourites to manage favourite list. Use “
”/“ ” and OK buttons to select Favourites.
You can set various channels as favourites so that• only the favourite channels are navigated.
Select a channel by using “• ” or “ ” button. Press
OK buttontoaddselected channel to favourites list.
Press OK button again to remove.
Button Functions
OK• : Add/remove a station.
YELLOW• : Tag/untag a channel.
GREEN• : Tag/untag all channels.
BLUE• : Displays filtering options.
Managing Stations: Sorting the
Channel List
You can select broadcasts to be listed in the channel
list.To displayspecifictypesof broadcast, youshould
use the Active channel list setting.
Select Active channel list from the Channel list
menu by using “ ” or “ ” button. Press OK button
to continue.
You can select a broadcast type option from the list
by using “ ” /“ ” and OK buttons.
On-Screen Information
You can press INFO button to display on-screen
information. Details of the station and current
programme will be displayed on the information
banner.
The information banner gives information on the
channelselectedand theprogrammes onit.Thename
of the channel is displayed, along with its channel
list number.
Hint: Not all channels broadcast the programme
data. If the name and time of the programme are
not available, then the information banner will be
displayed with blanks.
If the selected channel is locked, you must enter the
correct four-digit numeric code to view the channel
(default code is 0000). “Enter PIN” will be displayed
on the screen.
01_MB62_[GB]_woypbpr_IDTV_TC_NICKEL17_1900UK_32906W_10078529_50216712.indd 1701_MB62_[GB]_woypbpr_IDTV_TC_NICKEL17_1900UK_32906W_10078529_50216712.indd 17 06.04.2012 19:48:0506.04.2012 19:48:05

English - 18 -
Media Playback Using Media
Browser
If the USB stick is not recognized after power off/on
or First Time Installation, first, plug the USB device
out and power off/on the TV set. Plug the USB device
in again.
To display Media Browser window, press either
“MENU” buttonontheremote controlandthenselect
Media Browser by pressing “ ” or “ ” button. Press
OK button to continue. Media Browser menu options
will be displayed.
Also, when you plug USB devices, media browser
screen will be displayed automatically:
You can play music, picture and video files from the
connected USB memory stick. Use “ ” or “ ” button
to select Videos, Photos, Music or Settings.
You can connect two USB devices to your TV. If both
USBdevicesinclude music,pictureor videofiles,USB
selection osd will be displayed on the screen. The
first USB device connected to the TV will be named
as USB Drive1.
Select a device by using “ ” or “ ” button and press
OK.
Viewing Videos via USB
When you select Videos from the main options,
available video files will be filtered and listed on this
screen.Youcanuse“ ”or “ ”buttonto selectavideo
file and press OK button to play a video. If you select
a subtitle file and press OK button, you can select or
deselect that subtitle file. The following menu will be
displayed while playing a video file:
Play ( button): Starts the video playback.
Stop ( button): Stops the video playback.
Pause ( button): Pause the video playback.
Rewind ( button): Goes backward.
Forward ( button): Goes forward.
Subtitle/Audio (LANG. button): Sets subtitle/Audio.
Jump (GREEN button): Jumps to time. Use numeric
buttons to type the desired time and press GREEN
button again to proceed.
Yellow: Opens subtitle time correction menu
Press RETURN button to switch back to previous
menu.
Viewing Photos via USB
When you select Photos from the main options,
available image files will be filtered and listed on this
screen.
01_MB62_[GB]_woypbpr_IDTV_TC_NICKEL17_1900UK_32906W_10078529_50216712.indd 1801_MB62_[GB]_woypbpr_IDTV_TC_NICKEL17_1900UK_32906W_10078529_50216712.indd 18 06.04.2012 19:48:0606.04.2012 19:48:06

English - 19 -
Jump (Numeric buttons):Jumpto selectedfileusing
the numeric buttons.
OK: Views the selected picture in full screen.
Slideshow ( button): Starts the slideshow using
all images.
GREEN button: Views images in thumbnails.
RED button: Sorts files by date.
YELLOW button: Toggles viewing style.
BLUE button: Changes media type.
Slideshow Options
Pause ( button): Pauses the slideshow.
Continue ( button): Continues the slideshow.
Loop/Shuffle(GREEN button):Pressoncetodisable
Loop. Press again to disable both Loop and Shuffle.
Press once more to enable only Shuffle. Press again
to enable all. You can follow the disabled functions
with the change of the icons.
Previous/Next (Left/Right buttons): Jumps to
previous or next file on slideshow.
Rotate (Up/Down buttons):Rotatesthe image using
up/down buttons.
RETURN: Back to file list.
INFO: Displays help screen.
Playing Music via USB
When you select Music from the main options,
available audio files will be filtered and listed on this
screen.
Play ( button): Plays all media files starting with
the selected one.
Stop ( button): Stops playback.
Pause ( button): Pauses the selected playback.
RED: Sorts files by Title,Artist or Album.
Loop/Shuffle(GREEN button):Pressoncetodisable
Loop. Press again to disable both Loop and Shuffle.
Press once more to enable only Shuffle. Press again
to enable all. You can follow the disabled functions
with the change of the icons.
Note:
Ifyoustart theplaybackwith the buttonandactivate
the symbol,theTV will playthenextmusic/video
file. The playback will proceed accordingly and when
the end of the list is reached, it will be played again
from the beginning (loop function).
If you start the playback with the OK button and
activate the symbol, the same music or video file
will be played in a loop (repeat function).
If you start the playback with or OK button and
activate the symbol, music or video file will be
played in a shuffle.
If you start the playback with or OK button and
activate symbols,musicor video fileplayback
will continue randomly and the random playback will
continue.
0..9 (Numeric buttons): Jumps to the selected file.
Play This (OK button): Plays the selected file.
Previous/Next (Left/Right buttons): Jumps to
previous or next file to play.
YELLOW: Toggles viewing style.
BLUE: Changes media type.
Recordings Library
IMPORTANT: To view recordings library, you should
first connect a USB disk to your TV while the TV is
switched off. You should then switch on the TV to
enablerecordingfeature. Otherwise,recordingfeature
will not be available.
To view the list of recordings, select “Recordings
Library”andpress the OK button.RecordingsLibrary
will then be displayed with available recordings.
All the recordings are kept in a list in the recordings
library.
RED button (Delete):Erases the selected
recording.
GREEN button (Edit): Makes changes on the
selected recording.
01_MB62_[GB]_woypbpr_IDTV_TC_NICKEL17_1900UK_32906W_10078529_50216712.indd 1901_MB62_[GB]_woypbpr_IDTV_TC_NICKEL17_1900UK_32906W_10078529_50216712.indd 19 06.04.2012 19:48:0706.04.2012 19:48:07
Table of contents
Languages:
Other Orion LCD TV manuals