Orion COMBI 1415X User manual

Operating Instructions
Before operating the unit, please read this manual thoroughly.
TV-/Video-/DVD-Combination
COMBI 1415X
COMBI 2115 SI
DIGITAL VIDEO
MODEL COMBI 1415X
5H00701A Cover-P02 12/11/03, 10:14 AM1

2
IMPORTANT
Unauthorized recording of copyright television programmes, films, video tapes and other materials
may infringe on the rights of copyright owners and be contrary to copyright laws.
WARNING
To prevent fire or shock hazard, do not expose this equipment to rain or moisture.
Please check that this package contains the following items. If any accessories are missing,
please contact the helpline.
1 Remote Control
2 Batteries (UM-4)
CAUTION:
THISUNITISACLASS 1 LASER PRODUCT. HOWEVER THIS UNITUSESAVISIBLE LASER BEAM WHICH COULD
CAUSE HAZARDOUS RADIATION EXPOSURE IF DIRECTED. BE SURE TO OPERATE THE PLAYER CORRECTLY
AS INSTRUCTED.
THE FOLLOWING CAUTION LABEL IS LOCATED ON THE REAR PANEL OF THE UNIT.
WHEN THIS UNIT IS PLUGGED INTO THE WALL OUTLET, DO NOT PLACE YOUR EYES CLOSE TO THE OPENING
OF THE DISC TRAY AND OTHER OPENINGS TO LOOK INTO THE INSIDE OF THIS UNIT.
USE OF CONTROLS OR ADJUSTMENTS OR PERFORMANCE OF PROCEDURES OTHER THAN THOSE
SPECIFIED HEREIN MAY RESULT IN HAZARDOUS RADIATION EXPOSURE.
DO NOT OPEN COVERSAND DO NOT REPAIR YOURSELF. REFER SERVICING TO QUALIFIED PERSONNEL.
CLASS 1
LASER PRODUCT
*Este producto incorpora tecnología de protección del copyright protegido por algunas patentes estadounidenses y otros
derechos de propiedad intelectual que pertenecen a Macrovision Corporation y otros propietarios. El uso de esta tecnología
de protección del copyright debe estar autorizado por Macrovision Corporation y otros propietarios, y está destinada a uso
doméstico y otras formas de exhibición restringida. De lo contrario es necesaria la autorización de Macrovision Corporation
y otros propietarios. La ingeniería inversa o el desmontaje están prohibidos.
*Fabricado bajo licencia de Dolby Laboratories.
“Dolby” y el símbolo de la doble D son marcas comerciales de Dolby Laboratories.
*“DTS” y “DTS Digital Out” son propiedad de Digital Theater Systems, Inc.
*La grabación no autorizada de programas de TV, películas, cintas de vídeo y otros materiales protegidos por copyright
puede infringir los derechos de los propietarios del copyright y puede ser contrario a las leyes de propiedad intelectual.
5H00701A Cover-P02 12/11/03, 10:14 AM2

3
FEATURES
CONTENTS
PREPARATION
FEATURES ................................................................ 3
PRECAUTIONS ......................................................... 4
LOCATION OF CONTROLS...................................... 5
REMOTE CONTROL ................................................. 6
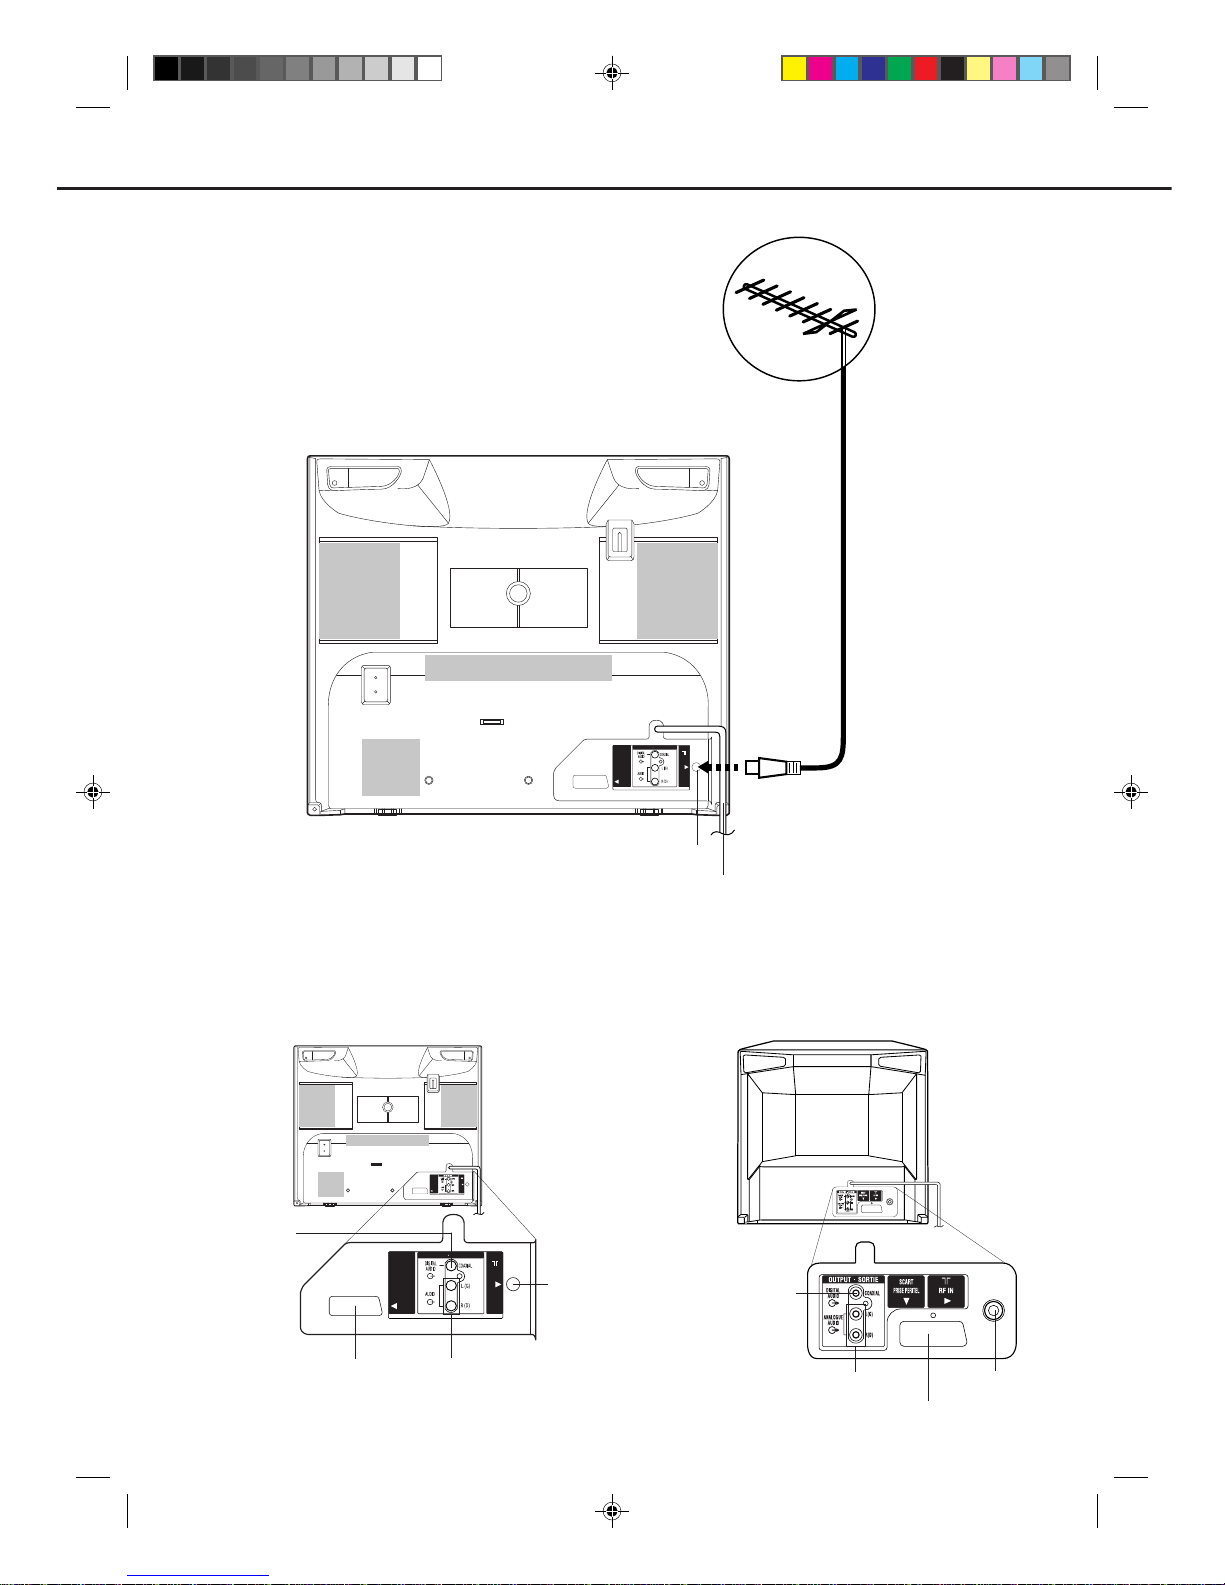
AERIAL CONNECTIONS........................................... 8
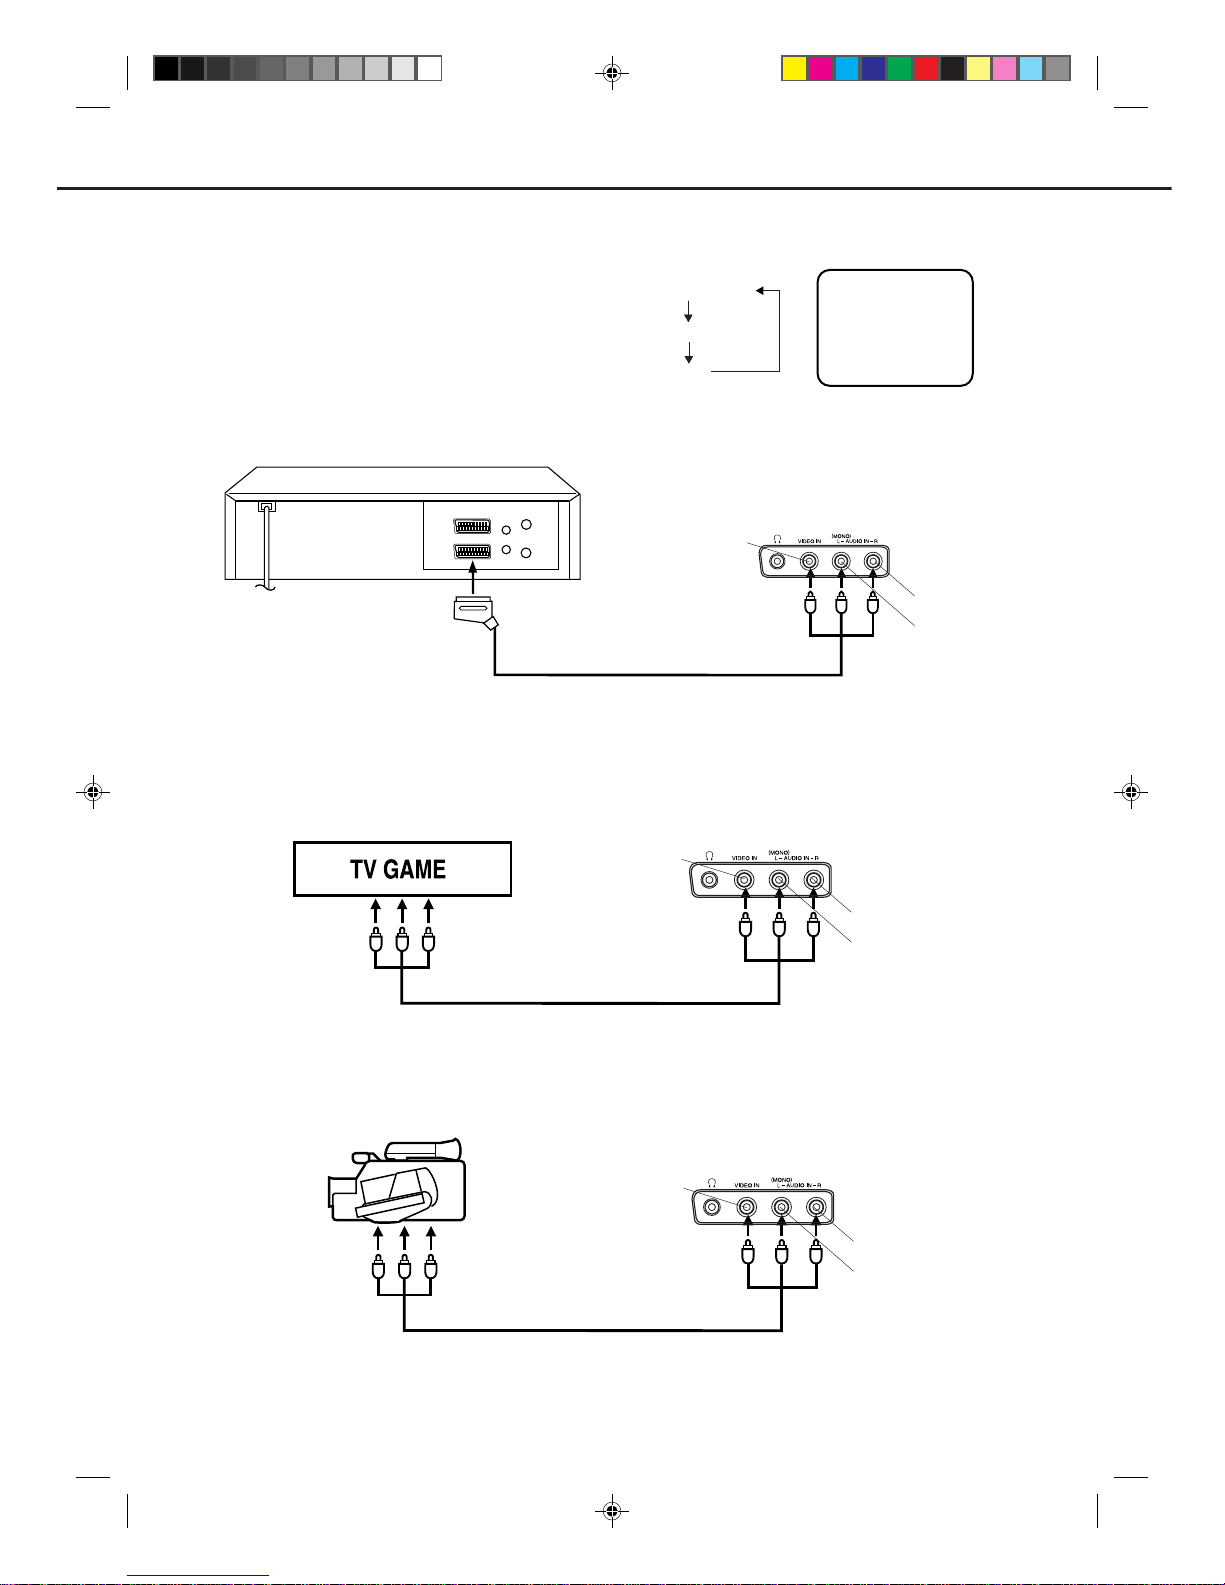
CONNECTION TO OTHER EQUIPMENT ................. 9
TV OPERATION
ON-SCREEN LANGUAGE SELECTION ................. 11
TO SET THE CLOCK .............................................. 11
AUTOMATIC TV STATION PRESETTING.............. 12
EXCHANGE THE TV STATIONS ............................ 12
MANUAL TV STATION PRESETTING .................... 13
TV OPERATION ...................................................... 14
PICTURE CONTROL ADJUSTMENTS ................... 15
TO SET THE ON TIMER ......................................... 15
TO SET THE OFF TIMER ....................................... 16
TAPE PLAYBACK OPERATION
RECORDING
LOADING AND UNLOADING THE VIDEO CASSETTE
TAPE........................................................................ 16
COLOR SYSTEM .................................................... 17
PLAYBACK .............................................................. 17
SPECIAL PLAYBACK .............................................. 18
RECORDING A TV PROGRAMME ......................... 19
TIMER RECORDING ............................................... 19
OTHER FUNCTIONS FOR TIMER RECORDING... 20
ONE-TOUCH TIMER RECORDING (OTR) ............. 20
ADVANCED FUNCTIONS OF TV/VCR SECTION
COUNTER DISPLAY ............................................... 21
VIDEO INDEX SEARCH SYSTEM (INDEX)............ 21
RECEPTION DISTURBANCE ................................. 21
NICAM/GERMAN A2 STEREO RECORDING
(COMBI 2115 SI ONLY) AND PLAYBACK .............. 22
TV/VCR
•HQ(High Quality)
• TELETEXT Function
• PAL/SECAM/MESECAM
•1 Month, 8 Programme Timer
•One-Touch Timer Recording (OTR)
•30 Minute Back Up
•Real Time Tape Counter with Zero Return
•NTSC Playback (PAL 60Hz)
• Hi-Fi STEREO
•Picture Control Adjustments
• Slow Motion
• Video Index Search System
• Digital Auto Tracking
• Programmable ON/OFF Timer
•Auto Power On/Auto Play
•Auto Rewind/Auto Eject
•Dual Speed Picture Search
• 2 Speed (SP/LP) Record/ Playback
• On Screen 5 Language Display
•Sleep Timer
•Auto Repeat Play
•Auto Video Head Cleaning
DVD Player
•Digital Audio Jack (Coaxial)
• Multi-Language
• Multi-Angle
•Repeat Playback
•Memory/Random Playback
•Zoom
• Video Aspect Ratio
•Parental Control
•Digital output for Dolby Digital and DTS
• Playback of DVD, Video-CD, SVCD,Audio-CD
and MP3/JPEG CD
• PAL & NTSC DVDs playback
•A-B Repeat playback
DISC PLAYBACK OPERATION
DISC ........................................................................ 26
PREPARATION ....................................................... 27
STATUS DISPLAY OF DISC ................................... 27
SETTING LANGUAGE ............................................ 27
PLAYBACK PROCEDURE ...................................... 28
SPECIAL PLAYBACK .............................................. 28
MP3/JPEG PLAYBACK ........................................... 29
SETTING THE JPEG INTERVAL ............................ 30
SETTING THE SELECT FILES ............................... 31
ZOOMING ................................................................ 31
LOCATING DESIRED SCENE ................................ 31
REPEAT A-B............................................................ 31
REPEAT/RANDOM/PROGRAM PLAYBACK .......... 32
CHANGING SOUNDTRACK LANGUAGE .............. 32
SUBTITLES ............................................................. 32
CHANGING ANGLES .............................................. 33
TITLE SELECTION .................................................. 33
DVD MENU .............................................................. 33
ADVANCED FUCTION OF DVD SECTION
SETTING THE ASPECT RATIO OF TV SCREEN .. 33
SETTING ON SCREEN DISPLAY ........................... 33
DYNAMIC RANGE CONTROL ................................ 34
PARENTAL CONTROL SETTING ........................... 34
TO CHANGE THE PARENTAL LEVEL ................... 35
TEMPORARY DISABLING OF RATING LEVEL BY
DVD DISC ................................................................ 35
ADDITIONAL INFORMATION
LANGUAGE CODE LIST ......................................... 36
BEFORE REQUESTING SERVICE......................... 37
CLEANING OF VIDEO HEADS ............................... 38
SPECIFICATION ..................................................... 39
CERTIFICADO DE CONFOMIDAD CON
NORMAS ............................................. BACK COVER
DUPLICATING A VIDEO TAPE ............................... 23
RECORDING FROM DISC TO VIDEO TAPE ......... 23
UNITEXT.................................................................. 24
5H00701A P03-10 12/11/03, 10:14 AM3

4
•Undercertainconditions, suchas lowhumidity orwalking across woolcarpet, youmay experiencea static
discharge when touching the unit. If this happens and it fails to function, follow the procedure below.
1) Un-plug the unit from the AC outlet.
2) It may take two to three hours for static build up to clear.
3) Re-plug the unit again.
•Do not place the unit on or near appliances which may cause electromagnetic interference eg. TV or hi-
fispeakers,etc.Doingsomayaffect operationofunitcausingerraticplayingor recording, pictureorsound
distortion, or noise.
• Avoid extreme moisture and dust.
•Donotinsertfingersoranyotherobjectsintothecassetteloadingslot.Donotspraycleanerorwaxdirectly
on the unit or use forced air to remove dust.
•Keep the unit away from flower vases, sink etc. Liquids spilled into the unit can cause serious damages.
SwitchOFF thePower Supply tothe unit andconsult aqualified service engineerbefore attempting touse
the unit again.
• When you leave your home for a long period of time, unplug the AC mains lead.
•Avoid extreme heat and cold.
•Theventilationholespreventoverheating.Donotblockorcovertheseholes.Especiallyavoidcoveringthe
holes with soft materials such as cloth or paper.
•Place the unit on a flat, stable, level surface, and never subject it to violent shaking or any other shock or
impact.
•When you finish operating the unit, always unload the cassette and turn off the power.
•To protect the unit during a thunder storm, unplug the AC mains lead from the wall outlet and disconnect
the Aerial.
MOISTURE CONDENSATION
If the unit is suddenly moved from a cold place to a warm place, moisture may form inside
the unit. In this case, do not operate it for two or three hours.
PRECAUTIONS
WHAT IS MOISTURE CONDENSATION?
When cold water is poured into a glass, for, example, water vapor in the air will condense
on the surface of the glass. This is called moisture condensation.
MOISTURE WILL CONDENSE ON THE UNIT IN THE FOLLOWING CASES;
•When you move the unit from a cold to a warm place.
•After heating a cold room or under extremely humid conditions.
IF YOU EXPERIENCE THE ABOVE CONDITIONS;
Plug the AC cord to AC outlet, set the Main Power (ON) Switch to ON and leave the unit at
the room temperature until moisture condensation disappears.
Depending on the surrounding conditions, this may take two or three hours.
Head Drum
Video Tape
5H00701A P03-10 12/11/03, 10:15 AM4

5
LOCATION OF CONTROLS
Note for key-operation
During TV/VCR mode:
•When you press DVD 6or 7(SKIP), the
operation will change to DVD SKIP SEARCH mode.
•When you press DVD 3 (STOP), the operation will change to
DVD mode.
Front
During DVD mode:
•When you press CH (CHANNEL) ▲or ▼, DVD mode will
change to TV/VCR mode.
• When you press VCR 1 (PLAY), the operation will change
to VCR PLAY mode.
STOP button (DVD)
OPEN/CLOSE button (DVD)
Disc tray
CHANNEL ▲/▼buttons
VIDEO/AUDIO IN (L/R) jacks (AV2) F.FWD SKIP button (DVD)
Remote sensor
Cassette Loading Slot
REV (Review) SKIP button (DVD)
REC button (VCR)
PLAY button (VCR)
PLAY button (DVD)
Phones socket
VOLUME ▲/▼buttons
REW (Rewind) button (VCR)
STOP/EJECT button (VCR)
Main Power (ON) Switch Sub Power ( ) button
STAND BY ( ) Indicator
REC/OTR Indicator
TIMER REC Indicator
F.FWD button (VCR)
Phones socket
F.FWD SKIP button (DVD)
REV (Review) SKIP button (DVD)
VIDEO IN
ON
L Ð AUDIO IN Ð R
TIMER RECREC/OTR
(MONO)
VCR DVD
STOP button (DVD)
OPEN/CLOSE button (DVD)
Disc tray
CHANNEL ▲/▼buttons (VCR)
VIDEO/AUDIO IN (L/R)
jacks (AV2) Remote sensor
Cassette Loading Slot
REC button (VCR) PLAY button (VCR)
PLAY button (DVD)
VOLUME ▲/▼buttons
REW (Rewind) button (VCR)
STOP/EJECT button (VCR)
Main Power (ON) Switch
Sub Power ( ) button
STAND BY ( ) Indicator
REC/OTR Indicator
TIMER REC Indicator
F.FWD button (VCR)
COMBI 2115 SI
COMBI 1415X
5H00701A P03-10 12/11/03, 10:15 AM5

6
Sub Power on/off 11,14
(EJECT) Eject a cassette tape 16
(OPEN/CLOSE) Open or Close the tray 28~30
info (CALL) Display VCR or DVD operation status 14,21,27
0-9 Direct channel selection of TV 12,19
Input setting 11~13,19,32
Enter a security code 34,35
(CHANNEL) +/– Select channel of the VCR 12,14,19
Utilize the teletext 25
AV Scart Input or AV-Front input 10,19,23
▲/ ▼/ B/ ACursor buttons
ENTER
Enter information in the menu/Select option in the menu
(TEXT/MIX/TV) Select teletext 24,25
TV/VCR Select to operate TV/VCR 10
DVD Select to operate DVD 27
DVDMENU Select menu of a DVD disc 33
(VOLUME) +/– Volume +/– 14
SETUP MENU
Display menu of setup 11~13,27
TITLE Select title of a DVD disc 33
ATR Auto tracking 17
RETURN Remove DVD set up menu 27,33~35
PLAY MODE Select playback mode 32
(QUICK VIEW)
Quick view 14
ZOOM Zoom (for DVD playback) 31
(REVEAL) Reveal 25
(SLEEP) Sleep timer 14
(MUTE) Mute 14
REPEAT A-B
Repeat playback betweenA and B (DVD/CD)
31
PROGRAM Confirmation of Timer-Recording 20
CANCEL Delete Timer program 20
Cancel input data in the setting mod
e
12,15,31,32
(F/T/B) F/T/B 25
JUMP Locating desired scene 31
(HOLD) Hold 24
SP/LP Sets the tape speed for recording 19,20
INDEX Search for INDEX marks 21
(SUB PAGE) Sub page 25
TIMER REC Timer recording On/Off 19
ANGLE Change playback angle of a DVD disc 33
00:00:00 Reset the counter to 00:00 21
(COUNTER RESET)
SUB TITLE Set Subtitle of a DVD disc 32
ZERO (ZERO RETURN)
Stop the tape when the counter reaches 00:00
21
AUDIO Switches sound between mono and stereo 22
Change sound track language of DVD 32
8 (REW) Rewind/Reviewplayback 17,18,28
1(PLAY) Playback 11
9(F.FWD) Fast Forward/Forward search playback 17,18,28
SKIP /Skip chapter to forward or reverse direction 28,30
TRK (TRACKING) –/+
Manual tracking 17,18,22
3(STOP) Stop 17~21,28
2 REC/OTR Recording/OTR 19,20,23
n(SLOW) Slow motion playback 18,28
4/X
(PAUSE/STILL)
Still picture/Recording pause on/off 18,19,23.28
REMOTE CONTROL
page
info
AV
TV/VCR
TITLE
ATR
AUDIO
TIMER REC
RETURN
SETUP
MENU
PLAY MODE/
ANGLE
00:00:00 SUB TITLE
ZERO
SP/LP
ZOOM/
CANCEL/
JUMP/ INDEX/
REPEAT A-B
PROGRAM
DVD
DVD MENU
– TRK/SKIP SKIP/TRK +
REC/OTR
ENTER
1 2 3
4 5 6
7 8 9 0
5H00701A P03-10 12/11/03, 10:15 AM6

7
REMOTE CONTROL
Open the battery compart-
ment cover in the direction
of the arrow.
Install two “AAA/R03/UM-4”
(penlight size) batteries,
paying attention to the
polarity diagram in the
battery compartment.
Replace the cover.
BATTERY INSTALLATION
•Use two "AAA/R03/UM-4" size penlight batteries for the remote control transmitter.
•The batteries may last approximately one year depending on how much the remote control is used. For best
performance it is recommended batteries be replaced on a yearly basis, or when remote operation becomes
erratic.
•Do not mix old and new batteries.
•Weak batteries can leak and severely damage the remote control transmitter. Always remove batteries as
soon as they become weak.
BATTERY CAUTIONS
NOTES:•When direct sunlight, an incandescent lamp, fluorescent lamp or any other strong light shines on the
remote sensor, the remote operation may be unstable.
•When there is an obstacle between the unit and the transmitter, the remote control transmitter may not
operate.
EFFECTIVE DISTANCE OF THE REMOTE CONTROL TRANSMITTER
m
COMBI 1415X COMBI 2115 SI
5m
30
30
5H00701A P03-10 12/11/03, 10:15 AM7

8
Connect an indoor or outdoor antenna (not supplied) to the aerial socket at the rear panel as shown below.
For all aerial circuit problems, please consult your local dealer.
AERIAL CONNECTIONS
The type of aerial required depends on the position of your home, its distance from the transmitter and local
interference. If you do not have an aerial and you are uncertain of what to buy, you should seek the advice of a local
aerial contractor.
EXTERNAL AERIAL
ANALOGUE
ANALOGUE
PRISE PERITEL
OUTPUT SORTIE
SCART
RF IN
PRISEPERITEL
RF IN
SCART
Aerial socket
AUDIO OUT (L/R) jacks
21 pin SCART/
PERITEL (AV1)
COAXIAL
DIGITALAUDIO
OUT jack
REAR
Aerial socket
21 pin SCART/PERITEL (AV1)
AUDIO OUT (L/R) jacks
COAXIAL DIGITAL
AUDIO OUT jack
COMBI 1415X COMBI 2115 SI
ANALOGUE
PRISE PERITEL
OUTPUT SORTIE
SCART
RF IN
Aerial socket
Mains lead
MODEL COMBI 1415X
5H00701A P03-10 12/11/03, 10:15 AM8

9
ANALOGUE
PRISE PERITEL
OUTPUT SORTIE
RF IN
SCART
Using an Audio Amplifier
Using an AV Amplifier with built-in digital surround
If you are using anAmplifier with a built-in digital surround sound decoder (such as Dolby Digital / DTS / MPEG / etc.),
you can connect it as shown below.
Theexactarrangementyouusetointerconnectvariousvideoandaudiocomponentstotheunitisdependentonthemodel
andfeaturesofeachcomponent. Checkthe Owner'sManualprovidedwitheachcomponentforthelocation ofvideo and
audio inputs and outputs.
Coaxial digital cable (not supplied)
AV Amplifier with built-in digital
surround decoder as listed above
Center Speaker
Front
Speaker
(Left)
Front
Speaker
(Right)
Subwoofer
Surround
Speaker (Left) Surround
Speaker (Right)
Coaxial Digital Audio Output
To Coaxial Digital Audio Input
Rear of unit
(COMBI 1415X) This unit
NOTES:
•When you make the connections above, make sure that the power of all units is switched off at the mains.
•Some DTS decoders which do not support DVD-DTS interface may not work properly with the unit.
•When playing DTS encoded material, the sound will only be available through the DigitalAudio Output Socket.
CONNECTION TO OTHER EQUIPMENT
ANALOGUE
PRISE PERITEL
OUTPUT SORTIE
RF IN
SCART
To Audio (L) Input
To Audio (R) Input
Amplifier
Rear of unit
(COMBI 1415X)
Audio (L) Output
AUDIO cord (not supplied)
Audio (R) Output
5H00701A P03-10 12/11/03, 10:15 AM9

10
AV1
Input Selection
If you connect the unit to a VCR, camcorder or games console, you can select this input by pressing the AV button.
3. To connect the TV to a camcorder
To playback from a camcorder, connect the camcorder to the unit as shown.
Press the AV button to select AV2 to use the TV as a monitor.
If you wish to make a recording from the camcorder, follow the same instructions as recording a TV programme (P.19),
but select AV2 for the channel. Front of unit
(COMBI 1415X)
2. To connect the TV to a TV Game
The unit can also be used as a display device for many video games. However, due to the wide variety of different types
of signal generated by these devices and subsequent hook-up variations required, they have not all been included in the
suggestedconnectiondiagrams.PresstheAVbuttontoselectAV2tousetheTVasamonitor.You'llneedtoconsulteach
component's Owner's Manual for additional information.
1. To connect the unit to a VCR
Press the AV button to select AV2 to use the TV as a monitor.
Camcorder
Front of unit
(COMBI 1415X)
Front of unit
(COMBI 1415X)
Audio/Video cord (not supplied)
To Audio/Video OUT
Audio/Video cord (not supplied)
To Audio/Video OUT
VIDEO IN
AUDIO IN (L)
AUDIO IN (R)
PresstheTV/VCR buttontoselecttheTV mode and
thenpress theAV button repeatedly to selectAV1 or
AV2.
AV1(Scart socket)
AV2(Front-AV-input)
TV-program
To Scart socket
of VCR
(not supplied)
VIDEO IN
AUDIO IN (L)
AUDIO IN (R)
CONNECTION TO OTHER EQUIPMENT
VIDEO IN
AUDIO IN (L)
AUDIO IN (R)
5H00701A P03-10 12/11/03, 10:15 AM10

11
ON-SCREEN LANGUAGE
SELECTION
Thisunitcandisplayfivelanguages,English,German,
French, Italian or Spanish.
•Make sure that the MAIN POWER (ON) switch on the
front panel is pushed in (ON). (The STANDBY ( )
indicator lights up.)
• Press the Sub Power ( ) button to turn on the unit.
(The STANDBY ( ) indicator goes off.)
1Press TV/VCR to select TV/VCR mode.
Press MENU.
2Press ▲or ▼to select the
GRUNDEINSTELLUNG
mode. Then press ENTER.
3Press ▲or ▼to select the
LANGUAGE mode. Then
press ENTER.
4Press ▲ or ▼to select the
desired language (e.g.:
ESPANOL).
Then press ENTER.
5Press MENU repeatedly until the TV picture appears
on the screen.
NOTE:
When you plug the AC mains lead into the mains socket
for the first time the MENU screen at the step 2 and step
3 will be skipped and move to the language selecting
screen at the step 4. But this is not a fault - please
select the language at first before operating this unit.
TO SET THE CLOCK
TIMER PROGRAMMIEREN
SYSTEMEINSTELLUNG TV
GRUNDEINSTELLUNG
SENDEREINSTELLUNG
WIEDERHOLUNG [AUS]
AUSWAEHLEN :ENTER
OK :MENU
ENDE :
Besides displaying the channel number and functions
symbols on the screen, the unit also displays the
present time and the day of the week. The digital clock
is the 24 hour type.
EXAMPLE: Setting the clock to 11:30, 27 March, 2004.
1Press MENU.
Press ▲or ▼to select the
SINTONIZAR SISTEMA
mode, then press ENTER.
2Press ▲or ▼to select the
AJUSTE DEL RELOJ.
mode, then press ENTER.
3Press / or 10 number
buttons to select the
current date, then press ▼.
•The day of the week will
not be correct until you
have finished entering the
month and year settings.
4Set the month, year and
hour in the same way as in
step 3.
5Press or to select current minute, then press
ENTER.
The time and day will be displayed.
•Youcanchangein10-minutesstepbyholdingdown
.
NOTES:
•During a power failure, disconnection of the mains lead
or if the MAIN POWER (ON) Switch is switched off, the
clock and all its programmed setting will remain in the
memoryfor30minutes.Ifthepowerfailureislongerthan
30 minutes you will have to reset the present time.
•Ifyouwanttocorrectthedigitswhilesetting,press▲until
the item you want to correct is blinking, then press or
to correct the desired setting.
AJUSTE GRAB TEMPORIZADA
REPETIDOR AUTO [OFF]
SINTONIZAR TV
SELEC :
ENTRAR
: ENTER
: MENU
SALIR
SINTONIZAR SISTEMA
SINTONIZAR CANAL
SELEC :
ENTRAR
: ENTER
: MENU
SALIR
AJUSTE DEL RELOJ.
SIST. DE COLOR [ AUTO]
SINTONIZAR SISTEMA
LANGUAGE/SPRACHE/LANGUE
LINGUA/LENGUA
UHR EINSTELLEN
LANGUAGE/SPRACHE/LANGUE
LINGUA/LENGUA
GRUNDEINSTELLUNG
AUSWAEHLEN :ENTER
OK
:MENU
ENDE
:
FARBSYSTEM [ AUTO]
LANGUAGE/SPRACHE/LANGUE
LINGUA/LENGUA
ESPANOL
ENGLISH
DEUTSCH
ITALIANO
SELEC : OK: ENTER
FRANCAIS
SELEC
:
SINTONIZAR
:
OK : ENTER SALIR : MENU
/
0–9
27 LUN
1
2003
0:00
DIA
MES
ANO
HORA
AJUSTE DEL RELOJ.
SELEC
:
SINTONIZAR
:
/
0–9
DIA 27 SAB
MES 3
ANO 2004
HORA 11:30
AJUSTE DEL RELOJ.
OK : ENTER SALIR : MENU
5H00701A P11-18 12/11/03, 10:15 AM11

12
AUTOMATIC TV STATION
PRESETTING
Thisunithasonebuilt-intunertoreceivethebroadcast.
BeforeyourecordoneTV-broadcast, youmustsetand
presetthewholeofthebroadcasts.Thisunitcanpreset
up to 80 broadcast.
1Press MENU.
Press ▲or ▼to select the
SINTONIZAR CANAL.
Then press ENTER.
Press ▲or ▼to select the
AUTO TUNING.
2
3Press ENTER. The unit will begin searching and set-
ting with early stored channel the number is increased
by one into memory all the
broadcasting channels
available in your area
(VHF-L, VHF-H, UHF).
While setting channels,
AUTO TUNING appears.
When the setting finished,
the CHANNEL SETUP
menu will appear.
4Press MENU repeatedly until the TV picture ap-
pears on the screen.
AUTO TUNING
Automatic station presetting
All stations will be preset in sequence available in your
area.
To skip a channel position
Unwanted channels can be skipped so that they
cannot be called up by pressing (CHANNEL)
/ .Select the channel to be skipped, ...e.g.
channel29.Selectchannel29,thenpress CANCEL.
Thischannel’s numberwillbe flashing.Thatway you
can cancel further channels one after the other.
NOTE:Tocancelskippingselecttheskippedchannelusing
10 number buttons, then press CANCEL. The channel
No.doesnotblinkanylonger,andthechannelNo.nowmay
be selected again using
(CHANNEL) / .
EXCHANGE THE TV
STATIONS
Example: Set the channel 10 to the channel position 5.
1Press MENU.
Press ▲or ▼to select the
SINTONIZARCANAL.Then
press ENTER.
2Press ▲or ▼to select the
CAMBIO. Then press
ENTER.
3Press ▲/ ▼or 10 number
buttons until the position
number that you want to
move appears, then press
ENTER.
The every channel will appear in the background of
this setting screen.
4Press ▲/ ▼or 10 number
buttons until the position
number(5)onwhichyouwant
toputthemovingchannelap-
pears.
5
Press MENU repeatedly until the TV picture appears
on the screen.
6
To arrange the other chan-
nels, repeat this procedure
or...
Press ENTER.
NOTE:
To arrange all channels, begin with channel 1.
Selectthe broadcast atstep3that shouldbeseen onchan-
nel position 1. Then set to 1 at step 4and press ENTER.
Then select the broadcast that should be seen on chan-
nel position 2.
Furthermore, continue this procedure to select the broad-
cast that should be seen on channel position 3, 4 and so
on.
AJUSTE GRAB TEMPORIZADA
REPETIDOR AUTO [OFF]
SINTONIZAR TV
SELEC :
ENTRAR
: ENTER
: MENU
SALIR
SINTONIZAR SISTEMA
SINTONIZAR CANAL
AJUSTE GRAB TEMPORIZADA
REPETIDOR AUTO [OFF]
SINTONIZAR TV
SELEC :
ENTRAR
: ENTER
: MENU
SALIR
SINTONIZAR SISTEMA
SINTONIZAR CANAL
AUTO TUNING
CAMBIO
SELEC :
ENTRAR
: ENTER
: MENU
SALIR
PRESELECCION DE CANAL
SINTONIZAR CANAL
AUTO TUNING
CAMBIO
SELEC :
ENTRAR
: ENTER
: MENU
SALIR
PRESELECCION DE CANAL
SINTONIZAR CANAL
CAMBIO CH 1
CH 10
SINTONIZAR :
OK :
ENTER
MENU
SALIR :
/ 0Ð9
CAMBIO CH 5
CH 10
SINTONIZAR :
OK :
ENTER
MENU
SALIR :
/ 0Ð9
CAMBIO CH 10
CH 5
SINTONIZAR :
OK :
ENTER
MENU
SALIR :
/ 0Ð9
5H00701A P11-18 12/11/03, 10:15 AM12

13
MANUAL TV STATION PRESETTING
1
2
4
Press (rising frequency) or (falling frequency)
once. The search starts. It stops at each broadcast
5
Press ▲or ▼to select the
PRESELECCION DE
CANAL. Then press
ENTER.
Press MENU.
Press ▲or ▼to select the
SINTONIZAR CANAL.
Then press ENTER.
The Auto CH Memory function(See page 11) memorizes all broadcasts to the suitable CH positions by where
you done this function.
However one broadcast may not be memorized depend on the bad receiving condition. In case of these broad-
cast, use this Manual tuning function.
Manual station presetting
You activate the auto search function until your preferred station is tuned in. Then you memorize this station into the
chosen channel memory. For each station you repeat this procedure.
Example: Preset the SAT1 on program position 5. 6Ifthe picture isnotsatisfac-
tory press ▲or ▼until the
best picture is achieved.
Then press ENTER.
7
Repeat the steps 3and 7to preset other TV stations.
8
Press ▲or ▼repeatedly
until"5"displayed.Orenter
5with10numberbuttons.
Then press ENTER.
9Press MENU repeatedly until the TV picture appears
on the screen.
Note:
Occasionally, the auto search might catch a weak signal
and stop. If the TV station signal is weak, you shouldn't
store this station.
In that case restart the auto search using or .
automatically (" " change
to " "). Press or re-
peatedly until the SAT1 ap-
pears.Ifyouwanttostopthe
searching, press / or ▲ /
▼.
AJUSTE GRAB TEMPORIZADA
REPETIDOR AUTO [OFF]
SINTONIZAR TV
SELEC :
ENTRAR
: ENTER
: MENU
SALIR
SINTONIZAR SISTEMA
SINTONIZAR CANAL
AUTO TUNING
CAMBIO
SELEC :
ENTRAR
: ENTER
: MENU
SALIR
PRESELECCION DE CANAL
SINTONIZAR CANAL
CH 1
MENUSALIR :
SELEC :
OK : ENTER
DEC OFF
SECAM
CH 1
BUSQUEDA : / S. FINA :
MENU
SALIR
:
DEC OFF
SECAM
CH 1
DEC OFF
BUSQUEDA : / S. FINA :
SECAM
OK : ENTER
SALIR : MENU
CH 5
CH
:ENTER
OK
:MENU
SALIR :
/ 0–9
DEC OFF
SECAM
3Press ▲or ▼to select the
“PAL” or “SECAM”. Then
press ENTER.
CH 1
MENUSALIR :
SELEC :
OK : ENTER
DEC OFF
SECAM
DEC ON/OFF selecting function is available only for
COMBI 2115 SI
DEC OFF will blink. Press
ENTER. DEC OFF does not
blinkanymore.BUSQUEDA
will appear.
Note:
lf you wish to store the PRE-
MIERE manually, the decoder must have been
connected.
During DEC OFF is blinking, press ▲.
DEC ON will blink now.
press ENTER.
5H00701A P11-18 12/11/03, 10:15 AM13

14
TV OPERATION
DISPLAY
Pressinfo(CALL).Thecurrenttime,channelnumber,real
time tape counter, tape speed and VCR operation will be
indicated.
Press info (CALL) again to remove the call display.
QUICK VIEW
This button allows you to go back to the last channel
selected by pressing (QUICK VIEW). Press this
button again to return to the last channel you were
watching.
SLEEP
To set the TV to turn off at a set time, press (SLEEP)
on the remote control. The clock will count down 10
minutes each time the button is pressed in the order of
120, 110.....20, 10, 0. After the sleep time is pro-
grammed, the display will disappear and will reappear
every 10 minutes. To confirm the sleep time setting,
press (SLEEP) once and
the remaining time will be
momentarily displayed. To
cancel the sleep time, press
(SLEEP) repeatedly until the
display turns to 0.
NOTE:
If (SLEEP)ispressedwhentheunitistheRECmode,the
clockwill count down and the picture will shut off atthe set
time, but the recording continues.
1Press Sub Power ( ). Then press TV/VCR to select
TV/VCR mode.
2Press 10 number buttons
to select the channel.
1-9: Press one of keys 1-9
as required.
10-80:Press the two digits in
order from left to right.
3The VOLUME can be
adjusted to a desired level
by pressing (VOLUME)
+or –. The VOLUME
control is represented by a
green bar on the screen.
MUTE
To cut off the sound, press this
button once. The unit will be si-
lenced and the symbol
"SILENCIO" will appear on the
screen. The muting can be re-
leased by pressing the MUTE
button again or (VOLUME)
+or –.
USING (CHANNEL) +
OR – BUTTON
Press and release (CHAN-
NEL) + or –.
Forchannelstochangeproperly,
they must be correctly tuned into
the unit's memory (P.13).
NOTE:
If the station being viewed stops broadcasting, the TV
will shut off after 15 minutes.
CH 2
VOLUMEN 32
DORMIR
90
CH 2
01 : 30 : 21 SP
11 : 30 LUN
TV/VCR
Current time
VCR operation
Channel No.
Real Time Tape Counter
Auto Repeat
Tape In
Tape Speed
TV/VCR mode or DVD mode
CH 2
SILENCIO
5H00701A P11-18 12/11/03, 10:15 AM14

15
PICTURE CONTROL
ADJUSTMENTS
The picture settings have been factory adjusted under
optimumsignalreception.However,conditionsmaynotbe
the same in your area. After tuning in the unit, allow it to
warmupforafewminutes.Ifthepictureisnottoyourliking,
make the following adjustments .
1Press MENU.
Press ▲or ▼to select the
SINTONIZARTVmode,then
press ENTER.
2Press ▲or ▼to select the
IMAGEN mode, then press
ENTER.
NOTE: NICAM menu
appears only for COMBI
2115 SI.
3Press ENTER until your
desired IMAGEN mode
appears eg. brightness,
contrast, colour, sharpness.
Then press the or
button to adjust the level of
the IMAGEN.
Each time you press ENTER, the picture adjustment
Screen changes as follows.
4After finishing the adjustment, press MENU repeat-
edly until the TV picture appears on the screen.
NOTE:
To resume the normal picture adjustment, press CAN-
CEL, while in the picture mode menu.
AJUSTE GRAB TEMPORIZADA
REPETIDOR AUTO [OFF]
SINTONIZAR TV
SELEC :
ENTRAR
: ENTER
: MENU
SALIR
SINTONIZAR SISTEMA
SINTONIZAR CANAL
IMAGEN
SELEC :
ENTRAR
: ENTER
: MENU
SALIR
NICAM [AUTO]
TEMPORIZADOR ON/OFF
SINTONIZAR TV
COLOUR
SHARPNESS
CONTRAST
BRIGHTNESS
SIGUIENTE
INICIAL
SINTONIZAR :
: ENTER
SALIR : MENU
: CANCEL
BRILLO 0
SIGUIENTE
INICIAL
SINTONIZAR :
: ENTER
SALIR : MENU
: CANCEL
BRILLO 0
SIGUIENTE
INICIAL
SINTONIZAR :
: ENTER
SALIR : MENU
: CANCEL
CONTRASTE 0
SIGUIENTE
INICIAL
SINTONIZAR :
: ENTER
SALIR : MENU
: CANCEL
COLOR 0
SIGUIENTE
INICIAL
SINTONIZAR :
: ENTER
SALIR : MENU
: CANCEL
DEFINICION 0
TO SET THE ON TIMER
This feature allows you to have the TV automatically
turn "ON" at predetermined time. If you programme the
ON TIMER once the timer will turn "ON" the TV daily at
the same time and to the same channel.
EXAMPLE: Turning on the TV to channel 3 at 7:45,
MONDAY-FRIDAY.
1Press MENU. Select the
SINTONIZAR TV mode
using ▲or ▼, then press
ENTER.
2Press ▲or ▼to select the
TEMPORIZADOR ON/OFF
mode, then press ENTER.
3Press ▲or ▼to set the
INCIO option, then press
ENTER.
4Press ▲/▼ or 10 number
buttons to set the desired
hour, then press .
5Set the desired minute,
channel and daily or
weekly timer date as in
step 4, then press .
6Press ▲or ▼to select the
ON mode, then press
ENTER. After finishing the
adjustment, press MENU
repeatedly until the TV
picture appears on the
screen.
NOTES:
• The TV will automatically turn off approximately 1 hour
later after the INCIO turns on the TV. If you wish to
continue watching the TV, press any button to cancel the
one hour automatic shut off. This shut off feature prevents
the TV from playing continuously if no off timer is set.
• To cancel the INCIO function; follow above steps 1-6, then
press ▲or ▼to select the OFF position. Press MENU to
return to the TV.
• After setting the INCIO, " " of the FIN will flash on and
off. If you wish to set the FIN, press ENTER then follow
the steps 4-6 on page 16.
0 : 00 CH 1
INCIO
0 : 00
FIN
DOM-SAB
OFF
OFF
TEMPORIZADOR ON/OFF
ENTRAR
SELEC
SALIR
:
: ENTER
: MENU
AJUSTE GRAB TEMPORIZADA
REPETIDOR AUTO [OFF]
SINTONIZAR TV
SELEC :
ENTRAR
: ENTER
: MENU
SALIR
SINTONIZAR SISTEMA
SINTONIZAR CANAL
IMAGEN
SELEC
:
ENTRAR
: ENTER
: MENU
SALIR
NICAM [AUTO]
TEMPORIZADOR ON/OFF
SINTONIZAR TV
7 : 00 CH 1
0 : 00
SALIR : MENU
INCIO
FIN
DOM-SAB
OFF
OFF
TEMPORIZADOR ON/OFF
SINTONIZAR
SELEC
OK
:
:/ 0-9
: ENTER
7 : 45 CH 3
0 : 00
INCIO
FIN
LUN-VIE
OFF
OFF
TEMPORIZADOR ON/OFF
SINTONIZAR
SELEC :
:
SALIR : MENU
OK : ENTER
7 : 45 CH 3
0 : 00
SINTONIZAR
SELEC :
:
INCIO
FIN
LUN-VIE
OFF
ON
TEMPORIZADOR ON/OFF
SALIR : MENU
OK : ENTER
5H00701A P11-18 12/11/03, 10:15 AM15

16
LOADING AND UNLOADING
THEVIDEOCASSETTETAPE
Use only video cassette tapes marked .
LOADING
Push the centre of the tape until it is
automatically inserted.
Insert the cassette with its labelled side facing you.
An inverted cassette cannot be inserted.
AUTOMATIC POWER ON AND PLAY (Make sure that
the MAIN POWER switch is pushed in.)
When loading a cassette tape without the erase
prevention tab intact, the unit will turn on and playback
will start immediately.
UNLOADING
1To unload a video cassette,
press (EJECT) on the
remote control, or press
(STOP/ EJECT) on the unit
twice. The first press will stop
the tape in any mode. The
second press will eject the tape.
2Pull the cassette out.
AUTOMATIC EJECT
When the unit is automatically rewinding the tape and
reaches its end (AUTO REWIND), the tape will be
ejected automatically (See NOTE on page 19).
NOTES:
•Always eject the tape when not in use.
•The cassette can be ejected even if Sup Power ( ) is
OFF.
TAPE SPEED AND MAXIMUM RECORDING/ PLAYBACK TIME
Adhesive tape
Screwdriver
Erase prevention tab
VIDEO CASSETTE TAPE
LP (Long Play)
TAPE SPEED
SP (Standard Play)
E-30
30
minutes
1 hour
1 hour
2 hours
E-60
E-90
1-1/2
hours
3 hours
E-180
3 hours
6 hours
4 hours
8 hours
E-240
5 hours
10 hours
E-300
TO PREVENT ACCI-
DENTAL ERASURE
After recording, break off the
erase prevention tab if you do
not wish to record over the
tape.
TO RECORD AGAIN
Cover the hole with adhesive
tape.
Be careful the tape does not
extend past the edges of the
cassette housing.
TO SET THE OFF TIMER
This feature allows you to have the TV turn "OFF"
automatically at a predetermined time. If you pro-
gramme the OFF TIMER once, the TV will be automati-
cally turned off at the same time daily.
EXAMPLE: Turning off the TV at 8:30.
1Press MENU. Select the
SINTONIZAR TV mode
using ▲or ▼, then press
ENTER.
2Press ▲or ▼to select
TEMPORIZADOR ON/OFF
mode, then press ENTER.
3Press ▲or ▼to set the
FIN option, then press
ENTER.
4Press ▲/▼ or 10 number
buttons to set the desired
hour, then press .
5Press ▲/▼ or 10 number
buttons to set the desired
minute, then press .
6Press ▲or ▼to select the
ON mode, then press
ENTER. After finishing the
adjustment, press MENU
repeatedly until the TV
picture appears on the
screen.
NOTES:
•If a station being viewed stops broadcasting, the TV will
automatically shut itself off after 15 minutes.
•To cancel the FIN function: follow above step 1-6, then
press ▲or ▼to select the OFF position. Press MENU
to return to the TV.
•To confirm the ON/OFF TIMER:
Press PROGRAM twice to indicate the programmes on
the screen, press again to return to normal TV screen.
/ 0-9
INCIO
FIN
OFF
ON
TEMPORIZADOR ON/OFF
LUN-VIE
SINTONIZAR
SELEC :
:
7 : 45 CH 3
8 : 30
SALIR : MENU
OK : ENTER
7 : 45 CH 3
8 : 00
/ 0-9
INCIO
FIN
OFF
ON
TEMPORIZADOR ON/OFF
LUN-VIE
SINTONIZAR
SELEC :
:
SALIR : MENU
OK : ENTER
INCIO
FIN
ON
ON
TEMPORIZADOR ON/OFF
LUN-VIE
SINTONIZAR
SELEC :
:
7 : 45 CH 3
8 : 30
SALIR : MENU
OK : ENTER
7 : 45 CH 3
INCIO
0 : 00
FIN
LUN-VIE
OFF
ON
TEMPORIZADOR ON/OFF
ENTRAR
SELEC
SALIR
:
: ENTER
: MENU
AJUSTE GRAB TEMPORIZADA
REPETIDOR AUTO [OFF]
SINTONIZAR TV
SELEC :
ENTRAR
: ENTER
: MENU
SALIR
SINTONIZAR SISTEMA
SINTONIZAR CANAL
IMAGEN
SELEC
:
ENTRAR
: ENTER
: MENU
SALIR
NICAM [AUTO]
TEMPORIZADOR ON/OFF
SINTONIZAR TV
5H00701A P11-18 12/11/03, 10:15 AM16

17
TO START PLAYBACK
1Load a pre-recorded tape (When
loading a cassette tape without
the erase prevention tab, playback
will start automatically).
2Press 1(PLAY).
Playback will start.
TO STOP PLAYBACK
Press 3 (STOP).
TO REWIND OR FORWARD THE TAPE
RAPIDLY
Press 8 (REW) when in the
STOP mode.
Press 9 (F.FWD) when in the
STOP mode.
FORWARD/REVERSE PICTURE SEARCH
If you want to see the tape program during REW (F.FWD)
mode,pressandholdthe8 (REW)(9(F.FWD)) button.
The backward(forward) visual search picture will be seen
on the screen. Release the button to return to the
REW(FWD) mode.
DIGITAL AUTO TRACKING ADJUSTMENTS
When a tape is played, the Digital Auto Tracking system
automaticallyadjuststhetrackingto obtain the best possi-
blepicture.Ifnoisebarsappearduringplayback,adjustthe
tracking manually as follows:
•Press TRK (TRACKING) + or –to obtain the best
possible picture. "TRACK MANUAL" will appear for 4
seconds on the screen.
To resume automatic tracking, press ATR.
"TRACK AUTO" will appear for 4 seconds on the
screen.
PLAYBACK
TRACK AUTO
TRACK MANUAL
CH :
COLOR SYSTEM
This unit can playback also tapes recorded on
SECAM or MESECAM .
In case you playback such a tape, set to SECAM or
MESECAM as follows.
1Press MENU. Press ▲or
▼to select the
SINTONIZAR SISTEMA
mode. Then press ENTER.
2Press ▲or ▼to select the
SIST. DE COLOR mode.
3Press / or ENTER to
select [AUTO], [PAL],
[SECAM] or [MESECAM]
Color system usually used
in AUTO position. But
when you play back the
tape recorded in the
MESECAM color system,
select the MESECAM
position.
4Press MENU repeatedly until the TV picture appears
on the screen.
AJUSTE GRAB TEMPORIZADA
REPETIDOR AUTO [OFF]
SINTONIZAR TV
SELEC :
ENTRAR
: ENTER
: MENU
SALIR
SINTONIZAR SISTEMA
SINTONIZAR CANAL
SELEC :
ENTRAR
: ENTER
: MENU
SALIR
AJUSTE DEL RELOJ.
SIST. DE COLOR [AUTO]
SINTONIZAR SISTEMA
LANGUAGE/SPRACHE/LANGUE
LINGUA/LENGUA
/
SELEC :
ENTRAR
: ENTER
: MENU
SALIR
AJUSTE DEL RELOJ.
SIST. DE COLOR [MESECAM]
SINTONIZAR SISTEMA
LANGUAGE/SPRACHE/LANGUE
LINGUA/LENGUA
/
5H00701A P11-18 12/11/03, 10:15 AM17

18
TO VISUALLY SEARCH FOR DESIRED POINTS
When either 9 (F.FWD) or 8 (REW) is pressed in the
PLAYBACK mode, the speed search picture will appear.
When pressed twice the search picture will increase in
speed. Speed search times depend upon the speed
used (SP or LP) during recording. To rewind or fast
forward a tape, press 3 (STOP), and then press 8
(REW) or 9 (F.FWD).
SPECIAL PLAYBACK
Press 8 (REW) once or twice in the PLAYBACK
mode.
Press 9 (F.FWD) once or twice in the PLAYBACK
mode.
•To return to playback, press 1(PLAY).
STILL PICTURE
Press 4/X (PAUSE/STILL) in the PLAYBACK mode.
To continue the normal playback, press 1(PLAY).
•To prevent damage to the tape, STILL playback is
automatically resumed to the PLAY mode after 5
minutes.
FRAME BY FRAME ADVANCE
Press 4/X (PAUSE/STILL) during STILL playback.
• The still picture will advance by one frame each time
you press the button. Hold the button for continuous
frame by frame viewing.
• Press 1(PLAY) again to resume normal playback.
SLOW MOTION PLAYBACK
Press n (SLOW) in the PLAYBACK mode. Each addi-
tional press of n (SLOW) will change the slow speed.
• Press 1(PLAY) again to resume normal playback.
NOTE: SLOW TRACKING AND VERTICAL LOCK
ADJUSTMENT
Ifnoise barsappearin the pictureduringslow motion,press
TRK (TRACKING) + or –to reduce the noise bars.
If the still picture jitters excessively, press TRK (TRACK-
ING) + or –to stabilize the still picture.
NOTES:
•The audio output is muted during SPEED SEARCH
and STILL.
•A few noise bars will appear on the picture during
SPEED SEARCH.
•It is normal for the picture to be noisy in the STILL
mode.
SPEED SEARCH TIMES
TAPE SPEED PICTURE SEARCH SPEED
PRESS TWICE
PRESS ONCE
SP (Standard Play)
LP (Long Play)
SP (Standard Play)
PAL
NTSC 7 X
3 X
5 X 7 X
13 X
5 X
NTSC TAPE PLAYBACK
Your unit can playback Video tapes recorded in the
NTSC Colour System (TV system usually used in
America and Japan).
To play the NTSC tape press the 1(PLAY) button. Your
unit will playback Video tapes
recorded using NTSC Standard
play, Long play (LP) and Super
Long play (SLP). However
there will be a deterioration in
sound quality in the Long play
and Super Long play modes.
TO WATCH A TAPE REPEATEDLY
1Press MENU.
Select REPETIDOR AUTO
mode using ▲or ▼.
2Press to select the ON
position.
3Press MENU to return to normal TV screen. If you
press 1(PLAY), the unit will repeat playing the
video tape until the repeat mode is cancelled (you
can still stop the tape by pressing the 3 (STOP)
button).
NOTE:
To cancel repeat mode, follow above steps 1 and 2,
then press Ato select the OFF position. Press MENU to
return to the TV.
AJUSTE GRAB TEMPORIZADA
REPETIDOR AUTO [OFF]
SINTONIZAR TV
SELEC :
ENTRAR
: ENTER
: MENU
SALIR
SINTONIZAR SISTEMA
SINTONIZAR CANAL
/
AJUSTE GRAB TEMPORIZADA
REPETIDOR AUTO [ ON]
SINTONIZAR TV
SELEC :
ENTRAR
: ENTER
: MENU
SALIR
SINTONIZAR SISTEMA
SINTONIZAR CANAL
/
5H00701A P11-18 12/11/03, 10:15 AM18

19
CH 2
INDICE
CH 2
RECORDING A TV
PROGRAMME
RECORDING AND VIEWING THE SAME TV PRO-
GRAMME
1Load a cassette tape with the
erase prevention tab intact.
2Press SP/LP to select the desired tape speed SP or
LP.
3Press the 10 number buttons
or (CHANNEL) + or –to
select the channel to be
recorded (Example: Channel
2).
4Press 2 REC/OTR.
One index mark will be recorded
and the REC/OTR indicator will
light.
TO STOP RECORDING
Press 3 (STOP).
TO STOP RECORDING TEMPORARILY
Press4/X(PAUSE/STILL)tostop
recordingofunwantedmaterial.The
REC/OTRindicatorwillblinkonand
off.
Press again to continue the recording.
NOTES:
• To prevent damage to the video head and video tape
the pause function will stop the VCR operation after
about 5 minutes.
•AUTO REWIND FEATURE:
Thisunitwillautomaticallyrewindandejectthetapewhen
the tape has ended (except during OTR and
TIMER REC).
•If the erase prevention tab has been removed, the tape
will eject when 2 REC/OTR is pressed.
•If the power is switched off during recording, the TV
sectionshutsoffandtheVCRsectioncontinuestorecord.
•
The unit's channel cannot be changed during recording.
•If you change the channel during a recording,
"GRABACION ACTIVA" will appear on the TV screen
for approx. 4 seconds.
TIMER RECORDING
Timer recording can be programmed on screen with the
remote control. The built-in timer allows automatic unat-
tended recordingof up to8 programmes within 1month.
PREPARATION:
•Load a cassette tape with the erase prevention tab intact.
The unit will automatically turn on.
•Make sure that the clock shows the present time correctly.
EXAMPLE: Programme a timer recording for 13:00-14:30,
channel 3, on timer programme number 1 (Tape speed : LP).
1Check that the AJUSTE GRAB
TEMPORIZADA option is se-
lected, then press ENTER.
2Press ▲or ▼to select one of the
program line, then press ENTER.
3Press / or 10 number but-
tons to select the desired date or
every day or every week setting,
then press ▼.
4Set the start time, end time, channel and tape speed as
in step 3.
Whenyouhavefinishedsettingallyourrecordings,press
ENTER. Press MENU repeatedly until the TV picture
appears on the screen.
AJUSTE GRAB TEMPORIZADA
REPETIDOR AUTO [OFF]
SINTONIZAR TV
SINTONIZAR SISTEMA
SINTONIZAR CANAL
CH 2
REC/OTR
REC/OTR
SALIR
SELEC : MENU
/ ENTER:
AJUSTE GRAB TEMPORIZADA
DATA
COMIEN
FIN
CH
VELOCIDAD
23 SAB
1SP
11:30
SALIR
SINTONIZAR
SELEC
: MENU
: / 0-9
:
:
•Whenyousettheminute,youcanchangein10-minutes
step by holding down button.
To set the timer for another programme, press ▲or ▼
until a blank programme line blinks, then press ENTER.
Repeat steps 3 to 4 to set the second programme.
TIMER REC
5PressTIMER REC.TheTIMERREC indica-
torwill light.TheTimeris programmed, when
theprogrammedtime is reached,the record-
ing is automatically started.
To cancel timer recording, press the button again and
TIMER REC indicator will go out.
NOTES:
•The VCR section cannot be used while the TIMER REC indicator is
lit. If you want to use the VCR operation, press TIMER REC to
deactivate the timer.
•If there is a power failure, the power plug is disconnected, or the
MAINPOWER (ON)Switch is switchedofffor morethan approx.30
mins, all programmed timer recordings and clock settings will be
lost. In this case, reset the clock (see page 11) and reprogram any
timer recordings.
•If you want to correct the digits while setting, press ▲until the item
you want to correct flashes, then correct the desired setting.
•If programming is performed without a tape in the unit, or with a
tape without an erase prevention tab, the Timer Recording is not
possible. If a tape without an erase prevention tab is in the unit, the
tape will be ejected.
• Torecord fromexternalequipment connectedviathe SCARTsocket
(AV1) or the front AV socket (AV2), press AV epeatedly until "AV1"
or "AV2" appears when setting the channel in step 4.
AJUSTE GRAB TEMPORIZADA
DATA
COMIEN
FIN
CH
VELOCIDAD
23 SAB
3LP
13:00
SALIR
SINTONIZAR
SELEC
: MENU OK: ENTER
:
:
14:30
23 SAB 13 : 00 14 : 30
LP
3
SALIR
SELEC : MENU
/ ENTER:
5H00701A P19-21 12/11/03, 10:15 AM19

20
TO SET DAILY/WEEKLY TIMER
When setting the date in the step 3 on page 19, press
repeatedly when the current day is displayed.
The setting changes as follows:
Example: Today is 26 Friday
ONE-TOUCH TIMER RE-
CORDING (OTR)
The One-touch Timer Recording feature provides a
simple and convenient way to make a timed recording.
EXAMPLE: One-touch Timer Recording for 30 minutes.
1Load a video cassette with the
erase prevention tab intact.
2Press SP/LP to select the desired tape speed (SP or
LP).
SP or LP will appear on the screen.
3Press the 10 number buttons
or (CHANNEL) + or –
button to select the channel to
be recorded (Example:
Channel 2).
4Press 2 REC/OTR to begin
recording. Press the button
again to stop recording after
30 minutes. Each additional
press of 2 REC/OTR will
increase recording time as
shown below, up to a maximum of 6 hours. “OTR”
will appear on the screen.
NOTES:
•Press 2 REC/OTR to increase the time needed for re-
cording (See the chart below).
•To cancel OTR, press 3 (STOP).
•The unit's channel cannot be changed during recording.
TO CONFIRM THE SETTINGS
PressPROGRAM once.TheTVscreendisplaysthetimer
program list.
Press PROGRAM again. The TV screen displays the ON/
OFF TIMER setting. (twice)
(once)
Press PROGRAM 3 times. The screen returns to the nor-
mal screen.
TO CANCEL A PROGRAM
Press ▲or ▼to select the AJUSTE
GRABTEMPORIZADA option inthe
MENU, then press ENTER.
Press ▲or ▼to select the unnec-
essaryprogram, andpressCANCEL
tocanceltheprogram.
PressMENU
twice to return to normal TV screen.
IF THE PROGRAM OVERLAPS ANOTHER
NOTE: Do not overlap programs as portions of the con-
flicting programs will be lost. The first recording
time has priority over the next recording time as
shown in the diagram.
NOTES:
•The everyday/every week recording can be made continuously
until the recording is canceled or the tape reaches the end.
•Duringtimerrecording,theautomaticrewindingmechanismdoes
not function.
• You can correct or cancel the programmed setting in program
confirm mode.
•If you press an invalid button during timer recording (such as
1(PLAY), 3(STOP), 2REC/OTR etc.), "RECORDING IN
PROGRESS" will appear on the TV screen for approx. 4 sec-
onds.
SALIR
SELEC : MENU
/ ENTER:
CANCEL
SELEC
: CANCEL
SALIR : MENU
/ ENTER:
23 SAB 13 : 00 14 : 30 LP3
7 : 45 CH 3
INCIO
8 : 30
FIN
LUN-VIE ON
ON
TEMPORIZADOR ON/OFF
ENTRAR
SELEC
SALIR
:
: ENTER
: MENU
OTHER FUNCTIONS FOR
TIMER RECORDING
once
NORMAL REC
twice
0:30
Press
Recording time
4 times
1:30 5 times
2:00
3 times
1:00
CH 2
OTR 0 : 30
CH 2
Press
Recording time 6 times
3:00
7 times
4:00 8 times
5:00 10 times
NORMAL REC
9 times
6:00
8 : 00 11 : 00
9 : 00 10 : 00
Programa 1
Programa 2
Programa 3
Prog.1
Partes borradas
Partes de porción no grabada
Prog.2 Prog.3
Ajuste del
control de
grabación
LUN-SAB = Everyday from Monday to Saturday
SEM-SAB = Weekly Saturday
LUN-SUB LUN-VIE SEM-JUE • • • • SEM-SAB
DOM-SAB 26VIE • • • • 25DOM SEM-VIE
ba
5H00701A P19-21 12/11/03, 10:15 AM20
This manual suits for next models
1
Table of contents
Other Orion TV DVD Combo manuals