Orphek NILUS POWER DIM User manual

INSTALLATION MAUAL
FOR NILUS POWER DIM
BY ORPHEK TECHNICAL SUPPORT
3.1.2012

Become familiar with the general safety instructions of the manual before installing, operating, maintaining or repairing this equipment.
Carefully read and observe all safety instructions in this manual, which alert you to safety hazards and conditions that may result in
personal injury, death or property and equipment damage. Make this manual available to personnel installing, operating, maintaining or
repairing this equipment.
Retain it for future reference. Record model number and serial number of the set. See the label attached on the back cover and quote this
information to your dealer when you require service.
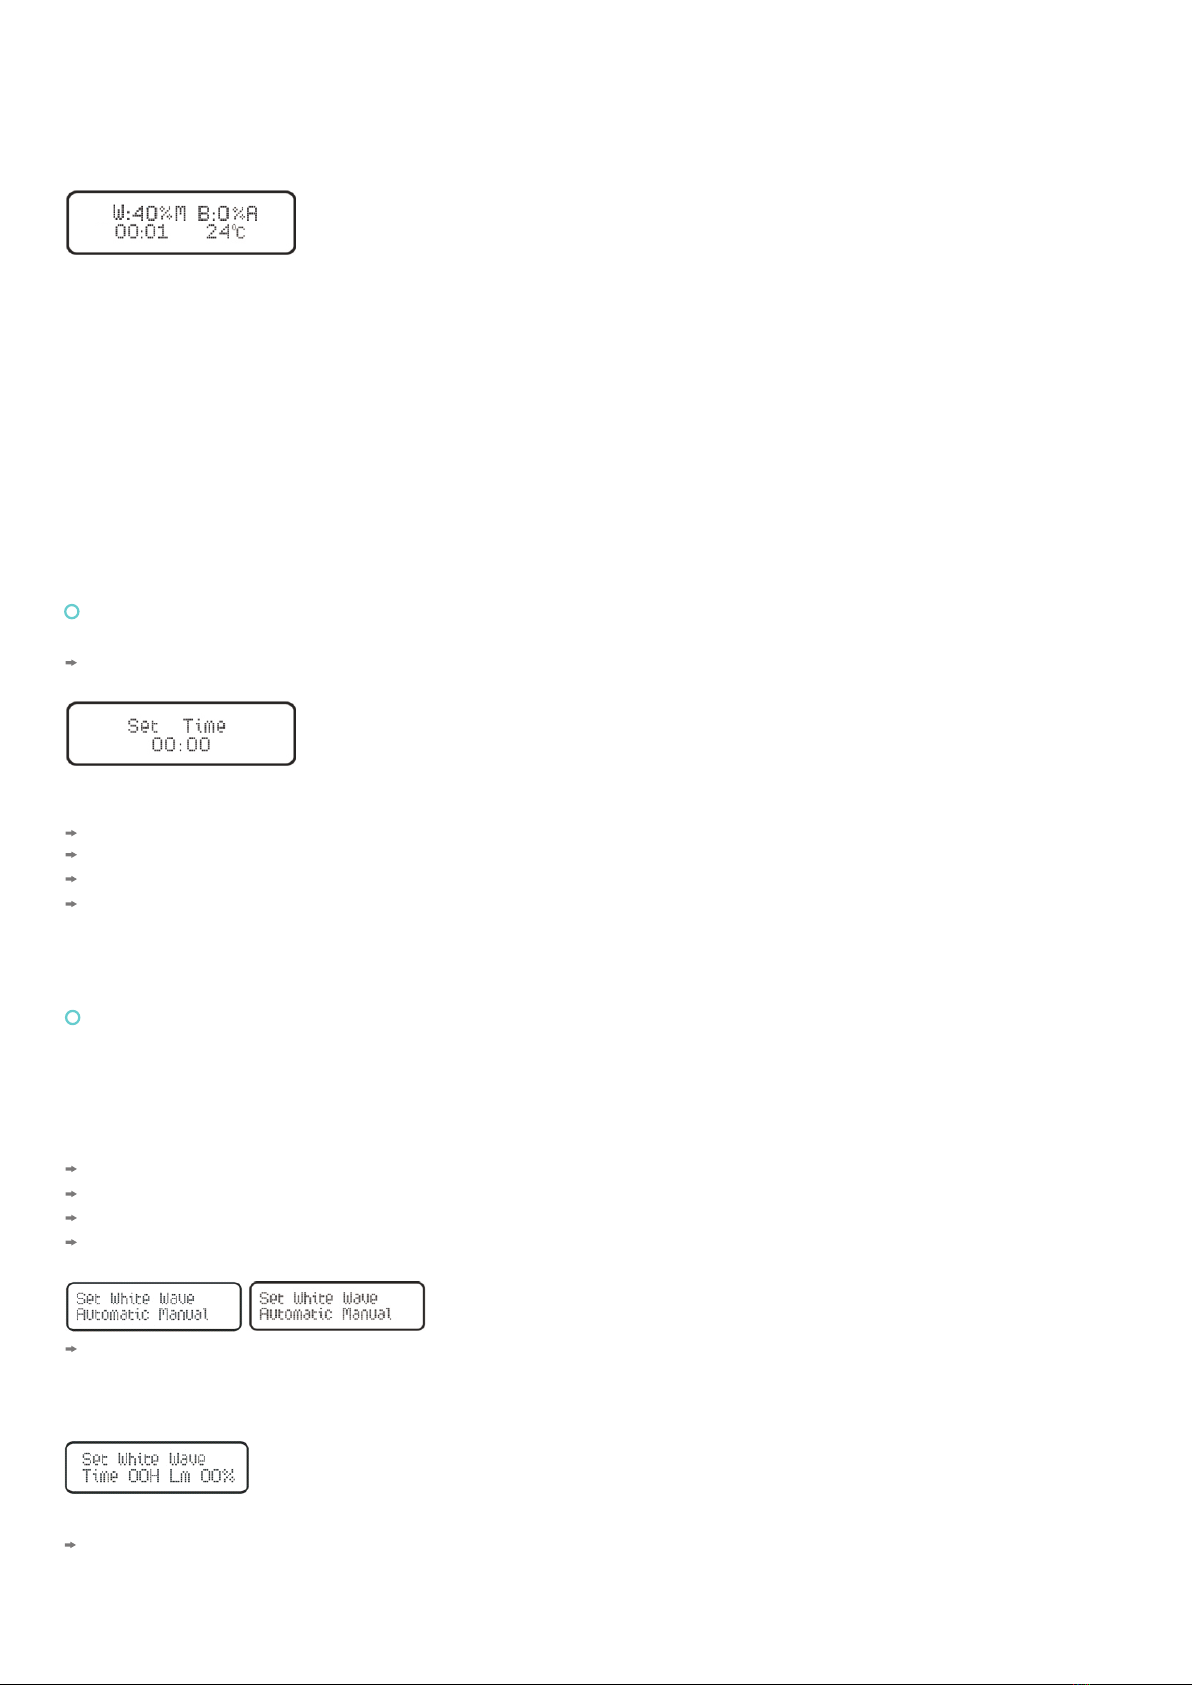
STORAGE OF YOUR NILUS POWER DIM
If equipment is to be stored prior to installation, it must be protected from the weather and kept free of condensation and dust. Failure to
follow this instruction can result in injury or equipment damage.
GENERAL SAFETY GUIDELINES
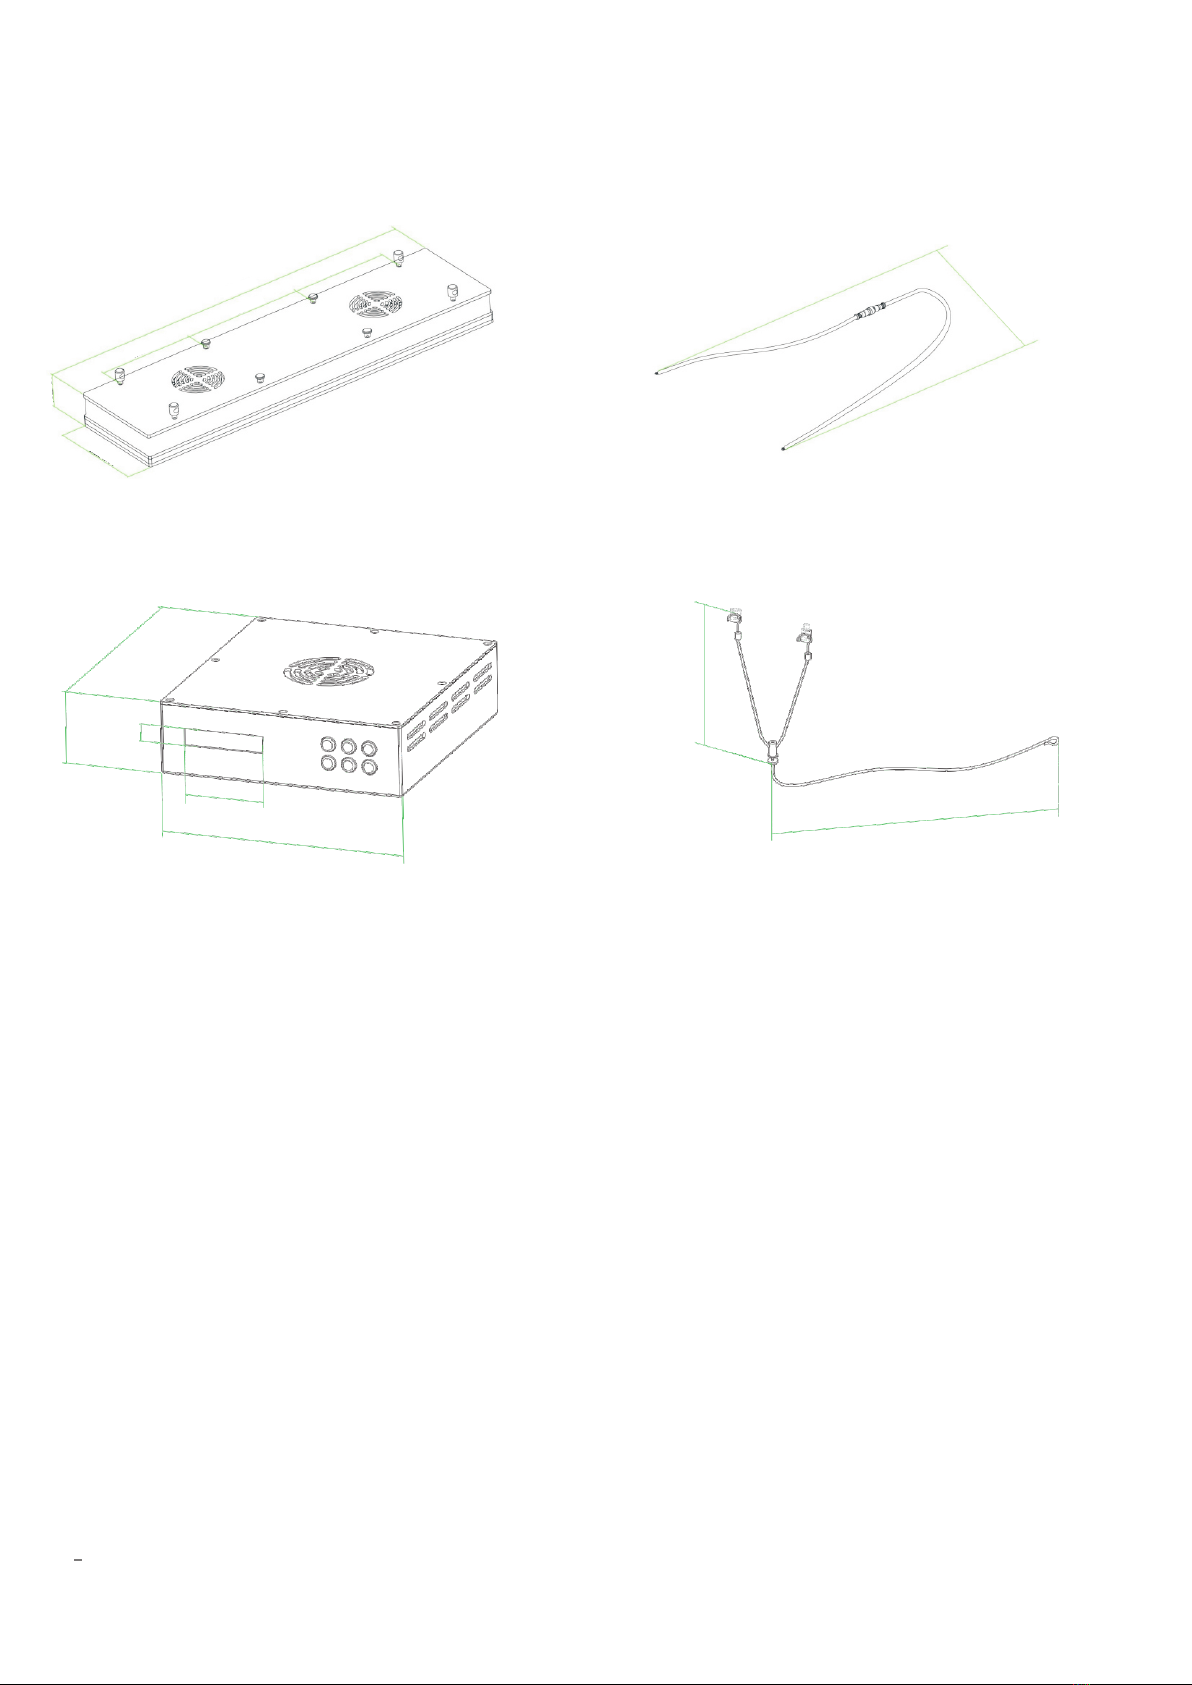
Orphek NILUS POWER DIM is designed and developed to increase growth and enhance color of marine corals; therefore it is perfect to
be installed above marine aquariums. When installed and used as instructed it does not represent any danger to the user or surroundings.
Do not use the fixture for other than intended use. The use of attachments not recommended or sold by the fixture manufacturer may
cause an unsafe condition.
The misuse of the product or non-observation of the safety measures may cause risk to the product, to corals, to marine creatures of the
aquarium and to the user.
READ AND FOLLOW ALL SAFETY INSTRUCTIONS PRESENTED HERE BEFORE INSTALLING ORPHEK LED LIGHTING SYSTEMS.
DANGER: To avoid possible electric shock, special care should be taken since water is employed in the use of aquarium equipment. For
each of the following situations, do not attempt repairs by yourself. CONTACT ORPHEK CUSTOMER & TECHNICAL ASSISTANCE TEAM
BEFORE ATTEMPTING TO REPAIR YOUR NILUS POWER DIM, OR IF YOU HAVE ANY QUESTIONS REGARDING THE INSTALATION, USE,
MAINTENANCE, OR FUNCTION.
If electrical components of the fixture get wet, unplug the appliance immediately.
Carefully examine the fixture after installation. It should not be plugged in if there is water on parts not intended to be wet.
Do not operate fixture if it has a damaged cord or plug, or if it is malfunctioning or damaged in any manner.
If the plug or receptacle does get wet, DON T unplug the cord. Disconnect the fuse or circuit breaker that supplies power to the fixture.
Then, unplug and examine for presence of water in the receptacle.
Close supervision is necessary when any appliance is used by or near children.
To avoid injury, do not contact hot parts such as lamps and the like.
Always unplug the fixture from an outlet when not in use, before putting on or taking off parts, and before cleaning. Never yank cord to
pull plug from outlet.
Grasp the plug and pull to disconnect.
Do not press on the LEDs when installing. Doing so may damage them. Clean the surface to be mounted to with isopropyl alcohol first.
Read and observe all the important notices on the fixture.
If an extension cord is necessary, a cord with a proper rating should be used. A cord rated for less Amperes or watts than the fixture rating
may overheat. Care should be taken to arrange the cord so that it will not be tripped over or pulled.
Past experience has shown us that we cannot control the quality or the conditions of extension cords not provided by Orphek. As we
cannot check the basic ability of users to check if they are checking the rate of the cord, products that were connected to extension cords
not provided by Orphek cannot be returned or refunded if damaged.
Read and carefully follow the instructions throughout this manual for performing specific tasks and working with specific equipment.
The equipment is shipped ready for installation. Handle equipment very carefully to prevent component damage. Unpack the package
upon receipt and check the contents and their condition. Note any exterior damage to the package that might lead to detection of
equipment damage. If you note any damage to any equipment, file a claim with the carrier immediately. The carrier may need to inspect
the equipment.
Before starting this equipment, check all safety interlocks, fire-detection systems, and protective devices such as panels and covers. Make
sure all devices are fully functional.
WARNING
SAFETY GUIDELINES FOR INSTALATION OF YOUR ORPHEK PR156 DIM
INTRODUCTION
’

Do not operate the system if these devices are not working properly.
Protect equipment with safety devices as specified by applicable safety regulations. If safety devices must be removed for installation,
install them immediately after the work is completed and check them for proper functioning.
Do not exceed rated maximum voltage. Orphek NILUS POWER DIM operates only under voltage AC90-130V or AC190-240V.
Use only compatible switches.
Do not attempt to install your Orphek NILUS POWER DIM touching the surface of the water. Any contact with water may damage your
product and may represent danger to the user and the marine biosphere of your aquarium.
Do not install or store the fixture where it will be exposed to the weather or to temperatures below freezing.
Do not install your Orphek NILUS POWER DIM barefooted or with humid or wet hands.
Make sure the fixture is securely installed before operating it. Do not attempt to make sharp bends or force the acrylic when installing
your Orphek NILUS POWER DIM.
●Do not install under mechanical stress.
●Allow for expansion due to changes in temperature.
●Install all electrical connections to local code.
●Use only electrical wire of sufficient gauge and insulation to handle the rated current demand. All wiring must meet local codes.
●Protect components from damage, wear, and harsh environment conditions.
●Allow ample room for maintenance, panel accessibility, and cover removal.
●Protect equipment with safety devices as specified by applicable safety regulations.
●If safety devices must be removed for installation, install them immediately after the work is completed and check them for proper
functioning prior to returning power to the circuit.
Orphek NILUS POWER DIM normally does not require maintenance except for light cleaning.
Follow the recommended maintenance procedures in the product manuals.
Turn off before cleaning. Clean only with non-conductive materials. Visually inspect system at the time for any obvious faults. The system
may be dusted with a non-conductive brush. No fluids should be used. If this procedure does not remove contaminants, please contact
Orphek for further advice.
Do not attempt to service electrical equipment if standing water is present. Use caution when servicing electrical equipment in a high-
humidity environment. Use tools with insulated handles when working with electrical equipment.
CONTACT ORPHEK CUSTOMER & TECHNICAL ASSISTANCE TEAM BEFORE ATTEMPTING TO REPAIR YOUR NILUS POWER DIM.
This manual could contain technical inaccuracies or typographical errors. Orphek Led Lighting Solutions reserves the right to revise this
manual from time to time in the contents thereof without obligation to notify any person of such revision or change.
Details and values given in this manual have been compiled with care. They are not binding, however, and Orphek disclaims any liability
for damages or detriments suffered as a result of reliance on the information given herein or the use of products, processes or equipment
to which this manual refers. No warranty is made that the use of the information or of the products, processes or equipment to which this
manual refers will not infringe any third party's patents or rights.
Now that you read all the safety guidelines please check here for the layout of your NILUS POWER DIM!
Working Temperature: -20ºC to +55ºC
Working Humidity: 0 to 60%
Frequency: 50/60Hz
Total power consumption: 128.5W (+/- 5 W)
Electrical outlet: region-appropriate
OBS.: Please be aware that while the system has a very long operational life, faults may still occur and provision needs to be made for
maintenance.
Input Voltage: AC90V-130V or AC190V-240V (Please use only under the appropriate voltage)
MAINTENACE
REPAIR
DISCLAIMER
OPERATING CONDITIONS, DIMENSIONS LAYOUTS AND SPECIFICATIONS OF YOUR
NILUS POWER DIM

DIMENSIONS & LAYOUTS
UNIT DIMENSIONS & LAYOUT CABLE DIMENSIONS & LAYOUT
TIMER DIMENSIONS & LAYOUT CABLE DIMENSIONS & LAYOUT
LIGHT FIXTURE
DIM TIMER BOX (TB)
Length: 23.97” (609mm)
Width: 6.26” (159mm)
Height: 2.06” (52.4mm)
Weight: 10.14lb (4.6kg)
Length: 9.06” (230mm)
Width: 7.87” (200mm)
Height: 2.44 ”(62mm)
Weight: 3.31lb (1.5kg)
CABLES
SUSPENSION KIT
Cable (LB to TB) length: 118” (3m)
Cable (TB) length: 70.87” (1.8m)
*Extension cables available at additional cost.
Consult Orphek for price quotation.
02 steel cables length: 15.75” (400mm)
01 steel cable length: 70.87” (1.8m)
Weight: 2.31lb (1.05kg)
NET WEIGHT
Package Specifications
INSTALLATION
BUTTON FUNCTIONS
Light Fixture: 10.14lb (4.6kg)
DIM Timer Box: 3.30lb (1.5kg)
Total Package Weight: 23.1lb (10.5kg)/unit
Units are protected by EPE foam inside, packed in a paper box and confined in a wood box standard for international shipping.
Power: LED Power On/Off
OK: Enter
Set: Select the menu.
Manual: Set daylight manually for an easy access.
(+):Increase/Select
( ):Decrease/Select
3000mm(118")
52.4mm(2")
159mm(6.3")
152mm(6")
190mm(7.5")
609mm(24")
152mm(6")
62mm(2.44")
14mm(0.55")
65mm(2.56")
230mm(9.06")
200mm(7.87")
150mm(5.91")
1800mm(70.87")

Featuring:
W: The dim percent of daylight
B: The dim percent of moonlight
M: Manual Mode which shows the Daylight/Moonlight working mode.
A: Automatic Mode which shows the Daylight/Moonlight working mode.
D: Default Mode which shows the Daylight/Moonlight working mode.
Time: Light system time
Temperature: Temperature of power box and light in Celsius
Connecting & switching on your NILUS POWER DIM for the first time:
Once your unit is unpacked, connect the equipment to an outlet. You will find the power switch on the backside of the unit. Switch it on,
and the main interface (screen) will come out. In this mode you will find the Time settings starting from zero hundred hours to twenty four
hundred hours (military time).
MAIN INTERFACE
FIGURE 01
Main Interface shows the status of the light system.
System Time Settings:
To set the time you need to use the SET, OK, +/ - buttons
Press SET button until the following picture shows:
FIGURE 02
Attention: Please remember that the unit is using 24hr military time and 00hr is midnight.
Use the (+) (–) buttons to choose the percentage, and the OK button to advance to the next hour.
The number blinking is the one that you are going to set.
Start by setting the hour.
Press (+) or (–) buttons to set the hour (increasing or decreasing the value according to your needs).
Press Ok button to save it and now move to set the minutes.
Press (+) or (–) buttons to set the hour (increasing or decreasing the value according to your needs).
Press SET button to save it and quit.
The time displayed on the main interface of the unit should be your local time.
Obs.: While setting time, from time to time your main interface will be switched off in order to save energy. Press any button to switch on again.
Attention: Please reset time after power failure!
You will find both Automatic and Manual modes as options available to simulate daylight and moonlight.
Daylight & Moonlight Settings:
Automatic Mode:
Under this mode, you will be able to set 24 Hours daylight dim percentage. The light system will operate automatically after
settings are saved.
In order to program the daylight and moonlight cycles on your NILUS POWER DIM unit you need to enter the programming mode.
Press any button on the unit to activate the Main Interface.
Press SET button, and the unit will enter into “set time” mode.
Press SET button a second time, and the unit will enter the “white wave” programming mode. This is the DAYLIGHT cycle mode.
Use the (+) (–) buttons to highlight “automatic”.
FIGURE 03
Press OK button.
This will bring you to the screen that you will use to enter the % that you want the lights at for each hour of the day¡£
The screen should display 00hr and 00%.
FIGURE 04
2
1

FIGURE 05
FIGURE 06
FIGURE 07
You will need to program your entire light cycle from 00hr to 23hr. The default setting is 00%, and if you will not need to enter anything for
the hours that you want the light to be off. Once you have entered the % for each hour of the day,
Press SET and the unit will enter to the “blue wave” programming mode.
This is the MOONLIGHT mode, and it controls the 4 blue moonlights in the unit. If you only needed to make changes to your daylight
cycle you can hit set again and return the unit to service mode. If you need to adjust your moonlight cycle, continue in the “Blue Wave”
programming mode
Use the (+) (–) buttons to highlight “automatic”.
Press OK button.
This will bring you to the screen that you will use to enter the % that you want the lights at for each hour of the day.
The screen should display 00hr and 00%.
Attention: Please remember that the unit is using 24hr military time and 00hr is midnight.
Use the (+) (–) buttons to choose the percentage, and the OK button to advance to the next hour.
You will need to program your entire light cycle from 00hr to 23hr. The default setting is 00%, and if you will not need to enter anything for
the hours that you want the light to be off.
Once you have entered the % for each hour of the day.
Press SET button and the unit will enter back to the “service mode” and is ready for use.
Manual button is only used to set Daylight manually.
Press Manual button will bring you to the Daylight “Manual Mode”.
Manual Button
FIGURE 08
Use the (+) (–) buttons to choose the percentage. Press the OK button to save and the light will work instantly as settings. Or
press the SET to quit.
3
ORPHEK NILUS S CHANNEL
http://youtu.be/6DXBi0E_m7w
http://youtu.be/FcsckbvzwEc
http://youtu.be/EV3VUDMpdjE
’
1. Setting the time
2. Setting the daylight
3. Setting the moonlight
Table of contents
Other Orphek Aquarium manuals