osily OSDR0500 User manual

DIGITAL ELECTRIC RADIATOR
INSTRUCTION & INSTALLATION GUIDE

2

3
SYMBOLS
DANGER. This symbol indicates a medium-high risk hazard which can result in serious
injury or even death.
DO NOT COVER. Do not dry or leave clothes or towels on the radiator. Do not leave
or place magazines, spray cans, volatile substances, or similar objects within 250 mm
of the radiator.
HOT SURFACE. This symbol indicates that your surfaces are hot during and
immediately after use. These must not be touched: danger of burns.
OBSERVE THE INSTRUCTIONS IN THE MANUAL. Please read this manual carefully
before installing and using the product. Keep it for later use. Read all instructions
and safety warnings. Failure to follow these can result in electric shock, re or serious
injuries.

4
INDEX
1. General Warnings .............................................................................................................................................5
2. Technical information ....................................................................................................................................8
3. Installation ........................................................................................................................................................... 9
4. Screen & Keypad ..............................................................................................................................................12
5. Functionality and programming .............................................................................................................13
5.1. ON & OFF ..................................................................................................................................................13
5.2. Select the temperature........................................................................................................................13
5.3. Temperature control ...........................................................................................................................13
5.4. Lock / unlock button pad....................................................................................................................13
5.5. Settings menu ........................................................................................................................................14
5.5.1. Settings submenu..........................................................................................................................14
5.5.2. Energy submenu............................................................................................................................15
5.5.3.Prog. mode........................................................................................................................................16
5.5.4.User mode .........................................................................................................................................20
6. Maintenance and cleaning ....................................................................................................................... .20
7. European Regulation (WEEE) 2012/19/EU ........................................................................................... .20
8. Warranty ............................................................................................................................................................21
Directive ERP Commission Regulation ......................................................................................................24

5
1. GENERAL WARNINGS
WARNINGS
This product may be used by children over 8 years of age and by
persons with reduced physical, sensory, or mental capabilities,
or lack of experience and knowledge under strict supervision or
instruction in the safe use of the product and if they understand
the hazards involved. Children should not plug, adjust, clean,
play with, or perform maintenance on this product. Children
under 3 years of age should be kept away from this product
unless supervised.
DO NOT use the product in enclosed spaces if the persons
present cannot leave the room independently and are not under
constant supervision.
DO NOT COVER.
To avoid overheating, do not cover the radiator.
DO NOT place spray cans, volatile substances, or similar objects
within 250mm of the product.
DO NOT use insecticides, paints, or chemicals on or near the
product.
Some parts of this product could reach high temperatures and
cause burns. DO NOT touch the external parts of the product
when in operation.
DO NOT install near curtains or other ammable materials.
Particular attention should be paid when children and vulnerable
people are present.

6
When using electrical appliances, precautions should be taken to
reduce the risk of re, electric shock and injury.
Never insert ngers, body parts or objects inside the product.
Make sure that the voltage indicated on the product’s technical
information corresponds to the voltage output you have at your
socket.
To avoid the risk of suocation, do not leave the packaging
including bags and other items within reach of babies or
children.
The product has an IP24 degree of protection and can be used
in bathrooms, but not in the vicinity of bathtubs, taps, showers,
water connections, toilets, swimming pools or other masses of
water. The product must never be installed where it, the switches
or the control panel are within the reach of people in the water.
Never use the product with wet hands. Do not place any water
containers (glasses, vases, etc.) on or near the product.

7
IMPORTANT
Disconnect the product from the power supply and make
sure the product is at room temperature before any cleaning
or maintenance. Do not use any abrasive substances on the
product, such as (but not limited to) chemicals, coarse cloths,
brushes, hard bristle, or wire/steel wool.
To disconnect the product from the power source, remove the
mains plug from the socket. Do not pull on the cable.
Before the rst start-up, or before the start of winter, or when the
product has not been used for many days, the appliance should
be cleaned (follow the steps in the “maintenance” section of this
manual).
Do not sit or lean on the product.
Temperature contrasts can generate “clicks” or noises in the
device.This is not a fault of the product, but due to the expansion/
contraction of the materials.
When disposing of the product, the requirements set out in
the legislation for the waste treatment and recycling must be
followed. See WEEE in section 8.
!

8
2. TECHNICAL INFORMATION
MODEL OSDR0500 OSDR0750 OSDR1000 OSDR1250 OSDR1500 OSDR1750 OSDR2000
Number of elements 3 5 6 8 9 11 12
DIMENSIONS, WEIGHTS & FINISHES
Width (mm) 345 505 585 747 927 1,010 1,069
Height (mm) 575 575 575 575 575 575 575
Depth (mm) 98 98 98 98 98 98 98
Installed depth (mm) 120 120 120 120 120 120 120
Weight (kg) 8 12 14 18 20 24 26
Finish White RAL 9010
ELECTRICAL CHARACTERISTICS
Nominal power (W) 500 750 1,000 1,250 1,500 1,750 2,000
Voltage (V) 220 - 240 ~V 220 - 240 ~V 220 - 240 ~V 220 - 240 ~V 220 - 240 ~V 220 - 240 ~V 220 - 240 ~V
Current (A) 2.2 3.3 4.3 5.4 6.5 7.6 8.7
SAFETY & INSTALLATION
Safety thermostat
Template & Installation Kit
Grade of protection IP 24 IP 24 IP 24 IP 24 IP 24 IP 24 IP 24

9
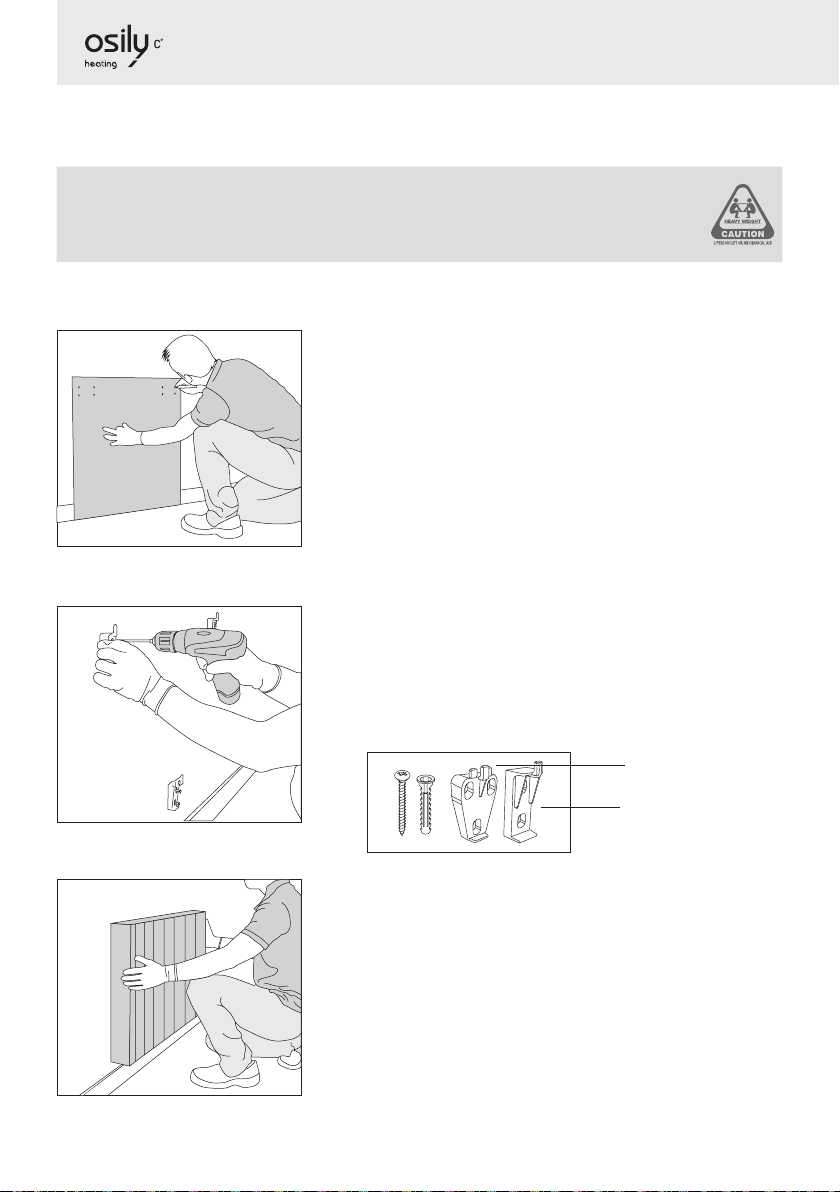
3. INSTALLATION
We recommend using a trusted installer or electrician for installation of the product.
IMPORTANT: Prior to installation, please locate the metal tag located at the back of the product
and note the product reference and serial number.
WARNING: Do not install the product directly over an electrical outlet or junction box. Do
not install the product or use it outdoors. Do not install directly under a shelf. This product
is designed to be installed on an interior wall using the template, the installation kit and the
xings supplied. Do not install the product in such a way that it encounters the power cable.
The product must be mounted on the wall in the position
shown in the accompanying image using the brackets and
with the xings supplied.
Our products transfer heat through the natural air
convection. If the product is covered, this will disrupt the
airow and could cause overheating. It must be positioned
in accordance with the minimum distances shown in the
accompanying picture.
WARNING: The product has an IP24 degree of protection and can be used in bathrooms, but
not in the vicinity of bathtubs, taps, showers, water connections, toilets, swimming pools
or other masses of water. The product can only be installed in zone 3 of the accompanying
picture. The product must never be installed where it, the switches or the control panel are
within the reach of people in the water. Never use the product with wet hands. Do not place
any water containers (glasses, vases, etc.) on or near the product.
ZONA EXTERIOR ZONA EXTERIOR
2.25 m
0.6 m 0.6 m
0.6 m
10
An installation kit is included in the product packaging. You will need a drill, a rubber mallet, a
spirit level and a pencil to complete the installation.
WARNING: The weight of some of the products may be heavy. The installation
may require two people.
IMPORTANT: Please follow these instructions carefully.
1. Remove the packaging and check that the installation
contains brackets, screws, rawl plugs and a cardboard
template.
2. Select a suitable location on the wall. Place the template
on the wall and mark the holes for the brackets and screws.
Observe the minimum distance requirements from the
previous page.
Use the oor as a base for the template, not the
skirting board.
3. Remove the template and carefully drill out the marked
holes.
4. Secure the upper brackets with the rawl plugs and screws
provided. Then x the lower bracket. To distinguish it, the
lower bracket has a dierent design from the top ones.
Bottom bracket
Top bracket
5. Slide the product up and down over the xed brackets.
6. Check the straightness with a spirit level and adjust the
supports accordingly if necessary.

11
7. Connect your product to the power supply and switch
it on.
8. See section 5 for operating instructions.
IMPORTANT: Template measurements per model
OSDR0500 OSDR0750 / OSDR1000
80 mm
44 mm
206 mm
642 mm
Floor
241 mm
124 mm
206 mm
642 mm
Floor
OSDR1250 / OSDR1500 / OSDR1750 OSDR2000
642 mm
206 mm
483 mm
286 mm
Floor
642 mm
206 mm
645 mm
322 mm
366 mm
Floor

12
4. SCREEN & KEYPAD
1
9
3
5
4
6
7
12
2
10
14
15
16
11
13
8
1Selected temperature
2Current time and day
3Heating element on
4Comfort mode
5Eco mode
6Anti-Frost mode
7Locked buttonpad
8Manual mode
9Automatic mode
10 Preset programs mode
11 Hourly programming
12 Open Windows indicator
13 Energy consumption
indicator
14 Auto mode / User
15 Pre-program mode / User
16 Manual mode / User
On / O button
Decrease temperature /
Go down button
Increase temperature
/ Go up button
Main menu button
+ Go back button
TFT screen
Programming button
13
5. FUNCTIONALITY & PROGRAMMING
5.1. ON & OFF
To turn the product on press the button once. To turn o press the button again. When you
turn the product on for the rst time, it will ask you to set the date and time. Use the buttons
to select the correct time and press the button to conrm. Then use the buttons to select
the correct minutes and press . Use the buttons again to select the correct day and press
the button to conrm.
5.2. SELECT THE SET TEMPERATURE
You can regulate the set temperature of the radiator by using the buttons. Press the button
to increase the product temperature by 0.5 ºC or the button to decrease the temperature by
0.5ºC, up to 7ºC. The temperature ranges for each mode are as follows:
COMFORT 19 - 30 oC
ECO 7.5 – 18.5 oC
ANTI-FROST 7 oC
5.3. TEMPERATURE CONTROL
When the room temperature is lower than the selected temperature, the heating element
is activated and the symbol appears. When the room reaches the selected temperature, the
temperature control will perform an intelligent control, which will activate and deactivate the
passage of electric current through the heating element to heat the radiator uid.
5.4. LOCK / UNLOCK BUTTON PAD
To lock / unlock the buttonpad using the product control panel, press and hold the buttons
together for 3 seconds.
The On/O button will still work, even if the control panel is locked. Press the button for 3
seconds to switch the product on or o.

14
5.5. SETTINGS MENU
Press the button to access the conguration menu. The available options are: Settings, Power,
and Programming mode.
Settings Set time
Backlight
Language
Firmware
Energy Open windows function
Balance mode
Adaptative mode
Prog. mode On/o
Preset programs
User mode
Use th buttons to move between the menu options. A box will appear around the option you
have selected. Press the button to enter the submenu.
5.5.1. SETTINGS SUBMENU
Press the button to access the conguration menu. Then use the buttons to navigate to
SETTINGS. Press the button to access.
• Set the day and time
To set the day or time select the CLOCK option.
Use th buttons to select the correct time and press the
button to conrm. Then use the buttons to select the
correct minutes and press the button to conrm. Then use
the buttons to select the correct day and press the
button to conrm.

15
• Adjust brightness
This function allows you to adjust the brightness when the
product is on or in standby.
To adjust the brightness, select BACKLIGHT. With the
buttons you can turn the brightness up or down. Press the
button to conrm.
• Language
This function allows you to change the language of the
product.
To change the language, select LANGUAGE. Use the
buttons to select the correct one and press .
• Firmware
Press the FIRMWARE option to see the current software
version and the release date.
5.5.2. ENERGY SUBMENU
Press the button to access the conguration menu. Then use the buttons to navigate to
ENERGY. Press the button to access.
• Open Windows
Use the buttons to select whether you want this func-
tion On / O and press to save.
When activated, the logo appears on the home screen, to the
right of temperature, indicating that it is active.

16
• Balance
This function resets your product to a temperature of 19ºC in
Manual mode.
Use the buttons to select this option and press to
conrm. The screen will show 19ºC in Manual mode.
• Adaptive mode
This function anticipates the product start-up, so that the
room temperature at the start of the
selected time is equal to the set temperature at the exact time
that we have established during programming. This means
your product will begin heating before the time set. This
ensures the
temperature is at the set temperature for the start of the time
selected.
To indicate that the algorithm is working, the icon will ash.
Use the buttons to select whether you want this func-
tion On / O and press to save.
5.5.3. PROG. MODE
To change the status of your product from MANUAL to AUTO or vice versa, make a quick press of
the button. If you want to start programming your product, make a long press of the button.
To see all the options available for programming your radiator, select the option PROG. MODE in
the main menu. The screen will show the following options:

17
• Mode
From the MODE menu, select the operating mode you
require: MANUAL or PROGRAMMING.
Use the buttons to select manual or programming and
press to conrm.
• Preset heating programs
From the PRE-PROGRAMS menu you can select a preset
heating program to use. There are 4 available. Use
to select between the dierent programs and press to
conrm.
Available pre-programs
PRE-PROGRAM 1
012345678910 11 12 13 14 15 16 17 18 19 20 21 22 23
Mon-
Fri
Sat-
Sun
PRE-PROGRAM 2
012345678910 11 12 13 14 15 16 17 18 19 20 21 22 23
Mon-
Fri
Sat-
Sun
PRE-PROGRAM 3
012345678910 11 12 13 14 15 16 17 18 19 20 21 22 23
Mon-
Fri
Sat-
Sun
PRE-PROGRAM 4
012345678910 11 12 13 14 15 16 17 18 19 20 21 22 23
Mon-
Fri
Sat-
Sun
COMFORT ECO OFF

18
• User program
This mode allows the user to make their own programming.
There are 2 ways to start editing the programming:
1. Do a long press on the button.
2. Enter the submenu USER PROGRAM from the main menu.
Then follow the steps below.
STEP 1
1. Select the COMFORT temperature:
Temperature range 19 – 30 °C
Use the buttons to select the desired
Comfort temperature.
Press to conrm.
2. Select the ECO temperature:
Temperature range: 7.5 – 18.5 °C
Use the buttons to select the desired
Eco temperature.
Press to conrm.
3. Select between ANTI-FROST or OFF:
Temperature range: 7 °C / OFF
Use the buttons to select the ANTI-
FROST or OFF.
Press to conrm.

19
STEP 2
Select the days to be programmed
Start on Day 1 (Monday).
Press the button to include this day in your
programming. Press the button again to
exclude.
Use the buttons to move to the next day
and repeat for all days of the week.
The selected days will be highlighted by a box
on the screen.
Once you have reached Day 7, press the
button to advance to the next step.
STEP 3
Select the hour and mode to be
programmed
Start on 0h (midnight).
Press the button to select ECO, COMFORT
or ANTI-FROST/OFF for that hour. Press to
move to the next hour and repeat.
• The upper right of the screen shows the
hour you are programming.
• The left side shows the selected days.
• The bottom programming bar indicates:
-Comfort mode: 2 shaded squares
-ECO mode: lower shaded square
-ANTI-FROST/OFF: 2 empty squares
Once you reach 23:00 hours, press to
complete the programming.

20
5.5.4. USER MODE
The USER mode allows the user to dene a permitted temperature range.
When in this mode, the symbol corresponding to the USER mode is displayed on the screen.
Access is gained by means of a password.
The default value is 0000. The numbers are
selected with the buttons and conrmed
with the button .
If the PIN code is incorrect, the following
screen is displayed and then you return to the
previous screen.
When the PIN code is correctly entered, the
following sub-menu appears, where we can
activate the user function, change the PIN
code, set the upper temperature limit and the
lower temperature limit.
6. MAINTENANCE AND CLEANING
The product does not require any maintenance. We recommend cleaning the product (back,
bottom of the product, etc.). Do not use abrasive substances on the product, clean it with a damp
cloth and neutral pH soap and the screen with a dry cloth. Before carrying out any cleaning
operation, make sure that the product is switched o and at room temperature.
7. EUROPEAN REGULATION WEEE 2012/19/EU
Based on the European regulation 2012/19/EU on Waste Electrical and Electronic Equipment
(WEEE), these appliances cannot be thrown in the usual council bins; they must be collected
selectively to optimise the recovery and recycling of the components and materials that make
This manual suits for next models
6
Table of contents
Other osily Heater manuals


Popular Heater manuals by other brands


Frico
Frico IR3000 Original instructions

TPI Corporation
TPI Corporation CEH/3380 Series installation instructions

Creda
Creda 75773301 installation instructions

ARDESTO
ARDESTO CH-1000MOW instruction manual

EcoHeater
EcoHeater SLIMLINE HE TH305 Assembly & fitting instructions

Comfort Zone
Comfort Zone CZ485 Series instructions


