osily OSPH1000E Owner's manual

SLIMLINE PANEL HEATERS
Installation And Operation Instructions
www.osily.co.uk
Model Number
OSPH1000E/1500E/2000E

www.osily.co.uk
OSPH1000E/1500E/2000E Slimline Panel Heater
Installation & Operating Instructions
IMPORTANT SAFETY INFORMATION
WARNING: In order to avoid overheating, do not cover the heater.
We recommend that this appliance is installed by a qualified electrician
in accordance to the current wiring and building regulations.
This appliance is intended for internal use only in domestic and small commercial applications
and warnings must be adhered to.
Do not cover the heater. Never cover or obstruct in any way the heat outlet slots at the top of
the heater or the air inlet slots in the base of the heater.
This appliance can be used by children aged from 8 years and above and persons with
reduced physical, sensory, or mental capabilities or lack of experience and knowledge if they
have been given supervision or instruction concerning use of the appliance in a safe way and
understand the hazards involved.
Children shall not play with the appliance. Cleaning and user maintenance shall not be made
by children without supervision.
Some parts of this appliance can become very hot and cause burns, please ensure that the
heater has been switched of and allowed to cool before cleaning etc.
If the supply cord is damaged, it must be replaced by the manufacturer, it’s service agent or
similarly qualified persons in order to avoid a hazard
Please do not use the product for any other purpose. Do not use this product
with an extension lead or multi plug adapter.
For your safety, this heater is fitted with a thermal cut-out. If the product overheats
for some reason, the cut-out prevents excessive temperatures on the product by cutting
the power to the heater.
There are no user serviceable parts in this appliance.
Please unplug and ensure that the unit is disconnected from the mains supply before any
attempt to open the case or any part of this heater
Thank you for purchasing this Osily Convector Heater. Please read these instructions
before installation or operation and leave with the appropriate person for future retention.
16 mm
5 mm
57 mm
www.osily.co.uk
&
Setting the Heater
This heater is intended for internal installation and operation and must not
be used for any other purpose.
Do not locate the heater directly below a fixed socket outlet or connection box.
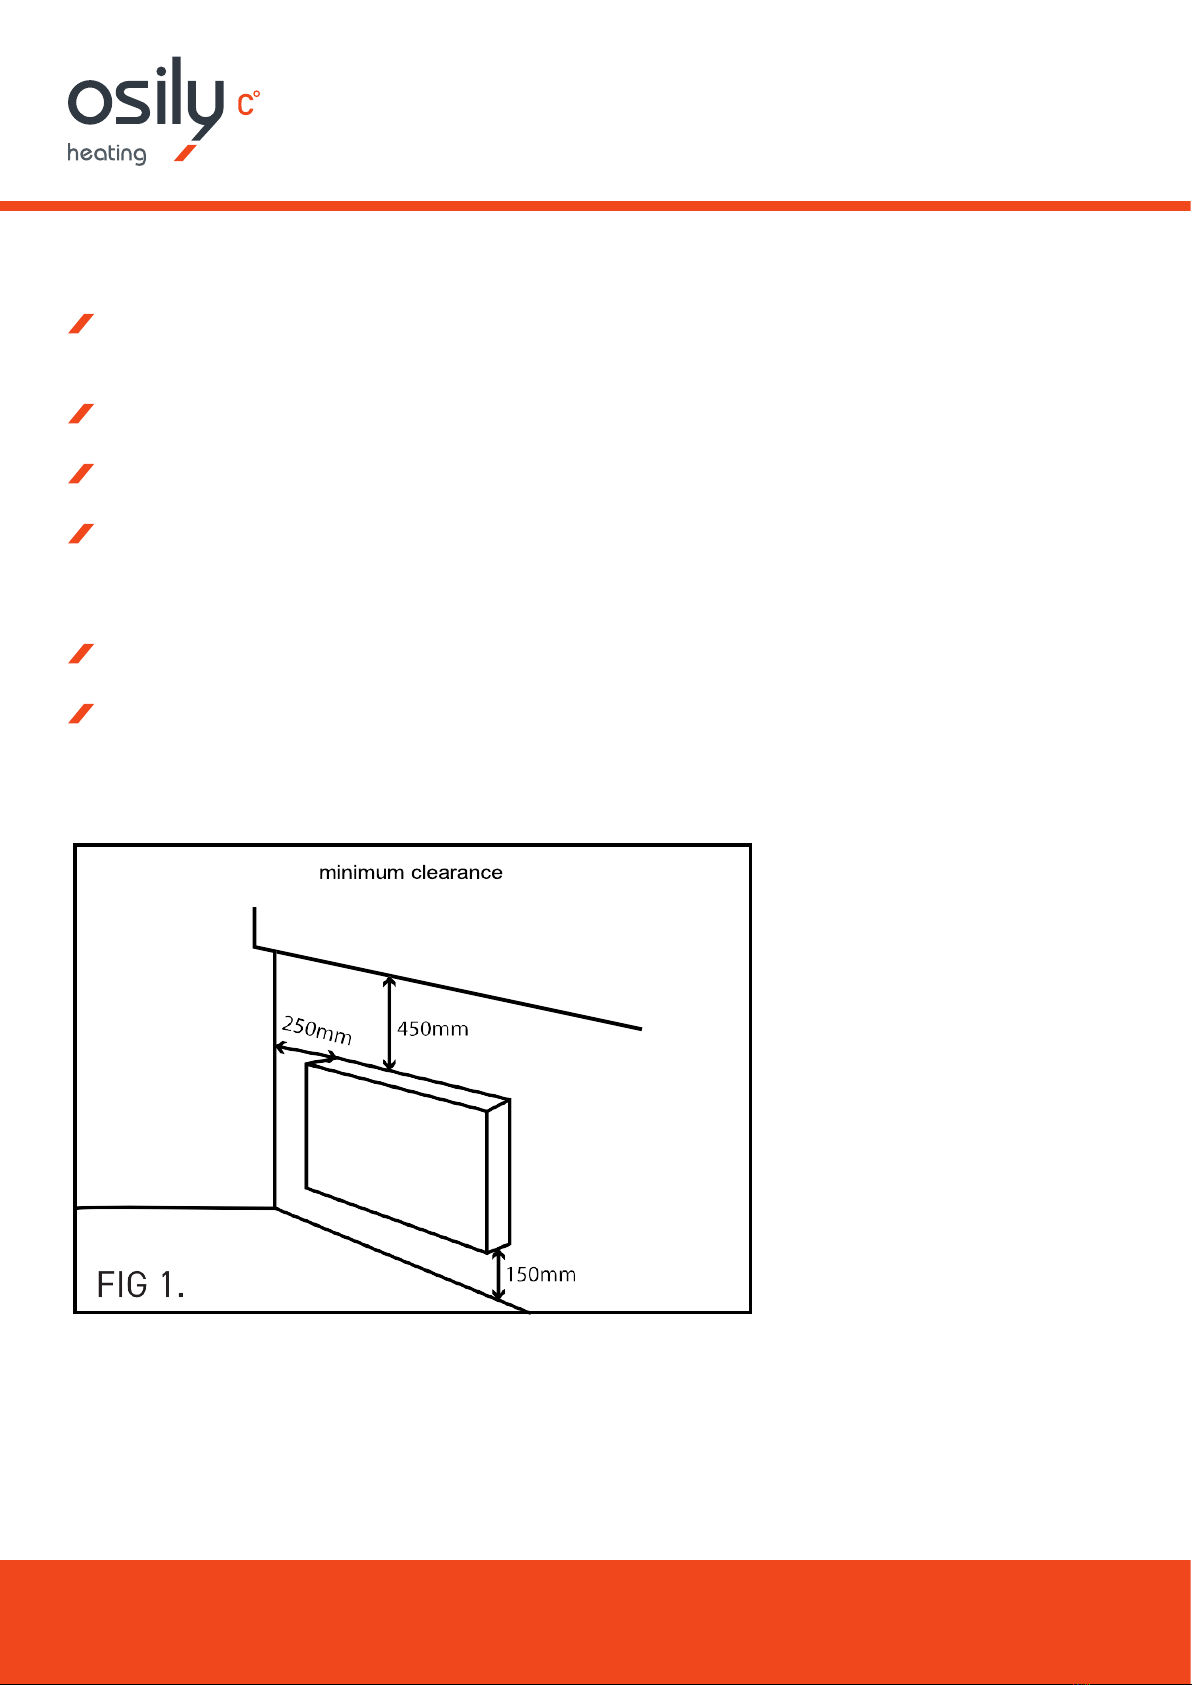
Please ensure that the minimum clearance area is adhered to as per Fig. 1.
Do not locate the heater in close proximity to curtains or other fabrics or materials.
In humid areas such as bathrooms and kitchens, the connection box must be
installed at least 250mm above the floor.
Do not install the heater in a draught likely to affect the control setting.
Do not locate the heater in any area that may store or contain paint,
fuel or other flammable liquids.
www.osily.co.uk
How to Install the Panel Heater
Please use the mounting brackets supplied. The heater should be positioned
observing the minimum clearances stated around the heater - see Fig. 1
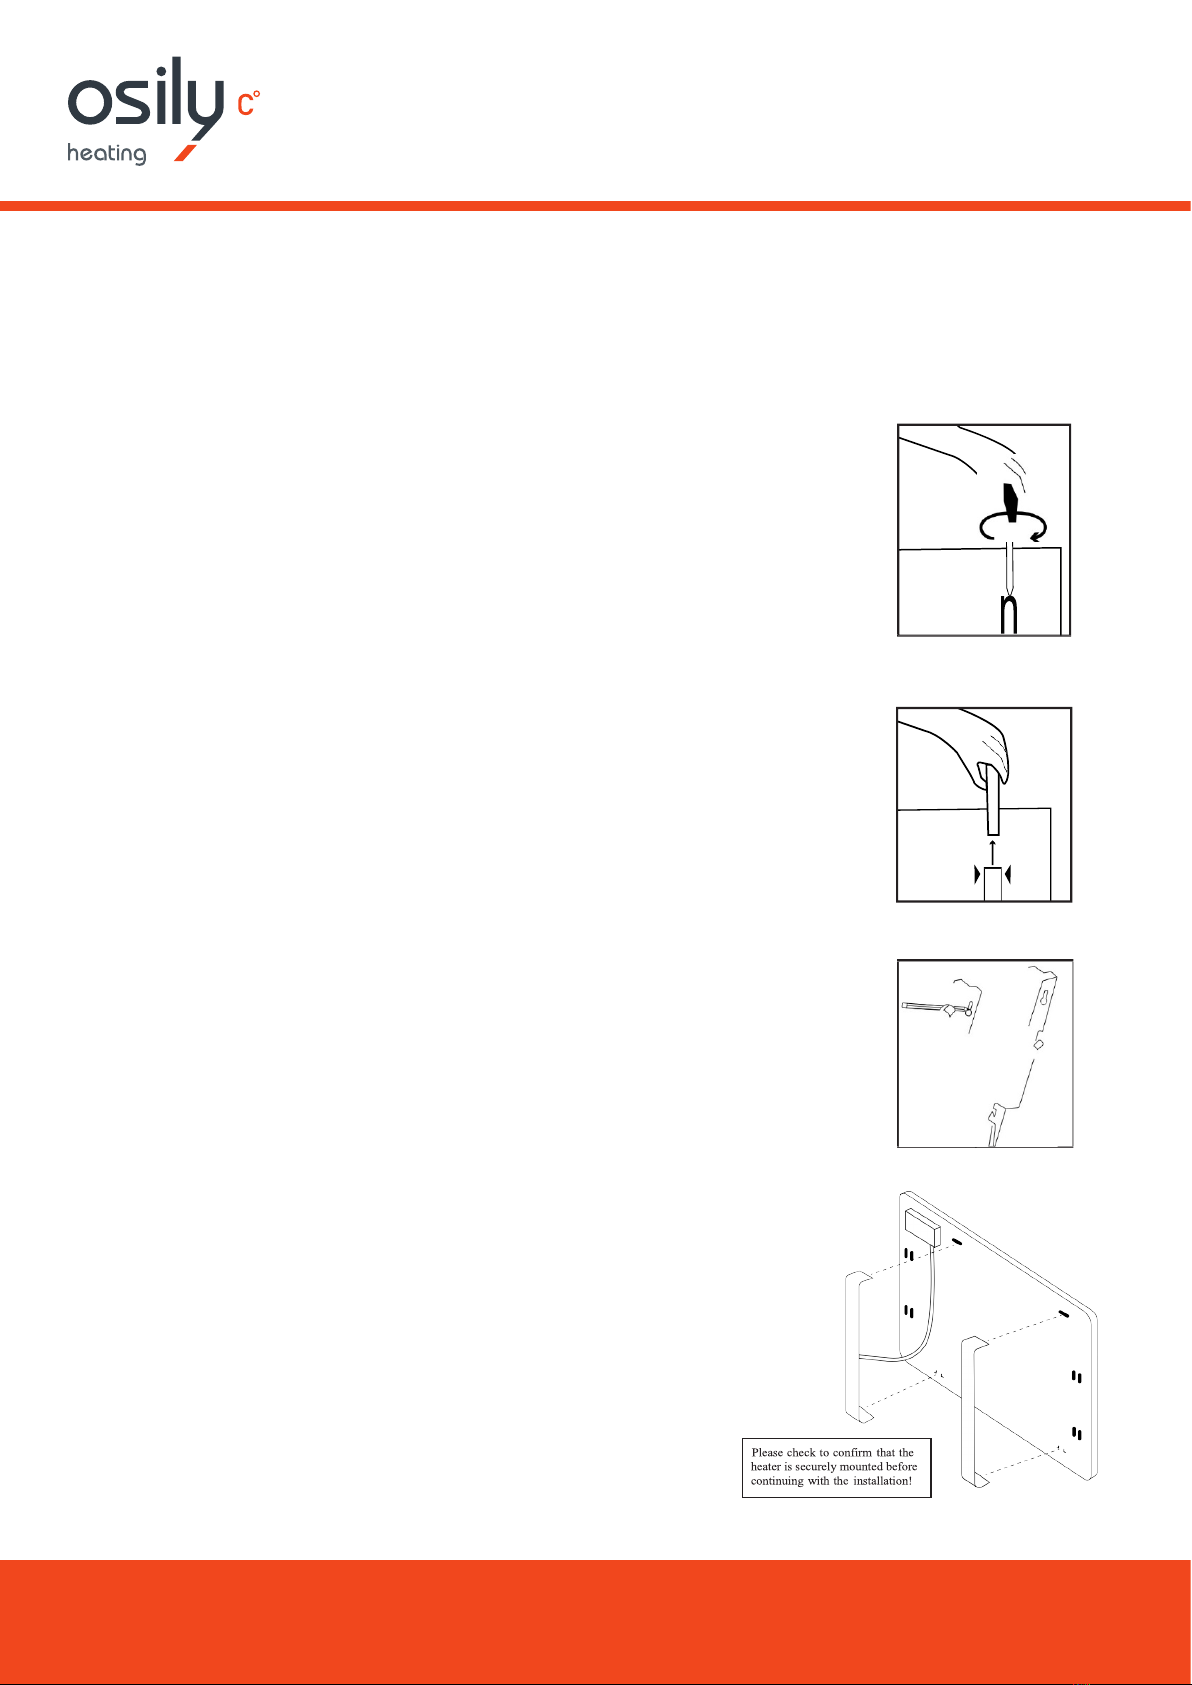
Step 1. First remove the wall bracket from the rear housing.
Unscrew the screws located on the top of the 2 vertical bars
of the wall bracket.
Step 2. Then pull out the top bar by pressing firmly both upper
parts slotted into the rear housing. Slide down the wall bracket in
order to remove it from the rear housing.
Step 3. Fix the wall bracket securely to the wall through the 4
screw holes provided.
Step 4. Raise the heater to upright position. Present the heater and
engage 2 slots ofthe bottom parts of the wall brackets in the wall
heater’s rear enclosure then pull up the heater. Then engage 2
slots of the upper parts of the wall bracket and tighten the 2
screws in order to lock the device.
(

www.osily.co.uk
Touch Controls
1. Minute Button
2. Hour Button & Mode Switched
3. Weekly Button & Function Selection
4. Heat Button
5. Temperature Up & Timer Heat On
6. Temperature Down & Timer Heat Off
7. Display
1.
2.
3.
4.
5.
6.
7.

www.osily.co.uk
Operation
Turning On
The unit should be turned on using the power switch on the side. The unit has 3 modes.
Press the SET button to change the heater into the desired mode. The current mode
will be indicated on the display
Standby Mode
On
Weekly Timer Mode
Setting the Day and Time
With the heater in Standby Mode: Display will show P
Press and hold the MODE button to set the hour
Press and hold the MIN button to set minute
Press and hold the SET button to set the day
Heat Level
Press the SET button to put the heater into ON mode the heat level icon will display ,
press this button to change between high heat setting and low heat options:
Low Heat
High Heat
Temperature Adjustment
Whilst in ON mode use the UP and DOWN buttons to adjust the desired temperature
(Range of 5°-40°C). The display shows the current detected room temperature on the left and the
desired room temperature on the right.
Child Lock
Press and hold the HEAT button for 5 seconds and the lock symbol will be displayed.
All buttons are deactivated. To exit the child lock, press and hold the HEAT button again
for 5 seconds.
Day
Hour
Minute
Mode

www.osily.co.uk
Weekly Timer
To Change the heater into Weekly timer mode. Press the SET button until “W” is displayed
Press the button to choose between the following pre- programmed heating periods:
1. Monday to Friday
2. Monday to Saturday
3. Individual days
4. Monday, Wednesday, Friday
5. Tuesday, Thursday, Saturday
6. Weekend
7. Monday to Wednesday
8. Thursday to Saturday
9. Monday to Sunday
Once the pre set heating period has been selected e.g. 1. for operation Monday to Friday then each
single hour starting from midnight needs to be assigned to either an on or off setting, for all 24 hours.
Therefore, for example to set the heater to be on from 06.00 until 08.00am, and then on at 18.00
until 22.00 please programme as follows.
1. Press the DOWN button 6 times the display will show 06.00
(this will set all hours to off until 06.00)
2. Now press the UP button twice the display will show 08.00
(this will set the heater to be on for 2 hours until 08.00)
3. Now press the DOWN button 10 times to set the heater to be off until 18.00.
4. Now press the UP button 4 times to set the heater to be on until 22.00.
5. Now press the DOWN button to set the last 2 hours of the day until midnight to
set the heater to be off.
While the unit is operating under the weekly timer, it will heat upto the temperature set within
the ON mode.
Notes: When the room temperature reaches the desired level, the heater will change to Low Heat
mode. When room temperature is 2 degrees over the desired temperature, the heater will enter
standby mode. The heater will resume operation when the temperature drops 2 degrees below
the desired temperature.

www.osily.co.uk
Technical Specification
PART NO. POWER (KW) VOLTAGE
RANGE FREQUENCY IP RATING OPERATION
CURRENT (A) ROOM SIZE DIMENSIONS
(WXDXH)
OSPH1000E 1 220-240V 50-60 Hz IP24 4.3 10mSQ 600 x 90 x 380 mm
OSPH1500E 1.5 220-240V 50-60 Hz IP24 6.5 15mSQ 760 x 90 x 380 mm
OSPH2000E 2 220-240V 50-60 Hz IP24 8.7 20mSQ 920 x 90 x 380 mm
Trouble Shooting
Please note that there are no user serviceable parts in this heater.
Disassembling this product will invalidate the warranty.
ISSUE POSSIBLE REASON SOLUTION
No Power
1. Power cord is unconnected
2. There is no power from socket
3. The power switch on the rear
of the unit is turned off.
1. Connect the power cord
2. Check socket is turned on
3. Ensure the power switch on the rear
of the unit is in the on position
Odour emission
from unit
1. New unit. When the heater is used for
the first time it is possible that a odour
may be omitted, this is normal and will
soon disappear.
N/A
Strong vibrations
and noise
1. The heater may not be securely
fixed to the wall
1. Check that the heater is fixed
securely to the wall
Disposal
This symbol indicates that this product must not be placed in general household waste.
It should be sent to a separate recycling facility for recovery, check Local Authorities
for details. By responsible recycling and separating this product from other household
waste it will help protect the environment and human health, as the volume of waste
sent to incinerators or landfill sites will be reduced and natural resources conserved

www.osily.co.uk
ITEM SYMBOL VALUE UNIT
Nominal heat output P nom 1.0 kW
Minimal heat output P min 0 kW
Maximum continuous output P max 1.0 kW
Heat Output
ITEM SYMBOL VALUE UNIT
At Nominal heat output el max N/A kW
At Minimal heat output el min N/A kW
At Maximum continuous output el sb 0 kW
Auxiliary Electricity Consumption
ITEM SYMBOL
Manual heat charge control, with integrated thermostat No
Manual heat charge control with room and/or outdoor temperature feedback No
Electronic heat charge control with room and/or outdoor temperature feedback No
Fan assisted heat output No
Type of heat input, for electric storage local space heaters only (select one)
www.osily.co.uk
ITEM SYMBOL
Single stage heat output and no room temperature control No
Two or more manual stages, no room temperature control No
With mechanical thermostat room temperature control No
With electronic room temperature control No
With electronic room temperature control plus day timer No
With electronic room temperature control plus week timer Yes
Type of heat output/room temperature control (select one)
MADE IN PRC
AER, Zac du Caillou, Rue Jules Verne, 69630, Chaponost, France
YESSS House, Unit B Foxbridge Way, Normanton, WF6 1TN, UK
ITEM SYMBOL
Room temperature control with presence detection No
Room temperature control, with open window detection No
With distance control option No
With adaptive start control Yes
With working time limitation Yes
With black bulb sensor No
Other control options (multiple selections possible)
This manual suits for next models
2
Table of contents
Other osily Heater manuals


Popular Heater manuals by other brands


EQUATION
EQUATION CH500 EQ Assembly, Use and Maintenance Manual

Duronic
Duronic Mica HV180 quick start guide

Powrmatic
Powrmatic OUH 20 User, Installation & Servicing Manual

Swann
Swann Smith's Ecovector II Smart LL Installation, commissioning and user manual

EINHELL
EINHELL HTO 2000 Original operating instructions

Toyostove
Toyostove R 256 TC datasheet


