OSIM uThrone OS-8201 User manual

uThrone
OS-8201 Operation Manual

1) English
2) Simplified Chinese 简体中文
3) Traditional Chinese 繁體中文

1
Safety 2
Names of parts and functions 5
Preparation before use 7
Operation 10
Product care and storage 14
Troubleshooting 15
Specifications 17
Contents
OS-8201 uThrone
Thank you for purchasing the OSIM uThrone. Please read the operation manual thoroughly
for the correct methods of usage and take special notice of the safety section before you start.
This manual should be kept on hand for easy reference. It is your guide to a safe and efficient
operation.
ENGLISH

2
IMPORTANT SAFETY INSTRUCTIONS
When using the product, please take special notice of the following basic precautions:
Read all instructions before using the product:
DANGER– To reduce the risk of electric shock:
Always unplug this product from the electrical outlet immediately after use and before cleaning.
WARNING – To reduce the risk of burns, fire, electric shock, or injury to persons:
1) The product should never be left unattended when plugged in. Unplug from electrical outlet
when it is not in use, and before putting on or taking off parts.
2) Use this product only for its intended use as described in this manual. Do not use attachments
not recommended by the manufacturer.
3) Never operate the product if it has a damaged cord or plug, a malfunction, or it is dropped
into the water. Return the product to OSIM Service Center for examination and repair.
4) Do not carry this product by the power cord or use the power cord as a handle.
5) Keep the product power cord away from heated surfaces.
6) Do not drop or insert any objects into any openings of the product.
7) Do not use this product outdoors.
8) Do not operate where aerosol (spray) products are being used or where oxygen is being
administered.
9) To disconnect, turn off all controls and remove the power plug from the electrical outlet.
10) Do not stand on or in the product. Use only while seated.
11) Children should be supervised to ensure that they do not play with the product.
12) This product can be used by children aged from 8 years and above and persons with reduced
physical, sensory or mental capabilities or lack of experience and knowledge if they have been
given supervision or instruction concerning use of the appliance in a safe way and understand
the hazards involved.
13) Cleaning and user maintenance of the product shall not be made by children.
14) The product is only to be used with the power adaptor provided.
SAVE THESE INSTRUCTIONS
This product is intended for household use only

3
Safety
Usage environment
• Do not operate the product in
environments with high temperature and/
or high humid.
• Do not operate the product in a dusty
environment.
• Do not expose the product to heaters,
stoves or direct sunlight.
• Place and use the product on an even non-
slip floor.
• This product is not for commercial
purposes.
Safety precautions
• Remove all accessories from body before
use.
• Do not use the product when the
upholstery or seat is removed or with
internal component exposed. This may
cause injury or malfunction.
• Do not rest or place heavy objects on the
product as this may result in malfunction
or damage to it.
•
To prevent accidental injury, do not allow
children and pets to play near the product,
especially under the back of the chair,
under the seat.
• Remove power plug from the electrical
outlet immediately should liquid be
accidentally spilled onto the product as
this may result in electric shock.
• Users must not attempt to disassemble or
repair the chair. All repairs or replacement
of parts must only be done at OSIM’s
Service Center or by an authorized service
agent.
• Power cord must be unobstructed at all
times, i.e. not twisted, not wind around the
product and do not place anything heavy
object on it.
• Do not use the product if the electrical outlet
is loose.
• When disconnecting the power plug, pull it
out by holding the plug, not the cord.
• Do not use the product in the event of a
power failure. Injury may occur when power
is restored unexpectedly.
• Wait for at least an hour after meal before
using the product.
• Recommanded to keep massage sessions to
30 minutes a day.
• Wear suitable clothing, do not massage with
bare skin.
• Do not use the product when your body is
wet or operate with wet hands.
• Do not place your hands or feet along the
path of the moving mechanism during use
as this may cause injury.
• Do not use the product if you are not feeling
well or under the influence of alcohol.
• This product is not intended for self-
diagnosis or self-treatment of conditions
that should be managed by a qualified
health care provider.
• Stop using immediately and consult your
health care provider should you experience
discomfort or any abnormal or severe pain.
• If you are under any medication or have
(but not limited to) any of the below
medical conditions, please consult your
health care provider first before use.
a) Heart Disease
b) High or Low Blood Pressure
c) Pregnant or menstruating
d) Medical implants
e) Recently underwent surgical
operations
f) With any bone fractures
g) Motion sickness or anxiety attacks

4
Grounding Instructions (For Canada / USA)
This product must be grounded. If it should malfunction or break down, grounding provides a
path of least resistance for the electric current to reduce the risk of electric shock. This product is
equipped with a cord with an equipment-grounding conductor and a grounding plug. The plug
must be plugged into an appropriate outlet that is properly installed and grounded in accordance
with all local codes and ordinances.
DANGER -Improper connection of the equipment-grounding conductor can result in a risk
of electric shock. Check with a qualified electrician or service technician if you are in doubt
as to whether the product is properly grounded. Do not modify the plug provided with the
product - if it will not fit the outlet, have a proper outlet installed by a qualified electrician.
This product is for use on a nominal 120V circuit and has a grounding plug that looks like
plug illustrated below. Make sure that the product is connected to an outlet having the
same configuration as plug. No adaptor should be used with this product.
Safety

5
Names of parts and functions
Main unit
* Power adaptor plug will vary according to country
# Search and connect to BT (ID: OSIM-xxxxxxxx)
1
2
3
4
5
6
7
8
9
10
12
11
13
14 15
16
1. Headrest pillow
2. Backrest
3. Backrest cushion
4. Control panel with sliding cover
5. Seat
6. Cable holding strap (under the seat)
7. Wheel stand
8. Castor wheel
9. Speakers (Bluetooth music stream)#
10. Armrest
11. Armrest height locking latch
12. Backrest angle locking lever
13. Seat height locking lever
14. Adaptor jack
15. Power adaptor*
16. Power socket
17. Pocket for adaptor storage
*Product images are for illustrative purposes only and are not drawn to scale.
Expanded
view for
Velcro
Tape
6
17
6
• Do not sit, step or place heavy objects on the control panel.
• Do not exert excessive force on the control panel.
• Do not operate the control panel with wet hands.
• Do not operate the control panel using sharp-edged or hard objects. It may result in damage.
Caution
Names of parts and functions
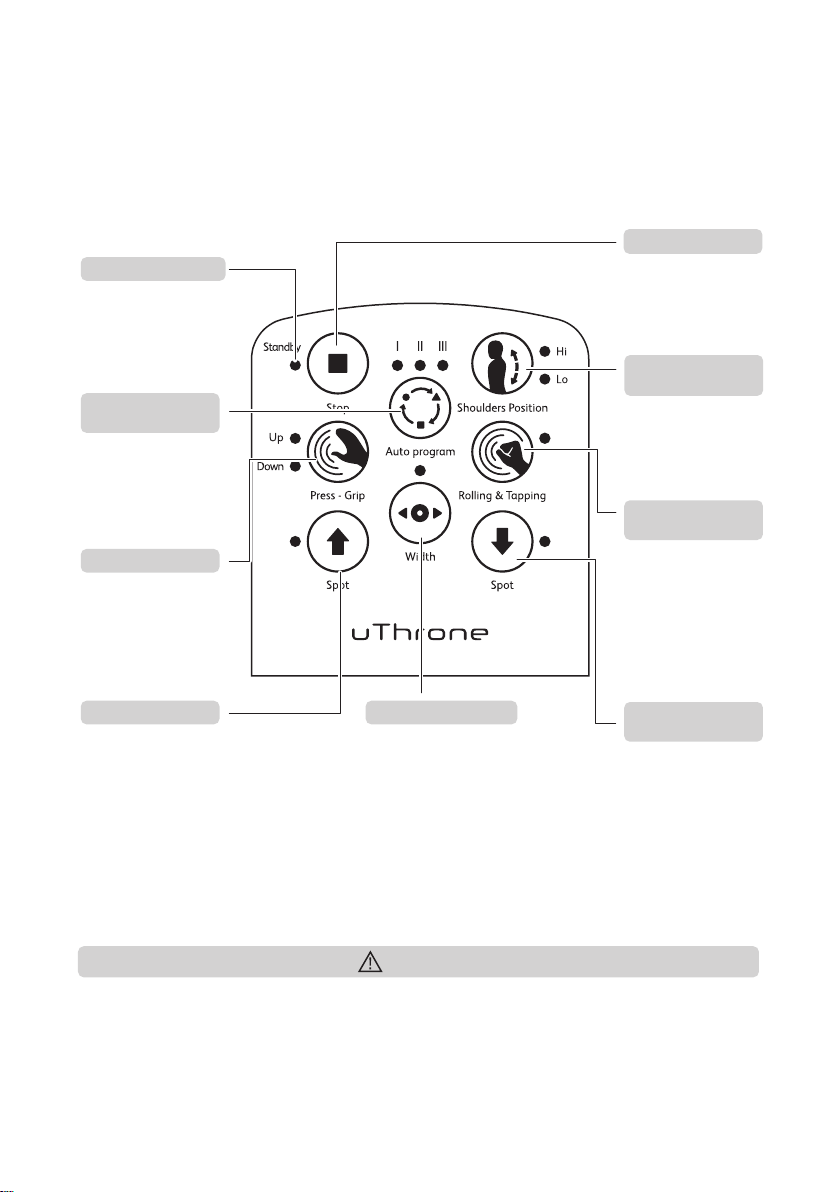
Control Panel
Stop button
Press button to STOP the
massage program. Press
it again to return the
massage unit to “Home”
position
Rolling & Tapping
button
Manual program - Press
the button to turn ON
the rolling and tapping
function
Spot ‘downward’
button
Press the button to
adjust the massage
location downward
to your preferred spot
(Only use for “Press-Grip”
manual program)
Shoulder position
button
Press the button to select the
shoulder position (6 levels)
to suit your shoulder height
first before start to select the
auto or manual program
LED lights up when in
Standby mode
Standby LED indicator
Switch the Auto programs
in the sequence of
I - Neck & Shoulders
II - Energize
III - Lumbar
Auto program
button
Manual program - Press
the button to turn ON the
kneading function in the
sequence of ‘Kneading
upward’/ ‘Kneading
downward’ direction
Press - Grip button
Press the button to adjust
the massage location
upward to your preferred
spot (Only use for “Press-
Grip” manual program)
Spot ‘upward’ button
Press the button to adjust
the roller width to suit your
preference (Only use for
“Rolling & Tapping” manual
program)
Roller width button

7
Preparation before use
Setting up the product
• Unpack the carton and assemble the
items accordingly to the provided
instruction sheet.
• Before use, ensure that the backrest is
raised fully to its upright position.
Placing the backrest cushion
• Place the backrest cushion on top of the
seat as shown.
Positioning the product
• Ensure a space allowance of at least 70cm
behind the product to prevent obstruction
when it reclines.
Placing the headrest pillow
• Place the headrest pillow on top of the
backrest and insert its flap through the
strap as shown
Headrest pillow
Backrest cushion
70 cm
Strap
Headrest pillow
Wall

8
Power socket
Power adaptor
Moving the chair
The chair is fitted with casters for easy
manoeuvring over a short distance.
•Raise the backrest fully to its upright
position and lower the seat’s height.
•Switch OFF the main power and
disconnect the power adapter.
•Push the chairl carefully (shown below) to
the desired location.
To switch on the power
• Route the adaptor jack through the cable
holding strap under the seat and connect
it into the power socket.
• Connect the power adaptor to the
electrical outlet.
• Turn on / off the chair by switching the
main power of the electrical outlet
Preparation before use
Caution
• Ensure the power cord is not placed under
the chair.
• Beware that the power cord might get
entangle or routed on the chair base over
the time. Check and release power cord to
prevent power trip.
• Ensure all switches are turned ‘OFF’
(including the main switch) before
connecting the power adaptor to an
electrical outlet.
Note
• As the chair is fitted with casters, please
do not move the chair during operation to
avoid a power trip.
• Do not move the chair with someone on it
as this might tip over the chair and cause
an accident and injury.
9
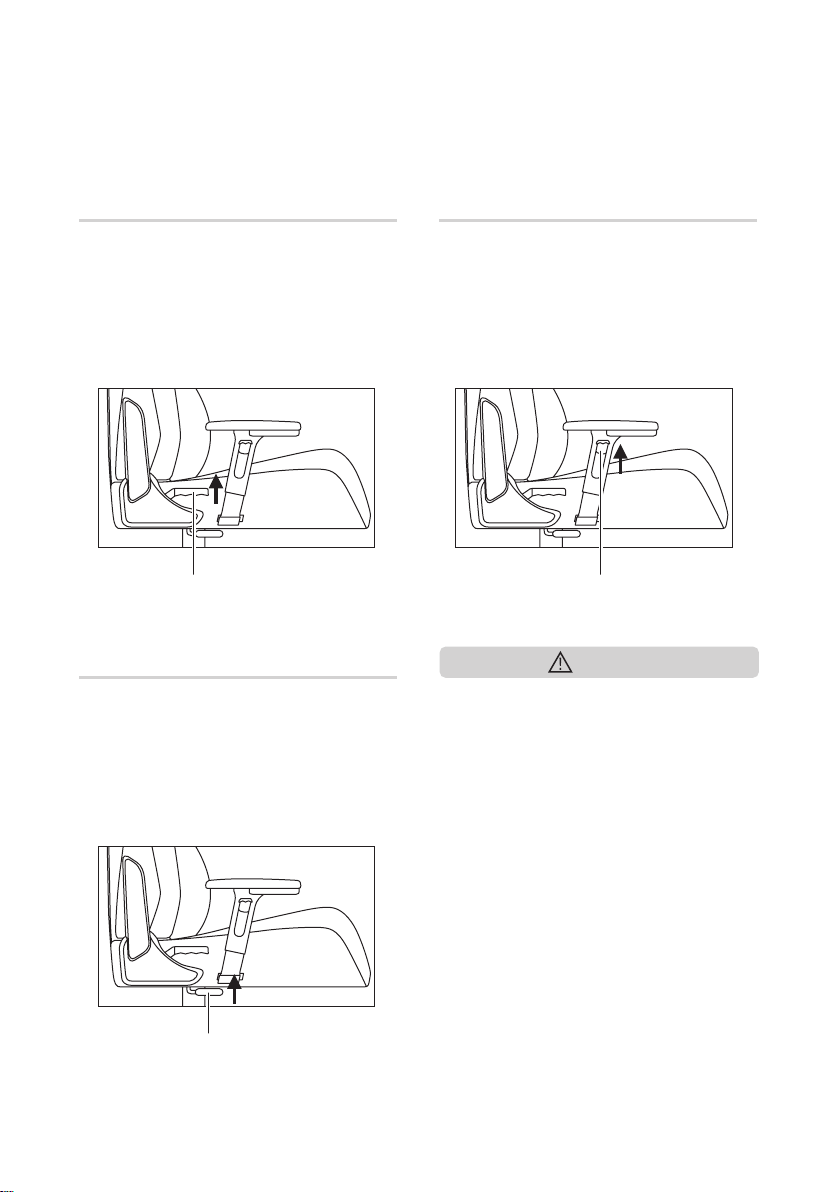
Preparation before use
Backrest angle adjustment
• Pull up the backrest angle locking lever as
shown.
• Lean your upper body backwards to your
preferred recline angle.
• Release the lever to lock the selected
position.
Armrest height adjustment
• Pull up the armrest height locking latch as
shown.
• Slide the armrest upwards or downwards
to your preference height.
• Release the latch to lock the selected
position.
Seat height adjustment
• Pull up the seat height locking lever as
shown.
• Lift up your lower body or use body weight
to adjust to your preferred sitting height.
• Release the lever to lock the selected
position.
Caution
• Ensure that the backrest is at its most
upright position before sitting on the
chair and reclining to your preferred
position.
• Do not place fingers or objects in the gap
between the headrest, backrest and seat
during adjustment.
• Ensure that there is no obstruction when
adjusting the angle / height of the
backrest and seat.
• Do not stand or squat on the chair. Any
misuse of chair may cause chair to tilt
and can result in injury.
• Ensure chair is properly assembled using
the provided assembly guide. Any missing
components or improper assembly may
cause chair to be unstable and can result
in injury.
Seat height locking lever
Backrest angle locking lever Armrest height locking latch

10
Operation
Auto Program Operation
• Turn on the power.
• Press any function key, the massage
mechanism will moving upward from its
home position (bottom of the backrest) to
user shoulder position.
• Press the “Shoulder Position” button
to adjust to user preference shoulder
position. There are 6 levels of shoulder
position. Ideal shoulder position is to place
the bottom of the top roller just touching
your top shoulder surface. By default, the
roller will move to the lowest shoulder
position. Just press the button once to
move the roller to the next higher position
and so on if feel the roller position is too
low.
• Once confirm the shoulder position. Press
“Auto Program” button to start the auto
program.
• User can switch the type of auto program
between “I / II / III” by just pressing the
same “Auto Program” button.
• Total massage duration is 15 mins.
• Press the “Stop” button to end the
massage operation. Press the “Stop”
button again to return the massage
mechanism back to home position.
Note
• Under auto program operation, the
“Width”; “Spot (Up)”; “Spot (Down)” will
not be able to operate.
• User can just press the “Knead” or “Roll &
Tap” button to switch to manual program.

11
Manual Program Operation
• Turn on the power.
• Press any function key, the massage
mechanism will moving upward from its
home position to user shoulder position.
• Press the “Shoulder Position” button
to adjust to user preference shoulder
position. There are 6 levels of shoulder
position. Ideal shoulder position is to place
the bottom of the top roller just touching
your top shoulder surface. By default, the
roller will move to the lowest shoulder
position. Just press the button once to
move the roller to the next higher position
and so on if feel the roller position is too
low.
• For “Roll & Tap” massage function :
- Press “Width” button to adjust your
preference roller width to massage.
The width of the massage roller will
move from narrow to wide then wide to
narrow.
- Press “Roll & Tap” button to start the
rolling and tapping massage function.
The massage mechanism will move from
upper body towards lower body and
then go back to upper body and vice
versa
• For “Knead” massage function :
- Press “Knead” button to start the
kneading massage.
- User can select their preference
kneading motion (Upward or
Downward) by just toggling the same
button.
- User can also further select their
preference kneading location between
their upper and lower back by just
pressing the “Spot (Up)”or “Spot
(down)”buttons.
Operation
Note
• Under manual program operation, “Spot
(Up)”and “Spot (Down)”buttons are
not applicable for “Tap & Roll” function.
And “Width” button is not applicable for
“Knead” massage function.
• Both “Roll & Tap” and “Kneading” massage
function can operate at the same time by
just pressing the respective button.
• Total massage duration is 15 mins.
• Press the “Stop” button to end the
massage operation. Press the “Stop”
button again to return the massage
mechanism back to home position.

12
Function Operation Table
Operation
Buttons
Auto Programs
Manual Program
Roll & Tap
Knead (Up / Down)
Shoulder
Position
Width Spot (Up) Spot (Down) Stop
OK
OK
OK
-
OK
-
-
-
OK
-
-
OK
OK
OK
OK

13
Pairing of Bluetooth function
• Turn on the product power
• Turn on the Bluetooth function on your
mobile device by accessing the Bluetooth
Setting Screen.
• Mobile device will show a list of available
items pending for paring.
• Select the item indicate “OSIM-xxxxxxxx”
to start pairing.
• Speaker will acknowledge with a “Peep”
sound once pairing is successful.
• User now can start playing their music
through Bluetooth function on the product
speaker.
• Turn off your mobile device Bluetooth
function if not in used. The speaker will
also acknowledge with a “Peep” sound
when disconnect the pairing.
Operation

14
Product care and storage
Chair placement and storage
Environmental factors can strongly affect the product physically and mechanically. Do not expose the
product to direct sunlight or in places with extreme heat or air-conditioning vents. These can cause the
upholstery to dry up, crack or the color to fade.
If the product is not to be used for a long period of time, cover it with a dust cover and disconnect the
power plug from the electrical outlet.
Ensure enough space between the chair and surrounding furniture items and wall for unobstructed
movements during chair usage. Direct contact between the exterior of the chair with other furniture
items and walls will cause abrasive damage to the upholstery.
Clean the product using a dry lint-free cloth
Before cleaning, ensure that the main switch is turned off and the power plug is disconnected from the
electrical outlet.
The upholstery of the product is customarily exposed to the natural body oils of users. The main unit
structure and fabric can be cleaned thoroughly with a piece of soft, dry cloth. The common micro-fiber
cleaning materials or gloves are very well suited for this routine maintenance process. Such materials
and gloves are available for sale in most DIY shops.
Do NOT use wet elements for cleaning
The product is made up of electrical components and mechanical parts, which are all very sensitive to
moisture. Under no circumstances should they be exposed to any form of water or moisture. If you use
water (eg. a wet cloth) to clean the upholstery, the coating may be eroded and the protection for the
product will be diminished.
As for the controller, it may result in malfunction if you use a wet cloth to clean.
Do NOT use cleaning solvents
Under no circumstances should you use any cleaning agents, like benzene or thinner to clean the
product. This may cause the color of the upholstery to fade.
Do not wash the upholstery using washing machine. This may result in the deterioration of upholstery
quality.
Do NOT attempt to repair your product
Under no circumstances should you attempt to repair the product, for safety reason.
If you suspect a malfunction, always call OSIM Service Center for further assistance and information.

15
• These sounds originate from the internal mechanism
within the product during operation.
• This may occur during normal usage and is not due to
malfunction.
Problem Possible causes/actions
• Frictional sound of rollers
against backrest.
• Motor sound during operation.
• Loud sound during kneading,
tapping and rolling massage.
• Check the power plug and ensure that it is securely
connected to the electrical outlet.
• Ensure that the main power switch is turned ‘ON’.
• The control panel does not
function correctly.
If you encounter problems with the operation of the product, please check the following points to
see if they can be rectified. If the product still malfunctions or does not work, please switch off the
product and remove the power plug from the electrical outlet. Contact OSIM Service Center* for
servicing.
Do not disassemble or attempt to repair the product yourself. Doing so will void the warranty
and OSIM will not be responsible for any subsequent consequences.
Troubleshooting
• Stop use the product immediately and contact OSIM
Service Center for assistance.
• The power adaptor and cord
are abnormally hot.
• The auto timer of 15 minutes has lapsed. Press any
program button to restart the massage.
• If the product fails to restart, turn off the main power
switch on the eletrical outlet. Turn it on again after 10
seconds.
• If the same problem persists, please turn off the main
switch, disconnect the power plug from the electrical
outlet and contact OSIM Service Center.
• The massage stops midway.
• Ensure that the main switch and the switch on the
electrical outlet is turned on.
• Ensure that the power plug is firmly connected to the
electrical outlet.
• Check that the voltage at the electrical outlet is
adequate.
• The product does not function.

16
Troubleshooting
Problem Possible causes/actions
• The roller mechanism may be strained when subjected
to excessive force.
• Do not apply excessive force on the rollers.
• The massage rollers stop
during the massage session.
• Turn off the main switch, disconnect the power plug
from the electrical outlet and contact OSIM Service
Center* for assistance.
• If you encounter any problems
other than the ones stated
above, or the same problem
persists.
* Please visit us at www.OSIM.com for information on the nearest service center.
Product warranty is valid only in the country of purchase.

17
Specifications
Model name OSIM uThrone
Model number OS-8201
Adaptor input 100-240V 50-60Hz
Adaptor output 24V 2.5A
(Kindly ensure that the local Alternating Current (AC)
voltage corresponds with product specified voltage)
Power consumption 60W
Auto timer 15 minutes
Backrest recline angle Approx 145 degree
Armrest extension for height 6.5 cm
Seat extension for height 10 cm
Dimensions
Backrest inclined position 68 (L) x 65.5 (W) x 121 (H) cm
Backrest reclined position 138 (L) x 65.5 (W) x 98.5 (H) cm
Weight
Net weight Approx. 27.5 kg
Gross weight Approx. 34 kg

18
Notes
This device complies with Part 15 of the FCC Rules / Industry Canada licence-exempt RSS
standard(s). Operation is subject to the following two conditions: (1) this device may not cause
harmful interference, and (2) this device must accept any interference received, including
interference that may cause undesired operation.
Le présent appareil est conforme aux CNR d’Industrie Canada applicables aux appareils
radio exempts de licence. L’exploitation est autorisée aux deux conditions suivantes : (1)
l’appareil ne doit pas produire de brouillage, et (2) l’utilisateur de l’appareil doit accepter tout
brouillage radioélectrique subi, même si le brouillage est susceptible d’en compromettre le
fonctionnement.
Changes or modifications not expressly approved by the party responsible for compliance could
void the user’s authority to operate the equipment.
This equipment has been tested and found to comply with the limits for a Class B digital device,
pursuant to part 15 of the FCC Rules. These limits are designed to provide reasonable protection
against harmful interference in a residential installation. This equipment generates
uses and can radiate radio frequency energy and, if not installed and used in accordance with
the instructions, may cause harmful interference to radio communications. However, there is
no guarantee that interference will not occur in a particular installation. If this equipment does
cause harmful interference to radio or television reception, which can be determined by turning
the equipment off and on, the user is encouraged to try to correct the interference by one or
more of the following measures:
- Reorient or relocate the receiving antenna.
- Increase the separation between the equipment and receiver.
- Connect the equipment into an outlet on a circuit different from that to which the
receiver is connected.
- Consult the dealer or an experienced radio/TV technician for help.
Other manuals for uThrone OS-8201
1
Table of contents
Other OSIM Indoor Furnishing manuals


