OSTO AST-300H User manual

(Version: V2.0)
Shenzhen OSTO Technology Company Limited
No.43,Longfeng Road,Xinsheng Community,Longgang Street,
Longgang District, 518116 Shenzhen City, Guangdong Province,China.
Consult instructions for use
AST-300H
Electrical Foot Massager and
Nerve Stimulator
Email: [email protected]

CONTENT
Foreword .................................................................................................................................. 3
2. SAFETY GUIDE ..................................................................................................................
2.1 Intended Use & Indications for Use .......................................................................
2.2 Special Population...................................................................................................
2.3 Contraindications ....................................................................................................
2.4 Warnings...................................................................................................................
2.5 Precautions...............................................................................................................
2.6 Adverse Reactions...................................................................................................
1. DEVICE DESCRIPTION........................................................................................................ 4
1.1 General Description of the Device ........................................................................... 4
1.2 Device Drawing .......................................................................................................... 4
6
7
9
10
1.3 Device Components.................................................................................................
1.4 Panel & Keypad .........................................................................................................
1.5 Treatment Modes .....................................................................................................
1.6 Specifications...........................................................................................................
3. USING INSTRUCTIONS .....................................................................................................16
3.1 Operation .................................................................................................................. 16
3.2 Electrode pads guidelines ...................................................................................... 20
3.3 Mode Selection......................................................................................................... 20
3.4 Intensity Selection ................................................................................................... 26
3.5 Auto Functions......................................................................................................... 26
4. CLEANING AND MAINTENANCE ..................................................................................... 27
13
13
13
13
13
15
16
5. STORAGE ........................................................................................................................... 28
6. TROUBLE SHOOTING ....................................................................................................... 28
7. DISPOSAL .......................................................................................................................... 30
8. WARRANTY CARD............................................................................................................. 30
9. LABEL SYMBOLS.............................................................................................................. 31
10. SAFETY, EMC & BIOCOMPATIBILITY ............................................................................ 32
10.1 Safety ...................................................................................................................... 32
10.2 EMC ......................................................................................................................... 32
10.3 Biocompatibility ..................................................................................................... 37
Page 2 of 37

Foreword
Thank you for purchasing our product. Before using, please carefully read the Instruction Manual
of Electrical Foot Massager and Nerve Stimulator, especially the SAFETY GUIDE, so that you can
operate it correctly. The Instruction Manual should be properly kept for your reference at any time.
General Principles
Transcutaneous electrical nerve stimulation (TENS) is a non-invasive analgesic technique that is
used to relieve pain. During TENS, pulsed electrical currents are generated by a portable pulse
generator and delivered across the intact surface of the skin via the self-adhering conducting pads,
namely electrodes. In many cases, this stimulation will greatly reduce or eliminate the pain
sensation felt by patients. Pain relief varies by individual patients, mode selected for therapy and
the type of pain.
Electrical stimulators (EMS) imposes current load on human muscle tissue for the initial purpose of
muscles strengthening and medical rehabilitation, but for a variety of purposes at present. On one
hand, it can relieve muscle spasm skinny and pumping inert, so as to control pains. On the other
hand, moderate movement of muscles is good for muscle strengthening. In short, EMS can
strengthen muscles in addition to mitigating acute or chronic pains.
Page 3 of 37
1. DEVICE DESCRIPTION
1.1 General Description of the Device
Electrical Foot Massager and Nerve Stimulator is a portable multifunctional device powered by
adapter, offering both Transcutaneous Electronic Nerve Stimulator (TENS) and Powered Muscle
Stimulator (PMS).
Electrical Foot Massager and Nerve Stimulator has 25 operation modes, which can give certain
electrical pulse through 4 electrode pads placed on the skin to help users to enjoy body
stimulation and 2 big electrode pads in Electrode Silicon Area for feet placed on the main unit to
help users to enjoy sole stimulation, as well as certain non-electrical rolling massage through one
massage roller.
The electronic stimulatory module has the operating elements of ON/OFF Switch, Display screen,
Mode Selection Key and Intensity Modification Key.
The LCD display screen shows the selected mode, output intensity of body and foot, and time
remaining of the application mode.
The device is equipped with accessories of electrode pads, electrode wire, adapter, remote
controller. The electrode wire is used to connect the pads on the main unit. The adapter is used
to connect the power supply to the device. All the accessories, including adapter, electrode pads,
electrode wire, adapter wires and remote controller can only be changed by professionals. The
electrode pads provided by Shenzhen Context Kang Technology Company Limited can be used
interchangeably, and they meet the biocompatibility standards ISO 10993-5 (Cytotoxicity) and
ISO 10993-10 (Irritation and Sensitization).
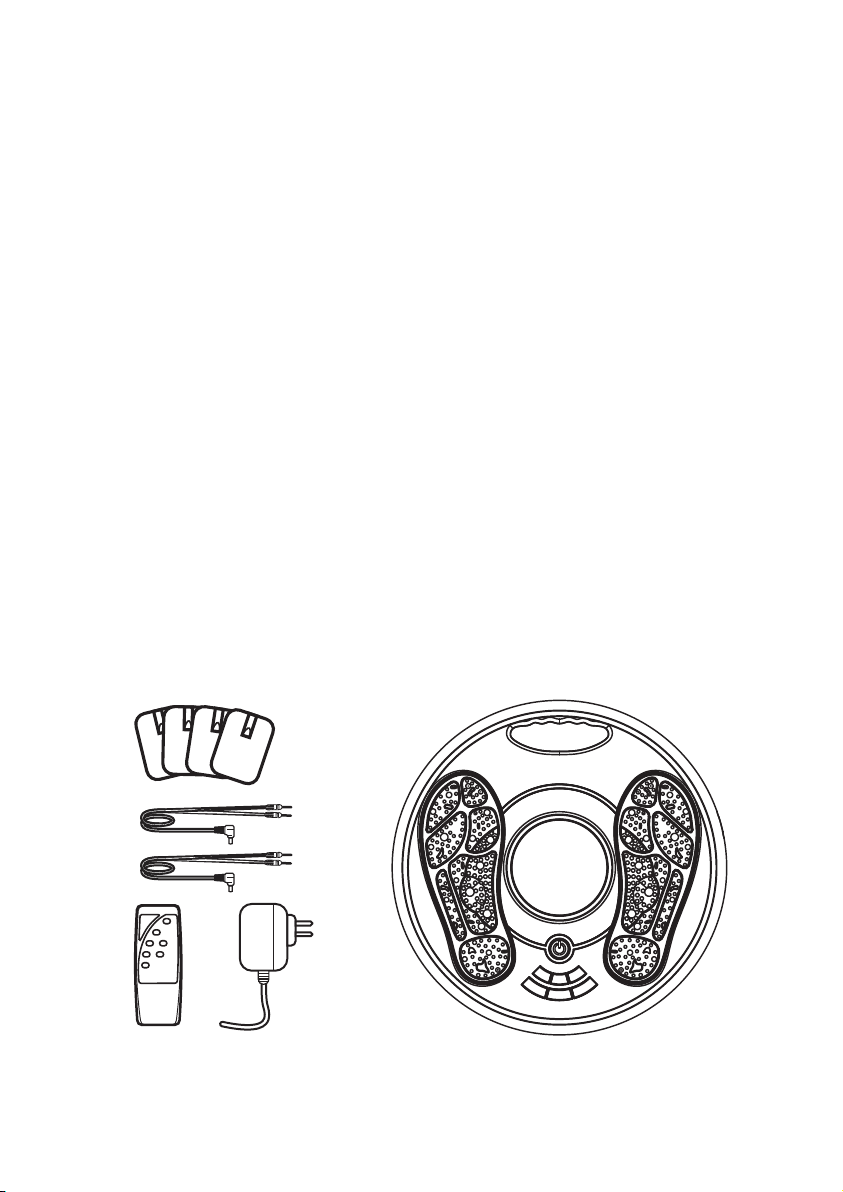
1.2 Device Drawing
Front View of Device
Page 4 of 37

Page 5 of 37
Adapter wire jack
Electrode wires jack
Left View of Device
Right View of Device
Back View of Device
Page 6 of 37
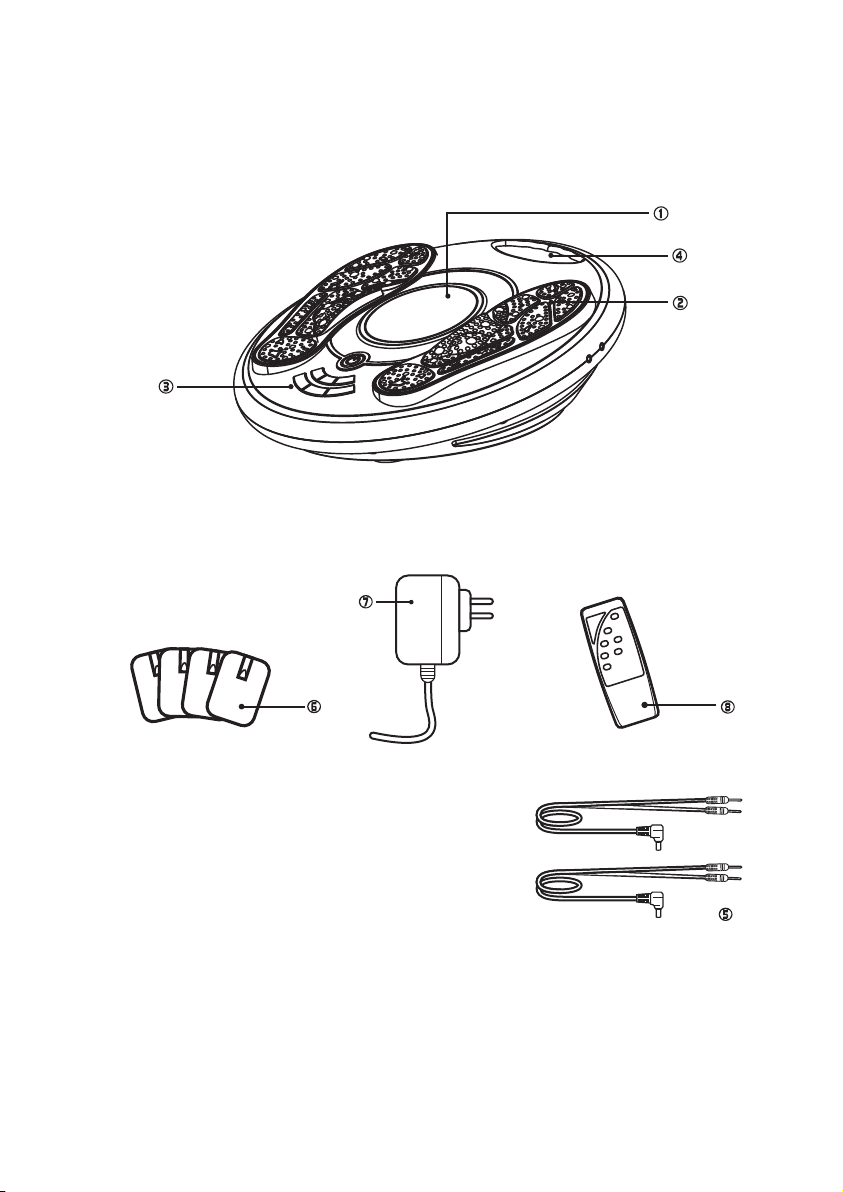
1.3 Device Components
1.3.1 Main Unit
1.3.2 Accessories
1. LCD Screen
2. Foot Conductive Rubbers
3. Button
4. Handle
5. Electrode wires X 2
6. Electrode pads X 4
7. Power adapter X 1
8. Remote controller X 1
Page 7 of 37
MODE
MANUAL
AUTOMATIC
TIME
BODY
LEVEL
FOOT
LEVEL
FOOT +
MODE +
BODY +
BODY -
MODE -
FOOT -
FOOT+
MODE +
BODY +
BODY -
MODE -
FOOT-
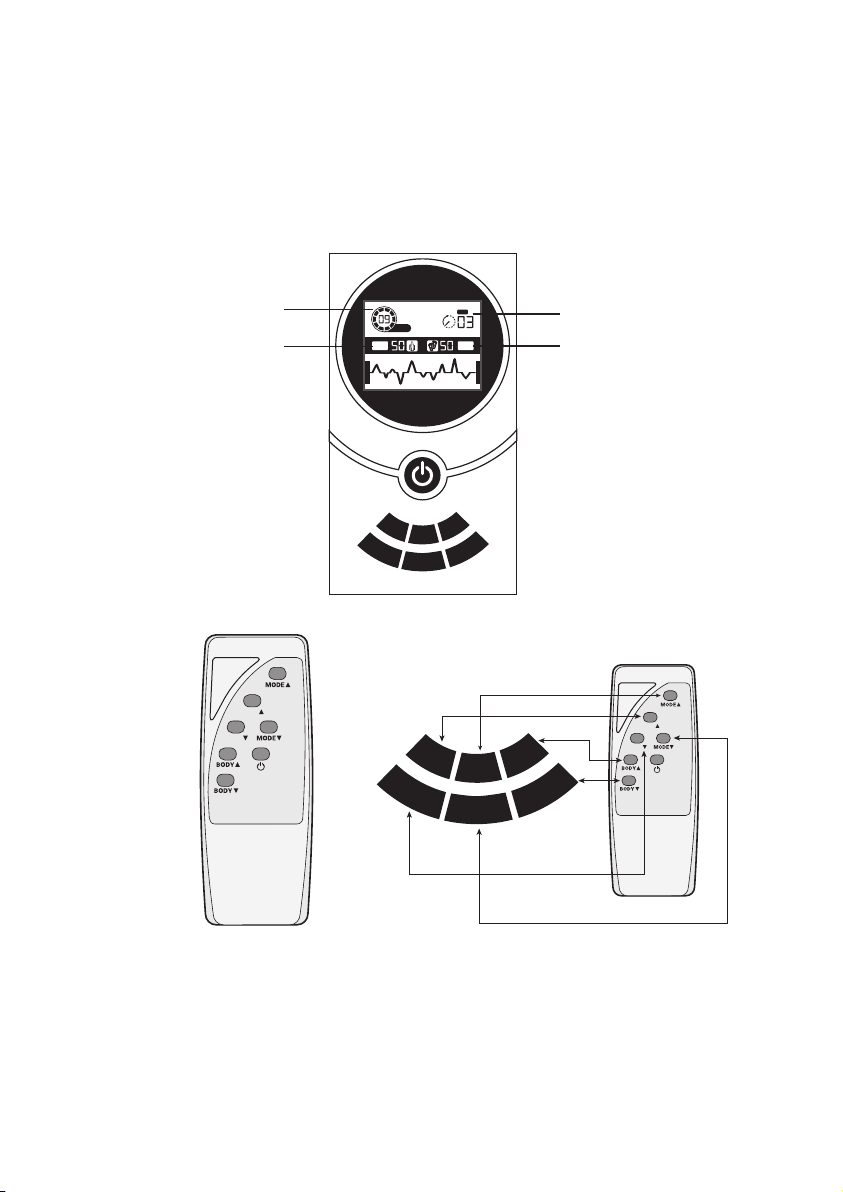
Remaining Time
Output Intensity of Body
Selected Mode
Output Intensity of Foot
1.4 Control Panel & Keypad
Explanation and operating instructions of the LCD panel and keypad of Main Unit and keypad
of Remote Controller are as followings:
LCD panel and keypad of Main Unit
Keypad of Remote Controller
FOOT
FOOT
FOOT
FOOT

EXPLANATION OF BUTTONS
Button Function Description
Main Unit Remote Controller
ON/OFF
Press the on the button about 0.6s on the
main unit to switch on or off the stimulator
Or press the ON/OFF remote controller to switch
on or off the stimulator immediately
When the stimulator is firstly switched on, it
starts atMode 1, Intensity 0by default. When
other mode is selected, the intensity will be
set to level 0 again.
FOOT▲FOOT▲
FOOT FOOT
▲ ▲
Press the button to increase the output intensity
of foot conductive rubber.
When the stimulator is firstly switched on, it
starts atMode 1, Intensity 0by default. When
other mode is selected, the intensity will be set
to level 0 again. Press the FOOT▲ button to
increase the intensity of foot by 1 level
( 99 levels in all).
Press the button to decrease FOOT intensity to
level 0, or press the MODE button to set the
FOOT intensity to level 0. When the stimulator
is switched on, press the FOOT▼ button each
time to decrease the FOOT intensity by 1 level
until level 0.
MODE▲MODE▲
Press the button to choose one mode from 25
pre-mode stimulation modes – upward
When other mode is selected, the intensity will
be set to level 0 again.
MODE ▼MODE▼
Press the button to choose one mode from 25
pre-mode massage modes – downward
When other mode is selected, the intensity will
be set to level 0 again.
Page 8 of 37

Button Function Description
Main Unit Remote Controller
BODY▲BODY▲
Press the button to increase the intensity of
electrode pads. When the stimulator is firstly
switched on, it starts at Mode 1 with the
intensity 0. When other mode is selected, the
output intensity of electrode pads will be set to
level 0 again. Press the BODY▲ button each
time to increase the output intensity of electrode
pads by 1 level ( 99 levels in all).
Press the button to decrease the intensity of
electrode pads to level 0, or press the MODE
button to set the intensity of electrode pads to
level 0.When the stimulator is switched on,
press the BODY▼ button each time to decrease
the intensity of electrode pads by 1 level until level 0.
BODY▼BODY▼
1.5 Treatment Modes
Users can choose Mode 1-8 to stimulate healthy muscles in order to improve and facilitate
muscle performance.
Users can choose Mode 9-25 for temporary relief of pain associated with sore and aching
muscles at the shoulder, waist, back, nape, arm, leg, and foot due to strain from exercise or
normal household work by applying current to stimulate nerve.
* Some people may experience immediate relief from muscle pain or the stimulation from the
foot, while others may feel the treatment effect after several days of regular use. The using
effect varies and depends upon your own conditions and how often you use the device. If the
device is not able to relieve your pain, please consult your physician instead of trying to
increase the intensity of the stimulation.
Page 9 of 37

1.6 Specifications
Basic Unit Characteristics
Power Source
Adaptor Input: 100-240Vac, 50-60Hz, 0.2-0.05A
Output: 5Vdc, 1A
Unit Input: 5Vdc, 1A
- Method of Line Current Isolation Type BF Applied Part
- Patient leakage current Comply with IEC 60601-1 and IEC 60601-2-10
- Normal Condition AC: 54.50µA DC: 0.5µA
- Single Fault Condition AC:120.00µA, DC: 0.6µA
Average DC current through
electrodes when device is on but no
pulses are being applied
<0.01μA
Number of channels 2
Number of modes 25
Output Intensity Level 99 Levels
Output Intensity 0V~122V
Indicator Display Indicate the following information: Power on/off,
Intensity level, selected mode, time remaining of an
application mode.
Time Range (minutes) 25
Main Unit Weight 1.364kg
Weight of accessories Adapter: 62g
Electrode :45g
Remote Controller: 24g
Main Unit Dimension 410mm x 410mm x 140mm
Electrode Pads Size Foot Conductive Rubber: 254mm × 98mm × 13mm,
99.27 cm2
Small: 90mm × 60mm × 3.2mm, 54 cm2
Electrode Wires Length 1815±10mm
AC Adapter Wire Length 1490±10mm
Housing Materials of main unit ABS plastic
Page 10 of 37
0413
10 – 40 ℃
30% RH ~ 75%RH
860 hPa to 1060 hPa
0 – 40 ℃
860 hPa to 1060 hPa
Model number: AST-300H
according to Clause 5.
Wellkang Ltd
SuiteB,29 Harley Street, LONDON W1G 9QR, England,United Kingdom
EC REP
HSMA05U-050100/HSMA05E-050100/HSMA05B-050100
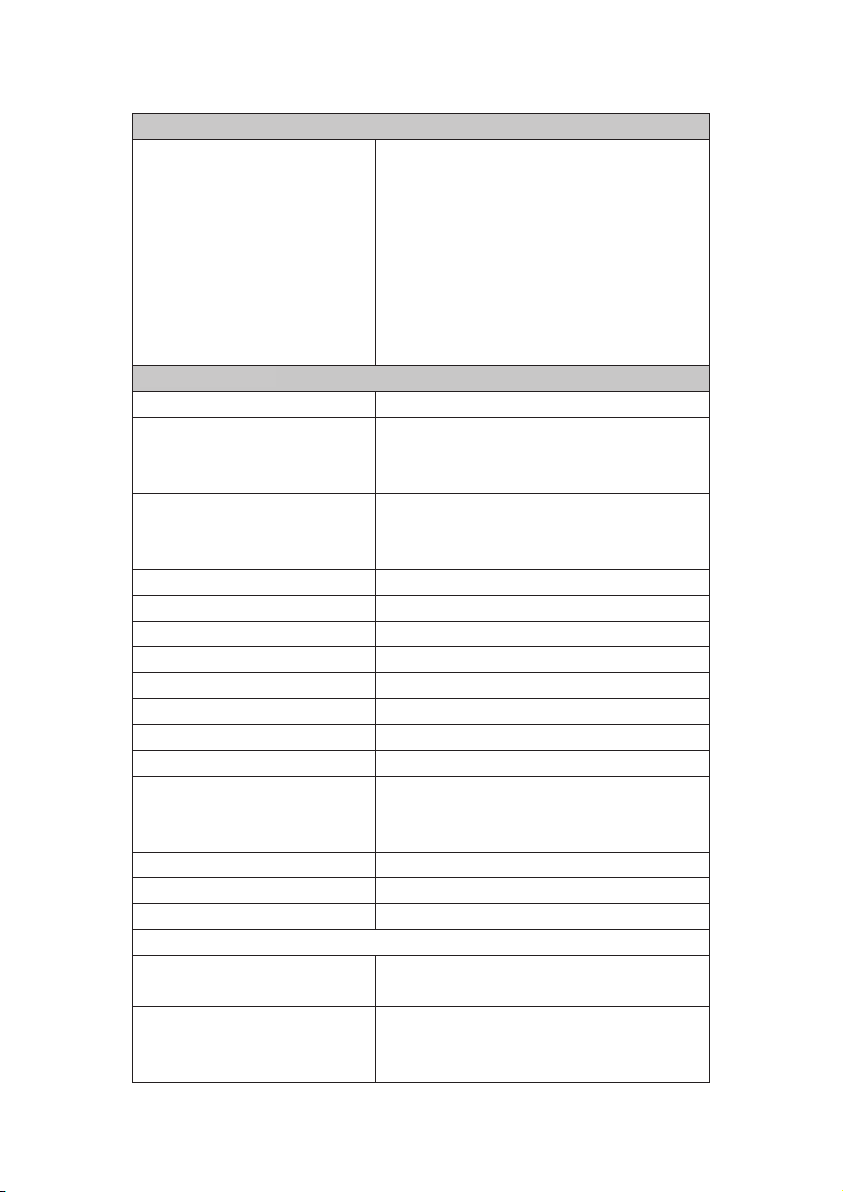
Basic Unit Characteristics
Accessories Materials
Foot Conductive Rubber: PP ( PP conductive
plastic)
Red Transparent Plastic: ABS Plastic
Small Electrode Pads: white silica gel, black
conductive silicone, transparent conductive
adhesive silicone, transparent PET silicone
AC Adapter Housing: ABS plastic
Remove Controller: ABS plastic
Sole Massage Roller: ABS plastic
Output Specification
Waveform and Shape Pulsed, symmetric biphasic, rectangular
Maximum Output Voltage (+/- 10%)
72V @ 500Ω
110V @ 2ΚΩ
122V @ 10ΚΩ
Maximum Output Current (+/- 10%)
144mA @ 500Ω
55mA @ 2ΚΩ
12.2mA @ 10ΚΩ
Net Charge (per pulse) 0µC @ 500Ω
Maximum Phase Charge 12.78µC @ 500Ω
Maximum Average Current 0.968mA @ 500Ω
Maximum Current Density 0.235mA/cm² @ 500Ω
Maximum Power Density 1.38mW/cm² @ 500Ω
Pulse Duration 440µs
Pulse Cycle 52.8ms
Frequency 18.94Hz
Contraction and Relaxation time
Adjustable, due to different modes.
Contraction time: 200ms ~ 56s
Relaxation time: 0~0.5s
Treatment Time 25 min (default)
ON Time 0.6 s
OFF Time 0.6 s
Additional Features
Environment for operation Temperature: 5 ~ 45° C
Humidity: 20 ~ 65% RH
Environment for storage
Temperature: 0 ~ 45° C,
Humidity: 10 ~ 90% RH
Electrode Pad: 10~20° C
Page 11 of 37

Page 12 of 37
Output Specification
Pulse
Duration and
Pulse Cycle
440μs
Specification of Remote Controller:
Type of wireless technology Infrared ray (Wavelength: 940nm)
Operating frequencies 455KHz
Operating voltage 3V
Maximum output powers 0.1W
Operating distances and ranges 15-20m
Intended usage environment Home
Functions Turn on/off the device;
Select mode and the intensity of output.
25 Modes Description
MODE Pattern
1
2
3
4
5
6
7
8
9
10
11
12
13
14
15
16
17
18
19
20
21
22
23
24
25
Accupuncture Pushing
Accupuncture
Accupuncture Kneading
Accupuncture Tapping
Scrapping
Squeezing
Massage
Pushing Massage
Pushing Squeezing
Accupuncture Squeezing
Accupuncture Hammering
Kneading
Thumping
Scrapping Pressing
Cupping
Body Shaping
Hammering
Massage Tapping
Pushing
Rolling Pounding
Massage Shiatsu
Stroke
Acupuncturetherapy Massage
Shiatsu
Rolling Kneading

2. SAFETY GUIDE
Please carefully read the whole Instruction Manual before you use Electrical Foot Massager and
Nerve Stimulator (Common name: electronic stimulator, hereafter referred to as the stimulator)
for better understanding the working principle of this product. If you are unsure whether a
medical condition should preclude you from using the device, please consult your
physiotherapist, osteopath, or medical practitioner. Do not use the device during the heavy days
of your period.
The Health Expert Electronic Stimulator is intended to use on healthy muscles only.
2.1 Intended Use & Indications
PMS (Mode 1 ~ 8):
It is intended to stimulate healthy muscles in order to improve or facilitate muscle
performance.
TENS (Mode 9~25):
To be used for temporary relief of pain associated with sore and aching muscles at the
shoulder, waist, back, nape , arm, leg, and foot due to strain from exercise or
normal household work activities by applying current to stimulate nerve.
2.2 Targeted Users
1. The Health Expert Electronic Stimulator is mainly used for adults, not for any children.
2. The Stimulator is not used for patient during pregnancy.
2.3 Contraindications
For the following patients, they only can use the stimulator after consulting doctors; otherwise
it may lead to accident or physical discomfort:
1. Patients who have a cardiac pacemaker, implanted defibrillator, or other implanted metallic
or electronic device. Electric shock, burns, electrical interference, or death may be caused
if such patients use the stimulator.
2. Patients whose pain syndromes are undiagnosed.
3. During pregnancy.
4. Children.
2.4 Warnings
1. The stimulator should be started with stimulation at lower levels for shorter periods of time
before increasing the time and intensity, and always keeping the intensity below the level
of discomfort.
2.
If you are in the care of a physician, please consult your physician before using the stimulator.
Page 13 of 37

3. If you have undergone any medical or physical treatment for your pain, please consult your
physician before using the stimulator.
4. If your pain is not relieved, becomes severe, or continues for more than five days, please
stop using the stimulator and consult your physician.
5. Do not put the electrodes on the side or front of the neck because such action could cause
severe muscle spasms resulting in closure of the airway, difficulty in breathing, or adverse
effects on heart rhythm or blood pressure.
6. Do not apply stimulation across your chest because the introduction of electrical current
into the chest may cause rhythm disturbances to your heart, which could be lethal.
7. The device should never be applied on the head or face..
8. Do not use in case of critical ischemia of the limbs.
9. Do not apply stimulation over open wounds or rashes, or over swollen, red, infected, or
inflamed areas or skin eruptions (e.g., phlebitis, thrombophlebitis or varicose veins).
10. Do not apply stimulation over, or in proximity to, cancerous lesions.
11. Do not apply stimulation in the presence of electronic monitoring equipment (e.g., cardiac
monitors, ECG alarms), which may not operate properly when the electrical stimulation
device is in use.
12. Do not apply stimulation when in the bath or shower.
13. Do not apply stimulation while sleeping.
14. Do not apply stimulation while driving, operating machinery, or during any activity in which
electrical stimulation can put you at risk of injury;
15. Do not use the device on children;
16. Do not apply stimulation over the carotid sinus nerves, particularly in patients with a
known sensitivity tothe carotid sinus reflex.
17. Do not apply stimulation transcerebrally.
18. Please consult your physician before using the stimulator, because the device may cause
lethal rhythm disturbances to the heart in susceptible individuals.
19. Apply stimulation only to normal, intact, clean, healthy skin.
20. The electrode pads should only be used by single patient for hygiene.
21. The electrode pads are for external use only.
22. Do not place pads over jewelry or body piercings.
23. Do not place the electrodes on opposite legs.
24. Use this device only with the leads, electrodes, and accessories supplied by the
manufacturer.
25. The electrical performance characteristics of the electrode gel may affect the safety and
effectiveness of electrical stimulation and recording.
26. Using stimulation electrodes that are too small or incorrectly applied could result in
discomfort or skin burns.
27. You should secure the limb(s) to prevent involuntary movement and should be seated or
Page 14 of 37

lying down while stimulating the lower body.
28. Please consult your physician before use:
a) If you have any serious illness or injury not mentioned in this guide.
b) If you are taking insulin for diabetes.
c) If you are using the device as part of a rehabilitation program.
d) If you have a tendency to bleed internally following an injury.
2.5 Precautions
1. The stimulator is not effective for pain of central origin, including headache.
2. The stimulator is not a substitute for pain medications and other pain management
therapies.
3. The stimulator has no curative value.
4. The stimulator is a symptomatic treatment and, as such, suppresses the sensation of pain
that would otherwise serve as a protective mechanism.
5. Effectiveness is highly dependent upon patient selection by a practitioner qualified in the
management of patients with pain.
6. The long-term effects of electrical stimulation are unknown.
7. The safety of electrical stimulation during pregnancy has not been established; Do not
use the stimulator during the pregnancy.
8. You may experience skin irritation or hypersensitivity due to the electrical stimulation or
electrical conductive medium (gel);
9. If you have suspected or diagnosed heart disease, you should follow precautions
recommended by your physician.
10. If you have suspected or diagnosed epilepsy, you should follow precautions
recommended by your physician.
11. Do not use the device in the following circumstances:
a) When there is a tendency to hemorrhagefollowing acute trauma or fracture.
b) Following recent surgical procedures when stimulation may disrupt the healing
process.
c) Over the menstruating or pregnant uterus.
d) Over areas of the skin which lack normal sensation.
12. Please keep the stimulator and accessories out of the reach of children.
13. Please use the stimulator only with the leads, electrode pads, and accessories
recommended by the manufacturer.
14. Never apply the pads to your skin with the power on, which may result in sudden shock.
If you want to move the pads to another body part during application, please switch off
the device first, and then move the pads on the place that you want to stimulate.
.
15. Two pads should be used together as a pair. Make sure to peel off the protective film on the
pads before use. Do not connect two pads on each other to avoid an electrical short.
Page 15 of 37
16. Do not apply pads on the same spot for over 25 minutes at atime.
17. Do not use the product in the condition of air mixed with flammable gases.
18. Never use this product near a microwave oven or other high frequency equipment.
19. Do not operate the product in close proximity (e.g. 1m/3ft) to shortwave therapy
equipment; it may produce instability in stimulator output.
20. Do not place electrode pads on opposite sides of your head.
21. Do not sit or stand on the electronic stimulator.
22. Do not use electrodes over areas of skin that lack normal sensation.
23. Please replace self-adhesive electrode pads if they no longer stick firmly to your skin.
24. Do not use if the device has to be placed over areas at which drugs/medicines are
administered (short-term or long-term) by injection (e.g. hormone treatment)
25. Minor redness at stimulation placement is a normal skin reaction. It is not considered a
skin irritation, and it will normally disappear within 30 minutes after the electrodes are
removed. If the redness does not disappear after 30 minutes from the removal of
electrodes, do not use the stimulator again until the excessive redness has
disappeared.
2.6 Adverse Reactions
1. You may experience skin irritation and burns beneath the stimulation electrodes applied
on your skin;
2. You should stop using the device and consult your physicians if you experience adverse
reactions from the device.
Page 16 of 37
3. USING INSTRUCTIONS
3.1 Operation
How to use OSITO electronic stimulator
Suggestion: Before using the foot massager stimulator, it is better to drink a lot of water and
moisturize the Foot to improve conductivity and stimulation. If your feet are too dry, it would
be Better to soak your feet in warm water for about 10-15 minutes.
Notice: OSITO electronic stimulator does not vibrate!
3.1.1 How to turn on the electronic stimulator.
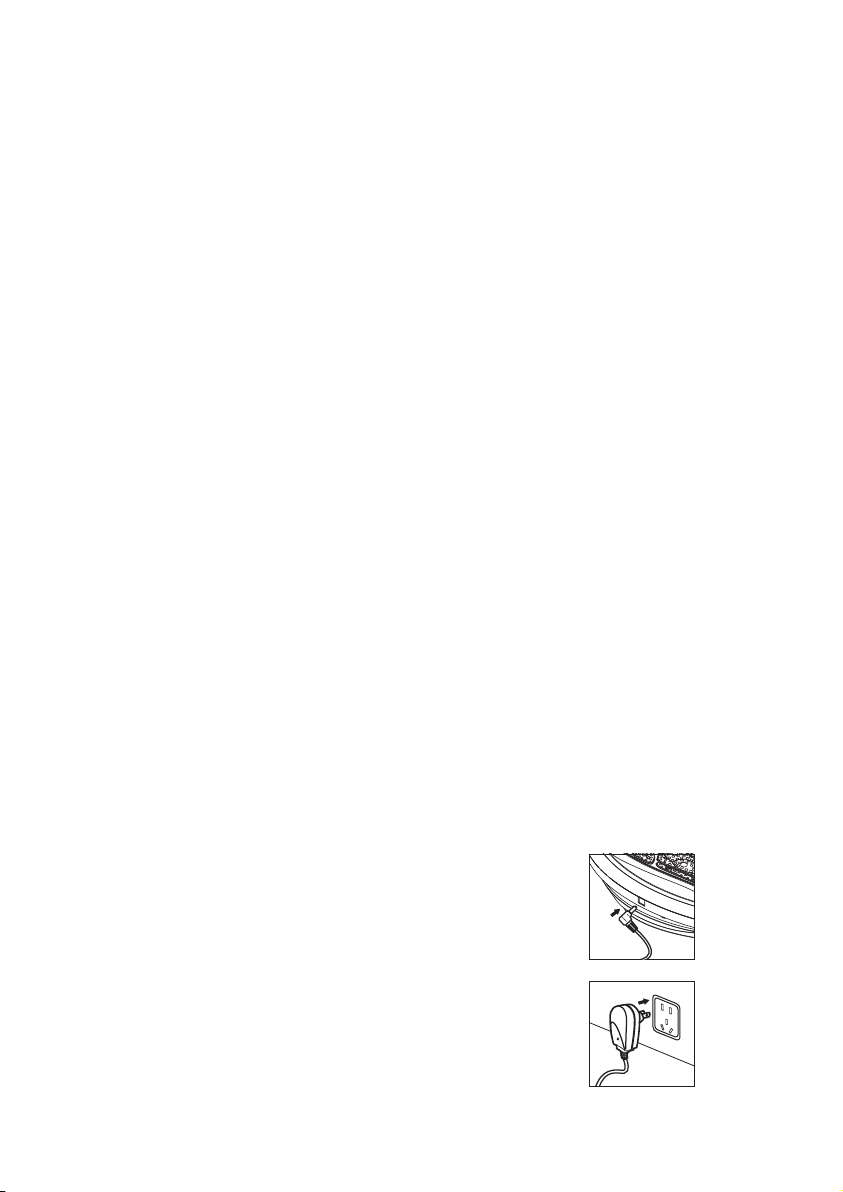
1. Plug the small end of power adapter cord into the adapter
wire jack on the left side of the machine.
2. Plug the power adapter into the electrical outlet, once the power is on,
the LED light and the LCD display will flash one time, it means that the
machine is powered on, but doesn’t mean the machine is turned on.

Page 17 of 37
3. Find a comfortable seat and place your bare feet on the foot
conductive rubber.
Note: please make sure you remove all footwear, no any socks
or stockings.
4. Press the ON/OFF button on the device about 0.6 seconds or
press the on remote controller to turn on the electronic stimulator.
5. Choose the MODE.
Press the “MODE▲”&“MODE▼” button on the device control panel or
remote controller keyboard to select the mode, totaling 25 modes.
Choose a comfortable mode is OK.
6. Increase the FOOT intensity.
Press the button “FOOT▲”on the device control panel or remote
controller keyboard to select the stimulating intensity level,
totaling 99 intensity levels. Increase the intensity slowly until you
find the desired and comfortable level. If too strong, you can press
the “FOOT▼” button to decrease the intensity level.
3.1.2 How to Use the Electrode Pads
As a big TENS unit, electrode pads are used to deliver electrical stimulation to the knees, shoulders,
back or arms. The device is equipped with 4 electrode pads in total, and each two of them is fitted
with 1 electrode wire.
1. Connect electrode pads on the electrode wires.
Note: One end of each electrode wire has a red and a white connector pin,
the colors indicate positive and negative, The connection between electrode
pads and connector pin is arbitrarily.
2. Plug the other end of the electrode wire plug into the jack on the right side of
the machine.
Warm tips: According to FDA's safety regulation, this machine can’t set a defaulted
stimulus intensity, because the working principle of OSITO Electronic Stimulator is
electrical pulse stimulation. When the machine starts, the instantaneous current may be
rather strong to hurt your feet. Therefore, when the machine is turned on each time, the
intensity has to start from 0 so as to avoid injury to the foot. Moreover, the strength of
stimulus are also a little different for different weather, humidity, and physique conditions.
SOLE +
MODE +
BODY +
BODY -
MODE -
SOLE -
FOOT+
MODE +
BODY +
BODY -
MODE -
FOOT-
FOOT
OOT
FOOT
FOOT
OT
Page 18 of 37
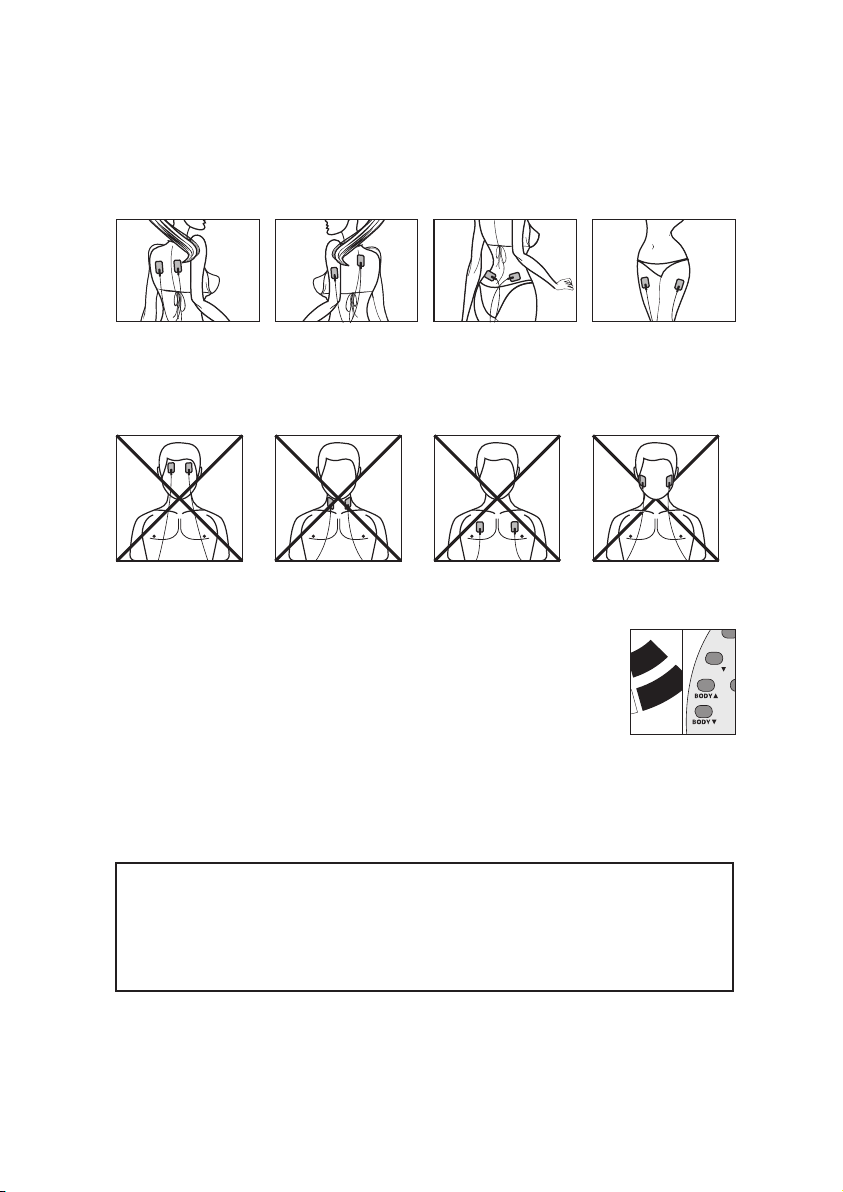
3. Place the electrode pads on the body parts where you want to treat (see 3.2 for details).
Warning: To avoid an electrical shock, do not put two electrode pads overlap or put only small part of
your foot on the foot conductive rubbers.
SOLE +
MODE +
BODY +
BODY -
MODE -
SOLE -
FOOT
FOOT
Do NOT use the electrode pads on your head, face, front neck or chest.
4. Press the “BODY▲” button to increase the intensity, the intensity level is the
same as FOOT setting from 0-99, choose the proper comfortable level to use.
If too strong, please press “BODY▼” to decrease the intensity.
Note: When choosing the FOOT or BODY intensity, please start at lower levels for
shorter periods of time before increasing the intensity, and always keeping the
intensity below the level of discomfort.
TIPS: You can use the machine only for foot stimulation without electrode pads,or use
electrode pads separately, or use both foot stimulation and electrode pads at the same time.
You are free to use it as you like.
How long should I use the machine?
How long should I use the elecroded pads?
Note: After using, it is normal to feel tingling or varying sensations in your calf muscles.
The default using time of OSITO foot stimulator is 25 minutes. If you want to use longer time,
you can turn on the machine again to use. Better 1 or 2 times a day.
The defaulted using time is 25 minutes, 2 or 3 times a day is better.
Page 19 of 37
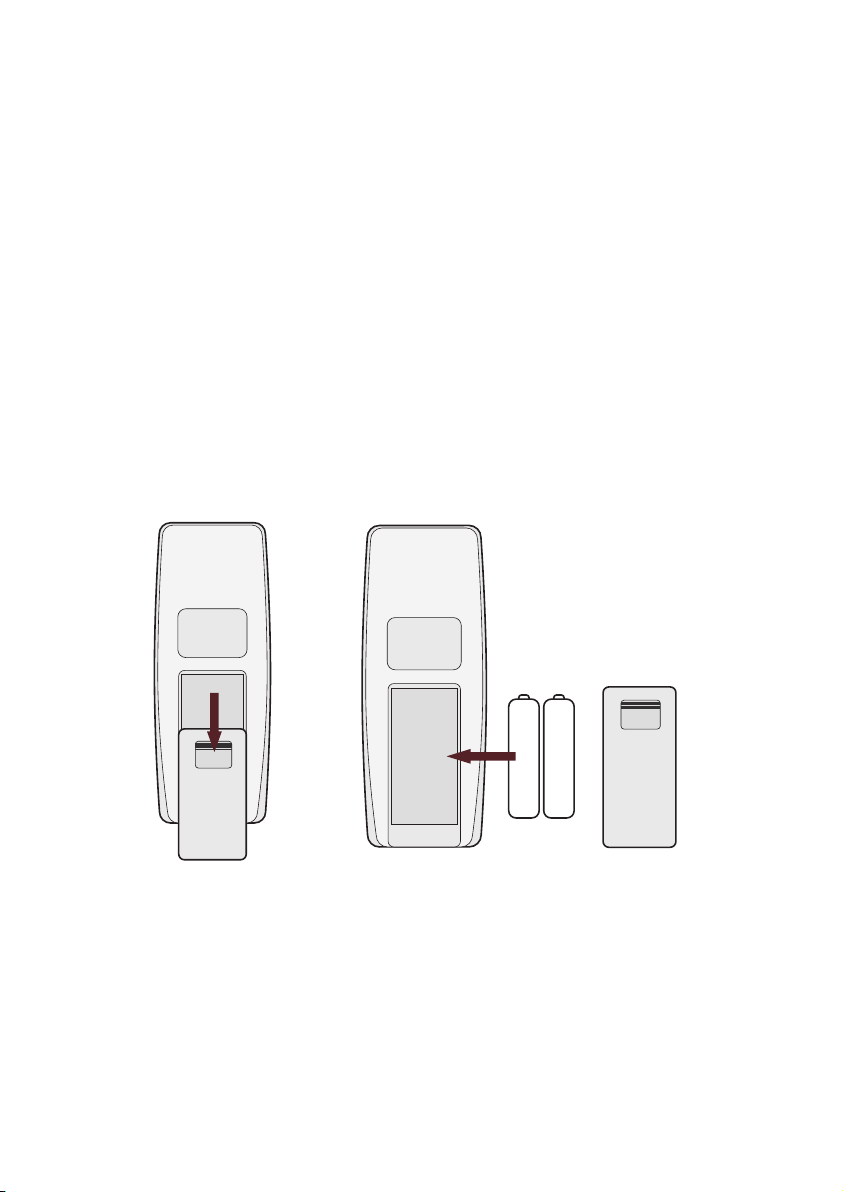
How to operate the remote control?
1. Open the battery cover behind the remote controller.
2. Put the two 7﹟(AAA) batteries into battery holder in correct polarities.
3. Close the battery cover.
4. The functions of buttons on the remote controller are the same as those on the main unit
(See 2.4 for details).
If you feel pain or discomfort, please do as below:
Remove one or both feet from the foot conductive rubbers to stop the stimulation.
Press “FOOT▼” button on the control panel or remote controller to decrease the intensity level, then
re-put your feet on OSITO to use it again.

3.2 Instructions for Electrode Pads
1. Only use the electrode pads supplied by the manufacturer; other electrode pads may
have a risk of unsuitable electrical characteristics with your stimulator.
2. The side of electrode pad is 88mm × 58mm × 3.2mm, 50.04 cm2.
3. Do not use the electrode pads on different people. Otherwise, skin reaction or cross
contamination may occur.
4. Please always turn power off before removing or repositioning the electrodes.
5. Please wash skin thoroughly, and then dry it before applying the electrodes.
6.
Please apply the whole surface of the electrode pads firmly tothe skin. Do not use electrode
pads that do not stick properly to the skin or only partially stick tothe skin.
7. In case of skin redness under the electrode pads after stimulation, do not stimulate in the
same place if skin redness is still evident.
3.3 Mode Selection
Press the MODE▲or MODE▼button to select MODE. After selecting the mode, the default
intensity is set to ‘0’. Please press FOOT▲, BODY▲and FOOT▼, BODY▼button to
increase/decrease the intensity of body or foot.
The charts below are merely a suggestion for where to place the electrodes, what mode to
choose and how long to stimulate, but only after the user has gone through the starting
procedure (above) and is familiar with the device.
Usage Figure Note
Muscle Stimulation (Mode 1-8)
Stimulate Muscle at Shoulder
Apply the electrode pads on shoulder.
It is intended to stimulate healthy muscles in order to
improve and facilitate muscle performance of the shoulder.
For 25 minutes; twice or 3 times a day.
Stimulate Muscle at Back
Apply the electrode pads on back.
It is intended to stimulate healthy muscles in order to
improve and facilitate muscle performance of the back.
For 25 minutes; twice or 3 times a day.
Stimulate Muscle at Waist
Apply the electrode pads on waist.
It is intended to stimulate healthy muscles in order to
improve and facilitate muscle performance of the waist.
For 25 minutes; twice or 3 times a day.
Page 20 of 37
Table of contents
Other OSTO Massager manuals


