OTG HyperDrive Album User manual


Thank you for purchasing the HyperDrive Album, a high performance photo
backup device designed for professional and casual photographers alike.
Important Statement
Should you lose any data because of improper usage, incompatible memory cards, computer
viruses, hard drive or product malfunctions or any other reason, our liability is only limited to
repairing or replacing your device within the warranty period. We will not be responsible for any
data loss or any nancial loss as a result of using our product. By using the product, you accept
the terms and conditions stated herein. If you do not accept, kindly return the unused product
to the dealer whom you purchase from.
Please test this product and familiarize yourself with its operations by reading this user manual
before actual usage.
Extended usage may cause the device to become hot. This is not a malfunction. Connect the
device to AC power supply when performing extended data transfers with the computer to
prevent loss of battery power or data loss.

INTRODUCTION
Getting to Know Your Device
BASIC OPERATIONS
Charging the Internal Battery
BASIC OPERATIONS
Power Switch On/O
BASIC OPERATIONS
Button Functions
BASIC OPERATIONS
Navigating
IMAGES
Backing Up
IMAGES
Browsing Images
06
07
09
12
05
03

IMAGES
Full-Screen Images
IMAGES
Zooming In/Out and Setting Images as Wallpaper
IMAGES
Recovering Images
CONNECTIONS
Connecting to a Computer
SETTINGS
Customizing the Backlight
Changing the Operating System Language and Backup Settings
Diagnosing the Hard Drive
Updating Firmware
Formatting the Hard Drive
Conguring System Sounds, Auto Shutdown and Factory Reset
24
26


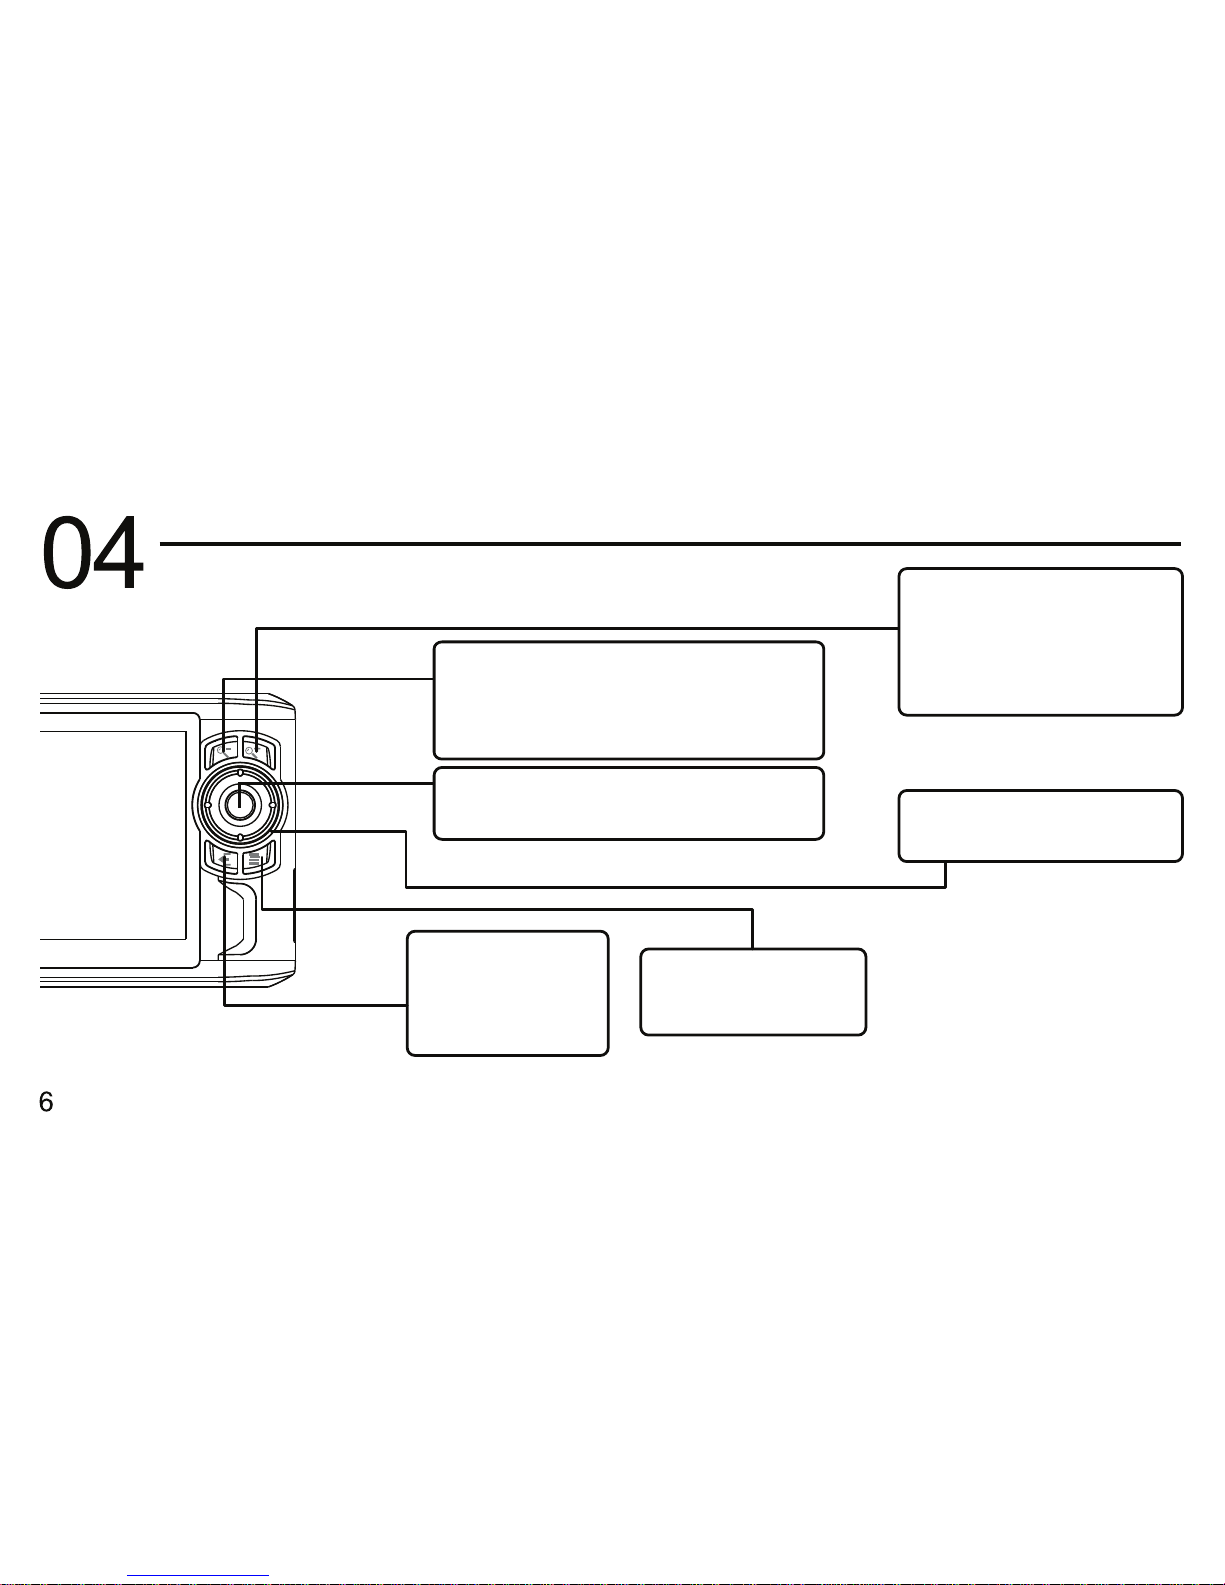
INTRODUCTION
Getting to Know Your Device
Zoom-Out Zoom-In
OK
Directional Pad
Menu (Fn)
Exit
Power Switch
LCD Screen
Reset Button
Charging / Power
Indicator Lights
Bottom

INTRODUCTION
Getting to Know Your Device
SD Card Slot
CF Card Slot
DC Port
Mini USB Port
DC Port
Mini USB Port
USB Port
Album Album OTG

BASIC OPERATIONS
Charging the Internal Battery
Charging with the Mini USB cable
Charging with the AC adapter
5V/500mA DC
5V/2A DC
Power o the device and connect it
to a USB port on your computer with
the Mini USB cable. Do not connect
through a USB hub.
Connect the device to a wall power socket
with the provided AC adapter. You can
continue to use the device while it is charging
Note: USB power can only recharge the battery. It is insucient to power and
operate the device. It will take 6 hours to full charge the battery from empty.
DC Port
Mini USB Port

BASIC OPERATIONS
Charging the Internal Battery
Charging Status
Yellow Light On Charging
Charging Completed
Charging Indicator

BASIC OPERATIONS
Powering the Device On
Power Indicator
Powering the Device Off
Power Status
Green Light On Power On
NOTE
Powering the Device On/O
Slide and hold the power switch until
you hear a beep sound.
Slide the power switch. A dialog
box will appear conrming power o.
Select "Yes".
If you cannot power the device o,
return to the Main Menu and try again.
BASIC OPERATIONS
Button Functions
Zoom-Out:
Zoom-In:
OK:
Conrm selected option. Directional Pad
Exit:
Exit the current
function, dialog
box or menu.
Menu (Fn)
Access sub-menus.
Zoom out of an image during
image browsing. Also a shortcut
key for some menu functions.
Zoom in on an image
during image browsing.
Also a shortcut key for
some menu functions.
Select options or images

BASIC OPERATIONS
Navigating
Main Menu Dialog Box
1. Highlight function with the
directional pad.
2. Press the OK button.
1. Select an option with the
directional pad.
2. Press the OK button.

BASIC OPERATIONS
Navigating
1. Select a menu option with the directional pad.
Sub-Menus
2. Press the OK button.

IMAGES
Backing Up Images
Connecting USB Devices to Album OTG
Inserting Memory Cards into Album
Memory Card
USB Memory Card Reader
USB Flash Drive
Digital Camera
CF
SD

IMAGES
Backing Up Images
Upload Menu Options
Upload all images/data from
memory card or USB device
Backup Folder Only upload selected folder and
all its contents within.
Incremental
Backup
Browse Images
Full Backup
For Album, insert a memory card and select Backup from the Main Menu to open the Backup menu.
Then, select a Backup option.
For Album OTG, the Backup menu will open automatically when you connect a USB device. If it does not,
return to the Main Menu and select Backup.
Analyze the source device and
backup all images added since the
latest backup.
Browse images on the source
device (no backup).

IMAGES
Backing Up Images
Backup Window
Backed Up Files
NOTE
Image Preview
File Name, Copying Speed, Total Number of Files
Progress Bar
Press the Exit button at any time to cancel a backup. You may have to press Exit a few times if the system is busy.
The contents of each backup are saved in a separate folder named "BACKUP.xxx" in the main directory of
the device, where "xxx" is a number that increases sequentially with each backup (e.g. BACKUP.001,
BACKUP.002 etc.) With Album, you can specify the backup folder destination.
Status

Images
Browsing Images
Internal Hard Drive Removable Memory
1. Select Browse from the Main Menu. 2. Select a drive.

IMAGES
Browsing Images
3. Select a folder. 4. Select a thumbnail image to view it full-screen.
Folder Icons:
Folder Containing
Images
Folder Containing
No Images
Folder Containing
Other Folders
Image with
thumbnail
Non-supported
Image
RAW Image
Image without
thumbnail
Thumbnail Icons:
Note: You may still view a supported image full-screen even
if it does not have an embedded thumbnail.

IMAGES
Browsing Images
1. Press the Menu button.
Toggle Thumbnail Displays
2. Select View Methods.
3. Select View
You can also toggle with
the Zoom-In/Out buttons
Zoom-In List View
Zoom-Out Icon View
NOTE
Icon View
List View
Table of contents


