oticon ConnectLine Streamer Pro 1.3A User manual

Streamer Pro
1.3A
ConnectLine
Instructions for use

Introduction to this booklet
This booklet gives you guidance on how to use and maintain your new Streamer
Pro. Please read the booklet carefully, including the Warning section. This will
help you achieve the full benefit of your Streamer Pro.
If you have additional questions about the use of your Streamer, please contact
your hearing care professional.
For your convenience, this booklet contains the below navigation bar to help you
navigate easily through the different sections.
About Start-up Handling Functions Warnings More info
Intended use
Intended use Streamer Pro is intended to be used by Oticon wireless hearing aid
users. The product is intended to be used together with the given
hearing solution. Streamer Pro is a communication interface between
the hearing aid and other devices such as mobile phones. Streamer Pro
can be connected to a range of external (additional) devices to enable
the hearing aid user to better hear a TV or to communicate through
Bluetooth-enabled mobile phones, etc.
Streamer Pro can also be used as a remote control that enables you to
adjust the hearing aid volume and change programs in the hearing aid.
Indications for use No indications for use.
Intended user Adults and children older than 36 months.
User environment Indoor/Outdoor.
Contraindications Users of active implants must pay special attention when using the
device. For more information, read the Warning section.
Clinical benefits See clinical benefits of the hearing aid.

Table of content
About
Package content 6
Accessories and spare parts 8
Streamer overview 11
Start-up
Use the Streamer with the neck loop 12
Use the Streamer without the neck loop 14
Turn the Streamer ON and OFF 16
Remote control of the hearing aid 18
Pair the Streamer 20
Charge the Streamer 22
Handling
Low battery indication 24
Clear pairing 28
Cleaning and maintenance 31
Functions
Primary functions 32
Mobile phone 33
ConnectLine phone solution 40
ConnectLine microphone 42
ConnectLine TV solution 44
ConnectLine App 46
Secondary functions 47
Music or audio cable 48
Headset cable 50
Music or audio wireless 52
Headset – wireless 54
T-coil (built-in) 56
FM receiver (optional) 58
Warnings
Warnings 60
More info
Conditions of use 64
International warranty 65
Warranty 66
Technical information 67
Streamer Pro
1.3A
ConnectLine
Instructions for use
6 7
About Start-up Handling Functions Warnings More info
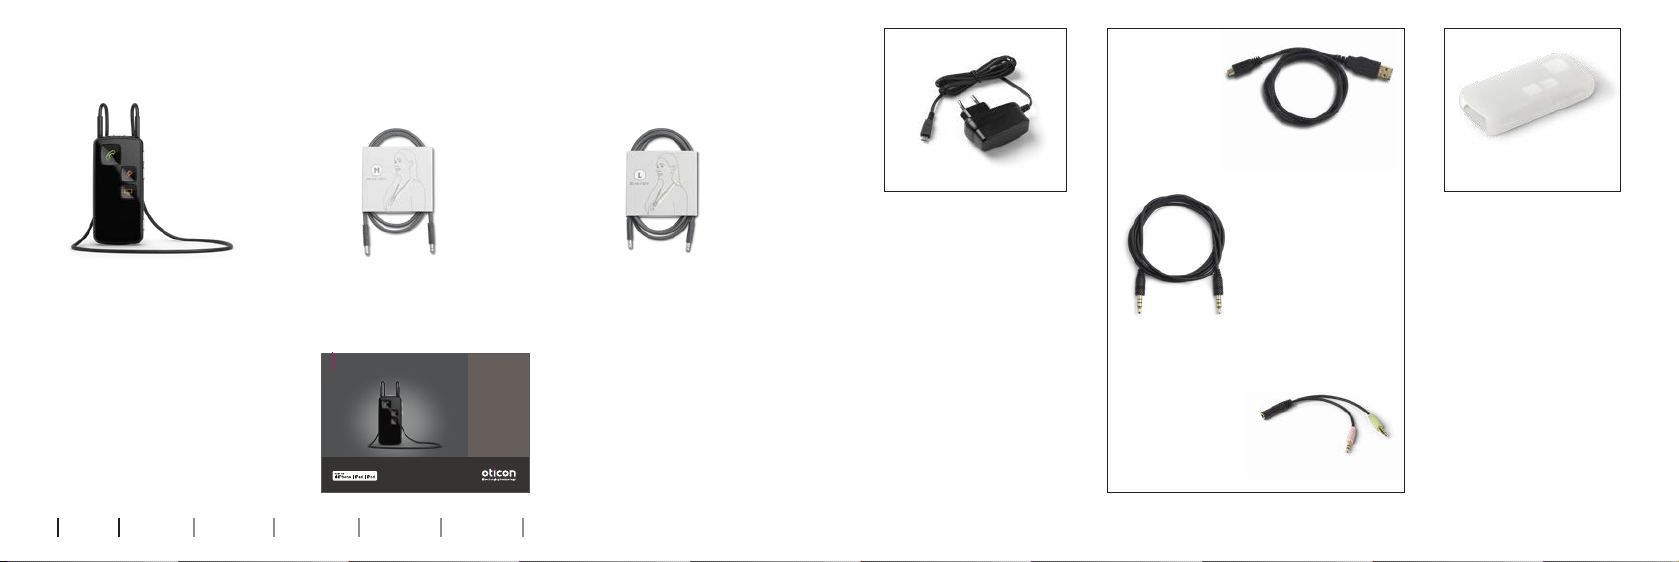
Package content
The package consists of the following elements:
Streamer Pro
1.3A
Protective skin
Box 3Box 1 Box 2
Neck loop – medium Neck loop – long
Charger
This booklet (Instructions for use)
3.5 mm mini
jack stereo
cable for MP3
or music
USB charger
cable
3.5 mm headset
splitter cable
for use with PCs
Power supply will vary from
country to country.
About

8 9
About Start-up Handling Functions Warnings More info
Accessories and spare parts
Protective skins
Additional protective skins, dark or light grey, are
available from your hearing care professional.
Protective skins – single button
A protective skins, dark or light grey, with one
protruding button, which makes “blind” operation
easier, are available from your hearing care
professional.
Replacement neck loops
Replacement neck loops, black or white,
are available in three sizes: Short (51
cm), medium (66 cm) and long (81 cm)
from your hearing care professional.
Belt clip
A belt clip, black or white, is available from your
hearing care professional.

10 11
About Start-up Handling Functions Warnings More info
Streamer overview
Microphone
Volume control
(up/down)
Neck loop in/out
Neck loop
Phone
TV
AUX selector
Microphone inlet
ON/OFF button
Status
indicator
ON/OFF indicator
Pairing Charging
Battery
Mini jack
FM receiver
Power supply
ON/OFF
IMPORTANT NOTICE
Please refer to your hearing aid’s Instructions for use for details on the functionality of
your specific hearing aid solution.

12 13
About Start-up Handling Functions Warnings More info
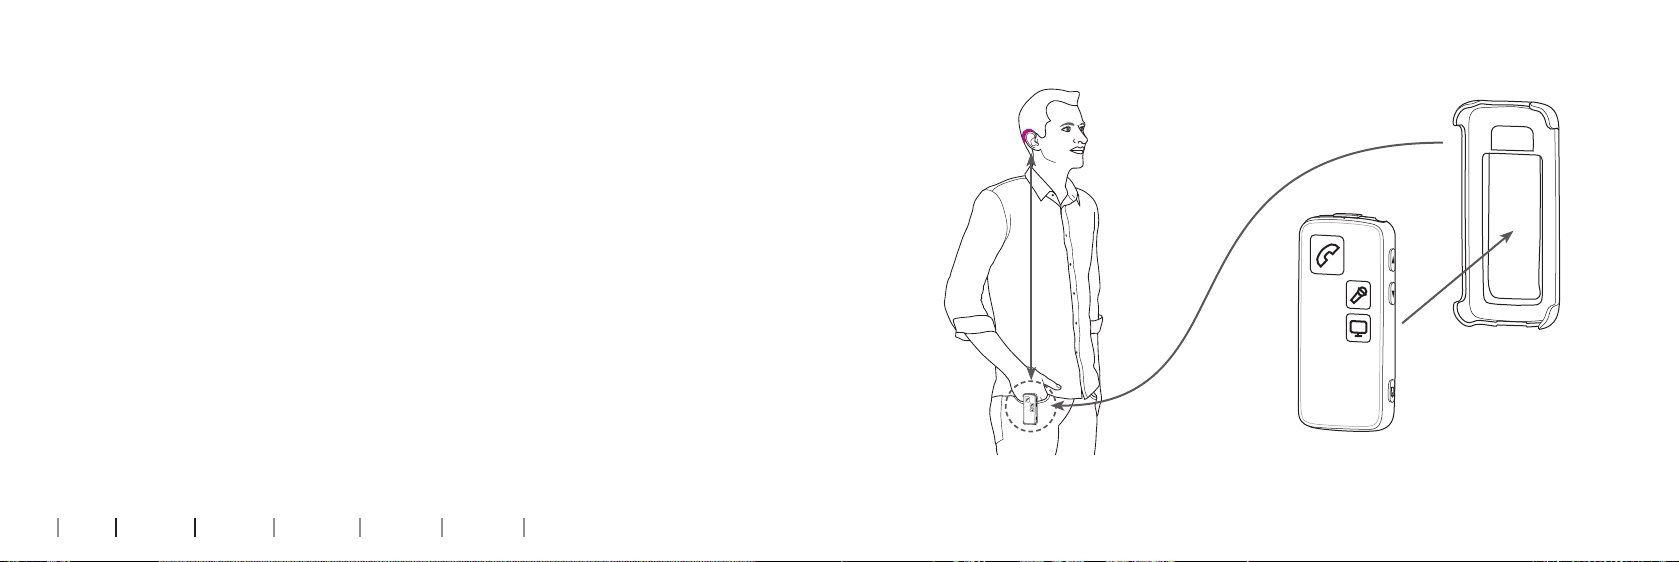
Use the Streamer with the neck loop
The neck loop is an integral part of the Streamer’s electronic system. It is used as
an antenna to transmit sound to your hearing aids.
For the best possible sound and longest possible streaming time, the Streamer
should always be worn with one of the included neck loops. The Streamer comes
with two neck loops, a long and a medium.
IMPORTANT NOTICE
Please use the neck loop carefully. To avoid strangulation the neck loop will
automatically release if it gets caught in something. Do not shorten or modify the neck
loop in any way, such as tie a knot to shorten the length. If a neck loop breaks, it cannot
be repaired and must be replaced immediately. Consult your hearing care professional
for a replacement.
Insert the neck loop
The neck loop snaps into the holes on the top of
the Streamer.
Note that when talking to somebody through the
Streamer, it is important that your voice can be
picked up by the built-in microphone on the top.
Microphone
Your
voice
Sound from
Streamer to
hearing aids
Start-up
14 15
About Start-up Handling Functions Warnings More info
Use the Streamer without the neck loop
When using the Streamer without the neck loop, the distance to the hearing aid
should be less than one metre. You may experience drop-outs in sound, which is
why we always recommend using the neck loop.
When using the Streamer without the neck loop, more power will be used –
consequently maximum streaming time is reduced to 5 hours on one full charge.
Max 1 metre
Belt clip (optional)

16 17
About Start-up Handling Functions Warnings More info
Turn the Streamer ON and OFF
Power on
Press the ON/OFF button on the top of the Streamer for
2 seconds until all lights on the front and top flash to
indicate it is powered on.
Release the ON/OFF button. The power indicator on the
top of the Streamer should now fade to green.
If the Streamer does not turn on, make sure it is
charged.
To see the status of the Streamer, press the ON/OFF
button briefly.
Power off
Press and hold the ON/OFF button on the top of the
Streamer for 2 seconds until the green power indicator
is turned off.
Status Front Description
The Streamer is off
After pressing the ON/OFF button for 2 seconds, all lights will be on
for a few seconds to indicate that the Streamer is now turned on.
The Streamer is now turned on and ready for use

18 19
About Start-up Handling Functions Warnings More info
Remote control of the hearing aid
Volume up/down
Briefly pressing on either volume up or down will regulate the volume in the
hearing aids accordingly. You will hear small confirmation “ticks” in the hearing
aids.
Changing programs in the hearing aids
You can change programs up or down by holding the volume up or down for more
than one second. Changing programmes is indicated by a sound in your hearing
aids.
Muting the hearing aids
You can mute the hearing aids by pressing the volume up AND down for 1 second
simultaneously.
Volume/program
shift Mute
IMPORTANT NOTICE
The mute function is only available in the most recent Oticon hearing aids. Please
consult your hearing care professional for details. Even though the Streamer is turned
off, the remote functionality of the hearing aids will still work.

0000
0000
20 21
About Start-up Handling Functions Warnings More info
Pair the Streamer
Before the Streamer can be used with other devices
– such as mobile phones – the two devices have to be
paired.
1. Put the Streamer in pairing mode
Press and hold the ON/OFF button for about 5 seconds,
until the indicator blinks blue.
2. Put the other device (e.g. mobile) in pairing
mode.
This is typically in a set-up menu on your phone.
We advise you to look in your mobile phone’s
“instructions for use”, e.g under pairing.
3. The other device (mobile phone) will often
request a pin code.
The pin code for the Streamer is 0 0 0 0
(four zeros).
4. Once paired, the mobile phone will typically
show a headset icon; at the same time the
Streamer pairing indicator will be steady blue.

22 23
About Start-up Handling Functions Warnings More info
Charge the Streamer
The Streamer uses a rechargeable battery. We recommend that
you charge the Streamer once a day for best possible
performance.
Insert cable from the enclosed charger in the micro USB socket
in the bottom of the Streamer (A). Remember to connect the
charger to a power outlet.
Charging, when turned on, is indicated by a blinking green
indicator on the top. Once fully charged, the indicator will show
steady green.
Charging, when turned off, is indicated by a blinking green
indicator on the top. Once fully charged, the indicator will be off.
Status Front Description
Charging – when turned off – status indicator will blink green.
Charging – when turned on (or in use) – the status indicator will
shift between strong and soft green.
Blink Fade
ON/OFF
indicator
A
IMPORTANT NOTICE
When charging, the charging indicator should be lit as described in this booklet.If the
charging indicator is not lit as described, disconnect the device from the charger and
consult your hearing care professional.
IMPORTANT NOTICE
When recharging the Streamer use the supplied original power supply
5.0V/1A, CE and safety marked.

24 25
About Start-up Handling Functions Warnings More info
Low battery indication
The Streamer will indicate low battery (about
20 minutes capacity left) with a steady red light, and
very low battery (about 5 minutes capacity left) with a
blinking red light.
IMPORTANT NOTICE
The battery should not be drained completely. Keeping the battery fully charged will
prolong the capacity of the battery. The battery cannot be replaced by the user.
Status Front Description
Low battery– 20 minutes capacity left when streaming to hearing
aids.
Very low battery – 5 minutes capacity left when streaming to
hearing aids.
Steady Fading
Low battery
indication
Handling

26 About Start-up Handling Functions Warnings More info
Battery capacity and charging time
Battery capacity using
neck loop
Up to 10 hours typical daily use: 2 hours phone, 6 hours TV and
2 hours standby.
Battery capacity not
using neck loop
Up to 5 hours typical use: 1 hour phone, 3 hours TV and 1 hour
standby.
Battery charge time 2 hours for complete charge, using enclosed power supply.
Remote control If the Streamer is turned off, remote control of hearing aid will
work for up to 6 months on one full charge.
Battery life expectancy The Streamer battery will last for more than 2 years if fully charged
once a day.

28 29
About Start-up Handling Functions Warnings More info
Clear pairing
If you have problems with pairings, you can clear all
pairings by pressing the ON/OFF button and the
volume up button at the same time for 3 seconds.
Status Front Description
Streamer in pairing mode
Pairing complete
Streamer on
Steady Blinking

30 31
About Start-up Handling Functions Warnings More info
Static electricity
If the Streamer is exposed to electrostatic discharge, i.e. static electricity, it may
stop streaming. The Streamer will by default restart and you can re-activate your
streaming.
For detailed information on how to establish specific streaming connections,
please refer to “Functions” in this Instructions for use.
Cleaning and maintenance
The Streamer is a sealed device that requires minimum maintenance. Any
dirt, moisture or grease should be cleaned off by using a soft, dry cloth. It is
recommended that you clean the Streamer on a regular basis. The microphone
inlet and the connectors for audio input, neck loop and charging must be kept
free of dirt or debris.
IMPORTANT NOTICE
Use a soft, damp cloth to clean the Streamer. The Streamer and the neck loop must
never be washed or immersed in water or other liquids.

32 33
About Start-up Handling Functions Warnings More info
Primary functions
The Streamer user interface has been designed to give you
the best possible daily use in the following situations:
1. Use of a mobile phone through Bluetooth*.
Use of the ConnectLine phone solution (sold separately)
with an analogue landline phone*.
2. Use of a ConnectLine partner microphone (sold
separately), to improve your chances of hearing a chosen
speaker at a distance, or in very noisy situations.
3. Use of ConnectLine TV solution (sold separately) to
wirelessly transmit the TV sound to your hearing aids*.
* In effect turning the Streamer and the hearing aids into a wireless headset
Mobile phone
To be able to receive or make calls while using the
Streamer, make sure that the Streamer and mobile
phone have been paired, are turned on and are
within range (10 metres). Your mobile phone will
often indicate that it is connected to the Streamer
with a small headset icon.
Functions

34 35
About Start-up Handling Functions Warnings More info
How to answer a call
Make sure that you are able to speak into the
Streamer’s microphone.
When your mobile phone rings, you will hear an
incoming call alert in your hearing aids. At the
same time the phone button on the Streamer
and the status indicator will blink green.
Press the phone button on the Streamer
briefly to answer the call. You will hear a small
confirmation beep in your hearing aids.
The phone button and status indicator will now
be steady green.
To end the call, simply press the phone button
on the Streamer briefly.
Microphone
Status Front Description
Streamer on and ready
Phone indicator and top status blinks green. You will hear an
incoming call indicator in your hearing aids.
When the call is connected, you will hear a beep acknowledging
that the call is answered – you are now able to listen and talk to the
other party.
Steady Blinking

33 40 17 _ _
36 37
About Start-up Handling Functions Warnings More info
How to make a call
Make sure that you are able to speak into the
Streamer’s microphone.
To make a call, you only need to operate the mobile
phone. You do not need to operate the Streamer.
Simply key in the number as you normally do to
make a call – the call is automatically connected to
your Streamer.
The phone button on the Streamer and the status
indicator on the top will turn green, and you will
hear a confirmation beep in your hearing aids
indicating that the call is now connected through
your Streamer and hearing aids.
To end the call, simply press the “call end” button
on the phone or the phone button on the Streamer
briefly.
Status Front Description
Streamer on and ready
When the call is connected, you will hear a beep acknowledging
that the call is connected – you are able to listen and talk to the
other party.
Steady Blinking

38 39
About Start-up Handling Functions Warnings More info
Personalisation of mobile phone features
The following mobile phone features can be enabled, or disabled, by your hearing
care professional.
Reject call – default on
An incoming call can be rejected by briefly pressing the volume down button on
the Streamer.
Voice dial – default on
Briefly pressing the phone button will enable voice dial (if supported by your
mobile phone and you are not in range of a ConnectLine phone adapter).
Last number redial – default on
Pressing and holding the phone button will activate the last number redial
(if supported by mobile phone).
Transfer call – default on
Pressing and holding the phone button will transfer a call back to the mobile
phone.
All front buttons answer call – default on
If off, only the phone button on the Streamer will answer calls.
Enable incoming (A2DP) connections – default off
If enabled, other devices, e.g. iPods, computers and mobile phones can activate
audio streaming, for example, incoming text alerts or music started from a paired
and connected mobile phone.
Other manuals for ConnectLine Streamer Pro 1.3A
2
Table of contents
Popular Conference System manuals by other brands


AVT
AVT MAGIC PhonerSet quick guide

Panasonic
Panasonic KX-VC300 user manual

Televic
Televic Confidea Installation & user manual

Lucent Technologies
Lucent Technologies Merlin 1030 Planning guide

SSS Siedle
SSS Siedle Siedle Access System manual

urmet domus
urmet domus IPerTalk 1375/10 Installation and configuration manual

StarLeaf
StarLeaf Touch 2045 quick start guide

PRESONUS
PRESONUS Central Station Plus owner's manual

Avaya
Avaya Scopia XT Series Deployment guide

Cisco
Cisco TelePresence SX20 reference guide

Sony
Sony PCS-XG100 System integration manual

Panasonic
Panasonic WXC3010 - CENTER MODULE - MULTI LANGUAGE operating instructions