oticon FittingLINK 3.0 User manual

Instructions for use
Wireless
Programmer
FittingLINK 3.0

Introduction to this booklet
This booklet guides you on how to use and maintain your new
FittingLINK 3.0. Please read the booklet carefully including the
“Warnings” section. This will help you get the most out of your new
FittingLINK 3.0.
If you have additional questions about the use of your FittingLINK
3.0, please contact your supplier’s support function.
For your convenience this booklet contains a navigation bar to help
you navigate easily through the different sections.
About Startup Daily use Warnings More info

Intended use
FittingLINK 3.0 is intended as a programming interface to fitting
software, for wireless transfer of fitting data from the device
running the fitting software to the wireless hearing aids.
FittingLINK 3.0 is intended to be used by hearing care professionals.
Compatibility
FittingLINK 3.0 is compatible with Oticon hearing aids with 2.4 GHz
radio technology. It is backwards compatible and can be used with
FittingLINK WP-2. For backwards compatibility refer to FittingLINK
WP-2 “Instructions for Use” which can be
found on: www.oticon.global
INSTRUCTIONS FOR USE

Table of contents
About
Package contents 6
Product overview 7
Start up
Connect FittingLINK 3.0 to a PC 8
FittingLINK 3.0 and your fitting software 11
Daily use
How to use FittingLINK 3.0 12
Pairing FittingLINK 3.0 with 2.4 GHz wireless hearing aids 14
LED indicator 18
Taking care of your FittingLINK 3.0 19
Troubleshooting 20
Warnings
Warnings 24

More info
International warranty 26
Technical information 27

Instructions for use
Wireless
Programmer
FittingLINK 3.0
6About Startup Daily use Warnings More info
About
Package contents
You will find the following items in the package:
FittingLINK 3.0 Desk stand Instructions for Use
(this booklet)

7
Product overview
FittingLINK 3.0
Desk stand
LED indicator
Cable (2 m)
USB 2.0
8About Startup Daily use Warnings More info
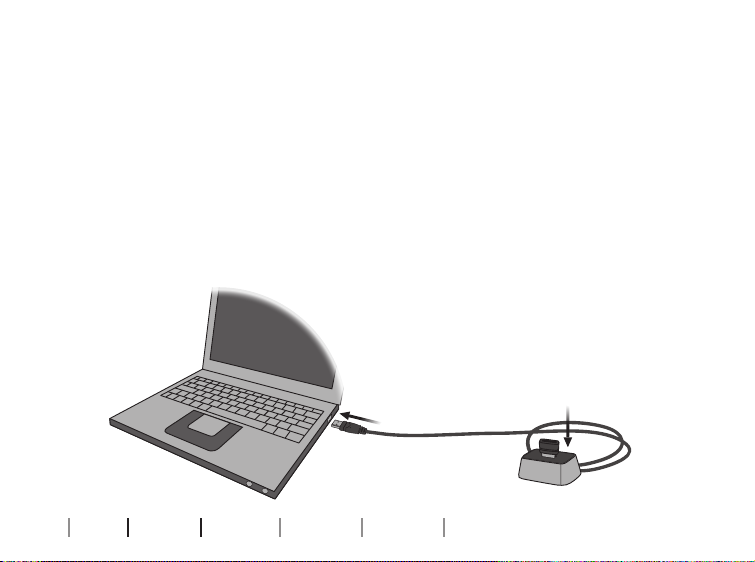
Connect FittingLINK 3.0 to a PC
Before FittingLINK 3.0 can be used as your programming device
for wireless hearing aids, Genie 2 must be installed on your PC.
FittingLINK 3.0 must then be plugged into your PC in one of two
ways:
You can choose to plug FittingLINK 3.0 in the desk stand and
connect the USB cable from the desk stand to the PC [A]
Start up
A
9
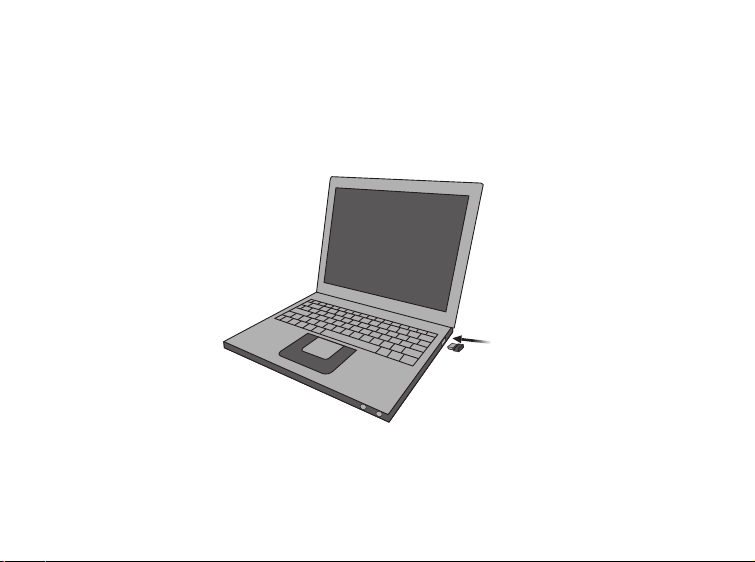
B
We recommend that you keep FittingLINK 3.0 in the desk stand to
ensure optimal performance.
or you can choose to plug FittingLINK 3.0 directly into a USB port on
the PC [B].

10
When you have connected FittingLINK 3.0 and turn on your PC the
first time, a small pop-up window will appear on the screen indicat-
ing that the applicable driver is being installed. Let the installation
finish before you proceed.
The driver installation runs only the first time you turn on your PC
or in case you unplug FittingLINK 3.0 and afterwards plug it into a
different USB port than the one originally used.
About Startup Daily use Warnings More info

11
FittingLINK 3.0 and your tting software
When you have connected FittingLINK 3.0 to your PC and you open
Genie 2 for the first time, FittingLINK 3.0 will be detected as a
programming device.
FittingLINK 3.0 is automatically added as an option on the “Detect”
button in Genie 2.

12 About Startup Daily use Warnings More info
How to use FittingLINK 3.0
At the beginning of every programming session FittingLINK 3.0
needs to be paired to the client’s hearing aids. See the “Pairing
FittingLINK 3.0 with 2.4 GHz wireless hearing aids” section.
We recommend that you keep FittingLINK 3.0 in the desk stand to
ensure optimal performance.
Operating range while pairing
In order to ensure steady high performance it is necessary to keep
the hearing aids within 30 centimetres of FittingLINK 3.0 during
pairing.
Operating range while programming
Once paired, the distance between FittingLINK 3.0 and your
hearing aids can be up to 5 metres (in direct line of sight).
Daily use

13
Operating range for test box verification
When performing coupler-based verification in a hearing aid test
box, the distance between FittingLINK 3.0 and the hearing aids
should be as short as possible and no more than 0.5 metres.

14 About Startup Daily use Warnings More info
Pairing FittingLINK 3.0 with 2.4 GHz wireless
hearing aids
1. Turn on your PC
2. Open Genie 2
3. Attach speakers to the hearing aids
4. Insert new batter-
ies in the battery
drawer on the
hearing aids.
5. Place the hearing aids and FittingLINK 3.0
within range. See the “Operating range while
pairing” section.
Up to 30 cm

15
6. Close the battery drawer and
wait for the startup jingle.
Now the hearing aids will be in
pairing mode for 3 minutes.
7. Select FittingLINK 3.0 as your
programming device and
FittingLINK 3.0 will automati-
cally detect all 2.4 GHz hearing
aids in range.

16 About Startup Daily use Warnings More info
8. In “Detect Wireless “select the
relevant hearing aids from the
instruments list and click
“Connect” to begin the fitting.
9. When the fitting is finished
enter “Save and Exit” and click
“OK” to save and close the
session.

17
IMPORTANT NOTICE
Please refer to the hearing aid’s instructions for use for details on the
functionality of the specific hearing aid solution.
18
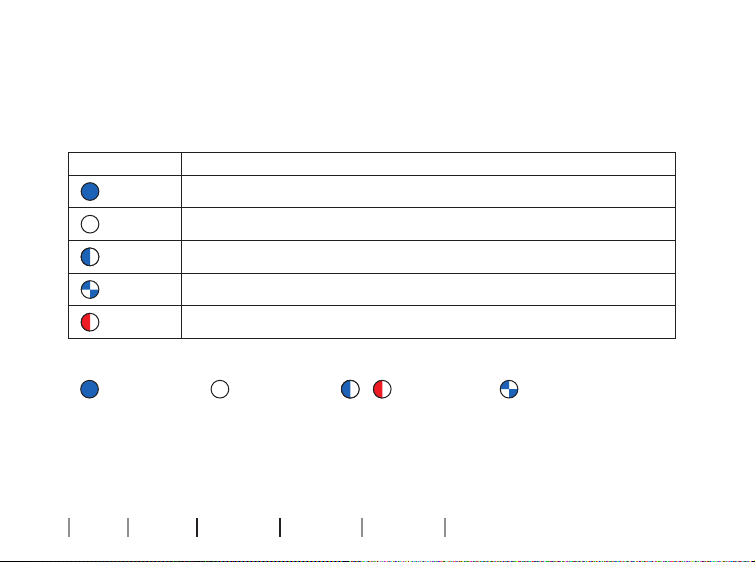
LED indicator
How to read the LED indicator
Indication Description
FittingLINK 3.0 active
FittingLINK 3.0 inactive
FittingLINK 3.0 searching for in range FittingLINK WP-2
FittingLINK 3.0 in pairing mode with FittingLINK WP-2
Self test error
Steady LED off Slow flash Fast flash
About Startup Daily use Warnings More info

19
Taking care of your FittingLINK 3.0
FittingLINK 3.0 and its accessories must be kept free of dirt and
debris. Use a soft, dry cloth to clean FittingLINK 3.0.
We recommend that FittingLINK 3.0 is kept in the desk stand in
between fitting sessions.
IMPORTANT NOTICE
FittingLINK 3.0 must never be washed or immersed in water or other
liquids.

20 About Startup Daily use Warnings More info
Troubleshooting
Locations where Bluetooth technology is not allowed
FittingLINK 3.0 must not be used in locations where Bluetooth
technology is not allowed. Please note that FittingLINK 3.0 is only
active when the LED indicator is on, i.e. when used by Genie 2.
Interference
Please note that active programming devices and wireless devices
in general may create interference. If you experience decreased
performance, relocate FittingLINK 3.0 or turn off the possible
sources of interference.
The PC cannot find the driver for FittingLINK 3.0
Genie 2 must be installed before the PC can find and install the
driver for FittingLINK 3.0. After installing Genie 2, re-connect
FittingLINK 3.0 to your PC and let the driver installation finish
before you proceed.
Other manuals for FittingLINK 3.0
7
Table of contents
Other oticon Motherboard manuals


