manuals.online logo
Brands
  1. Home
  2. •
  3. Brands
  4. •
  5. Otona no Kagaku
  6. •
  7. Toy
  8. •
  9. Otona no Kagaku Ornithopter Kit Administrator Guide

Otona no Kagaku Ornithopter Kit Administrator Guide

1Otona no Kagaku
Things you will need
A Phillips head screwdriver (JIS No. 1), cellophane tape, a ruler,
scissors and a cutter
Parts in the Kit
Ornithopter Kit
Assembly time: Approx. 1.5 hour
● Materials used in this kit
Ornithopter parts (black),
Catapult kit (white): ABS
Wing framework: Carbon-fiber-reinforced polymer
(CFRP)
Wing films: PE
Fuselage: Balsa
Crankshaft, screws: Steel
* Please dispose of this product in accordance with
local regulations.
CAUTION Please be sure to read the following instructions before
assembling this kit.
● Handle sharp parts carefully, particularly the carbon shafts. Sharp parts
can cause eye and other injuries.
● Be careful when using the smaller parts so that you do not put them in your
mouth and accidentally swallow them. There is a risk of suffocation.
● Do not fly the plane in trafficked areas.
● Keep this kit out of the reach of small children when not in use.
* Please read the instructions and cautions thoroughly before use.
* For your safety, be sure to follow the instructions in this manual. In addition, do not
use any parts that have become damaged or deformed during use.
Detach parts from runners before use.
How to Assemble and Use the Supplement
Front
frame
(for bird
version)
Front frame
(for insect
version)
Carbon shafts (4)
Fuselages (2)
Double-sided tape (eight 3 mm x 200 mm pieces)
Wing films (one of the two is a spare)
Tail frame
Left wing
gear
(10 teeth)
Right wing
gear
(11 teeth)
Knobs
Safety cover
Wing gear clamp
Stopper
Wing boom
Wind-up
knob
Wing arm
Wing arm
clamp
Connecting rod
clamp (short)
Connecting
rod (short)
Connecting rod (long)
Tail
boom
Weight
Rubber band
Screws (3)
Catapult body
Trigger
Slider B
Slider A
Base front
Base bottom
Washer
Washer
* One of the two washers is a spare.
Elastic cords (2)
* Wing films are in pouch form.
First cut the pouch into two sheets.
Cut out pieces along the solid lines in the figure
above, which are also printed on the film.
Wing for bird version
Tail for bird version
Wing for
insect
version
Tail for
insect
version
Rear frame
(for insect
version)
Rear frame
(for bird
version)
Connecting rod clamp (long)
31号英訳0614.indd 1 11/06/14 18:21
2
Insert the front frame, stopper, and rear
frame into the fuselage. 4
2
1
5
3 6
Insert the connecting rod (long) and connecting
rod clamp (long) into the left wing gear in the
orientation shown in the drawing and mount the
assembly on the front frame. Also slide two
knobs onto the crankshaft and insert the tip of
the shaft into the safety cover.
Insert the right wing gear into the front frame.
Insert the wing gear clamp.
Push the wing boom
into the front frame.
Insert the fuselage into the stopper, then
press the rear frame onto the stopper/
fuselage assembly. Insert the fuselage
firmly so that it goes all the way into the
holes of the front and rear frames.
The angled corner of the
fuselage should face the
bottom front.
Assembly time: Approximately 40 minutes
Parts used
Front frame (for bird version), elastic cord (1), fuselage (1), carbon shafts (2), double-sided tape (4
pieces), wing film (bird-style wing and tail), runner parts used in bird-style ornithopter [left wing
gear (10 teeth), right wing gear (11 teeth), connecting rod (long), connecting rod clamp (long), knobs
(2, also used on insect version), safety cover (also used on insect version), wing gear clamp, rear
frame (for bird version), stopper, wing frame (also used on insect version), tail frame, wind-up knob
(also used on insect version)]
Front frame
(for bird version)
Front frame
Wing gear clamp
Wing boom
Frontframe
Right wing gear
(11 teeth)
Fuselage
Rear frame
(for bird version)
Stopper
Insert the carbon shafts into the wing gears.
Carbon shaft
Double-check the orientations!
Insert firmly, all the
way into the hole.
Align the teeth of the left and right
wing gears so that the parts
indicated by the dotted line in the
photo on right are completely
straight.
Align the boom to the
cutout in the round
hole and push it all
the way in.
Building the bird-style ornithopter
Double-check: Turn the crank by holding
the knobs and make sure that the left and
right carbon shafts both move smoothly
up and down in the same way.
Front frame
Knobs
Safety
cover
Connecting rod
(long)
Left wing gear
(10 teeth)
Connecting rod
clamp (long)
Double-check the orientations!
Insert firmly,
all the way in.
Crankshaft
Carbon shaft
Push the safety
cover firmly
onto the shaft.
Once the cover is
bonded to the
shaft, it will not
come off.
31号英訳0614.indd 2 11/06/14 18:21
3Otona no Kagaku
Cut the wing from the wing film
along the printed line and, with
the L and R at the ends of the
wing readably oriented, tape it
onto the portion of tape with the
protective paper peeled off. The
L is the tip of the left wing; the R
is the tip of the right wing.
The carbon shafts must be at their lowest positions
when taping on the wing film! If the film is attached
with the shafts raised, the film will be too tight and the
shafts will be unable to descend.
Tape it to the flat surface and
then remove all the protective
paper.
ape the wing film on, starting at the
tip, taking care not to let slack into
the wing film. Then, progressively
tape on the film by lightly pressing,
moving toward the center, and then
press firmly once
the film is
positioned to permanently attach
the film.
7
8
9
10
11
Tape the double-sided tape to the left and right carbon shafts and to the wing boom, as shown in the
drawing, and then peel back 15 mm of protective paper in the areas near the centers of each.
With the carbon shafts at their lowest position, put the bird-style wing film temporarily in place.
Remove the protective paper from the double-sided tape taped to the wing boom and tape on the wing film,
aligning the center line.
Place on the edge of a table or a similar
surface, peel the protective paper from the
double-sided tape taped to the carbon shafts,
and tape on the wing film.
Perform this step one wing at a time.
Cut the double-sided tape to half-length and
tape it to the tail frame as shown in the
drawing.
Wing boom
75mm
Double-sided tape (1 piece) Double-sided tape (1 piece)
Double-sided tape
Wing film
Wing film
Wing film
Wing boom
Remove
Tail frame
100mm 100mm
Double-sided tape Double-sided tape
L←→R
200mm 200mm
Attach the double-sided tape up to this point.
Cut the double-sided
tape into a 75 mm section
for use here.
Peel back 15 mm
of protective paper
Seen from above
Carbon
shaft
Carbon
shaft
31号英訳0614.indd 3 11/06/14 18:21
4
Hold the crank knobs of the front frame and test the
movement of the wing by winding the elastic a little. When
you try this, check that the part sticking out of the rear
frame wind-up knob catches and is facing upwards.
Cut the tail film from
the wing film along the
printed lines. Place it on
a table with the L and R
backwards, as shown in
the figure.
Gather the two loops
together at the knot
end, pass them
through the rear
frame, and then hook
them onto the wind-
up knob. Press the
knob into the hole in
the rear frame.
25cm
The knot can be moved by pulling on
the elastic cord.
Tie with a
loose knot.
Cut the leftovers
so that about
5 cm remains.
Fasten tightly.
12. 16.
17
15
13
14
Turn the tail film upside down, place it on a
table, position the tail frame so it covers the
film and tape it onto the film.
Double up the elastic cord, pass the loops
through the hole in the frame, and hook the
loops around the wind-up knob.
Hook the other ends of the elastic cord
loops around the crank of the front frame.
When the loop is 25 cm long, tighten the
knot, and then tie another knot at the end.
Insert the tail into the rear frame, adjust
the angle, and secure the tail in place with
the stopper.
Make a loop of about 25 cm out of the
elastic cord.
Tail frame
Tail film
Tail
Rear frame
Line up the tail with the fifth or sixth
groove from the top of the rear frame
and secure it in place with the
stopper.
Wind-up knob
Elastic cord
Double up the elastic cord.
Elastic cord
Crank
Completed
Wind-up knob
Crank knobs
Use cellophane tape to
cover the tip of the
carbon shaft (the round
part) for safety.
31号英訳0614.indd 4 11/06/14 18:21
5Otona no Kagaku
The angled corner of the fuselage should face the
bottom front. Insert firmly so that it goes all the
way into the holes of the front and rear frames.
Front frame
(for insect version)
Fuselage
Fuselage
(for insect version)
Assembly time: Approximately 30 minutes
Parts used
Front frame (for insect version), elastic cord (1), fuselage (1), carbon shafts (2), double-sided tape (3
pieces), wing film (insect-style wing and tail), runner parts used in insect-style ornithopter [wing
arm, wing arm clamp, connecting rod (short), connecting rod clamp (short), rear frame (for insect
version), knobs (2, also used on bird version), safety cover (also used on bird version), wing boom
(also used on bird version), tail boom, wind-up knob (also used on bird version)]
Building the insect-style ornithopter
1 4
5
6
2
3
Insert the front and rear frames into the
fuselage. Mount the tail boom on the rear frame.
Insert the carbon shaft into the rear frame hole.
Insert the carbon shaft into the wing arm.
Insert the connecting rod (short) and connecting rod
clamp (short) into the wing arm in the orientation
shown in the drawing, mount the assembly on the
front frame and hold it in place with the wing arm
clamp. Also slide two knobs onto the crankshaft and
insert the tip of the shaft into the safety cover.
Push the wing boom into the front frame.
Front frame
Connecting
rod (short)
Connecting rod clamp
(short)
Wing arm
Wing arm
clamp
Safety cover
Knob
Wing boom
Front frame
Align the boom to the
cutout in the round hole
and push it all the way in.
Tail boom
Rear frame
Rear frame
Carbon shaft
Wing arm
Carbon shaft
Insert firmly,
all the way in.
Crankshaft
The tail boom does not
adjust for height, so
insert it into the tip of the
boom between the prongs
protruding from the rear
frame, as shown in the
above drawing.
The shaft may not insert
easily, so be careful not to
stab your hand on it.
Push the safety cover
firmly onto the shaft.
Once the cover is
bonded to the shaft,
it will not come off.
31号英訳0614.indd 5 11/06/14 18:21

Other Otona no Kagaku Toy manuals

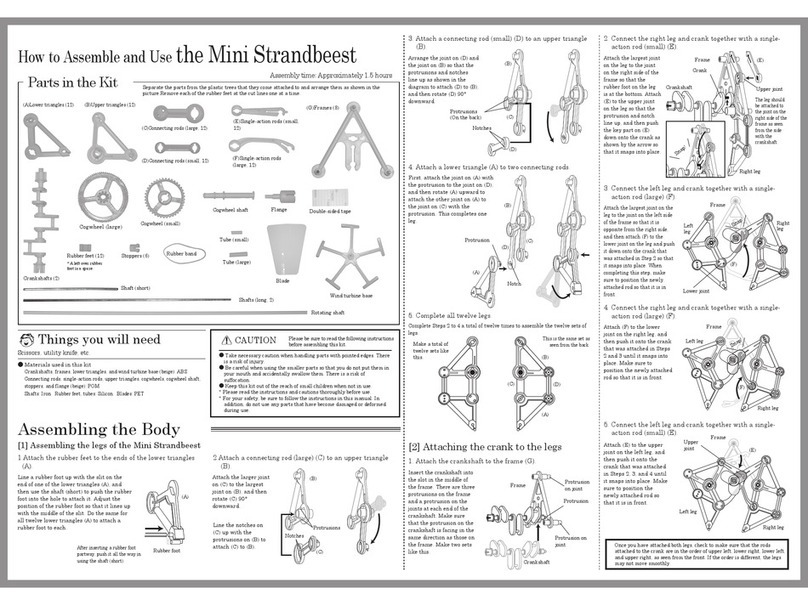
Otona no Kagaku Mini Strandbeest Quick setup guide

Otona no Kagaku

Otona no Kagaku Mini Strandbeest Quick setup guide

Otona no Kagaku Karakuri User manual

Otona no Kagaku

Otona no Kagaku Karakuri User manual

Popular Toy manuals by other brands

FUTABA GY470 instruction manual

FUTABA

FUTABA GY470 instruction manual

LEGO 41116 manual

LEGO

LEGO 41116 manual

Fisher-Price ColorMe Flowerz Bouquet Maker P9692 instruction sheet

Fisher-Price

Fisher-Price ColorMe Flowerz Bouquet Maker P9692 instruction sheet

Little Tikes LITTLE HANDIWORKER 0920 Assembly instructions

Little Tikes

Little Tikes LITTLE HANDIWORKER 0920 Assembly instructions

Eduard EF-2000 Two-seater exterior Assembly instructions

Eduard

Eduard EF-2000 Two-seater exterior Assembly instructions

USA Trains EXTENDED VISION CABOOSE instructions

USA Trains

USA Trains EXTENDED VISION CABOOSE instructions

Modellbau Laffont Z1601 Assembly instructions

Modellbau Laffont

Modellbau Laffont Z1601 Assembly instructions

NOCH 12905 instruction manual

NOCH

NOCH 12905 instruction manual

Eduard Ki-61-Id quick start guide

Eduard

Eduard Ki-61-Id quick start guide

Viessmann Vollmer 45616 Mounting instruction

Viessmann

Viessmann Vollmer 45616 Mounting instruction

Vollmer 42004 Mounting instruction

Vollmer

Vollmer 42004 Mounting instruction

Phoenix Model CLASSIC-EP instruction manual

Phoenix Model

Phoenix Model CLASSIC-EP instruction manual

H-KING Sopwith Camel British WW1 Fighter instruction manual

H-KING

H-KING Sopwith Camel British WW1 Fighter instruction manual

MODSTER Predator 4x4 Crawler user manual

MODSTER

MODSTER Predator 4x4 Crawler user manual

DHK Hobby 8136 User instruction manual

DHK Hobby

DHK Hobby 8136 User instruction manual

THUNDER TIGER Raptor 50 V2 kit manual

THUNDER TIGER

THUNDER TIGER Raptor 50 V2 kit manual

Timberkits Skateboarder instructions

Timberkits

Timberkits Skateboarder instructions

Hangar 9 Funtana 125 Assembly manual

Hangar 9

Hangar 9 Funtana 125 Assembly manual

manuals.online logo
manuals.online logoBrands
  • About & Mission
  • Contact us
  • Privacy Policy
  • Terms and Conditions

Copyright 2025 Manuals.Online. All Rights Reserved.