Otto Wilde G32 CONNECTED User manual

USER MANUAL
This instruction manual contains important information necessary for the proper assembly and safe use of
the appliance. Please read and follow all warnings and instructions before assembling and using the appliance.
BE SURE TO READ BEFORE USING
Keep product manual and original packaging
G32 CONNECTED
PLATFORM
1

WELCOME
TO THE FAMILY! FIIINALLY,
BUDDY!
Congratulations on the purchase of our G32 and thank
you very much, that you become a part of the grill rev-
olution. The special and unique features of this high-
end grill make every grillers heart beat faster.
The commercial grade burners offer you immense
power and durability. The entire Firebox is made of
stainless steel and promises unlimited grilling pleasure
with the simplest cleaning. The body of the G32 is made
of stainless steel coated with a heat-resistant powder
coating. The Full Dome Lights with daylight sensor
provide the right lighting and only light up when you
really need it. The Otto Wilde App comes with an ev-
er-expanding collection of tested recipes and provides
step-by-step guidance for your grilling sessions. To
give you optimum control over your grilling, the G32
features 4 zone probes and 4 meat probe ports. We
made the G32 with the support of the greatest com-
munity in the world. Many features were implemented
together with the help of this community. You are now
a part of this family and we want to thank you for that.
Have fun with your new G32!
Your Otto, Alex, Julia and Nils
GRILLING
SAFE LY!
Of course, you would like to start grilling right now and
have your first meal on the grill grate. But before you
get to the festive grilling, you should take a close look
at our manual. This increases your anticipation and
guarantees safe grilling pleasure. In this manual, we ex-
plain the ins and outs of your G32 and everything else
you need to know to grill safely. Should you lend out
your grill, this manual should be part of the package.
2 3

HE WHO READS LIVE LONGER
WARNING NOTES
The G32 is a really hot device reaching really high temperatures (450°C). As a high-temperature
griller, you have to master the grill and the grill process well. That’s why we’ve put together
important information for you on how to use the G32 safely. Please read this carefully, as failure
to comply with the hazard warnings and precautions listed here could result in serious or even
fatal injury or property damage from fire or explosion.
GENERAL DANGERS
!Liquid gas is highly flammable and highly explosive.
!If the concentration of gas is too high, asphyxiation
due to lack of oxygen can result.
!Liquid gas weighs more than oxygen and can accumu-
late in depressions or if it escapes uncontrolled, can
lead to gas concentrations that present a health risk
in small, poorly ventilated yards.
!This Otto Wilde Grillers gas grill is intended ex-
clusively for outdoor use and for use in areas with
adequate ventilation.
!You should make sure that liquid gas does not
escape uncontrolled.
!Instructions of the manufacturer or provider of the
gas cylinder that is being used must be followed.
!Follow the instructions relating to connection of the
gas pressure regulator provided for the gas grill.
!Ensure that no ignition sources are located in the
proximity of the grill when connecting the gas
cylinder, especially open fires or lit cigarettes, candles,
lamps etc. Electronic devices can also pose a risk in
the event that gas escapes during connection.
!If the gas hose is porous or defective, the grill
must not be put into operation.
!If your gas hose has exceeded its expiration date,
if required by national regulations and/or their appli-
cability, or if porous or defective areas are present,
it should be replaced.
!If you have not used your Otto Wilde Grillers
gas grill for a long time, check for gas leaks
prior to use.
!Never use an open flame to search for gas leaks.
!Do not use your Otto Wilde Grillers gas grill if
there is a possibility of or in the event of a gas leak.
!Thoroughly clean your Otto Wilde Grillers gas grill
at regular intervals in accordance with the ‘Cleaning’
instructions.
!Liquid propane gas is not natural gas. Modification
of the grill to use natural gas and any attempts to
use natural gas with this liquid propane gas grill are
dangerous and prohibited. Any attempts to do so
will immediately void the warranty.
!A dented or rusty gas cylinder can be dangerous
and should be tested by your gas supplier.
!Do not use gas cylinders with damaged valves.
!Gas cylinders that appear to be empty may still
contain gas. These gas cylinders should be trans-
ported and stored accordingly.
!After use, turn off the gas supply on the gas cylinder.
!Do not carry out any modifications or alterations to
your Otto Wilde Grillers gas grill.
!The Installation of the Otto Wilde Grillers gas grill in
or on a boat or motor home is prohibited.
!Do not install this model of the grill in an integrated
or slide-in construction. Failure to do so may cause
fire or explosion, resulting in serious injury, death or
property damage.
!To eliminate the risk of injury, always open the hood
completely and close it carefully with both hands.
!Extreme heat development is to be expected during
the use of the grill. Smartphones and tablets in the
immediate vicinity can be damaged by the high heat.
Please keep electronic devices away from the vicinity
of the grill.
DURING OPERATION
!Regarding the certification, the Otto Wilde Grillers
gas grill is designed exclusively for outdoor use
and must only be used for this intended purpose.
!Take care when using your Otto Wilde Grillers gas
grill. The grill gets hot when it is in use. Never
leave the grill unattended, and do not move the
grill when it is in use.
!In the event that uncontrolled flames shoot up,
remove the food product from the flames until they
die down.
!Whilst operating the grill, never touch the front,
side or back of the grill chamber.
!Keep the fuel supply hose away from any heated
surfaces.
!Keep the grilling area free of flammable gases and
liquids, such as fuel, alcohol and other combustible
materials.
!In the event that the burner extinguishes whilst the
grill is in operation, close the valve on the gas cylinder.
Wait five minutes before attempting to re-ignite your
grill in accordance with the ‘Ignition’ instructions.
!Do not store spare or unconnected gas cylinders
in the proximity of the grill.
!This appliance can be used by children aged from 14
years and above and persons with reduced physical,
sensory or mental capabilities or lack of experience
and knowledge if they have been given supervision or
instruction concerning use of the appliance in a safe
way and understand the hazards involved. Children
must not play with the appliance. Cleaning and user
maintenance must not be carried out by children
without supervision.
!Never, under any circumstance, attempt to
disassemble the gas regulator or other assembly
parts of the gas supply while the grill is in use.
!Do not place the gas hose or the electrical cable
in walkway areas. Make sure the gas hose and the
electrical cable are not exposed where they can be
accidentally tripped over, tipping the gas supply
cylinder.
!Always use heat-resistant grill gloves, when you
operate the grill.
RISK OF FIRE
!Flammable materials must not be present within an
area of 60cm behind or to the side of the grill.
!Do not use charcoal, briquettes or other fuels in your
Otto Wilde Grillers gas grill. Fire hazard!
!In the event that fats start to burn, turn off the gas
supply on the gas cylinder and let the fats burn.
Never attempt to extinguish burning fat with water,
as this leads to explosions.
!Make sure that dry food, such as bread, do not start
to burn.
!Do not put the grill cover or other flammable
items on top of the grill. Fire hazard!
!Greater accumulations of fat should be avoided and
optionally removed.
STORAGE
!When the Otto Wilde Grillers gas grill is not
in use, the tap on the liquid gas cylinder must be
turned off.
!If the Otto Wilde Grillers gas grill is stored
in indoors, the liquid gas cylinder must be
removed and stored in an adequately ventilated
space outdoors.
!If the liquid gas cylinder is not removed from the
Otto Wilde Grillers gas grill, the grill must be
stored in an adequately ventilated space outdoors.
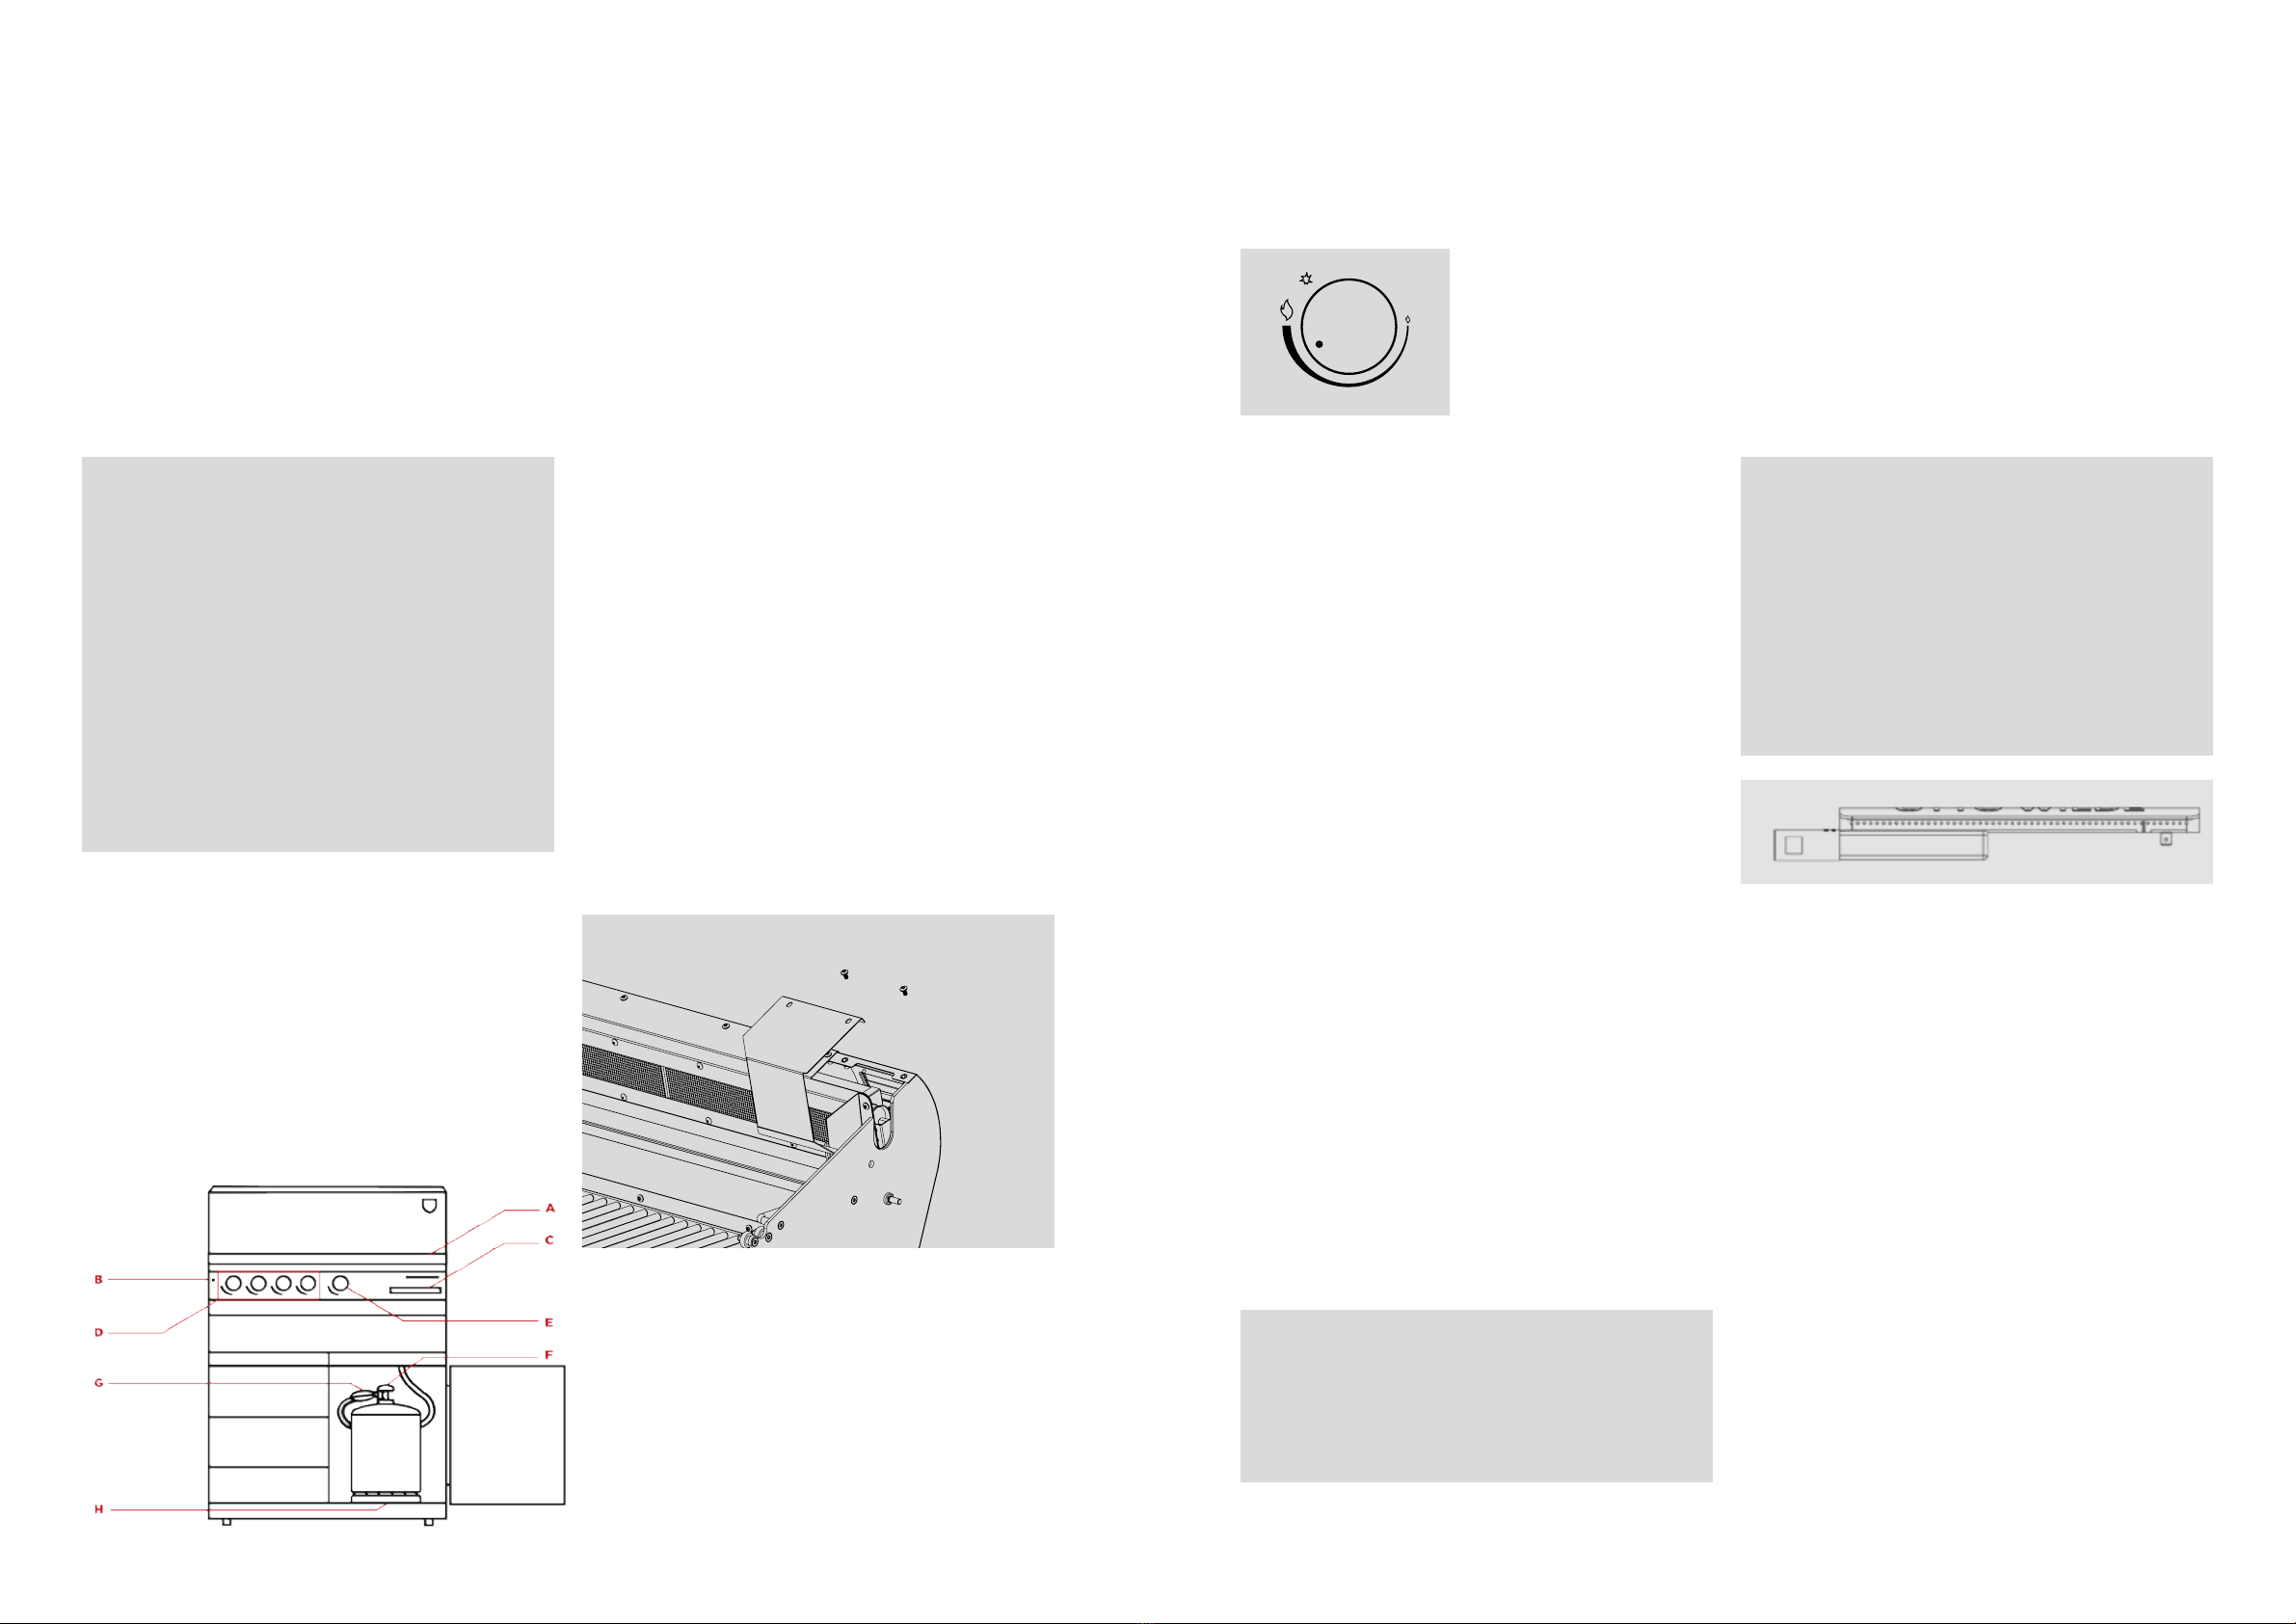
!Store the connected gas cylinder in the base cabinet
of the Otto Wilde Grillers gas grill and keep aware
that the ventilation holes are free
!Liquid gas cylinders must be stored in an adequately
ventilated space outdoors that is not accessible to
children. Liquid gas cylinders must not be stored in
a building, garage or any enclosed area.
IF YOU SMELL GAS
• Shut off gas to the appliance.
• Extinguish any open flame.
• If odor continues, keep away from the
appliance and immediately call your
fire department.
DANGER
!Never operate this appliance
unattended.
!Never operate this appliance within
60 cm of any structure, combustible
material or other gas cylinder.
!Never operate this appliance within
75cm of any flammable liquid.
!Never allow oil or grease to get hotter
than 200 °C. If the temperature exceeds
200 °C or if oil begins to smoke,
immediately turn the burner or gas
supply OFF.
!Heated liquids remain at scalding
temperatures long aft er the cooking
process. Never touch cooking appliance
until liquids have cooled to 45°C or less.
!If a fire should occur, keep away from
the appliance and immediately call
your fire department. Do not attempt
to extinguish an oil or a grease fire with
water.
Failure to follow these instructions could
result in fire,explosion or burn hazard
which could cause property damage,
personal injury or death.
!This instruction manual contains
important information necessary for
the proper assembly and safe use of
the appliance.
!Read and follow all warnings and
instructions before assembling and
using the appliance.
!Follow all warnings and instructions
when using the appliance.
!Keep this manual for future reference.
4 5

WELL PREPARED
BEFORE YOU START
POSSIBLE
EQUIPMENT VARIANTS
Your G32 comes with multiple parts, which are listed individually below. Before using your
G32 for the first time, make sure that you have received all the parts.
!For detailed description of scope of delivery refer to assembly manual.
!Confirm before comissioning all parts have been delivered.
!The grill is intended for operation on the European mains network (mains supply) with fuse
protection installed in accordance with the regulations and a protective conductor system.
The nameplate data must be taken into account.
+ +
DrawerDoorDoor Door Drawer
Body
USAGE
Your Otto Wilde Grillers gas grill is intended exclusively
for grilling food. Your Otto Wilde Grillers gas grill is
designed for home use and, thereby, only for quantities
for normal household use.
PRIOR TO INITIAL USE
Before grilling on your Otto Wilde Grillers gas grill for
the first time, burn off the grill to rid it of any odours or
foreign matter as explained in “Burn-Off” on page 16.
GAS TYPE BUTANE (G30) / PROPANE (G31)
Destination Countries BE, BG, CY, DK,
EE, FI, FR, GB,
HR, HU, IS, IT,
LT, LU, MT, NL,
NO, RO, SE, SI,
SK, TR
BE, CH, CY, CZ,
ES, FR, GB, GR,
IE, IT, LT, LU,
LV, PT, SI, PL
AT, CH, DE, SK
Voltage/Frequency/Power 230 V~ 50 HZ | 46 W Grill + 2.2KW outlets
Category I3B/ P I3+ I3B /P
Operating Pressure 29 mbar 28-30 /37mbar 50 mbar
Nominal Heat Input 19,1 KW /
1,4 kg /h
19,1 KW /
1,4 kg /h
19,1 KW /
1,4 kg /h
Main Burners 4x 3,5 KW /
4x 0,25kg/h
4x 3,5 KW /
4x 0,25kg/h
4x 3,5 KW /
4x 0,25kg/h
Rotisserie Burner 5,0 KW/
0,36 kg /h
5,0 KW/
0,36 kg /h
5,0 KW/
0,36 kg /h
Orice Size Main Burners 0,90 mm 0,90 mm 0,80 mm
Orice Size Rotisserie Burner 1,12 mm 1,12mm 0,99 mm
1x Door 16˝ +
1x Door 16˝
3x Drawer 32˝3x Drawer 16˝ +
1x Door 16˝
6 7

0°
0°
0°
SETTING UP THE G32
HERE WE GO
To save time, avoid errors and guarantee a safe assembly, it is important to follow our separate
Assembly Manual exactly. The Assembly Manual contains detailed step-by-step instructions.
Any mistakes that are due to incorrect setup can have fatal consequences. To make the
assembly easier for you, we recommend the support of another grill buddy.
1. Before positioning the grill on a flat, level surface,
be sure that the rubber feet are in the up position by
turning the red adjustment wheel in the clockwise
direction.
SETUP
!Maintain a minimum of 60cm from the appliance to
any flammable construction.
!Do not place under an unprotected flammable
ceiling or cover. Keep the area around this grill clear
from any flammable materials, petrol, or other flam-
mable vapors and liquids.
!Do not prevent the flow of gas and ventilating air.
2. After you have positioned the grill, you can level it.
3. Lower the rubber feet by turning the red adjustment
wheel in the counter clockwise direction.
4. Adjust the rubber feet until the grill is level in both
directions.
FRONT
SIDE
!Below we share information on how to set up your
G32 correctly, after assembly is complete. This
information does not replace the step-by-step
assembly instructions provided in the Assembly
Manual.
1.
4.1
3.
2.
4.2
8 9

SETTING UP THE G32
CYLINDER
!We recommend the use of an 11kg cylinder. Do not
use cylinders larger than 11 kg. Always handle the
cylinder with care. Never store it on its side because
the valve could become damaged, resulting in a
leak which could be serious. Always use the cylinder
upright. Horizontally, liquid fuel could get into the
supply pipes with damaging results.
!Always place the cylinder in an accessible location
that allows changing and emergency shut off.
Always disconnect the gas cylinder before moving
the grill.Never subject a cylinder to heat. The
pressure inside the cylinder could build up and
exceed the designed safety limit.
!Propane is heavier than air. If there is a leak, the gas
will collect at low level and become dangerous in the
presence of a spark or flame. Never store butane or
propane cylinders indoors.
SETTING UP THE G32
REGULATOR /
LP GAS HOSE
REGULATOR
The G32 must be fitted with a regulator complying
with the local /national standards and/or norms with
a nominal outlet according to the country you operate
the grill in. Check the chart on page 6 for more
information.
LP GAS HOSE
This grill must be fitted with an LPG hose complying
with local /national standards and/or norms. Position
the LPG hose away from any hot surface, including the
bottom of the Firebox.
Be sure the LPG hose is not twisted. Inspect the LPG
hose when replacing the gas cylinder or once per year
whichever is more frequent. If the LPG hose is cracked,
cut, expired or damaged in any way, the grill must not
be operated. The LPG hose must be replaced if dam-
aged and when national conditions require it. Contact
your dealer or the Otto Wilde Service for replacement.
CONNECTION OF THE GAS HOSE
TO THE GRILL
The gas hose is connected to the manifold (cross),
which is attached to the outer wall in the right storage
compartment (substructure). To do this, screw the union
nut of the gas hose onto the lower connection (1/4”LKS)
of the distributor by turning it counterclockwise. If an
open-end wrench (17mm) or pliers are used for this pur-
pose, they must be countered with an open-end wrench
(20 mm) or pliers on the square body of the manifold.
STORAGE
When storing the grill for long periods of time, remove
the cylinder and cover the grill. Store the cylinder out-
doors in a well-ventilated location.
SERVICING
This gas grill should not be modified or tampered with.
Any adjustment or servicing should be done by a
qualified service specialist. Regular maintenance is
recommended. See maintenance instructions.
10 11

SETTING UP THE G32
GAS VENTURIS
AND ORIFICIES
!Keep gas venturis and orifices clean.
!Clogging caused by spiders, insects
and nests can cause a flashback fire.
!If a flashback fire occurs, turn off gas
at the source immediately.
!The nozzles are to be removed by Otto
Wilde Grillers certified personel only!
A broken safety seal on the nozzles will
void the warranty.
Inspect and clean the gas venturis and orifices (main
burner and rotisserie burner) if any of the following
symptoms occur:
1. You smell gas.
2. Your grill does not reach temperature.
3. Your grill heats unevenly.
4. The burners make popping noises.
SETTING UP THE G32
CHANGING THE GAS
CYLINDER
The G32 may be used with propane at an operating
pressure of 29-50mbar. NEVER use an unregulated
gas supply or a regulator for other operating pressures.
The orifices size corresponds to the specific operating
pressure available in the destination country. Only
operate your G32 with the operating pressure indicated
on the rating plate.
WARNING: Changing a gas cylinder may only be
done when there is no open re (candles, cigarettes,
etc.) near the grill or gas cylinders.
Propane cylinders have various types of connections.
If a sealing washer is used in the connection, check
that it is present and not damaged when changing
cylinders. Some connectors have a handwheel to
tighten and some have a click on adapter.
CONNECTING THE CYLINDER
1. Check that the cylinder valve is “Off” by turning
clockwise. Remove protective plug and keep for
replacing later.
2. Inspect the connection for damage before
connecting. Fit the left-hand thread connecting
nut to the cylinder.
a) Handwheel Connecting Nut – Using hand pressure,
tighten the connecting nut firmly. Do not use a
spanner on a handwheel connection. After fitting
the regulator, it may have assumed a position out of
the horizontal, this is not important, DO NOT TWIST
THE REGULATOR.
b) Jumbo Connector – Place the “Quick On” regulator
on to the valve and push down firmly. A “click” sound
should be heard to ensure the switch is securely
latched. Fit the left-hand thread connecting nut to
the Jumbo Connector outlet.
3. When gas is required, turn the cylinder valve
counter-clockwise. Leak test all connections before
operating the grill.
DISCONNECTING THE CYLINDER
1. Turn the cylinder valve “Off” (clockwise rotation).
Check that the burner flame has gone out.
2. Loosen the connecting nut of the regulator by
turning it clockwise (left-hand thread). Replace
protective plug into valve outlet. Place empty
cylinder in a safe place.
INSPECTING & CLEANING GAS
VENTURIS AND ORIFICES
1. Turn off gas at the source.
2. When grill cooled down, remove the grates, and the
flame tamers of the Fire Box and lift the burner from
the grill housing.
3. Clean the gas nozzle mount with a pipe cleaner.
4. Lower the burner into position in the Firebox,
making sure that the gas venturis and orifices are
correctly aligned and fitted on the counterpart.
5. Put flame tamers and grates back in place.
12 13

OFF
SETTING UP THE G32
LEAK TESTING
All factory-made connections have been thoroughly tested for gas leaks and the burners
have been flame tested. However, shipping and handling may have loosened a gas fitting.
Therefore, it is required to perform leak-testing before you operate your G32.
SETTING UP THE G32
LIGHTING
AS A SAFETY PRECAUTION
!Disconnect the grill from the socket,
before you carry out the tests.
!Test all fittings for leaks before using
your gas grill.
!Test the cylinder valve for leaks each
time the cylinder is filled.
!Test for leaks every time you disconnect
and reconnect a gas fitting.
!Do not smoke near grill when changing
the gas cylinder!
!Never test for leaks with a lighted
match or open flame.
!Test for leaks outdoors.
1. Connect the flexible tube and regulator to a full gas
cylinder.
2. Check that all control knobs are turned to “OFF”.
3. Prepare a test liquid of one part water,
one part soap.
4. Open cylinder valve all the way.
5. Brush the test liquid on each connection.
6. To test the XL rotisserie burner:
a) Remove the cover over the burner nozzle mount
(fig.).
b) Place fingertip over the rear burner jet.
c) Turn “REAR” control to “High Flame”.
d) Brush test liquid on each connection between
jet and control valve.
e) Turn “REAR” control to “OFF”.
DETAILS
A Handle
B On/Off Switch
CBluetooth/WIFI Connection
DMain Burner Control
ERotisserie Burner Control
FCylinder Valve
GRegulator
HGas Buddy
1. Assemble the grill following the step-by-step
instructions in the Assembly Manual provided online
at ottogrills.com/pages/service-center.
2. Check that your gas cylinder is full and properly
connected to the regulator.
3. Check that there are no gas leaks in the gas supply
system. See Leak Testing.
4. Check that the gas venturis and orifices are properly
located over the gas valve counterparts.
5. Read carefully all instructions contained on the
information plate attached to the grill.
6. WARNING: Open lid before lighting.
7. Set control knobs to “OFF” and turn on the gas
supply.
8. For Rear Burners: Never use the main burner at the
same time as the rear burner! Remove the storage
grate.
For Main Burner: Check that the power supply is
plugged in. Push and turn one main burner control
knob to “High Flame”. Push and hold down the con-
trol knob at “High Flame” position. Burner should
ignite within 5 seconds. Hold down the knob for
another 5 seconds to deactivate the thermoelectric
safety valve.
NOTE: To light burner with a lighter follow the steps
above. Press against the regulator of a main burner
and turn it to “High Flame”. Hold long lighter or re-
place match next to the burner. Burner should ignite
within 5 seconds.
!Although the grill might still light, the
accumulated gas might also ignite and
cause a fire around the gas venturis
and orifices at the control panel or side
burner.
!The burner can only be ignited if the
burner is correctly positioned over the
nozzle and the safety splint is fitted.
!It is recommended to wear gloves when
removing and inserting the safety splint.
9. Caution - Check your G32 after lighting.
All the ports on the burner should show a 2.5cm flame
on “High Flame” setting. If any of the following symp-
toms occur there is probably a clogging in the gas
venturis and orifices. Shut off gas at once and clean
the gas venturis and orifices. See “Gas venturis and
orifices” on page 12.
ALSO CLEAN THE BURNER PORTS IF
1. You smell gas.
2. A flashback fire occurs.
3. Your grill heats unevenly.
4. The burners make popping noises.
IF BURNER DOES NOT IGNITE
1. Push and turn control knob to “OFF”. Wait
5 minutes, then try again with control knob set
at “Middle Flame”.
2. If any burner will not light, consult “Trouble Shooting
Guide” on page 20. If problem cannot be resolved,
do not attempt to operate the grill; contact your
dealer or the Otto Wilde Service.
7. A leak is identified by a flow of bubbles from the
area of the leak.
8. If a leak is detected, close the gas cylinder “shut off”
valve, tighten the connection and retest (Step 5).
9. If the leak persists, contact your grill dealer or
Otto Wilde Service for assistance. Do not attempt
to operate grill if a leak is present.
a)
!Never use the back burner and main
burners at the same time even when
cooking with the rotisserie.
!Always remove the rotisserie motor
when not in use.
14 15

4. Pre-heat your G32 to the desired temperature with
the cover closed.
5. Use the meat probes for optimal results.
INDIRECT GRILLING/SMOKING
This method is ideal for grilling or smoking large cuts
of meat such as roasts or poultry with or without a
rotisserie. The food is cooked by hot air circulating
around it.
1. Using the G32 for indirect grilling turn burners 1
and 4 on “Low Flame” and leave burners 2 and 3
turned off.
2. In most cases indirect grilling / smoking with and
without a rotisserie is best with the cover closed and
the heat reduced.
3. Use grilling gloves when working around the G32
to avoid injury.
4. Use the meat probes for optimal results.
5. Turn grill off and allow it to cool before removing
drip pan from the fat management drawer.The fat
drippings are highly flammable and must be han-
dled carefully to avoid injury. Let the fat cool before
you discard it. Do not pour it into the sink.
INFRARED XL ROTISSERIE BURNER
The G32 features an extra-long rear burner for rotis-
serie grilling. The rear burner rotisserie method is the
perfect grilling method for grilling kabab, roasts and
poultry. With the heat source located behind the food,
there is no chance of a flare up caused by fat drippings.
You will get perfect and steady results every time. A
dish or drip pan placed below the spit will collect the
juices for basting or for preparing a sauce. To operate
your infrared rotisserie burner, follow the lighting
directions on page 15.
Check the Otto Wilde app for specic recipes and
grilling guides.
SETTING UP THE G32
OPERATION
READY, SET, GO
COOKING TECHNIQUES
BURN-OFF
Before grilling on your G32 for the first time, burn off
the grill to rid it of any odours or foreign matter as
follows:
Ignite the burners. Close the lid and operate the grill
for 20 minutes with the control knobs set at “Middle
Flame/High Flame”. Turn the gas off at the source.
Turn the control knobs to “OFF”. Let the grill cool
down. You are now ready to use your G32.
PREHEATING
When grilling, preheat the G32 on “Middle Flame/High
Flame” with the lid closed for ten minutes. Reduce
heat as appropriate for what you are grilling. Scrub
grate with the Otto Wilde wire grill brush.
LID POSITION
The position of the lid during grilling is a matter of
personal preference, but the G32 grills faster, uses less
gas, and controls the temperature best with the lid
closed. A closed lid also imparts a smokier flavour to
the meal cooked directly on the grate and is essential
for smoking and indirect grilling.
FLAME TAMER SYSTEM
Your G32 is designed for use with the Flame Tamer
system. Using lava rock, ceramic briquets or any other
vaporization system other than the one that came with
your grill is not recommended, , unless they are
marketed by Otto Wilde for that specific application.
HEAT ZONE SEPARATORS
Your Firebox is designed for direct and indirect grilling.
To use isolate the indirect zone from radiant heat, we
included Heat Zone Separators in the G32. You find
them on the very left and right of your Firebox, next
to the grill grates. Release them by pulling them out
vertically. Insert the Zone Separators between ignited
burners and your indirect zone to keep your food away
from direct heat.
GAS BUDDY FEATURE
To keep you updated on the actual gas level we
developed a gas tank monitor called Gas Buddy.
Simply weigh in your type of gas cylinder in the Otto
Wilde app. Follow these steps:
a) Connect your G32 with your app by following the
steps in the “Quick start guide Otto Wilde App” on
page 22.
b) Connect your preferred gas cylinder with your G32.
See “Changing A Gas Cylinder” on page 13 for more
information. Please make sure that the cylinder is
completely full and placed right in the middle of the
crossbar cylinder holder.
c) Open the Otto Wilde app with your smartphone.
d) Click the status symbol.
e) Click on the gas cylinder icon in the upper right
corner.
f) Click on “Start new tank”
g) Select the tare weight of your gas cylinder. You can
find it in the upper section of the tank.
h) Click continue.
i) Select the filling capacity of the gas tank.
j) Click continue. Congratulations, you are done!
Please scan the specic QR-Code for your device to
download the Otto Wilde App.
COOKING TEMPERATURES
DIRECT (ALL BURNERS ON)
• “High Flame” Setting will produce temperatures
up to 450 °C at the grill grate.
• “Middle Flame” Setting will produce temperatures
at the grill grate up to 350 °C.
• “Low Flame” Setting will produce temperatures
inside the grill at the grill grate up to 200 °C.
INDIRECT (BURNER 1 AND BURNER 4 ON)
• “High Flame” Setting will produce temperatures
up to 200 °C inside the grill.
• “Middle Flame” Setting will produce temperatures
inside the grill up to 150°C with the lid down.
• “Low Flame” Setting will produce temperatures in-
side the grill up to 100 °C.
INDIRECT (BURNER 1 OR BURNER 4 ON)
• “High Flame” Setting will produce temperatures
up to 100 °C inside the grill.
• “Middle Flame” Setting will produce temperatures
inside the grill up to 75°C with the lid down.
• “Low Flame” Setting will produce temperatures
inside the grill up to 50 °C.
All these temperatures are approximate only
and vary with the outside temperature and the
amount of wind present.
MEAT PROBES
Avoid laying the cable directly over a
working main burner. Avoid placing the
cable directly in front of the rear burner.
When placing the MP into meat, insert it at
an angle in order to reduce the risk of the
cable coming in contact with the grill grate.
DIRECT GRILLING
The direct grilling method involves grilling the food on
the grate directly over the flame. Direct grilling is the
most popular method for most single serving items
such as steaks, chops, fish, burgers, and vegetables.
1. Prepare food in advance to avoid delay and timing
problems. If using marinade or spices, they should
be applied before placing meat on the grill grate. If
basting with sauces, they should be applied the last
2-4 minutes of grilling to avoid burning.
2. Organize the area around the G32 to include forks,
tongs, gloves, sauces and seasonings, to allow you
to stay near the grill during grilling process.
3. Bring meat to room temperature just prior to
grilling. Trim excess fat from meat to minimize the
“flare-ups” that are caused by dripping grease.
16 17

PERIODIC MAINTENANCE
MAINTENANCE
After you have finished your grilling process, prepare for the next cookout by burning off any
residue of food from the grate and Flame Tamers in the following manner:
GRILLING GRATES
Remove all food from the grates, turn the control
knobs to “High Flame”, and operate the G32 with the
lid closed for 5 to 10 minutes or until smoking stops.
Turn the gas cylinder valve to “off”, then the control
knobs to “OFF”. Use Otto Wilde wire grill brush to
clean the grates. Remember that the grill is still hot,
so wear Otto Wilde grilling gloves to handle the brush.
You do not have to wash the grates and upper warm-
ing rack after each cookout, but if you wish to do so,
just put them in the dishwasher.
FLAME TAMER
If a lot of grease is on your Flame Tamers, remove
grilling grates and scrape excess residue with
Otto Wilde wire grill brush.
FAT MANAGEMENT
The Fat Management Sytem is located in the drawer
under the Firebox. The grease trays should be checked
and cleaned regularly to prevent fat and grease from
overflowing onto your patio or in the drawer.
ANNUAL MAINTENANCE
To ensure safe and efficient performance, the following
components should be inspected and cleaned at least
once per year or after any period of storage exceeding
one month.
COMMERCIAL GRADE BURNERS
Remove burners and clean the gas nozzle mount
using a pipe cleaner to eliminate any clogging caused
by spiders or insects. See “Gas venturis and orifices”
on page 12. A clogged tube can lead to a fire beneath
the grill.
While burners are removed, clean interior of Firebox
by scraping the sides.
HOSE
Inspect and replace the hose if necessary. See “Hose
and Regulator” on page 11.
EXTERIOR FINISH
Wash the exterior finish with mild soap and water.
REPLACEMENT PARTS
If a problem is found with the regulator, hose, burner, or
control valves, do not attempt repair. See your deal-
er or call the Otto Wilde Service. To ensure optimum
performance, use only original Otto Wilde replacement
parts.
LEAK TEST
After reconnecting gas cylinder, be sure to check for
leaks. See “Leak Testing” on page 14.
ATTENTION
! In order to prohibit damages from
environmental elements (such as water,
wind, dust, UV radiation, etc.), all mod-
ules of your Platform should remain
covered when not in use. Ensure to
protect your Platform with a cover of
suitable size which is made of textile
that blocks radiation, has water repel-
ling properties and is breathable.
To cover the Otto Wilde platform, we recommend
the Otto Wilde grill cover.
18 19

IF YOUR GRILL IS NOT WORKING PROPERLY
WHAT WOULD OTTO DO?
IF YOUR GRILL IS NOT WORKING PROPERLY
WARRANTY
BURNERS
The life of the commercial grade burners (made of
stainless steel) depends almost entirely on proper use,
cleaning and maintenance. This warranty does not
cover failure due to improper use and maintenance.
FIREBOX
The Otto G32 Fire Box is made for and should only
be used with original Otto Wilde Flame Tamers, Heat
Separators and Grates. Use of any other product will
nullify the warranty.
For all questions regarding repairs, please contact our
customer service:
CONTACT
Otto Wilde Grillers GmbH
Benzenbergstr. 44
40219 Düsseldorf
Service Hotline
+49 (0)211 542 130 30
E-Mail
service@ottowilde.de
Recipes, tips and much more
at www.ottowildegrillers.com
or in the Otto Wilde App
The Otto Wilde Warranty is effective from date of
delivery and is limited to the repair or replacement of
parts at no charge which prove to be defective under
normal domestic use.
This warranty is extended only to the original pur-
chaser as indicated on the warranty registration and
applies only to products sold at authorised dealers or
in the Otto Wilde online shop and only when used in
country where purchased.
WHAT IS COVERED
Integrity of stainless-steel housing: lifetime
Electronics and electrical components: 2 years
Firebox and stainless steel parts: lifetime
Coating: 2 years (scratches and improper handling
excluded)
WHAT IS NOT COVERED
Any failures or operating difficulties due to
accident, abuse, misuse, alteration, misapplication,
vandalism, improper installation or improper
maintenance or service, or failure to perform normal
and routine maintenance, including but not limited
to damage caused by insects within the commercial
grade burners, as set out in the owner’s manual.
Deterioration or damage due to severe weather
conditions such as hail, hurricanes, earthquakes or
tornadoes, discoloration due to exposure to chemicals
either directly or in the atmosphere.
Shipping or transportation costs. Removal or
re-installation costs. Labor costs for installation and
repair, cost of service calls, liability for indirect, or
consequential damages.
REPLACEMENT PARTS
Original Otto Wilde parts must always be used for
replacement. Use of any other parts will automatically
nullify the above warranty.
PROBLEM POSSIBLE CAUSE CORRECTIVE ACTION
SMELL OF GAS. SHUT OFF LPG CYLINDER VALVE IMMEDIATELY. WAIT UNTIL YOU NO LON-
GER SMELL GAS AND. PERFORM LEAK TESTING. IF YOU FIND A LEAK,
DO NOT USE THE GRILL UNTIL LEAK IS SEALED.
Leak detected at cylinder, regulator
or other connection.
1. Regulator fitting loose.
2. Gas leak in hose/regulator or
control valves.
1. Tighten fitting and perform
“Leak Test”.
2. See authorized service center or
call Otto Wilde.
Flame ashback beneath control
panel.
1. Gas orifice clogged. 1. Remove burner, clean gas orifice.
See “Gas venturis and orifices”.
Burner will not light. 1. Out of LPG.
2. Ignitor malfunction.
3. Regulator is not fully connected
to the cylinder valve.
4. Gas orifice clogged.
5. Venturi not aligned with valve
counterpart.
6. Hose is twisted.
7. Electrical power is not connected/
turned on.
1. Exchange or refill LPG Cylinder.
2. Use “Manual Lighting” Procedure.
3. Tighten the connecting nut.
4. Close burner and cylinder valves.
Open cylinder valve slowly, then
open burner valve to light.
5. Leak test connections to deter-
mine loose fitting. Tighten fitting.
Leak test system.
6. Remove burner, clean gas orifice.
See “Gas venturis and orifices”.
7. Realign gas orifice to counterpart.
See “Gas venturis and orifices”.
8. Straighten hose.
Keep away from Firebox.
9. Connect grill to power outlet.
Decreasing heat, “popping sound”. 1. Out of LPG.
2. Gas orifice clogged.
1. Exchange or refill LPG Cylinder.
2. Remove burner, clean gas orifice.
See “Gas venturis and orifices”.
Hot spots on cooking surface. 1. Gas orifice clogged. 1. Remove burner, clean gas orifice.
See “Gas venturis and orifices”.
“Flare-ups” or grease res. 1. Excessive grease build up.
2. Excessive heat.
1. See “Maintenance”.
2. Turn burner controls to a lower
setting.
Humming noise from regulator. 1. Cylinder valve turned on too
quickly.
1. Turn cylinder valve on slowly.
Yellow Flame. 1. Some yellow flame is normal. If it
becomes excessive the gas orifice
may be clogged.
2. Burner ports blocked.
1. Remove burner, clean gas orifice.
See “Gas venturis and orifices”.
2. Remove burner & clean with soft
bristle brush.
Inside of lid appears to be peeling. 1. This is a buildup of grease. The
inside of the lid is not painted.
1. Clean with Otto Wilde grill brush.
App connection failed. 1. No WIFI signal.
2. No Bluetooth signal.
1. Make sure your home router is in
WIFI mode and connected to the
internet. If not, reset your router.
2. Make sure your smartphone has
an active Bluetooth connection.
20 21

22
2
Preferences Preferences Preferences Preferences Preferences Preferences PreferencesShopping list Shopping list Shopping list Shopping list Shopping list Shopping list Shopping listStatus Status Status Status Status Status StatusRecipes Recipes Recipes Recipes Recipes Recipes RecipesHome Home Home Home Home Home Home
DATA & PRIVACY
In Order to ensure the best for Otto Wilde Grillers,
we collect data from our users on grill usage and
location. Don’t worry though, we promise it’s only
used to better understand our customer’s need to
make your grilling experience as smooth as possible.
Want the full scoop?
Read our Privacy Policy.
Click „I agree“ to start grilling.
I AGREE
Privacy policy
BLUETOOTH
If there is no WiFi network in reach, which you can
connect to, you can also connect to your grill via
Bluetooth. Please keep in mind that Bluetooth has
a limited reach, which means that you need to stay
close to your grill for connection.
CONTINUE
CONNECT WITH BLUETOOTH
CONNECTION
SELECT CONNECTION MODE
WIFI
Your grill will be connected to [Current WiFi Name],
which is the WiFi your phone is currently using. Not
the right WiFi? In order to connect to a different WiFi
network, go to your phone settings, choose WiFi and
connect to your preferred WiFi network before initi-
alizing the grill connection process.
ERROR
You are currently not
connected to a WiFi net-
work, in order to connect
to your grill via WiFi you
need to be connected to
the same WiFi with your
phone. Go to your phone
settings, choose WiFi and
connect to your preferred
WiFi network.
Ok
PREPARE GRILL FOR WIFI
CONNECTION
Press the WiFi touch button which is located on the
control panel of your grill for 5-10secs. When the
WiFi icon flashes at a frequency of 2Hz, showing
the grill has entered WiFi configuration mode, press
CONFIRM to continue with connection.
CONFIRM
G32 Smart
WIFI CONNECTION 1/5
I HAVE A QR CODE
I don‘t have a QR Code
WIFI CONNECTION
LOCATE QR CODE
Otto has sent you a unique QR Code for easy con-
nection of your grill. You can find it on the 2 stickers
attached to your user manual, which has been packa-
ged with the control panel, and on the back side of
you control panel. After assembly of your grill, make
sure to attach one of the QR Code stickers to the
designated spot on the rating plate, which is located
at the back of your grill.
2/5
WIFI CONNECTION 3/5
SCAN QR CODE TO
CONNECT TO GRILL
Center the QR Code in the area above.
WIFI CONNECTION 3/5
SCAN QR CODE TO
CONNECT TO GRILL
Center the QR Code in the area above.
Allow Otto Wilde App
to use camera to capture
QR Code
Allow Deny
Preferences
Shopping
list
StatusRecipesHome
SIGN UP
YOUR INFORMATION
* Required field
Email Address*
Confirm Email*
Password*
Confirm Password*
First Name*
Preferences
Shopping
list
StatusRecipesHome
OVERVIEW SHOPPING LIST
3-2-1 RIBS
6 missing ingredients
LOREM IPSUM
8 missing ingredients
LOREM IPSUM
3 missing ingredients
LOREM IPSUM
11 missing ingredients
Delete
3
5
Download the Otto Wilde App
on your smartphone using the
QR-Codes for your preferred
operating system or search the
App Store or Google Play Store
for Otto Wilde.
ProductsTutorials News
GRILL CONNECTION View all
NEW TO G-PLATFORM?
Connect your Grill to unlock the
power of your Otto Grill.
START TO GRILL SMART
PURCHASE OTTO WILDE GRILL
CONNECT TO GRILL
2
Open the Otto Wilde App. To
connect your grill to the Otto
Wilde App. To do so click
the button “START TO GRILL
SMART” and after that click on
“CONNECT TO GRILL”.
Select connection mode (WIFI
or Bluetooth). Turn page for
further instructions.
Important: To use the WiFi
connection, the location setting
must be activated in the device.
4
For individual functions within
the app, registration is required.
Fill in the required information
marked with a (*) to set up a
new account and verify your
account via email.
After you have successfully
activated and logged in to the
app, functions, such as the
shopping list, are available to
you.
1
G32
QUICK START GUIDE
OTTO WILDE APP
The G32 is a connected product and only shows its full potential when linked to the Otto Wilde
App. The app can be used to read temperatures in the different zones of your G32 as well
as core temperature from the food items you’re preparing. In addition, you can choose from
recipes which guide you through the grilling process step-by-step. Follow the steps below to
connect your grill with the Otto Wilde App:
Preferences Preferences Preferences Preferences Preferences Preferences PreferencesShopping list Shopping list Shopping list Shopping list Shopping list Shopping list Shopping listStatus Status Status Status Status Status StatusRecipes Recipes Recipes Recipes Recipes Recipes RecipesHome Home Home Home Home Home Home
BLUETOOTH CONNECTION 1/2 BLUETOOTH CONNECTION 1/2
PAIRED GRILLS
G32
G16 paired
i
i
BLUETOOTH
Enable bluetooth on your mobile device.
CONFIRM
G32 Smart
BLUETOOTH CONNECTION 1/2
PREPARE GRILL FOR BLUETOOTH
CONNECTION
Press the Bluetooth touch button which is located on
the control panel of your grill for 5-10secs. When the
Bluetooth icon flashes at a frequency of 2Hz, sho-
wing the grill has entered Bluetooth pairing mode,
press CONFIRM to continue with connection.
BLUETOOTH
If there is no WiFi network in reach, which you can
connect to, you can also connect to your grill via
Bluetooth. Please keep in mind that Bluetooth has
a limited reach, which means that you need to stay
close to your grill for connection.
CONTINUE
CONNECT WITH BLUETOOTH
CONNECTION
SELECT CONNECTION MODE
WIFI
Your grill will be connected to [Current WiFi Name],
which is the WiFi your phone is currently using. Not
the right WiFi? In order to connect to a different WiFi
network, go to your phone settings, choose WiFi and
connect to your preferred WiFi network before initi-
alizing the grill connection process.
DATA & PRIVACY
In Order to ensure the best for Otto Wilde Grillers,
we collect data from our users on grill usage and
location. Don’t worry though, we promise it’s only
used to better understand our customer’s need to
make your grilling experience as smooth as possible.
Want the full scoop?
Read our Privacy Policy.
Click „I agree“ to start grilling.
I AGREE
Privacy policy
AVAILABLE DEVICES
G-Platform unpaired
i
i
G-rold unpaired
PAIRED GRILLS
G16 paired
i
i
AVAILABLE DEVICES
G-Platform unpaired
i
i
G-rold unpaired
G32 paired
BLUETOOTH CONNECTION 1/2
PAIRED GRILLS
G16 paired
i
i
AVAILABLE DEVICES
G16 unpaired
G-Platform unpaired
i
i
i
G32 unpaired
G32 paired
G32" CONNECTED
Zones
Alert
-Lorem
Probes
40°
–
40°
–
40°
–
40°
–
10°
–
10°
–
10°
–
10°
–
C C C C
C C C C
Connecting to grill …
Preferences Preferences Preferences Preferences Preferences Preferences PreferencesShopping list Shopping list Shopping list Shopping list Shopping list Shopping list Shopping listStatus Status Status Status Status Status StatusRecipes Recipes Recipes Recipes Recipes Recipes RecipesHome Home Home Home Home Home Home
ENTER WIFI PASSWORD
Roviduciis ut et re, omnis andam, current wi.
Suzanne
Connecting to wifi …
4/5
WIFI CONNECTION 4/5
CONNECT GRILL TO YOUR WIFI
Enter the password for [Current WiFi Name].
Peter475
WIFI CONNECTION
ENTER WIFI PASSWORD
Roviduciis ut et re, omnis andam, current wi.
Suzanne
Connecting to wifi …
WIFI CONNECTION 4/5 WIFI CONNECTION 5/5
NICKNAME YOUR GRILL
It’s finally time to name your grill. This name will
be shown at the top of the dashboard to help you
distinguish grills, when you have connected more
than one.
G-rold
CONTINUE
WIFI CONNECTION 4/5
CONNECT GRILL TO YOUR WIFI
Enter the password for [Current WiFi Name].
Not the right WiFi? In order to connect to a different
WiFi network, close the Otto Wilde App, go to your
phone settings, choose WiFi and connect to your
preferred WiFi network. Afterwards, open the Otto
Wilde App again and restart the grill connection
process.
G32" CONNECTED
Zones
Probes
Alert
-Lorem
40°
–
40°
–
40°
–
40°
–
10°
–
10°
–
10°
–
10°
–
C
C C CC
C C C
Connecting to grill …
G32" CONNECTED
Zones
Alert
-Lorem
Probes
40°
–
40°
–
40°
–
40°
–
10°
–
10°
–
10°
–
10°
–
C C C C
C C C C
“G32 Connected” wants to
connect to WiFi [Current
WiFi Name].
Allow Deny
6
Your grill should now connect
to your WIFI.
If successful:
Dashboard will show up.
If not successful:
Follow the instructions provided
by the Otto Wilde App.
Preferences Preferences Preferences Preferences Preferences Preferences PreferencesShopping list Shopping list Shopping list Shopping list Shopping list Shopping list Shopping listStatus Status Status Status Status Status StatusRecipes Recipes Recipes Recipes Recipes Recipes RecipesHome Home Home Home Home Home Home
DATA & PRIVACY
In Order to ensure the best for Otto Wilde Grillers,
we collect data from our users on grill usage and
location. Don’t worry though, we promise it’s only
used to better understand our customer’s need to
make your grilling experience as smooth as possible.
Want the full scoop?
Read our Privacy Policy.
Click „I agree“ to start grilling.
I AGREE
Privacy policy
BLUETOOTH
If there is no WiFi network in reach, which you can
connect to, you can also connect to your grill via
Bluetooth. Please keep in mind that Bluetooth has
a limited reach, which means that you need to stay
close to your grill for connection.
CONTINUE
CONNECT WITH BLUETOOTH
CONNECTION
SELECT CONNECTION MODE
WIFI
Your grill will be connected to [Current WiFi Name],
which is the WiFi your phone is currently using. Not
the right WiFi? In order to connect to a different WiFi
network, go to your phone settings, choose WiFi and
connect to your preferred WiFi network before initi-
alizing the grill connection process.
ERROR
You are currently not
connected to a WiFi net-
work, in order to connect
to your grill via WiFi you
need to be connected to
the same WiFi with your
phone. Go to your phone
settings, choose WiFi and
connect to your preferred
WiFi network.
Ok
PREPARE GRILL FOR WIFI
CONNECTION
Press the WiFi touch button which is located on the
control panel of your grill for 5-10secs. When the
WiFi icon flashes at a frequency of 2Hz, showing
the grill has entered WiFi configuration mode, press
CONFIRM to continue with connection.
CONFIRM
G32 Smart
WIFI CONNECTION 1/5
I HAVE A QR CODE
I don‘t have a QR Code
WIFI CONNECTION
LOCATE QR CODE
Otto has sent you a unique QR Code for easy con-
nection of your grill. You can find it on the 2 stickers
attached to your user manual, which has been packa-
ged with the control panel, and on the back side of
you control panel. After assembly of your grill, make
sure to attach one of the QR Code stickers to the
designated spot on the rating plate, which is located
at the back of your grill.
2/5
WIFI CONNECTION 3/5
SCAN QR CODE TO
CONNECT TO GRILL
Center the QR Code in the area above.
WIFI CONNECTION 3/5
SCAN QR CODE TO
CONNECT TO GRILL
Center the QR Code in the area above.
Allow Otto Wilde App
to use camera to capture
QR Code
Allow Deny
Use your smartphone to scan
the QR-code located on the
stickers attached to your grill.
3
PreferencesShopping listStatusRecipesHome
BLUETOOTH CONNECTION 1/2
PAIRED GRILLS
G16 paired
i
i
AVAILABLE DEVICES
G-Platform unpaired
i
i
G-rold unpaired
G32 paired
Choose the grill you want to
connect to from the list “AVAIL-
ABLE DEVICES”.
3
Press WIFI button on
your grill for 5 seconds
until you hear the
second beep to set
your grill to AP mode.
Ensure your smart-
phone is connected to
the WIFI you want to
connect your grill to
and your grill is on.
WIFI
Make sure Bluetooth
is activated on your
smartphone and your
grill is on.
1
BLUETOOTH
2
Press Bluetooth button
on your grill and wait
for 5 seconds until you
hear the second beep
to set your grill to Blue-
tooth pairing mode.
1
ENJOY THE
REVOLUTION
Preferences Preferences Preferences Preferences Preferences Preferences PreferencesShopping list Shopping list Shopping list Shopping list Shopping list Shopping list Shopping listStatus Status Status Status Status Status StatusRecipes Recipes Recipes Recipes Recipes Recipes RecipesHome Home Home Home Home Home Home
ENTER WIFI PASSWORD
Roviduciis ut et re, omnis andam, current wi.
Suzanne
Connecting to wifi …
4/5
WIFI CONNECTION 4/5
CONNECT GRILL TO YOUR WIFI
Enter the password for [Current WiFi Name].
Peter475
WIFI CONNECTION
ENTER WIFI PASSWORD
Roviduciis ut et re, omnis andam, current wi.
Suzanne
Connecting to wifi …
WIFI CONNECTION 4/5 WIFI CONNECTION 5/5
NICKNAME YOUR GRILL
It’s finally time to name your grill. This name will
be shown at the top of the dashboard to help you
distinguish grills, when you have connected more
than one.
G-rold
CONTINUE
WIFI CONNECTION 4/5
CONNECT GRILL TO YOUR WIFI
Enter the password for [Current WiFi Name].
Not the right WiFi? In order to connect to a different
WiFi network, close the Otto Wilde App, go to your
phone settings, choose WiFi and connect to your
preferred WiFi network. Afterwards, open the Otto
Wilde App again and restart the grill connection
process.
G32" CONNECTED
Zones
Probes
Alert
-Lorem
40°
–
40°
–
40°
–
40°
–
10°
–
10°
–
10°
–
10°
–
C
C C CC
C C C
Connecting to grill …
G32" CONNECTED
Zones
Alert
-Lorem
Probes
40°
–
40°
–
40°
–
40°
–
10°
–
10°
–
10°
–
10°
–
C C C C
C C C C
“G32 Connected” wants to
connect to WiFi [Current
WiFi Name].
Allow Deny
4
Enter the password of the WIFI
you want to connect your grill to.
5
**************R9!
SmartBoy1
Nickname your grill.
44
Your grill should now connect to
your smartphone via Bluetooth.
If successful:
Dashboard will show up.
If not successful:
Follow the instructions provided
by the Otto Wilde App.
2322

Share your grill experience with us!
Otto Wilde Grillers GmbH
Benzenbergstr. 44
40219 Düsseldorf
0211 542 130 30
service@ottowilde.de
www.ottowildegrillers.com
Scan the QR-Code
with the camera of
your smartphone or
your tablet to open
the website with the
Assembly Manual
content.
24
Table of contents
Other Otto Wilde Grill manuals
Popular Grill manuals by other brands

BlueRhino
BlueRhino UniFlame Gold HBT822WA owner's manual

Proficook
Proficook PC-EBG 1201 instruction manual

GrillChef
GrillChef 11529 Assembly instruction

MasterChef
MasterChef 76 cm (30?) Safe use, care and assembly manual

BlueRhino
BlueRhino UniFlame GBC820W owner's manual

Silvercrest
Silvercrest SKGET 2000 A1 operating instructions