OVINGTON BOATS Musto Skiff Quick start guide

Musto Skiff – Rigging Guide (v0.5) -Jan 2019 1 of 19
Musto Skiff Rigging Guide
This rigging guide is to be used in conjunction with the Class Rules and CE Owners Manual, both available at
http://www.mustoskiff.com
Please take your time to rig your boat up prior to your first sail. You will, no doubt, be in a hurry to get out on the water and
enjoy some serious skiff sailing but a few extra minutes spent checking your boat is correctly rigged will make sure you have
an enjoyable sail and may prevent you damaging your kit.
You can rig the boat in a different order from than that described here but we know this method works.
NOTE: The following rigging fittings that are designed to be adjustable may be adjusted when not racing using only the fitting
functionality – (i) the angle and length of the mast spreaders, (ii) inboard, outboard and forestay shroud adjusters, and (iii) the
batten tensioners.”
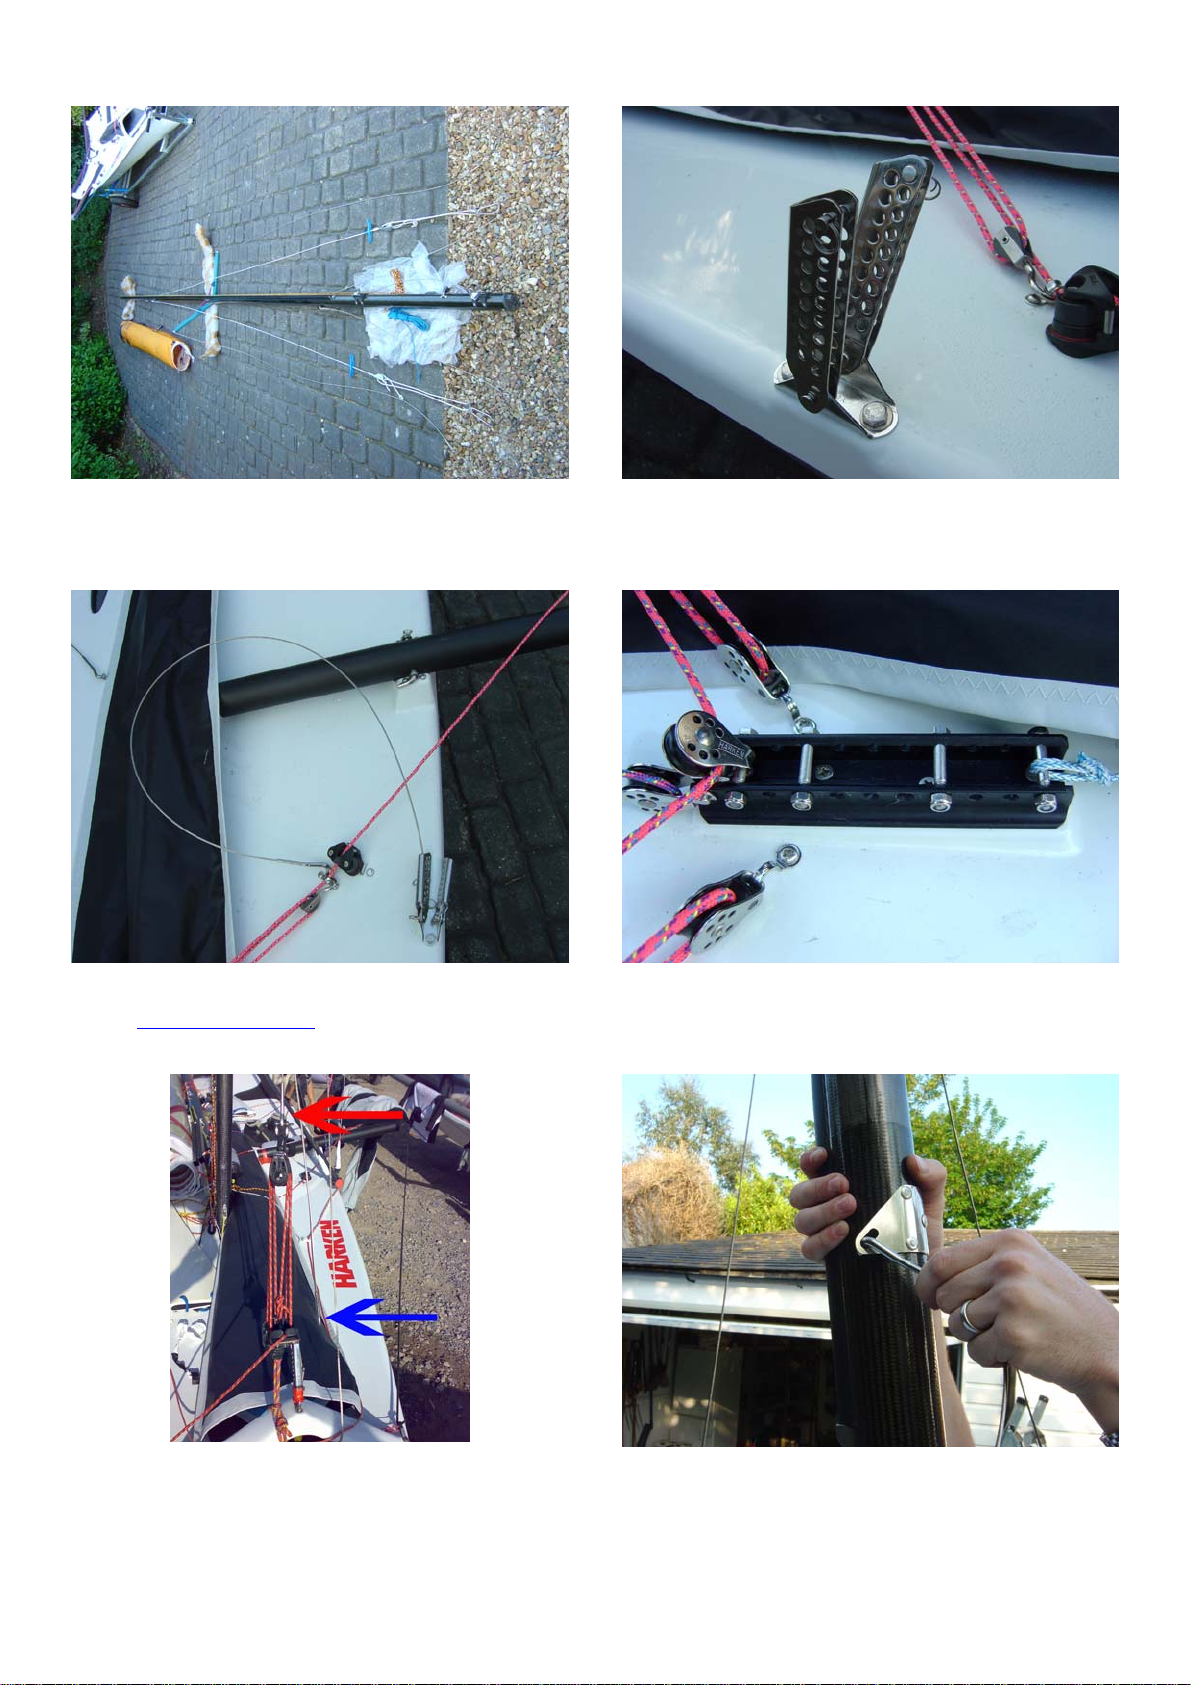
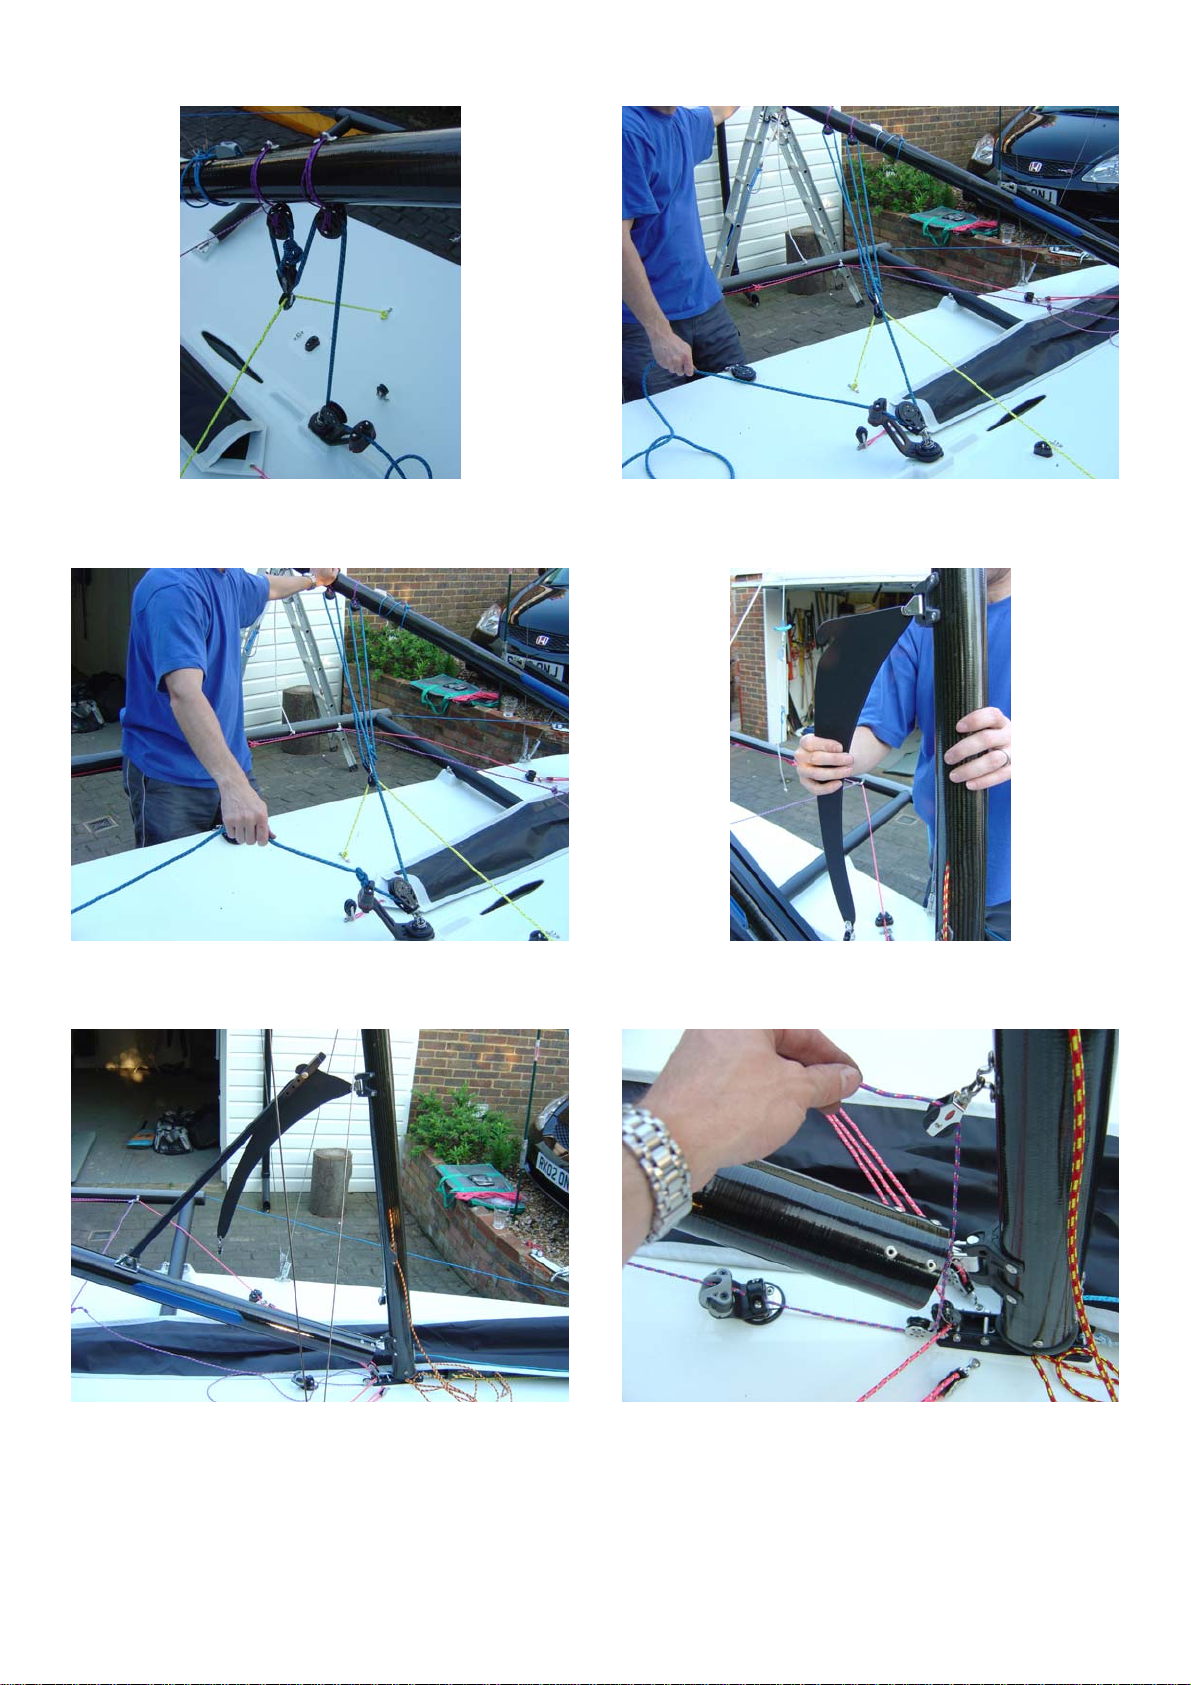
Below; shows the starting point, you should have one of everything in this picture.
1. The boat comes supplied with everything (except the
forestay tensioning device) you need to go sailing, if you are
missing an item please call your dealer
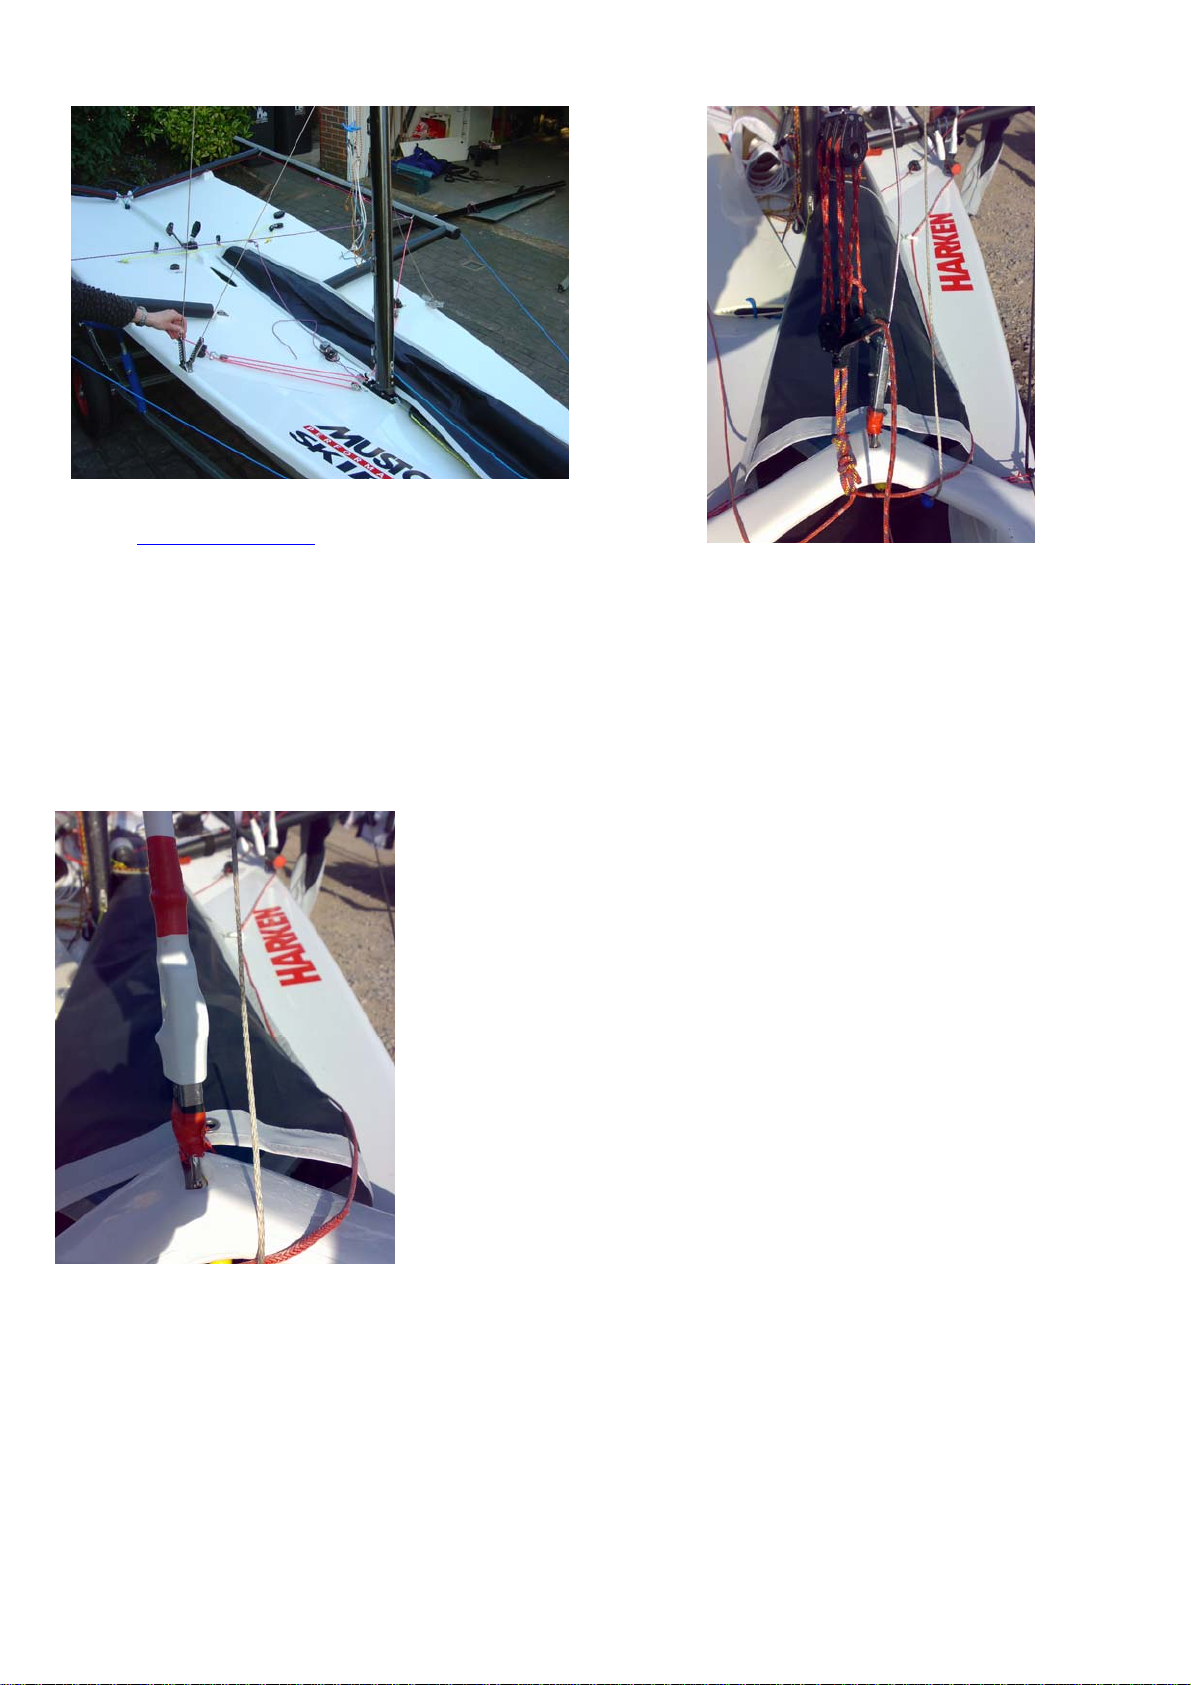
2. You have to start somewhere so lets start by attaching the
Harken Carbo Ratchamatics for the spinnaker sheets. One
each side. They are not handed so you don’t need to worry
about which wa
y
round the
y
g
o.

Musto Skiff – Rigging Guide (v0.5) -Jan 2019 2 of 19
Rigging the Boom
3. The first step is to fit the Harken blocks to the boom for the
mainsheet. Thread a strin
g
throu
g
h the block
4. Pass the string through the top of the block.
5. Take it through eye on the top of the boom and back
through the top of the block. Then back through the body of
the block.
6. Repeat the process until you have several wraps around
the boom. Finish the process by tying/splicing the ends off
leavin
g
the block “snu
g
” to the boom.
7. Repeat the process for the second block.
8. Bolt the double kicker bar to the boom fittin
g

Musto Skiff – Rigging Guide (v0.5) -Jan 2019 3 of 19
9. Make sure you don’t over tighten this as it will need to
move up and down as the kicker is ad
j
usted.

Musto Skiff – Rigging Guide (v0.5) -Jan 2019 4 of 19
Fitting the Wings
10. Fitting the wings is simple; make sure you align the white
end fittings with the male fitting on the deck.
11. Insert the wing pins. If they are difficult to insert you may
not have the wings in properly. Give them a little “wiggle” until
the pin can be inserted.
12. Clip the elastic over the pin end between the bar and the
deck eye
13. With the elastic between the wing and the deck eye the
elastic can never get knocked off and you won’t lose any
pins. The folded ends of the pins should preferably be away
from the cockpit so that ropes don’t
g
et cau
g
ht on the pin.
14. With the wings fitted ensure that the line for the downhaul
(
pink in this picture
)
is on top of the win
g
bar.
Stepping the Mast

Musto Skiff – Rigging Guide (v0.5) -Jan 2019 5 of 19
15. Before stepping the mast lay it out (on padding, you don’t
want to scratch your new carbon mast). Check the lines and
wires are not twisted up. LOOK UP to check you are not
going to hit anything when you raise mast, especially power
lines!! NOTE: The trapeze T terminals
g
o in the upper slots.
16. Fit the rig adjusters onto the chain plates
17. Attach the lower shroud to the inboard rig adjuster. Five
holes down on the front row is a good start but check
www.mustoskiff.com for tuning information
18. Check the mast step is clear for the mast to be stepped.
The 2 intermediate bolts may be relocated to different holes
in the mast step between the front and back bolts. The back
bolt may be moved to the back holes. The kicker control line
bloc
k
ma
y
be relocated to anothe
r
part of the step.
19. Step the mast and loosely the forestay with the rig
tensioning device (not supplied) to the upper eye (arrowed)
20. With the weight of the mast now on the forestay attach
the lower shrouds to the plate on the mast. Do both sides
and the mast will now be self supported.

Musto Skiff – Rigging Guide (v0.5) -Jan 2019 6 of 19
21. Attach the shroud to the outboard rig adjuster. Five holes
down on the front row is a good start but check
www.mustoskiff.com for tuning information
22. Now you have both shrouds and lowers are attached
tension the rig using the tensioning device and then locate
the lower eye (shown blue arrow in step 19) into the
chainplate and insert the pin. Then remove the tensioning
device. NOTE: Please don’t over tension the rigging; call
Ovington Boats if unsure on required rig tension.
22a. Now tape or cover the chainplate AND the
upper eye that the rig tensioning device was attached to
to prevent the spinnaker snagging

Musto Skiff – Rigging Guide (v0.5) -Jan 2019 7 of 19
Attaching the Trapezes (One of the styles allowed)
23. Now the rig is tensioned the trapezes can be connected
to the elastic that is available on the win
g
bar.
24. Take the loop and pull it through the ring block.
25. Take the loop around the trapeze rin
g
26. Pull it ti
g
ht and that’s done. Repeat the other side.

Musto Skiff – Rigging Guide (v0.5) -Jan 2019 8 of 19
Fitting the boom, vang and mainsheet
27. Place the rigged boom in the cockpit
28. Remove the pin in the lower gooseneck and fit it through
the boom.
29. Attach the main hal
y
ard to the outhaul
30. Cleat the outhaul off in the centre of the boom
31. Pull some of the main halyard through so the boom is in
the approximate position that you would expect when sailing
32. Rig the mainsheet starting with a knot at the block
attached to the mainsheet bridal. The method of tying is
optional. Then thread it throu
g
h the front block on the boom.

Musto Skiff – Rigging Guide (v0.5) -Jan 2019 9 of 19
33. Then thread it through the block on the bridal then back
through the aft block on the boom and through the jammer.
MAKE SURE YOU GET IT THE RIGHT WAY THROUGH
THE RATCHET BLOCK,
34. Push the boom out to the shroud and cleat the
mainsheet.
35. Pull the sheet on a little bit and we recommend putting a
stopper knot of your choice into the mainsheet; this will stop
the boom hitting the shroud when the mainsheet is not
cleated.
36. Fit the other kicker bar to the upper gooseneck.
37. Locate the two kicker bars together. Note if they will not
then just adjust the height of the boom by adjusting the angle
of the boom with the main hal
y
ard.
38. Thread the kicker control line. From the cleat, through the
block on the mast step then through the block on the mast.

Musto Skiff – Rigging Guide (v0.5) -Jan 2019 10 of 19
39. Then take the rope through the block on the end of the
kicker bar and back towards the mast.
40. Then tie the end of the rope to the eye on the mast.

Musto Skiff – Rigging Guide (v0.5) -Jan 2019 11 of 19
Rigging the Spinnaker
41. Take the halyard from the exit on the front of the mast,
under the chute throat and through the block attached to the
pole “puller”
42. Take it back under the chute throat
43. Preferably over the downhaul line (pink) and under the
van
g
line
(
purple
)
44. Through the cleat on the deck and through the block
behind it. Note: Make sure
y
ou
g
o under the bridle.
45. Through the “take up” block at the back of the boat and
throu
g
h the block at the back of the chute.
46. Use the tiller extension to thread the halyard through the
chute.

Musto Skiff – Rigging Guide (v0.5) -Jan 2019 12 of 19
47. Tie the hal
y
ard on the tiller extension
48. Pull the extension out of the chute
49. Tie the halyard onto the forestay eye, otherwise the
elastic will pull it back a
g
ain.
50. Roll the kite out and tie the tack on the clew line eg with a
bowline.
51. Then you may attach the kite sheets to the clew. There
are various options for attaching the sheets, some are shown
on the class website, The method shown involves finding the
middle of the sheets and push the loop throu
g
h
52. Then post the end of the sheets through to make a “larks
foot” on the clew.

Musto Skiff – Rigging Guide (v0.5) -Jan 2019 13 of 19
53. Thread the sheet ends through the ratchet blocks,
observing the arrow on the blocks to make sure that the
ratchet is workin
g
in the correct direction
54. Tie the sheet ends together eg using a fishermans knot.
Note: You can tie the sheet ends to the clew if you want but I
prefer this method. There are also other options for this.
55. Make sure you have run the kite sheets on top of other
ropes and behind the mainsheet.
56. Tie the head to the kite halyard.
57. Un-tie the downhaul from the forestay eye (remember
step 49) thread it through the ring on the kite. Make sure you
are under the kite sheets
58. Tie the downhaul to the upper patch on the kite.

Musto Skiff – Rigging Guide (v0.5) -Jan 2019 14 of 19
59. If it is the first time you have rigged an asymmetric
spinnaker it’s a good idea to hoist it on the shore AS LONG
A
S IT IS NOT TOO WINDY.
60. Then drop the kite, make sure you do not get it caught on
the trolley handles on the way down, they of course won’t be
there when
y
ou a
r
e sailin
g
.
61. Have a quick look up to make sure the halyard is not
twisted or inside a shroud.
62. Your cockpit should now look like this …

Musto Skiff – Rigging Guide (v0.5) -Jan 2019 15 of 19
Fitting the Rudder
63. Offer the stock up to the pintles and insert the pin from
below the bottom pintle plate
64. Insert the split ring at the top to hold the pin in place.
Once on the stock it can be left on the boat permanentl
y
.
65. Clip the tiller extension onto the tiller.
66. Insert the rudder blade. Friction will keep it up.
Fit the Bung and Tape EVERYTHING up
NOTE: The following rigging fittings that are designed to be adjustable may be adjusted when not racing using only the fitting
functionality – (i) the angle and length of the mast spreaders, (ii) inboard, outboard and forestay shroud adjusters, and (iii) the
batten tensioners.”
67. Don’t for
g
et to put the bun
g
in!!!!
68. Tape ever
y
thin
g
up -, “if in doubt, tape it up”

Musto Skiff – Rigging Guide (v0.5) -Jan 2019 16 of 19
Hoist the mainsail
69. Check the halyard doesn’t have any
twists and shackle the head on.
70, Slowly pull the main up, as it’s fully
battened it can be stiff so go steady. A
good spray of suitable lubricant on the
track can make this easier.
71. Once it is at the very top give the
halyard a good pull and cleat it off.
72. Coil the halyard up. It may be
placed in the pocket on the side of the
main or into some shockcord on spa
r
.
73. If using the pocket, close it using the
Velcro.
74. Post the clew strap over the end of the boom.
75. Take the outhaul throu
g
h the clew crin
g
le

Musto Skiff – Rigging Guide (v0.5) -Jan 2019 17 of 19
76. Back throu
g
h the hole in the boom.
77. Give the outhaul a pull and cleat it off.
78. You may tie the slack end of the outhaul to the bolt of the
kicker bar to keep the end tid
y
, or leave it loose knotted.
79. Slot the kicker bars together. You may need to apply
some leech tension with the mainsheet to achieve this. Make
sure the boat is head to wind and if it’s windy get some help
otherwise the boat can
g
et blown off the trolle
y
.
80. The bolt should be in the top of the four available holes.

Musto Skiff – Rigging Guide (v0.5) -Jan 2019 18 of 19
81. Hook the port downhaul block to the
port loop
82. Then the starboard one
83. Make sure there are no twists in the
system and everything is the correct
side of boom and not twsited.
84. Zip the sleeve up
85. All the wa
y
to the bottom
86. Buckle up the two straps.
87. Place the da
gg
erboard in the boat
88. You are read
y
to
g
o ….

Musto Skiff – Rigging Guide (v0.5) -Jan 2019 19 of 19
89. The cockpit should look like this
90. Just add water.
Other manuals for Musto Skiff
1
Table of contents
Other OVINGTON BOATS Boat manuals