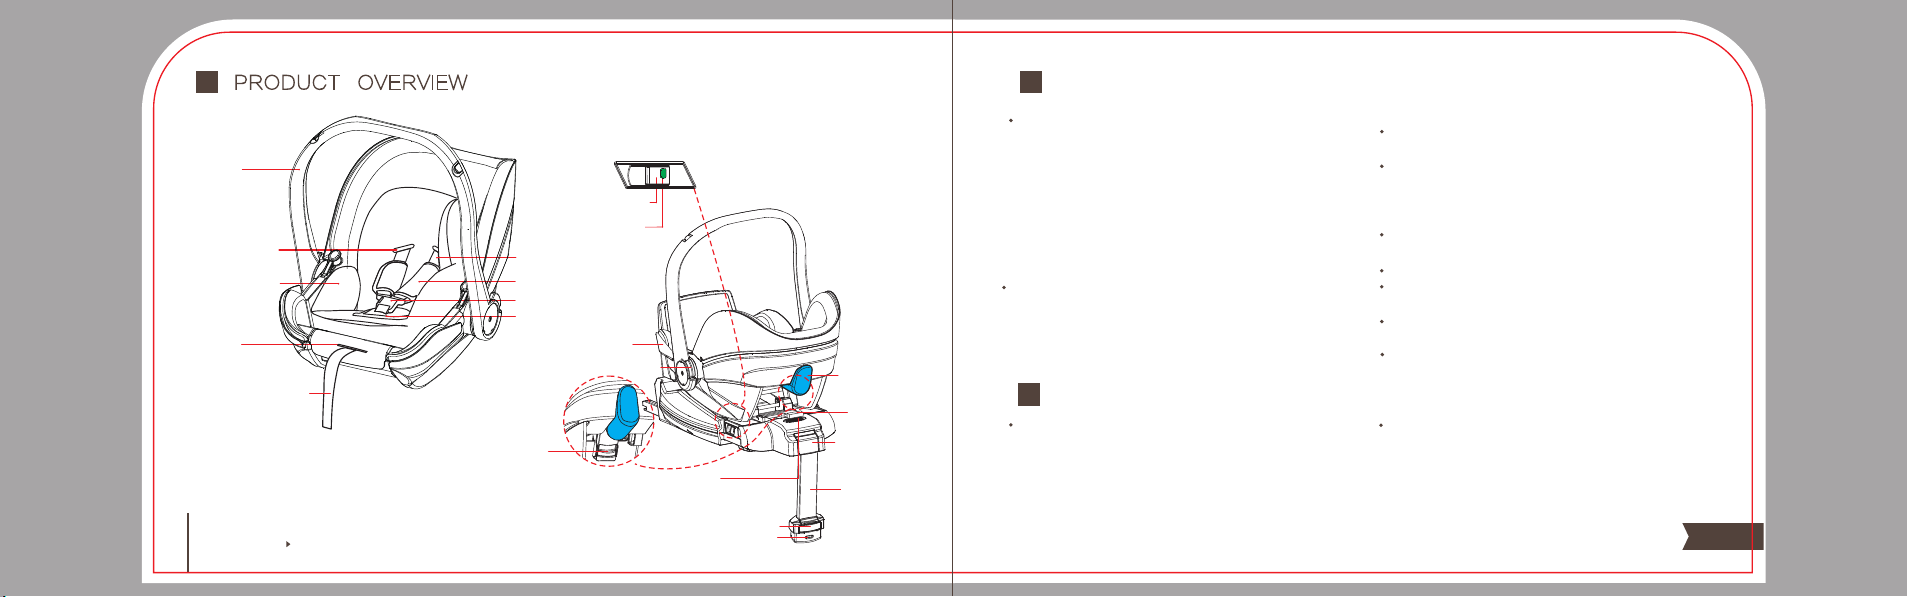
Oyster Capsule Infant User manual

Approval ECE-R129
• +441509 816444
• www.babystyle.co.uk
Oyst@r
Capsule
Infant
Child car seat
Instructions
Height: 40-83cm Weight 0-13kg
For your child's safety
please read carefully
before use

User Guide
This is an “i-Size” Enhanced Child Restraint System (car seat).It is approved to Regulation
No.129, for use in, “i-Size compatible” vehicle seating positions as indicated by vehicle
manufacturers in the vehicle users’manual.
If in doubt, consult either the Enhanced Child Restraint System manufacturer or the retailer.
Oyster Capsule Infant Isofix Isize Car Seat

01/02
Instructions Safety Guidelines
This is an i-Size child car seat, ,commonly known as a
baby carrier/baby car seat/ Infant carrier. This infant
carrier can be used together with a stroller (check
compatibility before use) to create a travel system. A
child should not spend more that 2 hours in the car seat/
infant carrier at one time, that includes time in the car and
when the seat is used as a travel system (as a stroller).
The safest way for babies to sleep is on their backs - as
recommended by experts at the Lullaby Trust.
This child seat can only be used with the integral Y-
shaped belt (harness) for children. It is suitable for
children up to a height of 83cm and a maximum weight to
13 kg. Never overload the child seat more than one child
or with other loads.
2
3
For your child’s safety, please read these instructions
carefully before useand keep them for future reference.
Failure to follow the instructions contained in this manual
could result in serious injury to your child.
1
Y-shaped belt
shoulder pad
Buckle
Crotch pad
Handle
Shoulder strap slot
Comfortable cushion
Adjuster
(under the cover)
Y-shaped belt adjuster
strap
belt guide hook
Belt guide hook
Handle adjusting button
For ISOFIX installation: Make sure you read the car
manufacturer’s handbook.
Do not use any load bearing contact points other than those
described in the instructions and marked in the child restraint
for infant carrier module without ISOFIX base. Any straps
holding the restraint to the vehicle should be tight.
Any straps restraining the child should be adjusted to the
child’s body, and that straps should not be twisted.
Any support-leg should be in contact with the vehicle floor.
Make sure any strap is worn low down,so that the pelvis is
firmly engaged, shall be stressed.
The child seat should be replaced when it has been subject
to violent stresses in an accident.
It is dangerous to make any alterations or additions to the
device without the approval of the Type Approval Authority,
not following closely the installation instructions provided by
the child restraint manufacturer is also dangerous.
The child seat should be kept away from sunlight if the seat
is not provided with a textile cover, otherwise it may be too
hot for the child’s skin, exposed plastic surfaces can become
very hot in the sun.
Support leg
Support leg status window
Support leg
Isofix adjusting
button
Connecting status window
Locking button
Seat belt
adjustment button
Isofix release button
Isofix status window
PRODUCT OVERVIEW
adjusting button
FEATURES
SAFETY WARNINGS

03/04
4
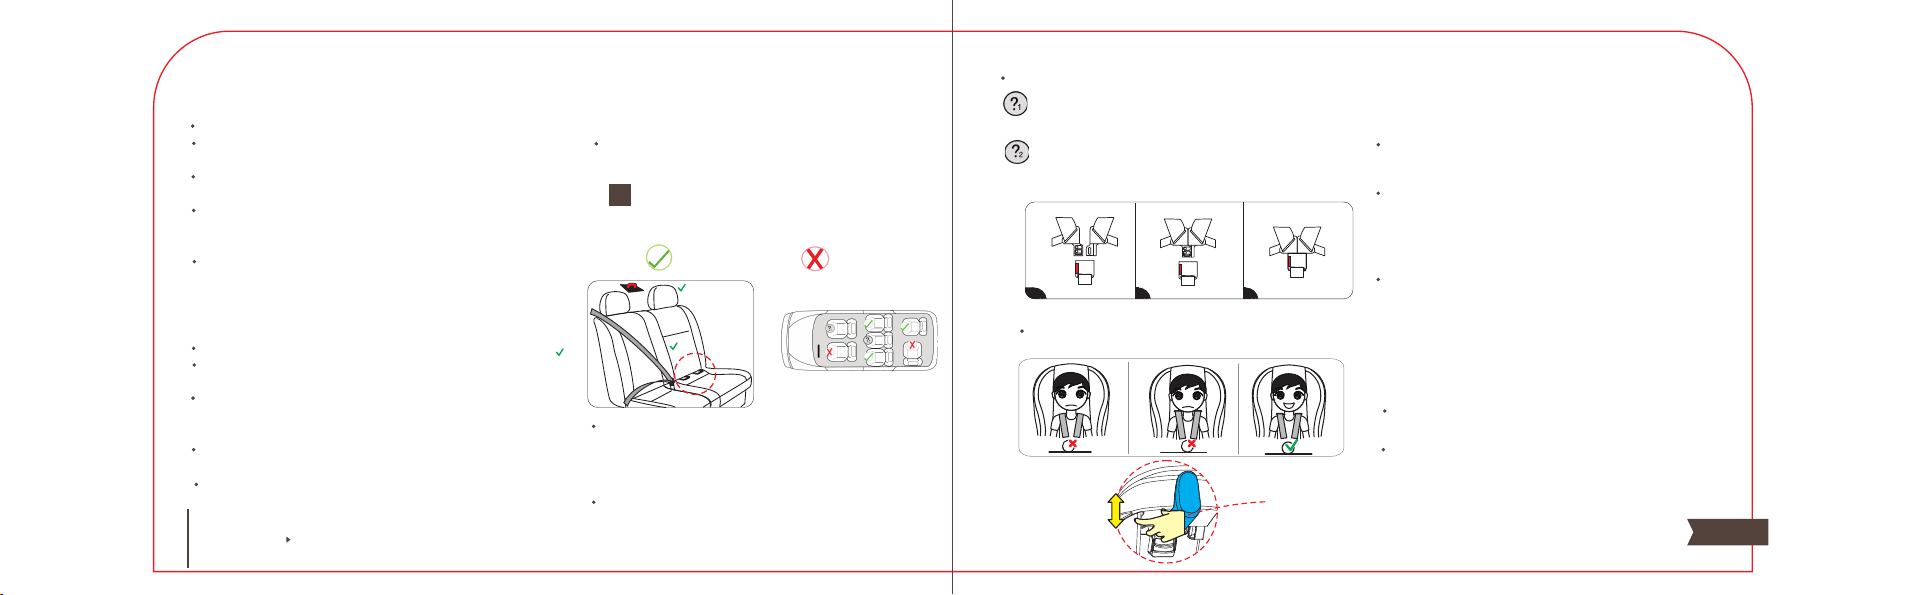
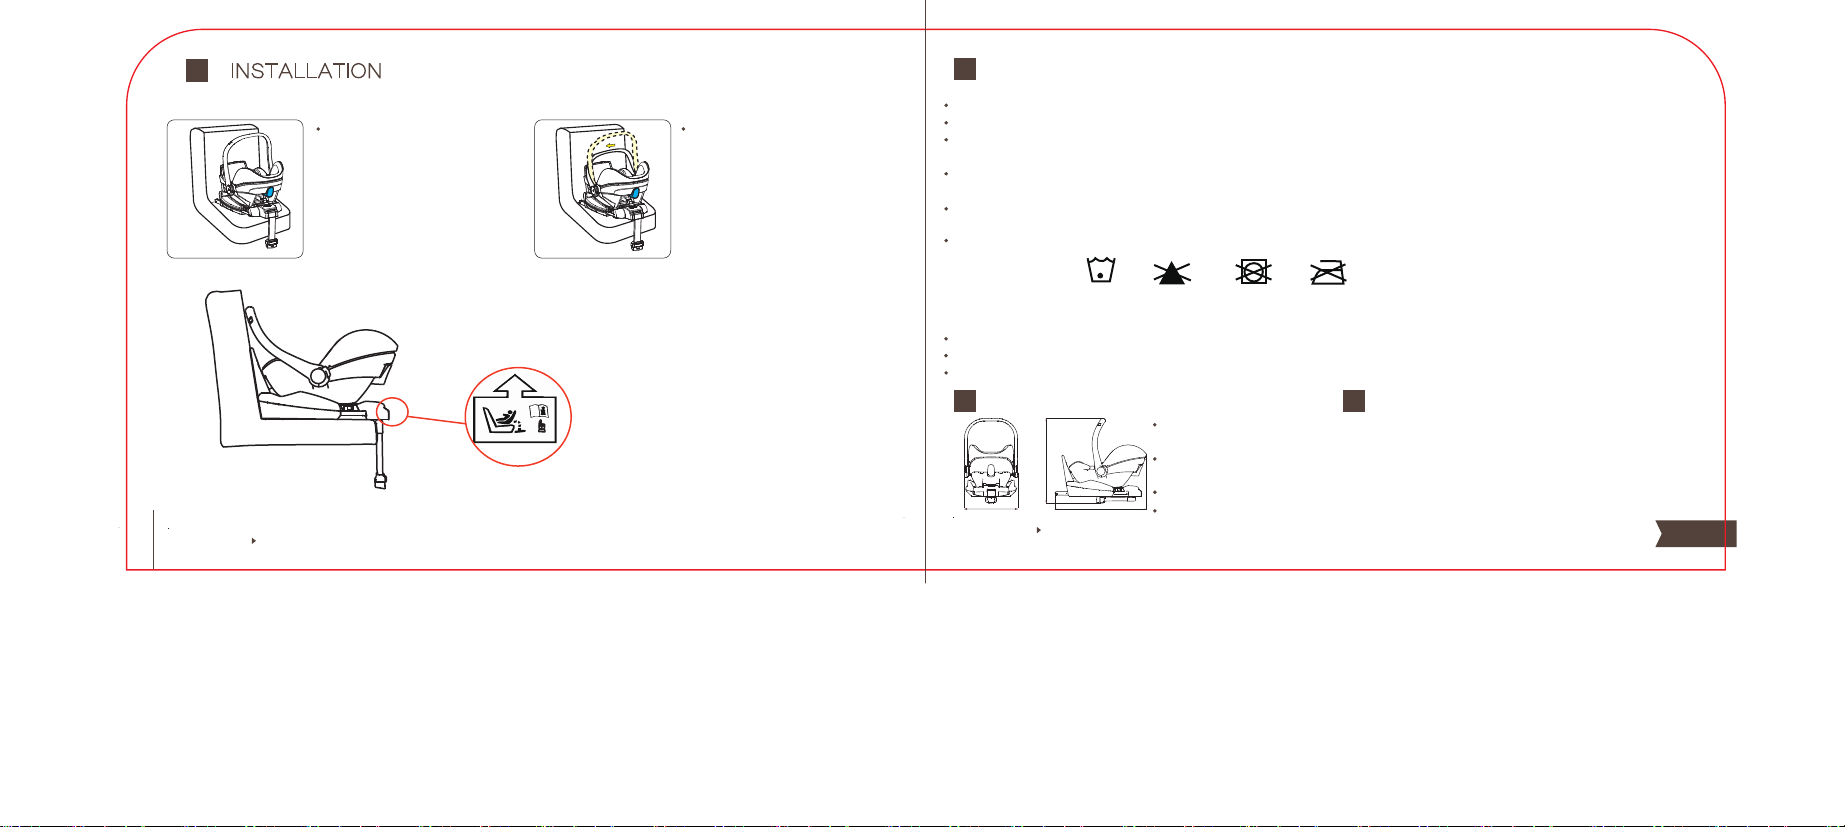
4.1 Installing position of the child seat in vehicle
4.2 Using the buckle, closing & opening
4.3 Check the height of harness
Rright
ISOFIX anchorages
Wrong
Rright installation
Step1: Place the left and the right pieces of buckle (on the
shoulder straps) together.
Step2: Insert the two pieces into the opening of the crotch
buckle at the same time. Hearing a "click" means the buckle
is locked and connected. Pull the belts connected to buckle
and check whether the buckle is locked correctly.
the buckle will eject and release.
Do not use rearward-facing in seating positions where
an active frontal airbag is installed.
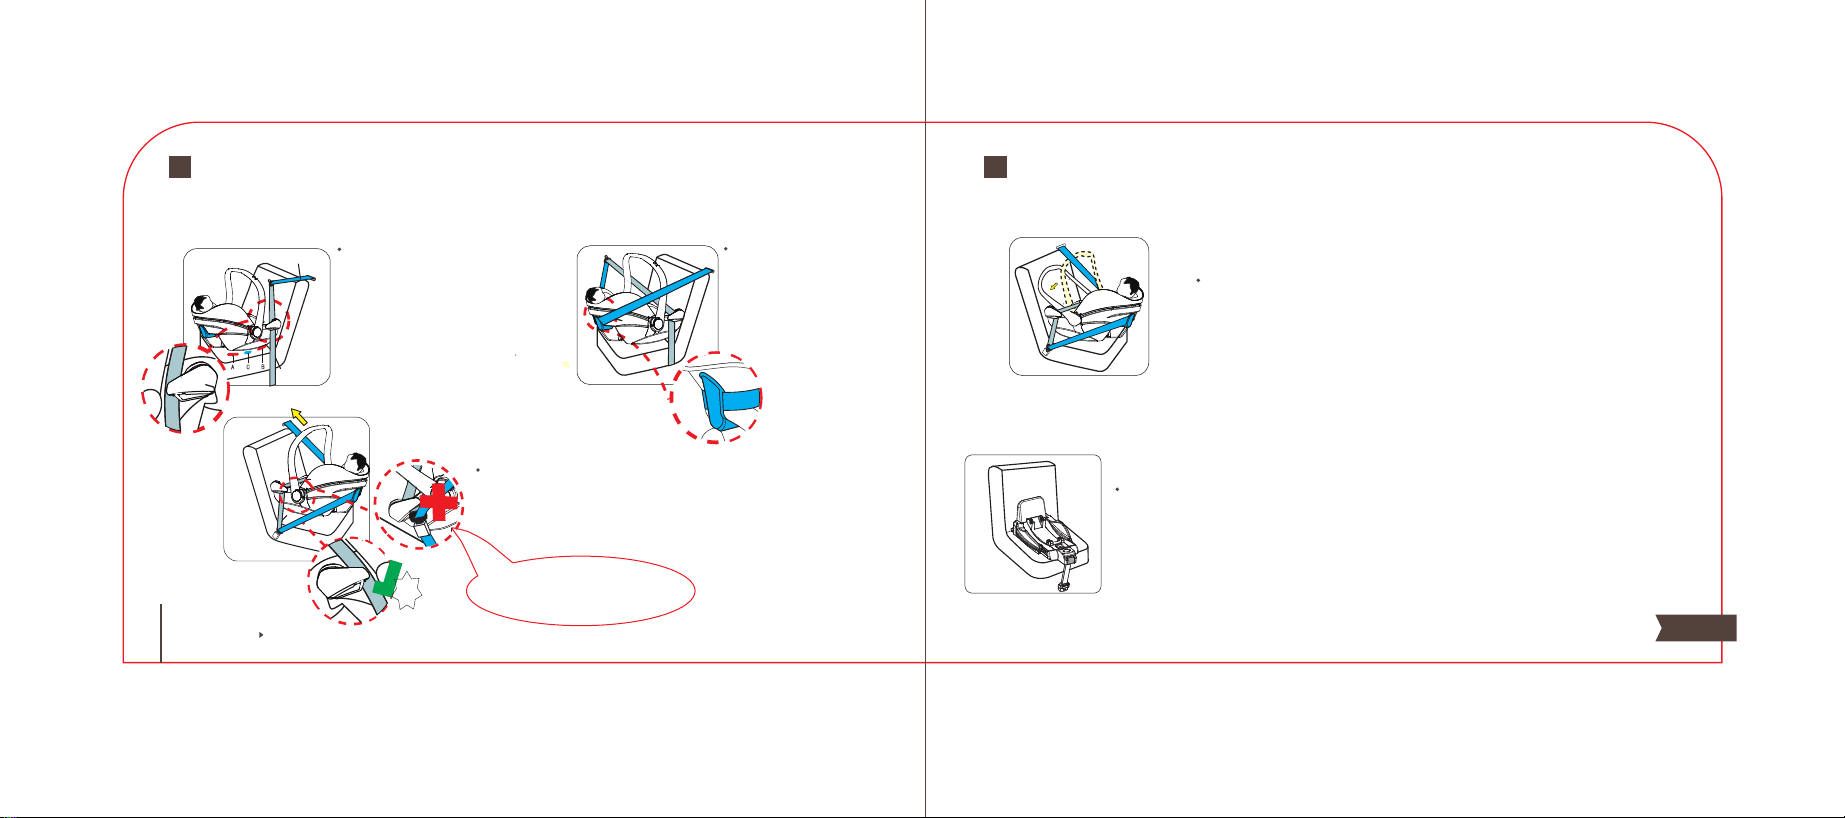
Only install in this position if three-point safety beltsare
fitted.
If the height of the harness shoulder straps not correct
please adjust according to the following steps:
Step1: Press the red button of buckle, two pieces of
buckle will eject automatically (see 4.2)
Step2: Move the seat belt adjustment slider to change
the position of harness shoulder belts .
1
1 2 3 Step 3: To release the buckle, press in the red button and
Diagonal belt and Lap belt
seat belt adjustment slider
Do not leave your child unattended in the seat at any time.
Any luggage or other objects liable to cause injuries in
the event of a collision shall be properly secured.
The Enhanced Child Restraint System shall not be used
without the cover.
The seat cover should not be replaced with any other than
the one recommended by the manufacturer, because the
cover constitutes an integral part of the restraint performance.
Ensure that all components of the children's safety seat are
secured to the correct position during the daily use
of the vehicle, that they are not liable,during the
everyday use of the vehicle,to become trapped by a
moveable seat or in a door of the vehicle.
Please keep this instruction manual for the life of the product .
Do not use this child seat at home. It has not been designed
for home use and should only be used in your car.
For the reason of safety,the child seat must be fixed inside
the vehicle using ISOFIX anchorages even if you do not put
your child inside the child seat.
Never use a second-hand product,as you can never be
certain what was happened to it.
This is an i-Size Enhanced Child Restraint System. It is
approved according to Regulation No.129, for use in, i-Size
compatible vehicles.
Instructions Safety Guidelines
compatible vehicle seating positions as indicated by
vehiclemanufacturers in the vehicle users’ manual.If in
doubt, consult either the Enhanced Child Restraint System
manufacturer or the retailer.
Don't use the child seat in seating positions where there
is an active frontal airbag installed.
This infant carrier not suitable for a car which is only equipped with 2 point safety belts.
When used as an infant carrier with ISOFIX base ,this type
of child safety seat is suitable for fixing into the seat
positions of the cars equipped with ISOFIX system that is
fitted in accordance with ECE R14.
When used as an infant carrier module without an ISOFIX
base, this type of child safety seat is suitable for a car
equipped with 3 point belts approved to ECE R16
Always check whether the Y-shaped belts are at the correct height for your child. If not , adjust the height of
headrest/harness using the adjustmentslider at the back of the seat (see the picture below) .
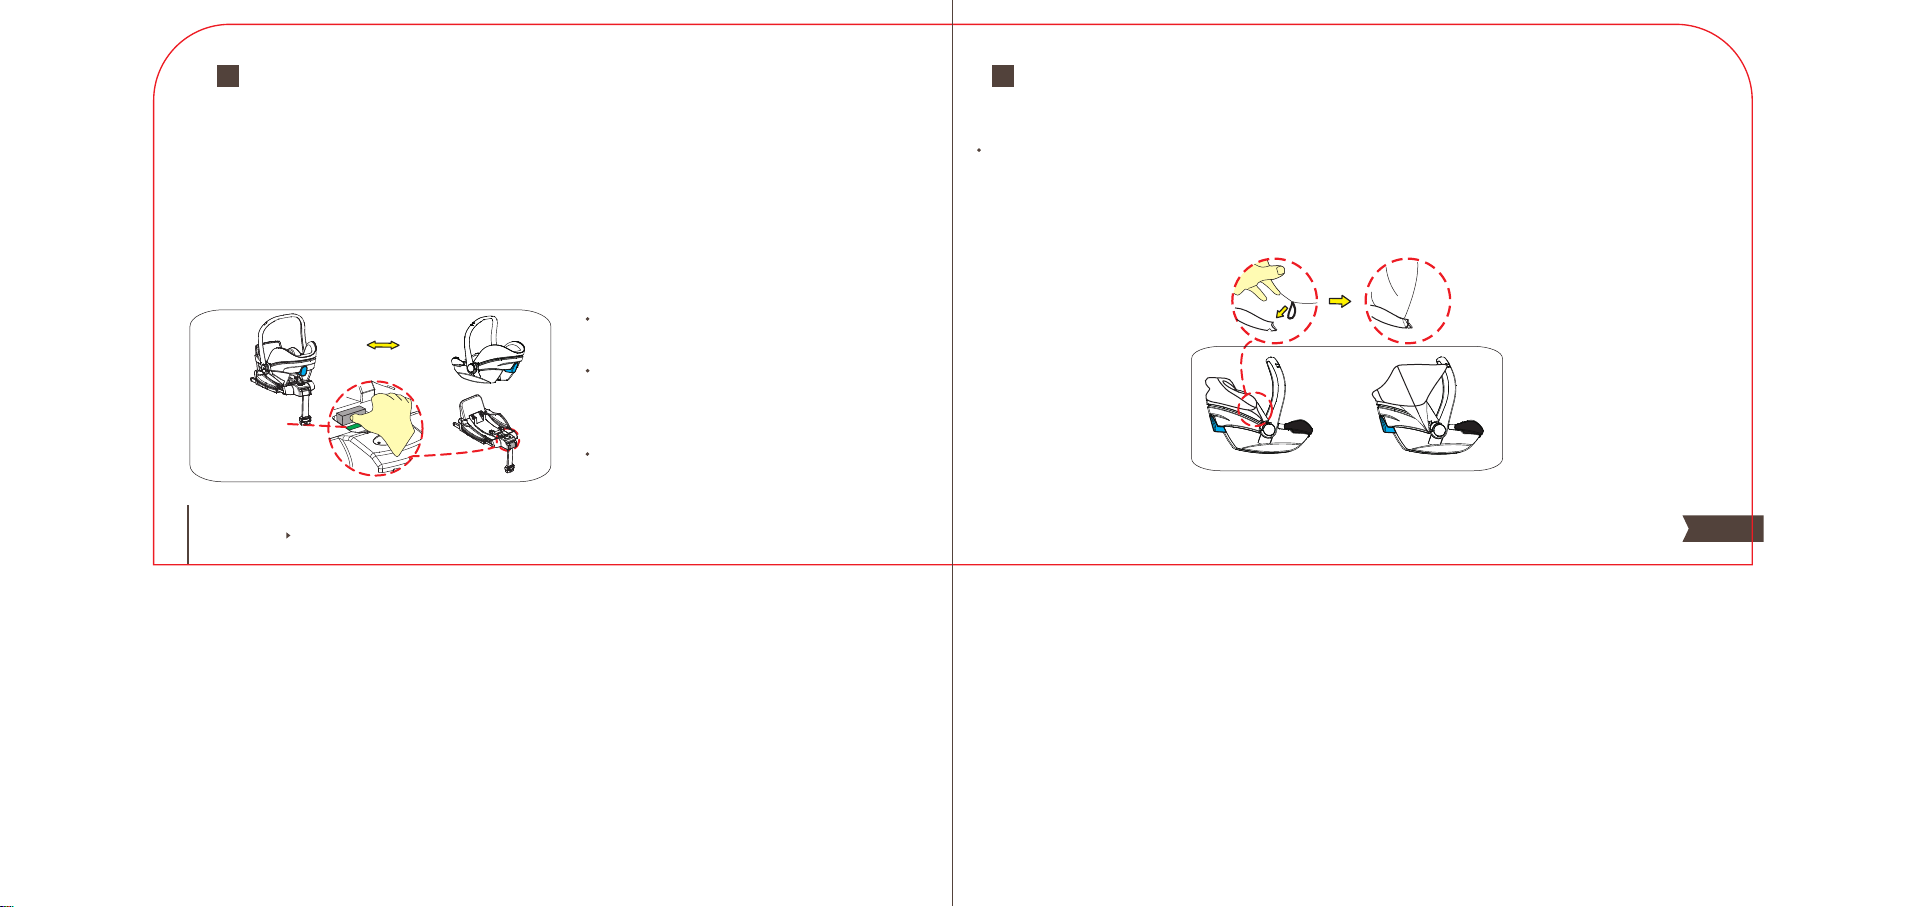
USAGE

05/06
Do not leave your child unattended in the seat at any
time.
Any luggage or other objects liable to cause injuries in
the event of a collision shall be properly secured.
The Enhanced Child Restraint System shall not be used
without the cover.
The seat cover should not be replaced with any other
than the one recommended by the manufacturer,
because the cover constitutes an integral part of the
restraint performance.
Ensure that all components of the children's safety seat
are secured to the correct position during the daily use
of the vehicle, that they are not liable,during the
everyday use of the vehicle,to become trapped by a
moveable seat or in a door of the vehicle.
Please keep operation instruction for its life period .
Do not use this child seat at home.It has not been
designed for home use and should only be used in your
car.
For the reason of safety,the child seat must be fixed
inside the vehicle using ISOFIX anchorages even if you
do not put your child inside the child seat.
Never use a second-hand product,as you can never be
certain what was happened to it.
Instructions Safety Guidelines
1
2
USAGE
4 USAGE
4
4.4 Adjust and use the Y-shaped belts
Loosen the Y-shaped belts
The Y-shaped belts can be slackened
by pressing the adjuster(under the
seat cover). Press the adjuster as
you grip the two Y-shaped belts with
your another hand.Pull the Y-shaped
belt towards you to loosen the
Y-shaped belts.
To tighten the Y-shaped harness belts
Pull the front upwards until the
Y-shaped belt is fully tightened. The Y-
shaped belt should be adjusted tightly
without causing discomfort to the child.
A loose Y-shaped harness belt can be
dangerous.
Check the harness belt adjuster and
tighten it each time when the child is
placed in the seat.
Position2Position1 Position3 Position4
4.5 Adjust the handle
Press the button to adjust the length of support leg and make sure the bottom
of the support leg touch the ground completely,to suitable for different height of
car seat. When the bottom of the support leg touch the ground completely, the
support leg status window shows green.
4.6 Adjust the length of support leg
4.7 Adjust the ISOFIX attachment bars
Support leg
adjusting button
Status window
shows green
ISOFIX adjusting button
Maximum position
Minimum position
The handle can be adjusted in 4 positions. At the same time,
squeeze-in the handle adjusting buttons at both ends of the
handle, rotate the handle to the desired position, and release
the handle adjusting buttons. Position the handle forwards,
backwards or upright, make sure the handle is locked in
position by releasing the handle adjusting button, you should
hear a 'click' .
Notice: When the vehicle is in use,the handle must be in the
position 4.
This is an i-Size Enhanced Child Restraint System. It is
approved according to Regulation No.129, for use in, i-Size
When used as an infant carrier module without ISOFIX base
,this type of child safety seat is suitable for the car equipped
with the 3-point belts and approved by ECE R16.

07/08
Instructions Safety Guidelines
4
USAGE
4
4
Whe correctly
fitted to the
base the indicator
shows GREEN, to
release push until red
NOTE: This child seat must be installed rearward
facing.
1.Installation: Lower the infant carrier onto the ISOFIX base
aligning the two bars on the infant carrier base with the
corresponding attachments on the base. Push down until you
year the click and the indicator shows GREEN. Pull up on
the infant carrier handle to check it is securely fitted.
2. To remove: Push the seat locking button until the
indicator shows red then lift the infant carrier up and
away from the base.
4.8 Fitting the infant carrier (car seat) to the ISOFIX base
4.9.2 Fitting and removing the sun shade
IMPORTANT: The sun shade can only be effective if the handle is in the upright position.
Installation:1. Put the sunroof cover into the gap between the shell and outside cover. 2. Put the rope of sunroof onto the hook
of both sides on the outside cover.3.Hook the top sunroof onto the hooks of the handle.
The ISOFIX attachments can be adjusted to other positions to fit the different positions of ISOFIX anchorage points relative ti the vehicle
seat. As the picture above shows (picture 1) pill up the ISOFIX adjusting lever found at the front of the base and the ISOFIX bars on eithe
side of the base will eject to the longest position. Connect both of the ISOFIX attachments with the corresponding ISOFIX vehicle
anchorage points. When you hear the 'clicks' the ISOFIX bars should be attached to the vehicle anchors. Check the ISOFIX status
windows, the windows will show GREEN when correctly fitted ( 4.7,picture 2). To release the ISOFIX attachments bars; push the the
release button/slider (4.7 picture 2). To complete the installation of the base; lift up the front lever (ISOFIX adjusting button, 4.7 picture 1)
and push the base towards the vehicle seat back until is is pressed firmly against the vehicle seat backrest.
Installation of the ISOFIX base is now complete. Check once again the status windows are showing GREEN.
IMPORTANT: Except the first position (the position where the bars are fully extended), the ISOFIX adjusting button need not be lifted, the
seat base can be simply pushed back towards the the vehicle seat back
USAGE USAGE

09/10
Instructions Safety Guidelines
5
咔嚓
Click
After the seat belt is fixed, the seat belt
buckle and belt guide can not be placed in
this position. Please contact the manufacturer
if in doubt.
Step 1:Install the ISOFIX interface to the vehicle seat(see 4.7). Make sure that the ISOFIX
status windows show GREEN. Next, push the ISOFIX seat base towards the vehicle seat
backrest until it is firmly pressed against the seat backrest. Then adjust the support leg to
touch the ground completely, ensure the leg status window shows GREEN (see 4.6) .
Step 1:Place the child seat on the car
seat rearward-facing and make sure
that the front of the child seat is firmly
pressed against the vehicle seat
backrest. Note:Ensure the infant
carrier base is sitting on the vehicle
seat so that the theoretical points A,B
&C (see opposite) are horizontal.
Step 2: Pass the belt
diagonally through the belt
guide on the back of the seat.
Diagonal belt
Lap belt
5.2 This child seat can be installed with the Capsule ISOFIX base with support leg.
Step 3: Thread the lap belt through the belt guide on the
other side of the infant carrier. Insert the lap belt into car
seat belt buckle until hear a “click”. Pull the vehicle seat belt
to eliminate any slack and check to make sure its us securely
fastened.
Step 4: Keep the infant carrier in a stable position and place on the vehicle
seat. Hold the infant carrier handle adjuster buttons with both hands; squeeze
the red buttons and at the same time push forward the handle against the
backrest of the car seat as pictured. Make sure the seat belt is free of twists
and follows a smooth route. Remove any slack from the seat belt .
5
WARNING: This child (seat) restraint must be installed rear facing.
5.1 This child seat can be installed with adult 3-point belt as an infant carrier module.
INSTALLATION
INSTALLATION

11/12
Instructions Safety Guidelines
INSTALLATION
5
Step 2: Place the child seat on
the ISOFIX base
rearward-facing and make sure
the basket is connected to the
base and the lock is green.(see
4.8)
Step 3:Keep the basket in a
stable position. Hold basket
handles adjust buttons with
hands. At the same time, press
down the basket handle and
make it against the backrest of
the car seat .
Instructions Safety Guidelines
756439
701
Name
Quantity
Child seat
1
Instruction manual
1
Distance from front to back
of the seat (depth):756mm
Distance from left to right of
the seat (width):439mm
Height of the seat:701mm
Weight of the seat:11kg
30℃
Do not bleach Do not tumble dry Do not iron
Hand wash,
below 30℃
6.1 Daily maintenance
In daily use, check periodically the child seat for defects. The child seat should be replaced after an accident.
Please keep this child seat in dry and ventilated place .
If the child seat belts become dirty,clean the belts and the plastic components by wiping them with a damp sponge
and allow dry naturally.
If food or drink contaminate the buckle, disassemble the seat belt from the child seat and rinse it gently with warm
water. Allow to dry naturally .
For cleaning the entire child seat fabric cover,please refer to the 6.2 washing instruction.
6.2 Washing instruction
Never use any solvant, chemical detergent or lubricant on any part of your child seat.
6.3 To remove and refit the fabric cover
Open the buckle and take off the shoulder pads and crotch pad and remove head cushion.
Unthread the harness shoulder straps and the crotch strap .
Remove the fabric cover of the child seat. To refit the fabric cover, please reverse the removal instructions.
Model: Oyster Capsule Infant. NO: LB/BBC- 328i- en- 01A
6
7 8
(Install with ISOFIX anchorages with support leg)
MAINTENANCE & CLEANING
CONTENTS
WEIGHT & DIMENSIONS
Table of contents