Oz Theatre Screens Majestic Series User manual

Visit us online today at hps://www.projectorscreens.com.au | P: 07 5546 1960
Reproducon including prinng, distribung or modifying of this PDF manual is forbidden.
© Copyright 2002-2019 Oz Theatre Screens.
To the owner
HEATRE SCREENS
OZ
Majesc Fixed Screen Installaon Manual
HEATRE SCREENS HEATRE SCREENS
PLEASE KEEP THIS INSTALLATION MANUAL IN A SAFE PLACE. IT CONTAINS YOUR WARRANTY AND
IMPORTANT CARE & MAINTENANCE INFORMATION FOR YOUR NEW OZ THEATRE MAJESTIC SCREEN.
Contents Page
To the owner
Accessories kit
Tools required
Hanging rail
Frame assembly
Evo 4K Fabric aachment
Acousc Vision aachment
Screen care and maintenance
Warranty info and cerficate
2
3
4
5-6
7-9
10-15
16-19
20
21-22

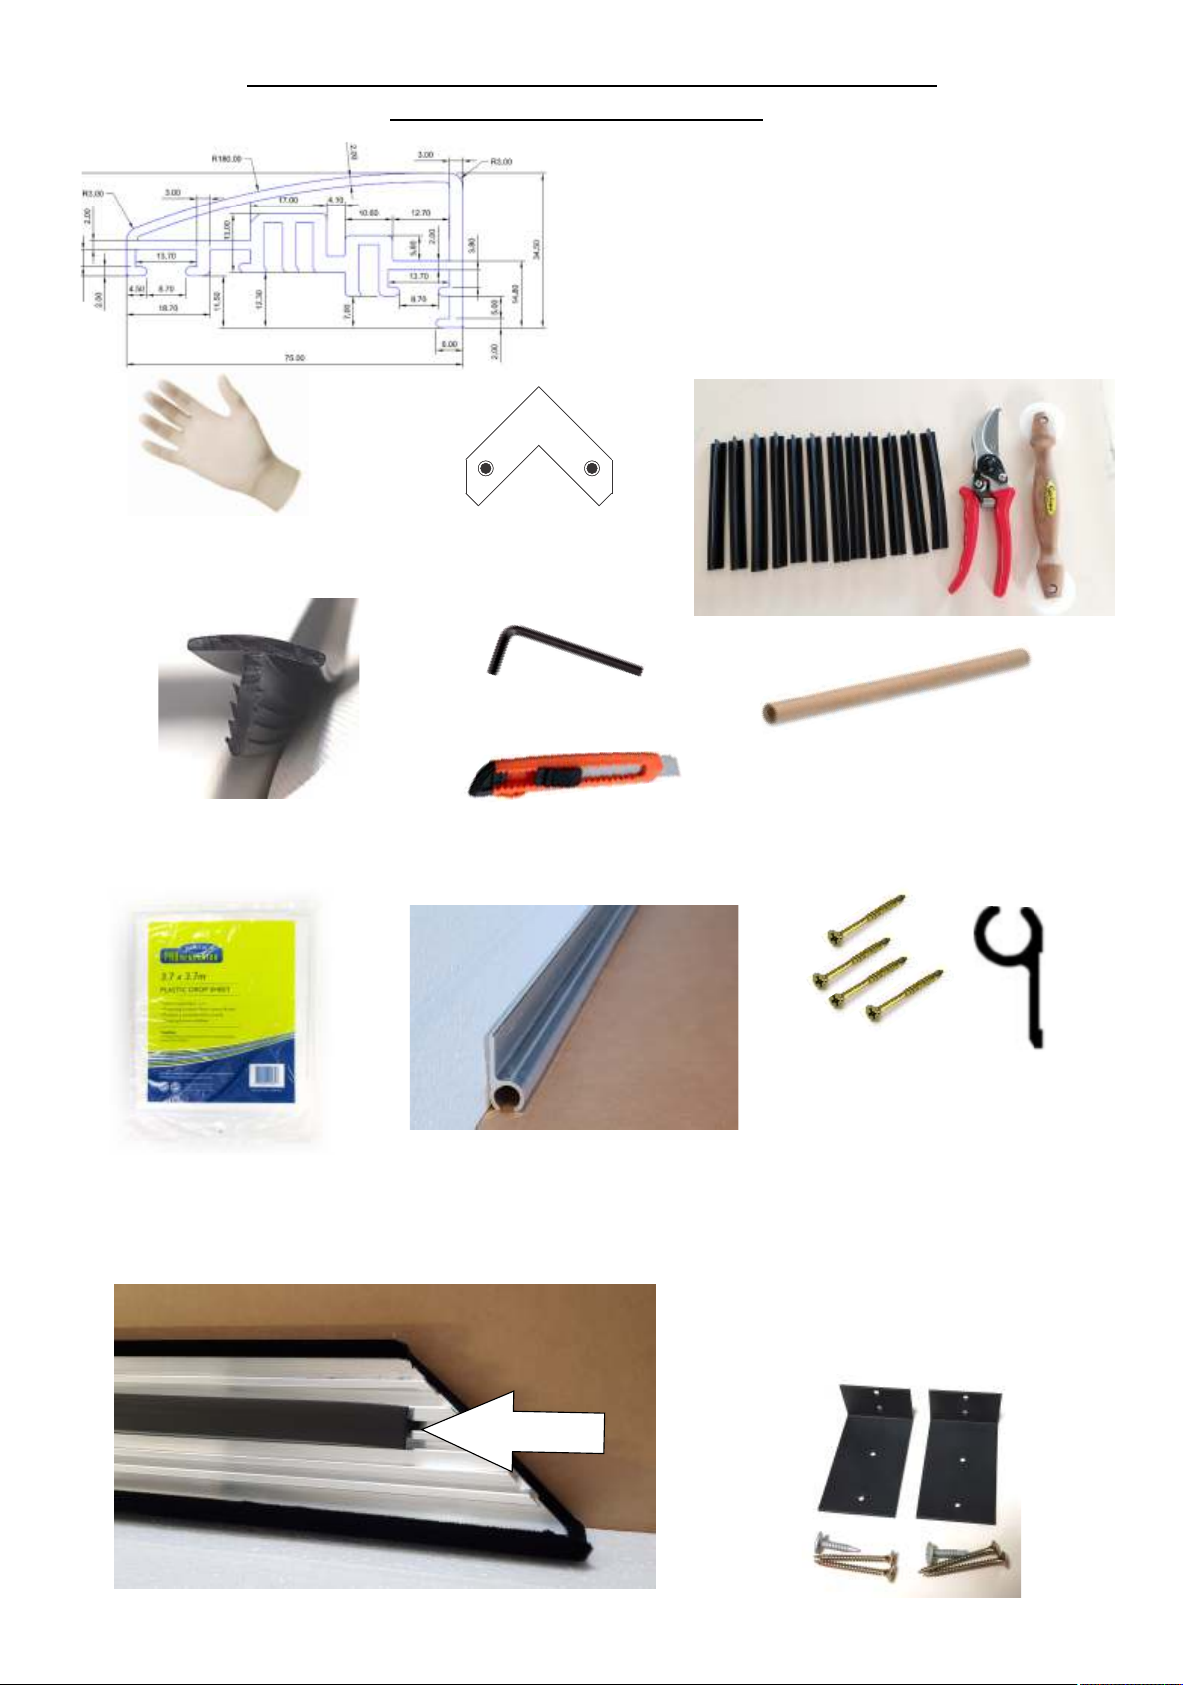
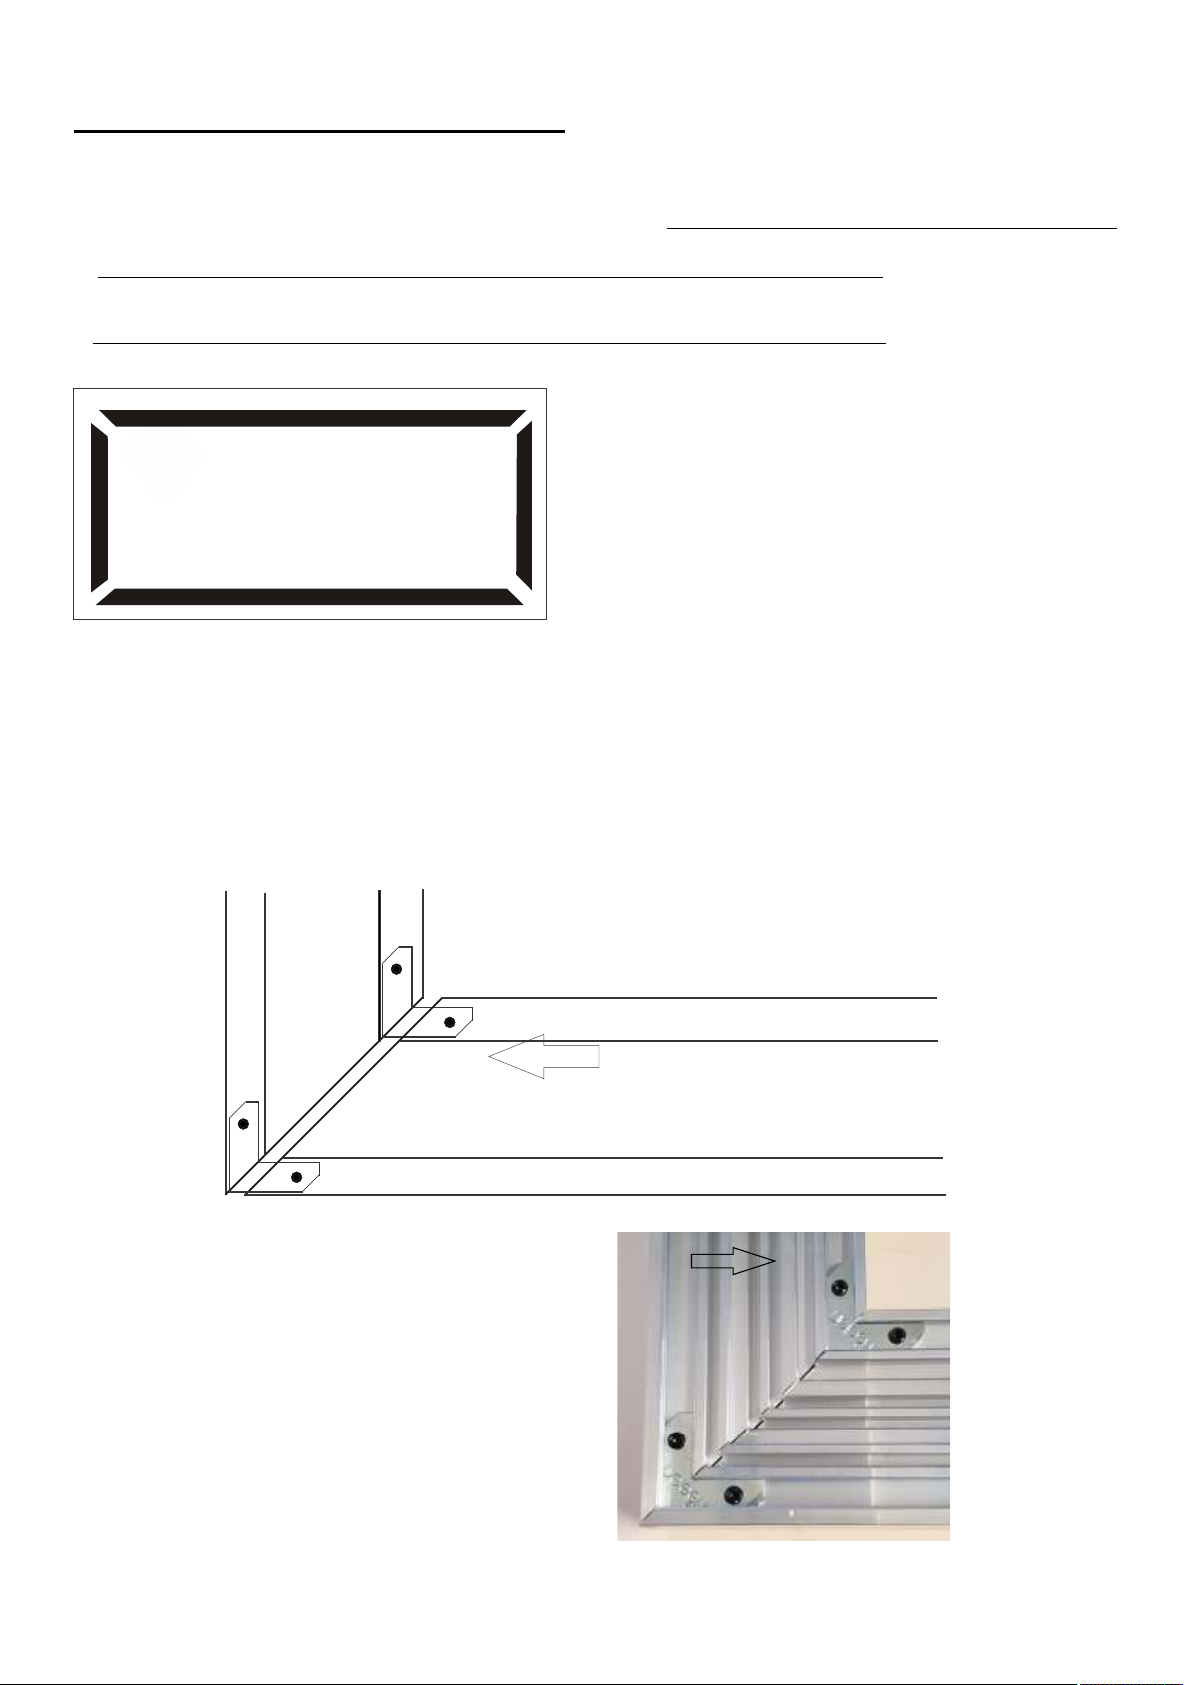
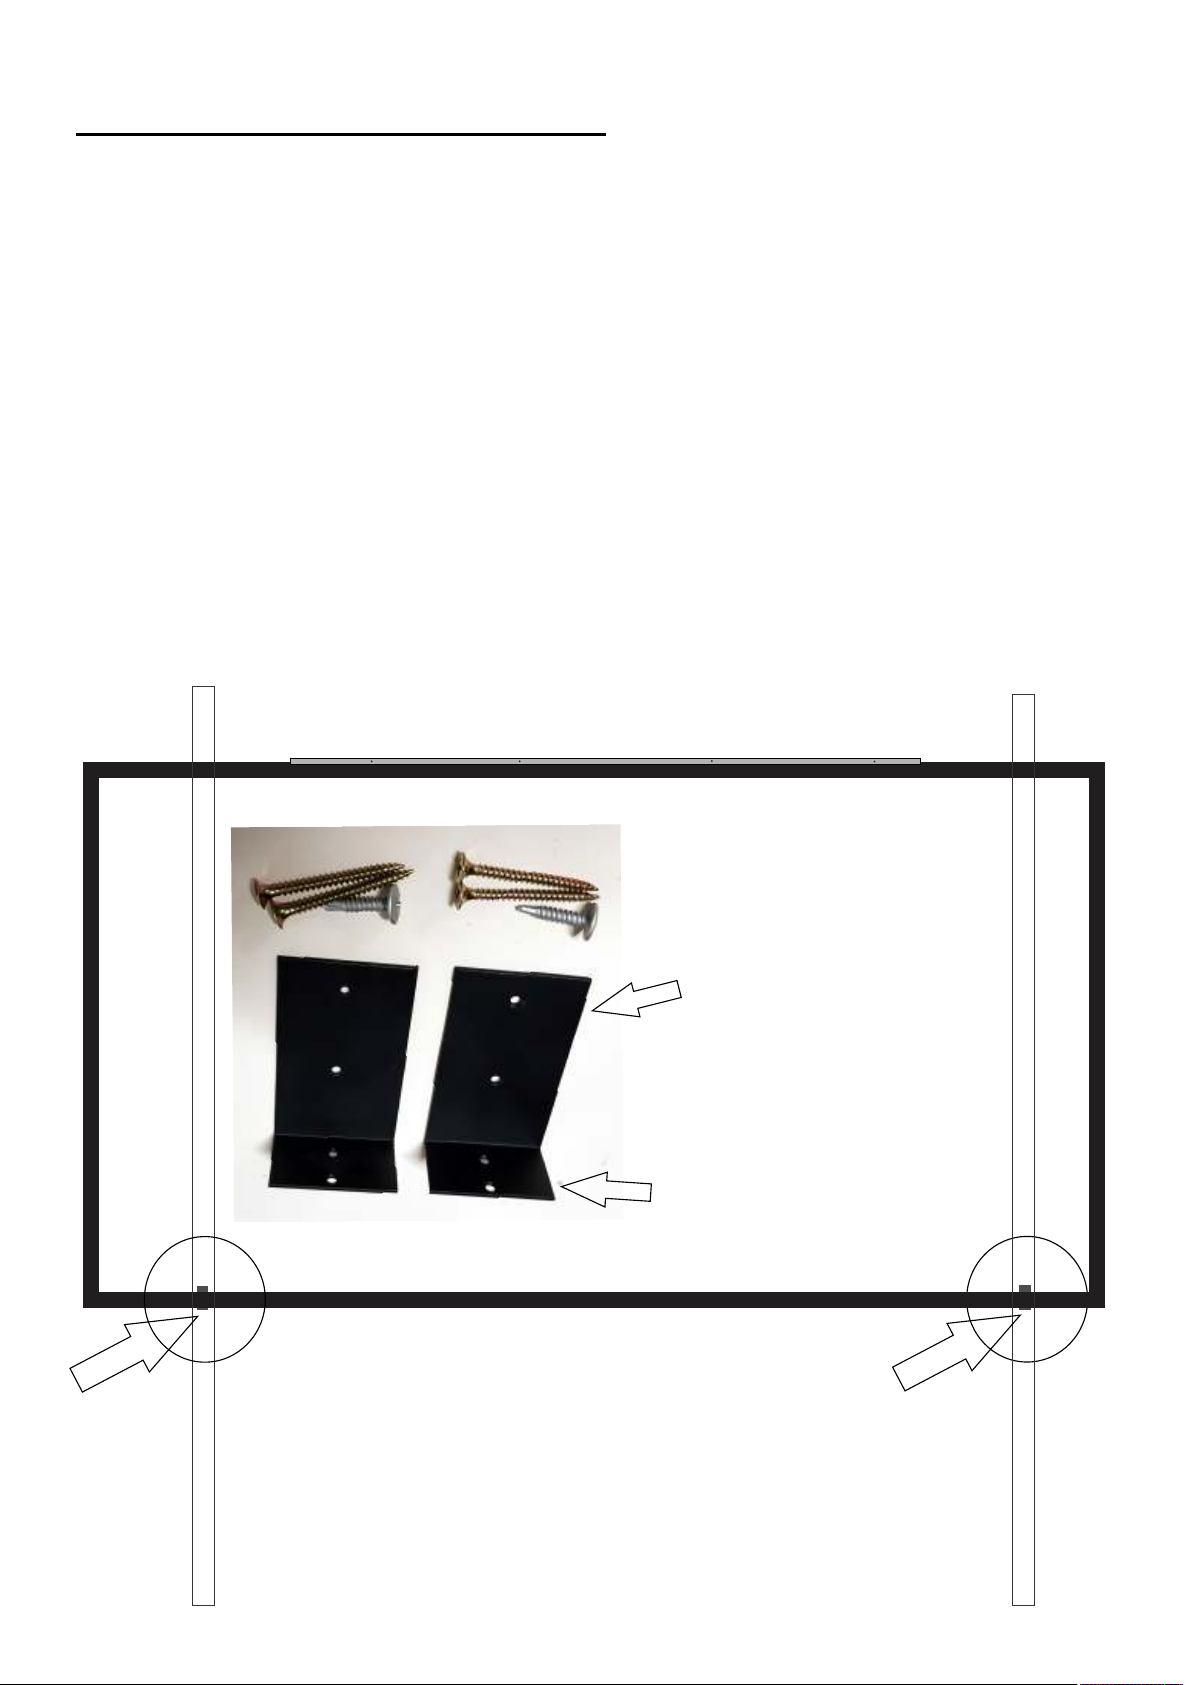
Oz Theatre Screens can also produce custom size screens upto 6 metres wide and 2.4 metres
high in some fabrics and formats. Contact us for other formats such as 4:3 and 16:10.
Visit us online today at https://www.projectorscreens.com.au or call (07) 5546 1960
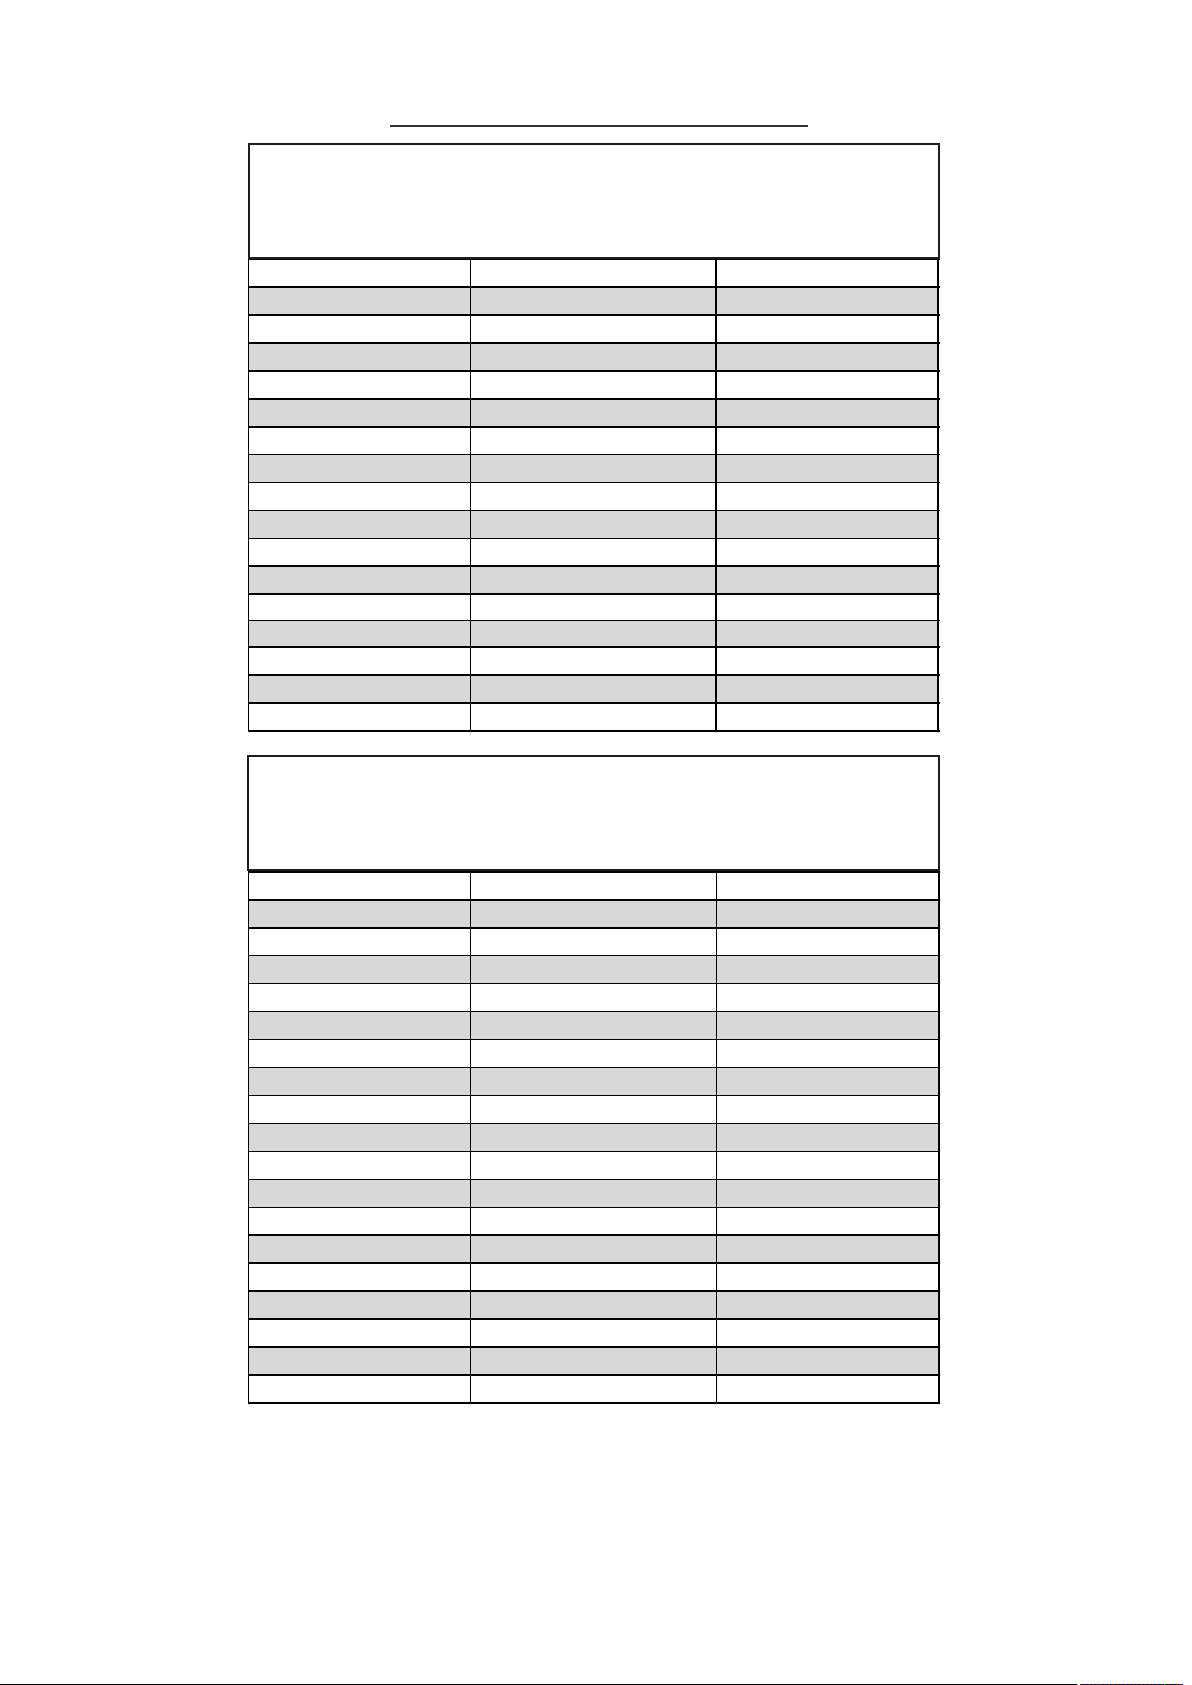
Majesc Screen Sizes
21:9 Cinemascope (2.37:1 format) Screen Dimensions
Viewing Diagonal
Inches
Overall Size Inc Frame
mm
Active Viewing Area
mm
73" 1766 X 1059 1616 X 909
82" 1980 X 1169 1812 X 1019
84" 2009 X 1195 1859 X 1045
88" 2103 X 1248 1953 X 1098
92" 2184 X 1295 2032 X 1143
96" 2271 X 1343 2121 X 1193
100" 2360 X 1393 2210 X 1243
106" 2500 X 1472 2350 X 1321
110" 2590 X 1522 2440 X 1372
115" 2693 X 1580 2543 X 1430
120" 2796 X 1638 2646 X 1488
125" 2918 X 1707 2768 X 1557
130" 3030 X 1770 2880 X 1620
135" 3140 X 1831 2990 X 1681
140" 3250 X 1894 3100 X 1744
145" 3360 X 1956 3210 X 1806
150" 3470 X 2018 3320 X 1868
16:9 HDTV (1.78:1 format) Screen Dimensions
Viewing Diagonal
Inches
Overall Size Inc Frame
mm
Active Viewing Area
mm
92" 2306 X 1060 2156 X 910
100" 2506 X 1144 2356 X 994
110" 2726 X 1237 2576 X 1087
115" 2841 X 1285 2691 X 1135
120" 2956 X 1334 2806 X 1184
125" 3071 x 1382 2921 x 1232
130" 3186 X 1431 3036 X 1281
135" 3302 x 1480 3152 x 1330
140" 3416 X 1528 3266 X 1378
145" 3530 X 1576 3380 X 1426
150" 3646 X 1625 3496 X 1475
155" 3760 X 1673 3610 X 1523
160" 3873 X 1721 3723 X 1571
165" 3995 X 1773 3845 X 1623
170" 4117 X 1824 3967 X 1674
175" 4241 X 1876 4091 X 1726
180" 4361 X 1927 4211 X 1777
185" 4480 X 1977 4330 X 1827
190" 4596 X 2026 4446 X 1876
or Email [email protected]
1

To the owner
C o n g r a t u l a t i o n s o n y o u r p u r c h a s e .
We at OZ THEATRE SCREENS would like to thank you for purchasing
this high quality projecon screen manufactured in Australia.
You have supported a 100% owned and operated Australian business
and Australian jobs by purchasing this high quality screen that has
been meculously developed and manufactured to provide you with
years of trouble free service and pure home theatre entertainment.
In the event your screen does require repair or maintenance
during the warranty period, please follow the enclosed procedure
The Majesc Screen Frame Profile.
outlined in this manual
Please read through this manual in it’s enrety before aempng
screen installaon.
2

1 Long arm Hex key
1 Pair of gloves
4 lengths of SCREEN-GRIP
located in back of each frame channel 1 trimming knife
1 roll of screen fabric wrapped
in acid free brown paper
Your OZ THEATRE MAJESTIC SCREEN COMES
WITH THE FOLLOWING:
4 Lengths of alloy frame extrusion wrapped Fidelio velvet
Packaged and sealed on foam shelving.
Pull out the 4 screen grip tensioning strips and put aside for now.
1 X 2 metre long hanging rail
with 4 mber screws.
Use longer screws if you have
double gyprock (not supplied)
Hanging rail is located on outer
edge of foam packaging.
12 small secons of screen grip.
1 pair of cuers and 1 spline roller
8 tapped corner plates
with grub screws
1 drop sheet
2 L brackets to secure frame
to the wall at the boom
3

Tools required:
The following tools are required for assembly of your Oz Theatre Majestic Projection Screen
1. Power or baery drill with 3mm bit and philips head bit.
2. Spirit level and or tape measure to ensure screen sits
straight on your wall.
3. A centre punch (oponal) 4. Scissors
4

Install hanging rail first.
Once you know the height of your screen on the wall, take the supplied hanging rail and measure up from
the top of the image 75mm. The top of the rail sits at the top of the frame which is 75mm higher than top
of the screen image. Screen image + 75mm = top of rail. (top of rail - 75mm = top of screen image)
Locate your wall studs. The Majesc Screen has a very solid and heavy frame. You must install the hanging
rail using the 4 mber screws provided and they must be drilled into wall studs or brickwork (use correct
masonary plugs if installing on an internal or external brick wall, not supplied)
The rail is 2.1 metres long for most screen sizes (unless other sizes are required) and should be fixed at 4
points if possible. Locate your wall studs and mark with either a pencil or use ‘post it sckers’ or similar
over their locaon and mark them. Hold the rail just under the marks and transfer the posion of the studs
to the rail using a marker. (DON'T remove any post it sckers from the wall just yet - unless you have
marked the stud locaons on the wall itself)
Drill the holes in the rail with at least a 3mm drill bit so the head of the screws countersink somewhat.
Use a spirit level or use your ceiling cornice as a parallel so the rail is level and screw into place.
CENTRE
rail
Stud locaons for hanging rail - 3 mbers minimum, 4 ideal.
Note stud centres are normally 450mm apart for exterior walls and 600mm apart for
internal walls in Australia, unless otherwise specified. Refer to your house and room plans.
5

WALL
How the screen frame sits on the rail on the wall.
screen fabric
If needed, use a centre punch to
keep drill holes in right spot.
Drill your holes in the rail
just under the centre of
straight secon.
Wall stud Gyprock
6

Frame assembly:
1. Find an area large enough to work on the screen. DO NOT ASSEMBLE YOUR SCREEN
ON A HARD FLOOR. ASSEMBLE ON CARPETED FLOOR ONLY.
NOTE: Do not unroll the projection fabric until frame is fully assembled.
Unpack your drop sheet and lay out in an area
large enough to work on your screen.
2. Each corner requires 2 corner plates for joining the frame.
3. Insert one plate into each channel of one of the long lengths
and then 3b. Slide one of the short lengths up to the long length.
Make sure brackets are in all the way. You may need to give them a slight tap.
1
3b. Slide short length up to long length
Long length
Carefully unpack the 4 frame pieces and lay
upside down on the drop sheet.
Remove the screen grip strips and put aside.
Get the 8 corner corner brackets and hex key
out of the kit bag.
You should have about .5 to 1mm gap in the
back of the frame join. This is because of the
velvet wrapping around the mitres on the
other side.
Fabric insert channel
7

4. Insert the remaining 2 sets of plates into the last short piece of frame and then insert both
ends into their corresponding channels at the same time. The best method used achieve this is
to insert one side only a small way in so you can also get the other side in. Once they are both
in butt up against their adjoining pieces and tighten grub screws as per steps 2 and 3. You may
need to give the frame a bit of tap to move it into place. See below.
Step 4
Inserting the last piece of frame
Repeat this for the other long side so you end up joining the 2 long sides and one of the
short sides. See below.
Frame assembly connued:
8

Once you’re happy with your frame joins and grub screws are all ghtened up. Hang the frame only (fabric
insert is aer this secon) on the rail and adjust your frame so it’s in the correct posion. Move le or right
to finalise it’s spot. And mark the 2 studs that are closest to the edge of the frame at each end.
Now install the mae black L brackets onto the wall. This is to hold the frame at the boom and is especially
recommended for Acouscally Transparent screens as there is oen some exceponal air movement behind
the screen. The long part of the bracket sits on the wall behind where the frame will sit. The boom secon
of the bracket is what sits under the frame flush with the velvet. The boom secon will be screwed onto the
frame with the 2 tek screws at the very end of the install. Mark where the brackets will go with a pencil by
drawing a line under the boom of the bracket on the wall lining up with stud.
Place frame back on drop sheet and drill and screw the 2 L brackets into the wall studs at each end.
Frame assembly connued:
This secon sits behind
the frame screwed into a
stud on the wall
This secon sits under the
boom of the frame flush
against it. And is then
screwed into place at the
end of the install.
9

FIXING THE SCREEN FABRIC TO THE FRAME
See PAGES 16-18 FOR ACOUSTIC VISION FABRIC ATTACHMENT
1. Put on gloves supplied and place the tube at the end of the frame and unroll over the back of
the assemble frame. The fabric should lay approx 10cm over all edges of the frame.
Once rolled out, adjust so it sits evenly over the back of the frame on all 4 sides.
2. Locate the 12 small SCREEN-GRIP pieces.
3. Insert one of the small clips into the inside channel. You may need to check where it’s located
first as there are 2 channels. The inside channel is used with all our screen fabrics.
10

43
1
2
Start here and push screen grip into inner channel then
4. Once the first piece is put in place on the first long side (top or boom) Pull the material
moderately ght and insert another small piece on the opposite side at #2. Then go across the
frame and insert 3 and 4. You may need to pull the material a lile ghter as the span is longer
le to right.
5. Now it’s me to pin the corners in place. Have 2 corners pieces ready and pull on the fabric
and hold on the outside of the frame as per photo below. Then insert the 2 corner secons.
You will need to feel for where the channel is located or li the edge of the fabric up to locate
it.
(5) So you end up with this below.
6
5
7
8
Pull material reasonably ght on the opposite side and insert the
2nd short piece.
By using this method I am pulling the material on the diagonal.
Seng up the material correctly with the centre and corner keepers
ensures the rest of the screen goes together without any issues.
Larger screens will require firmer tension. The material is forgiving
and can be simply pulled up and re inserted without causing any
damage.
Then pull the material moderately taught and insert the 3rd piece, then
pull the fabric taught again on the other side of the screen and insert the
4th piece.
11

Once the material is pinned in place in the centres and corners. You can now start to insert the longer strips
into the channel. Massage the roller wheel into the (USE ONLY THE CONVEX WHEEL curved outward)
first secon at the top of the frame next to the centre piece rolling the material into the channel out toward
the corner. Go back and forth as you need to remove any creases or secons not sing right.
Do not be concerned if you see this when rolling
the fabric into the channel. Pull the material
slightly outward just ahead of where you’re
rolling the roller in. Roll back and forth as needed
and this (le image) will end up like this below.
Inserng the corner keepers. Two
people makes shorter work as one
can hold the material outward while
the other inserts the screen grip
material.
Remember. You want a flat screen
not a drum skin. Don’t try and over
stretch the Evo 4K fabrics. It only
needs to be flat. Larger screens
however will require a bit more
force when installing the centre and
corner pieces.
The ACOUSTIC MATERIAL NEEDS TO
BE TIGHTER - SEE PAGE on inserng
Acousc Vision 4K woven fabric.
12

Once the first secon is in place, move to the opposite side and pull material outward as you roll it from
the from the centre to the corner, go back and forth unl you get a smooth finish as per images below.
Hold the screen grip slightly upward and roll it down into the channel as you
go along. Moving from the centre out towards the corners. The other way
also works - going from the corners to the centres.
13

You can either leave the smaller secons in place
and simply cut the longer secons to size as you
get to each one. OR you can completely remove
the small pieces as you get to each one. Both ways
work well, the laer being the more logical choice.
In this example the short pieces were le in place.
If you do want to remove them and replace with
the complete strip, pry up the edge of the strip
from the channel with the supplied cuers as you
get to each piece. You may need to re-tension the
corners as you roll the longer piece into place.
DO NOT PULL THE FABRIC UPWARD TO GET THE
PIECES OUT AS YOU RISK TEARING THE SCREEN
VINYL.
Cut as required. Tip: To easily cut the strips
turn it on it’s side so you cut the pointed part
of the strip first.
14

Run knife along the inside edge of either of the 2 spots above and carefully
Once all the secons are in place. Check the screen grip strips and press down in any areas where it’s
sll raised up slightly. Check all areas of screen for flatness and check if using Acousc Vision material
that’s it’s sing fairly ght.
cut off the excess material paying close aenon to the corners.
15
Now you are ready to hang your screen on the rail. Slide le or right as required then once you have
the correct posion, carefully drill thru the boom part of the L bracket hole into the frame then screw
the tek screws supplied into place securing your screen to the wall.

Fixing Acousc Vision to the frame.
NOTE: The Acousc Vision4K fabric is supplied in the full width of 250cm or 320cm for larger sizes.
The fabric MUST BE TURNED on an angle to remove any chance of seeing moire paerns.
Turn fabric so each side of the frame has approx 30-100mm overhang.
30-100mm excess/overhang
Pin the fabric in place as per previous instrucons
once you have turned the fabric on an angle.
ACOUSTIC VISION fabric must be turned on an angle so you have 30-100mm minimum excess.
16

Once you have pinned the fabric as per instrucons on the previous pages, you can carefully trim off the
excess material to make it easier to work with. Scissors are recommended, if using the supplied knife
be careful. Leave yourself about 100mm on all 4 sides.
Then start splining the fabric firmly into the
channel and insert the strips starng on one
of the short sides, then the adjacent top and
boom secons.
Spline the fabric into the channel and insert
the strips creang a firm taut finish.
17

The end result.
A perfectly flat and taut
Acouscally transparent screen
18

Cleaning the screen surface:
Your Oz Theatre Projecon Fabric can be easily damaged if handled, installed or
cleaned incorrectly. Please pay special aenon to these cleaning instrucons.
Never aempt to use inappropriate cleaning chemicals on the screen.
In the event of soiling the screen surface may be cleaned using the following:
Cleaning guidelines : You will generally require 3 new micro fibre cloths or 3 new
cleaning towels - DO NOT use scourers or abrasive materials on your screen material
or frame. Use a mild soluon of detergent and water with a so new sponge or lint
free cloth. White terry toweling or a so micro fibre cloth are the most appropriate.
Rub lightly to remove any stains, but be careful NOT to rub back and forth excessively
as this may blemish or mark the fabric effecng the opcal and reflecve properes.
Use a new moist cloth or towel to wash off and soak up any soap residue that may be
le on the screen then blot with a dry sponge or micro fibre towel to remove excess
water. For Acousc Vision fabric, to remove any dust build up, you may use a vacuum
Dry the screen with a so micro fibre cloth or towel by absorbing any remaining water.
If you follow the system of blot/dilute/blot you will almost certainly remove any minor
stains. If you are unsure please call us for advice first on (07) 5546 1960.
If you plan to paint or do any work anywhere near the screen please make sure it is
completely covered with a suitable sheet.
If you follow this cleaning procedure you can expect many years of trouble free use for
your new Oz Theatre Majesc Screen.
Cleaning the frame
BLACK VELVET FINISH - Use a lint brush or so bristle brush to remove any dust from the
frame. Other cleaning opons include a can of compressed air. If you own a compressor you
can also use an air gun to blow off dust and dirt.
Screen care
19
cleaner aachment - make it is clean otherwise do not use.
Table of contents
Popular Projection Screen manuals by other brands

Premier Screens
Premier Screens Roller Fly manual

Banner
Banner EZ-SCREEN LS System Operation, Diagnostics and Troubleshooting

Elite Screens
Elite Screens YARD MASTER MANUAL SERIES Product White Paper

Gemmy
Gemmy Airblown 39112-31 instruction sheet

Draper
Draper Silhouette E Series Installation & operating instructions

REMACO TECHNOLOGIES
REMACO TECHNOLOGIES PRO-L3030 manual

Da-Lite
Da-Lite Whiteboard Mount Instruction book

Samo
Samo B7816 Assembly instruction

Elite Prime Vision
Elite Prime Vision Polar Star Series user guide

Euroscreen
Euroscreen Diplomat TabTension user manual

Grandview
Grandview Cyber Series CB-MIxx instruction manual

Draper
Draper Clarion Assembly/mounting instructions