OZtrail CAM-H016-F User manual

OWNERS MANUAL
www.oztrail.com.au
Covert 16MP
CAM-H016-F

2
CONTENTS PAGE
Contents Page
2
Introduction
3
Important Safety Precautions
3
Product Specification
6
Contents
7
Getting to know your Camera
8
Getting Started
10
Camera Operation
15
AV Output
28
Connection to a Computer
29
Troubleshooting
31
Warranty
33

3
INTRODUCTION
Congratulations on the purchase of your new camera.
This manual contains important safety and operating
information. Please read all the information carefully before
you use the device to avoid accidents and keep it for future
reference. Follow these important safety and operation
instructions.
IMPORTANT SAFETY INSTRUCTIONS
•This Product is rated IP54, please ensure it is use within
this environment
•Press the buttons gently. Pressing too hard can damage
the product.
•Do not subject the camera to heat source or impact to
avoid damage.
•Do not attempt to dismantle or repair this camera

4
yourself. Qualified personnel should perform repairs.
•Disconnect or remove all power source from the camera
before cleaning.
•This product is not intended for commercial use.
Household/personal use only.
•To prevent software failure, never disconnect the product
from a PC while file transferring is in progress
•Keep your camera clean (use a dry soft cloth to clean. Do
not use alcohol, thinners or benzene to clean the surface
of the product).
•Do not kink USB and video cable and do not install it over
sharp edges.
•Keep batteries away from children and pets.
•Insert the batteries observing the proper polarity (+/-).
Failure to properly align the battery polarity can cause
Injury and/or property damage.

5
•Remove old or discharged batteries from the product.
•Remove the batteries when the product will not be used
for extended periods of time to prevent damage due to
rusted or corroded batteries.
•Never throw batteries into a fire, do not expose batteries
to fire or other heat sources.
•Battery Disposal: Old or discharged batteries must be
properly disposed of.
•Keep children away from batteries. If you suspect a
battery has been swallowed, seek immediate medical
assistance.
Attention: We have done our best to produce a complete and
accurate manual. However, we cannot ensure that there are no
errors or omissions during the printing process.

6
PRODUCT SPECIFICATION
•Video Resolution: 720P (1280 x 720 @ 30fps), 1080P
(1920 x 1080 @ 20fps)
•Still Image: 3MP, 5MP, 8MP, 12MP, 16MP
•2.4” Preview Screen
•IP54
•Triggering Distance: 20m
•Triggering Speed: 0.6secs
•Up to 7 images per trigger
•46 IR Low Glow LED (850nm)
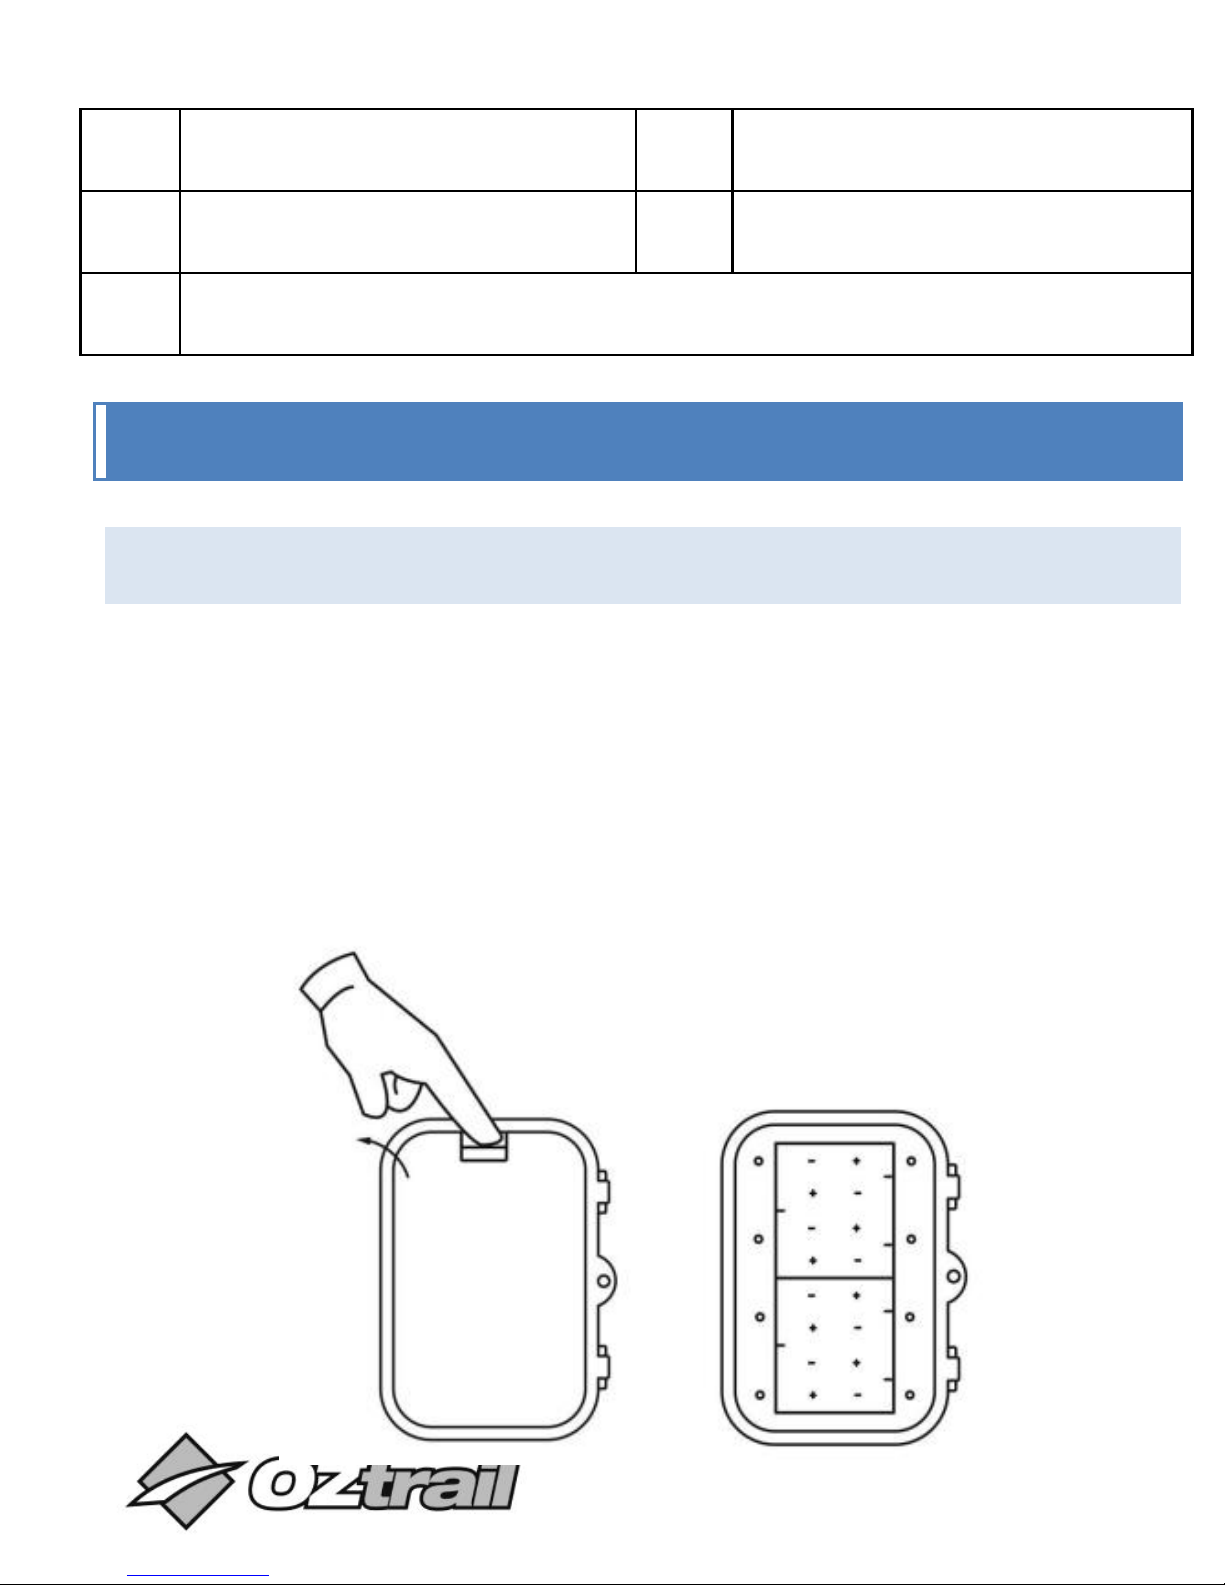
•Powered by 8 x AA batteries
•Expandable Micro SD Slot up to 32GB
•Works with Windows XP, Vista, 7, 8, 10, OSX 10.2 and
above
NOTE: As a result of continual improvements, the design and specifications of the
product within may differ slightly from the unit illustrated on the packaging.

7
CONTENTS
Please make sure that the items shown below are included in
the package. Should an item be missing, please contact the
local retailer from which you purchased this product
1. Trail Camera 1 piece
2. Mounting Bracket and Accessories 1 piece
3. Mounting Strap 1 piece
4. USB Cable 1 piece
5. AV Cable 1 piece
6. User Manual 1 piece

8
GETTING TO KNOW YOUR CAMERA
DEVICE OVERVIEW
15

9
1
Up/Video
2
Right
3
Shot
4
OK
5
Left
6
Menu
7
Replay
8
Down/Capture
9
Micro SD Slot
10
AV Output
11
USB Output
12
OFF (Mode Switch)
13
Test (Mode Switch)
14
ON (Mode Switch)

10
15
Preview Screen
16
IR LED
17
Lens
18
Motion Sensor
19
Side Motion Sensors
GETTING STARTED
POWER SUPPLY
Please install batteries before using the camera.
Open the camera case and remove the battery cover. Install 8
pieces of 1.5V AA batteries. Please make sure they are inserted
as per the (+ and -) symbols.

11
INSERTING MICRO SD CARD
This camera does not have internal memory.
You will need a Class 8 or higher Micro SD card and must be
inserted for this camera to operate and record.
1. Turn off the camera
2. Find the Micro SD card slot, and then insert the Micro SD
card by pushing it into place.
3. To remove the Micro SD card, push the card again until is
partially ejects
Note: Some Micro SD cards may need to be formatted before
using; this can be done via your computer.

12
MOUNTING STRAP
The Mounting strap can be used to attached the camera to a
tree or other object
Position the camera and pull the loose end of the strap until
the camera is firmly secured. To release the strap again, pull at
the tab of the strap.

13
MOUNTING BRACKET
You can mount the camera permanently on a wall or tree using
the below fasteners supplied with this product.
1. Tripod screw
2. Lock nut
3. Pivot bolts
4. Mounting holes
5. Hex Key
6. Wall plugs
7. Mounting screws

14
Installation
Tools required (not included)
1. Drill
2. 6 mm drill bit
3. Phillips head screwdriver
Please Note:
1. The supplied wall plugs the supplied wall plugs are
only suitable for mounting on concrete and stone.
2. The camera can be tighten with the “Lock nut” .
3. The camera positioning can be adjusted by
loosening and tightening the “Pivot bolts”.

15
4. The assembly material used must be suitable for the
respective location. If in doubt, consult a
professional.
CAMERA OPERATION
SETTING UP THE CAMERA
When first using the camera we need to adjust the settings to
suit the planned recording method. Inside the camera you will
find a switch that says OFF-TEST-ON.
OFF: The camera will be completely switched off.
TEST: Adjusts settings, manually take photos or videos and
playback photos and videos.
ON: The camera is activated to take photos automatically as
per your settings.

16
ADJUST SETTINGS
To adjust the settings move the mode switch to TEST and press
the “Menu” button. Press the “Up/Down” buttons to select the
setting and “OK” button to enter and confirm the setting.
MENU
FUNCTION
Mode
Set the mode of the camera
Photo: The camera will just take pictures
Video: The camera will only record video
Photo & Video: The camera will take a
photo first then record video
Options:【Photo】/【Video】/【Photo &
Video】
Photo
Resolution
Set the photo resolution for your pictures.
Options: 【16MP】/【12MP】/【8MP】/
【5MP】/【3MP】

17
Photo Series
Sets the number of continuous photos the
camera can take in photo mode.
Options:【1】/【3】/【7】
Video
Resolution
Set the video resolution for your videos.
Options:【1920 x 1080P】/【1280 x 720P】
/【720 x 480P】/【640 x 480P】/【320 x
240P】
TL Video
Resolution
Set the resolution of time lapse video.
Options:【2592x1944P】/【2048x1536P】
Video Length
Set the duration of recording a video clip.
Options:3 seconds - 10 minutes.
Audio
Recording
The camera can record audio when
recording video.
Options:【On】/【Off】
Shot Lag
When motion is detected the camera the
will record straight away (approx. 0.6secs).

18
The Shot lag is the time the camera will wait
after the 1st recording before the motion
sensor will start working again.
For example if you select 1 minute, after the
1st recording the camera does not record
any images or videos during this 1 minute
period. After 1minute has passed the
motion sensor will be activated again and
when motion is detected it will record.
This prevents the memory card from being
filled with unnecessary shots.
Options:5 seconds - 60 minutes.
IR Distance
Set the distance of infrared.
Options:【Near】/【Middle】/【Far】

19
Side Motion
Sensors
Allows you to turn on/off the two side
motion sensors.
Options:【On】/【Off】
Sensitivity
Motion Sensors
Set the sensitivity of the motion sensor.
Options:【Low】/【Middle】/【High】
Target
Recording Time
Set the target recording time. As shown in
below picture, you can set the start and
stop time. The camera will record just in the
stated time; the camera will be on standby
while not in the stated time.
Options:【On】/【Off】
Set
Target recording time
Start:Stop:
Hr:Min Hr:Min
00 00 00 00
MENU Back OK Select

20
Time Lapse
In Time lapse menu, there are three options
as below.
Normal: The camera will take pictures
automatically as per set time interval. For
example set the interval time to 1 hour, the
camera will take a photo every hour. If you
want to record a plant flowering, the
camera will take 24 photos in 24 hours.
TL Video: The camera will take pictures
automatically as per set time interval. For
example set the interval time to 1 hour, the
camera will take a photo each hour. If the
camera works for 24 hours, there will be 24
photos. These photos will be converted into
a video.
Off: Close the time lapse function.
Options:【 Normal】/【TL Video】/【Off】
Table of contents
Other OZtrail Scouting Camera manuals