Pacific Floorcare S-SERIES User manual

This operator’s book has important information for the use and safe operation of this machine. Read this book carefully before
starting the machine. Keep this book near the machine, protected from liquids and other substances that can cause damage to it.
If you do not follow the instructions, you can cause an injury or damage equipment, furniture or buildings.
For new books, please download your copy from our website www.pacicoorcare.com or write to:
Pacic Floorcare®
2259 S. Sheridan Drive
Muskegon, MI 49442-6252
Carefully inspect all components to ensure that there is no concealed freight damage. If such damage is discovered, le a
“CONCEALED DAMAGE REPORT” immediately with the delivering carrier.
The contents of this manual are based on the latest product information available at the time of publication. Pacic Floorcare
reserves the right to make changes or improvements without being obliged to apply changes to the machines previously sold.
Thank you for purchasing a Pacic Floorcare product. Warranty registration will allow us to better serve you over the lifetime of
the product. For quick and easy registration, go to: www.pacicoorcare.com/Register Product.
PLEASE READ THIS BOOK
S-SERIES, 22-GALLON MID-SIZE
AUTO SCRUBBERS
PARTS & OPERATING MANUAL

SAFETY PRECAUTIONS
This machine is intended for commercial use. Only use recommended pads or brushes and commercially approved oor cleaning chemical
intended for machine application.
The following symbols will be used to warn you of hazards or unsafe practices which could result in personal injury or death:
CAUTION: INDICATES A POTENTIALLY HAZARDOUS SITUATION WHICH, IF NOT AVOIDED, MAY RESULT IN MINOR OR MODERATE INJURY.
WARNING: INDICATES A POTENTIALLY HAZARDOUS SITUATION WHICH, IF NOT AVOIDED, COULD RESULT IN DEATH OR SERIOUS INJURY.
DANGER: INDICATES AN IMMINENTLY HAZARDOUS SITUATION WHICH, IF NOT AVOIDED, WILL RESULT IN DEATH OR SERIOUS INJURY.
WARNING:
Fire or explosion hazard: Never use flammable liquids or operate machine in or near flammable liquids, vapors or combustible dusts.
This machine is not equipped with explosion proof motors. The electric motors will spark upon start up and during operation which could
cause a flash fire or explosion if machine is used in an area where flammable vapors/liquids or combustible dusts are present
WARNING: Do not pick up flammable or reactive materials.
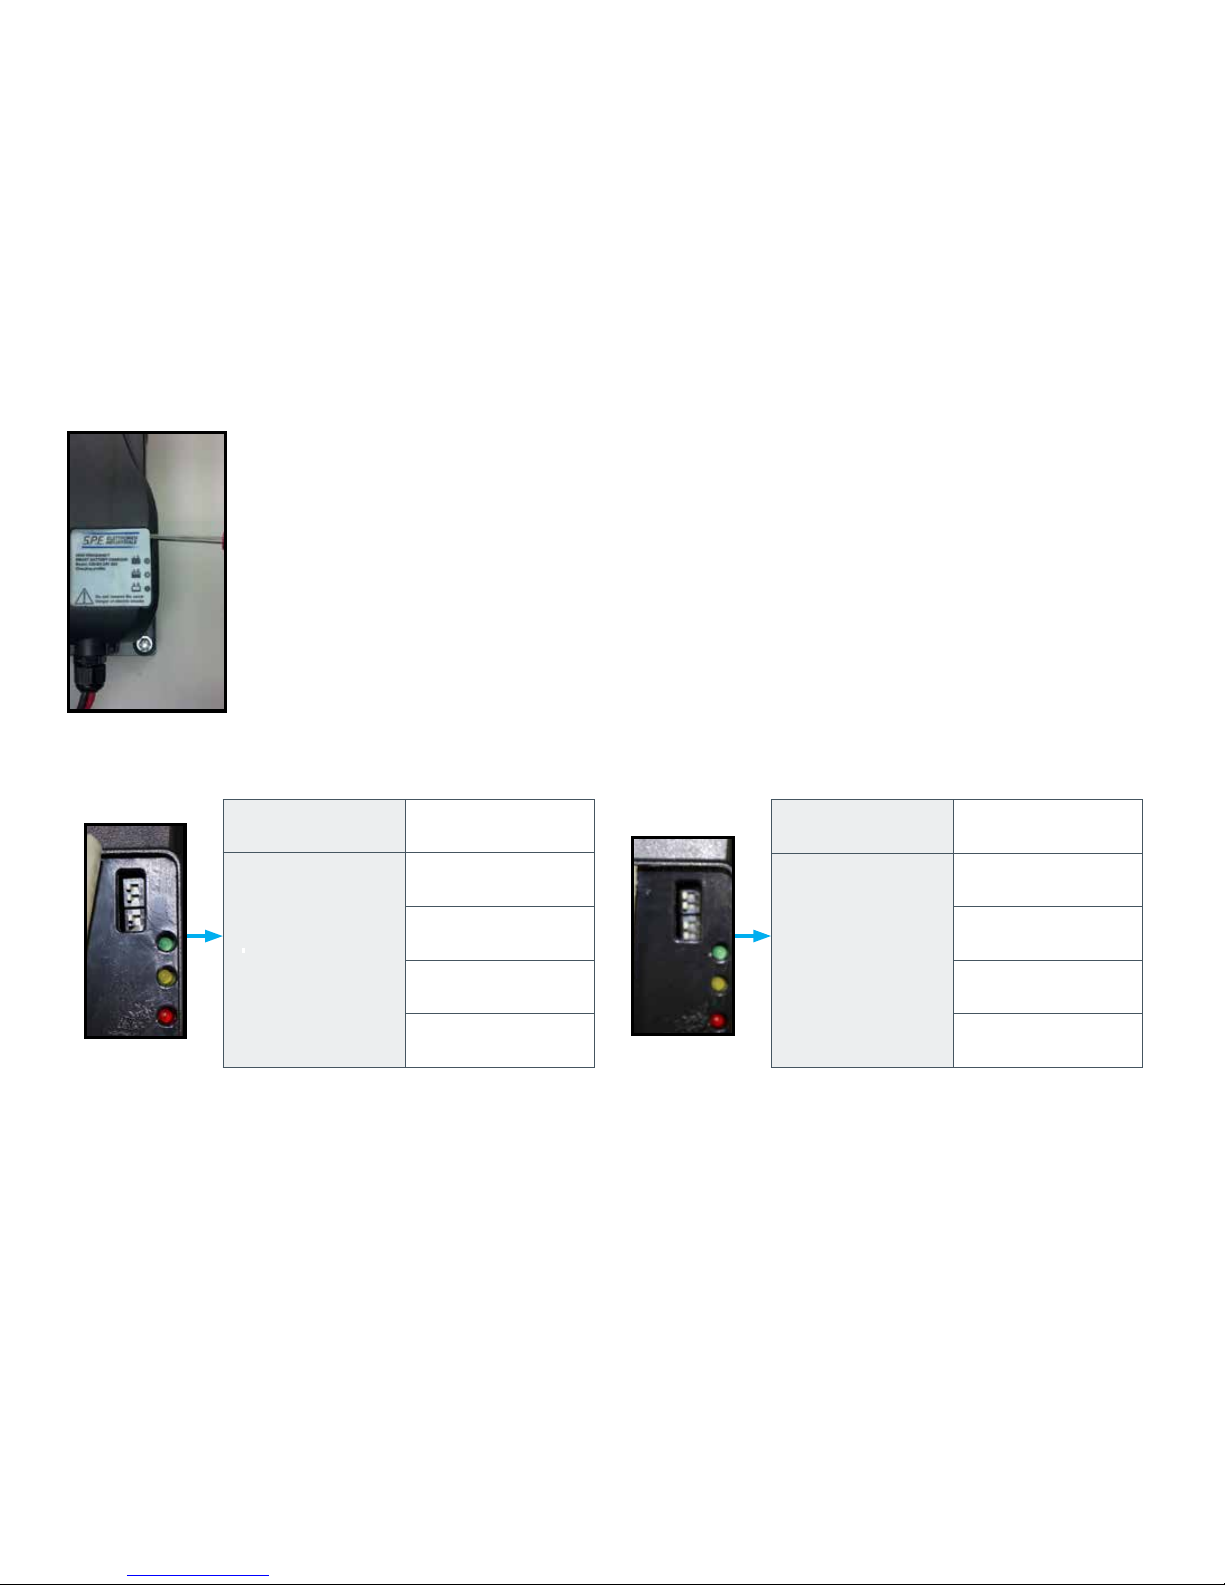
WARNING: Batteries emit hydrogen gas. Keep sparks and open flame away. Keep battery compartment open when charging. Perform this
procedure in a well ventilated area.
WARNING: Electrical hazard. Disconnect battery cables before servicing.
CAUTION: Spinning brush. Keep hands away. Turn off power before working on machine.
CAUTION: Do not operate machine unless trained and authorized.
NOTE: Do not operate machine unless operator manual is read and understood.
CAUTION: Do not operate machine if it is not in proper operating condition.
CAUTION: When using the machine, go slow on inclines and slippery surfaces.
CAUTION: When using the machine, wear non-slip shoes.
CAUTION: When using the machine, reduce speed when turning.
NOTE: When using the machine, report machine damage or faulty operation immediately to your supervisor.
CAUTION: When using the machine, never allow children to play on or around it.
CAUTION: When using the machine, follow mixing and handling instructions on chemical containers.
WARNING: When using the machine, do not use the machine as a means for transport.
CAUTION: Use Bromine only in your TTS recovery tank treatment system! Do not use chlorine. Chlorine can interact with
ammonia based detergents to cause harmful fumes.
2

NOTE: Do not allow the brush/pad to operate while the machine is stationary to avoid damage to the floor.
CAUTION: Do not bump into shelves or scaffoldings, especially where there is a risk of falling objects.
CAUTION: Before leaving or servicing a machine, stop it on a level surface.
NOTE: Before leaving or servicing a machine, turn off the unit and remove the key.
CAUTION: When servicing the machine, avoid moving parts. Do not wear loose jackets, shirts or sleeves
WARNING: When servicing the machine, do not wear jewelry when working near electrical components.
WARNING: When servicing the machine, disconnect battery connections before beginning work.
NOTE: Do not power spray or hose off the machine. Electrical malfunction may occur.
WARNING: When servicing the machine, do not work under the lifted machine without supporting it with safety stands.
NOTE: When servicing the machine, use manufacturer supplied or approved replacement parts.
NOTE: All repairs must be performed by a qualified service person.
CAUTION: When servicing the machine, do not modify the machine from its original design.
NOTE: When transporting the machine, turn the machine off.
CAUTION: When transporting the machine, do not lift the machine when batteries are installed.
CAUTION: When transporting the machine, get assistance when lifting the machine.
NOTE: Use a recommended ramp with a maximum of a 12°maximum incline when loading or unloading into/off truck or trailer.
NOTE: When transporting the machine, use tie down straps to secure the machine to the truck or trailer.
NOTE: When transporting the machine, put the scrub head in the lowered position. Make sure the unit is off before doing so.
WARNING: Do not charge the batteries if the battery charger cable or plug is damaged.
WARNING: When charging batteries, do not smoke near the machine.
NOTE: When storing the machine, always store it indoors in an area where the temperature is between 32oand 104oF (0oand 40oC)
NOTE: Replace any and all safety labels located on the machine if they are missing or become damaged or illegible.
SAFETY PRECAUTIONS

MACHINE PREPARATION
UNPACKING & BATTERY INSTALLATION
UNPACKING THE MACHINE
1. Remove the outer packaging.
2. The machine is fastened to the pallet with tie down brackets. Remove the brackets with a 3/8-inch
socket head tip in a cordless screwdriver.
3. The machine is also held in place with four cleats. Remove the cleats with a phillips tip
in a cordless screwdriver.
4. Raise the scrub head of scrubber and put it in the transport position.
5. Using a ramp, push the machine backwards down from the pallet.
5. Keep the pallet and brackets for any future transport needs.
4
BATTERY TYPE
To power the machine you can use either wet batteries or AGM batteries. Other types must not be used.
The maximum dimensions and the weight are:
Width: 7 1/8 in (181 mm)
Length: 10 3/8 in (264 mm)
Height: 11 5/8 in (295 mm)
Weight: 72 lb (33 kg)
BATTERY INSTALLATION
The machine will be supplied with a battery charger and either four 6V wet or AGM
batteries. The batteries must be housed in the battery compartment beneath the
recovery tank.
To insert batteries:
1. Lift the recovery water tank, opening it as far as it will go using the side handle.
2. The batteries must be lowered into the compartment using lifting and
transportation means suitable for the weight and dimensions.
3. They must be connected together in series, to obtain overall voltage of 24V on
the lugs.
NOTE: Fully charge the batteries before using the machine.
NOTE: Your charger must be set according to the type of battery you install. Read charging section of manual for further instructions on how
to set your charger correctly for your battery type.
Battery Connection
Diagram
Tie down bracket
NOTE: The on-board charger has been programmed to work with the batteries that Pacic Floorcare provides. Using other battery
types not specied for the S-Series mid-size scrubber by Pacic Floorcare may impair performance of the unit and will affect
the life of the batteries.
Recovery tank shown in fully
open position
Cleats

5
MACHINE PREPARATION
BATTERY POWER LEVEL INDICATORS
The battery power level gage is located on the upper control panel. The gage has a series of LEDs to indicate the amount of power left in the
batteries. When the batteries have a full charge, all LEDs are lit. As the batteries are discharged, the LEDs will begin to go out from right to
left. To maximize the life of the batteries, do not allow the LEDs to go beyond the discharge level as described below.
To maximize the life of the batteries, only recharge the batteries when the machine is operated for a total of 30 minutes or more and always
recharge the batteries immediately after usage when LEDs are indicating charging is required as described below.
BATTERY POWER LEVEL INDICATOR
The battery power level gage is located on the upper control panel. The gage has red, yellow and green
LEDs to indicate the amount of power left in the batteries.
On lead acid battery-equipped units, when the discharge level reaches the rst red LED, it is a good time
to nish your scrubbing application and recharge the unit. If you do choose to continue scrubbing, when
the last red LED begins to ash, the unit will shut down the brush motor but leave the vacuum and
traction drive operational to perform nal water recovery and transport back to storage. This function
not only serves as an indicator that your battery level has reached a point where recharging is required,
but also protects the batteries from being fully discharged.
AGM battery-equipped units should not be used after the last yellow LED goes out leaving only red
LEDs. Using the unit beyond this point can reduce the life of the batteries.
NOTE: The battery power level gage also displays fault codes. The LEDs will ash specic fault codes if
a fault is detected. See Troubleshooting section for LED fault codes.
Battery Level Indicator
Recharge AGM
batteries
Recharge lead
acid batteries

6
CHARGING THE BATTERIES WITH AN ON-BOARD CHARGER
Before using your S-Series mid-size scrubber for the rst time, fully charge your batteries.
MACHINE PREPARATION
USING YOUR ON-BOARD CHARGER
The on-board charger has charging indication LEDs - the red LED means it has just started the charging cycle, the yellow LED indicates that it
has reached the second phase of charging and green LED means the unit is fully charged.
Charging indication LEDs
Red indicates charge cycle has just begun
Yellow indicates charge cycle is in the second phase
Green indicates charge cycle is complete
On-board charger
1
On-board charger cord wrap
2
Quick release hook
3
These units can be equipped with an on-board charger.
1
2
3
The on-board charger is equipped with a 9 foot long cord that can be plugged directly into a 120V outlet. Do not use an extension cord.
This will void the warranty on the charger.
The cord wrap on the unit has a quick-release hook. The lower hook allows the user to slip the cord off and then the cord can be lifted off
the upper hook, all without having to unravel the entire cord.
After charging is complete, wrap the cord of your on-board charger securely to ensure the cord is not damaged.

MACHINE PREPARATION
SETTING THE DIP SWITCHES ON YOUR ON-BOARD CHARGER FOR YOUR BATTERY TYPE
Both the on-board and off-board chargers are able to charge wet, lead acid or maintenance-free AGM batteries. As
your unit leaves Pacic Floorcare’s factory, the charger is set up to match the type of battery chosen in the original
machine order. Should you choose to change from the original battery type, the charger can be changed by re-setting
the dip switches.
NOTE: The on-board charger has been programmed to work with the batteries that Pacic Floorcare provides. Using
other battery types not specied for the S-Series mid-size scrubber by Pacic Floorcare may impair performance of the
unit and will affect the life of the batteries.
To access the dip switches, use a small screw driver to lift the corner of the label on the on-board charger and peel back
partially to reveal them. Set the dip switches as shown below for the specic battery type being used in your machine.
7
Use small screw driver
to lift label off charger
BATTERY TYPE
871301 TROJAN
260AH LEAD ACID
DIP SWITCHES
OFF
(L)
OFF
(L)
OFF
(L)
ON
(R)
BATTERY TYPE
FULL RIVER
250AH AGM
DIP SWITCHES
OFF
(L)
OFF
(L)
OFF
(L)
OFF
(L)

8
MACHINE PREPARATION
USING YOUR OFF-BOARD CHARGER
CHARGING THE BATTERIES WITH AN OFF-BOARD CHARGER
Before using your S-Series mid-size scrubber for the rst time, fully charge your batteries.
Anderson connector located on
lower, rear panel
Anderson connector located on
charger cable
Off-board charger
The off-board charger has charging indication LEDs. The primary LED is
green and if blinking slowly, then the batteries are still below 80% of full
charge. If blinking fast, then the batteries are above 80% of full charge while
if solid green, the batteries are fully charged. There is a red “fault” LED
as well. In the rare occurence that this LED comes on, check the charger
operator manual for troubleshooting guidance.
Charger connected to machine
Charging indication LEDs
(charger appearance may vary)
Primary indicator light
Fault light
1 2 3 4
1
2
3
These units can be equipped with an off-board charger.
There is also an Anderson connector on-board the S-Series mid-size scrubber located on the lower control panel at the rear of the
machine.
With the 120V cord plugged into the wall, connect the two Anderson connectors and the batteries to begin charging.
4
The off-board charger has both a standard 120V power cord and a cord with an “Anderson connector”.

MACHINE PREPARATION
SETTING THE DIP SWITCHES ON YOUR OFF-BOARD CHARGER FOR YOUR BATTERY TYPE
The off-board charger is able to charge wet, lead acid or maintenance-free AGM batteries. As your unit leaves Pacic Floorcare’s factory, the
charger is set up to match the type of battery chosen in the original machine order. Should you choose to change from the original battery
type to the other, the charger can be changed by re-setting the dip switch.
To re-set the dip switch, slide the switch up for wet, lead acid batteries (battery part number 871301) or down for sealed,
maintenance free AGM batteries (battery part number 871302).
9
Front view of off-board charger
(charger appearance may vary) Close up of dip switch

It is easy to gage the solution level by watching the fog-free solution sight gage at the rear of the
machine. Additionally, marks on the tank provide solution level indicators as a guide.
10
To prepare the machine for cleaning, the unit must be lled with cleaning solution.
Rear hose ll port
NOTE: Always use low-foam detergent. Introduce a small amount of defoaming liquid in the recovery tank
before starting work to prevent foam from being generated. Never use pure acids.
MACHINE PREPARATION
SOLUTION TANK
1
2
1
Water and cleaning agent can be added to the S-Series mid-size scrubber’s rear hose ll port located to
the left of the control panel.
Liquid detergent should be added to the tank in the concentration and manner specied by the
manufacturer for an twenty two (22) gallon solution tank. The formation of excess foam could damage the
vacuum motor, so be sure to use only the correct amount of detergent. Water temperature should not
exceed 120°F (50°C).
Sight gage hose
4
4
6The sight gage hose performs double-duty as the solution drain hose as well. You simply slide the
hose off the press tting and lower the hose to a drain or mop sink.
Sight gage hose released from
press tting
6
Solution level indicators
5The bottom of the front ll port is also a full level indicator. Once you are able to see water at the base
of the opening, you have reached the full level.
3
There is also a front ll port that is able to accept hose or bucket lling.
The S-Series mid-size scrubber comes equipped with a ll port strainer to block debris from falling into
the solution tank.
Front ll port
2
5
3

11
MACHINE PREPARATION
SOLUTION TANK - AUTO-OFF SOLUTION FILL SYSTEM OPTION
1
If your machine is equipped with the auto-off solution ll system option, connect the male end of the quick-connector to your 1/2-inch inner
diameter ll hose. Once your ll hose is set up, leave the faucet for that hose open - the connector will act as a stop.
Auto-off solution ll system
connected to scrubber
2
Male quick-connect shown on ll
hose
1
2
When it is time to ll your machine, click the hose onto the female quick-connector at the back of the machine and the unit will begin
to ll with water.
Once the machine is full, the automatic ll port will shut off the water ow. Then just disconnect the hose and you are ready to add
detergent.

12
Connect the cleaning pad to the disk pad drivers by centering them on the drivers.
MACHINE PREPARATION
ATTACHING CLEANING PADS TO YOUR PAD DRIVERS - DISK HEAD
Depress position “A” for 1 second
then depress position “B”
1
If using oor pads with your pad drivers:
1
2
3
Place your pad drivers on a work surface and remove the center lock tting from the pad drivers. To do so, squeeze the center lock wires
inward and lift the center lock off the pads.
Remove the pad drivers by locating the automatic off switch on the lower control panel at the rear of the machine. Depress position “A”
for 1 second and then depress position “B” to “click-off” the pad drivers.
4Squeeze center lock wires inward and press center lock down, tab side rst, compressing the pad and then release the wires so that they
lock in place holding the pad. Repeat for the other pad driver.
NOTE: The S-Series pad drivers are tufted pad drivers. Do not use a pad driver on the oor without a pad in place. This will cause damage
to your oor.
Disconnect center lock tting & lay
next to the pad driver
Center pad on pad driver
Squeeze center lock wires inward,
press down onto pad & release wires
23
4
Close up showing center lock tab &
wires
4
wires
tab

13
The pad drivers or brushes are attached by using the automatic on/off system. This valuable ingenuity removes the need for operators to
kneel or strain to attach the pad drivers or brushes.
First, start by placing the pad drivers or brushes on the oor in front of the S-Series mid-size scrubber.
Quickly pulse the activation trigger
Position scrub head over pad
drivers or brushes
MACHINE PREPARATION
ATTACHING YOUR PAD DRIVERS OR BRUSHES TO THE S-SERIES MID-SIZE SCRUBBER - DISK HEAD
Lower the scrub head using the
foot pedal
Turn unit on using key switch
Turn the unit on using the power key switch.
Push or drive it into position so that the unit’s scrub head is centered over the pad drivers or brushes.
Utilize the foot pedal to lower the scrub deck down onto the pad drivers or brushes by depressing the pedal while shifting it to the right.
Once clear of the lower notch, lifting your foot will lower the scrub deck. Make sure that the shroud completely covers the pad drivers or
brushes in the lowered position. Should the shroud be resting on a portion of the pad drivers or brushes, the head isn’t centered and will
not attach properly.
The operation is completed by quickly pulsing the activation trigger. This will “click on” the pad drivers or brushes. If the pad drivers or
brushes do not quickly engage, do not continue pressing the activation trigger. Realign the scrub deck and try procedure again. When
you have the scrub deck aligned properly, you should see a noticeable drop of the scrub deck when lowered and the bristle skirt on the
shroud should almost be touching the oor.
1
2
3
4
1 2 34

14
ATTACHING A PAD TO YOUR ORBITAL PAD DRIVER
The orbital unit can be used for daily cleaning; however it specializes in chemical-free nish removal for low-cost nish maintenance
programs. The following directions show how to prepare the machine for both applications.
For cleaning, the orbital unit is t with a rectangular, 28 in (711 mm) x 14 in (356 mm) pad. The head comes standard with a rectangular pad
drive plate with a Mighty-Lok® connection system.
MACHINE PREPARATION
ATTACHING YOUR PAD - ORBITAL HEAD
Red backer pad & Velcro pad
retainer (black) alignment
shown above with surface prep
pad (brown) pulled away
Align the front corners of the pad
and press to adhere Proper alignment of pad
Lower the scrub head using the
foot pedal
For chemical-free nish removal, it requires the addition of a specialized surface
preparation pad. The application still requires the attachment of a traditional
cleaning pad rst. This pad acts as a “backer pad” which compensates for low
and high spots in the oor.
Proper alignment of pad
To attach the pad, align the front corners of the pad to the front corners of the orbital drive plate and press to attach.
Use the foot pedal to lower the scrub deck down onto the pad ensuring alignment from front-to-back and side-to-side.
When the head is properly set onto the pad, you are ready for cleaning.
1
2
3
1 2 3
4 5
Align the Velcro pad retainer along one length of the red, backer pad and press
down. This will leave a 2” gap along one side of the backer pad. Then place
the surface prep pad on top of the pad retainer, centering it from front-to-back
& side-to-side with the red pad. The 2” gap left by the pad retainer needs to be
at the front of the machine so that water can fully saturate the pad. Align your
pad assembly with all corners of the pad driver and press upward. The red
backer pad should be in closest contact with the pad driver.
Finish the operation by using the foot pedal to lower the scrub deck down onto
the surface preparation pad, once again ensuring alignment from front-to-back
and side-to-side. When the head is properly set onto the pad, you are ready
for your nish maintenance program.
4
5

15
MACHINE PREPARATION
CONNECTING THE SQUEEGEE AND ADJUSTING SQUEEGEE HEIGHT
Prior to shipping from the factory, the squeegee assembly is removed from the unit. To connect your squeegee assembly to the machine:
The squeegee blade assembly height is factory set at the optimum water recovery position with the squeegee wheels being
approximately 1/32 inch (1 mm) off the ground allowing the recovery blade to deect as shown below.
Button screw to raise and lower
squeegee assembly wheels
Align the squeegee assembly retention slots with the easy-grip knobs then tighten until secure.
Attach the recovery hose to the squeegee assembly neck. Make sure to route the hose so that it won’t interfere with the swing of the
squeegee assembly.
Close up of squeegee assembly and
blade deection
Proper recovery
blade deection
Slight clearance
off of oor
No clearance
off of oor
1
2
3
4
3 4
If for some reason your squeegee blade height must be adjusted, it is done so by turning the left button screw located on the squeegee
frame assembly clockwise to raise the left squeegee wheel and counter-clockwise to lower the wheel. The same is true for the right
button screw/squeegee wheel.
After aligning assembly, tighten the
easy-grip knobs and attach the
recovery hose
2
Positioning the squeegee assembly to
mount onto the squeegee frame
1
Easy-grip
knob
Easy-grip
knob

16
MACHINE PREPARATION
RECOVERY TANK PREPARATION & PLASTIC BAG HOLDER
PICKING UP LARGER DEBRIS DURING THE CLEANING PROCESS
Your S-Series mid-size scrubber has been designed with two hooks molded into the handle that can be
used to hang a plastic bag to put larger pieces of debris that you come across during the cleaning process
or that obstruct the squeegee assembly and cause streaking. Simply slide a handle of the plastic bag over
each of the hooks.
Plastic bag hooks indicated above
1
TREATING YOUR RECOVERY TANK
Your S-Series mid-size scrubber has been designed with a debris tray and the TTS tank treatment system. TTS is a treatment system that
utilizes Bromine tablets, typically used in pools and spas, to kill the bacteria in the tank that cause odors. To ensure that TTS is prepared to
treat your recovery tank:
Check the TTS bromine puck
3
Press the TTS holder and bromine
puck back into the debris tray
4
TTS is located in the debris tray
inside the recovery tank
1
Lift the recovery tank lid to the open position and locate the debris tray.
1
Lift the debris tray out and turn it over so that you are able to pinch the two tabs protruding from the underside of the debris tray
together to release the TTS Bromine puck holder.
2
Remove the debris tray
2
Check the size of the Bromine puck. Replace the Bromine puck when it is approximately 25% of it’s original size.
3
Press the TTS holder and bromine puck back into the debris tray.
4
CAUTION: Use Bromine only! Do not use chlorine. Chlorine can interact with ammonia based detergents to cause harmful fumes.

17
MACHINE OPERATION
OPERATIONAL CONTROLS
The machine operation and controls were designed to minimize operator training and decrease the need for adjustments during
operation. Additionally, once in operation, Pacic Floorcare’s goal was to provide an ergonomic, easy to use system. Due to this focus, the
S-Series mid-size scrubber’s key operational controls are all within reach so that the operator doesn’t have to remove their hands to perform
the operation - a key to safe, trouble-free, highly productive cleaning.
TURNING THE UNIT ON/OFF
The machine is powered on through a key switch on the upper control panel. Turn the key to the ON
position. You will see the battery meter on the left side of the upper control panel light up to show the
battery charge level.
The key switch is a proven way to eliminate unwanted operation. Simply remove the key and safely store it
away when you have completed scrubbing.
S-Series key switch
SETTING DESIRED SOLUTION FLOW RATE
For units that aren’t equipped with a chemical injection system, the next step is to set the unit to the
desired solution ow. This control feature is located at the lower rear of the machine and can be adjusted
from low to high ow spanning a range of 0 to .55 gallons (0 to 2.1 L) per minute.
Solution ow adjustment knob

MACHINE OPERATION
ON-BOARD CHEMICAL INJECTION SYSTEM
If your S-Series mid-size scrubber is equipped with the on-board chemical injection system, the following instructions will walk you through
the easy process of setting up and operating this system.
Chemical injection chemical mix
ratio dial being set
Lift the recovery water tank, opening it as far as it will go using the side handle.
Review the chemical’s prescribed mix ratio in ounces per gallon and then set the dial on the
scrubber’s lower control panel to match. There are 12 settings on the dial (including off), but if you
don’t see a match, use the one that most closely matches the chemical’s suggested mix ratio.
1
4
4
Recovery tank shown in fully open
position
1
Place your 1-gallon chemical container in the holder inside the machine’s battery compartment and remove the cap. The chemical holder
will accept round, square or rectangular shaped containers.
2
Insert the chemical injection system’s leader hose into the container, ensuring that the end is resting on the bottom of the container, and
screw down the system’s universal cap.
3
1-gallon chemical bottle in holder,
preparing to insert leader hose
2
Close up of leader hose
3
Strainer
on
leader
hose
Chemical bottle connected properly
to chemical injection system
3
Once the container is in place, it is time to set your mix ratio on the control panel.
18

MACHINE OPERATION
ON-BOARD CHEMICAL INJECTION SYSTEM
Once the chemical mix ratio is selected, set your desired solution ow rate to low,
medium or high based on your cleaning needs and the chemical injection system will
automatically mix your chemical for you. A solid green LED indicates the system is
powered and working properly.
4
19
Close up of chemical injection
system dials
4
Solution ow
rate dial
NOMINAL WATER FLOW (GPM/LPM)
HEAD SIZE & TYPE LOW MED HIGH
24-inch (610 mm) dual disk .1 gal (.38 l) .26 gal (1 l) .48 gal (1.8 l)
28-inch (711 mm) dual disk .12 gal (.45 l) .3 gal (1.1 l) .56 gal (2.1 l)
28 x 14-inch (711 x 356 mm) orbital .12 gal (.45 l) .3 gal (1.1 l) .56 gal (2.1 l)
32-inch (813 mm) dual disk .14 gal (.53 l) .35 gal (1.3 l) .6 gal (2.3 l)
To purge an old detergent, set the detergent to the highest chemical mix ratio and run until the leader hose line is empty.
If the detergent is not priming, temporarily set the detergent to a higher setting until detergent appears on the oor.
*Flow tolerances are approximately plus or minus 20%

20
MACHINE OPERATION
OPERATIONAL CONTROLS
Once the machine is powered on and the solution ow is set, it takes three
simple steps to operate the machine: lower the scrub deck, lower the
squeegee and engage the activation trigger. These steps are visually shown
on the lower control panel by the S-Series mid-size scrubber’s “1, 2, 3-Step”
on-board operation guide. Following are the detail steps of how scrubbing
and recovery functions are activated.
On-board “1, 2, 3-Step” operation guide
LOWERING THE SCRUB DECK
The scrub deck is lowered using the foot pedal at the rear of the unit.
Lowering scrub head using foot
pedal
Lower down pressure setting
Place your foot on the pedal and depress the lever while shifting it to the right. Once clear of the lower notch, lifting your foot will lower
the scrub deck into the operating position.
The S-Series mid-size scrubbers have three down pressure settings.
• The 24-inch (610 mm) disk unit has settings of 50, 100 & 140 lb (23, 45 & 64 kg)
• The 28-inch (711 mm) & 32-inch (813 mm) disk scrubbers have settings of 70, 110 & 150 lb (32, 50 & 68 kg)
• The 28-inch (711 mm) orbital scrubber has settings of 70, 110 & 160 lb (32, 50 & 73 kg)
When the unit is set into operating position with the foot pedal, it is in the lower down pressure position. This position is typically used
for daily cleaning of normal soils. However, should you have tough soils or want to perform chemical-free nish removal, you can engage
higher down pressure settings. To engage the medium down pressure setting, lift the foot pedal lever so that the hook is secured in the
cutout in the foot lever. To engage high down pressure, lift the foot lever to the upper notch position so that the bottom of the lever is
locked on the hook of the bracket. To disengage medium or high down pressure, simply lift and shift the lever to the right and lower into
normal operating position.
1
2
1 2
High down pressure setting when
lever is lifted to top position
2
Medium down pressure when lever
is hooked in mid-position
2
Table of contents
Other Pacific Floorcare Scrubber manuals

Pacific Floorcare
Pacific Floorcare S-28HD User manual

Pacific Floorcare
Pacific Floorcare S-24XM User manual

Pacific Floorcare
Pacific Floorcare S-24 User manual

Pacific Floorcare
Pacific Floorcare QS-12 User manual

Pacific Floorcare
Pacific Floorcare RS28 User manual

Pacific Floorcare
Pacific Floorcare S-20 User manual

Pacific Floorcare
Pacific Floorcare S-24 User manual
Popular Scrubber manuals by other brands

Factory Cat
Factory Cat 29ss Series Operator, parts, & service manual

Pioneer Eclipse
Pioneer Eclipse PE310AS manual

DIVERSITECH
DIVERSITECH MINI-VAC Operation & maintenance manual

Tennant
Tennant 8300 Operator's manual

Kärcher
Kärcher BD 38/12 C Bp manual

comoc
comoc cm mini orbital Use and maintenance manual