Pacific Yurts 20' Yurt User guide

20′, 24′, & 30′Yurts
The original manufacturer of the modern lattice wall yurt, the highest quality for over 35 years.
Manufactured by Pacic Yurts Inc. • 77456 Hwy 99 S. • Cottage Grove, OR 97424 • (541) 942-9435 • www.yurts.com
SET UP MANUAL
The Original Modern YurtTM
Dome Skylight
Top Cover
Optional Solar
Skylight Arc
Center Ring
Rafters
Tension Cable
Window
Lattice Wall
Door & Frame
Side Cover
Artist's Conception © Pacific Yurts Inc.

Have you done these important things?
Please be sure you have done the following:
The platform must be round and the same diameter as your yurt.
The screw in the tip of each rafter should be installed to keep the rafter from lifting off the
tension cable. (Page 9)
The rafters over the door should be secured to the top door sill with the screws provided.
(Page 10)
If the Snow & Wind Kit was purchased, the cables in the rafters zigzag inopposite
directions so they pull against each other and both cables need to have the same amount of
tension on them. (Page 12 and diagram page 13)
If the Snow & Wind Kit was purchased, two screws need to be installed through the lattice
wall into the back of each rafter support. (Page 11)
The gap between the side cover and grommet strip on the top cover needs to be a consistent
1” before securing the bottom of the side cover to the platform. (Page 24)
After making sure the gap is 1”, be sure the cord in the grommet strip (under the valance) is
securely tied to the last grommet on the top cover next to the door. (Page 24)
The cord that is laced through the grommets at the bottom of the top cover valance needs to
be pulled as tight as possible and secured at the door frame. (Page 28)
If the dome opener is purchased it isextremely important to make sure the opener
spindle is installed correctly to avoid breaking the dome skylight. (Page 32)
When cleaning the dome skylightDO NOT USE glass cleaners! See care recommendations
on page 50.
Remember that this manual includes a care and maintenance section that should be referred
to periodically.
If you do not fully understand the set up process call us at 1-800-944-0240.

The Yurt Set Up Manual
Including Care & Maintenance
20′, 24′& 30′Yurts
Pacic Yurts Inc.
Recreational Living Structures
Warning: Safety is very important in the assembly and use of yurts. Therefore, purchaser should read
the manual thoroughly before starting assembly in order to avoid accidental injury.

Welcome Aboard!
We would like to take this opportunity to thank you for purchasing a Pacic Yurt and to welcome
you to the growing Pacic Yurts’ family. Pacic Yurts was established in 1978 and is the original
designer and manufacturer of the modern lattice wall yurt. Today Pacic Yurts Inc. enjoys an
international reputation for successfully adapting this ancient shelter into a modern recreational
living structure. We are committed to the highest quality in our materials and workmanship. Each
yurt is made of select kiln dried, second growth Douglas r and space age architectural fabrics.
We are dedicated to earning your condence by giving you the same professional quality and
service we ourselves appreciate. We welcome your comments and suggestions. Count on us to
be here for all your future needs.
If after reading through this manual you have any questions about the installation of the yurt
please call us at 800-944-0240.
Enjoy your yurt!
Sincerely,
The Pacic Yurts’ Staff
Manufactured by:
Pacic Yurts Inc. • 77456 Hwy. 99 S • Cottage Grove, OR 97424 • 541-942-9435 • www.yurts.com
Patented. All rights reserved. No part of this work covered by the copyright hereon may be reproduced or copied in any form
or by any means – graphic, electronic, or mechanical, including photocopying, recording, or informational and retrieval systems –
without written permission of Pacic Yurts Inc.
©2016, Pacic Yurts Inc.

Set Up Manual for 20′, 24′, & 30′ Yurts v
©2016 Pacic Yurts Inc.
List of Diagrams
Typical Platform Elevation ...............................................................................1
Diagram I: Door Cut-Out In Drip Edge ..............................................................3
Diagram II: Connecting The Lattice Wall To Door Frame..................................5
Diagram III: Securing The Lattice Wall.............................................................5
Diagram IV: Sequence for the 20' Yurt.............................................................7
Diagram V: Ring-to-Rafter Brackets ................................................................9
Diagram VI: Securing Tension Cable................................................................9
Diagram VII: Typical Section Through Yurt ....................................................11
Diagram VIII: Snow & Wind Kit Cables...........................................................13
Diagram IX: Perimeter Blocking.....................................................................13
Diagram X: Installation Of Interior Bracing....................................................15
Diagram XI: Additional Valance Lacing..........................................................15
Diagram XII: Unfolding Roof Insulation Liner................................................. 17
Diagram XIII: Unfolding Custom 2/3 Roof Insulation Liner ............................19
Diagram XIV: Unfolding Top Cover .................................................................21
Diagram XV: Top Cover Door Detail................................................................21
Diagram XVI: Wall Insulation Example...........................................................23
Diagram XVII: Roof to Wall Connection..........................................................25
Diagram XVIII: Attaching Side Cover Clips.....................................................25
Diagram XIX: Side Cover Attachment At Door................................................25
Diagram XX: Securing The Side Cover ...........................................................27
Diagram XXI: Rain Diverter Inserts................................................................29
Diagram XXII: Central Column ......................................................................31
Diagram XXIII: Non-Opening Skylight............................................................33
Diagram XXIV: Dome Opener Spindle.............................................................34
Diagram XXV: Opening Skylight.....................................................................35
Diagram XXVI: Stovepipe Hole .......................................................................37
Diagram XXVII: Woodstove & Chimney Installation .......................................38
Diagram XXVIII: Gas Stove Installation ..........................................................39
Diagram XXIX: Insulation Board Pattern ........................................................41
Diagram XXX: Water Catchment System........................................................43
Diagram XXXI: Cable Tie-Down System .........................................................45
Diagram XXXII: Gutter Parts ..........................................................................47
Diagram XXXIII: Gutter Hanger Bracket.........................................................47
Diagram XXXIV: Gutter Assembly ..................................................................47

Set Up Manual for 20′, 24′,& 30′ Yurts vi
©2016 Pacic Yurts Inc.
Tool List
10’ - 12’ step ladder for 20’ yurt or scaffolding for 24’ & 30’ (10’ high) & 8’ step ladder
Blanket or pad (for protecting top cover while installing dome)
Cable cutters (for trimming excess on safety cable)
Electric drill (or cordless driver drill) with Phillips bit
Hand saw (for cutting lattice for stovepipe)
Knife (for cutting lacing cord)
Level
Masking tape
Miter saw (for trimming rafter supports on Snow & Wind Kit)
Phillips screwdriver
Standard screwdriver
Pliers (for crimping springs on dome opener if applicable)
Sawzall or equivalent (for cutting door opening in drip edge)
Sharp scissors
Small crescent wrench
Staple gun
Baby powder (for top cover insulation only)
Tape measure
1/4” hex driver (for Snow & Wind Kit only)
Note: Remember the tools required may vary according to your platform height, options chosen and yurt size.
Read entire manual before installation.

Set Up Manual for 20′, 24′, & 30′ Yurts vii
©2016 Pacic Yurts Inc.
Contents
Tool List ...................................................... vi
Site Location............................................. viii
Platform (Floor) Construction................... viii
Ready To Start ............................................. 2
Assembling the Framework......................... 2
Lattice Wall ................................................................... 2
Door Frame ................................................................... 4
Adjusting & Securing The Lattice Wall ......................... 4
Tension Cable ............................................................... 4
Raising The Center Ring & Rafters ............................... 6
Securing Tension Cable ................................................ 9
Securing Rafters To Door Frame .................................10
Safety Cable ................................................................10
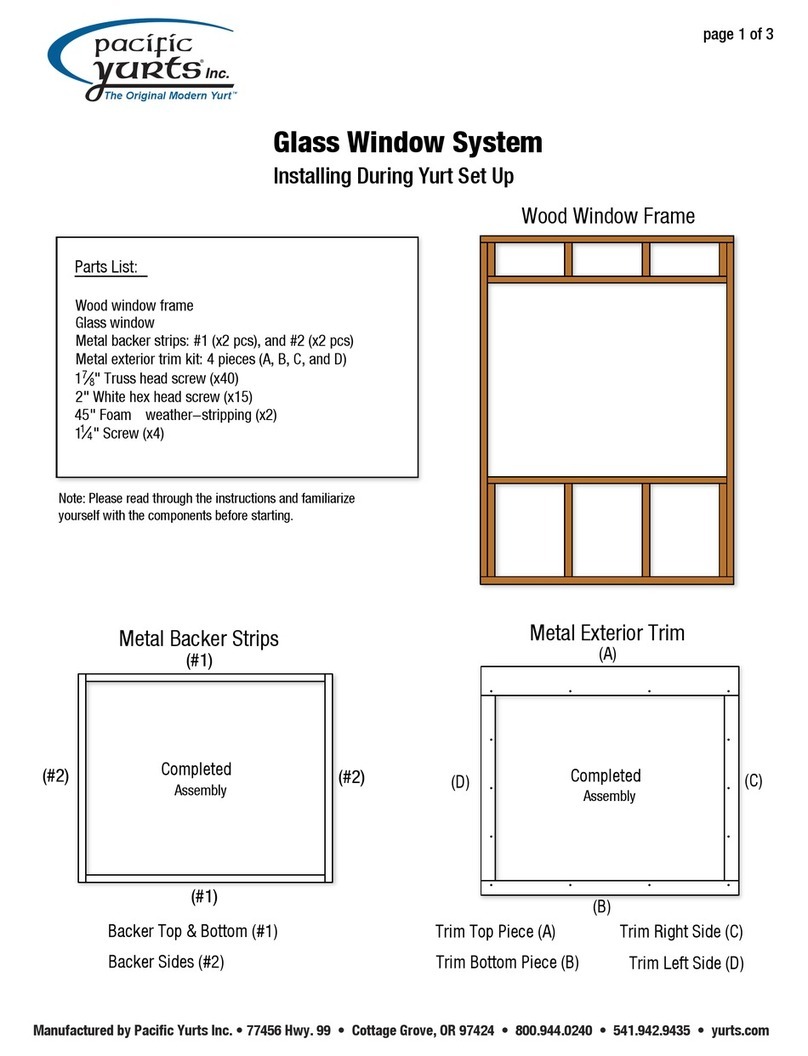
Wood Frame for Custom Curve Glass Window ............10
Snow & Wind Kit ..........................................................10
Perimeter Blocking ......................................................14
Snow And Wind Protection ..........................................14
Installing Insulation & Outer Covers.......... 16
Insulating The Yurt ......................................................16
Roof Insulation And Liner Facing .................................16
Custom 2/3 Roof Insulation .........................................18
Top Cover .................................................................... 20
Wall Insulation With Liner Facing ............................... 22
Side Cover................................................................... 24
Custom Curve Glass Window ..................................... 26
Top Cover Valance ...................................................... 28
Central Column ........................................................... 30
Dome Skylight ........................................... 32
Dome Skylight (Without Opener) ................................ 32
Dome Skylight (With Opener) ..................................... 32
Stovepipe Installation................................ 36
Direct Vent Gas Stove Installation .............................. 37
Additional Insulation Information.............. 40
Insulating The Roof With Insulation Board ................. 40
Floor Insulation ............................................................41
Additional Options ..................................... 42
Door Screen Curtain ................................................... 42
Center Ring Insert ....................................................... 42
Insulated Window Cover ............................................. 42
Removable Cable Tie-Down System .......................... 44
Perimeter Gutter System ............................................ 46
Care & Maintenance .................................. 48
Vinyl Covers ................................................................ 48
100% Polyester Side Covers ...................................... 48
Stove ........................................................................... 48
Lattice Wall ................................................................. 49
Adjusting The Door ..................................................... 49
Door & Door Frame ..................................................... 49
Dome Skylight And Door Window ............................... 50
Vinyl Windows ............................................................ 50
Glossary..................................................... 51
Limited Warranty ....................................... 52
Epilogue ..................................................... 53

Set Up Manual for 20′, 24′,& 30′ Yurts viii
©2016 Pacic Yurts Inc.
Site Location
Being what we call a ‘soft’ structure, the yurt reacts more readily to climatic conditions than do ‘rigid’ structures, therefore,
it is important to choose your site carefully and take into account prevailing wind patterns, overhead tree limbs, water
runoff, etc. In general, the best site would be protected from the wind, would receive morning sun and afternoon shade
and be free from overhead objects such as large dead tree limbs that could damage the yurt in heavy winds. Plan your
entry so that the doorway is facing away from prevailing winds.
We do not recommend setting up the yurt for extended periods without a platform (oor). However, if you do set up the
yurt on the ground, make sure your site is leveled, leaving enough room to ditch around the perimeter for watershed
control. Plan your site with the lay of the land and runoff patterns in mind so that you don’t get caught by surprise in the
rst rainstorm. Also, we recommend a ring of gravel or bricks so that the side cover does not come in contact with the
damp earth. A temporary oor can be easily installed using a layer of bark chips covered with heavy black plastic and
layered with carpeting. Be sure to stake down the lattice wall securely.
Platform (Floor) Construction
For a secure and comfortable installation, a well-built platform is necessary. To ensure a weather proof installation the
platform needs to be circular and the same diameter as the yurt so the side cover fabric can extend below the interior
oor level. This will provide a draft-free and watertight seal. Any exterior decking should be separated from, or at a lower
level than the yurt platform. Unless you are skilled, enlist the help of an experienced carpenter for building the platform.
Contact Pacic Yurts to obtain recommended platform construction plans for the size of your yurt or download them from
our web site www.yurts.com. Keep in mind that every site will be different, so the platform construction and footings
should reect the conditions of each individual site and may need to be modied from our recommended plan.

Set Up Manual for 20′, 24′, & 30′ Yurts 1
©2016 Pacic Yurts Inc.
Typical Platform Elevation
Grade
Entry deck
Typical bracing
4x4 Posts
Concrete piers
Note: Platform and footings should be designed
according to the conditions of each individual
site and local building requirements.

Set Up Manual for 20′, 24′,& 30′ Yurts 2
©2016 Pacic Yurts Inc.
Ready To Start
Now you are ready to start setting up the yurt. It is helpful at this point to familiarize yourself with the various components
(see diagram on front cover) and to have read through the entire set up sequence so that it is clear and you know what
to expect. A glossary is included in this manual to familiarize yourself with the terms used. All hardware for the yurt is
provided in the hardware box.
1. Locate your door position(s) exactly and mark the center on your platform’s drip edge.
2. Measure the door threshold length (43 7/8" for standard door and 55 5/8" for French door) and notch out 1” of drip
edge material to this dimension using your mark as center. You are simply cutting the 1” portion of the plywood
drip edge that extends above the interior oor level back down to oor level so the door threshold can overhang the
circular platform. When marking the platform’s drip edge for the door cut-out be sure to measure the width of the
door threshold straight across rather than around the curved surface of the platform. (See Diagram I)
Note: If you are setting up a yurt with doors at 6:00 & 12:00, be sure the doors are exactly opposite by running a string
through the center point of the circle to the outside perimeter on each side. This is the center line of the doors. To locate
the center of doors located at 3:00 or 9:00 you can measure around the circumference from 6:00 to 12:00. The midpoint
of this measurement is the center of your door.
Assembling the Framework
Lattice Wall
1. Locate and unwrap the lattice wall. It will be a cylindrical package roughly 24” in diameter and eight feet long. Take
the lattice wall and a helper to the back of the circular platform, opposite to where you want the 6:00 door to be,
and stand the lattice wall on end. (Note: Make sure the lattice wall is right side up! The bottom of the lattice wall
is easily identied by the bolts that have been installed for the anchoring straps.) Also, note that there is an inside
and an outside. The outside is the side with the holes in the middle of the rivets, while the inside has no holes in the
rivets.
2. Carefully undo the straps around the lattice wall and stretch it out around the perimeter of the circular platform
(just inside the drip edge), making sure to keep it stable as you proceed. (Safety note: Be careful of pinch
points while extending lattice wall.)
3. Leave about 4 ft. for the door opening. The lattice wall will be secured to the platform after the door is in place.

Set Up Manual for 20′, 24′, & 30′ Yurts 3
©2016 Pacic Yurts Inc.
43
78
" for standard door
55
58
" for French door
Plywood drip edge Notch for door frame
Diagram I
Door Cut-Out In Drip EdgeDiagram I:

Set Up Manual for 20′, 24′,& 30′ Yurts 4
©2016 Pacic Yurts Inc.
Door Frame
1. Position the door frame at the opening, making sure the keyed side of the door faces outward. (See Diagram II)
Remove the door clamp fascia and “door stickers” and set them aside for later.
2. Remove the wing nuts and washers (but not the wooden door clamps) from the inside of the door frame. The ends
of the lattice wall have metal plates installed, which will attach to the bolts on the door frame.
3. Slip the end of the plate with the oval hole onto the clamp bolts then replace the washers and wing nuts and snug
them down (not too tightly at this point).
4. Notice that there is a notch in the door threshold directly behind the door frame upright. Position the door threshold
so that this notch is outside of the drip edge (see Diagram II) and then anchor the threshold to the platform using
the screws provided in hardware box. The notch allows the side cover to extend below the threshold.
Adjusting & Securing The Lattice Wall
The lattice wall height should be consistent all the way around the perimeter (within 1/2”).
1. Go around the perimeter and check the wall height with a tape measure every few feet. The nished height will vary
depending on the yurt size and number of doors, but it is important that the measurement be consistent. The height
of the lattice wall can be adjusted by expanding out the lattice wall where it needs to be shorter and contracting it
where it needs to be taller. Be sure to keep the lattice wall against the drip edge as you go. Helpful Hint: Using a
stick with the average height marked on it is a quick and easy way of measuring the height of the lattice wall.
2. Remove the cap nuts, washers, and bolts, located approximately every sixth crotch along the bottom of the lattice
wall. Then bolt on the formed lattice wall anchoring straps (from your hardware box) and anchor them to the edge
of the platform with the screws provided. (See Diagram III) These brackets are designed so the screws will go
through the plywood drip edge and into the ooring material.
Tension Cable
1. Locate the steel cable (in your hardware box) labeled “tension cable”. Unroll the cable by starting with one end ‘off
center’ above the 6:00 door. This is important so that the cable hardware does not interfere with the rafters that will
be resting on top of the door frame.
2. Lay the cable in the crotches along the top of the lattice wall. Take the slack out as you go and be sure not to miss a
crotch. Hook the two ends together as you come around, meeting above the door where you began. If the two ends
do not meet there is excess slack in the cable. Simply pull out the slack a little at a time, working it towards the
cable ends. Before setting the rafters make sure to distribute any slack in the cable evenly around the perimeter.

Set Up Manual for 20′, 24′, & 30′ Yurts 5
©2016 Pacic Yurts Inc.
Lattice wall plates
Lattice wall
Door frame uprights
Door clamp Washer
Wing nut
Notch behind door frame upright
should be outside of drip edge
Diagram II
1-1/4" bolt
Bottom of
lattice wall
Cap nut
Washer
Lattice wall
anchoring strap
Interior floor
Plywood drip edge
Screw
Diagram III
Lock Washer
Connecting The Lattice Wall To Door FrameDiagram II:
Securing The Lattice WallDiagram III:

Set Up Manual for 20′, 24′,& 30′ Yurts 6
©2016 Pacic Yurts Inc.
Raising The Center Ring & Rafters
Raising the center ring is the most exciting step and needs to be executed with some care. Extra care should be taken on
larger yurts because of the added weight of the components, length of the rafters and height of the center ring. Because
the rafters are longer and heavier they are potentially more hazardous if dropped out of the ring. We
therefore recommend that you enlist the help of a few friends for the yurt raising. 10’ high scaffolding in the center
of the platform is highly recommended when setting up a 24’ or 30’ yurt to provide secure footing when
raising the center ring and unfolding the top cover. Be sure to read this entire section before beginning.
Note: If you purchased a 2x6 rafter upgrade, Central Column or Alpine Package the yurt components are
very heavy and extreme caution should be used. A yurt with the Alpine Package will include separate
instructions which should be reviewed before proceeding.
1. Disconnect the dome skylight from the center ring. The dome will be installed later.
2. Bring the center ring into the yurt and lay it in the center of the oor (for 20’ yurts) with the bolt heads down and
nutted ends up. For 24’ and 30’ yurts, lay the center ring on top of the scaffolding in the middle of the yurt.
3. Important Note: If you purchased a dome opener, it is at this point you will want to position the
aluminum bracket on the center ring away from the prevailing winds to avoid having the wind catch
the dome on the open side. The aluminum bracket is on the side that opens, not the hinge side. Using
a heavy felt pen (and referring to the Rafter Spacing Diagram enclosed in your hardware box) mark the locations
of the three or four evenly spaced holes on the center ring (shown in blue on diagram). These will be the points at
which the rst “set up” rafters will be inserted to raise the center ring. (20’ yurts use three, while 24’ and 30’ use
four.) The rafters shown in orange have been modied to rest on top of the door(s).
4. Locate the positions where these “set up” rafters will rest on the cable (again refer to the Rafter Spacing
Diagram) and mark each of these cable spaces with a piece of tape to facilitate the set up.
CAUTION: UNTIL THE RAFTERS ARE ALL INSERTED, THE INTERIOR OF THE YURT SHOULD BE CONSIDERED
A HARD-HAT ZONE; CHILDREN AND THOSE NOT INVOLVED WITH THE ASSEMBLY SHOULD WAIT OUTSIDE! IF
SOMEONE PUSHES A RAFTER INTO THE RING WITH TOO MUCH FORCE IT COULD MAKE THE RAFTER NEXT TO
IT SLIP OUT OF THE RING AND FALL!
For 20’ yurts follow steps 5 – 8 then skip to step 13. For 24’ and 30’ yurts follow steps 9 - 12 on page 8.
5. (Steps 5-8 are for 20’ yurts only) Bring ve or six rafters into the center of the yurt and lay them aside. Place one
of the rafters on one of the tension cable’s marked spaces (notched end to the cable and the pin towards the ring).
Note: The notched end of the rafter has a rounded top and a pointed bottom. The pointed end should
be facing downward when the ring and rafters are erected.
6. Lift the ring up so it is on edge and insert the pin of the rafter into the ring. Staying on the marked holes and cable
spaces only, do the same with the second rafter. (See Diagram IV)

Set Up Manual for 20′, 24′, & 30′ Yurts 7
©2016 Pacic Yurts Inc.
Sequence for the 20' YurtDiagram IV:
Lift ring upward while keeping
pressure against first two rafters
Slip notch of third rafter
onto tension cable
SEQUENCE FOR 20' YURT
Diagram IV
Insert first two rafters
while ring is at floor level.

Set Up Manual for 20′, 24′,& 30′ Yurts 8
©2016 Pacic Yurts Inc.
Lift the ring off the ground letting the rst two rafters support one side of it and insert the pin of the third rafter into 7.
the remaining marked hole. Use the third rafter to lift the center ring up into position, keeping pressure against the
rst two rafters, and then place the notched end on the cable. It helps to have someone standing by with an extra
rafter to help push the ring up and brace it until you get a few more rafters into position. (See Diagram IV)
Carefully insert the rest of the rafters, being sure to balance your placement by keeping the rafter pattern symmetrical
8.
(so the weight stays equally distributed) and keeping two lattice wall crotches between each rafter. When inserting
the rafters, it works best to set the pin end in completely, bring the other end up under the cable, push the lattice
wall out a little with your shoulder (not too far) and then hook the rafter onto the cable. Do not force the rafter into
the ring. Once you get the correct angle it will easily slip in. Now go directly to step 13.
(Steps 9-12 are for 24’ and 30’ yurts only)
9. Have two people on top of the scaffolding to guide the pin-end of
the rafters into the appropriate hole in the center ring while others work from oor level slipping the tension cable
into the rafter notch. Insert the steel pin of two rafters into the appropriate holes on the center ring (refer to Rafter
Spacing Diagram from hardware box) and onto the tension cable’s marked spaces, letting these rst two rafters
support one side of the ring.
Keeping pressure against the rst two rafters, place the pins of the third and fourth rafters into the ring and notched
10.
end onto the cable. Note: The notched end of the rafter has a rounded top and a pointed bottom. The
pointed end should be facing downward when the ring and rafters are erected.
If you purchased the Snow & Wind Kit
11. you will have four ring-to-rafter brackets, which slide onto the pin end of the
rafter and screw to it. After fastening these brackets onto four rafters carefully insert these rafters keeping all eight
spaced evenly as shown on Diagram V (24’ & 30’ yurts only). It is best to wait until all of the rafters have been
installed before screwing the ring-to-rafter brackets to the center ring because the center ring will rise upward as
you install more rafters.
Carefully insert the rest of the rafters, being sure to balance your placement by keeping the rafter pattern symmetrical
12.
(so the weight stays equally distributed) and keeping two lattice wall crotches between each rafter. When inserting
the rafters, it works best to set the pin end in completely, bring the other end up under the cable, push the lattice
wall out a little with your shoulder (not too far) and then hook the rafter onto the cable. Do not force the rafter
into the ring. Once you get the correct angle it will easily slip in.
Install the
13. rafters over the door(s) last. These rafters have been modied to rest on top of the door frame and hold
the tension cable in place.
Once the rafters are in place double check to make sure all the rafters square up with the center ring and are
14.
separated by two lattice wall crotches. Also check to be sure that all of the rafters that should be resting on the door
are actually on top of the door and not next to it (refer to the Rafter Spacing Diagram). If your yurt includes
ring-to-rafter brackets (24’ & 30’ yurts only) you can now install the nal screws securing the brackets to the center
ring.

Set Up Manual for 20′, 24′, & 30′ Yurts 9
©2016 Pacic Yurts Inc.
Securing Tension Cable
To eliminate the possibility of the tension cable coming out of the rafter notch a screw will need to be installed into
the predrilled hole on the underside of the rafter. (See Diagram VI) This secures the rafter end onto the cable. Do
not substitute longer screws for those provided.
When installing the screw, install it only deep enough to make the head of the screw ush with the bottom of the
rafter. If installed too deeply it is possible to drive the screw through the rafter and damage the top
cover. Note: The rafters over the door(s) will not need these screws because they will be fastened to the door
frame.
Ring-to-Rafter BracketsDiagram V:
Center Ring
Center Ring
Rafter
Ring-to-Rafter
Bracket
Rafter
Ring-to-Rafter
Bracket
Diagram V
Side View
Top View
Ring-to-Rafter
Bracket Ring-to-Rafter
Bracket
Ring-to-Rafter
Bracket
Securing Tension CableDiagram VI:
Diagram VI

Set Up Manual for 20′, 24′,& 30′ Yurts 10
©2016 Pacic Yurts Inc.
Securing Rafters To Door Frame
Rafters over doors will be secured in position using header brackets provided in the hardware box. Each of the modied
rafters have a slight notch where the tension cable will be held in place against the door frame.
From inside the yurt, place the header bracket onto the rafters above the door (with the at side resting on top of the 1.
door header) and slide it forward until it butts against the tension cable as shown on Diagram VII.
Using the screws provided, fasten the brackets onto the rafters. Check to be sure the door is plumb and square
2.
before fastening the header brackets to the door header.
Safety Cable
Note: If you purchased the Snow & Wind Kit you will not have a safety cable and you should go directly
to the Custom Curve glass window instructions. If you did not purchase a Custom Curve glass window go
directly to the Snow & Wind Kit instructions.
If you did not order the Snow & Wind Kit a “Safety Cable” is provided, which installs in a circular pattern through predrilled
holes in the rafters. The rafters have been predrilled with four holes in the event you add the Snow & Wind Kit in the future,
but the Safety Cable should be installed only through the hole in each rafter nearest the center ring.
Remove the cable clamps from the end of the safety cable and thread it through the predrilled holes in the rafters
1.
in a circular pattern (do not zigzag).
Once the cable is laced through the rafters and you get back to the starting point, pass the end of the cable through
2.
the loop on the opposite end and pull tight.
Put the cable clamps back on and tighten securely.
3.
Cut off any excess cable using a cable cutter.4.
Wood Frame for Custom Curve Glass Window
If you purchased Custom Curve glass windows please refer to your separate instruction yer. If you are not installing the
glass windows at this time go directly to the instructions for installing the Snow & Wind Kit below.
Snow & Wind Kit
If you purchased the Snow & Wind Kit continue. If you are not installing the Snow & Wind Kit at this time go to
page 16 for installing the roof insulation. This is to be done after the wood frame is completely installed. If you
did not purchase insulation for your yurt, go directly to page 20 for top cover installation. Note: The Snow
& Wind Kit involves a lot of screws. If the yurt is being set up at a site without electricity be sure to have plenty of fully
charged batteries for cordless drills or a generator to charge them.
Locate and unwrap the package(s) marked “Rafter Supports”. The 2x4 rafter supports will be installed against the
1.
lattice wall under each rafter. (See Diagram VII). They are purposely provided long so they can be cut on site to t
exactly (since the lattice wall height may vary). Be sure to cut the square end when cutting them to length so the
angled end is not changed. (A miter saw works well for this.)
Measure and cut one rafter support and check it under several rafters to make sure it is the proper length. Once you
2.
are convinced that you have the right length, cut all of the rafter supports to the same length.

Set Up Manual for 20′, 24′, & 30′ Yurts 11
©2016 Pacic Yurts Inc.
Typical Section Through YurtDiagram VII:
Mending plate on both sides
at each rafter and rafter support
under each rafter
Angle brackets on
both sides at each rafter
support to platform
Tension cable
1/4" bolt
Metal strap
drip edge into platform
Hole 4
Hole 3
Hole 2
Hole 1
Holes for cable blocking
Rafter
Steel rafter pin
Center ring Door header
Screw
Rafter
Door frame
upright
AT DOOR FRAME
2 x4 rafter support
Screw through
Diagram VII
1 12" Flooring
Header bracket
Lattice wall screws
to supports
Lattice wall screws
to supports

Set Up Manual for 20′, 24′,& 30′ Yurts 12
©2016 Pacic Yurts Inc.
2” x 4” mending plates are provided to attach the rafter supports to the rafters on both sides. 2” x 2” angle brackets
are provided for attaching the rafter supports to the oor on each side (see Diagram VII, page 11). Note: If you
purchased a 2x6 rafter upgrade the mending plates are replaced with one-piece rafter brackets (see
Diagram XXII, page 31), which slide onto the rafter and secure to the rafter support after it is in position
against the lattice wall.
Use the cardboard template from your hardware box and the pilot bit provided to drill pilot holes for the metal plates3.
before screwing them onto the rafter supports. This will ensure that the plates are properly positioned and the
screws are offset so they do not hit each other.
Using a ¼” hex driver, attach the mending plates and angle brackets to the rafter supports with the hex head screws4.
provided (in hardware box). Be sure to drive the screws in straight to avoid having the heads pop off.
Once all of the rafter supports have the hardware mounted to them, stand them up under each rafter and make sure5.
the rafter is centered between the lattice wall crotches. Note: It is helpful to place a 1” block against the drip edge
to ensure proper positioning of the rafter support. Have one person drill pilot holes while another installs the screws
to secure the rafter support to the oor.
Once the rafter support has been anchored to the oor make sure it is plumb and secure it to the rafter. Be sure to 6.
drill pilot holes before driving in the screws.
Repeat for all rafter supports.Double check to be sure the rafter supports are plumb, centered between lattice7.
wall crotches and are tight against the lattice wall. From outside the yurt drill a pilot hole through the
lattice wall (where it crosses) into each rafter support using the drill bit provided (see Diagram VII,
page 11). This should be done in two locations: Approximately 12” from the top of the lattice wall
(just above the rivet) and at approximately 51” from the top of the lattice wall. Then drive a 1-7/8”
screw (from hardware box) through the lattice wall into the support at each location. This is done
from outside of the yurt before the side cover is installed. This screw is an important part of the Snow & Wind
Kit providing a shear point to prevent torque in the yurt.
Locate the Snow & Wind Kit cables in your hardware box. Notice that one is marked as “long”, while the other8.
is marked “short”. Uncoil the cable marked “short” and remove the two cable clamps. Notice that your rafters
each have four pre-drilled holes, but you will only be using two of them (having four holes makes the rafters
interchangeable). Install the cable in a zigzag pattern through the two holes nearest the center ring as shown on
Diagram VIII, page 13.
When you come around to where you began thread the end of the cable through the loop on the other end of the9.
cable, pull it tight and secure the cable using the cable clamps.
Now install the cable marked “long” through the lower two holes (nearest the tension cable) in the same manner, 10.
but be absolutely sure that the cables pull in opposition and have equal tension on each (see Diagram VIII,
page 13). If one is tighter than the other some rafters will start pulling away from the center ring and could
weaken the structure and result in failure at lesser snow or winds loads.
Tighten cable clamps securely and cut off any excess cable using a cable cutter.11.
This manual suits for next models
2
Table of contents
Other Pacific Yurts Tent manuals