manuals.online logo
Brands
  1. Home
  2. •
  3. Brands
  4. •
  5. Tarptent
  6. •
  7. Tent
  8. •
  9. Tarptent Bowfin 2 User manual

Tarptent Bowfin 2 User manual

pull grosgrain
to tension
interior oor
pull cord to tension vestibules
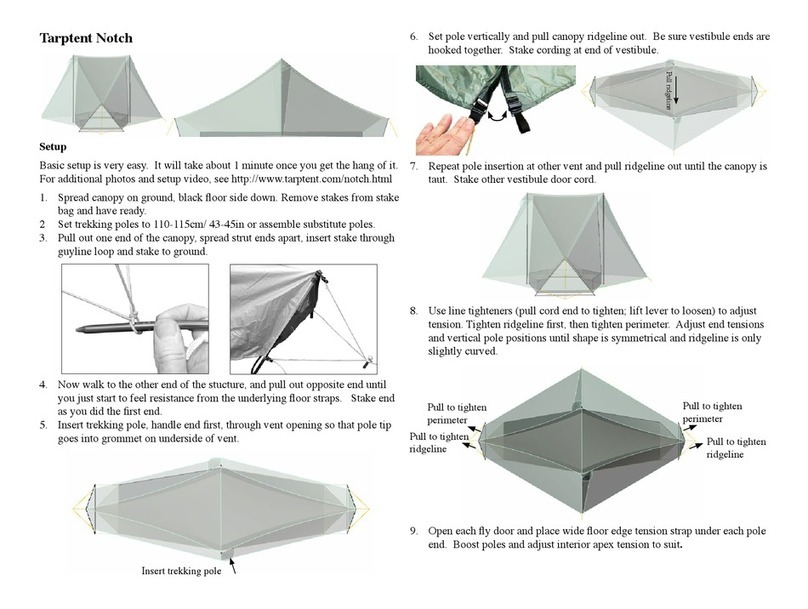
3. End storm aps can be opened or closed from outside the tent (Image 3A).
4. Pole sleeve loops, bottom edge pullouts, and sidewall pullouts can be
used for extra support in high winds, bad weather, or to help the Bown 2
accomodate a snow-load (Image 3A).
5. When entering/exiting in the rain, unbuckle oor from the vestibule edge
and bunch it towards the center of the tent. After entering the tent, rezip the
vestibule before rebuckling the oor. This will prevent the interior of the
tent from getting wet.
6. To take down the PitchLoc+ end supports, release tension on the lineloc and
fold inward for storage (Image 3B).
Tarptent Bown 2 Setup
With practice, setup is less than 2 minutes. For additional photos and videos
visit: http://www.tarptent.com/bown2.html
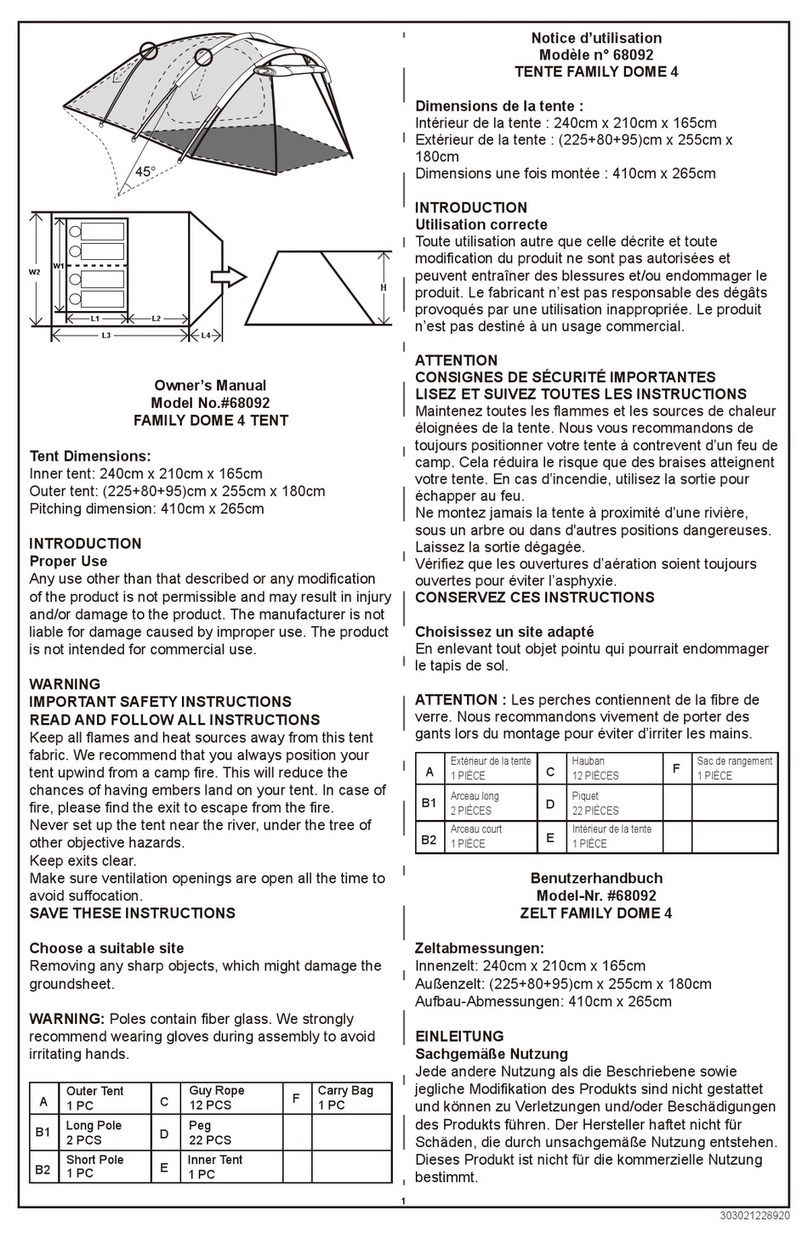
Your Tarptent Bown 2 order includes: stuff sack, tent canopy with embedded
cross strut and PitchLoc+™ end supports, tent interior, a 162 inch long arch
pole, and 2 blue stakes.
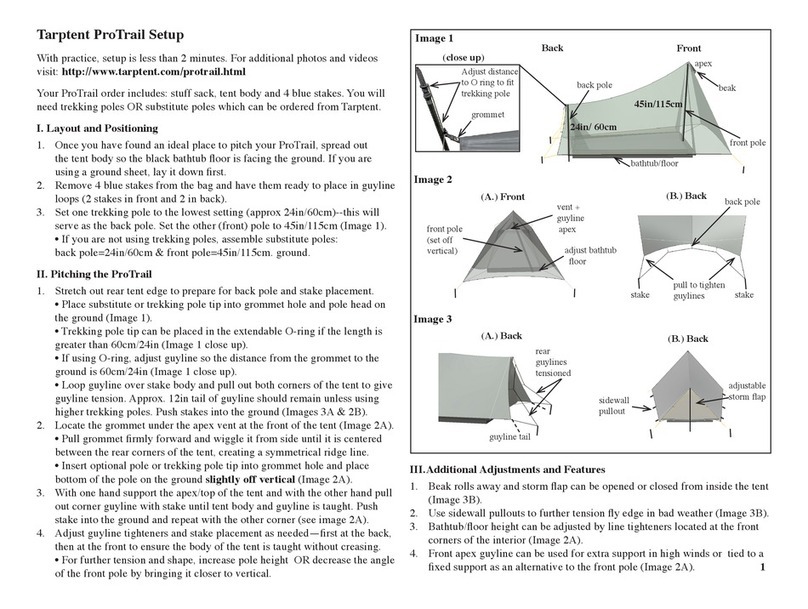
I. Layout and Positioning
1. Once you have found an ideal place to pitch your Bown 2, spread out
the tent body so the black bathtub oor is facing the ground. If you are
using a ground sheet, lay it down rst.
2. Remove 2 blue stakes from the bag and have them ready to place in guyline
loops (1 stake on either side of tent).
3. Assemble the PitchLoc+ supports on either end of tent by pulling the cord
(Image 1A) until the cross strut is straight across and tight with no gaps
(Image 1B). Lock it in place with the lineloc. Here is a helpful video on
assembling your PitchLoc+ end supports: vimeo.com/tarptent/bownstrut
4. Put together the shock-corded arch pole.
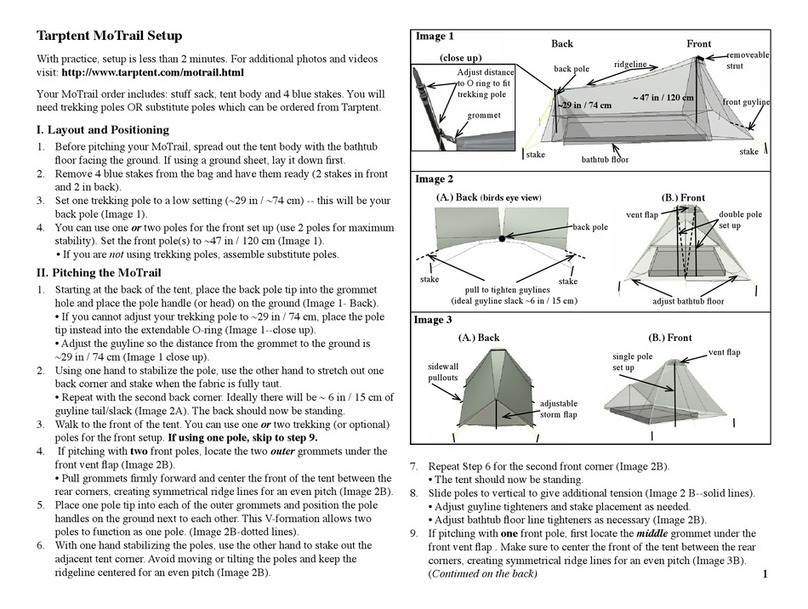
II. Pitching the Bown 2
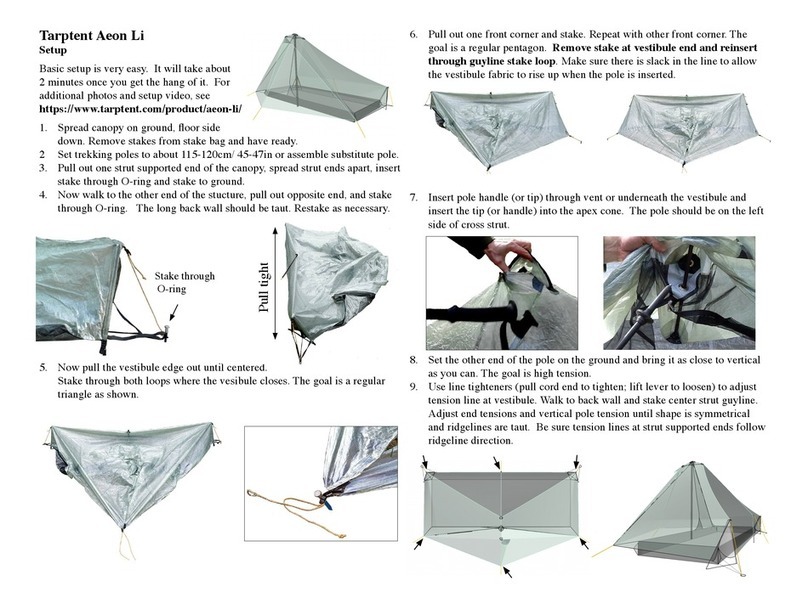
1. Locate the yellow sleeve and thread the pole into the end. Push the pole
through the sleeve, tilting the front end towards the ground so it slides
easily under the top cross strut.
2. Insert each pole tip into its respective pole-tip pocket.
3. Tighten the pole-tip pocket straps so that it has a 6” tail and the canopy of
the tent is fully tensioned. Each end of the tent will have three points of
contact with the ground: pole tip and two PitchLoc+ ends (Image 2A).
4. Unbuckle the interior from the vestibules. Stake out the vestibules and then
rebuckle and tension the oor (Image 2B).
III. Additional Adjustments and Features
1. Place your gear inside the tent with you or increase the size of your
protected vestibule by unbuckling the oor and clipping the near-zipper
glove hook to the elastic loop on the main oor seam. Clip up the sidewall
to remove slack in the mesh.
2. Vestibule beaks can be deployed or rolled up completely for more views
and ventilation. In the latter conguration, stake out the oor or place a
rock, boot, or waterbottle on the oor strap to ultilize the maximum width.
pull
Image 1
A
no gaps or gold
cord showing
B
Image 2
Image 3
B
Apole sleeve loop
bottom edge pullouts
sidewall
pullout
end
storm
ap
B
pull down strut
open lineloc
1
A
three points of
contact with the ground
IV. Seam-Sealing
Tarptent shelters need to be seam-sealed with silicone only!
Please refer to the seam-sealing instructional video:
http://www.tarptent.com/ttvideos.html
Seam-sealing is a quick, inexpensive way to ensure your shelter is fully water
proof. You can order the Tarptent seam-sealing service OR order a seam-sealing
kit from the Tarptent online store OR buy the materials at your local hardware
store. We recommend GE Silicone II clear sealer, available at most hardware
stores in a squeeze tube.
To Seam-Seal your Bown 2:
1. Set up tent in a dry, well ventilated area.
2. In a well ventilated location prepare silicone sealant by squirting approx. 4
tablespoons of silicone into a tuna can (or a similar disposable receptacle)
and mix with approx. 4 tablespoons odorless mineral spirits (paint thinner)
or Coleman fuel/white gas. Mix until the solution resembles the consistency
of a thick olive oil.
3. Using a small foam brush or rolled up paper towel, paint the solution onto
the seams as shown in the image below. After the solution is applied, run
a paper towel over the seams to help push the solution into the seam holes
and to wipe up the excess solution.
4. We recommend painting several thick lines of silicone on the interior oor
of the shelter to form an anti-skid mat. Also, be sure to seal the seam down
the center of your Bown 2’s oor.
V. Condensation and Sag
• Ventilation and fabric warmth are your best defenses against condensation.
Keep doors open as much possible and try to set up where it’s breezy. Look
for warmer and drier microclimates under trees and try to stay out of valleys
and lake basins.
• For a short, fun animation about condensation and the best place to pitch
your Tarptent at night, please see our Youtube or Vimeo page or visit
https://vimeo.com/tarptent/condensation
• Nylon stretches (and sags) when the humidity goes up, night is falling, and/
or when it starts to rain. Use the line tighteners to tighten the fabric.
VI. Key Points to Consider
• Your Bown 2 is made of strong, lightweight, and ammable fabric; it will
resist much stress but neither ame nor abrasion. Treat it accordingly.
• Push, rather than pull, the arch pole through the sleeve to prevent
separation.
Thank you for your purchase We sincerely hope that you enjoy your
Bown 2! Feedback is always welcome.
Tarptent
12213 Koswyn Ct.
Nevada City, CA 95959 USA
e-mail: [email protected]
ph: (650) 587-1548
Seam-seal seams along dotted lines.
Be sure to paint both sides of the
arch . Pay special attention to the
black loops along the arch.
2

Other Tarptent Tent manuals

Tarptent Double Rainbow Manual

Tarptent

Tarptent Double Rainbow Manual

Tarptent Saddle 2 Manual

Tarptent

Tarptent Saddle 2 Manual

Tarptent ProTrail Manual

Tarptent

Tarptent ProTrail Manual

Tarptent MoTrail Manual

Tarptent

Tarptent MoTrail Manual

Tarptent Notch User manual

Tarptent

Tarptent Notch User manual

Tarptent Aeon Li User manual

Tarptent

Tarptent Aeon Li User manual

Tarptent Cloudburst 3 Manual

Tarptent

Tarptent Cloudburst 3 Manual

Tarptent StratoSpire Li User manual

Tarptent

Tarptent StratoSpire Li User manual

Tarptent Cloudburst 3 Manual

Tarptent

Tarptent Cloudburst 3 Manual

Tarptent Rainshadow 3 Manual

Tarptent

Tarptent Rainshadow 3 Manual

Tarptent Scarp 1 User manual

Tarptent

Tarptent Scarp 1 User manual

Tarptent Rainbow Manual

Tarptent

Tarptent Rainbow Manual

Tarptent Notch Li User manual

Tarptent

Tarptent Notch Li User manual

Popular Tent manuals by other brands

Caravan canopy MAGNUM Series Reference manual

Caravan canopy

Caravan canopy MAGNUM Series Reference manual

Haushalt International 62810 Assembly instruction

Haushalt International

Haushalt International 62810 Assembly instruction

ClearSpan 115408 manual

ClearSpan

ClearSpan 115408 manual

Ohenry Productions Premium 15x50 quick start guide

Ohenry Productions

Ohenry Productions Premium 15x50 quick start guide

NETTUNO Marine Equipment JOLLY Assembly instructions

NETTUNO Marine Equipment

NETTUNO Marine Equipment JOLLY Assembly instructions

Nemo BUGOUT 9x9 quick start guide

Nemo

Nemo BUGOUT 9x9 quick start guide

Tentipi Safirflex manual

Tentipi

Tentipi Safirflex manual

BERGER Sigma II Assembly instructions

BERGER

BERGER Sigma II Assembly instructions

Arrow 697.68221 Owner's manual & assembly instructions

Arrow

Arrow 697.68221 Owner's manual & assembly instructions

Palram Stratus 2050 F Assembly instructions

Palram

Palram Stratus 2050 F Assembly instructions

Tepui HyBox owner's manual

Tepui

Tepui HyBox owner's manual

Coleman Dome 9556A605K installation instructions

Coleman

Coleman Dome 9556A605K installation instructions

ShelterLogic 25783 Assembly instructions

ShelterLogic

ShelterLogic 25783 Assembly instructions

Bell Tent Pro Porch and Connector Setting up

Bell Tent

Bell Tent Pro Porch and Connector Setting up

Bestway FAMILY DOME 4 TENT owner's manual

Bestway

Bestway FAMILY DOME 4 TENT owner's manual

Palram ALTAIR 1500 installation instructions

Palram

Palram ALTAIR 1500 installation instructions

Vango AIRBEAM EVOQUE Pitching instructions

Vango

Vango AIRBEAM EVOQUE Pitching instructions

mont-bell U.L. Zelt user manual

mont-bell

mont-bell U.L. Zelt user manual

manuals.online logo
manuals.online logoBrands
  • About & Mission
  • Contact us
  • Privacy Policy
  • Terms and Conditions

Copyright 2025 Manuals.Online. All Rights Reserved.