manuals.online logo
Brands
  1. Home
  2. •
  3. Brands
  4. •
  5. PAG
  6. •
  7. Spotlight
  8. •
  9. PAG Mini Paglight PowerArc Manual

PAG Mini Paglight PowerArc Manual

This manual suits for next models

1

Popular Spotlight manuals by other brands

Foscam S41/SPC user manual

Foscam

Foscam S41/SPC user manual

EuroLite LED SLS-144 UV Floor Spot user manual

EuroLite

EuroLite LED SLS-144 UV Floor Spot user manual

Guangzhou Yinhe Lighting&Sound Equipment Factory NE-204 user manual

Guangzhou Yinhe Lighting&Sound Equipment Factory

Guangzhou Yinhe Lighting&Sound Equipment Factory NE-204 user manual

LIVARNO home 375304 2101 Installation, operating and safety information

LIVARNO home

LIVARNO home 375304 2101 Installation, operating and safety information

Leviton Ellipsoid 5/50 user guide

Leviton

Leviton Ellipsoid 5/50 user guide

Vector SL3AKV instruction manual

Vector

Vector SL3AKV instruction manual

Quantum Q262 Product data sheet

Quantum

Quantum Q262 Product data sheet

EUROSPOT C51 instruction manual

EUROSPOT

EUROSPOT C51 instruction manual

DTS MINI BRICK ARC user manual

DTS

DTS MINI BRICK ARC user manual

Federal Signal Corporation VISIBEAM II Installation, operation and maintenance instructions

Federal Signal Corporation

Federal Signal Corporation VISIBEAM II Installation, operation and maintenance instructions

ACME LED-MS350B user manual

ACME

ACME LED-MS350B user manual

EuroLite Akku flat light 1 user manual

EuroLite

EuroLite Akku flat light 1 user manual

Commercial Electric SPTM-1401 Use and care guide

Commercial Electric

Commercial Electric SPTM-1401 Use and care guide

Vision & Control SLB-500-W5K7-P-SL Instructions for use

Vision & Control

Vision & Control SLB-500-W5K7-P-SL Instructions for use

Craftsman CMXLSB10 instruction manual

Craftsman

Craftsman CMXLSB10 instruction manual

Cameo CLQS40WW user manual

Cameo

Cameo CLQS40WW user manual

EverStart maxx SL5W09E quick start guide

EverStart

EverStart maxx SL5W09E quick start guide

Philips 6919114PH brochure

Philips

Philips 6919114PH brochure

manuals.online logo
manuals.online logoBrands
  • About & Mission
  • Contact us
  • Privacy Policy
  • Terms and Conditions

Copyright 2025 Manuals.Online. All Rights Reserved.

Mini Paglight PowerArc
Instruction Leaflet
Model 9022
Safety
Specification
Fitting
3.1 IMPORTANT: The quartz Arc lamp is a delicate assembly, and can
be broken during fitting, unless the instructions below are
followed closely. Before breaking the seal and removing the quartz
Arc lamp from its transparent shipping tube, inspect it carefully to
ensure that no damage has occurred during transportation. The Arc
lamp can be returned under warranty providing the seal is intact.
3.2 VISUAL INSPECTION:
If the quartz envelope is unbroken the Arc lamp should be in
working order. EXPECT TO SEE A GAP BETWEEN THE TWO ARC
ELECTRODES AND POSSIBLY TINY DEPOSITS WITHIN THE QUARTZ
ENVELOPE, (TO THE UNINITIATED THIS COULD RESEMBLE A BLOWN
FILAMENT, BUT THIS IS HOW IT SHOULD BE).
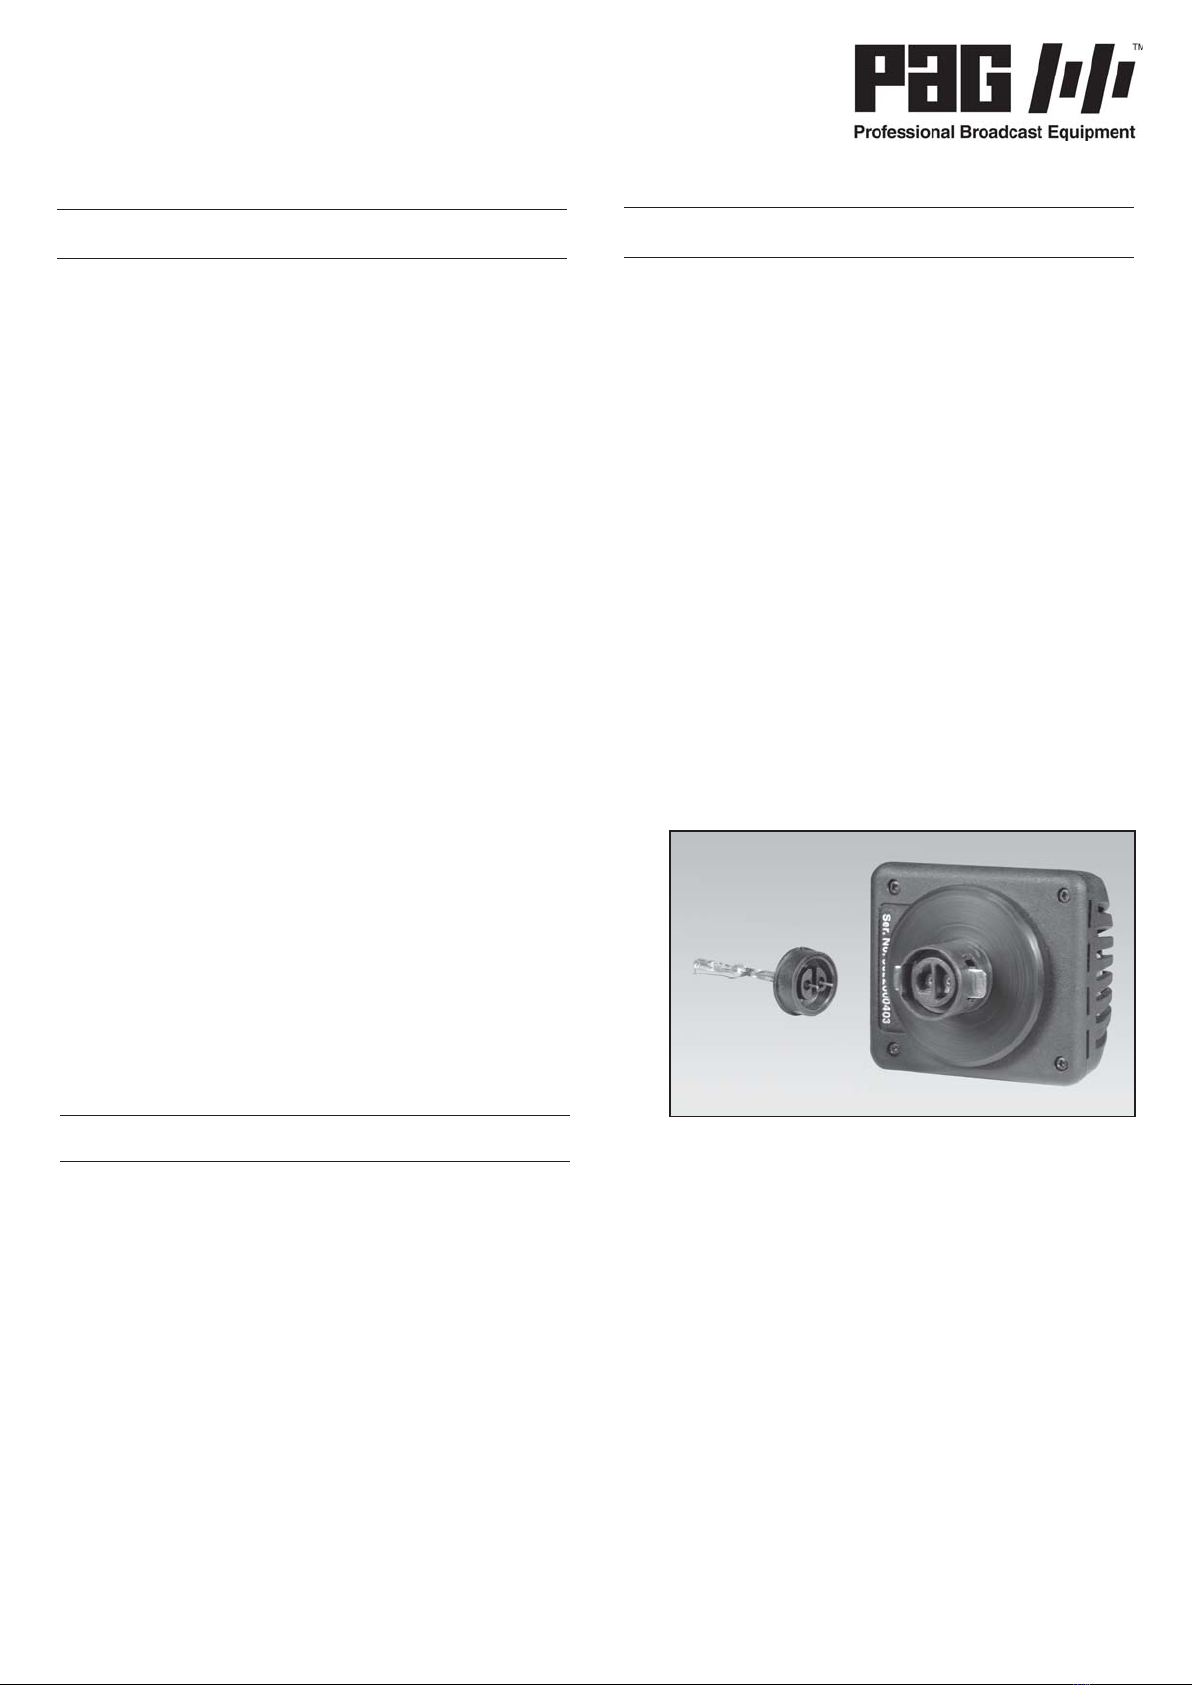
3.3 FITTING THE ARC LAMP INTO THE LAMPHOLDER:
1. Remove the quartz Arc lamp from the packaging without
touching the quartz envelope itself.
2. The Arc lamp is a push fit into the PowerArc unit. Carefully
holding the lamp by its base flange, and without touching
the quartz envelope, align the pins of the lamp with the holes
in the PowerArc unit. You will notice by the shape of the pin
mounting platforms that there is only one correct way of
successfully fitting the lamp into the PowerArc unit (see
Fig. 1). Take great care not to twist or bend the pins during
this operation.
3.4 FITTING THE POWERARC UNIT TO THE PAGLIGHT M:
BEFORE PROCEDING ENSURE THAT THE PAGLIGHT IS
DISCONNECTED FROM THE POWER SOURCE.
1. IMPORTANT: Great care must be taken to avoid the risk of
breaking the delicate quartz Arc Lamp when inserting the
PowerArc unit into the lamp body. Ensure that the lamp is
correctly aligned when fitting the PowerArc unit to the
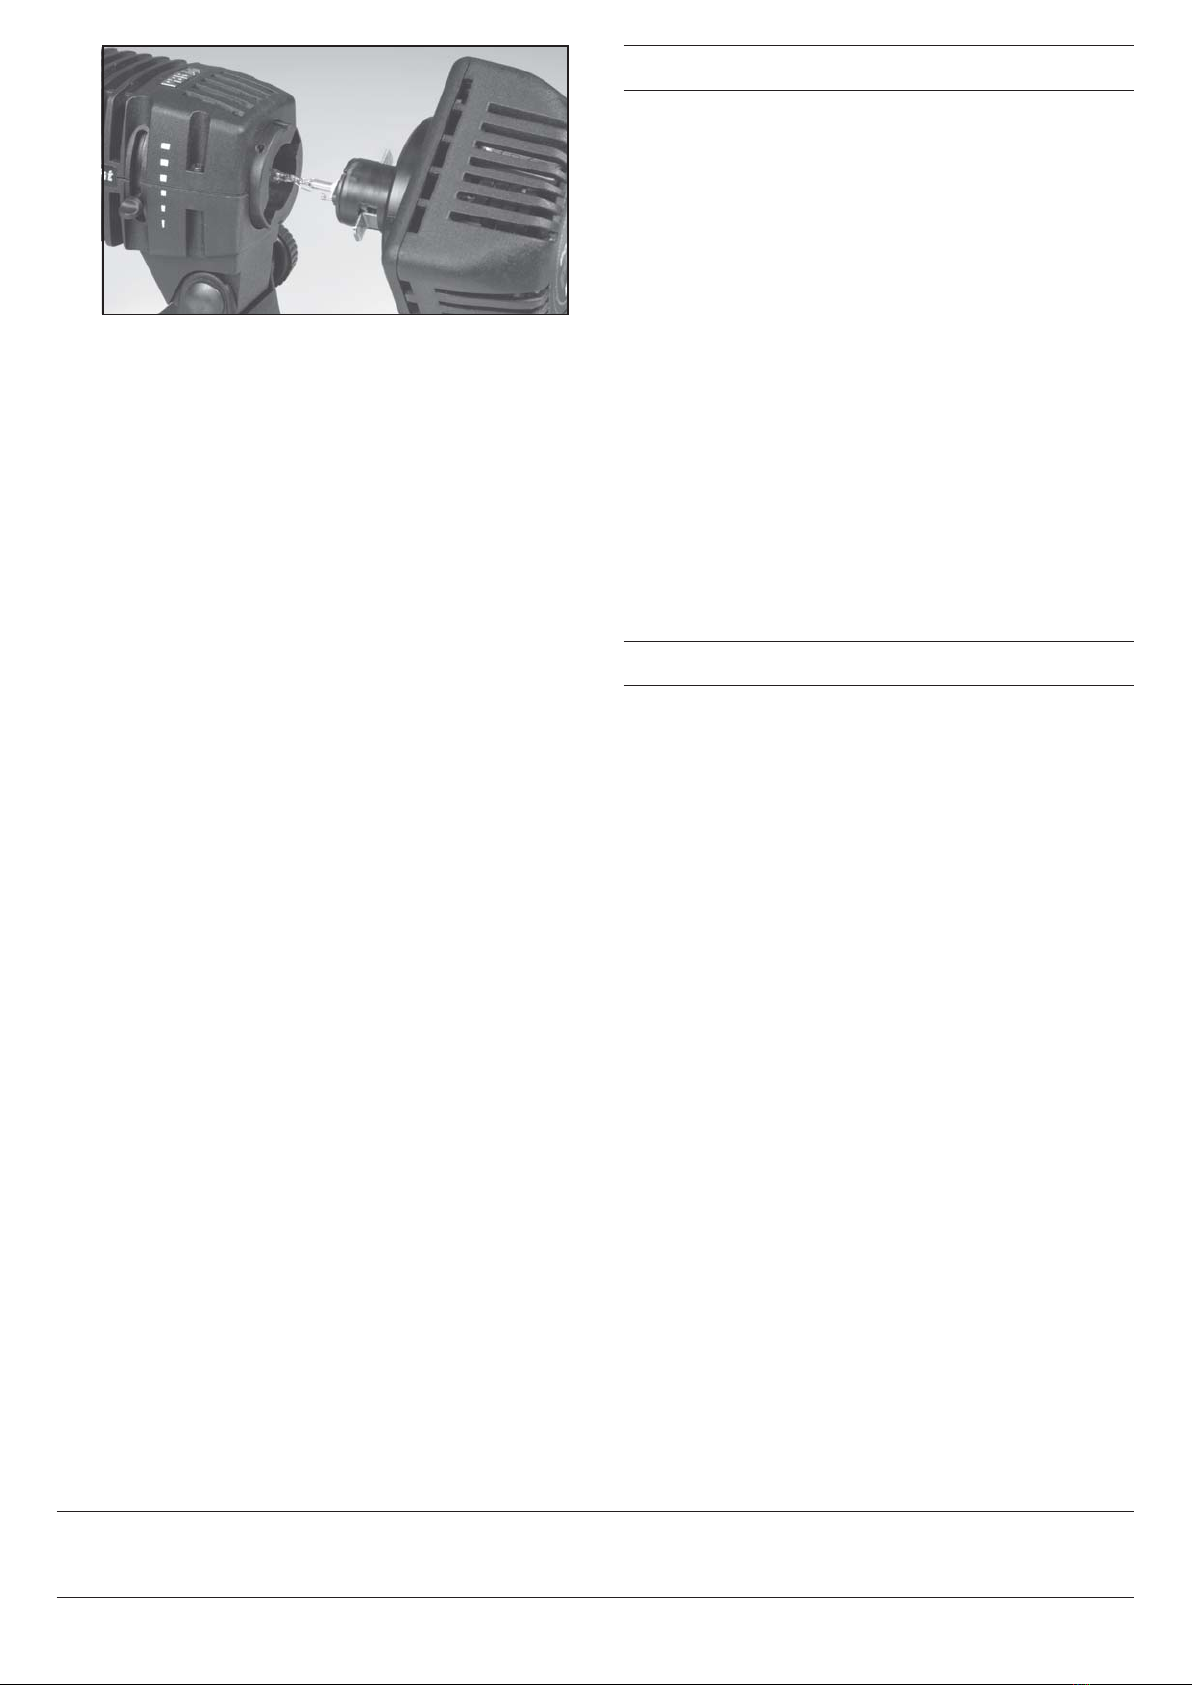
Paglight M (see Fig. 2 over).
2. Correctly align the contact blades of the PowerArc unit with
the aperture in the rear of the lamp body, the larger blade
lowermost (see Fig. 2 over). Carefully and slowly insert the
unit, ensuring that the Arc lamp is passed through the
aperture in both reflectors without touching them.
(It is an essential part of the design that the aperture is
small, to maximise the efficiency of the Paglight output).
Once inserted, rotate the PowerArc clockwise until you feel
the unit gently lock into position.
Fig.1
PLEASE READ THESE INSTRUCTIONS CAREFULLY BEFORE USE.
This leaflet contains important safety and operating information.
1.1 The PAG PowerArc is polarity sensitive and designed for low
voltage DC input only. Do not connect to incorrect supplies
(see Specification).
1.2 Never attempt to run the Arc lamp unit away from its enclosure.
During operation the Arc lamp should always be enclosed within
the reflector housing with the clear UV safety glass intact.
1.3 Without the safety glass UV is emitted from this lamp. Possible
skin and eye irritation can result from direct exposure.
1.4 Avoid the possibility of water ingress. This could cause the lamp
to rupture forcibly.
1.5 Always switch the Paglight off before removing or replacing the
PowerArc plug-in lamp unit.
1.6 The Arc lamp’s quartz envelope runs at elevated temperatures.
For personal safety, never remove the PowerArc unit from the
Paglight without allowing it to cool completely. After removing
the PowerArc unit from the Paglight always use the PAG Lamp
Protector cover, to avoid contamination and damage to the quartz
Arc lamp.
1.7 For optimum performance never handle the lamp’s quartz envelope
directly. Should you inadvertently handle the quartz envelope you
must clean it carefully with methylated spirit or industrial alcohol,
using a lint free cloth.
1.8 Do not disassemble the PowerArc unit. The electronics housing
contains no user serviceable parts. Incorrect reassembly may result
in a safety hazard.
1.9 The PowerArc electronics generate high voltages when striking.
Operating the Paglight with a damaged or misaligned lamp near
combustible materials could be hazardous.
1.10 Care should be taken not to obstruct the cooling vents.
2.1 PAG POWERARC (BALLAST UNIT)
Input Voltage: 10V to 16V DC. 32W
Output Voltage: Striking 3000V, running 60V.
2.2 PAG POWERARC (LAMP)
Low wattage, single-ended short-arc metal-halide lamp.
Lamp Consumption: 24W.
Colour Temperature: 5600°K (daylight).
Lumens: 1850.
Warm-up Time: 20 seconds to 90% of full output.
30 seconds to stabilised colour temperature.
Lamp Life: Up to 350 hours dependant upon number of restrikes.
4.1 The life of the Arc lamp will be greatly shortened if the Paglight is
turned on and off frequently, particularly when it is not at full
operating temperature (minimum 5 minutes operation). Arc lamp
life is affected more by the number of on/off cycles which have
been performed, rather than the number of hours of uninterrupted
operation. The onset of lamp failure can be detected by increasing
reluctance for the initial Arc to strike.
4.2 If a fault develops, do not disassemble the light or its ancillaries.
The electronics assemblies do not require periodic maintenance,
and contain no user serviceable parts. Unqualified personnel
should not attempt further investigation. Any such interference
will invalidate the guarantee and may cause more damage than
the original fault.
4.3 The PowerArc unit operates at a high voltage, and incorrect
reassembly may give rise to the risk of electric shock. Incorrect
reassembly of any other part of the light may give rise to a fire
hazard as a result of the high currents that flow during normal
operation.
In order to maintain the PAG quality standard for which this
product was originally selected, seek advice from your nearest
PAG Dealer or direct from PAG Ltd., London by telephoning
+44 (0)20 8543 3131, or by emailing [email protected]
5.1 The PowerArc lamp is guaranteed against defects in material and
craftsmanship only. This guarantee excludes failure from any other
cause including improper installation or use, or damage by
accident or neglect. In the unlikely event that a lamp fails to
operate when commissioned, it will be replaced or refunded at
the option of PAG Ltd. London.
Service
Guarantee
PAG Ltd. 565 Kingston Road, Raynes Park, London SW20 8SA, U.K.
Tel +44 (0)20 8543 3131 Fax +44 (0)20 8540 4116 E-mail [email protected] Web Site www.paguk.com
3. To ensure compliance with EMC Directive 89/336/EU
a suppressor is supplied with the PowerArc unit. This should
be clipped around the Power Base cable as close to the unit
as possible.
4. Removing the PowerArc unit is a simple operation but
without using the correct technique there is a risk of damage
to the delicate quartz Arc lamp. Gently push the unit into the
lamp body to release the lock whilst rotating it anti-clockwise
to the end of its travel (approx. 45 degrees). Then, carefully
and slowly ease the unit from the lamp body, ensuring that
the quartz Arc lamp does not touch the internal reflector
components. Once the PowerArc unit has been removed it is
advisable to fit the supplied PAG Lamp Protector. This will
safeguard the Arc lamp during storage and transportation.
5. The PowerArc unit should be fitted with a PAG Lamp Protector
immediately following withdrawal from the Paglight. This will
safeguard the lamp during storage and transportation.
Fig.2
U5093 ISS A / OCT 2007