manuals.online logo
Brands
  1. Home
  2. •
  3. Brands
  4. •
  5. Palm
  6. •
  7. Software
  8. •
  9. Palm eyecontact User manual

Palm eyecontact User manual

user’s guide version 2.0
user’s guide version 2.0 page 1
What is eyecontact?
eyecontact is an application that allows you to
attach images to your address book entries. Using
eyecontact, you will be able to view your address
entries along with an image. Images and
thumbnails are in color when used with a color
Handspring Prism. eyecontact works with the
same database of addresses that your normal
address book uses. You will still have your regular
address book after installing eyecontact.
A few simple functions allow you to choose and
capture images. eyecontact can be used on most
Palm OS based devices. However, the Handspring
devices allow you to attach the eyemodule or
eyemodule2 digital camera modules to capture
and choose images to attach. eyecontact works
together with the eyemodule digital camera image
capture feature and image database.
If you have an eyemodule application installed
with images in its database, eyecontact allows
you to easily attach one of these images to an
address. If you also have the eyemodule or
eyemodule2 digital camera inserted into a
Handspring Springboard slot, you can also
capture images directly from the eyecontact
application.
Getting Started
Compatibility:
• Handspring Solo, Visor, Deluxe, Platinum, or
Prism.
• Other Palm OS 3.1 and 3.5 devices.
Hardware recommended:
• eyemodule digital camera
Software required:
• eyecontact application – download from
www.eyemodule.com. The application can also be
beamed to you from another Palm OS device.
eyecontact is also available on the CD included
with the purchase of an eyemodule or eyemodule2
digital camera.
• Handspring Platinum and Prism require
eyemodule_35, a software patch downloadable
from www.eyemodule.com.
Brief Functional Overview
eyecontact has three basic screens:
1) Address List View
2) Address View
3) Edit Record
These features are covered in the following pages.
For more information on eyecontact, visit
www.eyemodule.com.

page 2
user’s guide version 2.0
Quick Start Guide to eyecontact
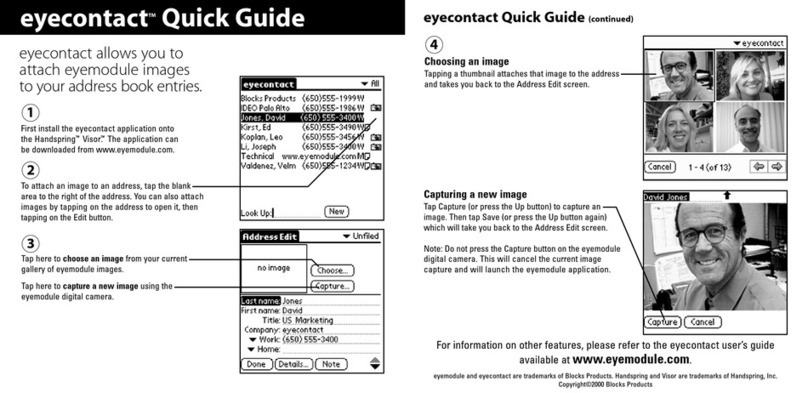
First, install the eyecontact application onto your Handspring™
handheld or other Palm OS device. The application can be
downloaded from www.eyemodule.com.
In the Address Edit screen, tap Choose to choose
an image from the eyemodule image database.
Tap Capture to capture a new image using the
eyemodule digital camera.
Choosing an image
Tapping a thumbnail attaches that image to the
address and takes you back to the Address
Edit screen.
Capturing a new image
Tap Capture (or press the Up button) to
capture an image. Then tap Save (or press the
Up button again) which will take you back to
the Address Edit screen.
Note: Do not press the Capture button on the
eyemodule digital camera. This will cancel
the current image capture and will launch the
eyemodule application.
To attach an image to an address, tap the
blank area to the right of the address. You can
also attach images by tapping on the address
to open it, then tapping on the Edit button.
123
user’s guide version 2.0
Address List View
Launching eyecontact displays a list of the
addresses in your address book. Addresses with
images will have a camera icon next to them.
Tapping the camera icon displays
the image attached to the address.
Tapping here presents the
address view of this listing.
Tapping “New” allows you to add
a new contact, and to choose or
capture an image for it.
Tapping this blank space on the
right allows you to edit this address.
Address View
Addresses in eyecontact are presented the same
way as in the regular address book, with the
addition of an image.
Tapping the image displays a
larger view of it (when available).
Tapping “Edit” allows you to
change the information, and to
replace, add, or remove an
attached image.
page 3
user’s guide version 2.0
Address Edit
Creating and editing addresses in eyecontact is
similar to editing them in the regular address book.
If you have any eyemodule digital camera in place,
you can also attach an image to an address by
either choosing an existing one or by capturing a
new one.
Images captured through eyecontact are also
viewable from the eyemodule application.
Due to Palm OS limitations, users with Palm 3.1 OS
will not be able to view images on the Address
Edit screen. However, images are viewable on
Address View screens. There will be a camera
icon to denote that an image is attached. Tap the
icon to view it.
Tapping “Remove” removes the
image that is currently attached
to this address.
Tapping “Capture” activates the
eyemodule (if it is in place) for
image capturing. To capture an
image, either tap on the “capture”
button on the screen or press the
up button on the handheld. You can
then confirm whether or not you
want to save the image.
Once an image is captured, it will
be attached to the currently
viewed address.
Tapping “Choose” presents a
thumbnail gallery of all the
eyemodule images currently on
the handheld.
Tapping a thumbnail will ‘highlight’
and attach that image to the
address and take you back to the
Address Edit screen.
page 4
user’s guide version 2.0
Beaming
While you are viewing an address, you can beam
it by tapping the menu icon on the device and
then selecting “Beam Address” from the Record
menu.
Devices receiving an eyecontact address with an
image must have the eyecontact application
installed.
Note: You cannot beam an entire category of
addresses with their attached thumbnails.
Preferences
While viewing your address list, you can edit
your Preferences by tapping the menu icon on
the device and then selecting “Preferences”
from the Options menu.
Need Help?
For further assistance:
URL: www.eyemodule.com
Email: [email protected]
Call: 650-322-1776
Selecting this allows you to
launch eyecontact with the
Address Book button on your
handheld.
Selecting this option keeps the last
address category you selected.
Tap here to set the size of images
captured through eyecontact. A
thumbnail image is the default
image size. If a palm size (160 x
120) image is selected, the palm
sized image will also be saved to
the eyemodule database.
Tap here to set the eyemodule
category for images captured
through eyecontact. A category
called “eyecontact’ is automatically
created in the eyemodule
application for palm sized images
taken from within eyecontact.
page 5

Other Palm Software manuals

Palm MultiMail Deluxe Desktop Link User manual

Palm

Palm MultiMail Deluxe Desktop Link User manual

Palm BlueBoard 2.0 User manual

Palm

Palm BlueBoard 2.0 User manual

Palm OS Devices User manual

Palm

Palm OS Devices User manual

Palm Neomar WAP Browser User manual

Palm

Palm Neomar WAP Browser User manual

Palm Dialer User manual

Palm

Palm Dialer User manual

Palm SMS User manual

Palm

Palm SMS User manual

Palm Mail User manual

Palm

Palm Mail User manual

Palm Treo Pro Manual

Palm

Palm Treo Pro Manual

Palm One-touch mail User manual

Palm

Palm One-touch mail User manual

Palm HandPHONE SMS User manual

Palm

Palm HandPHONE SMS User manual

Palm HotSyne Mail Application User manual

Palm

Palm HotSyne Mail Application User manual

Palm Desktop Organizer Instruction sheet

Palm

Palm Desktop Organizer Instruction sheet

Palm Voice Memo User manual

Palm

Palm Voice Memo User manual

Palm eyecontact User manual

Palm

Palm eyecontact User manual

Palm SmartOffice SmartOffice Mobile User manual

Palm

Palm SmartOffice SmartOffice Mobile User manual

Palm VersaMail 2.5 User manual

Palm

Palm VersaMail 2.5 User manual

Palm Phone Link Handbook User manual

Palm

Palm Phone Link Handbook User manual

Palm Web Browser Pro User manual

Palm

Palm Web Browser Pro User manual

Palm BlueChat 2.0 User manual

Palm

Palm BlueChat 2.0 User manual

Popular Software manuals by other brands

HP ProLiant DL320e user guide

HP

HP ProLiant DL320e user guide

Ulead COOL 3D 3.5 manual

Ulead

Ulead COOL 3D 3.5 manual

Waves Multimaximizer L3-LL user manual

Waves

Waves Multimaximizer L3-LL user manual

Esselte MCI-120 owner's manual

Esselte

Esselte MCI-120 owner's manual

Cisco IPICS quick start

Cisco

Cisco IPICS quick start

F-SECURE MOBILE SECURITY 6 FOR WINDOWS MOBILE - user guide

F-SECURE

F-SECURE MOBILE SECURITY 6 FOR WINDOWS MOBILE - user guide

Adobe DRIVE 2 user guide

Adobe

Adobe DRIVE 2 user guide

Autodesk AUTOCAD P AND ID 2010 brochure

Autodesk

Autodesk AUTOCAD P AND ID 2010 brochure

Vivotek ST3401 specification

Vivotek

Vivotek ST3401 specification

Netscape NETSCAPE MANAGEMENT SYSTEM 4.5 Installation and setup guide

Netscape

Netscape NETSCAPE MANAGEMENT SYSTEM 4.5 Installation and setup guide

ACRONIS BACKUP RECOVERY 10 ADVANCED SERVER - installation guide

ACRONIS

ACRONIS BACKUP RECOVERY 10 ADVANCED SERVER - installation guide

Belkin F8GBPC002 Software manual

Belkin

Belkin F8GBPC002 Software manual

Adaptec Command Line Utility user guide

Adaptec

Adaptec Command Line Utility user guide

Optica Video Storage Server user manual

Optica

Optica Video Storage Server user manual

KAPERSKY MAIL GATEWAY 5.5 - Administrator's guide

KAPERSKY

KAPERSKY MAIL GATEWAY 5.5 - Administrator's guide

WIDCOMM DBT-120 user guide

WIDCOMM

WIDCOMM DBT-120 user guide

F-SECURE CLIENT SECURITY 7.00 Administrator's guide

F-SECURE

F-SECURE CLIENT SECURITY 7.00 Administrator's guide

Adobe FLEX 2 - CREATING AND EXTENDING  COMPONENTS manual

Adobe

Adobe FLEX 2 - CREATING AND EXTENDING COMPONENTS manual

manuals.online logo
manuals.online logoBrands
  • About & Mission
  • Contact us
  • Privacy Policy
  • Terms and Conditions

Copyright 2025 Manuals.Online. All Rights Reserved.